
Chapter 4
Customizing Easy Mode
IN THIS CHAPTER
![]() Understanding Linux configuration and file permissions. This is necessary background information for customizing Easy Mode
Understanding Linux configuration and file permissions. This is necessary background information for customizing Easy Mode
![]() Customizing the Easy Mode tabbed interface
Customizing the Easy Mode tabbed interface
![]() Enabling the Start menu in Easy Mode
Enabling the Start menu in Easy Mode
![]() Unleashing the underlying window manager
Unleashing the underlying window manager
![]() Loading the ROX File Manager
Loading the ROX File Manager
Easy Mode is one of the attractive features of the Eee PC. I’ve watched a three-year-old child master it in little time. For casual users and non-geeks, Easy Mode is a wonderful thing. It’s amazingly simple and intuitive, and runs nicely in the limited space of the Eee PC’s onboard screen.
Easy Mode is a well-thought-out adaptation of a window manager that was optimized for the Eee screen and the default applications. Frankly, if you’re not interested in the capabilities of the Eee PC beyond the set of applications exposed through Easy Mode, you can do all of your day-to-day tasks with it.
This chapter covers how to customize Easy Mode and how to liberate the underlying window manager and use it to its full potential. You can completely change the look and feel of Easy Mode, making it a much more advanced interface to the Eee PC.
What Is a Window Manager?
Microsoft Windows provides a single windows manager, which is the interface the defines the look and operation of windows, the location and contents of menus, and even the “physics” of how you interact with windows via the mouse. Linux provides many, many windows managers to choose from. By the time you finish this book, you will have encountered most of the major Linux Windows managers and some of the more interesting minor ones.
In the Linux world, window managers interact with the underlying windowing system called “X-Windows.” X-Windows provides the basic framework for drawing windows, interacting with input devices (such as the mouse and keyboard), and everything else required to construct the user interface.
Easy Mode is actually based on the Ice Window Manager (IceWM), and is customized for the Eee PC. IceWM is actually not one of the two most popular Windows managers in the Linux world, and holds a position as a “minor player.” The irony is that customizing Easy Mode is much harder than customizing the Full Desktop (as covered in Chapter 5), which is based on the KDE window manager. The Easy Mode desktop provides the tools for only very minor customizations Therefore, to customize Easy Mode requires customizing the Easy Mode configuration files.
Because Easy Mode is a specific implementation of a user interface for the Eee PC, applications do not provide ready-made icons for Easy Mode. Perhaps this will change over time as the Eee PC gains in popularity. Unfortunately, this currently means that adding icons for new applications onto specific tabs is not trivial. In fact, it requires more than a little skill with a high-end graphic package as well as modifying configuration files.
Given the difficulty of making modifications to Easy Mode, why do it at all? There are several reasons:
![]() You intend to use your Eee PC without an attached monitor most of the time. Easy Mode works especially well with the limited real estate on the default display.
You intend to use your Eee PC without an attached monitor most of the time. Easy Mode works especially well with the limited real estate on the default display.
![]() The primary user of the Eee PC is a young person, and you want to set it up with additional software.
The primary user of the Eee PC is a young person, and you want to set it up with additional software.
![]() Your school, library, or other group has purchased a number of Eee PC machines for your students, and you want to customize them for your group. One of the primary goals for the Eee PC is to provide a simple and inexpensive computer for students. Therefore, you may need to make customizations to Easy Mode for a large number of machines. To do so, customize one as outlined in this chapter and copy the icons and configuration files to the other computers.
Your school, library, or other group has purchased a number of Eee PC machines for your students, and you want to customize them for your group. One of the primary goals for the Eee PC is to provide a simple and inexpensive computer for students. Therefore, you may need to make customizations to Easy Mode for a large number of machines. To do so, customize one as outlined in this chapter and copy the icons and configuration files to the other computers.
Beyond merely customizing the tabbed interface, you can augment or even abandon the tabbed interface of Easy Mode and rely instead on the IceWM window manager without the Eee PC customizations. In fact, you can customize IceWM until its capabilities rival that of the KDE desktop in Full Desktop mode. The latter portion of this chapter covers how to do this.
Even if you don’t decide to do anything with Easy Mode, consider this an introduction to the fun of Linux as well. Microsoft Windows is pretty much about doing your day-to-day tasks and that’s all. Linux is about exploring, pushing the limits, and seeing what happens when you “do this.” It is not always necessarily about the end result, but what you learn in the journey to reach that result. That’s why Linux provides so many possibilities and choices for doing practically anything.
Adding Application Icons to the Favorites Tab
Working with applications in Easy Mode is simplicity itself. You click a tab and then click an icon to launch an application. Chapter 8, “Getting More Linux Applications,” discusses adding and removing applications in general to the Eee PC. The following provides the steps for adding the additional applications to Easy Mode.
The Favorites tab is the Easy Mode method of adding additional applications icons to the desktop, but its functionality is limited. You can add icons for most preinstalled programs to the Favorites tab by clicking the Customize application icon (see Figure 4.1). Simply select in the Available Favorites list the application you want to add, and click the Add button to add it to the Current Favorites list on the right. The Up and Down buttons let you move the currently selected application icon up and down the list, which sets the order in which it appears on the Favorites tab.
FIGURE 4.1 Adding icons to the Favorites tab.

Unfortunately, if you want to add applications that aren’t listed here, you need to start editing configuration files and creating icons, covered next. You can add such icons to any tabs, you are no longer limited to Favorites.
Adding Application Icons to the Easy Mode Tabs
If you’ve added applications to your Eee PC (which is covered in Chapter 8), you may wish to add them to the appropriate Easy Mode tabs. For example, if you add the GIMP image editor, which in fact is a very good idea for creating new icons, its icons should be on either the Work or Play tabs. You need to do a few things to add icons to these tabs:
1. Create a local customizations directory for Easy Mode.
2. Set up a work folder for icons and load the Easy Mode icons into it.
3. Create custom icons for your applications. Each application needs five icons: one for normal display and four for the four Easy Mode themes.
4. Add the custom icons to the the appropriate tabs.
The first two tasks are pretty simple, but building icons that look good is quite a challenge. Moreover, the challenge is three-fold: you must drop out the background (make it transparent) for the icon art, scale the icon to match the other icons, and copy the icon onto a separate layer on all four background icons (one is required for each of the Easy Mode themes).
What make creating custom icons a little tougher is that the paint program installed with Xandros, MTPaint, really isn’t up to the task. You need a more capable paint program, such as GIMP. Chapter 8 explains how to download applications such as GIMP. You could also use any other advanced paint package as well, although the instruction here are specific to GIMP.
This section covers this process in detail, from setting up the working directories to actually building the icons. At present, unfortunately, the best way to customize the tabbed Easy Mode interface is still to build the icons in a competent graphics program.
Setting Up the Work Area for Icons
First off, let’s go over what you’re going to do and why you’re doing it that way:
1. Set up a local customizations directory for AsusLauncher, which is the proper name of the Easy Mode interface. This directory will contain the customizations to the Easy Mode user interface. Having a local customizations directory means you’re free to modify files in that directory without changing the master files for the system.
2. Set up a working directory for icons. This can be anywhere under your home directory tree; however, if you have an SD card installed, you might as well put it there and save wear and tear on the solid-state drive.
This may sound a little odd, but you won’t be doing these tasks in Easy Mode. You can, but you’ll need to restart X Window System to test things anyway, so why not start out in Full Desktop where it’s a little more convenient to work? Actually, I have my Eee PC set to boot into Full Desktop for this.
Also, although you can do all of this from the command line (and you’ll mostly be using the command line throughout this chapter), you’ll use the File Manager to preview the icons. This is simply for convenience, as you simply double-click a graphics file to preview it. It’s a good idea to preview the icons to make sure they look right before you copy them into place and restart X Window System.
First, build the local customizations directory for AsusLauncher. Launch an xterm or console window (choose Launch, Run Command, and then enter Konsole) and check the current directory by looking at the shell prompt. The current directory location should be /user/home.
Issue the following command to build the working directory:
> mkdir .AsusLauncher
You don’t need sudo because it’s your home directory. Now copy the simpleui.rc file to .AsusLauncher:
> cp /opt/xandros/share/AsusLauncher/simpleui.rc .AsusLauncher
Next, make a pristine backup of the configuration file, just in case things go awry. Sure, you can always get another one from the /opt tree, but it’s really good to get into the habit of backing up configuration files before you twiddle with them.
> cp /opt/xandros/share/AsusLauncher/simpleui.rc AsusLauncherOriginal.rc
Next, create a working directory for the various icon files. I’m assuming that you have an MMC-SD card installed, so the command will look something like this:
> mkdir /media/MMC-SD/partition1/icons
If you don’t have an MMC-SD card, simply create the directory within /user/home. Now copy the icon files you need to build your new icons:
> cp /opt/xandros/share/AsusLauncher/*icon_background.png /media/MMC-![]() SD/partition1/icons/
SD/partition1/icons/
Adding Icons to the Easy Mode Configuration File
A bit of background first. The simpleui.rc file is the configuration for the Easy Mode interface. Like many newer configuration files, simpleui.rc is an XML file. XML is actually much easier to work with than the older formats and enables you to easily see where something begins and ends. Each element, or tag, has a clear beginning, in the format <element>, and ending, in the format </element>. As long as you maintain this balance of beginning and ending tags and carefully type in what’s shown, you can’t go wrong.
The tag structure in the simpleui.rc file mimics the structure of the Easy Mode desktop, with its tabs that contain either application icons or folders. Folders in the desktop can also contain application icons, so that structure exists in the simpleui.rc file as well. In general, the structure is something like this:
<simplecat></simplecat> defines a tab.
<folder></folder> defines a folder.
<parcel> </parcel> defines an application icon and the logic to launch the application itself.
A <parcel> element contains a simplecat attribute, which defines the icon’s location in the tab structure. In XML, an attribute is a way of specifying something within a tag. In this case, if the icon is on the Internet tab, the attribute value will be simplecat=“Internet”. Pay close attention to the equals sign and make sure the value that’s specified, Internet, is in quotes. If the icon happens to be in a folder, then you use a convention similar to a directory structure, with the tab and folder names separated by a slash. For example, to place an application icon in the Webmail folder on the Internet tab, the attribute value would be simplecat=“Internet/Webmail”.
By the way, as I’ve learned from hard experience, if you make a mistake with the simplecat=“xxxx” attribute, you’ll drive yourself nuts wondering what happened to the icon or folder you’ve created. It simply won’t appear. Therefore, double-check that your syntax and capitalization are correct.
First, change the directory to .AsusLauncher:
> cd .AsusLauncher
You don’t need to “be” in this directory to work, but I find it more convenient.
Next, you need to edit the simpleui.rc file. The file was copied from the /opt tree, which means its permissions are such that you need root access to edit the file. You can change the file permissions if you like with chmod (change mode); however, it’s just as easy to open the file with sudo prepended to the command. (For more information about the chmod command, see Chapter 11, “Introduction to the Linux Command Line.”) If you’re doing this from the File Manager, you need the Administrative File Manager (available in Full Desktop Mode) to open the file in your editor of choice and be able to save your changes. That’s another good reason to do all of this from within Full Desktop: accessing the Administrative File Manager is a lot easier.
I’m an old xemacs kind of guy (I installed XEmacs via Synaptic), so I open the file with the following command. Substitute your text editor of choice for xemacs.
> sudo xemacs simpleui.rc &
For this example, I’m going to add an Opera browser icon to the Internet tab. (I’ve already installed Opera via the .deb package I downloaded, and I’ve made sure that it works; for instructions on installing Opera and other applications, see Chapter 8.) All I have to do is insert an entry for the Opera icon in the simpleui.rc file. First, I need to search for some other icons on the Internet tab. Icons are placed on the tab in the order in which they appear in the file. I want to put the Opera icon right beside the Web icon for Firefox, because they are related applications. So, I’ll look for Firefox. This is a bit tricky, because Firefox is actually used for many icons, so I need to find the correct one. To do that, I search for Firefox and look for an entry within a <parcel> element that has the simplecat=“Internet” attribute. After I find that, I’ll add a few extra blank lines for some working space after the <parcel> element. The entry for Opera looks like this:
<parcel extraargs=“/usr/bin/opera” simplecat=“Internet” selected_
icon=“opera_hi.png” icon=“opera_norm.png”>
<name lang=“en”>Opera</name>
</parcel>
A bit of translation is required:
![]() The
The extraargs attribute defines the command necessary to run the application. In this case, I just need to run the opera executable file. I need to provide the full path to this from the root of the file system.
![]() The
The simplecat attribute defines this icon as residing in the Internet tab.
![]() The
The selected_icon attribute points to the PNG (Portable Network Graphics) format graphics file that will be used when the icon is selected (this is the hi, or highlighted icon). The selected attribute means that either the mouse is hovering over the icon or the icon has been clicked. The icon attribute points to the normal (norm) icon PNG file. The normal icon file is the one used to simply display the icon on the tab.
![]() The
The <name> element defines the word used under the icon for the language (en for English) that I use. Check the other entries to get the right language code if your native language is something other than English.
![]() The end tag
The end tag </parcel> closes the XML element. As I previously mentioned, this is very important. XML parsers do not like tags that donÕt end.
Note that the graphics files do not require a complete path as did the extraargs attribute. The Easy Mode launcher knows to look in the /opt/xandros/share/AsusLauncher directory for icons.
Check over your entry and then save the file.
Building the Icons
To follow the instructions in this section, you need to use the graphics program GIMP. If you haven’t installed it, refer to Chapter 8 for instructions. Using GIMP to create icons is a bit tricky, because you must work with transparencies and layers. This section gives detailed instructions, so you should be fine even if you are new to GIMP.
Your first big problem is getting a suitable graphics file to use as the basis of the icon. For Opera, I simply used Google’s Image Search and looked for “Opera” and “icon.” While GIMP is perfectly capable of sizing a graphic down to the resolution you need, you may get some nasty-looking edges if you take a really big, high-resolution graphic and reduce it down to the 120×120-pixel size that’s required. I found one that was 128×128 pixels, which I was able to scale down to 120×120 pixels.
A suitable icon consists of a file that’s 120×120 pixels in PNG format and that has a transparent background. Because GIMP is a highly capable graphics editor, it’s possible to take graphics files of pretty much any format and create a suitable icon.
Assuming that you have found an image (via a search engine perhaps) for the icon that you wish to build, save the graphic to the icons directory you just created. Now you can either load the graphics file into GIMP by right-clicking it in the File Manager and choosing Open With, GIMP Image Editor or you can edit it from the command line by using the GIMP command followed by the image file on the command line.
After you load the image, you need to resize it to 120×120 pixels. To do this within the GIMP menus, choose Image, Scale Image to open the Scale Image dialog box, shown in Figure 4.2 Enter 120 in both the Width and Height fields. If the resolution for X and Y isn’t 72 dpi, set it to 72. Check that all the settings are as described and then click the Scale button to set the image at the right size and resolution. Make sure that the clarity of the scaled image is acceptable. If the image is blocky or fuzzy, find another on the web.
FIGURE 4.2 Sizing a graphic in GIMP

Now you have the image at the right size. However, you need to reduce just the picture portion of the image to 80×80 pixels. The entire graphic, or graphic frame, however, must remain at 120×120 pixels. This requires cutting the icon portion of the frame, creating a new frame, and pasting it there. Next, you’ll scale the frame to 80×80 pixels. This trick gets the image to the necessary 80×80 size that leaves room for the title of the icon. Then you’ll extend the layer boundaries back to 120×120 pixels, centering the scaled picture in the frame. Finally, you’ll select the picture portion and move it up a bit, leaving a little extra room at the bottom for text.
To put the picture on a new layer:
1. Using the square selection tool from the main GIMP tool window, drag a selection box around the icon portion of the frame.
2. Press Ctrl+X to cut the picture from the frame.
3. In the window that contains your graphic file, choose Layer, New Layer.
4. Press Ctrl+V to paste the picture into the new layer.
To resize the layer and picture:
1. Choose Layer, Scale Layer to open the Scale Layer dialog box.
2. Set the Width and Height to 80 pixels.
3. Click Scale.
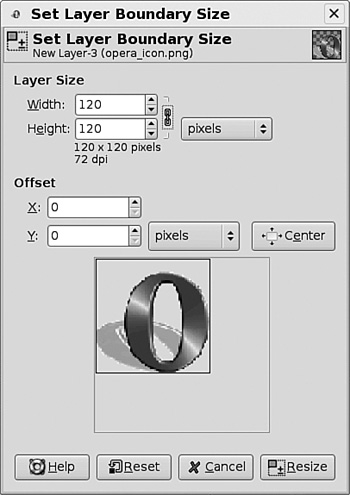
4. Choose Layer, Layer Boundary Size to open the Set Layer Boundary Size dialog box, shown in Figure 4.3.
5. Set the Width and Height to 120 pixels.
FIGURE 4.3 Setting the Width and Height to 120.
7. Click Resize.
Now you have an 80×80-pixel picture in a 120×120-pixel frame.
To move the picture up in the frame:
1. Using the square selection tool from the main GIMP tool window, drag a selection box around the picture portion of the graphic.
2. Drag the picture up, leaving the bottom fifth or quarter of the frame free for text.
The background image is ready, but you need to do a few more things before you’re done. Just to make sure that image is an RGB color model (especially if you’re converting from GIF, which has a fixed palette), choose Image, Mode, RGB. If RGB is grayed out, it is already using the RGB color model.
You’ll want to save a copy of the file in the GIMP native XCF format first, because the format for Easy Mode icon files, PNG, doesn’t support layers. This means that the image will be “flattened,” and you may want to keep your layers. This might not be absolutely necessary for the plain icon, but for the “hi” (highlighted icon) versions it’s essential, because the base layer of the image has the highlight fill, and you need to keep the picture portion as a separate layer so as to not disrupt the bottom layer fountain fill while sizing and moving the picture portion.
The file-naming convention is extremely important, by the way. If you don’t get the file naming right, your icons won’t work. For the standard icon, the filename must be name_norm.png. Each file of the five files must start with the name that you choose, and the base file must end in _norm. I list the highlighted icon names in a bit, so you can get them absolutely right.
Save the file first as an XCF file (to preserve the layers) by choosing File, Save As. In the Name field, enter name_norm.xcf and click Save.
Next, save the file as a PNG file by choosing File, Save As. This time, use .png as the extension, clear the Save Background Color option, and then click Save. You’ll be told by GIMP that you need to export the file first (this flattens the layers) and then save. Just go ahead and do this.
One file down, four to go. Remember when you copied *icon_background.png from the AsusLauncher directory to the new icons directory? This copied four files: accessibility_icon_background.png, business_icon_background.png, home_icon_background.png, and student_icon_background.png? Each of these is a building block for the highlighted icons for four desktop themes. Regardless of whether or not you ever intend to switch the Asus Eee PC built-in themes, you have to build all of these. Now that you have your base icon file, this is going to be fairly simple. You load each background icon file into GIMP (GIMP can have multiple open files) and save it with the appropriate filename within this list of names:
accessibility_name_hi.xcf
business_name_hi.xcf
home_name_hi.xcf
student_name_hi.xcf
Again, you initially save the files as XCF files to preserve the layers. After you’ve created each of these files, create a new layer by choosing Layer, New Layer, just as you did with the base icon. Now each has a blank layer (above the background fill pattern) into which you can copy the picture portion of your icon.
If the name_norm.png file isn’t open, load that into GIMP as well. You’ll use the PNG file because you’re only interested in copying the icon portion of the frame. Use the square selection tool again, and select the entire picture area.
Press Ctrl+C to copy the picture. Click one of the background graphics and press Ctrl+V to paste the picture onto the upper layer. It should paste in exactly the correct position (if not, choose Select, None and then reselect it and drag it). Repeat this for each of the background files, saving each as you go.
Now for the last part. Save each file with precisely the same name but with a .png extension. You’ll be prompted to “export” for each, which you must do, and then you’re done.
Click each of the files in the File Manager and make sure that the pictures are all in the correct position in the graphics frame. For the highlighted icon (hi) files, the background should have a tint, but should also show the “checkerboard” pattern that denotes that the background is transparent.
From the command line, use the cd command to change the directory to your icon working directory. Issue the following commands to copy the files into place:
> sudo cp *name_hi.png /opt/xandros/share/AsusLauncher/
> sudo cp *name.png /opt/xandros/share/AsusLauncher/
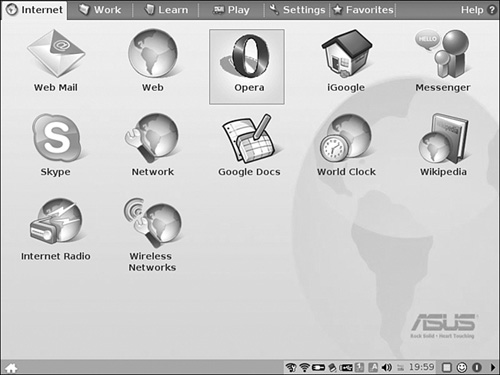
You’re now ready to give the icon a try. Select Easy Mode from the Launch menu to switch modes. Once in Easy Mode, check that your new icon is in position on the tab you designated (see Figure 4.4). Hover the mouse pointer over it to ensure that it “highlights” like the other icons. If so, click the icon and check that it opens the application. If all works well, congratulations!
FIGURE 4.4 The completed Opera icon.
Common things that can go wrong include the following:
![]() A syntax error in the XML in the simpleui.rc file. If you don’t see your icon at all, check this. The
A syntax error in the XML in the simpleui.rc file. If you don’t see your icon at all, check this. The simplecat attribute must contain the tab name precisely as it appears in similar entries in the file. The end tag, </parcel>, must be present to properly close the <parcel> tag. Quotes must be on both sides of the attribute values.
![]() No transparency in the base icon file. This means that the base icon, and all of the “hi” versions, will look a little odd. Make sure that you save the file to .png format with the Save Background Colors option deselected.
No transparency in the base icon file. This means that the base icon, and all of the “hi” versions, will look a little odd. Make sure that you save the file to .png format with the Save Background Colors option deselected.
Enabling the IceWM Start Menu
As mentioned at the beginning of the chapter, Easy Mode is a custom version of IceWM. According to the official IceWM website (http://icewm.org), “The goal of IceWM is speed, simplicity, and not getting in the user’s way.” Sounds perfect for the Eee PC, doesn’t it?
In the Easy Mode Eee PC implementation, many IceWM features are turned off. One really nice feature is a Start menu (similar to the Windows Start menu or KDE Launch menu). From within Easy Mode, you can easily turn on this menu and customize it using nothing but a text editor. You will, however, need to build another local preferences directory from your /home/user directory. Before you do that, first switch the Eee PC to Easy Mode. You can now work within Easy Mode because you don’t have all the fussing around with icons to worry about.
Making a User Configuration Directory
Launch an xterm window by pressing Ctrl+Alt+T and make sure that the prompt says that you are indeed in the /home/user directory. At the command line, enter the following commands to create the directory and then switch to it:
> mkdir .icewm
> cd .icewm
Now, you need to copy some files:
> cp /etc/X11/icewm/preferences .
> cp /etc/X11/icewm/menu .
The trailing dot is shorthand for the current directory, and is required because the cp command needs a destination argument.
You’ll be editing both files, so you need to either use sudo to issue the command to load the file into the editor of choice, or change the file permissions to read/write. I mentioned before that this is done through the chmod command, which is explained in Chapter 11. To change the permissions on the files, issue the following command:
> chmod 666 *
The 666 sets the permissions bits to read and write for the user/group/world permissions.
Now you can easily edit either of the files without sudo. This time, use the built-in kwrite editor:
> kwrite preferences &
The & spawns a separate process for the editor, and it’s no longer tied to the terminal window. Use the Find command in the Edit menu and look for the following string: TaskBarShowStartMenu.
You should find a section that looks like this:
# Show ‘Start’ menu on task bar
# TaskBarShowStartMenu=1 # 0/1
TaskBarShowStartMenu=0
TaskBarShowStartMenu=0
to
TaskBarShowStartMenu=1
This will enable the Start menu. It’s fairly anticlimactic, but that’s all there is to it. Save the file, close all of your files and save any information. Restart X Window System by pressing Ctrl+Alt+Backspace.
Using the Menu
When Easy Mode is back in business, you should now have a nifty Start menu. The Start menu in its raw state has a lot of cool things on it and also a lot of nonfunctional things. The Eee PC doesn’t have some of the programs that normally reside in IceWM environments, so there are a few nonfunctional items. For the most part, the menu system does actually hide things that aren’t there and picks up things that are. On my Eee PC, I’ve added both the XEmacs graphics editor and GIMP, and they both show up. You may also find a few default entries that don’t do anything on the Eee PC.
Because things are missing that you might want to use, the next task is to modify the Start menu to pick up things that you want to add and remove things that you don’t want. To do that, edit the menu file:
> kwrite menu &
The structure of this file is pretty easy to follow. The pound sign # at the beginning of a line is a comment. The separator statement alone on a line creates a separator line in the menu. menu starts a menu item, which contains a folder. prog is a program. So, for example, to add the Xandros File Manager before the Applications folder, you would add something like the following:
separator
menu “File Manager” folder {
prog “Xandros File Manager” /usr/bin/XandrosFileManager
XandrosFileManager
}
separator
menu Applications folder {
.
.
.
The menu “File Manager” folder statement adds a menu item, which is a folder (that is, it contains other items) to the menu. The item itself will show up as File Manager. The open curly brace ({)is followed by the prog statement, which has “Xandros File Manager” as the submenu item name, and two ways to invoke the program (one if its directory is in the PATH environment variable and one with the full path). The closing curly brace ends the statement. Save the file and check your menu; you don’t need to restart the X Window System environment. Try it out and select the Xandros File Manager to launch it. Pretty cool, eh?
If you want to remove something, you can put a comment character (#) at the beginning of each line in its entry. That’s really all there is to this. Just make sure you put a comment before each line in a group.
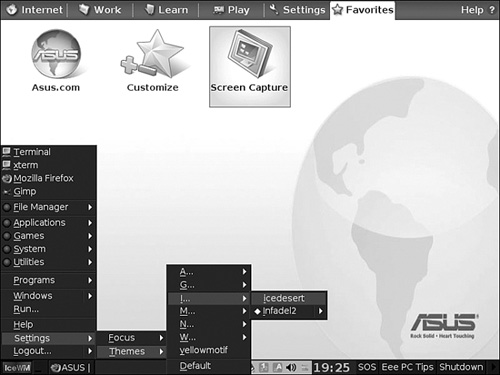
IceWM has a few more goodies that you might like. On the Start menu, you can change themes by choosing Start, Settings, Themes and then selecting a theme from the menu (see Figure 4.5). The infadel2 theme is especially nice, with its black metallic look.
FIGURE 4.5 Selecting a theme.
Also, take a look at Start, Windows. This provides a window from which you can select one of four virtual desktops. This is basically the same functionality as in the virtual desktops offered by the KDE and other Linux window managers.
Choosing IceWM as Your Window Manager
If you really like the more typical IceWM interface, other than the Easy Mode implementation, you can make that interface your default.
The whole idea, which is detailed at http://www.ProductiveLinux.com, is to provide the functionality of the various desktop tools using a lightweight, multipurpose file and system management tool called ROX-Filer. ROX-Filer has menu-like windows to launch applications, functions for setting the computer wallpaper, and even its own taskbar-like structure. Supposedly the combination of IceWM and ROX-Filer is as functional as the KDE but faster.
caution
After you’ve made IceWM your default window manager, you won’t be able to switch to Full Desktop (KDE) without first undoing some configuration settings.
To actually set up the ROX/IceMW environment, you need to:
1. Install the ROX-Filer package.
2. Modify the configuration file that invokes AsusLauncher for Easy Mode.
Fortunately, you can load ROX-Filer directly from Synaptic using the repositories that Chapter 8 sets up. If you want to pursue using ROX, jump ahead to Chapter 8 and set up the repositories and learn a little about Synaptic. After you do so, you can proceed here.
Installing the ROX-Filer Package
Launch the Synaptic Package Manager from a terminal window with the sudo synaptic command. If you haven’t reloaded the repositories in a while, click the Reload button in Synaptic.
Click one of the packages in the list, and start typing “rox.” (If you use the Search function, look in Chapter 8 for instructions about clearing the error that Search causes in Synaptic.) You’re looking for a package called rox-filer, as shown in Figure 4.6. Once you’ve found it, mark it for installation by checking its check box and then install it.
FIGURE 4.6 Loading ROX-Filer via Synaptic.

Modifying the AsusLauncher Configuration for ROX-Filer
After Easy Mode is loaded, press Ctrl+Alt+T to launch an xterm window. What you’re going to do is make a copy of the /usr/bin/startsimple.sh shell script. This is the script that starts the desktop. If you want to return to a configuration with Easy Mode and Full Desktop, you’ll want a pristine copy of this script. To copy the script, issue the following command at the prompt:
> sudo cp /usr/bin/startsimple.sh /usr/bin/startsimple.sh_OLD
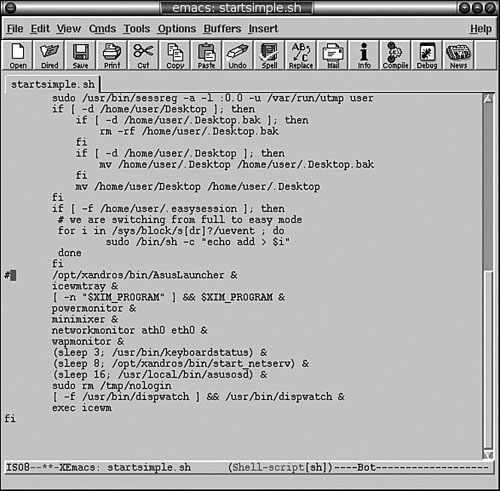
Next, load the startsimple.sh shell (see Figure 4.7) into your favorite editor, invoking the editor with sudo so that you have permission to write a modified version of the file. I’ll use xemacs and launch it this way:
> sudo xemacs /usr/bin/startsimple.sh &
Use the Search function in your editor to find the line with /opt/xandros/bin/AsusLauncher &. Put a comment character (#) as the first character in the line. This line now won’t be executed. You’ve now disabled AsusLauncher, so Easy Mode and Full Desktop are no longer available. You’ll need to replace that line with ROX. Look for a line that contains wapmonitor &. Insert a blank line below that and enter the following into the blank line:
Rox -S &
FIGURE 4.7 Editing startsimple.sh.
A little explanation is required. The -S switch invokes ROX in the ROX-Session mode, which launches the ROX Desktop. The & character spawns ROX as a new process and makes it independent of the script. You can now save the file, exit your editor, and reset the X Window System environment by pressing Ctrl+Alt+Backspace. The Eee PC will now load the IceWM and ROX-Session, and you’ll be in a brave new world.
ROX takes a little getting used to, but its convention of treating everything in a drag-and-drop way is quite convenient. Actually, ROX has lots of conveniences. For example, you can load any of the Eee PC wallpapers quite easily from ROX via the Background function. This is pretty cool, as all you really need to do is drag the background graphic file icon from a ROX file manager window onto the Set Background dialog box (see Figure 4.8).
You can get Eee PC wallpapers from lots of sources. Just run a Google search for “Eee PC” and “wallpaper.” Download the wallpaper file anywhere you like, and then use the Set Background dialog box to load the wallpaper. Once loaded, you can stretch it, center it, and so forth right from the Set Background dialog box.
Figure 4.9 shows the ROX Desktop with the IceWM taskbar running the Infadel2 theme. This shows the Applications window, which is really just the file manager showing the /usr/share directory.
FIGURE 4.8 Preparing to drag-and-drop the wallpaper file.

FIGURE 4.9 IceWM and ROX.

Although the combination of IceWM and ROX is nice, I frankly prefer the KDE desktop. If you tire of the IceWM/ROX environment, simply reinvoke the original AsusLauncher by deleting the usr/bin/startsimple.sh file and copying /usr/bin/startsimple.sh_OLD to /usr/bin/startsimple.sh. Remember to use sudo with the cp command if you do this.
If you want to find out more information about IceWM, check out http://www.icewm.org. There’s documentation and themes that you can use. As for ROX, you’ll find everything you need at http://roscidus.com/desktop/.
Summary
This chapter took a rather deep dive into Linux configuration focused on Easy Mode and its underlying window manager. If you are going to support extensions to Easy Mode, it provided the necessary instructions. If you’re a fan of the IceWM window manager in general, it also provided instructions for removing the Eee PC customizations and using it in a more “default” look-and-feel.
If you wish to build custom icons for Easy Mode and find this difficult, check the various Eee PC forums and web sites and use Google to search for “easy mode editor.” When this was written, the manual method of building icons described in this chapter provided the best quality icons. However, someone may have come up with an Easy Mode editor that does a good job with icons, and that will save you considerable effort.