Chapter 5
Working with the Full (KDE) Desktop
IN THIS CHAPTER
![]() History of the KDE desktop
History of the KDE desktop
![]() The major user interface components of the KDE Desktop
The major user interface components of the KDE Desktop
![]() How to configure the KDE customize the KDE Interface
How to configure the KDE customize the KDE Interface
![]() How to use the File Manager and the structure of the file system
How to use the File Manager and the structure of the file system
![]() What Konqueror is and how it can be used instead of the Xandros File Manager
What Konqueror is and how it can be used instead of the Xandros File Manager
The Full Desktop, or more properly the KDE Desktop, provides more capability than the Easy Mode. One wonders why it was actually hidden in the Eee PC. Clearly, given that it was configured to work well with the Eee PC, it should have been easier to launch. In Chapter 1, you learned how to access the KDE Desktop. In this chapter, you’ll learn more about how to use it and tailor it to your liking.
Back in the 1990s, when UNIX boxes roamed the earth, I worked on a project that had a component from X/Open (actually, it was called the Open Software Group then) known as the Common Desktop Environment (CDE). It was kind of “clunky,” but at the time, it was one of the easiest-to-use desktop environments in the UNIX world. One of the big drawbacks was that there were very few applications that ran under the CDE, and most were just old UNIX applications that really had very different (and very odd) user interfaces.
Around 1996, a German student named Mathias Ettrich started the ball rolling toward development of an easy-to-use desktop, the K Desktop Environment (KDE), and a toolkit for developing applications. Today, the KDE is still largely built by volunteers, although Mandriva and a few other companies actually contribute resources to the project.
I work with a lot of desktops and operating systems, and while the standard Macintosh desktop (Aqua) is really quite nice, I still prefer the KDE. It’s easy to use, efficient, massively customizable, and a lot less cluttered than the interface in various Microsoft Windows versions.
note
There’s a terminology issue that you’ll encounter in this chapter and in your everyday computing as well: folder and directory. They both mean the same thing, but “directory” is often used when discussing the file tree from the perspective of the command line, whereas “folder” is commonly used when discussing a graphical user interface (GUI). I use the terms interchangeably.
The Xandros Eee PC KDE incarnation has all the preloaded software nicely installed in the Launch menus. Moreover, most applications that you load via the Synaptic Package Manager or apt-get automatically install in the Launch menus. Really, care and maintenance of the KDE is pretty easy. With easy customization of various applications by “dot” directories from your home directory, no Windows registry to worry about, and a really powerful command line, it’s a great environment for every day computing.
Introducing the KDE Panel
From Easy Mode, you can launch the KDE (Full Desktop) from the Shutdown icon on the taskbar. (The taskbar is called the “panel” in the KDE as well as most Linux desktops. This section introduces the various parts of the basic KDE panel, shown in Figure 5.1, and then explains how to customize the panel.
FIGURE 5.1 The basic KDE desktop.

The panel or “kicker,” on the bottom of the KDE screen has the following components from left-to-right:
![]() Launch button, which (when clicked) gives you access to the application and system menus as well as some direct actions such as running a command, switching to Easy Mode, and logging out.
Launch button, which (when clicked) gives you access to the application and system menus as well as some direct actions such as running a command, switching to Easy Mode, and logging out.
![]() Firefox.
Firefox.
![]() Thunderbird.
Thunderbird.
![]() File Manager (this version has your user privileges and isn’t the Administrator version).
File Manager (this version has your user privileges and isn’t the Administrator version).
![]() The Show Desktop button (click this to minimize-all-applications).
The Show Desktop button (click this to minimize-all-applications).
![]() Beyond the application buttons lie the buttons for currently running tasks (this part of the panel is also called the Taskbar).
Beyond the application buttons lie the buttons for currently running tasks (this part of the panel is also called the Taskbar).
![]() Next are the two virtual desktop buttons. Virtual desktops is a concept recognizable all the way back to the CDE. The idea is that you can clutter up your desktop all you want, and when it’s full, you can just click another button to start over with another desktop. Actually, the concept is quite useful. While writing this book, I used three virtual desktops: one for writing, one for experimenting, and one to manage graphics. It’s a tremendous convenience to be able to switch between desktops at the click of a button. You can also right-click a button and select Configure Desktops to add more (up to 20 if you really want to get carried away).
Next are the two virtual desktop buttons. Virtual desktops is a concept recognizable all the way back to the CDE. The idea is that you can clutter up your desktop all you want, and when it’s full, you can just click another button to start over with another desktop. Actually, the concept is quite useful. While writing this book, I used three virtual desktops: one for writing, one for experimenting, and one to manage graphics. It’s a tremendous convenience to be able to switch between desktops at the click of a button. You can also right-click a button and select Configure Desktops to add more (up to 20 if you really want to get carried away).
![]() Next along the panel is the power icon, which tells you whether you’re plugged in (the plug appears) or on battery power. Hovering over this icon provides a tool tip with the current battery charge level.
Next along the panel is the power icon, which tells you whether you’re plugged in (the plug appears) or on battery power. Hovering over this icon provides a tool tip with the current battery charge level.
![]() The bug-on-the-shield button launches the antivirus control panel. The Xandros antivirus application isn’t an interactive, all-intrusive, processor-cycle-devouring application like that on Windows. It doesn’t scan emails or constantly run in the background. From the Anti-virus panel, you can update the virus database or scan all or any part of the file system (including a single file). You can also schedule auto-scans and auto-updates. Given that Linux isn’t the target of large-scale, concerted efforts to take over machines or steal information (yet), this antivirus protection is adequate. Actually, it’s much more useful for protecting Windows machines that might share a network with your Eee because the Eee might download files that contain viruses which would affect Windows.
The bug-on-the-shield button launches the antivirus control panel. The Xandros antivirus application isn’t an interactive, all-intrusive, processor-cycle-devouring application like that on Windows. It doesn’t scan emails or constantly run in the background. From the Anti-virus panel, you can update the virus database or scan all or any part of the file system (including a single file). You can also schedule auto-scans and auto-updates. Given that Linux isn’t the target of large-scale, concerted efforts to take over machines or steal information (yet), this antivirus protection is adequate. Actually, it’s much more useful for protecting Windows machines that might share a network with your Eee because the Eee might download files that contain viruses which would affect Windows.
![]() Next is the MMC-SD storage control. If you hover over this icon, the tool tip will tell you how much space is left. Right-click this icon to see a menu with a single choice: Safely Remove the Flash Memory Card. This control will be followed to the left by USB Flash Drive controls, for any flash drives plugged into the Eee PC. The work in the same fashion as the MMC-SD storage control.
Next is the MMC-SD storage control. If you hover over this icon, the tool tip will tell you how much space is left. Right-click this icon to see a menu with a single choice: Safely Remove the Flash Memory Card. This control will be followed to the left by USB Flash Drive controls, for any flash drives plugged into the Eee PC. The work in the same fashion as the MMC-SD storage control.
![]() The Volume Control provides a slider for the output volume to the speakers or the headphones.
The Volume Control provides a slider for the output volume to the speakers or the headphones.
![]() The keyboard control provides options for keyboard configurations, including layouts that are specific to certain languages.
The keyboard control provides options for keyboard configurations, including layouts that are specific to certain languages.
![]() Next is the Network button. Click this to connect to and disconnect from both wired and wireless networks. You can also set up new connections, configure existing connections, and so forth.
Next is the Network button. Click this to connect to and disconnect from both wired and wireless networks. You can also set up new connections, configure existing connections, and so forth.
![]() Finally, at the end of the panel is the Lock button. Unless you’ve set a user password during your initial Eee PC start up, do not click this button. You’ll lock yourself out and you’ll need to reboot. It won’t take “no password” for a password. You can use this menu to display the Logout button, which is kind of handy.
Finally, at the end of the panel is the Lock button. Unless you’ve set a user password during your initial Eee PC start up, do not click this button. You’ll lock yourself out and you’ll need to reboot. It won’t take “no password” for a password. You can use this menu to display the Logout button, which is kind of handy.
Our tour of the panel completes with roll-up buttons. Click one of these and the panel rolls to the right or left (if you are on the default screen and have two buttons), exposing more of the screen. Click again and the panel rolls back out along the bottom of the screen.
On the 701 Eee PCs, you can’t see the clock unless you connect to external monitor. Click the right roll-up button to see the clock. You can right-click the clock to set the time, change the clock mode, and bring up the calendar. This is covered in detail in Chapter 1, “Getting to Know Your Eee PC.” There are a few more tricks lurking in the panel. If you hover your mouse to the upper left of any button or icon on the panel, a tiny triangle appears. Click that to produce a menu to move, remove, or launch the related application or function.
Configuring the Panel
Right-clicking a one of the narrow blank spaces between the taskbar and virtual desktop buttons opens the panel menu. The panel menu provides commands to add buttons to panels, remove existing buttons, and configure the panel itself (actually, the panel menu is also available from the button menus).
The variety of ways in which you can customize the panel is actually pretty amazing. You do most customization through the Panel screen of the Configure KDE Panel window (Configure Panel is available from the Panel Menu), shown in Figure 5.2.
Arrangement Tab
On the Arrangement tab (see Figure 5.2), you can position the panel on the top, right, left, or bottom (default) of the screen. In the Length section, you can use the slider or field to set the panel’s length, or can choose to have it expand as required to fit the contents.
FIGURE 5.2 Configuring the panel.
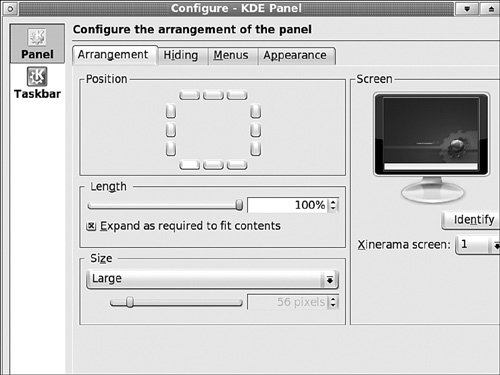
The Size setting is actually very useful on the Eee PC, because you can set the height (or width, depending on the orientation) of the panel. The Tiny option works great on the built-in Eee PC screen, and Large is useful if you have a very high-resolution monitor attached.
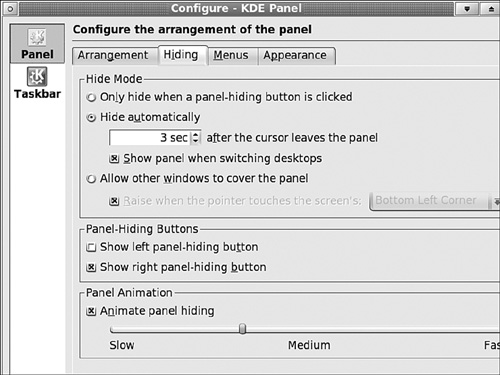
Hiding Tab
The Hiding tab (see Figure 5.3) has some controls that are really appropriate to the Eee PC’s default screen size. You can choose either to hide the panel or to allow applications to cover it. If you choose to allow applications to cover it, you can set a designated edge or corner of the screen to recover the panel. Thus, you can get the panel back by placing the mouse pointer at that designated location. If you want to use the panel but don’t want to give up the screen real estate, select Hide Automatically. Just put the mouse pointer toward the bottom the screen to get the panel back.
Menus Tab
The Menus tab lets you configure the Launch menu. You can add additional menus as well as edit the contents of the Launch menu. One particularly useful menu is the Quick Browser, which combines the functionality of a file manager with the speed and simplicity of a menu. From its top level, you can jump to the home folder, root folder, or (and I really like this) to the various system configuration directories. So, if you want to play with your X11 or emacs configuration files, just follow along the cascading menus. The number of Quick Browser menus shown can get quickly out of hand, which is why there’s a control to limit this.
FIGURE 5.3 The panel-hiding controls.
Clicking the Edit Launch Menu button brings up the Menu Editor, which is covered in more detail in Chapter 8, “Getting More Linux Applications.” Suffice it to say that you can add, delete, and otherwise control all the entries in the menu.
Appearance Tab
The Appearance tab gives you tools to customize the look of the panel. Aside from the color schemes for various buttons, you can customize the look of the panel itself. The panel even has its own wallpaper. You can turn this off by enabling transparency, which allows the desktop wallpaper to show through.
The Advanced Options button offers additional tweaks, and you can set the size of the panel in pixels and the amount of tint if you have transparency active.
Taskbar Button
Clicking the Taskbar button in the upper-left corner of the Configure KDE Panel window provides a few more space-saving functions you might appreciate on the Eee PC’s small screen. You can show only application buttons from minimized windows, instead of buttons from all windows. That can limit the number of buttons on the panel. You can also set the taskbar to group similar applications to save space.
tip
If you decide to remove the Performance Monitor, use Remove Applets, not Remove Display. Remove Display simply takes away the graph and leaves the empty box to clutter up the panel.
Add to Panel Command
If you remove all items from the taskbar, you can right-click the open space and produce a menu that includes the Add to Panel command. The Add to Panel command offers some really useful (and nonuseful) tools. You can keep track of the available system memory and your current CPU load with the Performance Monitor (it’s under Applets).
Under Panels, you’ll find some alternative panels. Be careful here, because I’ve managed to actually lock out the regular panel simply by trying to use the Universal Sidebar. I’d stay away from that. If you do manage to lock out the panel, you’ll need to reset the X Window System with the magic Ctrl+Alt+Backspace key combination. The KasBar is a simple, and I think ugly, panel alternative.
Configuring the KDE Interface
The KDE is extremely configurable, with many more options than are available in Microsoft Windows. In fact, the array of ways to configure the KDE is absolutely dizzying.
There are two routes to configuring the desktop, which lead to two separate interfaces that pretty much do the same thing:
![]() Display pane of the Control Center: Choose Launch, Control Center, Control Center, Display.
Display pane of the Control Center: Choose Launch, Control Center, Control Center, Display.
![]() Display Properties window: Right-click an open space on the desktop and choose Properties.
Display Properties window: Right-click an open space on the desktop and choose Properties.
This section discusses the second option, the Display Properties window, because that’s the easier one to use. The Display Properties application, shown in Figure 5.4, has a number of buttons on the left, each of which opens a different set of options on the right when you click it, as described next. The Panel options are not described because they are the same options described in the previous section, “Configuring the Panel.”
Background
Clicking the Background button provides controls for setting the wallpaper, as well as a very nifty way to get additional wallpapers.
By the way, wallpapers are stored in the /user/share/wallpapers folder, should you ever want to manually install a wallpaper or delete a few to save space. Unlike Windows, the KDE can use SVG wallpapers, which are significantly smaller than the JPG, GIF or PNG bitmap formats that it also supports.
On the Background settings, you can choose to have wallpaper for each virtual desktop, or not. If you choose not to have wallpaper, you can select other nice visual effects, such as fountain fills, patterns, and colors. If you do select a wallpaper from the list, you can see a preview of it on the right.
Now for the fun part: clicking the Get New Wallpapers button gives you access to the wallpapers available at http://www.KDE-Look.org, which has a nice collection of KDE-themed (and other) wallpaper. You can browse by Latest, Most Downloads, and Highest Rated, as shown in Figure 5.4. You can also preview each wallpaper in the right pane.
FIGURE 5.4 Previewing wallpapers to download and install.

Colors
Clicking the Colors button provides controls for setting the window color schemes. The top pane provides examples of items in the interface, which you click to select and can then change their colors. You can also load preset color schemes for the desktop, as well as create your own. Additional color schemes are available from http://www.KDE-Look.org, and if you download any of these, you can load them through the Import Scheme button.
Fonts
The Fonts icon provides controls for changing the fonts for the various parts of the desktop, or changing all fonts. You can also change all fonts throughout the interface at once through the Adjust All Fonts button. If you wish to tinker with the anti-aliasing, you can do that from here as well.
Icons
Click Icons and you’ll find tools for switching the icon sets, as shown in Figure 5.5. Note that only one icon set is shown in the list. Once again, http://www.KDE-Look.org comes to the rescue as a convenient repository for new icons. Download an icons file (they run about 15 to 20MB as a rule) and load it via the file browser from the Install New Theme button.
FIGURE 5.5 Selecting icon sets.

Screen Saver
Clicking Screen Saver is a bit of a disappointment, because there are no screensavers installed. If you want to install a screensaver, the easiest way is to do a search through the Synaptic Package Manager (just search for “screensaver”). Due to a bug in the Synaptic Package Manager on the Eee PC, you’ll need to run the fix command twice after each search before you can download a package. Once a screensaver is installed, you can configure it from this screen.
Style
The Style controls configure the look and feel of the radio buttons, check boxes, and so on that appear in the various dialog boxes. Note that you can adopt some of the old UNIX looks, such as SGI (Silicon Graphics) and CDE, as well as newer styles developed for Linux. As you select different styles, the example controls change to provide a preview.
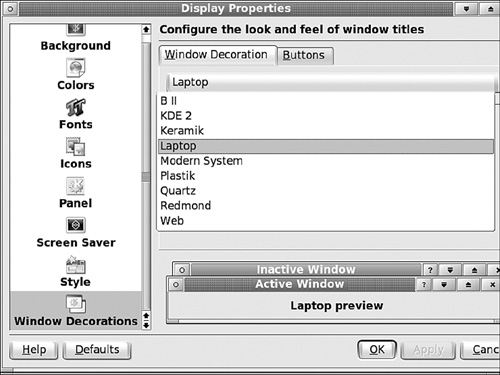
Window Decorations
The Window Decorations controls (see Figure 5.6) actually rather radically change the behavior and appearance of windows in the desktop. Try each one and note the changes to the look of the windows and the controls. For some window schemes, the Buttons tab allows you to add extra control buttons to the windows.
FIGURE 5.6 Selecting the window decorations.
Touring the File System
If you’re new to the Linux file system, you’ll notice that the major difference from Microsoft Windows (aside from the forward slash instead of a backslash to separate folders in a file path) is that the entire file system is one tree. The top level is called “root” and is shown as /. Linux does not use the MS-DOS notion of a C: drive, D: drive, etc. When you plug in a flash drive or add an MMC/SD card, they are automatically mounted into the file system as folders under /media. The same is true if you add a CD or DVD drive.
The second convention that you need to understand is the concept of a “home” directory. While the early versions of Windows, and its predecessor DOS, were essentially single-user operating systems, UNIX and Linux are essentially multiuser operating systems. Thus, the idea of a separate home directory for each user was created. While the Eee PC is a single-user implementation of Xandros (a Linux variant), it still has the concept of a user and a home directory. This is /user/home.
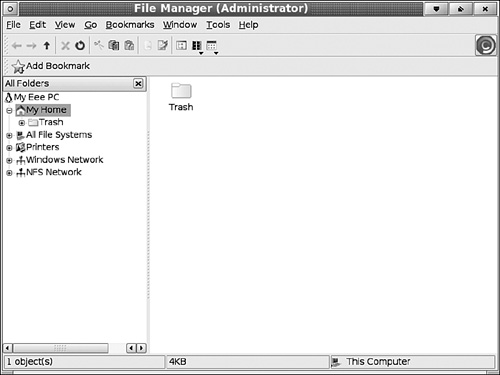
There are plenty of file managers in Linux, and the Eee PC’s default KDE desktop exposes two of them from the launch menu: File Manager (blue) and Administrative File Manager (red). These are actually based on the XandrosFileManager application. The main difference between the two is that the Administrative File Manager runs with root privileges. This makes the Administrator version capable of changing things in the nonuser part of the file system. This is both good, in that you have a graphical way to do this, and risky, in that you can mess things up quite a bit.
Given that the File Manager (blue) is designed for managing user-related files, it opens to the /home/user directory with the subfolders under it opened in the tree. The Administrative File Manager also opens to the /user/home directory, but it has an additional default entry in the tree called All File Systems (see Figure 5.7), which opens to reveal the root of the file system plus any folders under /media. In the File Manager (blue), you can also see the rest of the file system via the View > Show All File Systems command. However, you can’t modify files outside of your user directories with this File Manager.
These folders correspond to the top of the file systems for the USB storage devices and MMC-SD drive.
To make it easy for you to reach the file trees under /media, symbolic links are automatically created when you plug in an storage device. These symbolic links connect the home directory to each of device file trees. The symbolic link is deleted when you use the panel control for that device to remove it. A symbolic link is a direct connection from one branch of the file tree to another. It’s another advantage the Linux file system has over Windows XP, because it allows you to make convenient connections throughout the file system.
You’ll find a folder called My Documents in your home directory, which leads to subfolders such as My Music and My Office. Keep in mind that this is on the internal file system and space is a premium there, so it’s a really good idea to store documents, music, photos, and so forth on an MMC/SD flash card instead.
FIGURE 5.7 Administrative File Manager with expanded file tree options.
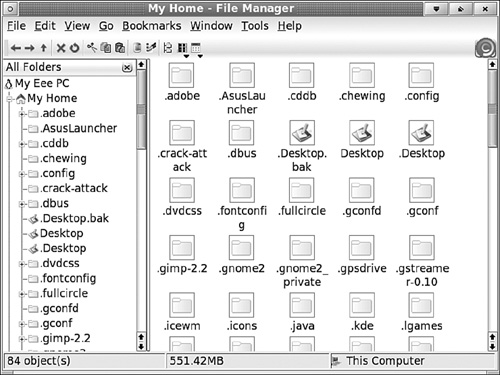
Linux has the concept of local configuration files, which are stored as subfolders to your home directory. These invariably begin with a “.” (which normally makes them hidden) and contain various configuration files and log files. Log files contain a history of events for the application and are often useful in trying to figure out what went wrong when things go awry. If you want to see your configuration directories in the File Manager, simply right-click a blank spot in the folder (right side of the File Manager) and select Show Hidden Files. You can also select View > Show Hidden Files from the menu. When you can see the folders in the File Manager (see Figure 5.8), you can navigate to them.
The File Manager tree also opens network file systems, such as a Windows Workgroup or a UNIX/Linux network file system (NFS). You can browse through machines and any shared parts of their file systems as well.
Although you can’t browse the entire file system with the File Manager, you can with the Administrative File Manager. Also, if you choose to edit a file with the Administrative File Manager (by selecting the Open With command from the File Manager’s right-click menu), the editor also has root privileges so that you can actually write to the file even if it’s outside of your user tree. Chapter 11, “Introduction to the Linux Command Line,” goes into detail about file permissions and navigating the file system with commands.
FIGURE 5.8 Hidden folders, revealed in the File Manager.
The following lists some of the points of interest in the file system:
/bin: The executable files that provide the basic commands and tools for Linux. This is used to start the Eee PC, but also by you as the basis for the various Linux commands.
/boot: Startup, shutdown, and system configuration files.
/dev: Device files that represent the various devices installed on the Eee PC.
/etc: Where Linux keeps its configuration files.
/home: The branch of the directory tree that leads to the various account directories (or, in the case of the Eee PC, the user directory).
/media: The directory branches (mount points) that lead to the files systems of various devices plugged into the Eee PC.
/opt: The branch that includes many (but not all) of the software packages you install. Others are installed under /usr/bin.
/sbin: More programs, usually related to administering the system.
/usr: Includes most of the programs you install, in the /bin directory.
/tmp: Where the temporary files used by the system live.
/var: The home of many log files, print spooler files, and the like.
Using the File Manager Right-Click Menu
You can perform most of the file-manipulation tasks that are required in running your system directly from either of the two File Managers (user and administrative) by right-clicking a filename. The following list describes the function of each of the menu commands:
Open: For many types of files, the KDE has a default application that is considered the editor of choice. For some types of files, such as OpenOffice.org Writer files, there’s probably only one editor on the Eee PC that can open those files. For other file types, such as graphics files, there may be many choices. Selecting Open instructs the KDE to open the file with the default application.
Open With: This is most useful when there are multiple applications that can open the file. The KDE presents you with a menu of applications that could be used. Selecting Other allows you to browse the list of known applications.
Find: If you select a folder instead of a file, Find provides some basic search tools to look for files of various types, a specific file, or a set of files. The Find tool matches on the filename, and you can use the * wildcard to match any set of characters. For example, my*.txt will find any files with the .txt extension that begin with the two-letter string “my.” You can also search the contents of files.
Cut: Places the file(s) or folder(s) on the clipboard (think of it as a temporary staging area) in preparation for a file move. When you paste an item, it’s moved from its original location to the destination.
Copy: Places the file(s) or folder(s) on the clipboard in preparation for a file copy. When you paste an item, it is copied rather than moved; that is, the original item is left in its original location.
Paste: Pastes the file(s) or folder(s) from the clipboard into the designated folder. The operation can be either a move or a copy operation, depending on what command placed the item(s) onto the clipboard.
Move to Trash: When you use either File Manager to remove a file or folder, you have a choice of whether to really get rid of it or simply move it to the Trash directory. If you right-click a file and select Move to Trash, the item is simply moved to the Trash directory. Trash is a staging area for things that you probably want to delete, but aren’t entirely sure about. On a system with as little storage as the Eee PC has, it’s a good idea not to keep a lot in the Trash. To delete the Trash, simply right-click the Trash folder and select Empty Trash; then the deleted items are gone for good.
Delete: Removes the selected file or folder completely. Be bold; space is at a premium!
Rename: Opens the file or folder name in a text field so that you can rename it.
Add Bookmark: Places the file or folder in the File Manager’s bookmark list (under the Bookmark menu). This gives you a way to quickly get back to certain files or folders.
Create Symbolic Link: Enables you to create a symbolic link between the currently selected file or folder and any other folder in the file system.
Scan with Anti-Virus: Enables you to scan the selected file or folder for viruses. This is a really convenient way to scan anything that you download.
Add to ZIP Archive: Add the currently selected file(s) or folder(s) to a ZIP file. This not only combines the files into a single file, for later unpacking, but compresses the size as well.
Create TGZ Archive: A combination of the Linux tar file repository and gzip (GnuZip) commands, to create a tg.zip or tgz file. The resulting file is often called a “tarball.” It’s similar to a ZIP file, but tarballs are native to the Linux/UNIX world.
Edit File Type: Displays a dialog box that you can use to change the file associations for applications that can open the file.
Properties: Enables you to change the filename and its permissions for owner, group, and other (the chmod function). For more about chmod, see Chapter 11.
Konqueror
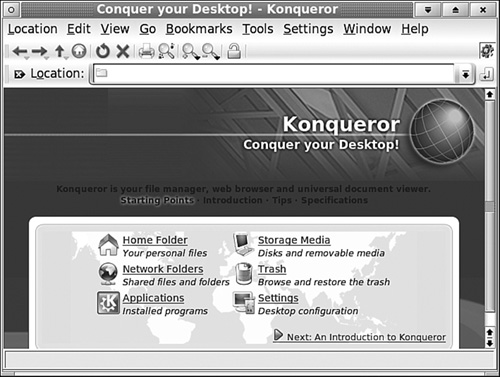
Because Xandros has its own file manager, it decided to not place the most popular KDE file manager, Konqueror, on the menus. That doesn’t mean Konqueror isn’t installed, however. Actually, Konqueror is far more than a file manager; it’s also a web browser and system administration tool. Konquerer has much more capability than the Xandros replacements.
You can launch Konqueror from the Launch menu Run command with this simple command: Konqueror. The Konqueror initial screen, shown in Figure 5.9, provides choices to manage your files, manage network file shares, or reach system administration screens. Like ROX (introduced in Chapter 4, “Customizing Easy Mode”), Konqueror is a do-it-all application. It is even a complete and standards-compliant web browser. If you type a URL into the Location field, it will browse to that website.
Backing Up Your System
Now that you know how to work with the file system, you’ll want ways to back it up. There are two types of backups:
![]() Simple file backups: To protect your data
Simple file backups: To protect your data
![]() Complete system backups: To restore your system to a particular working state if necessary
Complete system backups: To restore your system to a particular working state if necessary
File Backups
For file backups, the easiest thing to do is to back up the system onto a DVD. A DVD enough capacity to store the whole file system, minus the MMC/SD flash drive, so that makes it somewhat simpler. The best way, and really the only reliable way that I’ve found, to do DVD backups on the Eee PC is through the K3b program. Chapter 8, “Getting More Linux Applications,” Chapter 9, “Must-Have Utilities,” provide instructions for adding applications in general and K3b in particular, respectively.
K3b has a simple drag-and-drop interface (see Figure 5.10). To create a backup DVD with K3b:
1. Launch K3b via Launch > Multimedia >K3b.
2. Click the New Data DVD Project button.
3. Drag the directories you’d like to write from the top file list to the bottom list.
FIGURE 5.10 K3B, with directories selected and ready to burn.

4. Click the Burn button (at the left of the screen).
5. In the DVD Project dialog box, select Create Image and Remove Image. Keep in mind the the ISO image (which is as large as the data itself) must also fit somewhere temporarily on the Eee’s available storage. You can select the location for this in the Image tab. If the location doesn’t have sufficient space, you’ll be told when you click the Burn button in the DVD Project dialog box.
6. Click the Burn button in the dialog box.
7. A dialog box will appear with options to store the directories referenced by the links, not to follow links but merely put the link file on the DVD, or ignore links entirely. Select the symbolic link option you wish to use.
8. The progress window, shown in Figure 5.11, shows the writing process.
FIGURE 5.11 Backing up with K3b.

Complete System Backups
Backing up the complete system sometimes is called making a drive image or “ghosting” (after a rather famous program for this purpose, called Ghost). This provides a snapshot of your current system that you can restore to bring the system back to its precise state at that time (thus overwriting any changed data). Although this isn’t horribly difficult to do, it does require some technical know-how and self-confidence. There are three ways to go about building system images, and they require that you have an attached CD drive:
![]() Write the image to a large enough USB flash drive. The flash drive must be 4GB or greater for a 4G, and 8GB or more for an 8G, and 12 or 20 GB or more for the 900 series.
Write the image to a large enough USB flash drive. The flash drive must be 4GB or greater for a 4G, and 8GB or more for an 8G, and 12 or 20 GB or more for the 900 series.
![]() Write the image to a USB portable hard drive. This lets you save multiple images, which could be helpful if you want to switch among several systems (Xandros, Windows XP, and Ubuntu, for instance).
Write the image to a USB portable hard drive. This lets you save multiple images, which could be helpful if you want to switch among several systems (Xandros, Windows XP, and Ubuntu, for instance).
![]() Write the image to a network drive. In this case, you must have another machine on your network to which you can write the image file. In this case, the network must be working under DHCP. Make sure the network drive has enough space!
Write the image to a network drive. In this case, you must have another machine on your network to which you can write the image file. In this case, the network must be working under DHCP. Make sure the network drive has enough space!
The following are two programs that you can use to make system images. Both are downloaded as ISO files. An ISO file is itself a disk image that you must burn to a CD or DVD:
![]() PING (Partimage Is Not Ghost): You can obtain this from http://ping.windowsdream.com/ping.html. It’s fairly easy to use and can be used to back up to a flash drive (memory stick), USB portable drive, or a network location. The website provides detailed instructions. Follow them to the letter.
PING (Partimage Is Not Ghost): You can obtain this from http://ping.windowsdream.com/ping.html. It’s fairly easy to use and can be used to back up to a flash drive (memory stick), USB portable drive, or a network location. The website provides detailed instructions. Follow them to the letter.
![]() Clonezilla: You can obtain this from http://www.clonezilla.org/. I recommend this one only for backing up to a flash drive (memory stick) or a USB portable drive. It has a somewhat “clunkier” interface, but works just fine.
Clonezilla: You can obtain this from http://www.clonezilla.org/. I recommend this one only for backing up to a flash drive (memory stick) or a USB portable drive. It has a somewhat “clunkier” interface, but works just fine.
Both programs provide “live” (that is, bootable) Linux CDs with the imaging software installed on the CD. To use either program, you must change the boot order of the Eee PC so that it boots from the CD first. To do this, reboot the system and, while it’s first starting up,press the F2 key. Find the boot order and make the first entry of the three the CD drive. Save and exit and the Eee PC will reboot normally.
Next, download the ISO image file for the utility you intend to use. Once downloaded, because it’s a CD image, you can double-click it in the File Manager to “burn” the image to CD. It’s only DVDs that are problematic; they require K3b.
After you have a completed CD, label it and then put it into the CD drive. Install your flash drive as well, and then reboot the system. The Eee PC will boot the version of Linux on the CD and will give you an option to load the utility. Do so. In either utility, you need to move around the menus in the interface with the arrow keys.
To back up the native Xandros Linux using PING, you’ll want to select hdc1 and hdc2 to back up. These are the two Linux partitions on which Xandros is written. For some reason, PING sees an installed MMC-SD card as SDA1. You do not need hdc3 and hdc4. For Clonezilla, you want to back up SDA1 and SDA2. You can tell the correct partitions because of the sizes and the file system type. On a 4G, the two partition sizes for Xandros are 2468MB and 1513MB. The file systems are EXT2 and EXT3 respectively.
If you’re using PING, make sure that you have created or connected (if it’s on a portable storage device) the destination directory for the image before you run the program. If you’re using Clonezilla and you’re putting the image on a USB device, wait until it prompts you and then connect the device. With either application, backups to take some time.
You’ll also need the CD or USB flash drive to restore the image. Keep in mind that restoring an image is a destructive affair. Back up your data (via K3b or simply by copying files to a flash drive) before restoring an image.
Summary
In this chapter, you got an introduction to configuring one of the major Linux desktops: the KDE. You also got a tour of the file system and the GUI file management tools. Given the number and variety of customizations available for the KDE, you should have no trouble tailoring it to suit your needs and tastes.
You also got a look at some of the ways that you can back up your information on the Eee PC, including a couple of ways that you can make a restorable image. Once you have configured the KDE the way you want, you can back up Xandros and your configuration.