Chapter 8
Getting More Linux Applications
IN THIS CHAPTER
![]() Learning about packages and package repositories
Learning about packages and package repositories
![]() Pointing package managers at additional repositories
Pointing package managers at additional repositories
![]() Using the Synaptic Package Manager
Using the Synaptic Package Manager
![]() Using the apt-get command-line package manager
Using the apt-get command-line package manager
![]() Adding applications to the KDE menu
Adding applications to the KDE menu
![]() Installing DEB packages
Installing DEB packages
Almost all of the software you’ll use in Xandros Linux is “open source” software whose source code is open to everyone and normally supported by volunteer efforts. Occasionally, as is the case with such applications as the Alfresco Content Management System, the code is open source but is mostly maintained and developed by a commercial enterprise. Open source software is always free; however, sometimes commercial support is available for a fee (Alfresco uses this model). By the way, I’m not recommending that you run Alfresco on an Eee PC; that’s just an example. I must, however, admit that the idea of running a complete content management system on something that small is intriguing….
There are some closed source software applications that are free (or free with restrictions). Programs such as the XnView graphics viewer/converter and the XMLmind XML editor are examples of free, closed source applications. Closed source commercial applications are built and sold by commercial enterprises. These have their own installers or specific installation instructions.
Another big difference is external libraries. Most Windows software includes private libraries that are installed with the application. This makes for rather large installations and takes up quite a bit of disk space, because multiple programs may have their own copies of the same libraries. Linux applications that you download and install are just the executable files; however, these executables also depend on shared libraries that are installed as separate entities. Finding, downloading, and manually resolving the dependencies on shared libraries can be an absolute nightmare because you also have to keep track of the versions of the executables and the libraries on which they depend.
Adding to the complexity of keeping track of the library dependencies is the number of distributions (“distros”) of Linux available, each of which may have many versions of executables and libraries. One final twist: at any given point, both stable and experimental versions of libraries and executables may be available.
Fortunately, in the Linux world, software for various distributions are gathered into collections called repositories. Even more fortunately for you, software specifically intended for the Eee PC is also gathered into repositories.
Repositories contain both applications (bundled into “packages,” which also list dependencies on libraries, descriptions of the software, version numbers, etc.) and libraries. The installation of packages is handled by package managers.
Using a Package Manager
The genius of package managers is that they connect to repositories and keep track of packages and their dependencies for you. They download and install not only the executable files but also the libraries on which they depend, keeping track of what versions of each have been installed. As repositories are modified, the package managers can refresh their indexes of each repository’s package contents. They can also delete applications and remove dependent libraries. When things go wrong, they can (to a certain extent) attempt to repair things as well. You can even search through the various repositories to which the package manager is pointed.
Both Easy Mode and the Full Desktop (KDE) have their own package managers, and they have very different interfaces. The following sections cover these in detail.
Using the Easy Mode Package Manager
In Easy Mode, the package manager is the Update Software application on the Settings tab. It’s designed to manage only the packages that ship with the Eee PC, and does not function as a general-purpose package manager. Still, it’s not without its virtues. It provides information about available upgrades, such as the upgrade for Skype. It also lets you know if there are upgrades to the Eee PC’s BIOS.
Using the Easy Mode package manager can be a little frustrating in that it provides very little feedback about what it’s doing. This is especially true the first time that you run it, as it must “refresh” its database of the repositories it knows about. This can take several minutes.
The interface for the Easy Mode Package Manager is very similar to the interface for Easy Mode itself. The various packages are categorized under Internet, Work, Learn, Play, and Settings tabs. Each tab shows a set of packages that can be updated. All you do to update a package is to click the related Install button. Occasionally, a Remove button will appear after installation. Clicking Remove deletes the installation files and therefore releases some storage space.
The bios updates are on the Settings tab. These are a little tricky as they will shut down the system and restart it to load a bios update. During an update, you’ll see almost no feedback and the screen may go black for several minutes. Be patient and don’t intervene. Interrupting a bios update can make your Eee PC unusable.
Using the Synaptic Package Manager and the apt-get Command
In Full Desktop Mode, you can access packages either via the Synaptic Package Manager or through the apt-get command- line utility. Both are package managers and both work from the same set of repositories. The chief difference is that Synaptic has a graphic interface and apt-get is strictly a command-line tool.
Before you can install packages with either of these package managers, you must first point them package managers at the package repositories via their Internet URL and then define some additional information about the repositories.
The package manager can then open the repository and download the metadata and create an index of the software it contains. The package manager won’t actually download any of the software until you request the package, and then it’ll download only if it can succeed in downloading all of the dependencies as well (or, at least that’s the theory).
For the Eee PC, unless you’re a Linux power user, you’ll probably want to stick to the repositories that are recommended through the major Eee PC web sites. The next most reliable repositories are specifically for the current release of Xandros. You can also use Debian repositories, but this is riskier. Although Xandros was derived from Debian, they aren’t quite the same any more.
Before you actually install software, you should make sure that you can restore your Xandros image back to its pristine state using the DVD-ROM that came with the computer. Refer Chapter 12, “Linux Distributions” for a complete description of how to do that. Being prepared to reinstall means that if something goes tragically wrong when installing an application—and your Eee PC becomes a cute, 2-lb block of dead plastic—you can restore it to life.
Picking Repositories That Work with the Eee PC
The Eee PC package manager knows about two repositories by default, which isn’t much:
![]() deb http://update.eeepc.asus.com/p701/ p701 main
deb http://update.eeepc.asus.com/p701/ p701 main
![]() deb http://update.eeepc.asus.com/p701/en/ p701 main
deb http://update.eeepc.asus.com/p701/en/ p701 main
Obviously, you’ll want to add to that, but be careful. Not all repositories contain software that’s compatible, and not all repsoitories are trustworthy.
Installing software on your computer is a security risk.
The following list is a pretty good starting point that provides a wide range of useful applications, and is recommended on EeeUser.com (a large and active Eee PC user community, at http://www.eeeuser.com/):
![]() deb http://xnv4.xandros.com/xs2.0/upkg-srv2/ etch main contrib non-free
deb http://xnv4.xandros.com/xs2.0/upkg-srv2/ etch main contrib non-free
![]() deb http://dccamirror.xandros.com/dccri/ dccri-3.0 main
deb http://dccamirror.xandros.com/dccri/ dccri-3.0 main
![]() deb http://www.geekconnection.org/ xandros4 main
deb http://www.geekconnection.org/ xandros4 main
![]() deb http://download.tuxfamily.org/eeepcrepos/ p701 main
deb http://download.tuxfamily.org/eeepcrepos/ p701 main
The following sections explain just how to point to these repositories and set the pinning directives. Pinning is a way of assigning preferences for which repositories and versions are used. This is covered in detail in the section, “Using the apt Command-Line Package Manager.” The pinning order I’ll show is the recommendation of EeeUser.com, and provides a little extra insurance that things won’t go utterly “in the weeds.” I’ve used this set of repositories and pinning order for quite a while, without a problem. Naturally, nothing is a sure thing, but these repositories seem to work very well.
Note that in the following sections, the discussion may go back and forth a bit between the Synaptic Package Manager and the apt-get command. This is because they are really just two ways to do the same thing. The both access the same database (really just a file) of repositories. So, if you add a repository via Synaptic, apt-get will see it as well.
Using the Synaptic Package Manager
Having a set of repositories is just the beginning; you need to have a way of installing and managing software. The Synaptic Package Manager provides an easy-to-use, GUI-based tool that you can use to install, update, or remove applications as well as point to new repositories. There are two ways to run the Synaptic Package Manager:
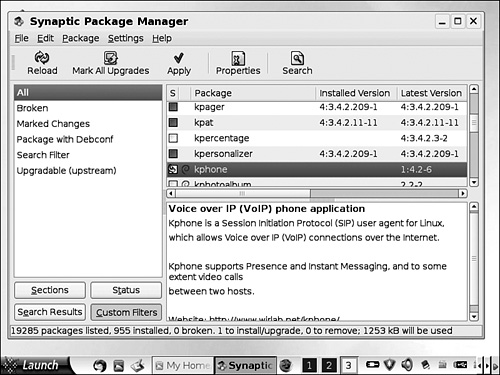
![]() From the Full Desktop, choose Launch, Applications, System, Synaptic Package Manager, as shown in Figure 8.1.
From the Full Desktop, choose Launch, Applications, System, Synaptic Package Manager, as shown in Figure 8.1.
![]() From the command line, enter
From the command line, enter
> sudo Synaptic
FIGURE 8.1 The Synaptic Package Manager.

Loading Repositories
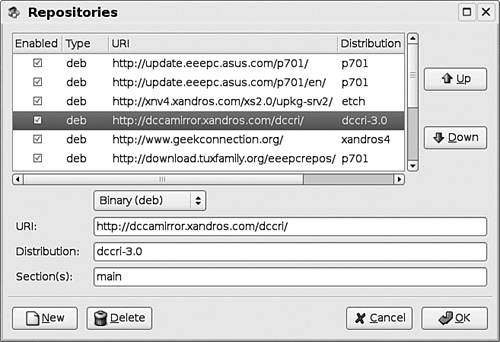
The first order of business in using Synaptic is to point it at the various repositories you’re going to use. To do that, choose Settings, Repositories and click the New button to open the Repositories dialog box, shown in Figure 8.2. A few definitions are required at this point so that you understand the fields at the bottom of the dialog box:
![]() URI: The universal resource identifier, which is the web address of the repository.
URI: The universal resource identifier, which is the web address of the repository.
![]() Distribution: The Debian distribution name. As of the writing of this book, the most up-to-date stable distribution is 4.0, which is called Etch. You’ll also encounter older distributions, such as Sarge (3.1) and Woody (3.0). The current unstable distribution is called Sid. Unless you don’t mind re-imaging your Eee PC, it’s probably a good idea to leave Sid alone.
Distribution: The Debian distribution name. As of the writing of this book, the most up-to-date stable distribution is 4.0, which is called Etch. You’ll also encounter older distributions, such as Sarge (3.1) and Woody (3.0). The current unstable distribution is called Sid. Unless you don’t mind re-imaging your Eee PC, it’s probably a good idea to leave Sid alone.
![]() Sections: Distributions may contain sections marked
Sections: Distributions may contain sections marked main, contrib, and non-free. Both main and contrib are free to use for both commercial and noncommercial use, while non-free usually has some restrictions (such as not free for commercial use).
So, referring to the list of repositories, you would enter the following (see Figure 8.2):
deb http://dccamirror.xandros.com/dccri/ dccri-3.0 main
as:
Deb
URI: http://dccamirror.xandros.com/dccri/
Distribution: dccri-3.0
Sections(s): main
FIGURE 8.2 Entering a repository.
After you add the repositories, click the Reload button to build the database of available packages. This will take several minutes. Don’t panic if you see some security errors; this is common. These are shown as GPG errors, and simply mean that there was no way of verifying these repositories via a public key.
However, if you get an “Unable to parse package file…” error, you probably have a typo in your entry for that repository. Double check that entry. You can to that through Settings, Repositories and then clicking the entry that had the error. You can now edit that entry.
Finding and Loading Packages
Before you can install a package, you must find it. Fortunately, package managers have functions to help yo locate the sort of packages you’re looking for, whether it’s a chess game or a GPS navigational program. Once you’ve found the package, or packages, you want all you need to do is “mark” them for installation and click Apply. Then the package manager carries out the actual installation.
Installing a package is actually a multistep process for the package manager. First, it makes sure that it can find and download all of the associated applications and libraries that support the package you want. These are called “dependencies” and are additional packages to the one that you requested. The package manager makes sure that it can resolve all the dependencies and get everything it needs before it goes on.
Next, the package manager downloads the package you requested and all of the supporting packages.
Finally, the package manager installs the software contained in the packages. In most cases, you will find the new software neatly installed in the KDE Launch menu. If you’re doing this from Easy Mode, resign yourself to either the drudgery of building new icons and adding them to the Easy Mode interface (see Chapter 4, “Customizing Easy Mode”) or to running your new applications directly from the command line.
note
There’s something not quite right about the Search function in the Eee PC implementation of Synaptic. Using it can cause subsequent installs to fail with the error message shown in Figure 8.3. This is easy to fix by choosing Edit, Fix Broken Packages. Stranger still, you will probably have to run this twice in a row before things are truly fixed. If the problem recurs—and it will if you use Search—you now know the drill. I go through this after every search; otherwise, Synaptic won’t install the selected packages.
Finding Packages to Install
The easiest way to find a package is by searching for a keyword (contained in that metadata). The Synaptic Package Manager includes a Search utility that you can use to search for keywords in the titles and descriptions of packages.
FIGURE 8.3 The infamous “Unable to parse…” error.

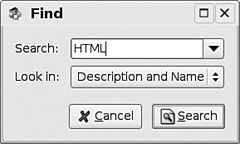
To search the repositories for packages, click the Search button on the toolbar. In the Find dialog box (see Figure 8.4), enter a search string, such as “HTML,” and choose a value in the Look In drop-down list to select where to look. Choosing Name simply searches through the names of the packages, but Description and Name searches both. Searching the descriptions is usually a much richer source for “hits” because the name may not be very descriptive. For example, searching for “ship” in the name produces very few hits, but by searching in the description as well, a number of games with the word “ship” in the description are identified. The same goes for “HTML.” Very few people name their web editor application “HTML,” but most put that in the description.
FIGURE 8.4 Searching for a package.
After you select where to look and what to look for, click the Search button to send Synaptic searching through the repository metadata in its database. When it finishes, it places your search term in the list at the left of the window. Click a search term to load all the packages that match your criteria in the list on the right. You can then scroll through the list until you find what you want.
If you know what you’re looking for, a quick way to find it is to select All in the left pane and then click any package in the list to the right. Once a package is selected, you can simply begin typing the name of the package and the list will begin matching as you type. Usually, you only need to type a few characters before you get a match. Using this method does not cause the Synaptic error messages when you try to load the package, so in some ways it’s a better way to work than using Search.
Installing Packages
Once you’ve found what you’re looking for, right-click the entry and select Mark for Installation. You may get a warning dialog box that the software can’t be authenticated. Heed these warnings, because software that can’t be authenticated might contain malicious code. This is where you must consider how trustworthy the source is. If you think it is trustworthy, go ahead and click the Mark button. (Actually, you’ll get this message a lot. You just learn to live with it.) Click the Apply button to start the installation.
If the package manager can’t resolve all of the dependencies, you won’t be able to mark a package for installation. You’ll need to expand your list of repositories, which increases your risk, or find another package. If you can mark it for installation, which is the usual case, click the Apply button.
FIGURE 8.5 A package marked for installation.
Next, you’ll see the Summary dialog box, which is an information screen about the package. It may contain another warning such as “the package cannot be authenticated,” as well as information about the number of packages that will be upgraded as part of the process. If you click the Show Details button in the Summary dialog box, you can see exactly which version will be installed.
On a 701, you’ll need to use the Alt-drag technique to move the window up so that you can click the Apply button on the Summary dialog box.
You should see the progress of the package download and installation (and if you’re really bored, you can select to watch as individual files are pulled down or the installation script runs). After your package is installed, the installed application may appear in your Launch menu. Odds are that it will, but be prepared to play hide-and-seek with the executable file. So that you know how to handle this if it arises, I’ll cover adding an application to the menu manually in the following section.
Before you learn about the apt-get interface for managing packages, there are a few other things you should know about the Synaptic Package Manager:
![]() Sections: Clicking this button shows an index of sorts, with broad package categories. For example, if you select Cross Platform (
Sections: Clicking this button shows an index of sorts, with broad package categories. For example, if you select Cross Platform (non-free), you’ll find the Google graphics application Picasa. It’s under non-free because it’s not open source but rather a Google product. However, it is free to download and use.
![]() Status: This button has search filters that show packages that are installed, that can be upgraded, or that are not installed. The filters can be very handy for keeping track of available upgrades.
Status: This button has search filters that show packages that are installed, that can be upgraded, or that are not installed. The filters can be very handy for keeping track of available upgrades.
![]() Reload: You should get into the habit of clicking Reload before you go package hunting. This refreshes the indexes of the repositories and keeps your searches up-to-date.
Reload: You should get into the habit of clicking Reload before you go package hunting. This refreshes the indexes of the repositories and keeps your searches up-to-date.
![]() Mark All Upgrades: This button does just what it says, and prepares to upgrade every application that can be upgraded.
Mark All Upgrades: This button does just what it says, and prepares to upgrade every application that can be upgraded.
![]() Properties: This button provides detailed version information about the currently selected package.
Properties: This button provides detailed version information about the currently selected package.
![]() File menu: This menu includes commands that enable you to mark things but not actually install them now, and a History command that shows you a history of package manager activities by date.
File menu: This menu includes commands that enable you to mark things but not actually install them now, and a History command that shows you a history of package manager activities by date.
Remember that I mentioned pinning? The next section covers the apt-get package manager, but it also covers pinning. This is just as appropriate for using Synaptic and, before you go wild downloading packages, take a look at the pinning instructions.
Using the apt-get Command-Line Package Manager
apt-get is a command-line package manager that is quite easy and efficient to use. You can launch it from any xterm command line, so by pressing Ctrl+Alt+T, you can fire up an xterm window in Easy Mode and pull down packages with apt. The easiest way in Full Desktop to launch a terminal-emulator window is to enter the following at the Launch, Run Command prompt:
Konsole
You can find the vast, canonical document that covers all the intricacies of apt-get and the other apt commands at http://www.debian.org/doc/manuals/apt-howto/. This is the “How To” document maintained by Debian.org.
What follows is a “quick reference” that covers the important details that you need to know to effectively use the apt commands. Before you dive into the command-line arguments, recall that you need to add the appropriate package repositories and set the order for referencing these (pinning). To do this, you need to edit some configuration files. If you’re not adept at any of the typical UNIX-type editors, you can always use Kwrite. Kwrite has a very simple interface, reminiscent of Windows Notepad. Having grown up in the world of UNIX, I prefer XCEmacs. The point is that pretty much any text editor will do. Don’t use OpenOffice.org Writer, however, because saving the file as something other than text is quite easy in Writer, making the configuration files unavailable to apt-get until this is fixed.
Working with the Package Manager Configuration Files
The configuration files in question are
![]() /etc/apt/sources.list, which contains the list of repositories.
/etc/apt/sources.list, which contains the list of repositories.
![]() /etc/apt/preferences, which contains the “pinning” list, or order of preference for searching repositories.
/etc/apt/preferences, which contains the “pinning” list, or order of preference for searching repositories.
So, the first order of business is to add the repositories. You need to create (or edit) the file via sudo to have write permissions, so issue the following command from an xterm window or from Konsole:
> sudo kwrite /etc/apt/sources.list
Enter the list of URIs, exactly as shown in the list of packages in the “Picking Repositories That Work with the EEE PC” section earlier in this chapter. When you’re finished, choose File, Save and then select Exit. Next, you need to set the pinning order. First, open the preferences file with kwrite:
> sudo kwrite /etc/apt/preferences
Package: *
Pin: origin update.eeepc.asus.com
Pin-Priority: 950
Package: *
Pin: origin
Pin-Priority: 925
Package: *
Pin: origin xnv4.xandros.com
Pin-Priority: 900
Package: *
Pin: origin dccamirror.xandros.com
Pin-Priority: 850
Package: *
Pin: origin www.geekconnection.org
Pin-Priority: 750
Package: *
Pin: release a=stable
Pin-Priority: 700
Package: *
Pin: release a=testing
Pin-Priority: 650
Package: *
Pin: release a=unstable
Pin-Priority: 600
The actual values for these directives are in fact important and somewhat arcane. Note that all the Pin-Priority values are less than 990 but more than 600. Numbers in this range mean that the designated package version (the Package: line) will be installed, unless there is a version available from the target release or if the current installation is more recent. The wildcard * means that any package version will be installed if it’s available. The higher the Pin-Priority value, the more weight each of the repositories, designated by the Pin: origin line, have. So, update.eeepc.asus.com has top priority for new releases, followed by any packages in local repositories, then xnv4.xandros.com, and so on. The second entry, which has the Package: set to origin, simply indicates to check local repositories (it means literally the origin is unknown).
The Pin: release lines give priority to stable, then testing, and then unstable releases.
A few more tidbits about pinning syntax:
![]()
Pin-Priority numbers greater than 1000 install the designated package version even if it requires downgrading the current package. You can use this to set a particular version for a particular package that won’t ever change.
![]() Numbers between 990 and 1000 install the designated package, even if it comes from a release that’s not the target release, unless the current installation is more recent.
Numbers between 990 and 1000 install the designated package, even if it comes from a release that’s not the target release, unless the current installation is more recent.
![]() Numbers between 500 and 990 install the designated package unless there is a version available that belongs to the target release or the current installation is more recent.
Numbers between 500 and 990 install the designated package unless there is a version available that belongs to the target release or the current installation is more recent.
![]() Numbers between 100 and 499 install the designated version unless there is a version available from another repository or the current installation is more recent.
Numbers between 100 and 499 install the designated version unless there is a version available from another repository or the current installation is more recent.
![]() Numbers between 0 and 99 install the designated version only if there isn’t any version installed.
Numbers between 0 and 99 install the designated version only if there isn’t any version installed.
![]() Numbers less than 0 prevent the designated version from being installed.
Numbers less than 0 prevent the designated version from being installed.
Once again, when finished, choose File, Save and then select Exit. Now, you’ve completed the setup and pinning and are ready to use apt. You need to have apt scan the repositories and build the index, by using the following command:
> sudo apt-get update
apt-get will spew a set of messages about its progress as it traverses the various repositories. It’ll also alert you to potential security problems, such as no public keys available to authenticate a repository. This is a polite way of saying that it can’t verify how genuine a given repository is, as it has no public key.
Now you’re ready to install something. Suppose that you want to install the solitaire game ace-of-penguins. You would issue the following command:
> sudo apt-get install ace-of-penguins
If apt-get can’t authenticate the source of the package, which is likely, it will stop and ask the following:
WARNING: The following packages cannot be authenticated!
ace-of-penguins
Install these packages without verification [y/N]?
Enter Y on the command line to continue with the installation. apt-get will continue on its way and let you know that the installation succeeded.
The following are a few more cool things you can do with apt-get:
![]() Each time you install a package,
Each time you install a package, apt-get stuffs the files it needs in a local repository within the /var/cache/apt/archives directory. Given that disk space is at a premium, you probably don’t want files to accumulate in that archive. So, you can clean them out with the following command:
> sudo apt-get clean
![]() It is possible that some package files may, over time, no longer be available from the designated repositories. If that’s a concern, you can clean out only those files that can still be downloaded by entering the following:
It is possible that some package files may, over time, no longer be available from the designated repositories. If that’s a concern, you can clean out only those files that can still be downloaded by entering the following:
> sudo apt-get autoclean
![]() You can upgrade your applications by using the following command:
You can upgrade your applications by using the following command:
> sudo apt-get upgrade
![]() If you want to remove an application, say for instance, ace-of-penguins, use the following command:
If you want to remove an application, say for instance, ace-of-penguins, use the following command:
> sudo apt-get remove ace-of-penguins
Adding Packages to the KDE Menu
Usually, when you install a new package, it shows up right where you might expect in the KDE menu.). For example, if you install the VLC media player, it immediately shows up under Launch, Applications, Multimedia. Sometimes, a package shows up somewhere else in the menu structure. However, occasionally, it doesn’t show up anywhere. So, what to do? If you want to use it at all, you must at least ensure that you know what it’s called and that it’s in one of the directories in which Xandros currently looks for executable files. If you want it to work from the menu, you have to manually construct a menu entry.
Unfortunately, finding the installed application can be quite challenging. There are a couple of ways of finding the package.
![]() You can use Synaptic to tell you where the application was installed.
You can use Synaptic to tell you where the application was installed.
![]() You can hunt for it with the package using the
You can hunt for it with the package using the which command.
Finding a Newly Installed Application with Synaptic
To find an installed file:
1. In the Synaptic Package Manager, click the Status button.
2. Click Installed in the Filters list.
3. Locate the package in the Package list.
4. Right-click the package and choose Properties.
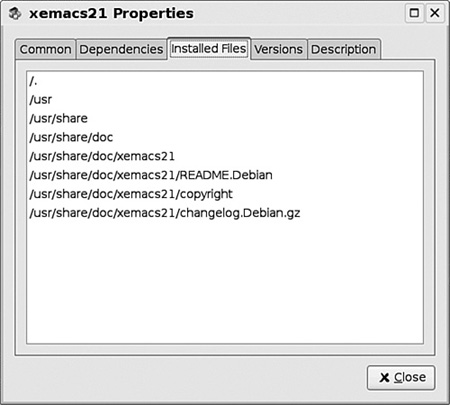
5. Click the Installed Files tab, shown in Figure 8.6.
Look for entries such as /usr/bin or /usr/bin/ package_name (where package_name is the name of the package).
FIGURE 8.6 The Installed Files list for a package.
Finding a Newly Installed Application with the which Command
You can also try to find a package through the command line. The Linux which command will identify the location if it finds the file you are querying. For example, if I’ve installed the gpsd package and I want to find it, I can use which to tell me where it is:
> which gpsd
/use/bin/gpsd
Of course, that only works if gpsd is installed somewhere that’s defined by the PATH environment variable. If you want to know what your PATH setting currently is, use the following command to pipe it through grep and search for the string PATH. (Chapter 11 discusses Linux commands and environment variables in more detail.)
> env | grep PATH
PATH=/usr/local/bin:/usr/bin:/bin:/usr/games
This path is the default Xandros PATH setting on the Eee PC.
Finding Instructions for Applications That You’ve Installed
Before you can add an application to the Launch menu, you must understand what, if any, command line switches are required. To do that, you’ll need instructions for the application. Normally, a package will install some sort of instructions along with the application. You can almost always expect at least a man page. Man pages are command reference pages that provide a synopsis of what the application does and how to use the command switches. To get the man page for gpsd, for example, simply enter:
man gpsd
Info pages, if they are available, provide more detailed information and are akin to a manual for the application. If info pages aren’t available, the man page will usually be displayed. To get the info pages, type the following:
info gpsd
In both info and man pages, you can exit by pressing Q (the case doesn’t matter). You can jump down a screen by pressing the spacebar. Also, you can browse up and down using the Page Up and Page Down keys. The Home key will return you to the start and the End key jumps to the end of the man or info page.
You can also search the various Eee PC forums and the homepage for the application for more information. Other Eee PC users may have encountered the same problem in dealing with a wayward application and may be able to provide some clues.
If you find your package and instructions, running it from the command line should be simple. If the package isn’t in a directory defined by the PATH environment variable, remember to include the absolute path to the executable file, as well as any handy command-line switches you might need (from the information you found via man or info pages).
Adding a Package to the Launch Menu
Once you’ve found the package and understand what command-line switches (if any) you might want to include, you can add it to the Full Desktop Launch menu. It’s a good idea to pull up a command line and try running if from there first.
To add something to the Launch menu:
1. Open the Menu Editor (Launch, Applications, System, Menu Editor).
2. Expand the Applications tree (click +) and decide exactly which category best fits the application you’ve installed. This example uses ace_taipei (which is the slightly nonobvious name for one of the Ace of Penguins games) and adds it under the Games category.
3. Expand the Games folder.
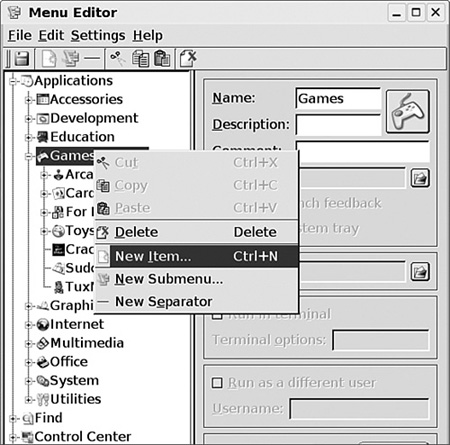
4. Right-click the Games category and choose New Item, as shown in Figure 8.7.
FIGURE 8.7 Adding a new menu item.
5. In the right pane of the Menu Editor window (see Figure 8.8), for the Name, use something not too long yet more descriptive than just the name. For ace_taipei, I chose “Mah-Jong” as the name. The other options available in the right pane are described after this list.
6. When you’ve finished filling out the pane, click File, Save to have your changes take effect.
The following list explains the various Menu Editor fields and check boxes shown in the right pane of Figure 8.8.
FIGURE 8.8 Setting up a new menu item.

![]() Name: This is the name that appears in the menu itself.
Name: This is the name that appears in the menu itself.
![]() Icon button: Located next to the Name field. Click to select an icon from the set to associate with this command in the menu and, optionally, in the system tray.
Icon button: Located next to the Name field. Click to select an icon from the set to associate with this command in the menu and, optionally, in the system tray.
![]() Description: In this case, I described it as really being Ace of Penguins Taipei.
Description: In this case, I described it as really being Ace of Penguins Taipei.
![]() Comment: You can add a comment if you like.
Comment: You can add a comment if you like.
![]() Command: This is the launch command (i.e., the command you’d use from to launch the applications from the command line) for the application, including any command-line arguments.
Command: This is the launch command (i.e., the command you’d use from to launch the applications from the command line) for the application, including any command-line arguments.
![]() Enable Launch Feedback: When selected, KDE will use the spinning hourglass to indicate that application is loading.
Enable Launch Feedback: When selected, KDE will use the spinning hourglass to indicate that application is loading.
![]() Place in System TrayAce: Check this box if you want to launch this application from the system tray. The icon associated with the application will appear in the system tray when the application is active.
Place in System TrayAce: Check this box if you want to launch this application from the system tray. The icon associated with the application will appear in the system tray when the application is active.
![]() Work Path: This is the directory from which the application will be launched. In some cases, this becomes the default directory for working files, providing a handy way of setting a default directory.
Work Path: This is the directory from which the application will be launched. In some cases, this becomes the default directory for working files, providing a handy way of setting a default directory.
![]() Run in Terminal: This creates a terminal window (console) for programs that require one. Check the application instructions for any relevant terminal options to enter.
Run in Terminal: This creates a terminal window (console) for programs that require one. Check the application instructions for any relevant terminal options to enter.
![]() Run as a Different User: Add a different username here if you wish to run the program as someone else on the system.
Run as a Different User: Add a different username here if you wish to run the program as someone else on the system.
![]() Current Shortcut Key: Click the button and then press the key combination you wish to associate with the application.
Current Shortcut Key: Click the button and then press the key combination you wish to associate with the application.
There are a few more things you can do with the Menu Editor, such as build new categories for the Launch menu and add separators between lists of applications. To create a new category, click the entry in the tree (such as Applications) under which you wish to add a new category. Next, choose File, Submenu. Enter the name for the new category, and then click OK. The new category (submenu) will appear at the top of the set of others, which is really not a problem because you can drag it to any position in the list. The separator (File, New) is just a visual separation line that appears in the menu entry.
Of course, if you can add something to the Launch menu, you can also delete it. This is trivial: select it, right-click, and choose Delete from the shortcut menu.
Installing Software the Old-Fashioned Way
Suppose that you want to load a Linux program that has no repositories. What then? You can install software manually via a DEB file. For example, the Opera browser, which some folks prefer to Firefox, is provided this way. To download Opera:
1. Create a directory, perhaps on your MMC-SD drive.
2. Launch Firefox from the Firefox icon on the panel.
3. Navigate to www.opera.com via Firefox. The website will detect that you’re running Linux and offer a green Free Download button that will take you to the Download page.
4. Select Debian from the list (see Figure 8.9), not Xandros (the Xandros version is missing some files).
5. Pick the Debian 4.0 (Etch) version.
6. Download the file to the directory you previously created.
As described next, you can install the software from either the Administrative File Manager or the command line. You must use the Administrative version of the File Manager, because it has sufficient privileges to install software.
FIGURE 8.9 Selecting the Debian Opera version.

7. Navigate the Administrative File Manager to the scratch directory and locate the DEB file. Right-click the file and choose Install DEB File (see Figure 8.10). That’s all there is to it.
FIGURE 8.10 Installing the DEB file.

Installing via the command line is almost as easy. Launch a command-line window and enter the following command:
> sudo dpkg -i /path/to/your_new_package.deb
The dpkg command is a lower-level package manager than Synaptic or apt-get, and is perfect for installing DEB files. The -i switch simply tells it to install the package. You must provide the path to the package and the name of the package file as an argument to the command. You must, of course, use sudo to have sufficient privileges to install the file. Press Enter, and dpkg will do the rest.
To test the installation, enter the following at the command line:
> which new_executable
new_executable is the name of the file to run the application. For example, if you used the opera file, then the command would return the following:
> which opera
/usr/bin/opera
The real test is in running it. From the command line, enter the name of the executable. If it runs, then all is well. By invoking the executable by its name alone, if something goes wrong, you can quickly kill it by pressing Ctrl+C in the terminal window. You can now either install an entry in the menu for the application, as you did earlier in the chapter, or run it followed by a space and an & to make it independent of the terminal window. For example:
> opera &
Managing Installed Packages
Now that you’ve installed the package, how do you manage it? Well, because you properly installed it, Synaptic will locate it if you click the Reload button to reload the repositories. Try it, and you’ll find your new package marked with the familiar green box showing that it’s installed.
The same is true of the command-line utilities. For example, update the package cache by using the following command:
> sudo apt-get update
Next, check on the status of your package. To check on the opera package, you would issue this command:
> apt-cache showpkg opera
The apt-cache showpkg command lists information about the opera package if it’s in the cache.
Because it is in the cache, the command returns all sorts of exciting information about the package, such as its version and so forth. Note that apt-cache didn’t require sudo, because you weren’t really changing anything with the command, just getting a report.
Summary
This was an important chapter, as it covered how to get additional applications for your Eee PC. You learned not only about packages and package repositories, but also about the various package mangers provided by Xandros. You also learned about the fairly esoteric, but essential concept of pinning.
Along the way, you also learned about Linux application and command documentation: man pages and info files. So, now you can look up what you need to know about any command or applications.