Chapter 14
Loading Windows
IN THIS CHAPTER
![]() Installing Windows XP Home Edition
Installing Windows XP Home Edition
![]() Installing Windows XP Professional
Installing Windows XP Professional
![]() Reducing the size of Windows Vista before installing it on the Eee PC
Reducing the size of Windows Vista before installing it on the Eee PC
![]() Installing Vista
Installing Vista
Switching from Xandros to Windows
Up to this point, most Eee PCs come preloaded with Xandros Linux. Asus estimates that for 2008, the numbers of Eee PCs shipped with Windows XP will grow to be about 60%. Clearly then, XP is a viable option for your Eee PC. Getting an XP equipped Eee PC comes at a price, however. These machines are traditionally a little more costly or have a smaller SSD than a similar model with Xandros Linux. So, if you have a copy of Windows XP that you can load on the Eee PC, buying the comparable Xandros-equipped model and loading XP yourself might be a better option.
Before we begin, it’s important to note that your Eee PC will need at least a 4GB SSD for this installation. Also, loading Windows will eat up most of your built-in storage space and leave you with precious little unless you follow the instructions in this chapter to free up some room. On the plus side, you can install many Windows applications on an attached MMC-SD flash card.
Currently, there are a lot of Xandros Linux utilities written specifically for the Eee PC. There are a few Eee PC specific Windows utilities, and the best of these are mentioned in this chapter.
While loading Windows to your built-in SSD will remove Xandros, if you want to run both, it is possible. You can load Windows to a large (4GB or greater) installed MMC-SD flash card and leave Xandros intact. This chapter assumes that you’ll be replacing Xandros with Windows. Also, should you wish to return your Eee PC to the Xandros Linux operating system, Chapter 12 covers this process in detail.
Installing Windows XP Home Edition
Installing Windows XP Home Edition on the Eee PC is pretty straightforward and is much like installing XP on a desktop or laptop PC. However, there are a few potentially confusing spots. First off, you need to have the following available:
![]() A copy of Windows XP Home Edition that has not already been activated
A copy of Windows XP Home Edition that has not already been activated
![]() A USB DVD drive
A USB DVD drive
By default, the Eee PC has its SSD divided into four partitions. As part of this exercise, you’ll delete all four partitions so that you have only a single partition for Windows. Here’s how to load Windows XP on your Eee PC:
1. Power down your Eee PC.
2. Plug your USB DVD drive into a USB port on your Eee PC.
3. Place the Windows XP DVD into the USB DVD drive, and then start the Eee PC.
4. As the system boots, press the F2 key to enter the setup screen.
5. Choose Advanced, Onboard Devices Configuration, and make sure that all options shown there are enabled.
6. Choose Advanced, OS Installation, and select Start.
7. Change the boot options so that the first drive is the USB DVD drive.
8. Press F10 to save your changes and continue booting your Eee PC.
9. As the system boots, press the Esc key until the Please Select Boot Device screen appears.
10. Select your DVD drive and press Enter.
11. The system will show you the four drive partitions, and you’ll need to delete each one. When there are no drive partitions left, proceed.
11. Windows XP will begin the tedious steps of preparing the drive and copying its components over to the Eee PC. Time to make lunch.
12. After you complete the Windows installation and find yourself staring at the green hillside of the default Windows wallpaper, reboot the system.
13. As your Eee PC boots, press F2.
14. When the setup screen appears, go to Advanced, OS Installation, and select Finished. Also, reset the boot order so that the SSD is first.
15. Press F10 to save your changes and reboot.
16. Now the fun begins. You must load all the Eee PC drivers from the Eee PC support DVD or CD. This is an autoloading DVD or CD, so just insert it and wait a bit.
17. Install the ACPI drivers. After this is installed, the support DVD/CD will be able to detect hardware and install the drivers.
18. When the Eee PC Software Support application launches, click the Drivers tab and then click the InstAll Drivers Installation Wizard (see Figure 14.1).
FIGURE 14.1 Selecting the InstAll Drivers Installation Wizard.

19. Choose the Install Drivers Automatically from InstAll (Recommended) radio button and click OK (see Figure 14.2).
20. For each driver that has a “Yes” in the Reboot column (see Figure 14.3), the system must reboot after the installation of that driver. The DVD/CD must remain in the drive during the reboot, and what complicates things is that the DVD/CD has a bootable copy of Linux on it. During each reboot, you will be asked if you want to boot the Linux operating system on the DVD/CD (and you don’t) or continue booting from the operating system on the Eee PC (this is the option you want). Choose to skip booting the DVD/CD; that is, type something other the “yes” and press enter. Actually, any key other than “y” will do.
FIGURE 14.2 Selecting to install all drivers automatically.

FIGURE 14.3 The driver installation screen.

21. After each driver is installed and Windows has booted, the DVD drive will open. A dialog box will appear, asking you to insert the support CD/DVD.
22. Close the DVD/CD drawer and then click OK (see Figure 14.4). The whole process will start all over again until the last driver is installed (which starts the reboot process again).
FIGURE 14.4 Close the DVD/CD drawer before you click this button!

23. After all the drivers have been loaded and you exit the support application, you’re ready to start setting up and optimizing Windows (covered in Chapter 15, “Windows Configuration”).
Loading Windows XP Professional
This process is almost identical to the XP process in the previous section, with a couple of additional things:
![]() You will get an opportunity to set an administrative password during the actual Windows setup.
You will get an opportunity to set an administrative password during the actual Windows setup.
![]() When you’re done, you’ll have a little less free disk space before you begin the optimization process covered in the next chapter. You’re starting with only around 670MB of free space on the hard drive.
When you’re done, you’ll have a little less free disk space before you begin the optimization process covered in the next chapter. You’re starting with only around 670MB of free space on the hard drive.
Loading Windows Vista Home Basic
I approached this installation with anxiety, because I wasn’t really sure how well Vista would run on the Eee PC. As is well advertised, Vista is a resource hog and can drag even a fairly powerful machine to its knees. The trick to getting Vista to run well on the Eee PC is to pare down the Vista installation using the vLite utility before you install it. What you’ll delete depends a bit on the options you wish to use in Vista. Generally, you can remove any other languages than perhaps English and your native language. Also, you can remove drivers you won’t use, such as drivers for printers other than those that you actually have. Speed-wise, a pared-down version runs surprisingly well on the Eee PC’s little mobile processor.
A little background before we begin: I loaded Vista on an Eee PC that has a 4GB drive and 2GB of memory. I wouldn’t try installing Vista on an Eee PC with less than 1GB of memory, and preferably you should upgrade to 2GB (see Chapter 17 for instructions on adding memory to your Eee PC).
Also, you’ll need an additional Windows machine with lots of drive space and a DVD reader/writer attached. You’re going to write your “pared down” version of Windows to a DVD when you’re done so that you can use that DVD to install Vista on the Eee PC. To write the DVD, you’ll need software that can burn a DVD from an ISO file. You can do it with a DVD-ROM and a flash drive, and installing from the flash drive is a little faster, but the DVD installation isn’t that slow and it’s an easier route.
note
I used the 1.1.6 version of vLite, which was the stable, production version at the time I wrote this. I ran this on an XP Home Edition machine, so your experience may vary depending on the version of the software and your operating system. If you have questions, refer to the vLite website, which has some brief, but very useful, documentation.
Follow these steps to install Vista on your Eee PC:
1. Using your desktop or laptop PC, download vLite from http://www.vlite.net/.
2. Create a directory that will hold your pared-down version of Vista. Also, you’ll need a temporary directory (vLite will pick one, or you can create one and redirect vLite there) that has a minimum of 8GB of free space. vLite will write a full copy of Vista, which it takes from your genuine Microsoft installation DVD, to the temp directory. It will then use that full copy of Vista in the temp directory to build the pared-down version.
3. Install vLite on your desktop or laptop PC and launch it.
4. On the Start page, vLite asks for the location in which you want to install Vista. Choose to install Vista on your DVD drive.
5. vLite then prompts you to choose the version of Vista you want to install (see Figure 14.5). Given the diminutive size of the Eee PC’s built-in storage, I recommend that you choose HOMEBASIC (which is the Basic Home Edition).
6. After you’ve made your selection, click OK and vLite will copy those files to the temp directory you set up on your desktop’s or laptop’s hard drive. Be patient, as this process will take a while.
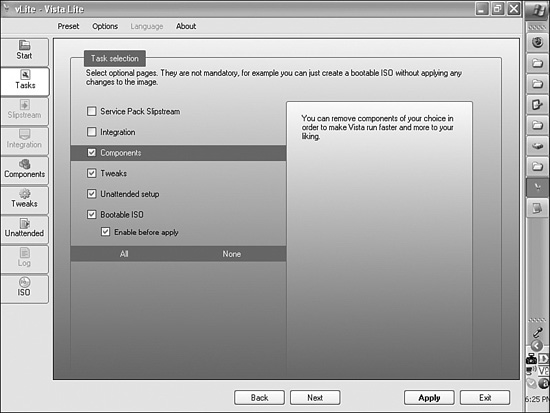
7. After vLite copies the files to the temp directory, it displays the Tasks page, shown in Figure 14.6, which enables you to choose the pages of options that you want to edit to pare down Vista. It also enables you to choose to create an ISO file. Make sure to select the following pages by checking their corresponding check boxes:
![]() Components
Components
![]() Tweaks
Tweaks
![]() Unattended Setup
Unattended Setup
![]() Bootable ISO
Bootable ISO
FIGURE 14.5 Choosing the Vista edition. Choose wisely.

FIGURE 14.6 vLite options you’ll need to check.
8. In the Compatibility pop-up window, make sure recommended is selected, then press OK.
9. Once you’ve selected those options, their icons on the left side of the screen become active, giving you access to their corresponding pages. As you fill in options and click the Next button, each of the icons will highlight in turn The Components icon, and its options, which automatically loaded when you closed the pop-up window.
10. On the Components page, choose the Vista components that you want to remove (see Figure 14.7). Remember, the more you remove, the smaller the installed OS becomes. Easy targets for removal are languages and printer drivers that you won’t use. When you’ve picked what to remove, click Next.
FIGURE 14.7 Some of the options you can choose to keep or cut.

11. The Tweaks page contains options for setting default behaviors for Vista security, system, file explorer, and Internet Explorer. These settings are personal preferences, and won’t help reduce the size of Vista. However, they are worth looking though and setting. Press Next when you’re done.
caution
Use extreme care when removing any option marked “Caution.” Don’t delete those unless you are absolutely sure you know what you’re doing.
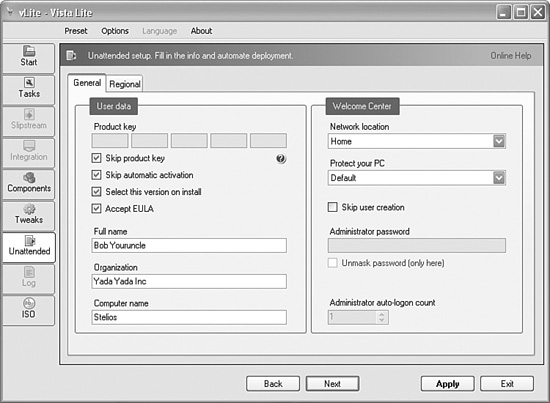
12. The Unattended page (see Figure 14.8) has options for presetting your license key, turning off automatic registration, automatically accepting the license, and selecting the temporary trial key (Skip Product Key). You can also enter any personal and organizational information here, such as your name, the machine name, workgroup, etc. If you are sure that you want to keep Vista and use your license key, don’t worry about the license setting. If you just want to try Vista for a while, select the temporary trial key. This will give you a few weeks to try it out before you must register. Click Next when you’re done.
tip
If you don’t need the accessibility features or even the IIS web server, take them out. If you want to tear out Internet Explorer (and really, who doesn’t?), it’s a good idea to have a portable apps system on a flash drive that has Portable Firefox installed. Portable apps are Windows applications (with a menu-driven launcher) that can be installed entirely on a flash drive. Using portable apps gives you the ability to plug-in one of more flash drives with whatever Windows applications you want without using up room to install them on the Eee PC’s SSD. This is covered in Chapter 15.
FIGURE 14.8 The Unattended options.
13. The Make Bootable ISO for Testing or Burning page lets you create a bootable ISO file from your pared and tweaked Vista settings. You can then use the ISO file to burn to a DVD or CD (if you get it small enough). Click Make ISO to build the file. Click Apply when this is done. The Apply process will rebuild the temp image to the smaller settings you created.
caution
Make sure during the “apply” process that you select to Rebuild One (the Vista version you selected) instead of Rebuild All.
14. At this point, you now have a DVD that you can use to install Vista on the Eee PC (see Figure 14.9). The BIOS setup is the same as for XP Home Edition listed at the beginning of this chapter, meaning that you must have the DVD drive first in the boot sequence. You may also need to delete the various Xandros partitions and create a single partition. This is, as you may imagine, a rather lengthy installation.
note
I was able to get Vista down to under 1GB on my first try, and could have done better on subsequent attempts had I been more economical with the options I chose. When installed on the Eee PC, it left a bit less than 1GB of free space on the built-in SSD.
FIGURE 14.9 Vista, Eee PC style.

Installing Wireless Drivers for Vista
After the Vista installation is complete, you’ll have a functional Vista system on the Eee PC except that you won’t have wireless connectivity—not at first, anyway. This is a bit of a problem, as the driver installation software on the Asus Support disc simply won’t run under Vista. However, you can skip the Driver Installation Wizard and manually install the driver from the disc. You should also check the Asus Eee support web site as there may be newer Atheros wireless drivers there. To install from the support DVD/CD:
1. Open the support CD/DVD Windows Explorer.
2. Navigate to the DriversWirelessInstall_CD directory.
3. Double-click setup.exe to install the Atheros client utility. You’ll need to click the ever-present I Accept the Terms of the License Agreement radio button and click Next. The utility will install.
4. To install the driver, pull up the Windows Control Panel menu (it’s on the right) and select the Device Manager.
5. Expand the network adapters and right-click one of the undefined entries.
6. Select to update the driver, and then browse to the Asus Support DVD.
7. Browse to the DriversWirelessInstall_CD directory and click OK.
8. After the driver is installed, you can select the Atheros utility from the Windows Start menu and configure your wireless connection.
9. Once connected, launch a browser and verify your connection.
caution
After your installation is complete, don’t forget to reset the boot sequence in the BIOS so that it boots first from the Eee PC’s drive and not from the DVD drive.
And there you have it: Vista running on the miniscule Eee PC (see Figure 14.10). What’s really amazing is how well it actually runs. Now, if you have a 4GB 701, you won’t be installing Office 2007. But if you have an 8 GB 701, 900 or 901, which have larger SSDs, you certainly could.
FIGURE 14.10 Vista with wireless running.

Summary
In this chapter, you learned how to install Windows XP Home Edition and XP Professional. Both make excellent choices for the Eee PC, although the smaller footprint of XP Home Edition makes it a better choice for Model 701s with 4GB of storage. You also learned how to trim what you don’t want or need from Windows Vista and install it on the Eee PC.