
Chapter 17
Upgrading the Hardware
IN THIS CHAPTER
![]() Adding internal “mods” to the Eee PC
Adding internal “mods” to the Eee PC
In this chapter, you’ll learn how to speed up your Eee PC under Xandros with a utility that not only changes the clock speed, but also allows you to monitor the CPU temperature and control the CPU cooling fan. You’ll also learn how to extend the capabilities of the Eee PC with a USB Bluetooth dongle and a USB GPS receiver. Finally, you’ll learn how to expand the number of available USB connections by attaching a USB hub directly to the motherboard and mounting that hub within the Eee PC case. As an example of how this can allow for internal hardware expansion, you’ll learn how to attach a USB device (in this case, a Bluetooth dongle) to the internal hub board.
Upgrading Memory
The memory hatch on the bottom of the Eee PC leads to the single memory socket. The Eee-PC uses DDR2 PC2-5300, 200-pin SODIMM memory. You can upgrade to 1GB or 2GB. Unless you're running Xandros, I suggest getting 2GB. Xandros can only use 1GB, so there's no sense wasting money on more than it can address.
Before you install memory, make sure that the Eee PC is off and the battery has been removed.
Overclocking the Eee PC 701 in Xandros
I continue to wait for a BIOS update that will allow you to adjust the speed of the 701 Eee PC’s CPU. While in theory I agree with the idea that underclocking the CPU will extend battery life, there are times when I just want to crank the processor up to its full rating of 900 MHz. Fortunately, there finally is a utility for Xandros that gives you control over the processor clock rate and fan speed and lets you monitor the processor temperature: eeecontrol. Once again, this utility is the work of an EeeUser.com forum member, eee_and_me. You can find the thread about this utility and the download link at http://forum.eeeuser.com/viewtopic.php?id=19493&p=1.
After you download the program, simply right-click it in the File Manager (Launch, File Manager) and unpack it to any directory. You can install the .deb file either by double-clicking it or by entering the following from the command line:
> sudo dpkg -i /path/to/eeecontrol.0.2.1.deb
After installing eeecontrol, you can run it via Launch, Applications, Utilities, Eeecontrol 0.2. After you launch it, an eeecontrol icon (a black fan) appears on your panel. Click this icon and the eeecontrol panel pops up (see Figure 17.1). To control the processor speed with eeecontrol, click the Manual Control button. You are actually setting the Front Side Bus (FSB) value and not the actual megahertz. The default FSB value of 70 provides a CPU speed of 630MHz, which is the default. You can adjust the FSB value higher to increase the clocking speed of the processor. Be careful! Don’t crank it up too much at first or you’ll crash your Eee PC. If you want to clock it at 900MHz (or even 800MHz), make sure that you check the Activate Vmod check box.
I have my suspicions about the accuracy of the CPU temperature value. No matter what it has risen to, I can reset it to its starting value of around 54 degrees Celsius by just rebooting the computer. Admittedly, the CPU will begin to cool off as soon as the clock rate drops, but 10 degrees in a few seconds is a pretty hefty drop.
However, I am confident that the CPU speed increases when I increase the FSB value. I loaded a simple benchmarking program, xengine, that tests the efficiency of the X Window System. Although this is not a true CPU test, it should indicate higher efficiency if the CPU speed increases. It did, and its values increased with each CPU speed increase.
FIGURE 17.1 Eeecontrol’s manual controls.

If you like eeecontrol, the Auto Control menu (see Figure 17.2) provides check boxes to automatically start it at PC startup and to run whatever autocontrol settings you make.
FIGURE 17.2 Eeecontrol’s Auto Control menu.

Enabling Bluetooth
Enabling Bluetooth on the Eee PC is a trivial matter. Because the Bluetooth stack is built in to Xandros, all you need is a USB Bluetooth dongle. If you are going to use a mouse or keyboard, you need to enable support for that in the /etc/default/bluetooth file. Use your favorite editor (remember to preface the command with sudo) and open the file. For example:
>sudo nano /etc/default/bluetooth
Look for the line that says:
HIDD_ENABLED=0
and change it to:
HIDD_ENABLED=1
Save the file and then exit.
Issue this command to restart the stack:
> sudo /etc/init.d/bluetooth restart
Next, plug in your Bluetooth USB dongle and enter:
> sudo hciconfig
You should see something similar to the following output if the device has been detected:
hci0: Type: USB
BD Address: 00:00:00:00:00:00 ACL MTU: 0:0 SCO MTU: 0:0
DOWN
RX bytes:0 acl:0 sco:0 events:0 errors:0
TX bytes:0 acl:0 sco:0 commands:0 errors:0
Note that the status was reported as being down. To bring it UP, enter:
> sudo hciconfig hci0: up
If your dongle has the almost-ubiquitous flashing blue light, that should commence flashing. Now that you have the dongle interface up, you need to find your device. Turn it on and then enter the following:
> sudo hidd –search
You should see something like the following output, indicating the devices in range and their addresses:
Searching …
Connecting to device 00:12:A1:63:07:DB
You should now be connected. If not, issue:
> sudo hidd —connect <addr>
where <addr> is the device address shown in the search.
If you want to shut down your USB dongle, enter:
> sudo hciconfig hci0: down
Using GPS in Xandros Linux
Unfortunately, at this point in development, the GPS navigation programs that are available for Xandros Linux are really not much beyond the toy and hobbyist category. Getting maps is tedious and the programs are not suitable for real-time car navigation. They are useful to a point in that they will track your position on maps.
To get most GPS applications working in Xandros, aside from a GPS receiver, you’ll need to get GPSD and the GPSD client, as well as one of several available GPS applications—this section takes a look at both GpsDrive and Roadnav. While some GPS applications can actually connect to the GPS directly, having GPSD is a good approach because practically anything can work through GPSD.
First, you need to determine whether your GPS device is supported by GPSD. The best list is at the GPSd website, on its Compatible Hardware page: http://gpsd.berlios.de/hardware.html. I have two GPS receivers, the GlobalSat BU-353 and the Microsoft-labeled Pharos. Both work equally well, although the Pharos is smaller and can be attached directly to the side of the Eee PC, because it can be detached from the USB cable.
Getting gpsd and GpsDrive
To install gpsd and GpsDrive using the Synaptic Package Manager, follow these steps:
1. From Full Desktop, choose Launch, Applications, System, Synaptic Package Manager.
2. Click the Reload button, and then click in the packages list and type gpsd.
3. Mark both gpsd and gpsd-clients for installation.
4. Use the same method to find GpsDrive, and mark that for installation.
5. Find the festival and flite speech packages and mark those for installation.
6. Click Apply and wait a bit as Synaptic downloads and installs these packages.
Running gpsd
Next, you have to get gpsd running. Open a shell or terminal window (choose Launch, Run and enter Konsole). If you’re using a USB-connected GPS receiver, enter the following command:
> gpsd /dev/ttyUSB0
If you have a Bluetooth unit (see “Enabling Bluetooth” earlier in this chapter), refer to http://gpsd.berlios.de/bt.html for instructions.
To see if the whole thing works, enter the following command:
> xgps &
xgps should launch and start reporting the present position of the satellites that your GPS device is using to pinpoint your position. If it’s not working, check the GPSd website for troubleshooting information. If you stick with a GPS that’s known to work (from the list on the GPSd site), this should be pretty fool-proof.
GpsDrive
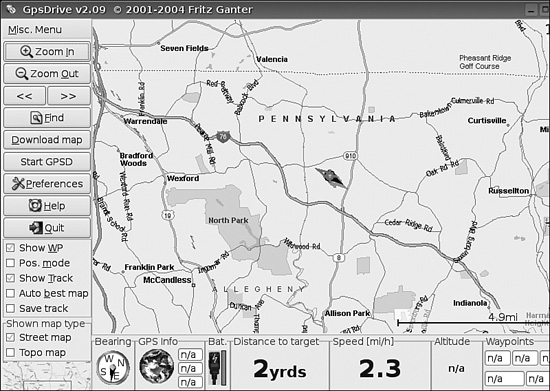
Given it’s inability to provide driving instructions, GpsDrive is a passive sort of GPS navigation program. It would be fine for a passenger in the car to check from time to time, but that’s about it. It is interesting in that it does work with maps rather well and will track your position.
GpsDrive is the product of Jörg Ostertag and Fritz Ganter of Germany. It can plot out your position on a street or on a topographic (topo) map, although getting the topo maps has become something of a challenge. GpsDrive comes with a low-resolution world map, but that’s it. However, downloading street maps is a cinch. At one point in its history, you could download topo maps as well from TopoZone and the option is still there. However, this option no longer works as TopoZone is now part of Trails.com and downloading the maps now requires a subscription fee.
The opening GpsDrive window shows your location on a world map, which at least tells you that your GPS device is running.
To download maps, simply click the Download Map button in the menu on the left side of the main GpsDrive window. You can select which Expedia you want to use (GpsDrive will download maps from either Expedia or Expedia Germany). Figure 17.3 shows the various maps scales you can select to download. These maps scales correspond to “zoom” levels. If you want to zoom in or out, you’ll need to download a map to that scale. If you want to find other map sources, do a Google search for “maps” and “GpsDrive” and you’ll find discussions on various forums that will help you find the currently best locations from which to download maps.
FIGURE 17.3 Downloading maps in GpsDrive.

Figure 17.4 shows GpsDrive in action, It accurately pinpoints your current location on a map and tracks your position, speed, and direction.
FIGURE 17.4 A typical map display on GpsDrive.
Roadnav
Roadnav is a much more full-featured program than GpsDrive, but it’s very buggy on the Eee PC under Xandros. For example, it will go into an endless “recalculating path” loop if you ask it for driving instructions. Also, it has a tendency to crash while downloading map data. Unfortunately, it’s also currently only really useful in the United States. However, it does function at a basic level and will, like GpsDrive, track your position against a map.
To get Roadnav, browse to http://roadnav.sourceforge.net/ and download the i586 Debian version. You can install it, once downloaded, by entering:
> dpkg -i /path/to/roadnav_0.19-1_i386.deb
Once installed, you can run it from the command line with:
> roadnav
FIGURE 17.5 A typical display in Roadnav.
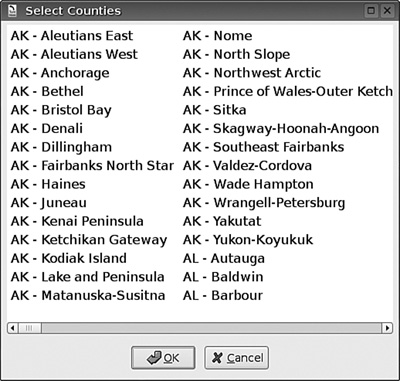
Roadnav has the potential to be a dandy navigation application on the Eee PC, but it isn’t really “there” yet. You’ll need to get maps first, and I suggest you pull down the TIGER (Topologically Integrated Geographic Encoding and Referencing) maps. These are vector-drawn street maps and are really quite nice. These can be accessed via Tools, Download TIGER/Line Maps(US). You’ll get a county-by-county list, organized by state (see Figure 17.6), and you can click the county map you want. To select multiple maps, you can select a range with Shift+click or pick multiple maps with Ctrl+click. Note that using the scrollbars is very slow.
FIGURE 17.6 Roadnav’s map-loading interface.
When I downloaded maps, Roadnav crashed after downloading a few and I had to restart. This was okay, because Roadnav highlighted the maps that I’d downloaded in the county list, but the process was tedious.
The View menu has some nice options, but also has some option that you should avoid. The GPS window gives you a display of your speed, position, heading, position, and current set of satellites. You can select to use the aerial photos, but beware: they will take a long time to download and will prevent you from doing anything else until they are all downloaded. They also eat up several megabytes of storage for each map.
Don’t select the What’s Nearby option. While the list is nice, Roadnav goes into an endless loop reloading the window. The 3D view option is, however, interesting and doesn’t cause any harm.
Voice commands for driving directions can be provided via the flite speech synthesizer. If you want to use this, enter the following on the command line:
> flite &
From within Roadnav, select Tools, Preferences, Test TTS. Select Flite for the TTS type and then click Test Phrase to check the speech output (make sure your speakers are on).
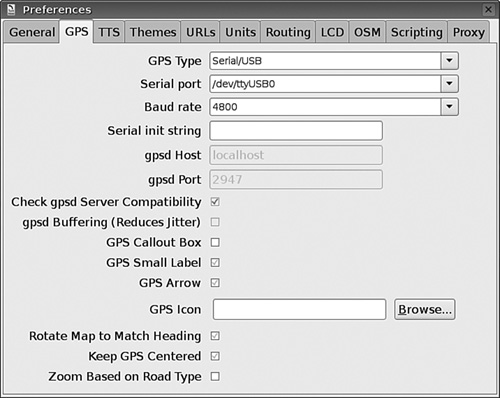
Roadnav works quite well with GPSD, but if you wish you can set it to talk directly with the GPS. This is also set through the Preferences dialog box. If your GPS is USB, select Serial/USB in the GPS Type drop-down list, /dev/ttyUSB0 in the Serial Port drop-down list, and 4800 in the Baud Rate drop-down list (see Figure 17.7).
FIGURE 17.7 GPS parameters in Roadnav.

The Zoom buttons are reminiscent of web map viewers, and you can zoom in or out to any level with the TIGER maps. The detail is pretty good, including streams, rivers, county lines, states lines, and so forth.
You can try the Get Directions button if you dare. When I tried, it consistently went into an endless route recalculation loop, which, coupled with the flite voice, was a bit annoying.
While this software has some great features, it isn’t very stable on the Eee PC under Xandros. There is an Ubuntu version, and it does run better under Ubuntu than under Xandros.
Using GPS in Windows: Microsoft Streets & Trips
Microsoft Streets & Trips is, for me at least, the defining application for the Eee PC. Combined with the Eee PC’s tiny size and quality speakers, Microsoft Streets & Trips is a road warrior’s dream come true. If you live in North America, Streets & Trips provides everything you need. If you’re in the United Kingdom, Germany, Italy, or Spain, you can use the European version: AutoRoute. Either way, this will turn your Eee PC into a full-fledged navigation system.
Installing Streets & Trips
Installation is trivial, but the amount of space consumed is not. Because this is commercial software, you’ll need access to a USB DVD reader. The North American version takes up just a bit over 900MB installed, which, on a 4GB SSD, is a bit daunting. Fortunately, you can install it on the MMC-SD drive (E:), which makes this a lot more tolerable. What occupies the space is what makes it so powerful—the built-in map set. On the Linux side of things, maps are a one-at-a-time download and often originate from the U.S. Census Bureau. Although Census Bureau maps show streets, they don’t show such essentials as one-way streets.
You should reboot the Eee PC after installation and before you plug in your GPS unit. Steets & Trips also installs the GPS drivers.
The version of Streets & Trips that I have came with its own Microsoft-labeled Pharos GPS receiver. Configuration was simply a matter of plug and play, and the system was up and running in seconds. I’ve used a lot of hand-held GPS devices, but the accuracy of the Pharos receiver was better than any of those. It was nearly in the pinpoint category.
Using Streets & Trips on the Eee PC
Frankly, my wife and I are map geeks, so navigating around the country has rarely been a problem. However, there have been times when we could have really used this combination. Like the time we were driving through rural Pennsylvania at dusk in a snow squall, and a snow-induced, multicar accident closed the road in front of us. The local police directed us to what was supposed to be an easy detour, but turned out instead to be a nerve-wracking 40-minute drive on dicey and unmarked farm roads. The Eee PC and Streets & Trips would have had us safely back on course almost at once.
To test the combination of the Eee PC and Streets & Trips, we took a family trip to a distant ice cream shop. I watched the display as my daughter drove, and it was really kind of eerie. The speed read-out on the Eee PC seemed glued to the needle on the speedometer. I know some of the elevations around our part of the world, and the altimeter seemed to be as accurate as the speed readout.
FIGURE 17.8 Typical navigational display in Streets & Trips.

The maps are really lovely and show quite a bit of detail. I tracked our progress down country roads, city streets, and a high-speed divided highway and the maps were dead on with their detail. The only unfortunate part of the trip was that we arrived at the site of what turned out to be a former ice cream shop, and we had to turn around and stop at one we had passed along the way.
Using Rerouting
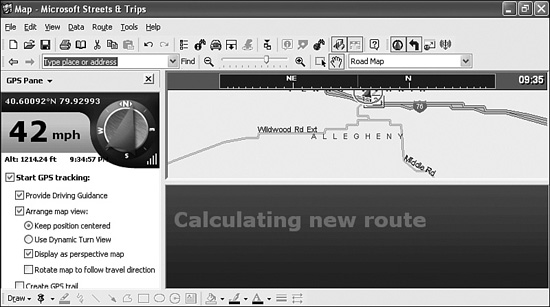
I took that opportunity to map out a new course, deliberately taking back roads, and this time paying close attention to the voice instructions. Mapping the route was simply a matter of defining waypoints, which was easily done by clicking those points on the maps and then adding them into the route list.
We were off and running again, and the unit performed flawlessly. At this point, we began deliberately making wrong turns. The Eee PC speakers would announce that we were “Off route!” and then Streets & Trips would begin recalculating the route after about 0.2 miles in the wrong direction (see Figure 17.9).
FIGURE 17.9 Recalculating route.
Over the next few days, I played with Streets & Trips extensively as I drove the 30.5 miles to or from work. On one instance, I deliberately took a much different route and ignored several attempts at rerouting. The software took only seconds to recalculate each route, even with the Eee PC’s processor running in its usual underclocked mode.The native-mode display on the Eee PC 701 is just a little too cramped for all the information that’s contained on the Streets & Trips screen. This reduces the map to a ribbon about an inch wide.
However, the AsTray Plus utility and the updated Intel driver, discussed in Chapter 15, give you the ability to nudge the screen resolution up just a bit and make the screen display close to perfect.
I live in a heavily forested part of the world, and I’m used to GPS devices losing contact with satellites. What surprised me with the Pharos was how rarely this happened. In several days of testing, I lost satellite contact only twice and regained it within seconds.
Frankly, if you are someone who’s on the road a lot or you’re planning a long trip, this one application alone makes a compelling argument for choosing a Windows-equipped Eee PC over the Linux version. If you’re a travel writer or a photographer, imagine the combination of the Eee PC with either Streets & Trips or AutoRoute (the European version of Streets & Trips), Adobe Photoshop (or GIMP), and a lightweight word processor such as Microsoft Works or AbiWord. Given the wireless and video-conferencing capabilities of any of the Windows-capable Eee PC models, you’d have everything you need in a package that will fit in a large jacket pocket or a purse.
For serious car navigation, you’ll need one of the car charger units currently on the market. The Eee PC’s battery life will shorten your trip range to only a few hours without the charger. At last count, I had found two Eee PC chargers:
![]() Brando car charger for the Eee PC
Brando car charger for the Eee PC
![]() eXpansys AC Adaptor + Car Charger for ASUS Eee PC
eXpansys AC Adaptor + Car Charger for ASUS Eee PC
Both eXpansys and Amazon sell the eXpansys, and a number of outlets carry the Brando unit.
The only thing that Streets & Trips lacks is topographic capabilities. Although Streets & Trips (as its name suggests) wasn’t intended for this purpose, the Eee PC is small and lightweight enough that you could use it for geocaching if Streets & Trips could load topo maps. Having a topo capability would make this software and hardware combination the perfect choice for back country or field use, as well as road navigation.
Making Hardware Modifications: Internal USB Hub and Bluetooth
Everything so far in this chapter concerns things that you can do to control existing hardware or things that you can plug into the USB ports. This section is for anyone who wants to take their Eee PC to the next level of customization by tearing it apart and soldering new hardware directly to the motherboard. Risky? Oh yeah. This will definitely void your Asus warranty and, if you make a mistake, could turn your Eee PC into a paperweight. So, you are warned: neither I nor the publisher will take responsibility for anything that happens to your Eee PC if you follow these instructions. You’re utterly on your own and bear the consequences of your actions.
If you’re still game, here’s something else to consider: All the places that you can solder to on the Eee PC to pick up USB Data+ and Data– connections are on surface-mounted device (SMD) pads or on the legs of SMD components themselves. These are really small soldering targets, and you need a precision, low-wattage soldering iron, good eyes (or a magnifier), plenty of light, and a little nerve. It’s amazingly easy to bridge these small connections with a little solder, and the outcome could be very bad.
If you have never attempted soldering before, learn how to do it and practice on some old, worthless circuit boards before proceeding. The following assumes that you’re comfortable with soldering and working with electronics in general. This is not a procedure for the absolute beginner.
The basic upgrade for the Eee PC is to add an internal USB hub, from which you can connect additional USB devices. For example, you can connect a Bluetooth dongle (which is the example covered in this chapter), one or more flash drives, an MMC/SD card reader, or anything else that runs on USB. The only catch is that it has to fit inside that itty-bitty case. If you think it must be cramped from looking at it on the outside, wait until you see it on the inside. There are, however, a few places where there’s sufficient room for a small circuit card or something else. I found room for a hub card and the circuit card from the Bluetooth dongle. If you choose a smaller hub card, you can probably cram a few more things in there. Also, there’s a little less free space inside a 900 series Eee PC than the 701.
Equipment List
The following is a list of the equipment you need to perform this modification:
![]() A low-power, fine-tipped soldering pencil. A temperature-controlled iron would be great, but if you don’t have one, you can get by with a low-power unit. I bought one at my local Radio Shack for around $10.
A low-power, fine-tipped soldering pencil. A temperature-controlled iron would be great, but if you don’t have one, you can get by with a low-power unit. I bought one at my local Radio Shack for around $10.
![]() Silver solder, lead free with flux core, .032”.
Silver solder, lead free with flux core, .032”.
![]() 30 AWG wire. I simply cut up an old USB cable and pulled out the requisite red, green, white, and black wires.
30 AWG wire. I simply cut up an old USB cable and pulled out the requisite red, green, white, and black wires.
![]() A solder pump or suction bulb (the pump works better). You’ll need to do some desoldering in the course of this process, and you’ll need to pull the excess solder away. Also, if you bridge something, you’ll need to heat up that solder and suck it away from the board.
A solder pump or suction bulb (the pump works better). You’ll need to do some desoldering in the course of this process, and you’ll need to pull the excess solder away. Also, if you bridge something, you’ll need to heat up that solder and suck it away from the board.
![]() A magnifier, with a light and “third hand.” Although this is not absolutely necessary, I certainly regretted my decision to carry on without it. You should at least have some sort of magnifier to examine the solder connections.
A magnifier, with a light and “third hand.” Although this is not absolutely necessary, I certainly regretted my decision to carry on without it. You should at least have some sort of magnifier to examine the solder connections.
![]() Unpowered USB hub, the smaller the better. Check your local big-box or discount store. You’re looking for small and cheap. Mine was cheap, but could have been smaller. I had a capacitor that towered over the board like a skyscraper, and greatly limited the mounting possibilities in the Eee PC.
Unpowered USB hub, the smaller the better. Check your local big-box or discount store. You’re looking for small and cheap. Mine was cheap, but could have been smaller. I had a capacitor that towered over the board like a skyscraper, and greatly limited the mounting possibilities in the Eee PC.
![]() Bluetooth dongle. I used a Cirago Bluetooth dongle, which was already as small as my thumbnail. Once freed from its case, it was no larger than a USB socket case.
Bluetooth dongle. I used a Cirago Bluetooth dongle, which was already as small as my thumbnail. Once freed from its case, it was no larger than a USB socket case.
![]() Wire cutters and fine gauge wire stripper.
Wire cutters and fine gauge wire stripper.
![]() Small Phillips and blade head screwdrivers.
Small Phillips and blade head screwdrivers.
![]() Needle-nosed pliers (preferably magnetic).
Needle-nosed pliers (preferably magnetic).
Building the Mod
This mod requires that you complete the following:
1. Disassemble the USB hub and Bluetooth dongle cases and remove the circuit cards.
2. Solder connections from the Bluetooth dongle to the USB hub.
3. Test the hub and Bluetooth dongle.
4. Disassemble the Eee PC.
5. Solder connections from the hub to the Eee PC motherboard.
6. Mount the hub and Bluetooth dongle circuit cards in the Eee PC.
7. Reassemble the Eee PC.
8. Test the Bluetooth dongle.
Being the cautious sort, I built and tested my USB hub and Bluetooth arrangement before installing it in the Eee PC. That way, if something didn’t work after the installation, at least I’d know that it wasn’t in the Bluetooth or USB wiring itself and must be related to the connections on the motherboard. I picked a USB hub that was a bit too large, but it did have the advantage of having a case held together with screws. It had USB sockets that were stacked, which had both anchoring pins and connectors soldered to the board. This is where the solder pump comes in handy. To create the hub and dongle board assembly:
1. Carefully heat up the solder connections and then pull the solder away with the pump. A little solder will remain, and you may need to carefully pry the USB sockets free of the board.
2. Leave the USB cable attached to the board for now. You’ll be able to plug the hub and Bluetooth dongle (or whatever peripheral you choose to install) into the Eee PC or another computer and test the whole arrangement. Also, you can use the wires in the cable to connect to the motherboard; simply snip off the end at an appropriate distance and then cut the insulating sheath and shielding off.
3. The Bluetooth dongle will probably pull apart easily with a pair of needle-nosed pliers. I just gently pried off the metal housing over the USB connection, and the circuit card pulled free of the plastic case.
USB connections use four standard wire colors:
Green: Data+
While: Data–
Black: Ground
Red: +5V
Their positions in a standard socket connector are shown in Figure 17.10, and you can use that to deduce which trace is which if you must solder directly to a connector. I was forced to do that to connect to the Bluetooth dongle board. A good practice is to double check your pin-configuration using a multi-meter.
FIGURE 17.10 USB pinout.

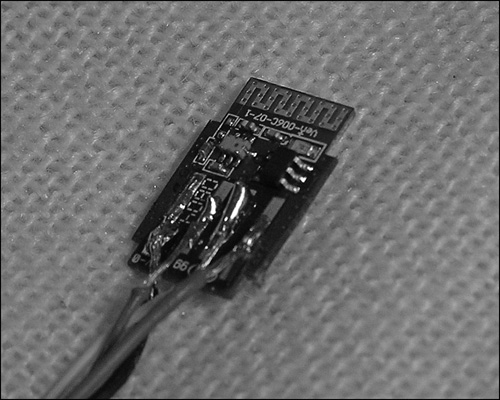
4. Make sure that you twist and tin your wires before connecting. If you are connecting to traces on a USB connector, gently clean them with steel wool and then alcohol before soldering. Figure 17.11 shows connections solded to a Bluetooth dongle.
FIGURE 17.11 Bluetooth dongle board connections.
Disassembling the Eee PC
The Eee PC is actually not that hard to disassemble, but you must have a gentle touch and be very patient. There are many small connectors, latches, and so forth, and you must take your time to release them all. When removing the top pieces of the case, you need to be especially careful to slowly and gently flex the case plastic over the microphone and headphone jacks. When removing the motherboard, all of those USB, network, and VGA connectors must be taken into consideration when you flex the lower part of the case:
1. Unplug the Eee PC and remove the battery. Just spread the two latches on the bottom of the Eee PC and pull the battery toward the back until it’s free.
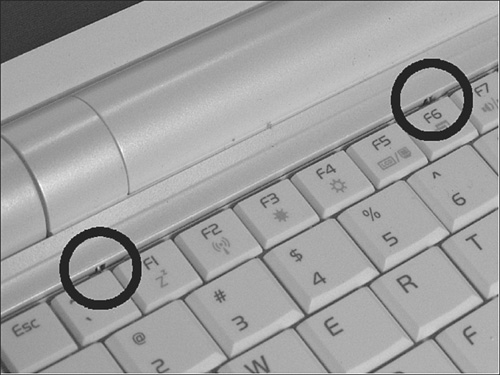
2. Flip the Eee PC over and locate the three tiny metal latches at the top of the keyboard, two of which are shown in Figure 17.12.
3. Gently push the latches back toward the back of the case. They don’t go very far, so push them just enough to release the keyboard.
4. Gently lift the keyboard up when the latches are disengaged. Don’t pry at the keyboard. Use your fingers with a light touch. Also, don’t lift the keyboard very far, because there is a ribbon cable that must be released.
FIGURE 17.12 Two of the three keyboard latches.
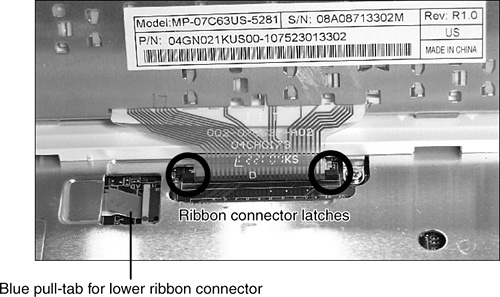
5. Locate the ribbon cable and, with the small blade screwdriver, gently lever the sides of the connector latches toward the keyboard recess space (see Figure 17.13). When both are unlatched, the keyboard ribbon cable will be free and you can set the keyboard aside.
FIGURE 17.13 Ribbon cable connector latches.
6. Remove all eight of the small Phillips-head screws (see Figure 17.14) and set them aside. Some of them won’t easily come out of their recesses, so use the needle-nosed pliers to help with this. Also, one of the screws is covered with tape that says you’ll void your warranty if you break this tape. Once again, you’ve been warned!
FIGURE 17.14 Remove all eight Phillips-head screws.

7. After you’ve removed the screws, note the blue pull tab on the ribbon connector (see Figure 17.13) that’s visible in the opening. Gently pull the release tab away from the connector until it’s free.
8. Flip the Eee PC on its back and remove the six screws on the bottom of the case (see Figure 17.15). Set these aside for later reassembly. All of the screws are the same size so you can just keep them together.
FIGURE 17.15 Remove all six Phillips-head screws on the bottom.

9. Flip the Eee PC back over and rock the display back as far as it will go. Carefully run a fingernail along the case seam starting at the back, and slowly pull the top of the case up. It will hang up on some plastic latches under the mouse button bar and around the headphone and microphone jacks. Gently pry the case over the headphone and microphone jacks. Keep going until the top pops free, and set it aside.
10. Gently free the two connectors on the top right of the motherboard. Once these connectors are loose, pull the motherboard up from the lower case while loosening the two metal latches holding the board in place. The latches are on the front (mouse button bar) side of the case. You’ll need to gently flex the case to get around the various connectors. When the motherboard lifts a bit out of the case, flip the unit over so that the motherboard is lying on the display. Now you’ve reached your destination, and the soldering can begin.
Attaching the Hub and Dongle Assembly to the Motherboard
I picked pins 36 and 38 for the Data– and Data+ connections on the motherboard for the second PCI Express connector. The second connector is absent on my machine, which makes that a somewhat easier choice. There are lots of spots on both sides of the board to tie into for USB Data+ and Data–. A good guide to their locations is http://beta.ivancover.com/wiki/index.php/Eee_PC_Research.
That’s the site I used to pick soldering points. However, there are lots of discussions of Eee PC mods on the various Eee PC forums.
If you wish to remove the mini-PCI Express card and memory, you can also do that. Just remember to reinstall them before reassembly. Seeing the Atheros wireless card lying on the table after putting the Eee PC back together is a bit of a disappointment.
If you look carefully on the Eee PC motherboard, you’ll see labels for pins 20 and 50 on the PCI Express connections that will give you your bearings. Count from pin 50 back to pins 38 and 36 (see Figure 17.16). There isn’t much room to spare here, so carefully tack the green wire (Data+) to pin 38 and the white wire (Data–) to pin 36.
Figures 17.17 and 17.18 indicate the positions for picking up the +5V and ground connections, respectively. These connections are a lot easier. I covered each of my connections with a little insulating tape, partly as a precaution against their moving and partly as strain relief.
FIGURE 17.16 USB Data+ (38) and Data– (36) soldering points.

FIGURE 17.17 +5 VDC connection.
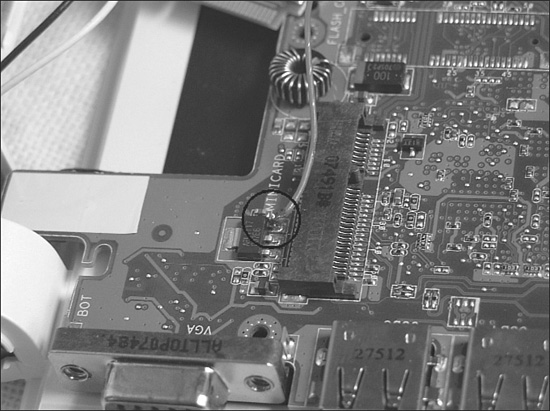
FIGURE 17.18 Ground connection.

Mounting the Hub and Bluetooth Dongle
The next challenge is where to mount things. I picked the open area under the memory hatch on the bottom side of the case, which is a great choice for the Eee PC 701. However, if you have a 900 series Eee PC, you’ll need to find another location. I mounted the USB hub board onto the hatch door with double-sided tape and covered the side facing the motherboard with insulating tape.
I mounted the board from the Bluetooth dongle directly to the top of a USB connector with double-sided tape (see Figure 17.19). That turns out to be a good location, because I can also see the flashing blue light around the gap in the case for the USB connection. Also, it places it near the side of the case, which should reduce interference.
FIGURE 17.19 Bluetooth dongle perched on the USB connector.

Reassembling the Eee PC
To reassemble the Eee PC:
1. Double check that your wiring is done and that your mounting is secure.
2. Reinsert the motherboard back into the base of the case and reconnect all of the connectors on the motherboard. Be especially careful to reconnect the fan connector as it’s easily missed.
3. Carefully flex the case to clear the connectors, and make certain that none of your wiring is caught between the case and the motherboard.
4. Place the top half of the case back over the bottom half and carefully snap it into place.
5. Grab the blue pull tab for the ribbon cable connector through the opening, and gently push it back into the socket.
6. Install all of the screws, front and back, to secure the case.
7. Reconnect the ribbon cable for the keyboard, and when it’s pushed back in its socket, carefully push the connectors back (use the small blade screwdriver) to lock it in place.
8. Gently lay the keyboard back into its recess to latch it in place.
9. Slide the battery back into position.
10. Turn on the Eee PC. If you did everything correctly, the USB peripheral you installed should be active. If you did install a Bluetooth dongle, refer to the “Enabling Bluetooth” section to activate it under Xandros. If you’re running Windows, install your Bluetooth drivers.
Summary
This chapter covered ways to expand your Eee PC. Even though there are no expansion slots in the Eee PC, there’s a wide range of peripherals you can add via USB connections. It also covered how to add to the expansion possibilities for the Eee PC by soldering a USB hub to the motherboard and, as an example, attaching a Bluetooth dongle to the hub.
You also learned how to overclock your Eee PC under the default Xandros operating system. Hopefully, at some point, Asus will make a BIOS update available that will let you set the processor speed from the bios, and you won’t need a third-party utility.