Chapter 15
Windows Configuration
Basic Windows XP Setup
IN THIS CHAPTER
![]() Tips for freeing up disk space on the Eee PC
Tips for freeing up disk space on the Eee PC
![]() Adding free anti-virus applications
Adding free anti-virus applications
![]() Installing productivity applications while keeping the space they consume to a minimum
Installing productivity applications while keeping the space they consume to a minimum
![]() Ways to maximize the resolution of the internal display
Ways to maximize the resolution of the internal display
![]() Using PortableApps.com to install applications on a flash drive instead of your onboard storage
Using PortableApps.com to install applications on a flash drive instead of your onboard storage
![]() How to encrypt data or an entire drive
How to encrypt data or an entire drive
![]() How to surf anonymously
How to surf anonymously
![]() How to easily remove temporary files to maximize your free storage space
How to easily remove temporary files to maximize your free storage space
After you have installed Windows XP on your Eee PC (see Chapter 14), you need to optimize the video for the Eee PC and wireless connectivity.
Eee–PC Specific Notes for Setting Up Graphics Properties
The following are some things to keep in mind when configuring the graphics options on the Eee PC. The tip about making a larger virtual desktop is specific to the Eee PC’s internal display. The tip concerning the screen settings automatically reverting is simply a handy thing to know, whether you’re setting up the internal display or an external monitor.
Setting up the graphics properties requires you to use the Intel Graphics Media Accelerator Driver for Mobile applications, which may be found in the system tray (or what Microsoft now calls the notification area). Right-click the icon and select Graphics Properties. (You can get to the same menu by right-clicking on an open part of the desktop.) Let’s go over a few things about the default Intel control itself:
![]() You can set the built-in Eee PC display to a greater resolution than the the display supports. This seems like a silly idea, but doing so sets a virtual desktop larger than your actual display space. Having a larger virtual desktop means that you can “push” the mouse pointer at the top or bottom of the screen, which scrolls the display up or down in this larger space. This is a great ploy for working with the limited space on the internal monitor. You can set this under the Display Settings option. For example, on the 701, you can set this to 800×600 instead of 800×480.
You can set the built-in Eee PC display to a greater resolution than the the display supports. This seems like a silly idea, but doing so sets a virtual desktop larger than your actual display space. Having a larger virtual desktop means that you can “push” the mouse pointer at the top or bottom of the screen, which scrolls the display up or down in this larger space. This is a great ploy for working with the limited space on the internal monitor. You can set this under the Display Settings option. For example, on the 701, you can set this to 800×600 instead of 800×480.
![]() Whenever you make changes, the Apply button gives you a chance to try out the changes. If something goes wrong and you don’t accept the changes in 15 seconds, the display reverts to its old settings. While automatically reverting to previous settings is handy when playing with settings for the internal display, it becomes invaluable if you hook up an external monitor.
Whenever you make changes, the Apply button gives you a chance to try out the changes. If something goes wrong and you don’t accept the changes in 15 seconds, the display reverts to its old settings. While automatically reverting to previous settings is handy when playing with settings for the internal display, it becomes invaluable if you hook up an external monitor.
![]() If you plug an external monitor into the Eee PC, you’ll see additional devices appear if you click Display Devices. Essentially, you can opt to have two monitors with separate displays (Extended Desktop), have two monitors that show the same thing (Display Clone), or shift the display entirely to the external monitor (Single Display).
If you plug an external monitor into the Eee PC, you’ll see additional devices appear if you click Display Devices. Essentially, you can opt to have two monitors with separate displays (Extended Desktop), have two monitors that show the same thing (Display Clone), or shift the display entirely to the external monitor (Single Display).
Keep the above in mind when configuring both the internal display or an external monitor. You have a few more display configuration options in Windows than in most version of Linux (except Mandriva). If you want to set up a virtual desktop even larger than the 800 × 600 option allowed by default in the Intel driver, this is covered in detail in the next section.
Expanding the Display Scrolling Space
If you work with the internal display on the 701 (or even the 900 series), you’ll soon discover that many Windows applications take up more space than can be shown. If you create a virtual desktop larger than the real desktop, you can move into the “virtual space” by placing the mouse pointer at the top or bottom of the screen (it will scroll). This is a great advantage for dealing with those oversized dialog boxes that are larger than the screen.
However, suppose you need a scrolling space much bigger than 800×600. No problem. Follow these steps:
1. Choose Start, Control Panel, Display.
2. In the Display Properties dialog box, click the Settings tab.
3. Make sure that Digital Flat Panel is selected for the display type, and then click the Advanced button.
4. Click the Monitor tab.
5. Clear the check mark from the Hide Modes That This Monitor Cannot Display check box (see Figure 15.1).
FIGURE 15.1 Clear the Hide Modes That This Monitor Cannot Display check box.

6. Click Apply and then click OK to return to the Display Properties dialog box.
7. Using the Screen Resolution slider, set the virtual resolution to whatever you like.
note
Later in this chapter, “Increasing the Screen Resolution” discusses downloading an updated Intel driver and increasing the resolution without scrolling. You can’t do that with the default driver, but you can with the combination of a utility and the updated driver.
8. Click Apply and then click OK.
The screen now scrolls when the mouse touches any edge.
Setting Up Wireless Connectivity
To set up wireless connectivity, you should use the Atheros Client Utility, not the native Windows Wireless wizard. The Atheros Client Utility is located in the system tray/notification area. Right-click the icon and choose Open Atheros Client Utility. The Atheros system allows you to set up “profiles” for each wireless network to which you connect. To set up wireless connectivity, follow these steps:
1. From the Atheros Client Utility, choose the Profile Management tab.
2. On the General subtab, set the name for the profile, which is any arbitrary name you’d like to choose, though if you connect to multiple wireless networks, you will want to name it something that won’t be confusing later.
3. On the Security subtab, enter the security information (WPA, 8021.x, or WEP) required to log on to a secure network (or no information if it’s a wide-open wireless hot spot). See Figure 15.2.
4. Click OK to close the dialog box. You can now right-click the network icon on the system tray and choose to connect to the wireless profile you just created.
FIGURE 15.2 The Security tab in the Atheros Client Utility.

Optimizing Windows Settings for the Eee PC
The following sections provide tips for both maximizing the amount of free space left on your SSD, which potentially increases its life. Some of these suggestions include moving Windows directories to an attached MMC-SD card, so if you don’t have one, you should consider purchasing one. The prices of MMC-SD cards has fallen quite a bit. I recently purchased a 4GB SD card at an office-supply chain for a mere $20.
Configuring the Swap File
By default on the Eee PC 701, 200 MB of space is taken up by the Windows swap file. The swap file is simply a part of the storage space (in this case, the SSD) set aside so that as your Eee PC runs out of memory, it can swap things between memory and the file. You can think of it as virtual memory on your SSD.
Under Xandros, swap space is disabled. Under Windows, by default, it isn’t disabled.
caution
If you want to protect your Eee PC and its data by encrypting the hard drive and using on-the-fly encryption, ignore this section. If you encrypt the C: drive, you’ll want to keep everything on it.
If you’re running with 512MB of memory, the recommendation is currently to set the Swap File Initial Size and Maximum Size to 256MB.
My recommendation is that if you’re running Windows, you really should upgrade your memory so that you can eliminate the Swap File entirely. This will not only improve performance, but it will likely lengthen the life of your Eee PC.
The Swap File can get a lot of “reads” and “writes,” and flash memory will eventually start to fail after a very large number of reads and writes. Using it as a substitute for real memory is a great way to reach that failure point in a much shorter time frame. Not good.
There is an alternative to eliminating the Swap File, by the way, but it means that your MMC-SD card must stay installed in the computer. Yes, this will contribute to a shorter life for the MMC-SD drive, but you can replace that easily. Replacing the SSD itself is, to date, not a simple affair.
The down side to having an MMC-SD card that you can’t remove is that you can’t have multiple MMC-SD cards—say, some with music, others with photos—and pop these in and out as needed. You’ll need to make do with USB drives instead.
Assigning a Drive Letter to the MMC-SD Card
By default, the Eee PC sets your MMC-SD card as drive E:. As long as you leave it plugged in, the Eee PC won’t reassign its drive letter. However, if you want to ensure that the drive letter stays the same, you can simply assign it a new drive letter (it doesn’t really matter which one). Before you make the change, close any applications that are accessing files on that card.
To change the drive designation:
1. Click Start, right-click My Computer, and select Manage.
2. Click Disk Management under Storage.
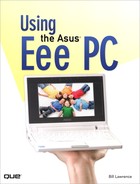
3. Right-click the MMC-SD card in the upper-right pane (it’ll likely be designated as the E: drive, but take a look at the size and make sure it matches the size of the card), and then click Change Drive Letters and Paths.
4. Click the Change button, and then assign it a new letter from the drop-down list.
5. Click OK; because you already closed any applications accessing or running from the card (you did, didn’t you?), you can be sure that it won’t cause any problems (see Figure 15.3).
FIGURE 15.3 Assigning a different drive letter to the MMC-SD drive.
To change your virtual memory settings:
1. Press the Windows key+Break to launch the System Properties dialog box.
2. In the System Properties dialog box, click the Advanced tab.
3. Click the Settings button in the Performance area.
4. In the Performance Options dialog box, click the Advanced tab.
5. Under Virtual Memory, click Change.
6. If you want to eliminate the swap space altogether or move it, select the No Paging File option. If you want to maintain 200MB (in case you only have 512MB of memory installed), select Custom Size and set both the Initial Size and Maximum Size values to 200MB. When moving the swap drive, select the drive on which it will reside and then set the values.
7. Click OK three times to exit the System Properties dialog box.
If you chose to eliminate the swap file, the Eee PC may have already created it, so turning it off by itself won’t free up any space. You need to erase the swap file. Doing so is perhaps easiest from a command prompt. Choose Start, Accessories, Command Prompt. Enter the following:
> cd
> dir /AS
If you see a file called pagefile.sys, delete it with this command:
> del /AS pagefile.sys
Moving My Documents and Other Windows Directories to the MMC-SD Card
If you wish to move your My Documents folder to the MMC-SD card, choose Start, right-click My Documents, and select Properties. In the My Documents Properties dialog box, click the Move button on the Target tab. Navigate to the MMC-SD card, which is E: by default, and either select an existing folder or click the Make New Folder button. Click OK and, when prompted, indicate that you do indeed want to move the files. Your My Documents folder will now be safely tucked away on the MMC-SD card.
You can play this same trick with anything that keeps temporary data, such as an Internet browser. In Internet Explorer, choose Tools, Internet Options. On the General tab, click the Settings button under Temporary Internet Files. Click the Move Folder button, navigate to a directory on the MMC-SD drive, and then click OK. See Figure 15.4.
FIGURE 15.4 Moving the Internet Explorer Temporary Internet Files folder.

The good thing about having things on the MMC-SD card is that you can back it up easily. Just take it to a machine with a card reader, plug it in, and drag everything off it into a backup directory. You can also burn a DVD with the contents directly from the Eee PC. Should the MMC-SC card suddenly fail, you can simply restore your last (and hopefully recent) backup to a new card and you’ll be “back in business.”
Compressing the SSD
The manual suggests that you should compress the SSD to get more space, so I gave it a try. It takes about 20 minutes and I did get considerably more space. It also doesn’t slow operation down appreciably, so I’d recommend compressing the SDD. You might want to turn off the indexing service while you’re there, as this will both slow operations down a little and use up space.
To do both, choose Start, My Computer. Right-click the C: drive and choose Properties. On the General tab, check the Compress Drive to Save Disk Space check box and uncheck the Allow Indexing Service to Index This Disk for Fast File Searching check box. Click Apply. Fairly soon in the process, you’ll need to tell Windows to ignore all errors.
After completing all of the suggestions under Optimizing Windows Settings for the Eee PC, I have almost 3GB of free space on my C: drive. Not bad considering I only had 4GB to start.
Reducing the Size of the Recycle Bin in XP
You can also save space by reducing the size of the Recycle Bin. By default, the Recycle Bin is set to take about 10% of the available space, but you can reduce this to whatever percentage you wish. To reduce the size of the Recycle Bin:
1. Right-click the Recycle Bin icon on the Windows desktop.
2. Select Properties.
3. On the Global tab, slide the bar to the desired percentage.
4. Click Apply.
5. Click OK.
If you wish to eliminate the Recycle Bin entirely, select Do Not Move Files to the Recycle Bin. If you eliminate the Recycle Bin, files will be removed when you delete them, instead of being stored in the Recycle Bin for possible later recovery.
Reducing the Size Allocated for System Restore
By default, 12% of your storage space is set aside for the System Restore function. System Restore automatically creates “Restore Points” that you can use to return to a previous, good configuration. If you reduce the space, the number of Restore Points that can be saved is decreased; however, the amount of free disk space is increased.
To reduce the allocation for System Restore:
1. Right-click the My Computer icon on the desktop.
2. Select Properties.
3. Click the System Restore tab.
4. Move the slider to the desired percentage of disk space allocated.
5. Click Apply.
6. Click OK.
Loading Microsoft Office on an MMC-SD Card
Let’s face it, having Microsoft Works is better than nothing and will help you complete simple tasks, but it isn’t designed for full-blown, day-to-day business, academic, or even home tasks. What you really want is an office suite such as Microsoft Office. You especially want Microsoft Office if your business, organization, or educational institution has settled on Office as a standard. (If you don’t need Microsoft Office, skip this section and read about the much lighter, and free, OpenOffice.org suite.) This section explains how to load Microsoft Office on an external drive, first a legacy version of Office (XP) and then the current version (2007).
The only real trick to loading Office is determining where to put it. To save space, you could move the My Documents folder to your MMC-SD card (it’s the E: drive on my Eee PC). This is covered in the previous section. You could also try to keep the installation folders for applications there as well (Office will prompt you during installation for the location in which you want to place the installation files).
Because a number of people have reported problems in loading Microsoft Office, I must admit I installed Office with some trepidation. I decided to start with a smaller, legacy version of Office. I dug out a copy of Office XP, plopped it into the DVD drive, and started the installation. Compared to Office 2007, Office XP is miniscule. It weighs in at a mere few hundred megabytes when fully installed.
Loading Microsoft Office XP
Moving Office XP to the MMC-SD card is pretty simple. In preparation, create a folder called Office on the MMC-SD card (which is probably mounted as the E: drive):
1. Put the Office XP CD into a CD/DVD drive and allow it to autorun.
2. Enter your license key and then click Next.
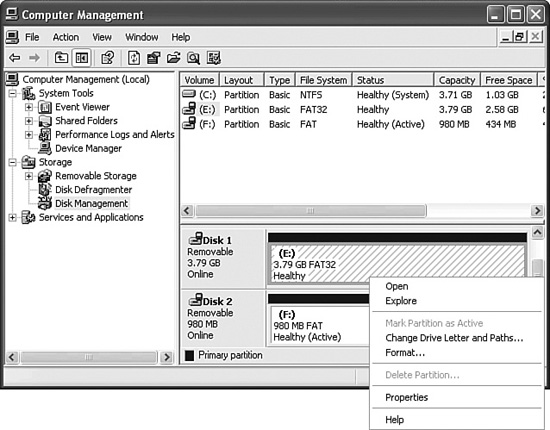
3. For the Install To field, browse to the Office folder of the MMC-SD drive.
4. In the same screen, select Install Now and then click Next.
5. Click Install.
The total installation will take up about 200MB of space on the MMC-SD drive. If you have a legacy copy of Office, rest assured it will run just fine in this environment.
FIGURE 15.5 Redirecting the installation to the E: drive.
Loading Microsoft Office 2007
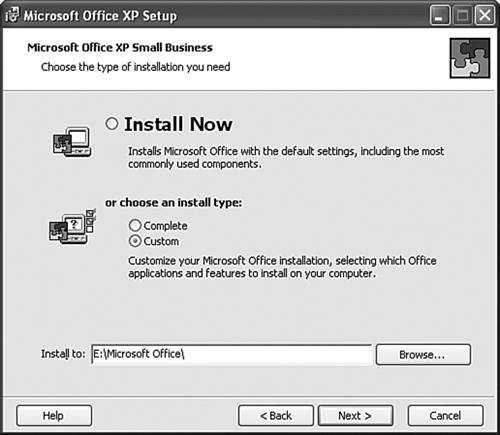
After testing the applications, rebooting, and writing in Office XP for a while (just to make sure all was indeed working), I uninstalled it and pulled out the Office Professional Plus 2007 DVD. This is a massive application, taking up about 800MB when fully installed. Once again, I had set up a Microsoft Office folder on the SD drive as the installation directory. This is a little trickier on Office 2007 because Microsoft has taken the option to install it into an alternate directory from main dialog boxes and tucked it away. When you reach the Choose the Installation You Want dialog box, click the Customize button. Customize launches the typical tree-control-laden dialog box that allows you to pick which parts of the application you want to load. However, it also has a File Location tab, which, when clicked, reveals the field for an alternate folder (see Figure 15.6). You can click the Browse button and navigate to whatever installation directory you’ve set up on the SD drive (or create the folder from within the file browser dialog box).
FIGURE 15.6 Redirecting the installation for Office 2007 to the E: drive.
This is a very, very long installation. However, once done, Office 2007 worked perfectly on my Eee PC. I rebooted, pulled up several Office applications, and used it as my main writing tool for a while with no problems. It did suck up a lot of storage space, however. The E: drive installation directory contained almost 600MB of files, with about 200MB taken up in the various common directories on the C: drive.
Installing OpenOffice.org
OpenOffice.org is a much “lighter,” full-featured office suite that is available for just about every imaginable platform. It is shipped with the Xandros Linux versions of the Eee PC, as well as most KDE-equipped versions of Linux. You can read more about OpenOffice.org in Chapter 7. Suffice it to say that I think so highly of it that I used OpenOffice.org to write this book.
What makes OpenOffice.org especially interesting for Eee PCs with Windows is that it has much less overhead than Microsoft Office and installs nearly completely on the E: drive. Compared to the 800MB that Microsoft Office consumes, OpenOffice.org uses up only a dainty 132MB. Unless you have a requirement to run Microsoft Office, I strongly suggest you choose OpenOffice.org instead. If you only need a word processor, then AbiWord is an even lighter-weight choice. The setup file for AbiWord is 6MB and the actual installation takes up only 24MB.
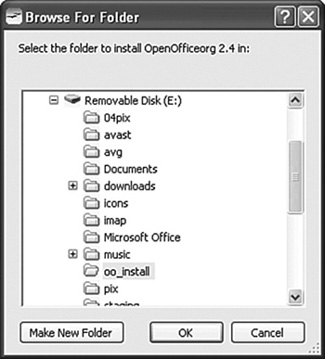
The only trick in the installation of OpenOffice.org, if you want to put it entirely on the MMC-SD drive, is to redirect it there when it asks about the installation directory. Click Browse to open the Browse For Folder dialog box (see Figure 15.7). You can even create the directory from within the Browse For Folder browser dialog box by clicking Make New Folder.
FIGURE 15.7 Redirecting the OpenOffice.org installation to the E: drive.
Once installed, OpenOffice.org runs perfectly under Windows. (This can’t be said for OpenOffice.org under Xandros, because the database application simply doesn’t work in the default OpenOffice.org installation.)
Overclocking in Windows
The Eee PC, as shipped, has its processor underclocked to conserve battery power. For example, the 701 4G has a 900MHz Celeron processor that’s underclocked to 630MHz.
The machine still seems zippy enough, but it could do much better. In Windows, controlling the Eee PC’s processor and fan, as well as the backlight, is a simple matter of downloading and running a free utility called eeectl (http://www.cpp.in/dev/eeectl/). Eeectl places an icon in your system tray/notification area that tells you the current temperature of the CPU and at what percentage of full speed it’s running.
note
eeectl is another example of an Eee PC–specific utility developed by the Eee PC community. It was crated by “Anthony,” a 22-year-old programmer from Russia. By the way, while you’re at the website, you can click a button to donate some cash to Anthony to support his efforts.
Anthony did an outstanding job with eeectl. It works perfectly. As part of my journalistic duty, I felt compelled to make sure that it was really resetting the clock, so I downloaded a small CPU benchmarking program called CPUFreeBenchMark2. I can’t attest to the quality of this tool, but the results of running it were interesting. Before eeectl, at its default speed, it took my Eee PC 126.31 seconds to complete the benchmarking test. After installation, I selected the Medium processor speed, and the Eee PC completed the drill in 103.29 seconds. Encouraged, I kicked it up to Full speed, and this time the Eee PC ran through the benchmarks in 87.74 seconds. That’s a pretty impressive speed boost.
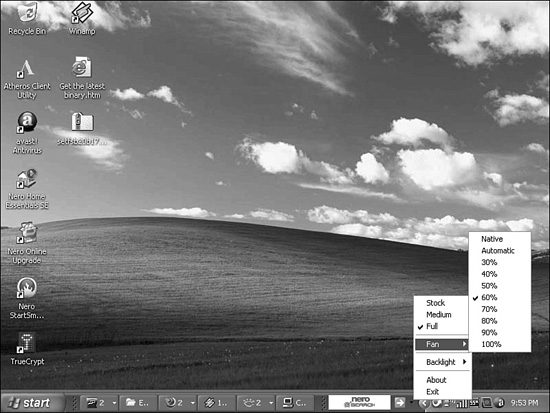
Eeectl is a simple executable file, packaged in a ZIP file with an INI file and a very terse readme file. Just double-click it to run it. When it runs, eeectl puts a square icon in the notification area, which alternates between displaying your current speed settings and the CPU temperature. Right-click the icon and you’ll get a menu that you can use to select between Stock (normal), Medium, or Full processor speed (see Figure 15.8). You can also select the percentage of time the fan runs and display the backlighting intensity. What more could you want?
Well, you might want it to automatically launch. If so, go to whatever directory you’ve installed eeectl in and make a shortcut file from the eeectl executable file. (Right-click eeectl.exe and select Create Shortcut.) Once you’ve created the shortcut file, select it and press Ctrl+X to “cut” it. Choose Start, All Programs, right-click Startup, and select Open. In the Startup directory, press Ctrl+V to paste the shortcut file. Now eeectl will launch whenever you start your Eee PC.
Getting Free Antivirus Software
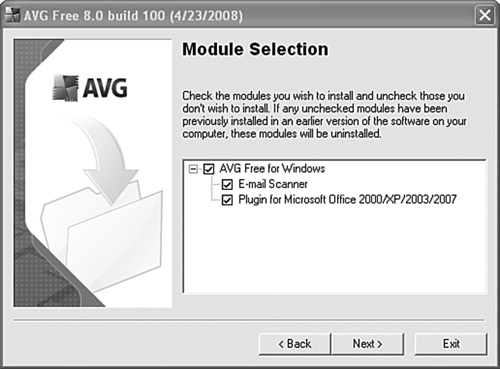
Linux isn’t entirely immune to viruses, Trojan horses, rootkits, and other malware, but the Windows community is the “target of opportunity.” Windows represents over 90% of the desktop OSs, so that’s what the crooks go after. So, how do you defend yourself? You can, of course, purchase either McAfee or Symantec and have top-notch protection. Most companies, government agencies, and other large organizations use one or the other. However, if you don’t want to spend the money, you can get excellent protection with the free version of either AVG (http://free.avg.com) or avast (http://www.avast.com/). At various times, I’ve run I’ve run one or the other of these products, and for the price of nothing, they are great. See Figure 15.9.
One problem is that these applications won’t install onto a removable device. So, installing them on the MMC-SD drive is not an option. Folks on the forums report using one or the other, and the usual “mine is better” discussion wars break out. Both seem to slow the system down slightly, but not overly much. Also, either work just fine even if you’ve chosen to encrypt the drive (covered next).
FIGURE 15.9 Installing AVG, and selecting email and Office support.
Both applications have these features:
![]() Configure to dynamically watch your browser and your email
Configure to dynamically watch your browser and your email
![]() Support Outlook
Support Outlook
![]() Can be set to autoscan your various logical drives
Can be set to autoscan your various logical drives
![]() Automatically update themselves when you are connected to the Internet
Automatically update themselves when you are connected to the Internet
![]() Provide a significant level of protection
Provide a significant level of protection
So which should you choose? Really, either does a great job.
Encrypting Your Data
The Eee PC is so portable, so handy, and so cool that it is a tempting target for thieves. Although the Eee PC itself is relatively inexpensive compared to other laptops, loosing the data you have stored on it might be a much more serious problem. It might be merely important, highly proprietary, or downright sensitive information that you don’t want to either lose or share with others. Fortunately, a Windows version of TrueCrypt is available. You can download it from http://www.truecrypt.org/. TrueCrypt provides military-grade encryption and is a very tough nut to crack.
TrueCrypt has two basic ways of protecting your data:
![]() You can create an encrypted volume file, which can reside on either the SSD or any removable device (either a USB flash drive or the MMC-SD card). Once you enter the password, this file (really something like an encrypted TAR file) becomes a logical drive on the system. Moreover, you can create a volume within a volume. This hidden-volume scheme is an extra precaution in case you fear that someone may coerce you to reveal your password to the volume. Thus, you can give them the password to the outer volume, and they’ll not know about the hidden volume. The TrueCrypt creators describe this as “plausible deniability.” They say that an attacker can’t tell the difference between the hidden volume and random data.
You can create an encrypted volume file, which can reside on either the SSD or any removable device (either a USB flash drive or the MMC-SD card). Once you enter the password, this file (really something like an encrypted TAR file) becomes a logical drive on the system. Moreover, you can create a volume within a volume. This hidden-volume scheme is an extra precaution in case you fear that someone may coerce you to reveal your password to the volume. Thus, you can give them the password to the outer volume, and they’ll not know about the hidden volume. The TrueCrypt creators describe this as “plausible deniability.” They say that an attacker can’t tell the difference between the hidden volume and random data.
![]() You can encrypt your C: drive, meaning the system will not boot unless you provide the password. You can encrypt a compressed drive. I tried it and half expected it to turn the machine into a plastic brick in the process. However, it worked fine and ran without a hitch for several days. Encrypting the C: drive is ideal for the Eee PC, because if someone steals it, they’ll need the password to get any use out of it. (Well, unless they download the Asus Support DVD/CD contents and one of the myriad operating systems that’ll run on it.)
You can encrypt your C: drive, meaning the system will not boot unless you provide the password. You can encrypt a compressed drive. I tried it and half expected it to turn the machine into a plastic brick in the process. However, it worked fine and ran without a hitch for several days. Encrypting the C: drive is ideal for the Eee PC, because if someone steals it, they’ll need the password to get any use out of it. (Well, unless they download the Asus Support DVD/CD contents and one of the myriad operating systems that’ll run on it.)
Encrypting your C: volume requires that you rethink where you locate things. Up to this point, I’ve made a point of telling you how to move things off of the C: drive and onto the MMC-SD drive (E:). However, you don’t want to do this if you’re encrypting the C: volume, for a few reasons:
![]() Your data won’t be encrypted unless it’s stored on the C: drive.
Your data won’t be encrypted unless it’s stored on the C: drive.
![]() You can’t encrypt the E: drive if components and directories that Windows needs are there. That could prevent Windows from working at all. The reason is part of a chicken-and-egg problem. You won’t be able to run TrueCrypt to unencrypt the E: drive until Windows boots, as the TrueCrypt bootloader will only unencrypt the C: drive. However, Windows won’t run until the E: drive is unencrypted.
You can’t encrypt the E: drive if components and directories that Windows needs are there. That could prevent Windows from working at all. The reason is part of a chicken-and-egg problem. You won’t be able to run TrueCrypt to unencrypt the E: drive until Windows boots, as the TrueCrypt bootloader will only unencrypt the C: drive. However, Windows won’t run until the E: drive is unencrypted.
If you want to go this route, store all of your Windows directories and vital applications on C:, and use E: and USB flash drives for data storage. These can then also be encrypted as file volumes. Any of these can contain a volume within a volume if you’re feeling especially paranoid.
You also need a CD or DVD burner hooked up to the Eee PC to be able to encrypt the C: drive. This is because TrueCrypt creates a rescue disk that will enable you to get your drive back if things go badly during the encryption process. It insists on this step, and won’t proceed until it has made a rescue disk and verified it.
To either encrypt the C: drive or simply create an encrypted volume (file) on any drive, launch TrueCrypt and click the Create Volume button. It will walk you step by step through either process, and you select which process you want to use in the first screen (see Figure 15.10). The setup includes selecting the encryption algorithm, wiggling your mouse over an arcane screen to “increase the strength of the hash code,” and other fun spy stuff.
FIGURE 15.10 Selecting the encryption type in TrueCrypt.

If you choose to encrypt the C: drive, it will automatically burn your rescue disk and verify it. It will also run a bootloader test just to make certain that the bootloader will work.
note
The actual time to encrypt the C: drive depends on how much is stored in it. I had about 1GB of free space on my 4GB SSD when I tried it, and it took a little less than 20 minutes. You can pause this process if you need to use the Eee PC for something, and then pick up the encryption later.
After encryption, when you start the Eee PC, aside from being challenged for the password you created, you’ll notice that the system runs just a trifle slower. This is because it’s doing on-the-fly encryption. However, if your Eee PC becomes the target of a smash-and-grab theft from your car, the thief (unless it’s a tech-savvy thief) will have no way of using it or getting to your data.
Increasing the Screen Resolution
Clearly, you can’t fit too much on a 701’s screen. However, the video display panel and the Intel graphics accelerator are capable of more resolution than the native Eee PC allows. If you want to increase your screen resolution, you can do so simply by upgrading the graphics driver with the latest genuine Intel driver and installing an additional system tray graphics switcher. I suggest you keep the original Asus switcher as well, as the new one doesn’t handle external monitors very well. This combination gets you to 1024×768 on the Eee PC screen without scrolling. Frankly, I find the letters at that resolution a bit teeny-tiny and rough-edged, but it’s great for some things such as running Photoshop or GIMP.
A number of folks have created experimental display drivers for the Eee PC, many of which can be found on the EeeUser forum (http://forum.eeeuser.com). Most of these push the display to really high resolutions and are not terribly useful for everyday computing. However, on the EeeUser wiki, I found a utility called AsTray Plus that is useful for everyday computing (though at the highest resolutions, it causes so much interpolation that the screen becomes difficult to read). Thus, I will cover AsTray Plus in this section.
At http://wiki.eeeuser.com/astrayplus, you’ll find the page that describes AsTray Plus. This was written by EeeUser senior member “BASSAM.” BASSAM has done a truly wonderful job with AsTray Plus. Coupled with the eeectl utility, these two applications truly improve the Eee PC user experience. My jaw dropped when I saw what could be done with the updated Intel driver. Frankly, I don’t see why Asus didn’t include this capability. The following explains the steps to get AsTray_plus running on your Eee_PC:
1. To change the screen resolutions, first you need the Intel driver, which you can download from http://downloadcenter.intel.com/Product_Filter.aspx?ProductID=1764.
2. Select your flavor of Windows and then download the EXE version, which is the easiest to install.
3. Once the driver is downloaded, simply double-click it and you’ll be guided through the installation.
4. If you set the graphics options to display video modes beyond what the driver could do so that you can scroll the video (as described earlier in this chapter), you’ll want to undo that.
5. Get AsTray Plus from BASSAM’s latest download link, which is currently http://forum.eeeuser.com/viewtopic.php?id=18260. If this link doesn’t work, search for “AsTray Plus” at http://wiki.eeeuser.com.
note
While you’re there, you can make a donation to BASSAM for his excellent work via PayPal. At the time of this writing, the ZIP file was a download from MediaFire. I had a bit of trouble downloading from MediaFire via Internet Explorer; however, Firefox worked perfectly.
6. Unzip the files for AsTray Plus to a directory and double-click astray.exe.
7. You’ll see the graphics properties icon in your system tray (see Figure 15.11). You can switch graphics modes via Quick Switch. The Native setting returns the Eee PC display to its default resolution.
FIGURE 15.11 The AsTray Plus menu, showing onboard screen resolutions.

If you have an Eee PC 701, I suggest keeping the original Intel graphics properties switcher because I had some odd, and sometimes comical, effects when running dual-monitor mode. Switching graphics resolutions via AsTray Plus tends to affect the external monitor, and sometimes it also rotates it 90 degrees. So, use the original Intel control when you’re using the dual-monitor mode and use AsTray Plus when you’re using only the built-in display. The Eee PC 900 seems immune from this weird behavior.
To autorun AsTray Plus at startup, make a shortcut file from the astray.exe file. (Right-click astray.exe and select Create Shortcut.) Once you’ve created the shortcut file, select it and press Ctrl+X to “cut” it. Click Start, All Programs, right-click Startup, and select Open. In the Startup directory, press Ctrl+V to paste the shortcut file.
Installing PortableApps.Com
Portable apps are the ultimate space savers because you can install them directly on a USB flash drive. This is ideal for applications that you rarely use and don’t want to install directly on the Eee PC. The great thing about PortableApps.com is that they come with their own launcher, so you’ll have a system tray icon that will pop up the launcher for all of the portable apps installed on the flash drive.
You can download PortableApps.com from http://portableapps.com (see Figure 15.12). PortableApps.com includes a basic launcher, a basic suite that comes with Firefox, Thunderbird, and various other utilities, and the AbiWord word processor. There’s also a full-fledged version that has OpenOffice.org instead of AbiWord. Click Download Now on the website’s main page to fetch these. However, keep in mind that this is simply a starter set. There are lots of additional applications on the PortableApps.com site that you can install on a flash drive. For instance:
![]() XAMPP: A full Apache web server plus mySQL, PHP, and phpMyAdmin.
XAMPP: A full Apache web server plus mySQL, PHP, and phpMyAdmin.
![]() GIMP Portable: An open source Photoshop alternative that’s a must-have item for the Eee PC under Linux.
GIMP Portable: An open source Photoshop alternative that’s a must-have item for the Eee PC under Linux.
![]() Nvu Portable: A complete, open source web-development environment.
Nvu Portable: A complete, open source web-development environment.
![]() Pidgin Portable: A multisystem chat client.
Pidgin Portable: A multisystem chat client.
![]() Audacity Portable: A complete sound-editing system.
Audacity Portable: A complete sound-editing system.
![]() VirtualDub Portable: A reasonably capable video-editing system.
VirtualDub Portable: A reasonably capable video-editing system.
![]() VLC Media Player Portable: My favorite music player.
VLC Media Player Portable: My favorite music player.
FIGURE 15.12 PortableApps.com.

All you need to do to add these files to the launcher is:
1. Download each of the portable apps.
2. Either double-click them or click Options, Install a New App in the PortableApps.com Launcher.
If you want even more portable apps, check out http://en.wikipedia.org/wiki/List_of_portable_software, a massive list of portable apps on Wikipedia. Literally hundreds of applications are listed there, ranging from full-blown wikis to BitTorrent clients.
Surfing Anonymously
Chapter 9 described Tor and Privoxy as important applications for anonymous web surfing. These programs might be especially important to people who live under regimes that censor the Web or do not allow freedom of speech. In the Windows world, there’s a portable application that does pretty much the same thing as the combination of Tor and Privoxy: OperaTor. OperaTor bundles up the Tor and Polipo applications with the Opera browser, making for a complete and convenient package. Moreover, it’s a portable application that can be stored either on your Eee PC or on a USB flash drive.
OperaTor can be downloaded from http://archetwist.com/en/opera/operator. It’s a small download, only 6.3MB, and comes as a ZIP package. You simply unpack it to whatever folder you like. If you have installed the PortableApps.com launcher, simply unpack it to the PortableApps directory (if the launcher is running, you’ll need to refresh the menu for it to appear).
OperaTor only anonymizes HTTP and HTTPS protocols, so stay away from FTP, BitTorrent, and so forth. If you want to check whether it’s working, navigate to http://check.torproject.org/. You should see the web page shown in Figure 15.13 if it’s working.
FIGURE 15.13 OperaTor, with verification that it’s working.

Cleaning Up Your Storage Space
You can download an excellent disk clean-up utility called CCleaner, which will remove temporary files from Internet Explorer, Firefox, and Opera, as well as unnecessary temporary files left around by Windows. It will even empty the Recycle Bin, clean the Windows Registry, and remove temporary files form a variety of third-party applications. You can download CCleaner from http://www.ccleaner.com/.
To install CCleaner, double-click the executable file that you downloaded. During the short installation, you’ll be given an opportunity to select the installation directory. So, if you wish, you can install it on the MMC-SD drive to minimize the amount of storage on the SSD CCleaner uses.
To run CCleaner, select Start, CCleaner, CCleaner. CCleaner presents you with two tabs and check boxes for removing temporary files, one tab for Windows clean-up and the other for Third Party cleanup. Set the check boxes for the types of files you like to clean up, and then click the Analyze button at the bottom of the screen.
Analysis will take a little while, as it will scan all of your storage for temporary and extraneous files. When it’s done, it will fill the blank space above the buttons with a list of files to be deleted. Scroll the list to ensure that nothing you need will be deleted. If all is well, click Run Cleaner. When it’s done cleaning, click the Close box to close the application.
Summary
This chapter is packed full of ways to optimize Windows for the Eee PC. If you follow the suggestions outline in this chapter, you’ll have an Eee PC that runs faster, has greater screen resolution, and has more free storage space than you may have thought possible. You can trim the fat out of Windows and make it a really great choice for the Eee PC operating system.