Chapter 7
Looking At The Installed Software
IN THIS CHAPTER
![]() Learn about the photo viewer, music player, and multimedia player applications.
Learn about the photo viewer, music player, and multimedia player applications.
![]() Get an overview of three of the set of learning applications: the typing tutor, the fraction tutor, and the virtual planetarium
Get an overview of three of the set of learning applications: the typing tutor, the fraction tutor, and the virtual planetarium
This chapter provides a quick look at some of the installed applications on the Eee PC. There’s enough information here to get you started with these applications; however, the best way to learn about what these applications can do is to try them. Experimenting is part of the fun of Linux. So go ahead, dive in and enjoy!
Working
The Eee PC ships with the OpenOffice.org suite, which was designed as an open source alternative to Microsoft Office. OpenOffice.org now has, according to its website, 20 years of code development behind it. It is a fully integrated office suite with an amazingly consistent interface throughout. In some ways, it is a better office suite than the Microsoft alternative.
OpenOffice.org started life as StarOffice, from a German company called Star Division. I remember this as being one of the few options back in the early days of PCs and DOS, when WordStar and WordPerfect ruled the Earth. Star Division was eventually bought by Sun, and Sun still sells a commercial variation of the package.
In every case, the OpenOffice.org products are at least comparable to their Microsoft Office counterparts. In the case of Writer, it is clearly a superior application to Microsoft Word. Word is rife with problems, ranging from automatic counters that are almost impossible to manage to long document features that are legendary for their bugginess. Writer is stable, powerful, and has the advantage of a much more thoughtful design. Word suffers from being a collection of add-ons whose sum is, from a usability perspective, considerably less than its parts.
OpenOffice.org has the following major components:
![]() Writer: A word processor with very impressive publishing and long document features thrown in.
Writer: A word processor with very impressive publishing and long document features thrown in.
![]() Impress: A presentation package designed to compete with PowerPoint. This is a very full-featured package.
Impress: A presentation package designed to compete with PowerPoint. This is a very full-featured package.
![]() Draw: A vector-based illustration package, more similar to CorelDRAW than to Adobe Illustrator. Draw also has some Microsoft Visio functionality for building flow charts and the like.
Draw: A vector-based illustration package, more similar to CorelDRAW than to Adobe Illustrator. Draw also has some Microsoft Visio functionality for building flow charts and the like.
![]() Calc: A powerful spreadsheet package.
Calc: A powerful spreadsheet package.
There are fairly frequent updates to the packages, so you can count on at least an upgrade per year. In fact, if you want to use the database package called OpenOffice.org Base, you’ll really have to upgrade OpenOffice.org. The version installed has a number of problems, such as nonfunctional wizards. OpenOffice.org has plenty of tutorials, frequently asked questions (FAQs), and the like for basic procedures and tasks. Also, there’s an excellent user community to which you can pose questions.
The following sections present a short introduction to the programs and some of their real (and perhaps not so obvious) strengths. These are hardly comprehensive manuals for the applications, but they will serve to get you started. The draft chapters for this book, by the way, were written using OpenOffice.org Writer on the Eee PC.
OpenOffice.org Writer
This is a superb word processor with enough power to rival such advanced publishing programs as Adobe FrameMaker. It’s the equal of Microsoft Word in everyday tasks such as reports, memos, homework, and the like. However, its features for building long documents truly excel, and have none of the fabled problems that plague Microsoft Word.
To launch OpenOffice.org Writer in Easy Mode, select the Work tab and then the Documents icon. From Full Desktop, choose Launch, Applications, Office, Writer. The interface is shown in Figure 7.1.
FIGURE. 7.1 OpenOffice.org Writer.
There are two ways to format text:
![]() Formatting toolbar: This is a quick way to format short, quick documents that do not need to conform to typographic guidelines and will not be updated over time.
Formatting toolbar: This is a quick way to format short, quick documents that do not need to conform to typographic guidelines and will not be updated over time.
![]() Styles and Formatting palette: This is the best way to format documents that must adhere to style guidelines, such as a corporate or organizational style guide. Also, if the document will be maintained and edited over time, styles are the only way to maintain any consistency from author to author and from version to version.
Styles and Formatting palette: This is the best way to format documents that must adhere to style guidelines, such as a corporate or organizational style guide. Also, if the document will be maintained and edited over time, styles are the only way to maintain any consistency from author to author and from version to version.
Using the Formatting Toolbar
The formatting toolbar, just below the menus, has buttons for almost all the functions you’ll use. Starting from the left side of the toolbar, you have three file operation buttons (New, Open, Save), a Print button, the Cut/Copy/Paste trio, and, my personal favorite, Undo. In the Font drop-down list, the list of fonts with Xandros is quite adequate, with a few representative serif, sans serif, fixed space, and script examples of text, display, and symbol fonts. To the right of the Font drop-down list are controls for font size, bold, italic, underline, font color, justification, and lists (both enumerated and bulleted).
Below the formatting toolbar, you’ll find the ruler, which is also your interactive tab-setting control. Simply click along the ruler to place a default tab (usually a left tab). Right-click an existing tab to change it to your choice: left, centered, right, or decimal aligning. The tab icon in the left corner, just to the right of the ruler, sets the default tab type. Just click this until the default is what you want.
The stops on the right and left of the ruler are interactive indenting markers. Drag them to indent or outdent from either side. Actual page setup controls are under Format, Page. In the Page Style dialog box, you’ll find controls to set the page size and margins, number of columns, background, and running headers and footers (as well as some more esoteric settings). You can also set the number of columns with Format, Columns.
Using the Styles and Formatting Palette
The other way of formatting is through the Styles and Formatting palette. You launch this by pressing F11 or choosing Format, Styles and Formatting. The palette appears to the right of the text area. It has a drop-down list at the bottom for the basic categories, such as chapter styles, text styles, and the like. Along the top of the palette, you’ll find icons for the various style types: paragraph, character, frame, page, and list. There’s also a button for applying styles to a selection and creating new styles. You can also right-click in the palette to create a new style or modify a selected style.
Having paragraph, character, and frame styles provides a lot of publishing power. Paragraph styles are fairly obvious—they format paragraphs. Character styles, sometimes called inline styles, format a selection of text (normally less than a paragraph).
Frames are box-shaped containers for text and graphics that you can create and move around on a page. Frame styles dictate the look of a selected frame. If you set up your paragraph styles and character styles to cover the various required formats in your document, and then religiously apply them instead of using the formatting toolbar, you’ll go a long way toward providing a uniform look to your documents.
The Table Editor
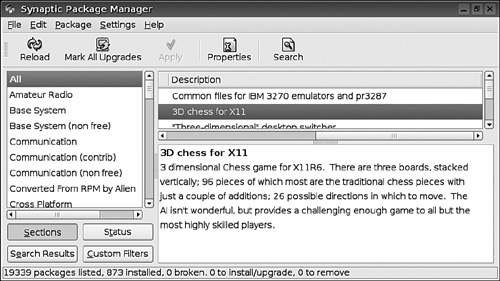
The Table Editor is a joy to use. Simply select Table, Insert Table, and you can select the number of rows, columns, and repeating header rows (see Figure 7.2). Clicking the AutoFormat button lets you pick from a number of preset table styles. Once your table is built, you’ll get a table toolbar with controls for cells, rows, and columns, as well as for borders and tints. There are also buttons to sort the table or sum the values in a column.
FIGURE 7.2 Table creation in Writer
To insert a graphics file, choose Insert, Picture, From File. Once the file is inserted, you can double-click the figure to produce the graphics controls, which control how text wraps around the figure, sizing, rules, captions, and many other things.
Writer supports an extremely rich set of graphics formats. In addition to the usual “universal” formats, such as .png, .jpg, .eps, .wmf. and .tif, it also supports a variety of cross-platform and more escoteric formats. For example, Apple Pict and Sun Raster formats are available. It can also import Adobe Photoshop, DXF (a common format from computer-aided drafting applications), and even Kodak photo CD formats.
The Find & Replace tool, available through Edit, Find & Replace, is extremely powerful, and includes full regular expressions plus the ability to search on all sorts of formatting characteristics (see Figure 7.3). Regular expressions are a notation for extremely powerful search queries, and have grown almost into a scripting language over the years. For example, you can use regular expressions to search for not only wildcards, but a range of characters or numbers.
FIGURE 7.3 Some of the extensive Find & Replace options in Writer.

Other Writer Features
Writer also has a highly configurable, multilingual spell checker. You can add your own words as you go, building a custom dictionary. It also comes with a built-in thesaurus. In addition, you can set it to autocorrect and suggest words as you type. If Writer completes the word you’re typing correctly, you can accept it and go on, thus saving keystrokes. Both the spell checker and auto-correction functions can be found in the Tools menu.
Writer has the typical automation functions for longer documents, such as papers, books, and manuals, that you would expect from a full featured word processor. Most of these functions may be found in the Insert menu, and you can choose to insert tables of contents, index entries, and cross-references. Under the Tools menu, you’ll even find a Bibliography Database command you can use to assist in building a bibliography.
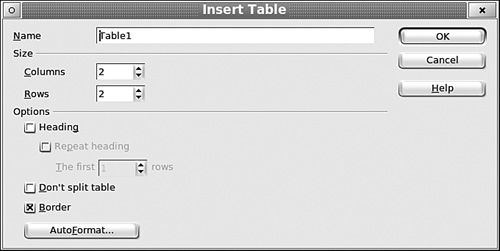
OpenOffice files are all actually stored in eXtensible Markup Language (XML) format. In addition to support the native OpenOffice XML formats, Writer can support other standard XML document formats as well. In the world of technical publishing, DocBook is a standard XML format used by software, aerospace, and publishing companies. Writer also has DocBook import and export filters. I wouldn’t recommend this as a general-purpose DocBook editor, but you can get DocBook files into Writer and you can export usable (though somewhat mindless) DocBook files (see Figure 7.4).
FIGURE 7.4 You can save files as DocBook XML.
Here are a few features that will turn Word fans green with envy:
![]() You can export your files directly to PDF.
You can export your files directly to PDF.
![]() Writer has a master document feature that actually works, and works well, to build very large documents by including them into a master file.
Writer has a master document feature that actually works, and works well, to build very large documents by including them into a master file.
![]() Writer includes heavy-duty cross-referencing, table of contents, and indexing functions that won’t fall apart in large documents.
Writer includes heavy-duty cross-referencing, table of contents, and indexing functions that won’t fall apart in large documents.
Speaking of Word, Writer on the Eee PC is set by default to use Word format. However, it has its own native format, ODT, that’s an open standard based on XML. You may want to use that instead of Word format, especially given that such things as the open source Scribus desktop publishing package and Alfresco content management system work so well with ODT format.
Impress
Impress strives to be much more than a PowerPoint wannabe. It has some truly remarkable features, such as excellent illustration tools and lots of special effects. Also, it will output the presentation directly to Adobe Flash, so that you can display it on your website.
You can launch Impress either by clicking the Presentations icon on the Office tab in Easy Mode or by choosing Launch, Applications, Office, Impress in Full Desktop. You’re greeted with a three-step Presentation Wizard that will guide you along in creating your presentation.
Using the Presentation Wizard
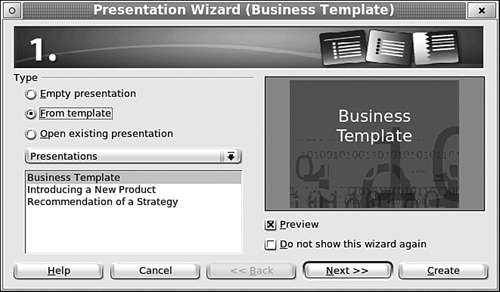
In Step 1 of the wizard, shown in Figure 7.5, you have a choice of creating a presentation from scratch, selecting one of the templates from the two installed, or importing the styles from an existing template. (See the sidebar for instructions on obtaining additional templates.) After you make your selection, click Next.
FIGURE 7.5 Step 1 of the Presentation Wizard in Impress.
In Step 2 of the wizard, you select from the palette of presentation backgroups and select the output medium. For example, if you are building a presentation that will be viewed from either a video projector or at least a monitor, you would select Screen. Click Next.
Step 3 of the wizard asks what sort of transition effects you’d like. If you’re going to have the presentation run as a Flash file or a standalone, automated presentation, you can pick the duration for each slide and the transition. If you have OpenOffice 2.0.4, click Create at this point to begin working with your presentation. If you have a later version of OpenOffice, click Next.
tip
Pick a subtle transition effect. Keeping your audience focused on the message is hard enough without setting off fireworks between each slide.
Step 4 requests metadata about your organization, the purpose of your presentation, and what other messages you’d like to convey. Fill in the fields and continue by clicking Next.
Step 5 asks what page types you’d like to include. Exactly why one would say, “No, please limit my choices!” is beyond me. I always leave everything available. When you’re done, click Create.
Once you’ve finished the wizard, you’ll find yourself with a powerful set of tools.
Touring the Impress Work Area
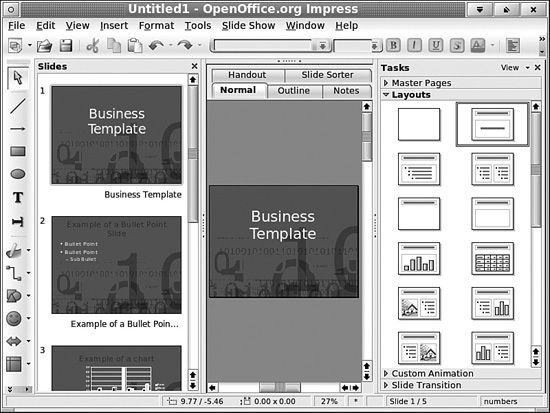
The Impress work area is shown in Figure 7.6 The left panel has the slides that you’ve created. You can navigate with this panel, as well as edit individual slides and anything attached to them. The center is your main work area, and is where you craft your slides, notes, and handouts. The right panel (Tasks) has selections for master pages (the basic look of the slide) as well as the various formats.
FIGURE 7.6 Impress work area.
Given that screen real-estate is at such a premium on the default Eee PC screen, you’ll be pleased to know that the View menu gives you options for hiding and displaying the various work areas.
Note the drawing toolbar along the left side of the screen. Here, you will find basic drawing tools similar to those in Draw. There are also a number of palettes of stock “shapes” you can select and then click-and-drag to draw on the work area (see Figure 7.7). You can reveal the shape palettes by clicking the little triangle on the side of the buttons.
When working with the limited depth of the built-in Eee PC screen, you won’t be able to see all the buttons that run the length of the drawing toolbar. The workaround for this is to click the button with the double arrow heads at the bottom of the toolbar. This launches a fly-out palette that contains most of the functions on the toolbar, but not all of them. To see all of the available buttons, hover over Visible Buttons in the flyout palette. If a button is checked, it’s on the toolbar or flyout palette. If you want to add a button, just click it.
The top of the window contains a formatting toolbar similar to the one in Writer (an example of the thoughtful consistency throughout the OpenOffice.org toolset).
FIGURE 7.7 Some of the shapes in the palette.

You’ll also see two text box controls in the drawing palette, one for vertical text and one for horizontal text. Just as with Writer, you can format the text either with the toolbar buttons or with styles. Although the Slides templates have a built-in stylesheet, if you’re doing presentations as part of an organization, you’ll want to take the time to develop your own stylesheet to provide a standard look and feel that complies with your organization’s identity standards.
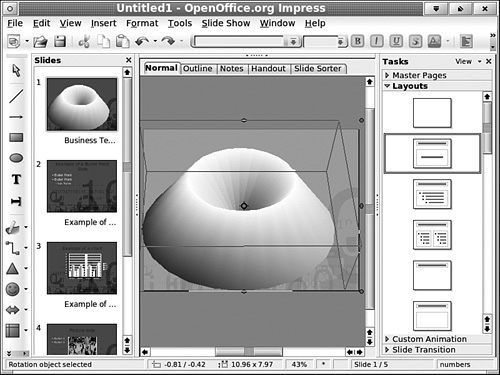
Any of the shapes or text boxes can be converted into 3D shapes. Simply select the object on the slide, right-click, and select Convert, To 3D. The object is given “thickness” and can then be rotated, skewed, and otherwise manipulated. This is a great effect for text. You can also convert an object to 3D via rotation (Convert, To 3D Rotation Object). This works by “sweeping” the shape 360 degrees around a central axis to make a shape. This works well for objects such as triangles, which sweep to cone shapes (see Figure 7.8). However, it works quite poorly for text, which usually sweeps to something like a set of concentric hoops.
FIGURE 7.8 3D sweep of triangle to a cone, tilted slightly forward.
You can also draw lines and lines with arrow heads. The Connector tool provides Microsoft Visio–like connector objects. By the way, if you seem stuck in some strange editing mode and the slide turns to a pale color, simply right-click and select Exit Group.
Adding Special Effects with Fontwork
If the 3D fonts aren’t enough special effects for you, Impress has a tool called Fontwork. This is only visible on the default screen through the Visible Buttons trick.
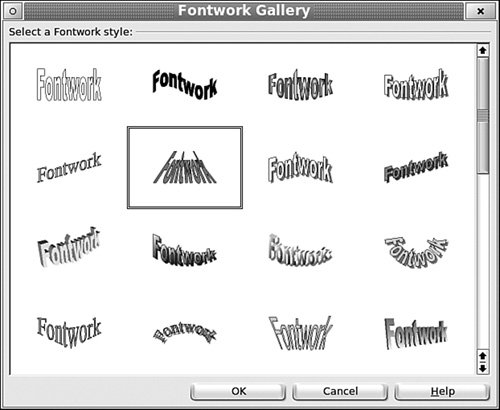
Fontwork has various colored 3D fonts that follow curved paths instead of a straight baseline. When you launch Fontwork and select an example from the palette, you get a floating Fontwork toolbar. Click the A button to launch the Fontwork Gallery, shown in Figure 7.9. You simply select a Fontwork object from the Gallery, click the OK button, and it appears on your slide. Double-click it and you’ll see the text in normal, straight letters. This is the text you edit.
Once you have a Fontwork object, the Fontwork toolbar provides tools for changing the text path, switching case, changing the alignment of a paragraph, and changing the character spacing (“kerning”). These tools provide a remarkable amount of font effects flexibility.
Fontwork provides cool effects, but don’t overdo it. Remember that the message you want the viewers to remember isn’t that you could do cool tricks with fonts. For the most part, you’re better off finding a nice template and sticking with its styles or perhaps styles that conform to your organization’s graphics standards.
Adding Animation
Another cool effect, but one that can also be overdone, is animation. Any object can be animated. Just right-click the object and select Custom Animation to open the Custom Animation window, shown in Figure 7.10. The Animation tools appear on the Inpress Tasks palette. You can select to have an object enter the screen, do something to gain attention (Emphasis tab), or exit the screen. You can also set the motion path, and can select such things as an 8-pointed star.
FIGURE 7.10 Setting up animation effects within Impress.

Adding Multimedia Objects
The real power of Impress comes from its ability to insert multimedia objects. There are two sure ways to build a bad presentation:
![]() Create a long series of bulleted lists that you, as the presenter, simply read to the audience. Your audience will lose focus by the third slide.
Create a long series of bulleted lists that you, as the presenter, simply read to the audience. Your audience will lose focus by the third slide.
![]() Create a series of slides, each of which uses fancy effects and different transitions, the sum of which obscures your message.
Create a series of slides, each of which uses fancy effects and different transitions, the sum of which obscures your message.
Impress can insert movie files, charts, graphs, and so forth. It can play sound files as well. Even the most modest digital cameras these days provide the ability to capture small movie files, with sound, that you can use to enliven your presentation. Mix interviews, photos, graphs, and other media to make a compelling story, instead of using a list of bullets. In a pinch, you can use the Eee PC itself as your multimedia tool. You can use its built-in webcam and recording capabilities to good effect to capture interviews and narratives.
Exporting Your Presentation
Once you’ve crafted your presentation, you can save it in either PowerPoint or Impress format. However, you can also export it to an Adobe Flash file. This can be played on any web browser equipped with the Flash plug-in. To do this, choose File, Export, Macromedia Flash. You can also export the presentation as HTML pages, a variety of graphics formats, or as Adobe PDF.
OpenOffice.org Draw
Draw is a vector-based illustration program in the vein of Adobe Illustrator and CorelDRAW. Unlike graphics editors such as Adobe Photoshop or GIMP, Draw works with lines and geometric objects. It can import bitmapped images, but these serve only as objects and can’t be edited in any meaningful way. Draw lacks some of the features of high-end illustration packages, but is significantly more powerful and useful than the rather limited drawing editor within Microsoft Word. Moreover, Draw can save files in all of the common vector graphic formats and export graphics in bitmapped formats or as PDF. Draw can also open files in most common vector formats, including files from CAD or technical illustration applications saved in either DXF or CGM formats.
Launching Draw
You can’t access Draw directly from the Easy Mode tabbed interface. The easiest way to run it in Easy Mode is to launch a terminal window with Ctrl-Alt-T and the type the following command:
> oodraw &
You can add it to the tabbed interface if you wish. Refer to Chapter 4, “Customizing Easy Mode,” for instructions concerning adding applications to Easy Mode. From the Full Desktop (KDE), you can launch Draw with Launch, Applications, Office, OpenOffice Draw.
Looking at the Draw Interface
After looking at Impress, the Draw interface will be extremely familiar (see Figure 7.11). It has the same drawing tools, this time with the toolbar running along the bottom of the screen. The formatting toolbar has a few additions, such as buttons for arrow heads and line weights. As an everyday Illustrator user, I have to admit that the placement of tools and the icons themselves in Draw is actually more intuitive.
FIGURE 7.11 Dragging a shape from the shape palette.
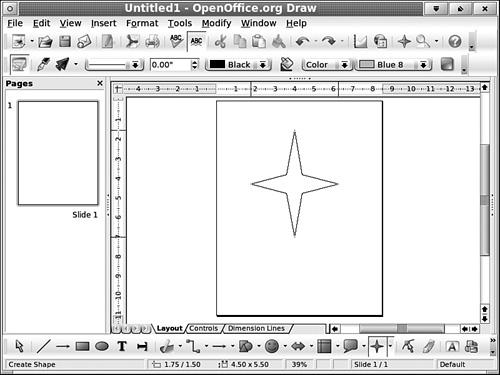
The theory behind Draw is that you’ll create your illustration using line elements, which may be multisided geometric forms of any shape or lines with complex curves, as well as predefined geometric shapes, which can be stretched and skewed as required. Objects have two components: lines (which form the outline of the object) and fills (which form the color or pattern of the interior of the object). You can also add type, including text boxes containing multiple paragraphs.
The combination of text and precision lines makes Draw suitable not only for illustrations but also as a layout package for single-page designs. Although Draw is certainly not the equal of a program such as Adobe InDesign or the open source alternative Scribus, it has enough capability to build ads and flyers.
Working with Freeform Drawing Tools
To truly master any vector-based illustration package, you must learn to draw with the three freeform tools:
![]() Polygon, which can be used to draw objects with straight sides.
Polygon, which can be used to draw objects with straight sides.
![]() Curve, sometimes called Bezier Curve, which provides a way, though nonintuitive and a little tricky to master, to draw precise curves with a mouse, touchpad, or trackball.
Curve, sometimes called Bezier Curve, which provides a way, though nonintuitive and a little tricky to master, to draw precise curves with a mouse, touchpad, or trackball.
![]() Freehand Curve, which is a reflection of your hand movement and is therefore only as precise as you are. Without an advanced drawing device, such as a digitizer pad, this is difficult. When I’ve used this tool, I’ve always ended up “fixing” the curve by editing the “node” within the lines.
Freehand Curve, which is a reflection of your hand movement and is therefore only as precise as you are. Without an advanced drawing device, such as a digitizer pad, this is difficult. When I’ve used this tool, I’ve always ended up “fixing” the curve by editing the “node” within the lines.
Each of these tools can be used as “filled” objects or as outlines (simply select the mode you want to use from the flyout menu). Filled versions automatically fill with the currently selected color and the outline takes the currently selected line color. Outlines simply take the line color. You select colors and line weights on the formatting bar above the drawing area.
The Polygon tool is the easiest to master, and comes in two flavors: Polygon (which may have lines with any arbitrary angle) and Polygon 45 Degree (which is constrained to having all lines at 45-degree angles). Drawing is a click-and-hold-while-dragging operation. The point where you first click-and-hold is the origin point of the first line. You release the mouse button to end a line segment, and then click-and-hold to start the next line segment. Double-click to complete the polygon. To close the polygon, make the last line segment end on the origin point of the first line segment. Figure 7.12 shows a polygon.
FIGURE 7.12 Drawing a polygon.

You draw curves not by tracing the curve with your mouse but by defining the lines that constrain the curves. For example, to draw an arc, you click-and-hold while dragging to define the path from the origin of the arc to the midpoint (which is also the highest point of the arc). You then release the mouse button and drag the line down toward the endpoint of the arc. When you reach the endpoint, double-click. If you don’t double-click, but merely click, you mark a node along the curve and you can start drawing a second curve as part of the line. In this way, you can create compound curves to define very complex shapes. Figure 7.13 shows the sorts of curves that can be drawn.
You’ll need to take time to master this technique. If you attempt to learn this under deadline pressure with the idea of building a polished illustration your first time out, you’re headed for a very frustrating time. Set aside an hour or so just to get the hang of this tool. It’s the basis of much that you will do in Draw, and learning to use it will pay off in the end.
FIGURE 7.13 Drawing a compound curve with the Bezier tool.

The Freeform line tools simply draw a line that exactly tracks your mouse movements. Just click-and-hold while dragging to draw the line. Because your mouse movement won’t be a precise curve, the line you create will have bumps and squiggles along its path. You can fix these using the Node Editing tool.
When you click an object with the Node Editing tool, little boxes appear along the path to mark the location of nodes. Click a node and editing “handles” will appear (see Figure 7.14). You can reposition the node, or drag the endpoints of the handles to change the angle of the curve from either side. Again, this is a skill that takes a little time to master. Practice this for a while to understand how this works and what the limitations are before you attempt to create “real” drawings.
The Edit Points toolbar provides tools for manipulating the curve via the various nodes. You can add nodes, delete node, split the curve, convert lines to curves, and so forth. The combination of these tools allows you to convert shapes that almost meet your needs into exactly what you want.
FIGURE 7.14 Changing a curve with node handles.

When using text boxes, keep in mind that you can apply only a single style to a text box. This works very well for such simple things as callout text or captions, but presents problems for large amounts of text with headings and body paragraphs. You’ll need to use multiple text boxes for these items and use the Alignment tools.
This brings us to the subject of alignment and arrangement. Objects can be aligned to the top, bottom, either side, or center. To do this, select a group of objects and right-click. Under the Alignment menu, you’ll find icons that designate the various alignment choices. Arrangement is the “z-order” for the various objects; that is, if vertical and horizontal movement represent the x- and y-axes, then the z-axis defines “above” and “below” or stacking order. This provides a way in a 2D drawing to place objects over each other. Under Arrange on the right-click menu, you’ll find commands to move an object up or down in the stacking order, or even to the top or bottom of the stack (see Figure 7.15).
FIGURE 7.15 Objects that are in different levels of the z-order, with the menu showing options to move up or down in the stack.

Another concept you’ll find invaluable is grouping. When you “group” a set of objects, you can manipulate them together. Thus, you can move, size, or stretch them as if they were a single object. Combined with cut and paste, grouping provides a great way of building an illustration out of smaller components. Suppose that you have an illustration with a number of electrical contacts, each of which is a collection of circles (screw heads) and rectangles (connector tabs). By combining simple shapes, you can build a single contact. By grouping these shapes and then copying and pasting them multiple times, you make a set of contacts. By aligning the contacts, you make it visually correct. By arranging the set of contacts, pulled together into a group, over another object, you’ve added the contacts to a housing for some device. While you may not care about technical illustration, the same techniques can be combined regardless of the type of drawing.
There are lots of other controls and functions you can use, including the 3D functions that were covered under the discussion of Impress (such as the Fontwork tool). There’s also a set of flowcharting symbols and connector lines that provides a lot of the functionality you’d find in Microsoft Visio.
As with the other OpenOffice.org applications, you can save your files in the native OpenOffice.org format or export them in a number of common formats for use in other applications. You can also create HTML pages, Flash files, and PDF files from your illustration.
OpenOffice.org Calc
Calc is a spreadsheet program with literally hundreds of functions. It maintains the common OpenOffice.org interface as much as possible, and is accessible and easy enough to produce simple spreadsheets yet has the power to do complex financial and statistical analyses. From Easy Mode, you can launch Calc from the Work tab by clicking the Spreadsheets icon. From Full Desktop, you can run it via Launch, Applications, Office, OpenOffice Calc.
Calc opens into a familiar spreadsheet interface with rows and columns of cells. To type into a cell, simply click it and start typing values or text. You can navigate from cell to cell via the arrow keys or Tab (goes to the right) and Alt+Tab (goes to the left). If you’re typing text that isn’t a formula, some characters must be “escaped” or they’ll be considered part of the formula. For example, the following is the formula to sum two cells:
=SUM(B1:B2)
Normally, that would produce the number that’s the sum of the values in those cells. But suppose you want to type the formula as text, without the equals sign being interpreted as the beginning of a formula? Just precede the equals sign with the escape character, a single apostrophe:
′=SUM(B1:B2)
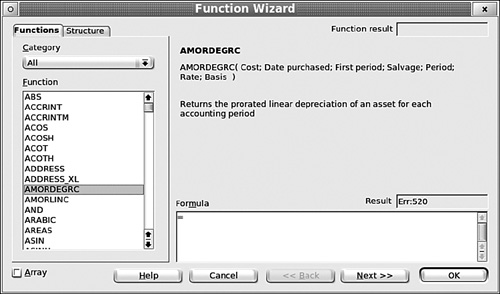
The easiest way to enter formulas in Calc is through the Function Wizard, which you access by clicking the Wizard button (the left-most of the three buttons) on the toolbar above the spreadsheet work area. The wizard opens to reveal a list of all the functions. You can use the Category list to limit the list to only related sets of functions, such as financial or statistical functions. If the function name, such as AMORDEGRC, isn’t exactly meaningful to you, just click it and you’ll get a description on the right explaining exactly what it does, as shown in Figure 7.16.
FIGURE 7.16 Picking a function in the Function Wizard.
After you choose the formula you want, click the Next button to choose the cells you want to use in calculating the formula. Each field represents a cell or range of cells. Click the button on the right of the field to select the cells (you can drag to select them, as shown in Figure 7.17) or click the number on the left of the field to apply a nested function to this selection only. You can have up to 30 selections.
FIGURE 7.17 Selecting a range of cells for a function.

As with the other applications in the OpenOffice.org suite, you can use the toolbar to format the spreadsheet. In addition to the usual text-formatting buttons, you’ll find some special functions for formatting spreadsheets, such as border styles, number of decimal places, background color, and text direction.
To sort a range of cells, simply select them and then choose Data, Sort. You can set up to three sort keys, each in descending precedence.
In addition to simply calculating values, Calc has a wizard to visualize your data through a variety of charts (see Figure 7.18). You can access this wizard by clicking the Insert Chart button on the toolbar or by choosing Insert, Chart. The wizard provides both 2D and 3D line, area, bar, and pie charts. It also has specialized charts, such as XY scatter plots, “candlestick” stock charts, and a “net” chart.
FIGURE 7.18 Charting wizard.

You can save your spreadsheet in native OpenOffice.org Calc format, Excel format, or a common data interchange format such as Comma Separated Values (CSV). You can also export the spreadsheet as XHTML or PDF.
Having Fun
The Eee PC comes well stocked with entertainment software and games. This section takes a look at some of these, in particular applications that you can use to view and organize your photographs and play music.
Organizing Your Pictures with the Photo Manager
The photo manager is the open source image browser and organizer Gwenview. It also has some basic image manipulation functions, but is in no way a replacement for something such as GIMP (see Chapter 9, “Must-Have Applications”). You can think of Gwenview as a file browser optimized for viewing and manipulating graphics files.
You can launch Gwenview from the Play tab in Easy Mode by clicking the Photo Manager icon. In Full Desktop, choose Launch, Applications, Graphics, Gwenview. It opens as a multipart browser window, as shown in Figure 7.19. The upper-left pane is a file tree navigation pane. The right pane shows thumbnails of the image files in the folder selected in the tree. The slider above the thumbnails pane sets the size of the thumbnails, which is really handy for the Eee PC’s built-in display. The icons to the left of the slider enable you to choose whether to show only file details or to have the file detail information appear to the right or under the thumbnail.
In the drop-down list to the right of the slider, you can select to view all files, only image files, or only video files. Clicking the More button provides filters for filename or data ranges. You can use these to restrict what’s shown in the thumbnails pane. By the way, you can also browse within ZIP files, tarballs (a group of files consolidated into a single file with the Linux tar command), or across the network file system.
The lower-left pane is a preview pane. This reflects a larger, though not full-sized, view of the image currently selected in the thumbnails pane. There are controls to zoom in or out, and to autofit the image to the pane. You can also rotate the image right or left. The right- and left-pointing blue arrows load the next or previous image, respectively, in the thumbnails pane, while the circle icon reloads the image (if it has been modified).
Gwenview provides a handy way of organizing images. You can copy, move, or link them via a right-click menu, as shown in Figure 7.19.
note
If you double-click an image, it fills the Gwenview screen. This is a very handy way to view images on the small screen. Press the Esc key to return to the Gwenview interface.
The right-click menu also provides a way to load the images into other tools, via the External Tools submenu. You can select KolourPaint (a very basic paint program) or GIMP (if it’s installed). You can also load the image into Konqueror, though, given that its function would be as a file browser, there seems little reason to do this because Gwenview serves as a file browser. The External Tools submenu also provides controls to set the image as the current wallpaper.
FIGURE 7.19 Gwenview, with the file commands right-click menu.

The Batch Processing submenu under the Plug-Ins menu provides tools to apply various image filters and effects to a set of images. This is a handy way to convert images to a particular format or to sharpen a set of photos. There are a number of image effects provided, ranging from charcoal drawings to embossing.
Playing Tunes with Music Manager
Music Manager is actually the open source player Amarok, which can play CDs and most audio files, including files from the iPod, and can be set as your default streaming player in Firefox. If you have installed K3b (see Chapter 9), you can also burn audio CDs via its K3b plug-in.
From Easy Mode, you can launch Music Manager from the Play tab by clicking the Music Manager icon. From Full Desktop, choose Launch, Applications, Multimedia, Music Manager.
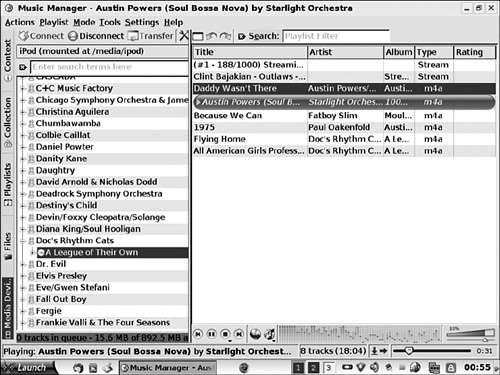
The Music Manager interface has tabs along its left side for a connected Media Device (such as an iPod), Files, Playlists, Collection, and Context, as shown in Figure 7.20. Of these tabs, the Collection and Context tabs are a little different from what you find in the average music player. The Collection tab lists the set of music that Music Manager has found. To set the parts of the file system that it should check, choose Settings, Configure Music Manager. To get Music Manager to build its collections, choose Tools, Rescan Collection.
FIGURE 7.20 Music Manager interface.

The Context tab includes its own tabs to provide information about what played (which is marvelous when listening to streaming audio), information about the artist, and even the lyrics (if available). To get lyrics, you must click the Lyrics script under the Lyrics tab.
When you plug in a device, such as an iPod, Music Manager scans for installed music and shows you the library (see Figure 7.21). You can play it or copy it.
FIGURE 7.21 Music Manager working with an iPod.
If you want to configure Firefox to use Music Manager, open Firefox and choose Edit, Preferences. Under the Content tab, click the Manage button under File Types. Scroll down to M3U and click it. Click the Change Action button. Select Open Them with This Application and browse to select /usr/bin/amarok.
Playing Multimedia with Media Player
Media Player (SMPlayer) is actually the graphical interface for MPlayer, which is the plug-in that plays video files inside Firefox. SMPlayer has such features as configurable subtitles. It would not play DVDs successfully on my Eee PC, however, until I installed K3b. See Chapter 9 for more information about K3b. It will not, by default, play DVD movies. However, this is easily fixed by installing the libdvdcss2. Installing this library requires the additional repositories mentioned in Chapter 8, “Getting More Linux Applications.” If you have these repositories listed in your sources.list file, you can easily install this library from a terminal window. You can launch a terminal window from Easy Mode with Ctrl-Alt-T or by typing Konsole in the Launch, Run Command field in the KDE. To install the library, type the following commands:
> sudo apt-get update
> sudo apt-get install libdvdcss2
In Easy Mode, you start Media Player from the Play tab. In Full Desktop, choose Launch, Applications, Multimedia, SMPlayer.
SMPlayer can play both video and audio files, as well as video DVDs and audio CDs. When playing a DVD, it has a tendency to pick up the director’s narration by default. You can fix that by choosing Audio, Filters and selecting one of the filters. This stops the extra narration.
SMPlayer can turn on subtitles for different languages (see Figure 7.22), but seems to have difficulty switching to different language tracks when playing a DVD. Also, in full-screen mode it tends to skip tracks.
FIGURE 7.22 Selecting subtitles for a DVD in SMPlayer.

Having said all of that, SMPlayer does play DVDs on the Eee PC tolerably well.
Learning
The Eee PC ships with a set of educational packages that include a typing programs, a number of math and spelling programs, a periodic table, and even a wonderful virtual planetarium. The quality of these applications is quite good and should appeal to a wide age range.
The following sections provide a sampling of some of these programs: the typing tutor, the fraction tutor, and the planetarium. If you have school-age children that either own or use an Eee PC, you should take the time to explore the entire set of learning applications. Even if you don’t, the planetarium is a lot of fun for adults as well.
Learning to Type with Tux Type
Tux Type is the built-in typing tutor, and is a very solid typing-practice program. You can launch it from Easy Mode by clicking the Learn tab, then the Language subtab, and finally the Typing icon. Strangely, Tux Type was omitted from Full Desktop. However, from a command prompt, you can run it with the following command:
> tuxtype &
If you want to add it to the Launch menu, the full path is /usr/games/tuxtype.
Tux Type is not a KDE application, but rather an X Window System application. Therefore, the video mode does change when you run it.
The practice modes in Tux Type run through fingering drills on the keyboard. The screen shows how to orient your fingers and what rows to place them on. It then highlights each finger to show what to type. It’s quite clever and provides a good set of drills.
In addition to the drills, Tux Type also includes a few games in which words fall from the top of the screen. Students rack up points by typing the words before they reach the bottom. There are controls that adjust the difficulty level as well, so that the games can keep pace with a student’s increasing level of skill.
Learning Fractions with Fraction Tutor
Fraction Tutor is actually an open source application called KBruch. You can launch it from Easy Mode by clicking the Learn tab, the Mathematics subtab, and then the Fraction Tutorial icon. From Full Desktop, choose Launch, Applications, Education, Mathematics, Fraction tutor.
In its basic task mode, shown in Figure 7.23, Fraction Tutor presents a set of tasks in fraction arithmetic. It keeps track of correct and incorrect answers as you work through the problems, and you can reset this by clicking Reset.
FIGURE 7.23 Fraction Tutor in its basic task mode.

In Comparison mode (click Comparison on the left), you are asked to compare two fractional values and choose which is greater. The choice is made by clicking the greater than or less than operator between the fractions to toggle it between the two.
In Conversion mode (click Conversion), you are presented with a decimal value that you must convert into a fraction. In Factorization mode, you are given a value for which you must list all the prime factors. Thus, 16 is shown as 2 × 2 × 2 × 2. As in the other modes, Fraction Tutor keeps track of right and wrong answers, and it can be reset.
You can set preferences through Settings, Configure KBruch. You can change the fonts used and the colors.
Learning the Sky Through Desktop Planetarium
Desktop Planetarium is the KStars application. The following is quoted from the KStars website (http://edu.kde.org/kstars/):
KStars is a Desktop Planetarium for KDE. It provides an accurate graphical simulation of the night sky, from any location on Earth, at any date and time. The display includes 130,000 stars, 13,000 deep-sky objects, all 8 planets, the Sun and Moon, and thousands of comets and asteroids.
That’s pretty impressive. To launch it in Easy Mode, click the Learn tab, Science subtab, and the Planetarium icon. In Full Desktop, choose Launch, Applications, Education, Science, Desktop Planetarium. On a 701 screen, you’ll need to use the Alt-drag method of moving the oversized windows around to reach some of the controls.
First off, you need to set your location. To do so, choose Settings, Set Geographic Location to open the dialog box shown in Figure 7.24. You can set your location by city, province, or country. If you happen to have a GPS device or know your current longitude and latitude, you can set that as well. It also has settings for local daylight saving time (DST) rules.
FIGURE 7.24 Setting the location in KStars.

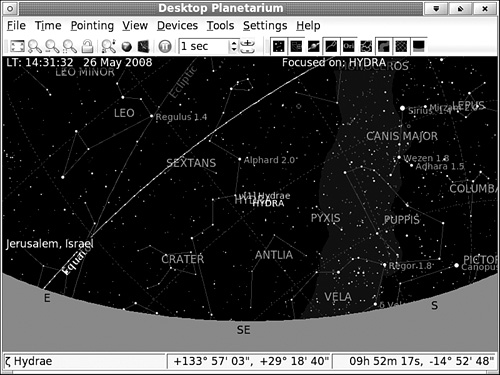
You can focus the cursor on any star in the display and, if it has a name, KStars pops up the name like a tool tip (see Figure 7.25). You can also drag and move the sky around, although this messes up the time synchronization a bit. There are buttons along the button bar to toggle the display of various items, ranging from the location of the Milky Way to whether constellation names are shown.
Under the Pointing menu, you can change the direction in which your “looking” at the night sky to any of the compass points or zenith (straight up). You can also search for a particular object (from a drop-down list with search) and the planetarium display will rotate to center on it. You access the object search function through Pointing, Find Object.
FIGURE 7.25 The sky, viewed through KStars, with the current focus on Hydra.
The Tools menu has a number of very cool features. What’s Up Tonight lists points of interest to observe at your location that night, including stars, planets, comets, asteroids, nebulae, and galaxies. You can set the planetarium to focus on the object once you’ve selected it. The Solar System Viewer is also kind of interesting, as it shows the current positions of the various planets along the plane of the ecliptic (see Figure 7.26).
Perhaps the most interesting feature of the Desktop Planetarium is its ability to control actual equipment. If you have a telescope with a drive, and it’s in the list of supported hardware, you can control the drive via KStars. Given the size and portability of the Eee PC, it should make an ideal control unit for a telescope.
FIGURE 7.26 Current position of the planets.

Summary
In this chapter, you got an overview of some of the pre-installed applications in the Eee PC. This is probably one of the Eee PC’s greatest strengths. It already has most of the applications people need to do any basic computing task. You should really take the time to explore the rest of the installed applications, as the computer has too many to cover in a single chapter.
You also got instructions for adding the ability to play DVDs in the multime-dial player: SMplayer. This is another strength of the Eee PC and of Linux in general, as many of the additional drivers, libraries, and applications that you might need can be easily installed via the internet and the built-in package management tools.