Chapter 2
Adding Peripheral Devices
IN THIS CHAPTER
![]() Connecting to an external monitor or video projector and configuring the display
Connecting to an external monitor or video projector and configuring the display
![]() Connecting a MMC-SD card for storage
Connecting a MMC-SD card for storage
![]() Connecting to an external hard drive or optical drive
Connecting to an external hard drive or optical drive
![]() Connecting to a LAN via an Ethernet connection
Connecting to a LAN via an Ethernet connection
If you plan to sit at a desk and do some heavy-duty typing and lots of work on your Eee PC, you’ll want to connect an external monitor, keyboard, and mouse to it. You might also want to add an external CD/DVD drive and attach the Eee PC to a printer. If you plan to use the Eee PC only as an ultra-portable machine, you probably don’t need to consider the expense of these items, though a portable mouse is always a good investment if you don’t like to use the touch pad.
Except for the monitor, everything plugs into a USB port; however, the machine only has three USB ports. So, if you plan to connect more than three USB gadgets to your Eee PC, you’ll also want to add a USB hub, as described first.
This chapter explains how to connect various external devices to your Eee PC. Adding a keyboard and mouse is pretty much a simple matter of plugging them in to a USB port. I’ve plugged in several keyboards, mice, and a trackball to my Eee PC and all worked flawlessly. Therefore, this chapter doesn’t cover this simple procedure.
Adding a USB Hub
Hubs usually come in four- and eight-port varieties. Unless you’re going to add a USB lava lamp and USB rocket launcher, four ports should be fine. With a four-port hub, you can attach a keyboard, CD/DVD drive, full-sized mouse, and printer. The really great thing about using a USB hub is that you only need to unplug the hub USB connector from the Eee PC and you’re ready to go. When you want to tie into everything again, there’s only one USB connector to attach.
Hubs are very generic items these days and extremely inexpensive. Your local discount or electronics store is almost certain to have several models. I recommend that you get a “powered” USB hub, meaning that it does not rely on the Eee PC for power. Because you’ll be using the hub at a desk where there’s probably power available, why not have a powered hub? No matter which type of hub you choose, just plug it into an open USB port on the Eee PC and you’ve instantly expanded the number of ports available.
Adding Flash Storage
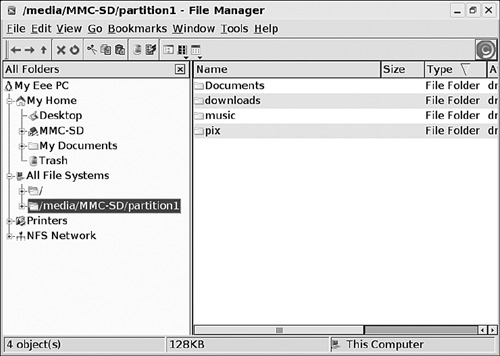
The Eee PC will accept MultiMediaCard (MMC), Secure Digital (SD), and the new higher-density Secure Digital High Capacity (SDHC) flash memory cards in the slot on the right side. Just plug in a flash memory card to add an extra drive. When you add the flash memory card, Xandros automatically mounts it and makes it accessible via a Linux cross directory connection (called a symbolic link) from your user directory. The best way to see this is through the File Manager, as shown in Figure 2.1. You can launch the File Manager from the Work tab in Easy mode.
FIGURE 2.1 File Manager showing the symbolic link for the flash drive.

Note that, by default, the MMC-SD mount starts with the first directory or directories as the partition(s) when viewed this way. However, if you open it with the Administrative File Manager in Full Desktop, the partition, still shown as a directory, is on the All Folders side and the mount is parallel to the main file system, as shown in Figure 2.2. Either way, the result is the same and you can navigate there.
FIGURE 2.2 Administrative File Manager showing the mount for the flash drive. From the command line, you’ll find a symbolic link to the mount at /home/user, which is quite convenient.
It would be good at this point to discuss how you can tell how much space is available on any drive. In Easy Mode, you can use the Disk Utility on the Settings tab to check remaining space internally.
You can also use the File Manager to check the amount of space left internally or on any drive that you plug in (SD/MMC card, USB drive, or external hard drive). You can access the File Manager on the Work tab, or by choosing Launch, File Manager in Full Desktop. You can’t check the space used and available by selecting a symbolic link for the drive; instead, you must select the actual mount for the drive in the file system. The symbolic link has a little arrow in the icon; the “real” partition is shown under All File Systems.
To check the remaining space, right-click the drive at its mount and select Properties from the shortcut menu. You’ll see values for the total storage on the drive, the amount used, and the amount remaining. If you see numbers only for Size and Size on Disk, you’re looking at a symbolic link, not the actual partition.
Connecting an External Hard Drive
External hard drives and most flash drives typically work simply by plugging them in to a USB port.
note
I did encounter a problem with U3 smart drives that have the built-in password protection application set. Because U3 smart drives are designed to launch on Windows, they simply don’t work on the Eee PC, and the flash drive won’t open. Removing the U3 application fixes that nicely enough. The easiest way to make these drives usable is to plug them into a Windows machine and format them as FAT 32.
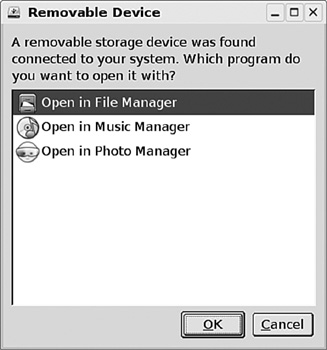
When you plug in an external disk drive or a flash drive, the Removable Device dialog box pops up (see Figure 2.3), giving you the choice of opening the drive in the File Manager, Music Manager, or Photo Manager. You can also just close the box by clicking Cancel.
FIGURE 2.3 The persistent Removable Device dialog box for removable media.
Flash drives, like SD cards, are mounted in /media and have a symbolic link under My Home (/home/user). You may see some very odd names for flash drives when viewing them in the File Manager.
If you want to remove a flash drive, you should first unmount it. This doesn’t remove power, which is unnecessary on the Eee PC as it supports “hot-swapping,” but disconnects it from the file system. To unmount a flash drive on either the Full Desktop or in Easy Mode, you’ll find a USB symbol icon in the bottom panel. Right-click the USB symbol and click the Safely Remove command. The Eee PC will unmount it from the system.
Connecting a CD/DVD Player
CD/DVD players are somewhat problematic in one aspect: playing DVDs. There is a library missing that we’ll discuss in Chapter 9 that will allow you to easily play DVDs.
Other than that, most external CD/DVD drives work just fine and are essentially plug-and-play. When a data/audio CD or data/video DVD is in place, the Eee PC mounts the drive under My Home via a symbolic link in the File Manager (it’s really under /media). However, there aren’t any applications residing on the Eee PC that will write data CDs or DVDs. Moreover, you can’t rip DVDs.
To make matters worse, none of the CD/DVD disk-burning packages in the default repositories for Xandros (and none of the packages I recommend) actually works on the Eee PC. However, Chapter 8 discusses adding additional package repositories and Chapter 9, “Must-Have Utilities,” discusses K3B, which enables you to burn DVDs, rip audio CDs, and do pretty much everything else you might need with CDs or DVDs. Chapter 9 provides a link to the website from which you can download a .deb package for Xandros that works perfectly on the Eee PC.
Connecting a Printer
Xandros Linux has excellent support for printers, and setting up a printer is almost trivial. About the only tricky thing is hooking up to a printer that is shared on a network. Even that’s pretty easy if you’ve already set up the Eee PC on the network. See Chapter 1 for information on joining the Eee PC to a Windows network.
You can easily set up a printer from either Easy Mode or the Full Desktop. In Easy Mode, click the Settings tab and then the Printers icon. In the Full Desktop, run Control Center (Launch, Control Center, Control Center). From there, choose Peripheral Devices and then Printers. Just click the Add button to get started with the Add Printer Wizard, shown in Figure 2.4.
FIGURE 2.4 First step in adding a printer.
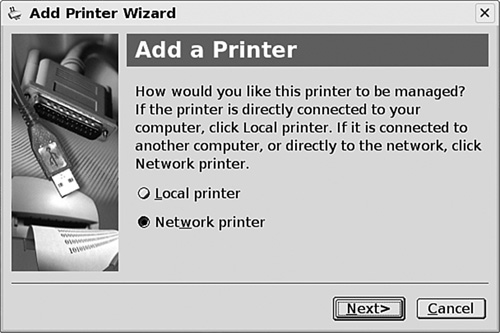
The wizard first asks you to specify whether the printer is attached directly to the Eee PC or attached to another computer on the network. (If attached directly to the Eee PC, this is another reason to have a powered USB hub.) Click Next when you’ve made your selection.
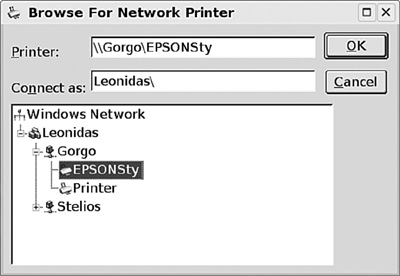
If it’s a network printer, it must be attached to another computer and “shared.” To access such a printer, click the Browse button to find it (don’t bother filling in the name at this point). In the Browse For Network Printer dialog box, shown in Figure 2.5, navigate to the computer and then to the printer it’s sharing (just click on the workgroup, then the machine, and finally the printer). Click OK. Now you can give the printer a name. It’s a good idea to give it a name that indicates the model. The printer name can’t contain spaces. You can substitute an underline character (_) for a space if you like. When you are finished, click Next.
FIGURE 2.5 Browsing for printers in the Windows workgroup.
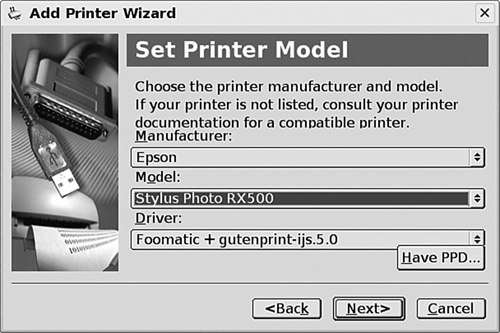
On the next wizard page, shown in Figure 2.6, select the printer manufacturer and model. Xandros recognizes many printers, so odds are in your favor that you’ll find your printer in the drop-down list. When you select your printer, the dialog automatically fills in the correct driver. If you do not find your printer in the list, you need to get the PPD file (printer driver) for it. To do so, open Firefox, go to the printer manufacturer’s website, and download the PPD file. Then, click the Have PPD button and navigate to it in the file browser. After you’ve identified your printer, click Next.
FIGURE 2.6 Selecting a printer from the list.
The final wizard page has you print a test page. I’ve found just about every printer I have access to on the menus, and I suspect you will, too.
Connecting an External Monitor or Projector
The screens on the 701 and 900 series are sufficient when you’re on the go or for just casual web surfing, emails, and so forth, but if you plan to, say, write a book, mix audio tracks, or retouch photographs, you’ll want to hook up an external monitor. Fortunately, this is simply a matter of connecting a VGA monitor cable into the port on the side of the Eee PC, connecting the other end to your monitor, and selecting to use the monitor through the External Monitor dialog box.
Adjusting the Screen Resolution
I’ve tried a number of monitors with my Eee PC, and they all work up to a 1024×768 resolution. However, recall from Chapter 1 that the Eee PC specifications indicate that it is capable of output up to 1600×1280 dpi. So what gives? Well, in some instances the Eee PC apparently doesn’t recognize what the monitor can handle.
Suppose you plug in a monitor that can handle up to 1280×1024 and you’d really like to use it at that resolution, but the option isn’t offered. You may still be able to use that resolution by doing a little configuration file tweaking. Follow these steps:
1. Open the External Display dialog box. In Easy Mode, click the Desktop Mode icon on the Settings tab. In Full Desktop, choose Launch, Control Center, External Display. If you set Resolution to Automatically Adjust, you usually get 1024×768 dpi.
2. Under Resolution, click the Manual radio button and open the drop-down list. You may see resolutions higher than 1024×768 (which is what you usually get when you select the Automatically Adjust option), in which case you can select a higher resolution and click Apply. Otherwise, you need to edit the /etc/X11 xorg.conf file.
note
In the External Display dialog box, you can choose to output video to the internal display only (the display on the Eee PC itself), the external display only (your monitor), or to both. When you run both, which I normally do, you don’t get a true split-screen display. Instead, the Eee PC display shows only as much of the top-left portion of the monitor that fits its limited display space.
3. Open the /etc/X11 xorg.conf file either from the command line with your favorite text editor (remember to preface the command with sudo so that you have permission to save the file) or by navigating to it in Full Desktop mode with the Administrative File Manager. The Administrative File Manager can be accessed through Launch > Applications > System > Administrator Tools > File Manager (Administrator). From the Administrative File Manager, right-click the file and choose Open With, Text Editor.
4. Look for the section called “Screen”. Change the Virtual entry for each of the four color depths (Depth; i.e. number of bits per pixel) from 1024×768 to whatever the maximum resolution is that your monitor will handle. The following shows my settings for the file:
Section “Screen”
Identifier “Screen1”
Device “Device1”
Monitor “Monitor1”
DefaultDepth 16
SubSection “Display”
Depth 8
Virtual 1280 1024
EndSubSection
SubSection “Display”
Depth 15
Virtual 1280 1024
EndSubSection
SubSection “Display”
Depth 16
Virtual 1280 1024
EndSubSection
SubSection “Display”
Depth 24
Virtual 1280 1024
EndSubSection
EndSection
5. Save the file and exit.
6. Open the External Display dialog box, and you’ll see new resolutions in the Manual drop-down list going up to whatever resolution you entered in the xorg.conf file, as shown in Figure 2.7.
7. Select the resolution you want and then click Apply. You get to try out the new resolution (to see if it works) and you have 15 seconds to accept it. If you don’t accept it in that time, the resolution will return to the previous setting. This is designed to prevent accidentally setting an unusable resolution.
FIGURE 2.7 The expanded resolutions list.

Rotating the Display to Resemble a Kindle
Now that you have set the resolution, it’s time to discuss the handy command-line video-control tool called xrandr. You can use xrandr to change the resolution as well, but it also enables you to do other nifty things such as rotate the screen. You need a command prompt to use this tool. In Easy Mode, press Ctrl+Alt+T. In Full Desktop, use your favorite method for launching an xterm window (or just choose Launch, Run Command and issue the Konsole command).
First, find out what your video display can do. To do that, from the command prompt, enter the following command:
> xrandr -q
You should get output that looks similar to the following:

From the output, you can see that I can command video resolutions for my monitor up to 1280×768 (which I set) and that the maximum the Eee PC internal display can handle is 800×480. Each resolution is followed by one or more numbers, which are the vertical scan rate(s), measured in Hertz, supported at that resolution.
Also note that normal, left, inverted, and right are available for both displays. Suppose that you have a monitor that will rotate to provide a “page” orientation display (higher than wide). You can use xrandr to rotate the display image to match this orientation by entering:
> xrandr -o left
Rotating your Eee PC display in this way enables you to have a display similar to that of an e-book display device such an Amazon Kindle. Load e-book reader software (such as Adobe Acrobat) and you have a very similar format for reading to that of a real book.
To return the display to normal, issue the following command:
> xrandr -o normal
By the way, using inverted flips the display upside down, which is just plain weird. It makes for a lovely practical joke, though.
If you want to set the resolution from the command line, use the -s argument. For example, the following sets the resolution to 1024×768:
> xrandr -s 1024×768
Setting the Clock
You can set both the clock and how it displays time. The procedure and available options are different depending on whether you are in Easy Mode or Full Desktop.
Setting the Clock in Easy Mode
To set the clock in Easy Mode, double-click the time display in the system tray. This opens the Date and Time dialog box, in which you can set the time, the date, and the time zone, and view a calendar.
You can also display a World Clock from Easy Mode by clicking this icon on the Internet tab. Just hover your mouse over one of the cities shown on the world map and you’ll see the current time there displayed in the tool tip. If you maximize the window first, you’ll find it easier to pinpoint the spot on the map that you want.
Establishing an Ethernet Connection
To get your network connection working by Ethernet, you first must find out whether the IP address for the Eee PC will be fixed (a static IP address) or dynamically assigned (via DHCP). Either your Internet Service Provider (ISP) or, if you are joining a LAN at an organization, your network administrator will provide this information.
If the IP address will be static, you need the following additional information:
![]() IP address for the Eee PC.
IP address for the Eee PC.
![]() Subnet mask. This is the same for all the addresses in your subnet (the machines hooked to a single router).
Subnet mask. This is the same for all the addresses in your subnet (the machines hooked to a single router).
![]() Gateway address, if your network has gateways.
Gateway address, if your network has gateways.
If the IP address will be dynamically assigned via DHCP, you probably don’t need to know the preceding details (but if you’re joining a large-scale network, ask your network administrator, because there are optional settings that you may need to use). When the Eee PC sends a DHCP request across the network, the DHCP server takes care of assigning the IP address (and how long you can keep it, which may be forever) as well as the gateway address, DNS addresses, and the subnet mask.
If you’re using a static IP address, you need to know the IP addresses of the DNS (Domain Name System) servers. DNS servers translate machine names and web addresses into IP addresses, and therefore provide human-friendly domain and machine names instead of IP addresses for the network. Usually, there is more than one DNS server, and you should find out in what order they should be entered (one is usually a secondary DNS server).
For example, in a Windows LAN a machine might be named //marysue; however, the static IP address for the machine might be 199.66.24.11. No one wants to remember //199.66.24.11 when it’s much easier to remember Mary Sue’s machine’s name.
Your network probably doesn’t use WINS servers, because DNS is the standard these days, but if it does, find out if you need to put in an override WINS address. (WINS is only sort of like DNS, but has dynamically assigned mappings.)
Sharing is an unlikely event on an Eee PC, but possible. Sharing refers to using the Eee PC to connect to the Internet by either ethernet or wireless and using the unused wireless or ethernet NIC to connect to one or more other computers. All other computers therefore connect to the Eee PC in order to connect to the Internet. Given that the Eee PC is noted for its portability, this isn’t a likely scenario. Besides, in the age of cheap routers and wireless, why bother?
Armed with that information, you’re ready to establish an Ethernet connection. If you’re connecting via a wire, you’re likely either joining a home network through a router or, in very rare cases, via a cross-over cable directly to the Ethernet port of another computer. For example, lots of industrial hardware has Ethernet connectivity and built-in web servers, so you simply connect the Eee PC via the cross-over cable to the machine, set the IP address for your Eee PC, and point your web browser to the IP address of the machine’s web server.
If your connection is through a router, it’s probably a DHCP connection, which is pretty trivial to set up. If you’re joining a larger LAN at some organization, you’ll probably need all of the above information.
You configure your setting in the Local Area Connection Properties dialog box, shown in Figure 2.8, available by clicking the Network icon on the Internet tab in Easy Mode or by choosing Launch, Control Center, Network Connections in Full Desktop.
FIGURE 2.8 Network properties.

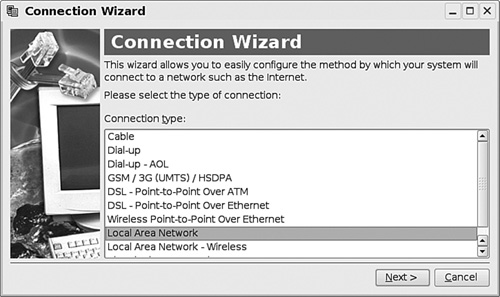
All of the settings discussed have their own nice, neat tabs, and setup is straightforward. If you’d prefer a wizard to ask you these sorts of questions, you can use the Connection Wizard, the first page of which is shown in Figure 2.9. You launch it in Easy Mode by clicking the Network icon on the Internet tab and then clicking the Create button and launch it in Full Desktop by choosing Launch, Applications, Internet, Connection Wizard. The wizard can actually set up both Ethernet and wireless connections.
FIGURE 2.9 Opening page of the Connection Wizard.
Summary
In this chapter, you’ve learned to connect the Eee PC to a variety of peripheral devices, including printers, networks, storage devices, keyboards, and drives. You’ll also learned how to connect to an external monitor and control its resolution, both from the External Monitor application and from the command line.
Setting display resolutions may require you to modify the the /etc/X11 xorg.conf file, which is also a good introduction to configuring devices in Linux. Modifying configuration files is a simple and painless process, but it can be daunting if you’ve never done it. Throughout the rest of the book, we’ll be doing that quite a bit.