
The following objectives for Exam CX-310-200 are covered in this chapter:
Explain and perform Solaris 10 OS user administration, and manage user accounts and initialization files.
![]() You need to know how to use the commands and utilities to set up user accounts, and you need to understand which files are configured and how the information is formatted in those files.
You need to know how to use the commands and utilities to set up user accounts, and you need to understand which files are configured and how the information is formatted in those files.
When you set up user accounts, you can customize each user’s session by using initialization files that are run each time the user logs in. This chapter describes how to administer each initialization file.
Monitor system access by using appropriate commands.
![]() You also need to control access to the operating system via user logins. Only users who have active logins should have access to the system. You need to control the level of access that each user will have. In addition to controlling system access, you need to monitor the system for unauthorized use.
You also need to control access to the operating system via user logins. Only users who have active logins should have access to the system. You need to control the level of access that each user will have. In addition to controlling system access, you need to monitor the system for unauthorized use.
Perform system security administration tasks by switching users on a system, and by becoming root and monitoring su attempts.
![]() Users sometimes obtain logins and passwords from other users. You need to monitor the system for any user that may be switching to a user account that they have not been authorized to use—this includes monitoring unauthorized use of the root account.
Users sometimes obtain logins and passwords from other users. You need to monitor the system for any user that may be switching to a user account that they have not been authorized to use—this includes monitoring unauthorized use of the root account.
Control system security through restricting FTP access and using /etc/hosts.equiv and $HOME/.rhosts files and SSH fundamentals.
![]() You need to understand the vulnerabilities that are presented to your system by network services such as FTP, Telnet, and other forms of remote access. You need to restrict access to these facilities and ensure that unauthorized users do not gain access to your system over the network via an unsecured network service.
You need to understand the vulnerabilities that are presented to your system by network services such as FTP, Telnet, and other forms of remote access. You need to restrict access to these facilities and ensure that unauthorized users do not gain access to your system over the network via an unsecured network service.
Restrict access to data in files through the use of group membership, ownership, and special file permissions.
![]() As a system administrator, you need to be able to assign access to directories and files by using the standard Solaris permissions scheme. Understanding this permission scheme and applying it to user and group IDs is necessary for controlling access to critical system data.
As a system administrator, you need to be able to assign access to directories and files by using the standard Solaris permissions scheme. Understanding this permission scheme and applying it to user and group IDs is necessary for controlling access to critical system data.
The following study strategies will help you prepare for the exam:
![]() As you read this chapter, you should practice the step-by-step examples on a Solaris 10 system. You should practice the steps until you are able to perform them from memory.
As you read this chapter, you should practice the step-by-step examples on a Solaris 10 system. You should practice the steps until you are able to perform them from memory.
![]() You should make sure you understand each of the attributes associated with a user account, such as the user ID (UID), primary group, default shell, and so on.
You should make sure you understand each of the attributes associated with a user account, such as the user ID (UID), primary group, default shell, and so on.
![]() You should practice using the command-line tools for adding, modifying, and removing user accounts, and you should pay attention to details. These commands will appear on the Sun exam, so you need to make sure you understand them thoroughly. You should continue practicing these commands until you can perform them from memory. You should modify the account attributes, such as the default shell, group, and UID value. You should modify variables in the initialization files for each user to see the results.
You should practice using the command-line tools for adding, modifying, and removing user accounts, and you should pay attention to details. These commands will appear on the Sun exam, so you need to make sure you understand them thoroughly. You should continue practicing these commands until you can perform them from memory. You should modify the account attributes, such as the default shell, group, and UID value. You should modify variables in the initialization files for each user to see the results.
![]() You should pay special attention to the section “Controlling File Access.” You need to understand everything discussed in that section because the exam tests heavily on those topics. You should know the commands described and understand permission values that are set on a file or directory.
You should pay special attention to the section “Controlling File Access.” You need to understand everything discussed in that section because the exam tests heavily on those topics. You should know the commands described and understand permission values that are set on a file or directory.
![]() You should memorize all the configuration files described in this chapter. You won’t need to understand how they are structured—just understand what they are used for and how they can be used to monitor and control security on a system.
You should memorize all the configuration files described in this chapter. You won’t need to understand how they are structured—just understand what they are used for and how they can be used to monitor and control security on a system.
![]() Various commands and files are described in the section “Auditing Users.” You need to understand the commands and log files that are described in that section. Also, as you read through the “Controlling Network Security” section, you should pay special attention to the concept of trusted hosts and restrictions on superuser access and understand how to restrict these services
Various commands and files are described in the section “Auditing Users.” You need to understand the commands and log files that are described in that section. Also, as you read through the “Controlling Network Security” section, you should pay special attention to the concept of trusted hosts and restrictions on superuser access and understand how to restrict these services
![]() You should study the terms at the end of the chapter. These terms might appear in questions on the exam, so you need to understand what they mean.
You should study the terms at the end of the chapter. These terms might appear in questions on the exam, so you need to understand what they mean.
Managing user accounts can be simple or complex, depending on the size of the network. Today, many Solaris servers are simply database servers or Web servers, and users do not log directly in to these systems. In addition, Solaris workstations may only require login accounts for one or two users. On the other hand, in a university setting, a server may hold hundreds of user login accounts. Managing these accounts is very complex because the accounts change every semester. The system administrator is not only responsible for managing user accounts but also for ensuring that system security is not compromised.
This chapter describes how to manage user accounts while maintaining a reasonable level of security on a system.
Objective:
Explain and perform Solaris 10 OS user administration, and manage user accounts and initialization files.
Access to a system is allowed only through user login accounts that are set up by the system administrator. A user account includes information that a user needs to log in and use a system—a user login name, a password, the user’s home directory, and login initialization files. Each of these items is described later in this chapter.
The following methods and tools are available in Solaris for adding new user accounts to a system:
![]() User and Group Manager—A graphical user interface (GUI) that is available in the Solaris Management Console.
User and Group Manager—A graphical user interface (GUI) that is available in the Solaris Management Console.
![]() The
The /usr/sadm/bin/smuser command—A command that can be executed from the command line.
![]() The
The useradd command—A command that can be executed from the command line.
As with many Unix commands, the command-line method of adding user accounts can be difficult for inexperienced administrators. For this reason, Sun has added user account administration to the Solaris Management Console (SMC).
The SMC is a GUI that is designed to ease several routine system administration tasks. When you use the SMC, you are presented with a menu-like interface that is much easier to use than the ASCII interface supplied at the command prompt. This chapter describes how to use the SMC and the command line to administer user accounts on a system.
To perform administrative tasks such as adding user accounts, SMC will prompt you for the root password or an authorized RBAC account before allowing permission to add, create, and modify user accounts. Chapter 11, “Controlling Access and Configuring System Messaging,” provides more information on RBAC.
Note
Editing User Accounts Files When you’re adding or modifying user accounts, the SMC edits the files /etc/passwd, /etc/shadow, and /etc/group. These files are described later in this chapter. As root, you could edit these files directly, but that is not recommended. Errors in any of these files could cause adverse effects on the system.
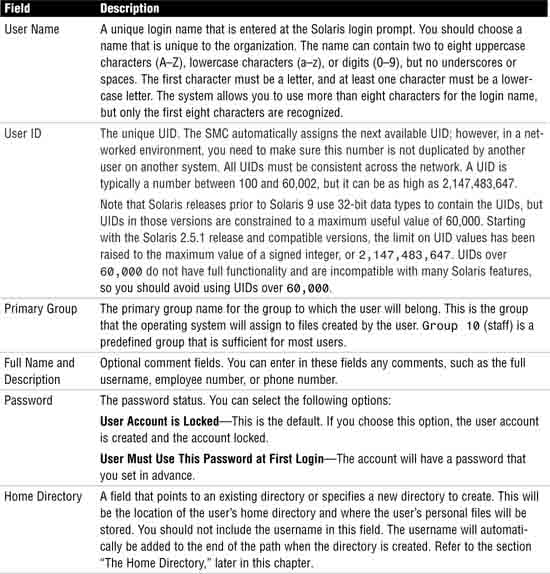
The first step in setting up a new user account is to have the user provide the information you need in order to administer the account. You also need to set up proper permissions so that the user can share information with other members of his or her department. You need to know the user’s full name, department, and any groups with which the user will be working. It’s a good idea for the system administrator to sit down with the user and compile an information sheet (like the one shown in Table 4.1) so that you have all the information you need when you set up the account.

To use the SMC to add a new user login account, you should follow the procedure described in Step by Step 4.1.
Exam Alert
Using the SMC to Add a New User For the exam, you will not be asked to use the SMC to add a new user account, but you do need to know what tool within the SMC is used to add a user account. You also need to know what information the SMC asks for.
STEP BY STEP
4.1 Adding a New Login Account
1. Start the SMC by typing smc at the command prompt. The SMC Welcome window appears, as shown in Figure 4.1.

2. In the left pane of the Welcome window, click the This Computer icon. The icon expands, displaying five additional icons, as shown in Figure 4.2.

3. Click the System Configuration icon, and the system configuration icons appear in the main pane of the window, as shown in Figure 4.3. One of these icons is Users.

4. Click the Users icon. You are prompted to enter a username and password. You can either enter the root password or enter your roll name and password if you have an RBAC account. After you enter the correct name and password, the User Accounts tool is loaded and displayed in the main pane of the window, as shown in Figure 4.4.

5. Click the User Accounts icon. Current user accounts are displayed, then choose the Action menu and Add User, as shown in Figure 4.5.

6. From the top toolbar, select Action, Add User. Slide the mouse to the right, and you see two options for adding users, as shown in Figure 4.6. Select the With Wizard option.

The Add User Wizard appears, as shown in Figure 4.7.
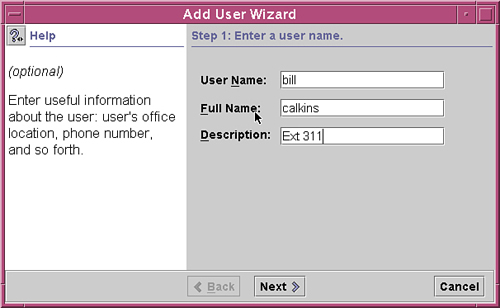
7. In the first wizard window that appears, all the fields are blank. Table 4.2 describes the information needed in this screen. If you aren’t sure how to complete a field, read the Help screen in the left pane after you click on that field. After you enter the information in the first wizard window, click the Next button.
8. Another window appears, asking you to enter a user ID (UID). Enter a UID and click Next.
9. In the third window of the wizard, you can either select to have the account locked or specify the password that the user will use the first time he or she logs in, as shown in Figure 4.8. Then click the Next button at the bottom of the window.

Note
Changing a Password from the Command Line A user can type the Unix command passwd at any time from the command prompt to change his or her password.
10. After you enter the user password information, a fourth window opens, asking you to select the primary group for that user. Select a group from the pull-down menu, as shown in Figure 4.9, and click the Next button.

11. The fifth wizard window asks you to set the user’s home directory, as shown in Figure 4.10. Fill in the information for the user’s home directory and click the Next button.

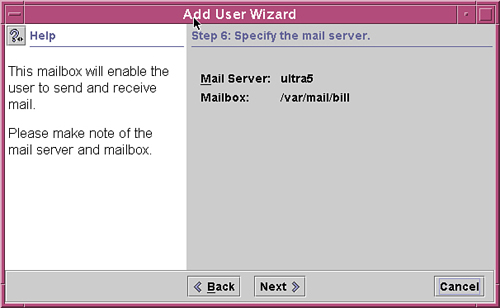
12. The sixth window displays the user’s mail server and mailbox information, as shown in Figure 4.11. Click the Next button to continue.
13. The next window displays a summary of the new user information, as shown in Figure 4.12. If the information is correct, click the Finish button, and you are returned to the main SMC window. Otherwise, click Back to go back and re-enter the information.

When you use the Add User Wizard to create an account, the following defaults are assigned to the account:
![]() The default shell is the Bourne shell (
The default shell is the Bourne shell (/bin/sh).
![]() No secondary groups are set up.
No secondary groups are set up.
To modify these settings, refer to the section “Modifying User Accounts with the SMC,” later in this chapter.
Refer to the man pages for a description of this command.
When a user account is no longer needed on a system, you need to delete it. Step by Step 4.2 describes how to perform this task.
STEP BY STEP
4.2 Using the SMC to Delete Existing User Accounts
1. Follow the steps in Step by Step 4.1 for adding a new login account through the SMC. When you get to the User Accounts tool (refer to Figure 4.5), right-click the user you want to delete. A pop-up menu appears, as shown in Figure 4.13.

2. Select Delete from the pop-up menu. A confirmation window appears, as shown in Figure 4.14.

Select whether you want to delete the user’s home directory and/or mailbox. Then click the Delete button at the bottom of the window to delete the account.
Caution
When selecting to remove the home directory, make sure that you are certain of the directory that will be removed. If you need data from this directory, do not remove it. Sometimes a user’s home directory might point to an important directory such as “/” root. In this case, removing the home directory would remove important system files.
If a login needs to be modified—to change a password or disable an account, for example—you can use the SMC to modify the user account settings, as described in Step by Step 4.3.
STEP BY STEP
4.3 Modifying User Accounts with the SMC
1. Follow the steps described in Step by Step 4.1 for adding a new login account through the SMC. When you get to the User Accounts tool (refer to Figure 4.5), double-click the user you want to modify. The window shown in Figure 4.15 appears.
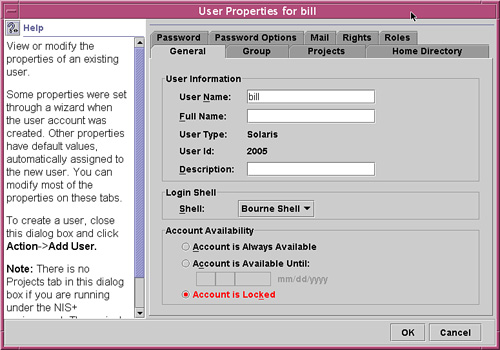
2. Modify any of the following items in the User Properties window:
![]() Change the username.
Change the username.
![]() Change the full name.
Change the full name.
![]() Change the description of the account.
Change the description of the account.
![]() Change the login shell. By default the user is assigned to the Bourne shell (
Change the login shell. By default the user is assigned to the Bourne shell (/bin/sh).
![]() Change the account availability. This option allows you to specify a date on which the account is locked.
Change the account availability. This option allows you to specify a date on which the account is locked.
![]() Lock an account to prevent logins using this user name.
Lock an account to prevent logins using this user name.
![]() Assign additional groups.
Assign additional groups.
![]() Make the user a member of a project. Projects are described later in this chapter.
Make the user a member of a project. Projects are described later in this chapter.
![]() Change the home directory.
Change the home directory.
![]() Share the home directory with other users or groups.
Share the home directory with other users or groups.
![]() Assign roles and grant rights to the account (see Chapter 11).
Assign roles and grant rights to the account (see Chapter 11).
![]() Change the password or set password options, such as how often passwords should be changed, or expire passwords after a specified period of inactivity.
Change the password or set password options, such as how often passwords should be changed, or expire passwords after a specified period of inactivity.
As a system administrator, you might need to add a group that does not already exist on the system. Perhaps a new group of users called engrg (from the Engineering Department) needs to be added. Step by Step 4.4 shows how to add this group to the system by using the SMC.
STEP BY STEP
4.4 Adding Groups with the SMC
1. Follow the steps described in Step by Step 4.1 for adding a new login account through the SMC. When you get to the Users tool (refer to Figure 4.4), double-click the Groups icon. The list of groups appears in the Groups tool, as shown in Figure 4.16.

2. From the top toolbar, select Action, Add Group, as shown in Figure 4.17.

The Add Group window appears, as shown in Figure 4.18.

3. Enter the group name engrg and then enter the unique GID number 200, then click on the OK button, as shown in Figure 4.19.
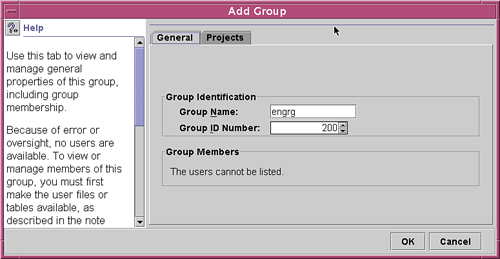
4. Click OK when you’re finished, and you are returned to the main SMC window. The list of groups displayed in the Groups window is updated to include the new group. You can modify the group by double-clicking the icon that represents the group that you want to change.
The /usr/sadm/bin/smgroup add command is the command-line equivalent of the SMC tool for adding a new group. For example, to add a group named development with a GID of 300, you enter this:
/usr/sadm/bin/smgroup add — -g 300 -n development
The system responds with this:
Authenticating as user: root
Type /? for help, pressing <enter> accepts the default denoted by [ ]
Please enter a string value for: password :: <Enter the Root Password>
Loading Tool: com.sun.admin.usermgr.cli.group.UserMgrGroupCli from ultra5
Refer to the man pages for a complete description of the smgroup command.
You can manage user accounts from the command line as well as through the SMC. Although using the command line is more complex than using the SMC GUI interface, the command line allows more options and provides a little more flexibility.
Solaris supplies the user administration commands described in Table 4.3 for setting up and managing user accounts.

Note
SMC Versus Conventional Administration Commands The SMC has its own command-line equivalents, such as smuser and smgroup. The difference between the SMC commands and the commands outlined in Table 4.3 is that the SMC can also update the name service. The commands in Table 4.3 only update the local files.
You can add new user accounts on the local system by using the useradd command. This command adds an entry for the new user into the /etc/passwd and /etc/shadow files, which are described later in this chapter, in the section “Where User Account Information Is Stored.”
Just like the SMC, the -m option to the useradd command copies all the user initialization files found in the /etc/skel directory into the new user’s home directory. User initialization files are covered in the section “Setting Up Shell Initialization Files,” later in this chapter.
The syntax for the useradd command is as follows:

Table 4.4 describes these options.

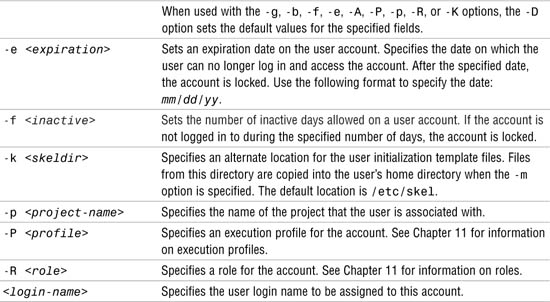
Many additional options are available, although most of them are not used as often as the ones in Table 4.4. Additional options to the useradd command apply specifically to RBAC accounts and are described in Chapter 11. You can also refer to the man pages to find a listing of all the options to the useradd command.
The following example creates a new login account for Bill Calkins:
useradd -u 3000 -g other -d /export/home/bcalkins -m -s /bin/sh
-c "Bill Calkins, ext. 2345" bcalkins
The login name is bcalkins, the UID is 3000, and the group is other. In this example, you instruct the system to create a home directory named /export/home/bcalkins. The default shell is /bin/sh, and the initialization files are to be copied from the /etc/skel directory.
Note
Assigning a UID If the -u option is not used to specify a UID, the UID defaults to the next available number above the highest number currently assigned. For example, if UIDs 100, 110, and 200 are already assigned to login names, the next UID that is automatically assigned is 201.
The /usr/sadm/bin/smuser add command is the command-line equivalent of the SMC tool for adding a new user. The advantage of using smuser over the useradd command is that smuser interacts with naming services, can use autohome functionality, and is well suited for remote management.
The smuser command has several subcommands and options. The syntax to add a user using smuser is
smuser add [ auth args ] - [subcommand args]
A few of the more common arguments that can be used with the add subcommand are described in Table 4.5.

The following example adds a new user named “bcalkins” and a comment field of “Bill Calkins ext. 100”:
# /usr/sadm/bin/smuser add — -n bcalkins -c "Bill Calkins Ext 100"
Authenticating as user: root
Type /? for help, pressing <enter> accepts the default denoted by [ ]
Please enter a string value for: password :: <ENTER ROOT PASSWORD>
Loading Tool: com.sun.admin.usermgr.cli.user.UserMgrCli from smokey
Login to smokey as user root was successful.
Download of com.sun.admin.usermgr.cli.user.UserMgrCli from smokey
was successful.
After you press Enter, the system asks for the root password to authenticate Bill Calkins before adding the new login account. The next step would be to set a password for the account using the passwd command as follows:
# passwd bcalkins
passwd: Changing password for bcalkins
New Password: <ENTER PASSWORD>
Re-enter new Password: <RE_ENTER PASSWD>
passwd: password successfully changed for bcalkins
Options that can be used with the passwd command are described in Table 4.6.

To force a user to change his or her password at the next login, type
# passwd -f bcalkins
passwd: password information changed for bcalkins
#
To change a user’s home directory, type
# passwd -h bcalkins
The system responds with
Default values are printed inside of '[]'.
To accept the default, type <return>.
To have a blank entry, type the word 'none'.
Enter the new home directory when prompted:
Home Directory [/home/wcalkins]: /home/bcalkins
passwd: password information changed for bcalkins
You use the usermod command to modify existing user accounts from the command line. You can use usermod to modify most of the options that were used when the account was originally created.
The following is the syntax for the usermod command:

The options used with the usermod command are the same as those described for the useradd command, except for those listed in Table 4.7.

Additional options to the usermod command apply specifically to RBAC accounts and are described in Chapter 11.
The following example changes the login name for user bcalkins to wcalkins:
usermod -d /export/home/wcalkins -m -s /bin/ksh -l wcalkins bcalkins
This example also changes the home directory to /export/home/wcalkins and default shell to /bin/ksh.
Note
Modifying the Home Directory When you’re changing the home directory, unless the -d and -m options are used, existing files still must be manually moved from the old home directory to the new home directory. In all cases, symbolic links, application-specific configuration files, and various other references to the old home directory must be manually updated.
To set a user’s account expiration date, you enter this:
usermod -e 10/15/2006 wcalkins
The account is now set to expire October 15, 2006. Notice the entry made to the /etc/shadow file:
wcalkins:1luzXWgmH3LeA:13005::::::
The syntax of the /etc/shadow file is described later in this chapter, in the section “Where User Account Information Is Stored.”
The /usr/sadm/bin/smuser modify command is the command-line equivalent of the SMC tool for modifying an existing user account.
You use the userdel command to delete a user’s login account from the system. You can specify options to save or remove the user’s home directory. The syntax for the userdel command is as follows:
userdel [-r] <login-name>
-r removes the user’s home directory from the local file system. If this option is not specified, only the login is removed; the home directory remains intact.
Caution
Make sure you know where the user’s home directory is located before removing it. Some users have / as their home directory, and removing their home directory would remove important system files.
The following example removes the login account for bcalkins but does not remove the home directory:
userdel bcalkins
The /usr/sadm/bin/smuser delete command is the command-line equivalent of the SMC tool for deleting an existing user account.
You use the groupadd command to add new group accounts on the local system. This command adds an entry to the /etc/group file. The syntax for the groupadd command is as follows:
groupadd [-g <gid>] -o <group-name>
Table 4.8 describes the groupadd command options.

The following example adds to the system a new group named acct with a GID of 1000:
groupadd -g 1000 acct
Note
Assigning a GID If the -g option is not used to specify a GID, the GID defaults to the next available number above the highest number currently assigned. For example, if group IDs 100, 110, and 200 are already assigned to group names, the next GID that is automatically assigned is 201.
The /usr/sadm/bin/smgroup add command is the command-line equivalent of the SMC tool for creating a new group.
You use the groupmod command to modify the definitions of a specified group. The syntax for the groupmod command is as follows:
groupmod [-g <gid>] -o [-n <name>] <group-name>
Table 4.9 describes the groupmod command options.

The following example changes the engrg group GID from 200 to 2000:
groupmod -g 2000 engrg
Any files that had the group ownership of “engrg” are now without a group name. A long listing would show a group ownership of 200 on these files, the previous GID for the engrg group. The group 200 no longer exists on the system, so only the GID is displayed in a long listing.
The /usr/sadm/bin/smgroup modify command is the command-line equivalent of the SMC tool for modifying an existing group.
You use the groupdel command to delete a group account from the local system. The syntax for the groupdel command is as follows:
groupdel <group-name>
The following example deletes the group named acct from the local system:
groupdel acct
The /usr/sadm/bin/smgroup delete command is the command-line equivalent of the SMC tool for deleting an existing group.
Objective:
When you set up user accounts, you can customize each user’s session by using initialization files that are referenced each time the user logs in. This chapter describes how to administer each initialization file.
As a system administrator, when you’re setting up a user’s home directory, you need to set up the shell initialization files for the user’s login shell (also called user initialization files). A shell initialization file is a shell script that runs automatically each time the user logs in. The initialization file sets up the work environment and customizes the shell environment for the user. The primary job of the shell initialization file is to define the user’s shell environment, such as the search path, environment variables, and windowing environment. Each Unix shell has its own shell initialization file (or files), located in the user’s home directory, as described in the following sections.
C shell initialization files run in a particular sequence after the user logs in to the system. For the C shell, initialization files are run in the following sequence:
1. Commands in /etc/.login are executed.
2. Commands from the $HOME/.cshrc file (located in the user’s home directory) are executed. In addition, each time the user starts a new shell or opens a new window in the CDE, commands from $HOME/.cshrc are run.
3. The shell executes commands from the $HOME/.login file (located in the user’s home directory). Typically, the $HOME/.login file contains commands to specify the terminal type and environment.
4. When startup processing is complete, the C shell begins reading commands from the default input device, the terminal.
Although it is not part of the initialization of the shell, when the C shell terminates, it performs commands from the $HOME/.logout file (if that file exists in the home directory).
Bourne shell initialization files run in a particular sequence after the user logs in to the system. For the Bourne shell, initialization files are run in the following sequence:
1. Commands in /etc/profile are executed.
2. Commands from the $HOME/.profile file (located in the user’s home directory) are executed. Typically, the $HOME/.profile file contains commands to specify the terminal type and environment.
3. When startup processing is complete, the Bourne shell begins reading commands from the default input device, the terminal.
Korn shell initialization files run in a particular sequence after the user logs in to the system. For the Korn shell, initialization files are run in the following sequence:
1. Commands in /etc/profile are executed.
2. Commands from the $HOME/.profile file (located in the user’s home directory) are executed. Typically, the $HOME/.profile file contains commands to specify the terminal type and environment.
3. If the $HOME/.kshrc file is present, commands located in this file are executed. In addition, this initialization file gets read (and the commands get executed) every time a new Korn shell is started after login.
4. When startup processing is complete, the Korn shell begins reading commands from the default input device, the terminal.
Solaris 10 also includes, as part of the operating environment, the bash, zsh, and tcsh shells. These shells, especially bash and tcsh, are gaining popularity with system administrators and contain extra options and functions. You can find further details about these shells and their additional functionality by consulting the man pages for them.
Note
The Effect of CDE on Shell Initialization Files Initialization files are executed in the order specified for each of the shells, except when you’re logging in to the CDE, where the $HOME/.dtprofile file is also run. If the DTSOURCEPROFILE variable is not set to TRUE in the .dtprofile file, the $HOME/.profile file will not be run.
When you’re using CDE, it may be necessary to add the following lines in the $HOME/.profile to get the .kshrc file to work properly in the Korn shell:
set -ha
ENV=$HOME/.kshrc
Without this entry, aliases and environment variables might not get passed to subshells (that is, additional shells spawned by the Korn shell). Therefore, when you open a new window in the CDE, alias and environment variables are set in the initial shell but are not set in subsequent shells, even though they are listed in the $HOME/.kshrc file. The preceding entries fix this problem.
When a user logs in to the system, the user’s login shell is invoked. The shell program looks for its initialization files in the correct order for the shell. The shell program then executes the commands contained in each file and, when it is finished, displays the shell prompt on the user’s screen.
Default user initialization files (such as .cshrc, .profile, and .login) are created automatically in the user’s home directory when a new user account is added. You can predefine the contents of these files, or you can choose to use the system default files. The Solaris 10 system software provides default user initialization files for each shell in the /etc/skel directory on each system. These files are listed in Table 4.10.

You can use these initialization files as a starting point and modify them to create a standard set of files that provides a work environment that is common to all users. You can also modify them to provide a working environment for different types of users.
When a user logs in to a system, the shell initialization files determine the work environment. The shell startup scripts can be modified to set environment variables and directory paths that are needed by a specific user. These startup scripts are located in the user’s home directory.
When you are setting up user initialization files, it might be important to allow the users to customize their own initialization files. You can do this by having centrally located and globally distributed user initialization files called site initialization files. With these files, you can continually introduce new functionality to all the user work environments by editing one initialization file.
The local initialization file, located in the user’s home directory, allows user-specific configuration. A local initialization file lets users further customize their own work environment.
Site initialization files are located in the /etc directory and can be edited only by root. They are designed to distribute sitewide changes to all user work environments. Individual user initialization files are located in each user’s home directory and can be customized by the owner of the directory. When a user logs in, the site initialization file is run first, and then the initialization file located in the user’s home directory is run.
Note
Sitewide Shell Initialization Files You should not use system initialization files located in the /etc directory (/etc/profile, /etc/.login) to manage an individual user’s work environment. Files in that folder are site initialization files, which are considered to be global files and are meant to be generic and used to set work environments for all users. The system runs these startup files first and then runs each user’s startup files, located in the home directories.
The most commonly customized aspects of shell startup scripts are environment variables. Table 4.11 describes the most common environment and shell variables, including some that you might want to customize in user initialization files.

Tip
Modifying the Shell Prompt Some users find it helpful to make their login name, the hostname, and the current directory part of the prompt. Here’s how you set it up in the Korn shell:
PS1="$(whoami)@$(hostname) [$PWD] #"
The resulting prompt looks like this:
root@ultra5 [/usr/bin] #
Step by Step 4.5 shows how to modify the shell environment by changing some of the variables in the shell startup file. It suggests some changes and shows the shell-specific syntax to use.
STEP BY STEP
4.5 Verifying and Changing a User’s Environment
1. Log in as the user. This enables you to see the user’s environment as the user would see it. You can use su- <username> to achieve this.
2. Set the user’s default path to include the home directory as well as directories or mount points for the user’s windowing environment and applications. To change the path setting, add or modify the line for PATH.
For the Bourne or Korn shell, this is the syntax:
PATH=/<dirname1>:/<dirname2>:/<dirname3>:.; export PATH
For example, you could enter the following line in the user’s $HOME/.profile file:
PATH=$PATH:/usr/bin:/$HOME/bin:/net/glrr/files1/bin:.;export PATH
For the C shell, notice that in the syntax, the colons are replaced with spaces:
set path =(/<dirname1>/<dirname2>/<dirname3> .)
For example, you could enter the following line in the user’s $HOME/.cshrc file:
set path=($path /usr/bin $HOME/bin /net/glrr/files1/bin .)
Note
Modifying the PATH Variable Prefixing $PATH (Korn shell) or $path (C shell) appends changes to the user’s path settings that are already set by the site initialization file. When you set the PATH variable with this procedure, initial path settings are not overwritten and are not lost. Also note the dot (.) at the end of the list to denote the current working directory. The dot should always be at the end of the path for users and should not be used in the path for root, as discussed in the section “Setting the Correct Path,” later in this chapter.
3. Make sure the environment variables are set to the correct directories for the user’s windowing environments and third-party applications. To do so, enter env, and you see the following:
$env
HOME=/export/home
HZ=100
LOGNAME=bill
MAIL=/var/mail/bill
PATH=/usr/bin:
SHELL=/bin/sh
TERM=xterm
TZ=US/Michigan
4. Add or change the settings of environment variables.
For the Bourne or Korn shell, the syntax is as follows:
VARIABLE=<value>;export VARIABLE
The following example sets the user’s default mail directory:
MAIL=/var/mail/bcalkins;export MAIL
For the C shell, the syntax is as follows:
setenv VARIABLE <value>
The following example sets the history to record the last 100 commands in C shell:
set history = 100
The home directory is the portion of a file system that is allocated to a user for storing private files. The amount of space you allocate for home directories depends on the kinds of files the user creates and the type of work performed. An entire file system is usually allocated specifically for home directories, and the users all share this space. As the system administrator, you need to monitor user home directories so that one user does not use more than his or her fair share of space. You can use disk quotas to control the amount of disk space a user can occupy. (Disk quotas are discussed in Chapter 1, “Managing File Systems.”) Or you can use soft partitions, which are described in Chapter 10.
A home directory can be located either on the user’s local system or on a remote file server. Although any directory name can be used for a home directory, it is customary that home directories are named using this convention: /export/home/<username>. When you put the home directory in /export/home, it is available across the network in case the user logs in from several different stations. For a large site, you should store home directories on a server.
Regardless of where their home directories are located, users usually access them through a mount point named /home/<username>. When AutoFS is used to mount home directories, you are not permitted to create any directories under the /home mount point on any system. The system recognizes the special status of /home when AutoFS is active. For more information about AutoFS and automounting home directories, see Chapter 9, “Virtual File Systems, Swap Space, and Core Dumps.”
To access a home directory anywhere on the network, a user should always refer to it as $HOME, not as /export/home/<username>. The latter is machine specific, and its use should be discouraged. In addition, any symbolic links created in a user’s home directory should use relative paths (for example, ../../../x/y/x) so that the links will be valid no matter where the home directory is mounted. The location of user home directories might change. By not using machine-specific names, you maintain consistency and reduce system administration.
The concept of projects was introduced in Solaris 8. Projects are included in Solaris 10, and they allow much-improved tracking of resources and usage. The project concept is extremely useful when multiple projects use the same system and are charged for their usage of the system. With projects, it is now simple to identify and subsequently charge each project based on the resources used. In addition, a system administrator supporting multiple projects can perform duties associated with those projects so that his or her time is also booked to the project requesting the service. The system administrator would do this by using the newtask command. (See the newtask man page for further details about this command.)
You establish projects by using the configuration file /etc/project. The following example shows the standard /etc/project file:
system:0::::
user.root:1::::
noproject:2::::
default:3::::
group.staff:10::::
As you can see from this example, all members of the staff group (GID 10) belong to the project group.staff.
You can edit this file to create new projects and assign users and groups of users to the projects. Accounting software can produce reports on usage based on the projects specified in the /etc/project file.
For further information on projects, see the man page entry for projects as well as the entry for the projects command, which lists the projects a user or group belongs to.
If you are managing user accounts for a large site, you might want to consider using a name service such as Network Information Service (NIS), Network Information Service Plus (NIS+), or Lightweight Directory Access Protocol (LDAP). A name service lets you store user account information in a centralized manner instead of storing it in every system’s /etc file. When you use a name service for user accounts, users can move from system to system, using the same user account without having sitewide user account information duplicated in every system’s /etc file. Using a name service also promotes centralized and consistent user account information. NIS, NIS+, and LDAP are discussed in Chapter 12, “Naming Services.”
Objective:
Restrict access to data in files through the use of group membership, ownership, and special file permissions.
In addition to setting up user accounts, keeping the system’s information secure is one of a system administrator’s primary tasks. System security involves protecting data against loss due to a disaster or system failure. In addition, the system administrator must protect systems from the threat of unauthorized access and protect data on the system from unauthorized users. Bad disasters often come from authorized personnel—even system administrators—destroying data unintentionally. Therefore, the system administrator is presented with two levels of security: protecting data from accidental loss and securing the system against intrusion or unauthorized access.
The first scenario—protecting data from accidental loss—is easy to achieve with a full system backup scheme that you run regularly. Regular backups provide protection in the event of a disaster. If a user accidentally destroys data, if the hardware malfunctions, or if a computer program simply corrupts data, you can restore files from the backup media. (Backup and recovery techniques are covered in Chapter 7, “Performing System Backups and Restorations.”)
The second form of security—securing the system against intrusion or unauthorized access—is more complex. This book cannot cover every security hole or threat, but it does discuss Unix security fundamentals. Protection against intruders involves the following:
![]() Controlling physical security—You need to limit physical access to the computer equipment.
Controlling physical security—You need to limit physical access to the computer equipment.
![]() Controlling system access—You need to limit user access via passwords and permissions.
Controlling system access—You need to limit user access via passwords and permissions.
![]() Controlling file access—You need to limit access to data by assigning file access permissions.
Controlling file access—You need to limit access to data by assigning file access permissions.
![]() Auditing users—You need to monitor user activities to detect a threat before damage occurs.
Auditing users—You need to monitor user activities to detect a threat before damage occurs.
![]() Controlling network security—You need to protect against access through phone lines, serial lines, or the network.
Controlling network security—You need to protect against access through phone lines, serial lines, or the network.
![]() Securing superuser access—You need to reserve superuser access for system administrator use only.
Securing superuser access—You need to reserve superuser access for system administrator use only.
The following sections describe these facets of security.
Physical security is simple: You need to lock the door. You should limit who has physical access to the computer equipment to prevent theft or vandalism. In addition, you should limit access to the system console. Anyone who has access to the console ultimately has access to the data. If the computer contains sensitive data, you need to keep it locked in a controlled environment with filtered power and adequate protection against fire, lightning, flood, and other disasters. You should restrict access to protect against tampering with the system and its backups. Anyone with access to the backup media could steal it and access the data. Furthermore, if a system is logged in and left unattended, anyone who can use that system can gain access to the operating system and the network. You need to make sure your users log out or lock their screens before walking away. In summary, you need to be aware of your users’ computer surroundings, and you need to physically protect them from unauthorized access.
Controlling access to systems involves using passwords and appropriate file permissions. To control access, all logins must have passwords, and those passwords must be changed frequently. Password aging is a system parameter that you set to require users to change their passwords after a certain number of days. Password aging lets you force users to change their passwords periodically or prevent users from changing their passwords before a specified interval. You can set an expiration date for a user account to prevent an intruder from gaining undetected access to the system through an old and inactive account. For a high level of security, you should require users to change their passwords periodically (for example, every six weeks or every three months for lower levels of security). You should change system administration passwords (such as root and any other user who has administrative privileges through an RBAC account) monthly or whenever a person who knows the root password leaves the company or is reassigned. Each user should have his or her own account, and no user should disclose his or her password to anyone else.
Several files that control default system access are stored in the /etc/default directory. Table 4.12 describes a few of the files in the /etc/default directory.

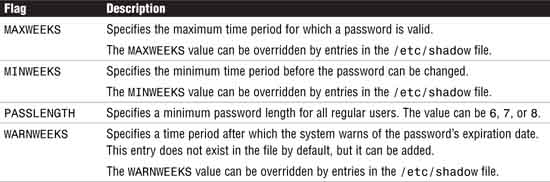
You can set default values in the /etc/default/passwd file to control user passwords. Table 4.13 lists the options that can be controlled through the /etc/default/passwd file.
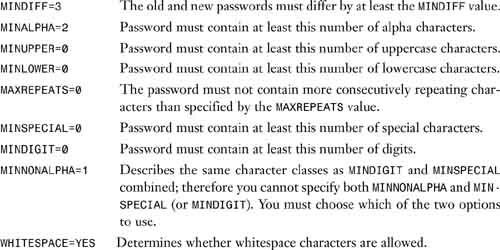
Additional controls have been added to Solaris 10 that can be set in the /etc/default/passwd file and are as follows:
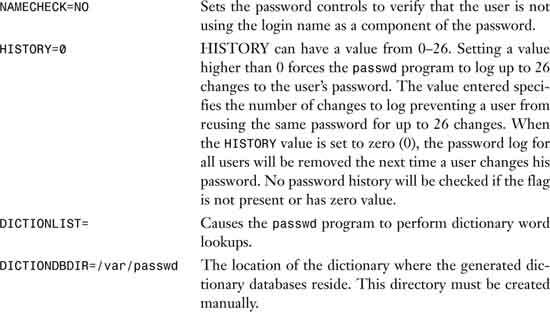
Complexity of the password can be controlled using the following parameters:
Note
Privileged users, such as root, are not forced to comply with password aging and password construction requirements. A privileged user can create a null password by entering a carriage return in response to the prompt for a new password. Therefore privileged users should be extra vigilant not to use bad (that is, easy to guess) passwords.
As a system administrator, your job is to ensure that all users have secure passwords. A system cracker can break weak passwords and put an entire system at risk. You should enforce the following guidelines on passwords:
![]() Passwords should contain a combination of six to eight letters, numbers, or special characters. Don’t use fewer than six characters.
Passwords should contain a combination of six to eight letters, numbers, or special characters. Don’t use fewer than six characters.
![]() Use a password with nonalphabetic characters, such as numerals or punctuation.
Use a password with nonalphabetic characters, such as numerals or punctuation.
![]() Mix upper- and lowercase characters.
Mix upper- and lowercase characters.
![]() The password must not contain any sequences of four or more letters (regardless of how you capitalize them) that can be found in a dictionary. Also, reversing the order of the letters doesn’t do any good because a standard way of cracking a password is to try all the words in a dictionary, in all possible upper-/lowercase combinations, both forward and backward. Prefixing and/or appending a numeral or punctuation character to a dictionary word doesn’t help either; on a modern computer, it doesn’t take too long to try all those possible combinations, and programs exist (and are easy to get) to do exactly that.
The password must not contain any sequences of four or more letters (regardless of how you capitalize them) that can be found in a dictionary. Also, reversing the order of the letters doesn’t do any good because a standard way of cracking a password is to try all the words in a dictionary, in all possible upper-/lowercase combinations, both forward and backward. Prefixing and/or appending a numeral or punctuation character to a dictionary word doesn’t help either; on a modern computer, it doesn’t take too long to try all those possible combinations, and programs exist (and are easy to get) to do exactly that.
![]() Use a password that is easy to remember, so you don’t have to write it down. Never write down a password or email or give your password to anyone! You should be able to type it quickly, without having to look at the keyboard. This makes it harder for someone to steal your password by watching over your shoulder.
Use a password that is easy to remember, so you don’t have to write it down. Never write down a password or email or give your password to anyone! You should be able to type it quickly, without having to look at the keyboard. This makes it harder for someone to steal your password by watching over your shoulder.
![]() Nonsense words made up of the first letter of every syllable in a phrase, such as
Nonsense words made up of the first letter of every syllable in a phrase, such as swotrb for “Somewhere Over the Rainbow,” work well for a password. Choose two short words and concatenate them together with a punctuation character between them (for example, dog;rain, book+mug, kid?goat).
Note
Dictionaries and Password Cracking Be aware that in addition to the standard American or English dictionaries, there are also crackers’ dictionaries. These are collections of common computer terms and phrases, names, slang and jargon, easily typed key sequences (such as asdfg and 123456), and commonly used phrases that one might be tempted to use for a password. These crackers’ dictionaries are frequently updated and shared; programs to crack passwords are distributed with copies of these dictionaries.
The following are poor choices for passwords:
![]() Proper nouns, names, login names, and other passwords that a person might guess just by knowing something about the user.
Proper nouns, names, login names, and other passwords that a person might guess just by knowing something about the user.
![]() The user’s name—forward, backward, or jumbled.
The user’s name—forward, backward, or jumbled.
![]() Names of the user’s family members or pets.
Names of the user’s family members or pets.
![]() Information that is easily obtained about you, such as the following:
Information that is easily obtained about you, such as the following:
Car license plate numbers
Telephone numbers
Social Security numbers
Employee numbers
![]() Names related to a hobby or an interest.
Names related to a hobby or an interest.
![]() Seasonal themes, such as Santa in December.
Seasonal themes, such as Santa in December.
![]() Any word in the dictionary (English or foreign language).
Any word in the dictionary (English or foreign language).
![]() Simple keyboard patterns (such as
Simple keyboard patterns (such as asdfgh).
![]() Passwords the user has used previously.
Passwords the user has used previously.
![]() A password with fewer than six characters.
A password with fewer than six characters.
![]() A password of all digits, or all the same letter. This significantly decreases the search time for a cracker.
A password of all digits, or all the same letter. This significantly decreases the search time for a cracker.
When no network name service is used, user account and group information is stored in files located in the /etc directory. Even when you’re using a name service, these local files still exist in the /etc directory, but most of the account information is stored in the name server’s database. Refer to Chapter 12 for more information.
Most user account information is stored in the /etc/passwd file; however, password encryption and password aging details are stored in the /etc/shadow file. Only root can view the /etc/shadow file. Group information is stored in the /etc/group file. Users are put together into groups based on their file access needs; for example, the acctng group might be users in the Accounting Department.
Each line in the /etc/passwd file contains several fields separated by colons (:), and each line is formatted as follows:
<username>:<password>:<uid>:<gid>:<comment>:<home-directory>:<login-shell>
Table 4.14 defines the fields in the /etc/passwd file.

Each line in the /etc/shadow file contains several fields, separated by colons (:). The lines in the /etc/shadow file have the following syntax:
<username>:<password>:<lastchg>:<min>:<max>:<warn>:<inactive>:<expire>
Table 4.15 defines the fields in the /etc/shadow file.

You should refrain from editing the /etc/passwd file directly, and you should never edit the /etc/shadow file directly. Any incorrect entry can prevent you from logging in to the system. These files are updated automatically, using one of the Solaris account administration commands or the SMC, as described earlier in this chapter.
If you must edit the /etc/passwd file manually, you should use the pwck command to check the file. The pwck command scans the password file and notes any inconsistencies. The checks include validation of the number of fields, login name, UID, GID, and whether the login directory and the program to use as shell exist.
Some experienced system administrators edit the /etc/passwd file directly for various reasons, but only after creating a backup copy of the original /etc/passwd file. (Chapter 12 describes this procedure.) For example, you might want to restore an /etc/passwd file from backup—perhaps because the original was corrupted or was incorrectly modified.
Use the /usr/ucb/vipw command to edit the /etc/passwd file. /usr/ucb/vipw edits the password file while setting the appropriate locks, and does any necessary processing after the password file is unlocked. If the password file is already being edited, you will be told to try again later. /usr/ucb/vipw also performs a number of consistency checks on the password entry for root and will not allow a password file with a “mangled” root entry to be installed. It also checks the /etc/shells file to verify that a valid login shell for root has been defined.
After modifying the /etc/passwd file, you run the pwconv command. This command updates the /etc/shadow file with information from the /etc/passwd file.
The pwconv command relies on the special value of x in the password field of the /etc/passwd file. The x indicates that the password for the user already exists in the /etc/shadow file. If the /etc/shadow file does not exist, pwconv re-creates everything in it from information found in the /etc/passwd file. If the /etc/shadow file does exist, the following is performed:
![]() Entries that are in the
Entries that are in the /etc/passwd file and not in the /etc/shadow file are added to the shadow file.
![]() Entries that are in the
Entries that are in the /etc/shadow file and not in the /etc/passwd file are removed from the shadow file.
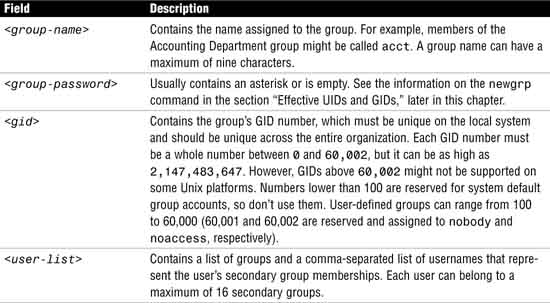
Each line in the /etc/group file contains several fields, separated by colons (:). The lines in the /etc/group file have the following syntax:
<group-name>:<group-password>:<gid>:<user-list>
Table 4.16 defines the fields in the /etc/group file.
Note
UID Values Earlier Solaris software releases use 32-bit data types to contain the GIDs, but GIDs are constrained to a maximum useful value of 60,000. Starting with Solaris 2.5.1 and compatible versions, the limit on GID values has been raised to the maximum value of a signed integer, or 2,147,483,647. GIDs greater than 60,000 do not have full functionality and are incompatible with many Solaris features, so you should avoid using them.
By default, all Solaris 10 systems have default groups already defined in the /etc/group file. Those entries are outlined in Table 4.17:
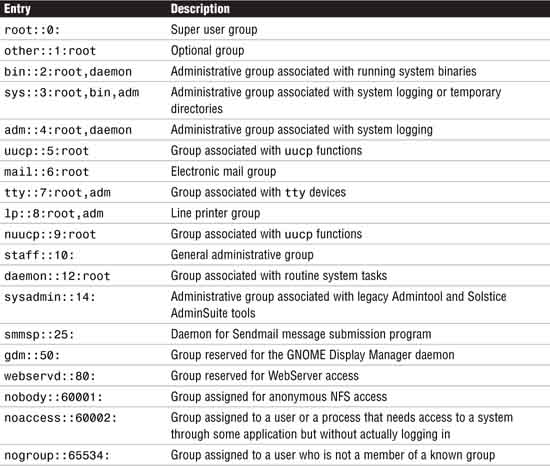
Other than the staff group, you should not use these groups for users. Also, some system processes and applications might rely on these groups, so you should not change the GIDs or remove these groups from the /etc/group file unless you are absolutely sure of the effect on the system.
If you edit the /etc/group file manually, you should use the grpck command to verify all entries in the group file. This verification includes a check of the number of fields, the group name, and the GID, as well as a check to ensure that all login names appear in the password file.
A user can display the list of groups that they belong to by typing the groups command as follows:
#groups
Their primary and secondary groups are listed as follows:
root other bin sys adm uucp mail tty lp nuucp daemon
A user can change their primary group using the newgrp command as follows:
# newgrp other
The root user has changed his or her primary group from root to other as displayed by the id command:
# id
uid=0(root) gid=1(other)
System administrators can use restricted versions of the Korn shell (rksh) and the Bourne shell (rsh) to limit the operations allowed for a particular user account. Restricted shells are especially useful for ensuring that time-sharing users and users’ guests on a system have restricted permissions during login sessions. When an account is set up with a restricted shell, users cannot do the following:
![]() Change directories to a directory above their home directory
Change directories to a directory above their home directory
![]() Set the
Set the $PATH variable
![]() Specify path or command names that begin with
Specify path or command names that begin with /
![]() Redirect output
Redirect output
You can also provide users with shell procedures that have access to the full power of the standard shell but that impose a limited menu of commands.
Note
Don’t Confuse rsh You should not confuse the restricted shell /usr/lib/rsh with the remote shell /usr/bin/rsh. When you specify a restricted shell, you should not include the following directories in the user’s path—/bin, /sbin, or /usr/bin. Doing so allows the user to start another shell (a nonrestricted shell).
Objective:
Restrict access to data in files through the use of group membership, ownership, and special file permissions.
After you have established login restrictions, you need to control access to the data on the system. Some users only need to look at files; others need the ability to change or delete files. You might have data that you do not want anyone else to see. You control data access by assigning permission levels to a file or directory.
Three levels of access permission are assigned to a Unix file to control access by the owner, the group, and all others. You display permissions by using the ls -la command. The following example shows the use of the ls -la command to display permissions on files in the /users directory:
ls -la /users
The system responds with this:

The first column of information displays the type of file and its access permissions for the user, group, and others. The r, w, x, and - symbols are described in Table 4.18. The third column displays the owner of the file—usually the user who created the file. The owner of a file (and the superuser) can decide who has the right to read it, to write to it, and—if it is a command—to execute it. The fourth column displays the group to which this file belongs—normally the owner’s primary group.

When you list the permissions on a directory, all columns of information are the same as for a file, with one exception. The r, w, x, and - found in the first column are treated slightly different for a directory than for a file, as described in Table 4.19.

You use the commands listed in Table 4.20 to modify file access permissions and ownership, but you need to remember that only the owner of the file or root can assign or modify these values.

Use the chmod command to change the permissions on a file to rwxrwxrwx as follows:
chmod rwxrwxrwx <filename>
Use the chown command to change the ownership on a file to bcalkins as follows:
chown bcalkins <filename>
Use the chgrp command to change group ownership of a file to engrg as follows:
chgrp engrg <filename>
The chown command can be used to change both the user and group ownership of a file as follows:
chown bcalkins:engrg <filename>
Sometimes you don’t have access to a file or directory if you use your current login and you want to switch from one login ID to another. As long as you know the login name and password, you can quickly switch to that login by using the su command, which is described in the following section.
The su (switch user) command enables a user to become another user without logging off the system. To use the su command, you must supply the password for the user you are attempting to log in as. The root user can run su to any account without being prompted for passwords.
System administrators often use the su command. For example, as a safety precaution, rather than using the root account as a regular login, you might use a regular, nonroot login whenever you are not performing administration functions. When root access is required, you can quickly become the superuser by using the su command. When you are finished performing the task, you can exit the superuser account and continue working using your normal, nonroot account.
If the user enters the correct password, su creates a new shell process, as specified in the shell field of the /etc/passwd file for that particular user. In the following example, user1 runs the su command to become user2:
su user2
An option to the su command is -. This option specifies a complete login. The specified user’s .profile file is run, and the environment is changed to what would be expected if the user actually logged in as the specified user.
Without the - option, the environment is passed along from the original login, with the exception of $PATH, which is controlled by PATH and SUPATH in the /etc/default/su file (which is described later in this chapter). When the administrator uses su to access the root account from an untrusted user’s account, the - option should always be used. If it is not used, the administrator is logged in as root, using a PATH variable defined for a nonroot user. This could result in the administrator inadvertently running commands specified in the user’s shell initialization files.
A user can also switch his or her primary group by using the newgrp command. The newgrp command logs a user in to a new group by changing a user’s real and effective GIDs. The user remains logged in, and the current directory is unchanged. The execution of su and newgrp always replaces the current shell with a new shell. The execution of newgrp always replaces the current shell with a new shell, even if the command terminates with an error (unknown group). Any variable that is not exported is reset to null or its default value. Exported variables retain their values.
With no operands and options, newgrp changes the user’s real and effective GIDs back to the primary group specified in the user’s password file entry.
A password is demanded if the group has a password (in the second field of the /etc/group file), the user is not listed in /etc/group as being a member of that group, and the group is not the user’s primary group. The only way to create a password for a group is to use the passwd command and then cut and paste the password from /etc/shadow to /etc/group. Group passwords are antiquated and not often used.
When a user creates a file or directory, the user mask controls the default file permissions assigned to the file or directory. The umask command should set the user mask in the /etc/default/login file or a user initialization file, such as /etc/profile or .cshrc. You can display the current value of the user mask by typing umask and pressing Enter.
The user mask is set with a three-digit octal value, such as 022. The first digit of this value sets permissions for the user, the second sets permissions for the group, and the third sets permissions for others. To set the user mask to 022, you type the following:
umask 022
By default, the system sets the permissions on a file to 666, granting read and write permission to the user, group, and others. The system sets the default permissions on a directory or executable file to 777, or rwxrwxrwx. The value assigned by umask is subtracted from the default. To determine what umask value you want to set, you subtract the value of the permissions you want from 666 (for a file) or 777 (for a directory). The remainder is the value to use with the umask command. For example, suppose you want to change the default mode for files to 644 (rw-r--r--). The difference between 666 and 644 is 022, so you would use this value as an argument to the umask command.
Setting the umask value has the effect of granting or denying permissions in the same way that chmod grants them. For example, the command chmod 644 denies write permission to the group, while others, such as umask 022, deny write permission to the group and others.
The sticky bit is a permission bit that protects the files within a directory. If the directory has the sticky bit set, a file can be deleted only by the owner of the file, the owner of the directory, or root. This prevents a user from deleting other users’ files from public directories. A t or T in the access permissions column of a directory listing indicates that the sticky bit has been set, as shown here:
drwxrwxrwt 5 root sys 458 Oct 17 23:04 /tmp
You use the chmod command to set the sticky bit. The symbols for setting the sticky bit by using the chmod command in symbolic mode are listed in Table 4.21.
Objective:
Restrict access to data in files through the use of group membership, ownership, and special file permissions.
ACLs (pronounced ackls) can provide greater control over file permissions when the traditional Unix file protection in the Solaris operating system is not enough. The traditional Unix file protection provides read, write, and execute permissions for the three user classes: owner, group, and other. An ACL provides better file security by allowing you to define file permissions for the owner, owner’s group, others, and specific users and groups, and allows you to set default permissions for each of these categories.
For example, assume you have a file you want everyone in a group to be able to read. To give everyone access, you would give “group” read permissions on that file. Now, assume you want only one person in the group to be able to write to that file. Standard Unix doesn’t let you set that up; however, you can set up an ACL to give only one person in the group write permissions on the file. Think of ACL entries as an extension to regular Unix permissions.
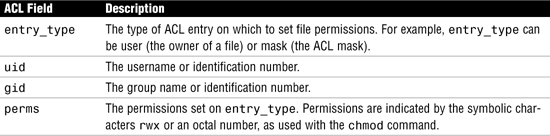
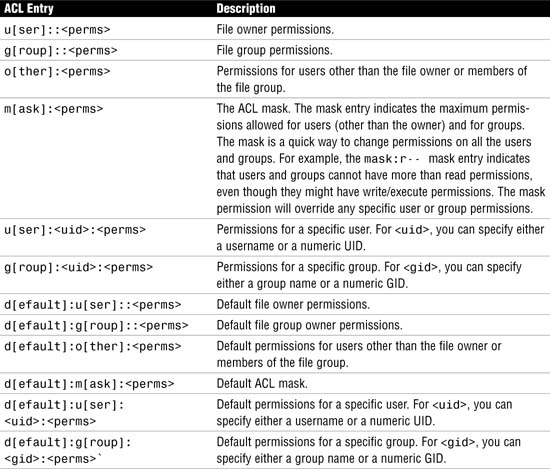
ACL entries are the way to define an ACL on a file, and they are set through the ACL commands. ACL entries consist of the following fields, separated by colons:
entry_type:uid|gid:perms
ACL entries are defined in Table 4.22.
Set ACL entries on a file or directory by using the setfacl command:
$ setfacl -s user::perms,group::perms,other:perms,mask:perms,
acl_entry_list filename ...
Tip
Setting Versus Modifying an ACL The -s option sets a new ACL, but also replaces an entire existing ACL with the new ACL entries. You should read any exam questions on this topic very carefully, as it can be easily confused with the -m option to modify an existing ACL.
The ACL entries that can be specified with the setfacl command are described in Table 4.23.
Exam Alert
ACL Entries Make sure you understand the ACL entries and how they work. It is quite common to get a question on the exam that gives you the ACL for a number of users/groups, such as Bill, Emily, and the “Accounts” group, and then asks which permissions does “Bill” have? Additionally, make sure you take into account the ACL mask.
The following example sets the user permissions to read/write, sets the group permissions to read-only, and other permissions to none on the txt1.doc file. In addition, the user bill is given read/write permissions on the file, and the ACL mask permissions are set to read/write, which means that no user or group can have execute permissions.
$ setfacl -s user::rw-,group::r--,other:---,mask:rw-,user:bill:rw- xt1.doc
In addition to the ACL entries for files, you can set default ACL entries on a directory that apply to files created within the directory. For example, I’ll use the setfacl command to add execute privileges on the /export/home/bholzgen directory for user bcalkins. This privilege on a directory allows the user bcalkins to change to that directory and do a long listing with the ls -l command to display the files in the directory. Before I set the ACL on this directory, let’s look at the default permission that currently exists on this directory:
drwxr-xr-x 2 bholzgen staff 512 Jul 30 12:41 bholzgen
Now, issue the command to set the default ACL privileges:
setfacl -s user::rwx,g::r--,o:---,d:user::rwx,d:group::r--,d:o:---
,d:m:r-x,d:user:bcalkins:r-x /export/home/bholzgen
Note
Default ACL Entries When you set default ACL entries for specific users and groups on a directory for the first time, you must also set default ACL entries for the file owner, file group, others, and the ACL mask.
Use the getfacl command with the -d switch to display the default ACL entries for the /export/home/bholzgen directory as follows:
getfacl -d /export/home/bholzgen
The system responds with the following:

Now, the only people allowed to change into the /export/home/bholzgen directory are bholzgen and bcalkins. No other members, except root, will be able to access this directory—not even members of the same group.
Check the new file permissions with the ls -l command. The plus sign (+) to the right of the mode field indicates that the file has an ACL:

To verify which ACL entries were set on the file, use the getfacl command:
$ getfacl txt1.doc
The system responds with this:

Copy a file’s ACL to another file by redirecting the getfacl output as follows:
getfacl <filename1> | setfacl -f - <filename2>
The following example copies the ACL from file1 to file2:
getfacl file1 | setfacl -f - file2
Issuing the getfacl command, you can verify that the change has been made:

Modify ACL entries on a file by using the setfacl command:
setfacl -m <acl_entry_list> <filename1> [filename2 ...]
The arguments for the setfacl command are described in Table 4.24.

To delete an ACL entry from a file, use the setfacl -d <acl_entry_list> command. The following example illustrates how to remove an ACL entry for user bcalkins on file1 and file2:
setfacl -d u:bcalkins file1 file2
Use the getfacl command, described earlier, to verify that the entries have been deleted.
Setting your path variable ($PATH) correctly is important; if you do not set it correctly, you might accidentally run a program introduced by someone else that harms the data or your system. That kind of program, which creates a security hazard, is called a Trojan horse. For example, a substitute su program could be placed in a public directory where you, as system administrator, might run it. Such a script would look just like the regular su command. The script would remove itself after execution, and you would have trouble knowing that you actually ran a Trojan horse.
The path variable is automatically set at login time through the /etc/default/login file and the shell initialization files .login, .profile, and/or .cshrc. Setting up the user search path so that the current directory (.) comes last prevents you and your users from running a Trojan horse. The path variable for superuser should not include the current directory (.).
Note
Checking Root’s Path Solaris provides a utility called the Automated Security Enhancement Tool (ASET) that examines the startup files to ensure that the path variable is set up correctly and does not contain a dot (.) entry for the current directory. ASET is discussed later in this chapter.
When set-user identification (setuid) permission is set on an executable file, a process that runs the file is granted access based on the file’s owner (usually root) rather than on the user who created the process. This enables a user to access files and directories that are normally available only to the owner. For example, the setuid permission on the passwd command makes it possible for a user to modify the /etc/passwd file to change passwords. When a user executes the passwd command, that user assumes the privileges of the root ID, which is UID 0. The setuid permission can be identified by using the ls -l command. The s in the permissions field of the following example indicates the use of setuid, and the second s indicates the use of setgid:
ls -l /usr/bin/passwd
-r-sr-sr-x 1 root sys 10332 May 3 08:23 /usr/bin/passwd
Many executable programs must be run by root (that is, by the superuser) in order to work properly. These executables run with the UID set to 0 (setuid=0). Anyone running these programs runs them with the root ID, which creates a potential security problem if the programs are not written with security in mind.
On the other hand, the use of setuid on an executable program presents a security risk. A determined user can usually find a way to maintain the permissions granted to him or her by the setuid process, even after the process has finished executing. For example, a particular command might grant root privileges through setuid. If a user could break out of this command, he or she could still have the root privileges granted by setuid on that file. An intruder who accesses a system will look for any files that have the setuid bit enabled.
Except for the executables shipped with Solaris that have setuid set to root, you should disallow the use of setuid programs—or at least restrict and keep them to a minimum. A good alternative to using setuid on programs is to use an RBAC account, as described in Chapter 11.
Note
Locating setuid Programs To find files that have setuid permissions, you should become superuser. Then you can use the find command to find files that have setuid permissions set, as in this example:
# find / -user root -perm -4000 ---ls> /tmp/<filename>
The set-group identification (setgid) permission is similar to setuid, except that with setgid the process’s effective GID is changed to the group owner of the file, and a user is granted access based on permissions granted to that group. By using the ls -l command, you can see that the file /usr/bin/mail has setgid permissions:
-r-x--s--x 1 bin mail 61076 Nov 8 2001 /usr/bin/mail
The following example illustrates how to set the UID on an executable file named myprog1:
chmod 4711 myprog1
You can verify the change by entering this:
ls -l myprog1
The system responds with this:
-rws--x--x 1 root other 25 Mar 6 11:52 myprog1
The following example illustrates how to set the GID on an executable file named myprog1:
chmod 2751 myprog1
You can verify the change by entering this:
ls -l myprog1
The system responds with this:
-rwxr-s--x 1 root other 25 Mar 6 11:58 myprog1
A user can set the UID or GID permission for any file he or she owns.
The following sections describe a few of the commands used to view information about users who have logged in to the system.
As a system administrator, you need to monitor system resources and watch for unusual activity. Having a method to monitor the system is useful, especially when you suspect a breach in security. For example, you might want to monitor the login status of a particular user. In that case, you could use the logins command to monitor a particular user’s activities, as described in Step by Step 4.6.
STEP BY STEP
4.6 Monitoring a User’s Activity
1. Become superuser.
2. Display a user’s login status by using the logins command:
# logins -x -l <username>
For example, to monitor login status for the user calkins, enter the following:
# logins -x -l calkins
The system displays the following information:

The following is the information displayed in the output of the logins command:

You should monitor user logins to ensure that their users’ passwords are secure. A potential security problem is for users to use blank passwords (that is, users using carriage returns for passwords) or no password at all. When an account does not have a password, the password prompt will not be presented at login. Simply enter the user name, and you are in. You can periodically check user logins by using the method described in Step by Step 4.7.
STEP BY STEP
4.7 Checking for Users with No Passwords
1. Become superuser.
2. Display users who have no passwords by using the logins command:
# logins -p
The system responds with a list of users who do not have passwords.
Another good idea is to watch anyone who has tried to access the system but failed. You can save failed login attempts by creating the /var/adm/loginlog file with read and write permission for root only. After you create the loginlog file, all failed login activity is automatically written to this file after five failed attempts. This file does not exist by default; you, as the system administrator, must create it. To enable logging to this file as root, you can create the file as follows:
touch /var/adm/loginlog
Then set the permission on the file to 600:
chmod 600 /var/adm/loginlog
The loginlog file contains one entry for each failed attempt. Each entry contains the user’s login name, the tty device, and the time of the failed attempt. If a person makes fewer than five unsuccessful attempts, none of the attempts is logged.
The following is an example of an entry in which someone tried to log in as root but failed:

The loginlog file might grow quickly. To use the information in this file and to prevent the file from getting too large, you must check it and clear its contents occasionally. If this file shows a lot of activity, someone might be attempting to break in to the computer system.
You use the Solaris who command to find out who is logged in to a system. To obtain the information it gives you, the who command examines the /var/adm/utmpx and /var/adm/wtmpx files. The utmpx file contains user access and accounting information for the who command (as well as for the write and login commands). The wtmpx file contains the history of user access and accounting information for the utmpx file.
Without arguments, the who command lists the login account name, terminal device, login date and time, and where the user logged in. Here is an example:

Table 4.25 lists some of the most common options used with the who command.

The rusers command is similar to the who command, but it can be used to list users logged in on a remote host. To use rusers, the rpc.rusers daemon must be running. Check whether the rpc.rusers daemon is running by typing
svcs rusers
For more information on the svcs command, refer to Chapter 3.
To list users logged into other systems on your network, use the rusers command as follows:

The command whoami displays the effective current username. It is a lot like the who command used with the am and i options. These two options to the who command limit the output to describing the invoking user, which is equivalent to the -m option. am and i must be separate arguments.
whoami is a carryover from Berkeley Software Distribution (BSD) Unix. This old BSD command is found under the /usr/ucb directory with other BSD commands. /usr/ucb/whoami displays the login name that corresponds to the current effective UID. If you have used su to temporarily change to another user, /usr/ucb/whoami reports the login name associated with that user ID. For example, suppose you are logged in as root and issue the following su command to become wcalkins:
su - wcalkins
Now issue the who am i command:
who am i
The system reports that you are logged in as root. The who am i command looks up the entry for your current tty in the utmpx file:
root pts/7 Oct 18 19:08
Next, you can issue the /usr/ucb/whoami command:
/usr/ucb/whoami
The system reports your current effective UID as follows:
wcalkins
The whodo command produces formatted and dated output from information in the /var/adm/utmpx, /tmp/ps_data, and /proc/pid files. It displays each user logged in and the active processes owned by that user. The output of the whodo command shows the date, time, and machine name. For each user who is logged in, the system displays the device name, UID, and login time, followed by a list of active processes associated with the UID. The process list includes the device name, process ID, CPU minutes and seconds used, and process name. You issue the whodo command as follows:
whodo
The system responds with this:

You use the -l option with the whodo command to get a long listing:
whodo -l
The system responds with this:

The fields displayed are the user’s login name; the name of the tty the user is on; the time of day the user logged in; the idle time (which is the time since the user last typed anything in hours:minutes); the CPU time used by all processes and their children on that terminal (in minutes:seconds); the CPU time used by the currently active processes (in minutes:seconds); and the name and arguments of the current process.
The Solaris last command looks in the /var/adm/wtmpx file for information about users who have logged in to the system. The last command displays the sessions of the specified users and terminals in reverse chronological order, displaying the most recent login first. For each user, last displays the time when the session began, the duration of the session, and the terminal where the session took place. The last command also indicates whether the session is still active or was terminated by a reboot.
For example, the command last root console lists all of root’s sessions, as well as all sessions on the console terminal:
# last root console |more
The system responds with this:

Objective:
Control system security through restricting FTP access and using /etc/hosts.equiv and $HOME/.rhosts files, and SSH fundamentals.
The most difficult system administration issue to address is network security. When you connect your computer to the rest of the world via a network such as the Internet, someone can find an opening and breach your security. The following sections describe a few fundamental recommendations for tightening up a system in a networked environment.
Solaris is a powerful operating system that executes many useful services such as FTP and HTTP services. However, some of the services aren’t needed and can pose potential security risks, especially for a system that is connected to the Internet. The first place to start tightening up a system is by disabling unneeded network services.
In past releases of Solaris, these services were managed by inetd, which obtained its instructions from the /etc/inetd.conf file. In Solaris 10, you’ll notice that this file is substantially smaller because inetd is now started by the SMF, which is described in Chapter 3. The inetd daemon is configured using the inetadm command, which is described in Chapter 8.
By default, inetd is configured for 40 or more services, but you probably need only some of them. You can list all of the network services and view their state with the inetadm command as follows:
You can deactivate unnecessary services by disabling them. For example, to disallow Telnet connections to the system, you would disable it as follows:
inetadm -d telnet
To disable FTP, type
inetadm -d ftp
You can verify that the FTP service has been disabled by typing
inetadm|grep ftp
The system responds with
disabled disabled svc:/network/ftp:default
You also can type
svcs ftp
The system responds with
![]()
You can disable nfs, spray, rexec, finger, and many other Internet services in a similar manner.
It is critical that you turn off all unneeded network services because many of the services that are run by inetd, such as rexd, pose serious security vulnerabilities. rexd is a daemon that is responsible for remote program execution. On a system that is connected to the rest of the world via the Internet, this could create a potential entry point for a hacker. You should absolutely disable TFTP unless it’s required, as with a JumpStart server. TFTP is managed by the SMF, under the service identifier svc:/network/tftp/udp6:default. Administrative actions on this service, such as enabling, disabling, or requesting restart, can be performed using svcadm. Responsibility for initiating and restarting this service is delegated to inetd. Use inetadm to make configuration changes and to view configuration information for this service. The service status can be queried using the svcs command.
You might also want to disable finger so that external users can’t figure out the usernames of your internal users—which would make breaking in much easier. Whether you keep the other services much depends on the needs of your site. Disable finger as follows:
inetadm -d finger
Other services that you may want to consider disabling are
![]()
svc:/network/nfs/client:default
![]()
svc:/network/nfs/server:default
![]()
svc:/system/filesystem/autofs:default
![]()
svc:/network/smtp:sendmail
![]()
svc:/network/rpc/rusers:default
![]()
lrc:/etc/rc2_d/S99dtlogin
![]()
lrc:/etc/rc3_d/S76snmpdx
The lrc services are disabled through their respective run control scripts.
One way to protect your system from unauthorized access—regardless of whether it’s on the Internet or not—is via the /etc/default/login file. You need to make sure the following line is not commented:
CONSOLE=/dev/console
With this entry, root is allowed to log in only from the secure system console and not via the network by using telnet or rlogin. However, this entry does not disallow a user from using the su command to switch to root after logging in as a regular user if he or she knows the root password.
Modems are always a potential point of entry for intruders. Anyone who discovers the phone number to which a modem is attached can attempt to log in. Low-cost computers can be turned into automatic calling devices that search for modem lines and then try endlessly to guess passwords and break in. If you must use a modem, you should use it for outgoing calls only. An outgoing modem will not answer the phone. If you allow calling in, you should implement a callback system. A callback system guarantees that only authorized phone numbers can connect to the system. Another option is to have two modems that establish a security key between them. This way, only modems with the security key can connect with the system modem and gain access to the computer.
Along with protecting passwords, you need to protect your system from a root user coming in from across the network. For example, say systemA is a trusted host from which a user can log in without being required to enter a password. A user who has root access on systemA could access the root login on systemB simply by logging in across the network, if systemA is set up as a trusted host on systemB. When systemB attempts to authenticate root from systemA, it relies on information in its local files—specifically, /etc/hosts.equiv and /.rhosts. Because of the many risks posed by rlogin and other r commands, you should not use them. Instead, you should use the Secure Shell (SSH) commands, which are described in the section “The Secure Shell (ssh),” later in this chapter.
The /etc/hosts.equiv file contains a list of trusted hosts for a remote system, one per line. An /etc/hosts.equiv file has the following structure:
system1
system2 user_a
If a user attempts to log in remotely by using rlogin from one of the hosts listed in this file, and if the remote system can access the user’s password entry, the remote system enables the user to log in without a password.
When an entry for a host is made in /etc/hosts.equiv (for example, the sample entry for system1 shown earlier), the host is trusted and so is any user at that machine. If the username is also mentioned, as in the second entry shown in the previous example, the host is trusted only if the specified user is attempting access. A single line of + in the /etc/hosts.equiv file indicates that any host is trusted.
Note
Don’t Trust Everyone Using a + in the hosts.equiv or .rhosts file is very bad practice and could pose a serious security problem because it specifies that all systems are trusted. You should get into the habit of listing the trusted systems and not using the + sign. Better yet, you should use a more secure alternative to rlogin, such as the Secure Shell (ssh).
Tip
Security and the /etc/hosts.equiv File The /etc/hosts.equiv file presents a security risk. If you maintain an /etc/hosts.equiv file on your system, this file should include only trusted hosts in your network. The file should not include any host that belongs to a different network or any machines that are in public areas. Also, you should never put a system name into the /etc/hosts.equiv file without a username or several names after it.
The .rhosts file is the user equivalent of the /etc/hosts.equiv file. It contains a list of hosts and users. If a host/user combination is listed in this file, the specified user is granted permission to log in remotely from the specified host without having to supply a password. Note that an .rhosts file must reside at the top level of a user’s home directory because .rhosts files located in subdirectories are not consulted. Users can create .rhosts files in their home directories; this is another way to allow trusted access between their own accounts on different systems without using the /etc/hosts.equiv file.
The .rhosts file presents a major security problem. Although the /etc/hosts.equiv file is under the system administrator’s control and can be managed effectively, any user can create an .rhosts file that grants access to whomever the user chooses—without the system administrator’s knowledge.
Note
Disabling .rhosts and hosts.equiv Files To disable .rhosts and /etc/hosts.equiv access altogether while still allowing the rlogin protocol, you comment the lines that reference pam_rhosts_auth.so.1 from /etc/pam.conf. This forces rlogin to use a password during authentication and effectively disables in.rshd and in.rexecd.
The only secure way to manage .rhosts files is to completely disallow them.
File Transfer Protocol (FTP) is a common tool for transferring files across a network. Although most sites leave FTP enabled, you need to limit who can use it. Solaris contains various configuration files in the /etc/ftpd directory to control access to the FTP server. One of these files is a file named /etc/ftpd/ftpusers, which is used to restrict access via FTP. The /etc/ftpd/ftpusers file contains a list of login names that are prohibited from running an FTP login on the system. The following is an example of a default /etc/ftpd/ftpusers file:
# more /etc/ftpd/ftpusers
# ident "@(#)ftpusers 1.5 04/02/20 SMI"
#
# List of users denied access to the FTP server, see ftpusers(4).
#
root
daemon
bin
sys
adm
lp
uucp
nuucp
smmsp
listen
gdm
webservd
nobody
noaccess
nobody4
Names in the /etc/ftpd/ftpusers file must match login names in the /etc/passwd file.
Note
Root Access to FTP The default in Solaris 10 is to not allow FTP logins by root. It is dangerous to allow root access via FTP because that would allow anyone who knows the root password to have access to the entire system.
The FTP server in.ftpd reads the /etc/ftpd/ftpusers file each time an FTP session is invoked. If the login name of the user trying to gain access matches a name in the /etc/ftpd/ftpusers file, access is denied.
The /etc/ftpd/ftphosts file is used to allow or deny access to accounts from specified hosts. The following example allows the user ftpadmin to connect via FTP from the explicitly listed addresses 208.164.186.1, 208.164.186.2, and 208.164.186.4; and deny the specified ftpadmin user to connect from the site 208.164.186.5:
# Example host access file
#
# Everything after a '#' is treated as comment,
# empty lines are ignored
allow ftpadmin 208.164.186.1 208.164.186.2 208.164.186.4
deny ftpadmin 208.164.186.5
The file /etc/shells contains a list of the shells on a system. Whereas the /etc/ftpd/ftpusers file contains a list of users not allowed to use FTP, the /etc/shells file enables FTP connections only to those users running shells that are defined in this file. If this file exists and an entry for a shell does not exist in this file, any user running the undefined shell is not allowed FTP connections to this system.
The /etc/shells file does not exist by default. If the file does not exist, the system default shells are used. The following are the system default shells:

You can create the /etc/shells file by using the vi editor and listing each shell that you want to be recognized by the system. The following is an example /etc/shells file:
# more /etc/shells
/sbin/sh
/bin/sh
/bin/ksh
Note
/etc/shells May Deny Access If you don’t list all the default shells in the /etc/shells file, as done in the previous example, users using those shells are not allowed access.
The Unix superuser (root) is immune from restrictions placed on other users of the system. Any Unix account with a UID of 0 is the superuser. All Unix systems have a default superuser login named root. The user of this account can access any file and run any command. This login is valuable because any user who might have gotten himself or herself into trouble by removing access permissions, forgetting his or her password, or simply needing a file from an area to which he or she doesn’t have access can be helped by root.
However, root access can be dangerous. Root can delete anything, including the operating system. The root login is both dangerous and necessary. System administrators must not give the root password to anyone and should use it themselves only when required. If it becomes necessary to grant superuser privileges to non-root users, you should utilize roles, as described in Chapter 11.
Root access needs to be safeguarded against unauthorized use. You should assume that any intruder is looking for root access. You can protect the superuser account on a system by restricting access to a specific device through the /etc/default/login file. For example, if superuser access is restricted to the console, the superuser can log in only at the console, which should be in a locked room. Anybody who remotely logs in to the system to perform an administrative function must first log in with his or her login and then use the su command to become superuser.
Step by Step 4.8 describes the procedure for restricting root from logging in to the system console from a remote system.
STEP BY STEP
4.8 Restricting Root Access
In Step by Step 4.8, you set the variable CONSOLE to /dev/console. If the variable CONSOLE were set as follows with no value defined, root could not log in from anywhere, not even from the console:
CONSOLE=
With the CONSOLE value set to nothing, the only way to get into the system as root is to first log in as a regular user and then become root by issuing the su command. If the system console is not in a controlled environment, the option of not being able to log in to the console as root might be useful.
Solaris can be set up to log all attempts to become superuser. The logs that contain this information are useful when you’re trying to track down unauthorized activity. Whenever someone issues the su command to switch from being a user to being root, this activity is logged in the file /var/adm/sulog. The sulog file lists all uses of the su command—not only those used to switch from being a user to being superuser. The entries in the sulog file show the date and time the command was entered, whether the command was successful, the port from which the command was issued, and the name of the user and the switched identity.
To monitor who is using the su command, the sulog logging utility must be turned on in the /etc/default/su file. By default, su logging is enabled. Step by Step 4.9 describes how to turn on logging of the su command if it has been disabled.
STEP BY STEP
4.9 Monitoring Superuser Access
Through the /etc/default/su file, you can also set up the system to display a message on the console each time an attempt is made to use the su command to gain superuser access from a remote system. This is a good way to immediately detect when someone is trying to gain superuser access to the system on which you are working. Step by Step 4.10 describes how to display root access attempts to the console.
STEP BY STEP
4.10 Monitoring Superuser Access Attempts
1. Become superuser.
2. Edit the /etc/default/su file and uncomment the following line:
CONSOLE=/dev/console
3. Use the su command to become root. Verify that a message is printed on the system console.
The Secure Shell (ssh) enables users to securely access a remote system over an insecure network. You use the Secure Shell to do the following:
![]() Log in to a remote system (by using
Log in to a remote system (by using ssh).
![]() Copy files over the network between hosts (by using
Copy files over the network between hosts (by using scp or sftp).
Before the Secure Shell was available, remote connections were—and still can be—handled via rlogin, rsh, and rcp. These commands create insecure connections and are prone to security risks.
With the Secure Shell, you establish secure communication between two hosts on an insecure network. The two hosts are referred to as the client (the host that requests the connection) and the server (the host being connected to). The Secure Shell daemon, sshd, starts up on each host at system boot, when the svc:/network/ssh:default service has been enabled by the SMF. The sshd daemon listens for connections, and it handles the encrypted authentication exchange between the hosts. When authentication is complete, the user can execute commands and copy files remotely.
The ssh on the client side is controlled by the /etc/ssh/ssh_config file and by ssh command line options. The ssh_config file controls which types of authentication are permitted for accessing the server. Optionally, a user can also provide ssh settings in his or her own $HOME/.ssh/config file.
The sshd on the server side is controlled by the /etc/ssh/sshd_config file, which is controlled by the system administrator.
Normally, each user wanting to use SSH with authentication runs the ssh-keygen command once to create the authentication key in $HOME/.ssh/identity, $HOME/.ssh/id_dsa, or $HOME/.ssh/id_rsa. The client maintains the private key, and the server is provided with the public key that is needed to complete authentication. Public-key authentication is a stronger type of authentication than typical password authentication because the private key never travels over the network. To create a public/private key for public key authentication, follow Step by Step 4.11.
STEP BY STEP
4.11 Setting Up Public Key Authentication for Solaris Secure Shell
In the following step by step, you’ll set up Public Key Authentication so that bcalkins can log in to a remote host using ssh. For this step by step, you’ll need two systems. One will be the client, and the other will be the remote host.
1. Make sure both systems have a user account named bcalkins, a password assigned to the account, and an established home directory named /export/home/bcalkins.
2. Make sure each account has a .ssh directory in the /export/home/bcalkins home directory. If not, you can create the .ssh directory by running the ssh-keygen command described in step 7.
3. As root, enable host-based authentication on the client by adding the following line to the /etc/ssh/ssh_config file:
HostbasedAuthentication yes
4. On the remote host, enable host based authentication by adding the following line to the /etc/ssh/sshd_config file:
HostbasedAuthentication yes
5. Start up sshd on the remote host if it is not currently running by typing
svcadm svc:/network/ssh:default
If the ssh service is already running, restart it.
6. On the remote host, ensure that the sshd daemon can access the list of trusted hosts by setting IgnoreRhosts to no in the /etc/ssh/sshd_config file as follows
IgnoreRhosts no
7. On the client, log in as bcalkins and create the client’s public key. To generate the public key on the client, issue the following command:
ssh-keygen -t rsa
Use the -t option to specify the type of algorithm; rsa, dsa, or rsa1. The system responds with
Generating public/private rsa key pair.
Enter file in which to save the key (//.ssh/id_rsa):
When you press Enter, the system responds with
Created directory '/export/home/bcalkins/.ssh'.
Enter passphrase(empty for no passphrase):
The passphrase is used for encrypting the private key. A good passphrase is 10–30 characters long, mixes alphabetic and numeric characters, and avoids simple English prose and English names. A carriage return entry means that no passphrase is used; this type of blank passphrase is strongly discouraged for user accounts. The passphrase is not displayed when you type it in, as shown here:
Enter same passphrase again:
Enter the passphrase again to confirm it. The system responds with
Your identification has been saved in /export/home/bcalkins/.ssh/id_rsa.
Your public key has been saved in /export/home/bcalkins/.ssh/id_rsa.pub.
The key fingerprint is:
c9:8e:d8:f9:69:6e:01:e7:c4:82:05:8a:8e:d3:03:56 root@ultra5
8. The key fingerprint is displayed as a colon-separated series of two-digit hexadecimal values. You should check to make sure the path to the key is correct. In this example, the path is /export/home/bcalkins/.ssh/id_rsa.pub. At this point, you have created a public/private key pair. Now, copy the public key and append the key to the $HOME/.ssh/authorized_keys file in your home directory on the remote host.
9. When the public key has been created on the client and copied to the remote host, you can start using the Secure Shell to log in to the remote system by typing this line, where <hostname> is the name of the remote host that you want to connect to:
ssh <hostname>
The first time you run ssh:
ssh 192.168.0.252
you’re prompted with questions regarding the authenticity of the remote host as follows:
The authenticity of host '192.168.0.252' can't be established.
RSA key fingerprint in md5 is:
78:28:11:cb:41:81:a2:73:50:5a:d4:49:bb:12:85:03
Are you sure you want to continue connecting(yes/no)? yes
This is a normal message for initial connections to the remote host. If you enter yes, the system responds with
Warning:
Permanently added '192.168.0.252' (RSA) to the list of known hosts.
Enter passphrase for key '/export/home/bcalkins/.ssh/id_rsa':
After you enter your passphrase, the system will log you into the remote host.
Last login: Wed Oct 19 20:43:57 2005 from ultra5
Sun Microsystems Inc. SunOS 5.10 Generic January 2005
To copy files by using the Secure Shell, you start the secure copy program by typing the scp command, using the following syntax:
scp <sourcefile> <username>@<hostname>:</destinationdir>
Table 4.26 describes the arguments to the scp command.

You should type the secure passphrase when prompted. The system responds by displaying the following:
![]() The filename
The filename
![]() The percentage of the file transferred as it is being copied
The percentage of the file transferred as it is being copied
![]() The quantity of data transferred as it is being transferred
The quantity of data transferred as it is being transferred
![]() The estimated time of arrival when the entire file will be copied to the remote directory
The estimated time of arrival when the entire file will be copied to the remote directory
This example copies the file named file1 to the home directory of bcalkins on the remote host:
scp file1 [email protected]:~
The system responds with this:
Password:
If you enter the user login password, you are then logged in to the remote host:
file1 100% |*************************************| 12540 0:00
For more information on using the Secure Shell, refer to the ssh and sshd man pages.
The Solaris 10 system software includes ASET (Automated Security Enhancement Tool), which helps you monitor and control system security by automatically performing tasks that you would otherwise do manually. ASET performs the following seven tasks, each of which makes specific checks and adjustments to system files and permissions to ensure system security:
![]() Verifies appropriate system file permissions
Verifies appropriate system file permissions
![]() Verifies system file contents
Verifies system file contents
![]() Checks the consistency and integrity of
Checks the consistency and integrity of /etc/passwd and /etc/group file entries
![]() Checks the contents of system configuration files
Checks the contents of system configuration files
![]() Checks environment files (
Checks environment files (.profile, .login, and .cshrc)
![]() Verifies appropriate electrically erasable programmable read-only memory (EEPROM) settings
Verifies appropriate electrically erasable programmable read-only memory (EEPROM) settings
![]() Ensures that the system can be safely used as a network relay
Ensures that the system can be safely used as a network relay
The ASET security package provides automated administration tools that let you control and monitor a system’s security. You specify a low, medium, or high security level at which ASET runs. At each higher level, ASET’s file-control functions increase to reduce file access and tighten system security.
ASET tasks are disk intensive and can interfere with regular activities. To minimize their impact on system performance, you should schedule ASET to run when the system activity level is lowest—for example, once every 24 or 48 hours, at midnight.
The syntax for the aset command is as follows:
/usr/aset/aset -l <level> -d <pathname>
Options to the aset command are described in Table 4.27.

The following example runs ASET at low security, using the default working directory /usr/aset:

A system administrator can have the best system security measures in place, but without the users’ cooperation, system security may be compromised. The system administrator must teach common-sense rules regarding system security, such as the following:
![]() Use proper passwords. Countless sites use weak passwords such as
Use proper passwords. Countless sites use weak passwords such as admin or supervisor for their root accounts.
![]() Don’t give your password to anyone, no matter who the person says he or she is. One of the best system crackers of our time said that he would simply pose as a system support person, ask a user for a password, and get free reign with the system.
Don’t give your password to anyone, no matter who the person says he or she is. One of the best system crackers of our time said that he would simply pose as a system support person, ask a user for a password, and get free reign with the system.
![]() Only give out a password to a known, trusted person. Users should know that no one would ever email or call asking for the password.
Only give out a password to a known, trusted person. Users should know that no one would ever email or call asking for the password.
![]() If you walk away from a system, log out or lock the screen.
If you walk away from a system, log out or lock the screen.
![]() Don’t connect modems to the system without approval from the system administrator.
Don’t connect modems to the system without approval from the system administrator.
This chapter describes how to add, modify, and remove user accounts using both the SMC and the command line. The GUI of the SMC makes managing user accounts much easier than using the command-line method.
This chapter also describes the user shell initialization files. It describes how to use these files to customize the user work environment. In addition, this chapter describes many of the default shell environment variables that control the user shell environment.
This chapter also discusses fundamental concepts in system security. When you’re considering security, you need to begin by securing the hardware in a safe location. Remember that anyone who has physical access to a computer can access the operating system and data, regardless of how secure you’ve made everything else.
Keep your data secure by controlling the user logins on the system. You should make sure that users have secure passwords and are not making their logins and passwords public. You should implement password aging and restricted shells where they make sense.
You should set up file and directory permissions to ensure that users have access to only the data that they are authorized to see. You should utilize secure umask values and, if necessary, ACLs. You should monitor all user activities by using the Solaris utilities described in this chapter. Finally, you should not set setuid and setgid permissions unless absolutely necessary.
If your system is on a network, you should implement the network security measures that are described in this chapter. You should turn off unneeded services, using the “deny first, then allow” rule. In other words, you should turn off as many services and applications as possible, and then you should selectively turn on those that are essential. You should utilize trusted systems carefully. Also, you should keep your operating system security patches up-to-date. As new threats are discovered, you should quickly fix them by installing security patches as they become available. Chapter 2, “Installing the Solaris 10 Operating Environment,” describes the process of obtaining and loading system patches.
In this chapter you have learned about securing the superuser password. You need to keep it under tight control and make sure that it is never made available to anyone except those who are authorized. You should limit using the superuser login unless the task to be performed requires root privileges. Chapter 11 describes RBAC, which is a great alternative to giving out the root password to system operators and junior-level administrators.
![]() High ASET security
High ASET security
![]() Low ASET security
Low ASET security
![]() Medium ASET security
Medium ASET security
![]() Set-user identification permission
Set-user identification permission
In this exercise, you use the SMC to add new users to your system, lock user accounts, and set up password aging.
Estimated time: 20 minutes

In this exercise, you work with user initialization files.
Estimated time: 20 minutes
1. Use the vi editor to edit the /etc/skel/local.profile file by adding the following entries and setting the following variables:
EDITOR=/usr/bin/vi; export EDITOR
PATH=$PATH:/usr/lib/lp; export EDITOR
2. Use the SMC to create a new user called user9 that uses the Korn shell. Log in as user9 and verify that all the variables you set in /etc/skel/local.profile are set correctly in the user’s environment by typing the following:
env
3. Create a .profile file for user9 that includes two aliases and sets the primary prompt to display the current working directory. Use the vi editor to add the following three lines to the .profile file that is located in user9’s home directory:
alias del='rm -i'
alias hi='echo hello'
PS1=$PWD' $'
4. Log out and log back in as the same user to verify that the .profile file works. Do you have a new shell prompt?
5. Verify that your new aliases are defined by typing the following:
alias
6. Log out and log back in again as root.
7. Use useradd to create a new user named user10, specify the Korn shell as the default shell, and assign the password trng:
# useradd -u 1010 -g 10 -d /export/home/user10 -m
-s /bin/ksh -c "Solaris Student" user10
# passwd user10
New Passwd:
Re-enter new passwd:
8. Log out and log back in as user10. Record the list of initialization files in your home directory by issuing the ls -la command. Which of these files is the same as /etc/skel/local.profile?
9. Copy /etc/skel/local.profile to .profile.
10. Log out and log back in as user10. Verify that the variables set in the .profile file for user9 are also set in user10’s login (PATH and EDITOR). Are they correct?
In this exercise, you use the various utilities to monitor users who are accessing your system.
Estimated time: 5 minutes
1. Log in as root.
2. Create a file called loginlog in the /var/adm directory and set the file permission to 600:
cd /var/adm
touch loginlog
chmod 600 loginlog
3. Log out and log back in. Do not log in using the CDE; log in using the command line.
4. Enter root after the login prompt and supply an incorrect password. Do this five times. After the fifth attempt, log in as root using the correct password and examine the /var/adm/loginlog file:
more /var/adm/loginlog
5. Use the finger command to display information about the user named user9:
finger user9
finger -m user9
6. User the finger command to display information about a user on another system:
finger user9@<hostname>
finger -m user9@<hostname>
7. Use the last command to display user and reboot activity.
8. Use the logins command to obtain information about the user9 login account:
logins -x -l user9
In this exercise, you use Unix permissions to control file access by allowing/disallowing access to files and directories.
Estimated time: 20 minutes
2. Enter the umask command to determine your current umask value:
umask
If the umask is not 002, change it by entering the following:
umask 002
3. Create a file called file1 in your home directory:
cd $HOME
touch file1
4. Enter ls -l to see the default permission that was assigned to the file1 file.
5. Set your umask to 022:
umask 022
6. Create a file named file2 and look at the default permission value:
touch file2
ls -l
7. Create a new user called newuser:
useradd -u 3001 -g 10 -d /export/home/user20 -m
-s /bin/ksh -c "Temporary User" user20
8. Set the password for user20:
passwd user20
9. Log out and log back in as user9. You are placed in your home directory, /export/home/user9.
10. Create a new file named file10 and list the permissions:
touch file10
ls -l
11. Use chmod to set the UID permissions on file10 and list the permissions:
chmod 4555 file10
ls -l
12. Use chmod to set the UID and GID permissions on file10, and then display the permissions:
chmod 6555 file10
ls -l
What changes?
13. Use chmod to remove all execute permissions from file10, and then display the new permissions:
chmod 6444 file10
ls -l
14. List the directory permissions on /tmp:
ls -ld /tmp
Note that the sticky bit is set on /tmp.
15. As user9, change to the /tmp directory and create a file called file1:
cd /tmp
touch file1
ls -l
Note the permissions on the file. They should be 644 (rw-r---r--).
16. Become user20, and in the /tmp directory, remove the file named file1:
su user20
cd /tmp
rm file1
What message do you receive?
17. Exit the current shell to return to being user9. Change to the user9 home directory and set the ACL on file10 so that user20 has read and write permissions on the file:
exit
cd $HOME
setfacl -m user:user20:6 file10
18. List the file permissions on file10 by issuing ls -l. Note the +, which indicates that an ACL is set on the file.
19. List the ACL entry on file10 as follows:
getfacl file10
20. Remove the ACL from file10 as follows:
setfacl -d u:user20 file10
In this exercise, you make changes to the system to restrict root logins.
Estimated time: 10 minutes
1. Try to log in to your system as root from a remote system. If the /etc/default/login file has not been modified from its default settings, you should not be able to log in.
2. Log in to your system from the console as root.
3. Use vi to edit the file /etc/default/login, adding a pound sign (#) at the beginning of the following line:
#CONSOLE=/dev/console
4. Try to log in to your system as root from a remote system. Does it work?
5. Now try to open an FTP connection from a remote system:
ftp <hostname>
6. When you are prompted with a login name, try to get in as root. If the /etc/ftpusers file has not been modified from its default settings, you get a Login Incorrect message and are not able to log in.
7. Remove root from the /etc/ftpusers files. Does the FTP session work now?
8. Disallow all FTP connections using the inetadm command as follows:
inetadm -d ftp
9. Try to connect from a remote system via FTP.
|
1. |
A. A user login name can contain two to eight uppercase characters (A–Z) or lowercase characters (a–z) or digits (0–9), but no underscores or spaces. The first character must be a letter, and at least one character must be a lowercase letter. For more information, see the section “Adding User Accounts with the SMC.” |
|
2. |
A. The UID for the root login is always |
|
3. |
D. A user can belong to as many as 15 secondary groups. Added to the primary group, a user can belong to 16 total groups. For more information, see the section “Where User Account Information Is Stored.” |
|
4. |
A, B, D. The password is cleared until first login is no longer an option in Solaris 10. You cannot lock an account via the Add User Wizard in the SMC. The SMC cannot automatically generate a password for a user account. For more information, see the section “Adding User Accounts with the SMC.” |
|
5. |
A. When you delete a user account in the SMC, you deselect the Delete Home Directory check box to retain all the user’s files. For more information, see the section “Deleting User Accounts with the SMC.” |
|
6. |
D. The following are default user initialization files that are put into a user’s home directory when the user’s account is created: |
|
7. |
B. The |
|
8. |
A. To set the default path in the Korn shell, you issue the following command: |
|
9. |
A. To set the default path in the C shell, you issue the following command: |
|
10. |
A. The |
|
11. |
A. The sitewide initialization file for the Korn shell is |
|
12. |
A. The sitewide initialization file for the C shell is |
|
13. |
A. UID numbers for regular users should range from |
|
B. In the |
|
|
15. |
A, B. The |
|
16. |
D. Whenever someone issues the |
|
17. |
C. If the sticky bit is set on the |
|
18. |
B. The |
|
19. |
D. Employee numbers are not secure passwords. For more information, see the section “Controlling System Access.” |
|
20. |
A. You should ensure that passwords contain a combination of 6–8 letters, numbers, or special characters. For more information, see the section “Controlling System Access.” |
|
21. |
B. Password encryption and password aging details are stored in the |
|
22. |
A. On files, the |
|
23. |
C. The |
|
24. |
C. When a user creates a file or directory, the |
|
25. |
B. A |
|
26. |
A. A |
|
27. |
B. The permissions |
|
D. |
|
|
29. |
A, B. A restricted shell does not allow the user to change directories or redirect output. For more information, see the section “Restricted Shells.” |
|
30. |
D. |
|
31. |
B. You use the |
|
32. |
B. The |
|
33. |
A. The |
|
34. |
B. You can protect the superuser account on a system by restricting access to a specific device through the |
|
35. |
D. The |
|
36. |
B. The Solaris 10 system software includes ASET, which helps you monitor and control system security by automatically performing tasks you would otherwise do manually. ASET performs seven tasks, making specific checks and adjustments to system files and permissions to ensure system security. For more information, see the section “ASET.” |
|
37. |
B. Except for the executables that are shipped with the |
|
38. |
C. You use the |
|
39. |
A. The plus sign ( |
|
A. You use the |
|
|
41. |
A. Use the |
|
42. |
A. The |
For more information on this topic, refer to the Solaris 10 System Administration Guide: Security Services by Sun Microsystems, Part number 816-4557-10. This guide is available at http://docs.sun.com.