
The following test objectives for exam CX-310-200 are covered in this chapter:
This chapter describes how to install and manage the Solaris 10 operating system software.
This chapter will prepare you for the following exam objectives:
Explain how to install the Solaris operating system from CD/DVD, including installation and upgrade options, hardware requirements, Solaris operating system software components (software packages, clusters, and groups) on SPARC, x64, and x86-based systems.
![]() There are many different methods that can be used to install the Solaris 10 operating environment (OE). Which method you use depends on whether you are upgrading the operating system from a previous release, installing the operating system from scratch, or installing several systems that are configured exactly the same way. You also need to know if your system meets the minimum hardware requirements for the Solaris 10 OE.
There are many different methods that can be used to install the Solaris 10 operating environment (OE). Which method you use depends on whether you are upgrading the operating system from a previous release, installing the operating system from scratch, or installing several systems that are configured exactly the same way. You also need to know if your system meets the minimum hardware requirements for the Solaris 10 OE.
In addition to installing Solaris on Sun SPARC systems, you must also understand how to install the OS on x86- and x64-based systems.
Perform Solaris 10 OS package administration using command-line interface commands and manage software patches for the Solaris OS, including preparing for patch administration and installing and removing patches using the patchadd and patchrm commands.
![]() When installing the operating system, you’ll need to understand how Sun packages their software into packages and groups. You’ll need to understand how to install, list, verify, and remove individual software packages using the command line interface commands described in this chapter.
When installing the operating system, you’ll need to understand how Sun packages their software into packages and groups. You’ll need to understand how to install, list, verify, and remove individual software packages using the command line interface commands described in this chapter.
In addition, you’ll need to understand how software updates are distributed via software patches. You’ll need to understand how to obtain, install, list, and remove these patches using the various command line interface utilities.
The following strategies will help you prepare for the exam:
![]() Understand each of the seven methods used to install the operating system. Primarily, you need to know the difference between each method as well as where and when to use each one.
Understand each of the seven methods used to install the operating system. Primarily, you need to know the difference between each method as well as where and when to use each one.
![]() Know all of the hardware requirements for installing the Solaris 10 operating environment on SPARC and x86/x64-based systems.
Know all of the hardware requirements for installing the Solaris 10 operating environment on SPARC and x86/x64-based systems.
![]() Become familiar with all of the tools used to manage software on a Solaris system. Understand which tool is best for a particular circumstance.
Become familiar with all of the tools used to manage software on a Solaris system. Understand which tool is best for a particular circumstance.
![]() Understand how to patch the operating system. Pay special attention to how to obtain patches, the various methods used to install and remove them, and how to verify patches on your system.
Understand how to patch the operating system. Pay special attention to how to obtain patches, the various methods used to install and remove them, and how to verify patches on your system.
![]() Practice all of the commands presented in this chapter until you can perform them and describe them from memory. In addition, practice installing the Solaris 10 OE and adding/removing software packages no less than three times or until you can perform all of the tasks from memory.
Practice all of the commands presented in this chapter until you can perform them and describe them from memory. In addition, practice installing the Solaris 10 OE and adding/removing software packages no less than three times or until you can perform all of the tasks from memory.
![]() Finally, understand all of the terminology and concepts described in this chapter as well as the terms outlined at the end of the chapter. Each term and concept is likely to appear on the exam.
Finally, understand all of the terminology and concepts described in this chapter as well as the terms outlined at the end of the chapter. Each term and concept is likely to appear on the exam.
The Solaris installation process consists of three phases: system configuration, system installation, and post-installation tasks such as setting up printers, users, and networking. This chapter describes the various system configurations and the installation of the Solaris operating system on a standalone system.
Once the software is installed, the system administrator is responsible for managing all software installed on a system. Installing and removing software is a routine task that is performed frequently. This chapter explains how to add and remove additional applications after the operating system has already been installed.
When installing the operating system onto a machine, you’ll be performing one of two types of installations: initial or upgrade.
You’ll perform an initial installation either on a system that does not have an existing Solaris operating system already installed on it or when you want to completely wipe out the existing operating system and reinstall it.
An upgrade is performed on a system that is already running Solaris 7, Solaris 8, Solaris 9, or a previous release of Solaris 10. An upgrade will save as many modifications as possible from the previous version of Solaris that is currently running on your system.
Caution
Upgrading to a New Software Group You cannot upgrade your system to a software group that is not currently installed on the system. For example, you cannot upgrade to the Developer Solaris Software group if you previously installed the End User Solaris Software group. You can, however, add software that is not currently part of the installed software group to a system.
Another option when upgrading your system is to take advantage of the Solaris live upgrade, which enables an upgrade to be installed while the operating system is running and can significantly reduce the downtime associated with an upgrade. The process involves creating a duplicate boot environment on an unused disk slice and upgrading the duplicate boot environment. When you’re ready to switch and make the upgraded boot environment active, you simply activate it and reboot. The old boot environment remains available as a fallback to the original boot environment and allows you to quickly reactivate and reboot the old environment. This is useful if you need to back out of the upgrade and go back to the previous operating system release.
Regardless of whether you are going to perform an initial installation or an upgrade, you need to first determine whether your hardware meets the minimum requirements to support the Solaris 10 environment.
The first step in the installation is to determine whether your system type is supported under Solaris 10. Second, you need to decide which system configuration you want to install and whether you have enough disk space to support that configuration.
In preparation for installing Solaris 10 on a system, use Table 2.1 to check whether your system type is supported. Also, make sure you have enough disk space for Solaris and all of the packages you plan to install. (The section “Software Terminology” later in this chapter will help you estimate the amount of disk space required to hold the Solaris operating system.)


If your system is running a previous version of Solaris, you can determine your system type using the uname -m command. The system will respond with the hardware class. Compare the system response to the Platform Group column in Table 2.1. For example, to check for Sun platforms that support the Solaris 10 environment, use the command uname -m. On a Sun Ultra5, the system returns sun4u as the platform name and on an x86/x64 system, the command will return i86pc as the platform name.
Note
OpenBoot Commands To determine the system type on a system that is not currently running some version of Solaris, you’ll need to use the OpenBoot commands described in the next chapter.
Table 2.1 outlines a general list of Sun systems that support Solaris 10. For a complete, up-to-date listing of all hardware that is compatible with the Solaris 10 OE, including all x86/x64-based systems, go to http://www.sun.com/bigadmin/hcl/. This site features a searchable database to quickly locate equipment in three categories: Sun Certified, Test Suite Certified, and Reported to Work. X86- and x64-based systems are available from many vendors, and the components can vary from system to system. Use this site to track down the specific components that are installed in your system to determine if it is compatible with Solaris 10. Overall, your x86/x64-based system needs to have a 120MHz or faster processor with hardware floating-point support required, a minimum of 128MB of RAM, and 12GB of disk space.
Check slice 2 by using the format command to determine whether your disk drive is large enough to hold Solaris. See Chapter 1, “Managing File Systems,” for the correct use of this command. As described in Chapter 1, slice 2 represents the entire disk.
The computer must meet the following requirements before you can install Solaris 10 using the interactive installation method:
![]() The system must have a minimum of 128MB of RAM (256MB is recommended). Sufficient memory requirements are determined by several factors, including the number of active users and applications you plan to run.
The system must have a minimum of 128MB of RAM (256MB is recommended). Sufficient memory requirements are determined by several factors, including the number of active users and applications you plan to run.
Exam Alert
Minimum Memory Requirements Although Sun states that 128MB of RAM is the minimum required, it is possible to install Solaris 10 on a system that has 64MB of RAM. With less than 128MB, the system will run sluggishly. It’s important that you use Sun’s RAM recommendations when you encounter this question on the exam. Also, pay close attention to the question and understand the difference between “minimum” and “recommended.”
![]() The media is distributed on CD-ROM and DVD only, so a CD-ROM or DVD-ROM drive is required either locally or on the network. You can use all of the Solaris installation methods to install the system from a networked CD-ROM or DVD-ROM.
The media is distributed on CD-ROM and DVD only, so a CD-ROM or DVD-ROM drive is required either locally or on the network. You can use all of the Solaris installation methods to install the system from a networked CD-ROM or DVD-ROM.
![]() A minimum of 2GB of disk space is required. See the next section for disk space requirements for the specific Solaris software you plan to install. Also, remember to add disk space to support your environment’s swap space requirements.
A minimum of 2GB of disk space is required. See the next section for disk space requirements for the specific Solaris software you plan to install. Also, remember to add disk space to support your environment’s swap space requirements.
![]() When upgrading the operating system, you must have an empty 512MB slice on the disk. The swap slice is preferred, but you can use any slice that will not be used in the upgrade such as root (
When upgrading the operating system, you must have an empty 512MB slice on the disk. The swap slice is preferred, but you can use any slice that will not be used in the upgrade such as root (/), /usr, /var, and /opt.
![]() The system must be a SPARC-based or supported x86/x64-based system.
The system must be a SPARC-based or supported x86/x64-based system.
The operating system is bundled in packages on the distribution media. Packages are arranged into software groups. The following sections describe the Solaris bundling scheme.
A software package is a collection of files and directories in a defined format. It describes a software application, such as manual pages and line printer support. The Solaris 10 entire distribution contains approximately 900 software packages that require 6.5 gigabytes of disk space.
A Solaris software package is the standard way to deliver bundled and unbundled software. Packages are administered by using the package administration commands, and they are generally identified by a SUNWxxx naming convention when supplied by Sun Microsystems. SUNW is Sun Microsystems’s ticker symbol on the stock exchange, hence the SUNW prefix.
Software packages are grouped into software groups, which are logical collections of software packages. Sometimes these groups are referred to as clusters. For example, the online manual pages software group contains one package. Some software groups contain multiple packages, such as the CDS software cluster, which contains the CDE man pages, CDE desktop applications, CDE daemons, and so on.
For SPARC systems, software groups are grouped into six configuration groups to make the software installation process easier. During the installation process, you will be asked to install one of the six configuration groups. These six configuration groups are reduced networking support, core system support, end-user support, developer system support, entire distribution, and entire distribution plus OEM system support. The following list describes each software group:
![]() Reduced networking support—Sun recommends 736MB to support the software, swap, and disk overhead required to support this software group. This group contains the minimum software that is required to boot and run a Solaris system with limited network service support. The Reduced Networking software group provides a multi-user text-based console and system administration utilities. This software group also enables the system to recognize network interfaces, but does not activate network services. A system installed with the Reduced Networking software group could, for example, be used as a thin-client host in a network.
Reduced networking support—Sun recommends 736MB to support the software, swap, and disk overhead required to support this software group. This group contains the minimum software that is required to boot and run a Solaris system with limited network service support. The Reduced Networking software group provides a multi-user text-based console and system administration utilities. This software group also enables the system to recognize network interfaces, but does not activate network services. A system installed with the Reduced Networking software group could, for example, be used as a thin-client host in a network.
![]() Core system support—Sun recommends 777MB to support the software, swap, and disk overhead required to support this software group. This software group contains the minimum software required to boot and run Solaris on a system. It includes some networking software and the drivers required to run the OpenWindows (OW) environment, but it does not include the OpenWindows software.
Core system support—Sun recommends 777MB to support the software, swap, and disk overhead required to support this software group. This software group contains the minimum software required to boot and run Solaris on a system. It includes some networking software and the drivers required to run the OpenWindows (OW) environment, but it does not include the OpenWindows software.
![]() End-user system support—Sun recommends 3.6 GB to support the software, swap, and disk overhead required to support this software group. This group contains the core system support software plus end-user software, which includes OW compatibility and the Common Desktop Environment (CDE) software.
End-user system support—Sun recommends 3.6 GB to support the software, swap, and disk overhead required to support this software group. This group contains the core system support software plus end-user software, which includes OW compatibility and the Common Desktop Environment (CDE) software.
![]() Developer system support—Sun recommends 4.6GB to support the software, swap, and disk overhead required to support this cluster. This software group contains the end-user software plus libraries, include files, man pages, and programming tools for developing software. Compilers and debuggers are purchased separately and are not included. However, you can use the open source GCC compiler supplied on the Solaris Companion CD.
Developer system support—Sun recommends 4.6GB to support the software, swap, and disk overhead required to support this cluster. This software group contains the end-user software plus libraries, include files, man pages, and programming tools for developing software. Compilers and debuggers are purchased separately and are not included. However, you can use the open source GCC compiler supplied on the Solaris Companion CD.
![]() Entire distribution—Sun recommends 4.7GB to support the software, swap, and disk overhead required to support this software group. This software group contains the entire Solaris 10 release, which includes additional software needed for servers.
Entire distribution—Sun recommends 4.7GB to support the software, swap, and disk overhead required to support this software group. This software group contains the entire Solaris 10 release, which includes additional software needed for servers.
![]() Entire distribution plus OEM system support—Sun recommends 4.8GB to support the software, swap, and disk overhead required to support this software group. This software group contains the entire Solaris 10 release software plus extended hardware support for non-Sun SPARC systems.
Entire distribution plus OEM system support—Sun recommends 4.8GB to support the software, swap, and disk overhead required to support this software group. This software group contains the entire Solaris 10 release software plus extended hardware support for non-Sun SPARC systems.
Note
Recommended Space Requirements Swap space and necessary file system overhead is included in the disk space recommendations for each software group. A minimum of 512MB is required for swap space, but more space might be needed.
In addition, as new releases of Solaris 10 are made available, the size of these software groups might change.
The Solaris 10 operating system software is distributed on a DVD or CD-ROM set numbered 1 through 4 and is referred to as “the installation media kit.” The single DVD contains the contents of the entire CD set and is bootable. CD 1 of the CD set is the only bootable CD. From this CD, you can access both the Solaris installation graphical user interface (GUI) and the console-based installation. This CD also enables you to install selected software products from both the GUI and the console-based installation. The remaining CDs of the CD set contain the following:
![]() Solaris packages
Solaris packages
![]() Extra value software which includes supported and unsupported software
Extra value software which includes supported and unsupported software
![]() Installers
Installers
![]() Localized interface software and documentation
Localized interface software and documentation
For those of you who have used previous versions of Solaris, the Supplemental CD and Installation CD are longer supplied.
Before installing the operating system, you need to determine the system configuration to be installed. The configurations are defined by the way they access the root (/) and /usr file systems and the swap area. The system configurations are as follows:
Each of these system configurations are discussed in the following sections.
A server is a system that provides services or file systems, such as home directories or mailboxes, to other systems on the network. An operating system server is a server that provides the Solaris software to other systems on the network.
There are file servers, startup servers, database servers, license servers, print servers, mail servers, web servers, installation servers, NFS servers, and even servers for particular applications. Each type of server has a different set of requirements based on the function it will serve. For example, a database server will be disk and memory intensive, but it probably will not have many logged-in users. Therefore, when this system is configured, special thought needs to be put into setting up the file systems and fine tuning kernel parameters that relate to disk I/O and memory usage to optimize system performance.
A server system typically has the following file systems installed locally:
![]() The root (
The root (/) and /usr file systems plus swap space
![]() The
The /var file system which supports the print spooler, mail repository, and software spooler.
![]() The
The /export, /export/swap, and /export/home file systems, which support client systems and provide home directories for users
![]() The
The /opt directory or file system for storing application software
Servers can also contain the following software to support other systems:
![]() Solaris CD-ROM image and boot software for networked systems to perform remote installations
Solaris CD-ROM image and boot software for networked systems to perform remote installations
![]() A JumpStart directory for networked systems to perform custom JumpStart installations
A JumpStart directory for networked systems to perform custom JumpStart installations
The server must meet a few minimum requirements before Solaris 10 can be installed:
![]() The Solaris 10 release supports all
The Solaris 10 release supports all sun4u platforms.
![]() To run a graphical user interface (GUI) installation, the system must have a minimum of 256MB of RAM. As a server, however, it is typical to have 512MB of RAM or more.
To run a graphical user interface (GUI) installation, the system must have a minimum of 256MB of RAM. As a server, however, it is typical to have 512MB of RAM or more.
![]() The disk needs to be large enough to hold the Solaris operating system, swap space, and additional software. Plan on a minimum of 9GB of disk space, but realistically the server should have 18GB to 36GB or more depending on the resources that this server will be providing.
The disk needs to be large enough to hold the Solaris operating system, swap space, and additional software. Plan on a minimum of 9GB of disk space, but realistically the server should have 18GB to 36GB or more depending on the resources that this server will be providing.
A client is a system that uses remote services from a server. Some clients have limited disk storage capacity or perhaps none at all, so they must rely on remote file systems from a server to function.
Other clients might use remote services (such as installation software) from a server, but they don’t rely on a server to function. A standalone system, which has its own hard disk containing the root (/), /usr, and /export/home file systems and swap space, is a good example of this type of client.
On a standalone system, the operating system is loaded on a local disk, and the system is set to run independently of other systems. The operating system might be networked to other standalone systems. A networked standalone system can share information with other systems on the network, but it can function autonomously because it has its own hard disk with enough space to contain the root (/), /usr, and /export/home file systems and swap space. The standalone system has local access to operating system software, executables, virtual memory space, and user-created files. Sometimes the standalone system will access the server for data or access a CD-ROM or tape drive from a server if one is not available locally.
Before you begin to install a system, you need to think about how you want data stored on your system’s disks. With one disk, the decision is easy. When multiple disks are installed, you must decide which disks to use for the operating system, the swap area, and the user data.
As described in Chapter 1, “Managing File Systems,” Solaris breaks disks into pieces called partitions, or slices. A Solaris disk can be divided into a maximum of seven slices.
Why would you want to divide the disk into multiple slices? Some administrators don’t; they use the entire disk with one slice. By using one slice, all of the space on the disk is available for anyone to use. When the system administrator creates a slice, the space in that slice is available only to the file system that is mounted on it. If another file system on the same disk runs out of space, it cannot borrow space from the other slice without repartitioning the disk. However, having multiple slices can provide some advantages. The following list describes some of the reasons why you might want to consider partitioning disks into multiple slices:
![]() Slices allow finer control over tasks such as creating backups. Unix commands such as
Slices allow finer control over tasks such as creating backups. Unix commands such as ufsdump work on entire file systems. For backups, you might want to separate data and swap space from the application software so that backups are completed faster with a ufsdump. For example, you might want to back up only data on a daily basis. On the other hand, you’ll need to take the system down to single-user mode to back up / and /usr, so separating the data will make your backup complete much more quickly and will result in less downtime.
![]() If one file system becomes corrupted, the others remain intact. If you need to perform a recovery operation, you can restore a smaller file system more quickly. Also, when data is separated from system software, you can modify file systems without shutting down the system or reloading operating system software.
If one file system becomes corrupted, the others remain intact. If you need to perform a recovery operation, you can restore a smaller file system more quickly. Also, when data is separated from system software, you can modify file systems without shutting down the system or reloading operating system software.
![]() Slices allow you to control the amount of disk storage allocated to an activity or type of use. For example,
Slices allow you to control the amount of disk storage allocated to an activity or type of use. For example, /var can grow rapidly because it stores mail, log files, and patch backups. To keep /var from filling up the root (/) file system, we typically create a slice specifically for the /var file system.
![]() If file systems are mounted remotely from other systems, you can share only the data that needs to be accessed, not the entire system disk.
If file systems are mounted remotely from other systems, you can share only the data that needs to be accessed, not the entire system disk.
The installation process gives you the option of creating slices. Start with the default partition scheme supplied with the installation program, which is to set up a file system for root (/) and swap. This scheme sets up the required slices and provides you with the sizes required, based on the software group you select to install. The following is a typical partitioning scheme for a system with a single disk drive:
![]() root (
root (/) and /usr—Solaris creates the root (/) slice by default. It is also recommended that you create a slice for /usr. The auto_layout function of the installation program determines how much space you need in root (/) and /usr. Most of the files in these two slices are static. Information in these file systems will not increase in size unless you add software packages later. If you plan to add third-party software after the installation of Solaris, make sure you increase the root (/) and /usr slices to accommodate the additional files you plan to load. If the root (/) file system fills up, the system will not operate properly.
![]() Swap—This area on the disk doesn’t have files in it. In Unix, you’re allowed to have more programs than will fit into memory. The pieces that aren’t currently needed in memory are transferred into swap to free up physical memory for other active processes. Swapping into a dedicated slice is a good idea for two reasons: Swap slices are isolated so that they aren’t put on tape with the daily backups, and a swap slice can be laid out on a disk in an area to optimize performance.
Swap—This area on the disk doesn’t have files in it. In Unix, you’re allowed to have more programs than will fit into memory. The pieces that aren’t currently needed in memory are transferred into swap to free up physical memory for other active processes. Swapping into a dedicated slice is a good idea for two reasons: Swap slices are isolated so that they aren’t put on tape with the daily backups, and a swap slice can be laid out on a disk in an area to optimize performance.
![]()
/export/home—On a single-disk system, everything not in root (/), /usr, or swap should go into a separate slice. /export/home is where you would put user-created files.
![]()
/var (optional)—Solaris uses this area for system log files, print spoolers, and email. The name /var is short for variable; this file system contains system files that are not static but are variable in size. One day the print spooler directory might be empty; another day it might contain several 1MB files. This separate file system is created to keep the root (/) and /usr file systems from filling up with these files. If the /var file system does not exist, make sure you make root (/) larger.
![]()
/opt (optional)—By default, the Solaris installation program loads optional software packages here. Also, third-party applications are usually loaded into /opt. If this file system does not exist, the installation program puts the optional software in the root file system. If the /opt file system does not exist, make sure you make root (/) larger.
File systems provide a way to segregate data, but when a file system runs out of space, you can’t “borrow” from a file system that has some unused space. Therefore, the best plan is to create a minimal number of file systems with adequate space for expansion. This concept is discussed in Chapter 1, “Managing File Systems,” and the ability to make file systems larger is described in Chapter 10, “Managing Storage Volumes.”
Planning disk and partition space depends on many factors: the number of users, the application requirements, and the number and size of files and databases. The following are some basic considerations for determining your disk space requirements:
![]() Allocate additional disk space for each language selected (for example, Chinese, Japanese, and Korean).
Allocate additional disk space for each language selected (for example, Chinese, Japanese, and Korean).
![]() If you need printing or mail support, create a slice for a separate
If you need printing or mail support, create a slice for a separate /var file system and allocate additional disk space. You need to estimate the number and size of email messages and print files to size this slice properly. In addition to this space, if you intend to use the crash dump feature savecore, allocate additional space in /var equal to twice the amount of physical memory.
![]() Allocate additional disk space on a server that will provide home file systems for users. Again, the number of users and the size of their files will dictate the size of this file system. By default, home directories are usually located in the
Allocate additional disk space on a server that will provide home file systems for users. Again, the number of users and the size of their files will dictate the size of this file system. By default, home directories are usually located in the /export file system.
![]() Allocate additional disk space on an operating system server for JumpStart clients if this server will be used as a JumpStart installation server.
Allocate additional disk space on an operating system server for JumpStart clients if this server will be used as a JumpStart installation server.
![]() Make sure you allocate enough swap space. The minimum size for the swap slice is 512MB. Factors that dictate the amount of swap space are the concurrent number of users and the application requirements. Consult with your application vendor for swap-space requirements. Vendors usually give you a formula to determine the amount of swap space you need for each application. In addition, the swap slice will be used for core dumps and should contain enough space to hold a complete core dump—that is, exceed the size of the installed RAM. See Chapter 9 for more information on configuring core dumps.
Make sure you allocate enough swap space. The minimum size for the swap slice is 512MB. Factors that dictate the amount of swap space are the concurrent number of users and the application requirements. Consult with your application vendor for swap-space requirements. Vendors usually give you a formula to determine the amount of swap space you need for each application. In addition, the swap slice will be used for core dumps and should contain enough space to hold a complete core dump—that is, exceed the size of the installed RAM. See Chapter 9 for more information on configuring core dumps.
Note
Sizing the Swap Area In the past, system administrators sized their swap based on the amount of RAM installed in their system. A simple rule of “set your minimum swap space at two times the amount of physical memory” was used. With newer systems now containing several gigabytes of RAM, this rule is no longer relevant. See Chapter 9, “Virtual File Systems, Swap, and Core Dumps” for more information on swap.
![]() Determine the software packages you will be installing and calculate the total amount of disk space required. When planning disk space, remember that the Solaris Interactive Installation program lets you add or remove individual software packages from the software group that you select.
Determine the software packages you will be installing and calculate the total amount of disk space required. When planning disk space, remember that the Solaris Interactive Installation program lets you add or remove individual software packages from the software group that you select.
![]() Create a minimum number of file systems. By default, the Solaris Interactive Installation program creates file systems for only root (
Create a minimum number of file systems. By default, the Solaris Interactive Installation program creates file systems for only root (/) and swap, although /export is also created when space is allocated for operating system services. Creating a minimum number of file systems helps with future upgrades and file system expansion because separate file systems are limited by their slice boundaries. Be generous with the size of your file systems, especially root (/) and /usr. Even when using logical volumes, these file systems cannot be increased without completely reloading the operating system.
![]() For each file system you create, allocate an additional 30% more disk space than you need to allow for future Solaris upgrades. This is because each new Solaris release needs approximately 10% more disk space than the previous release. By allocating an additional 30% more space for each file system, you’ll allow for several Solaris upgrades before you need to repartition your system disk.
For each file system you create, allocate an additional 30% more disk space than you need to allow for future Solaris upgrades. This is because each new Solaris release needs approximately 10% more disk space than the previous release. By allocating an additional 30% more space for each file system, you’ll allow for several Solaris upgrades before you need to repartition your system disk.
![]() Calculate additional disk space for copackaged or third-party software.
Calculate additional disk space for copackaged or third-party software.
![]() If you will be using Solaris Volume Manager (SVM), you’ll need to allocate an empty slice for the
If you will be using Solaris Volume Manager (SVM), you’ll need to allocate an empty slice for the metadb replicas. See Chapter 10, “Managing Storage Volumes,” for more information on SVM.
Although a single large disk can hold all slices and their corresponding file systems, two or more disks are often used to hold a system’s slices and file systems.
Note
Conventional File Systems Using conventional Solaris file systems, you cannot split a slice between two or more disks. Solaris Volume Manager is described in Chapter 9 and allows us to overcome this limitation. For this chapter, however, I’m going to describe the use of conventional file systems.
For example, a single disk might hold the root (/) file system, a swap area, and the /usr file system, and a second disk might be used for the /export/home file system and other file systems containing user data. In a multiple-disk arrangement, the disk containing the root (/) and /usr file systems and swap space is referred to as the system disk or boot disk. Disks other than the system disk are called secondary disks or nonsystem disks.
Locating a system’s file systems on multiple disks allows you to modify file systems and slices on the secondary disks without shutting down the system or reloading the operating system software. Also, using multiple disks allows you to distribute the workload as evenly as possible among different I/O systems and disk drives, such as distributing the /home and swap slices evenly across disks.
Having more than one disk increases input/output (I/O) volume. By distributing the I/O load across multiple disks, you can avoid I/O bottlenecks.
Note
Improving System Performance with Multiple Swap Slices A good way to improve system performance is to create more than one swap slice and assign each one to a separate disk drive. When the system needs to access swap, the disk I/O is spread evenly across the multiple disk drives.
You can use one of seven methods to install the Solaris software:
![]() Solaris Interactive installation using the graphical user interface (GUI)
Solaris Interactive installation using the graphical user interface (GUI)
![]() Solaris Interactive installation using the command line interface (CLI)
Solaris Interactive installation using the command line interface (CLI)
![]() Solaris JumpStart
Solaris JumpStart
![]() Solaris Upgrade Method
Solaris Upgrade Method
Each of these is discussed in the following sections.
The Solaris Interactive Installation program, suninstall, guides you step by step through installing the Solaris software. You’ll be allowed to do a complete installation/reinstallation, perform an upgrade, or install a Solaris Flash archive. I like to refer to this installation as the conventional interactive installation. If you’ve installed previous versions of Solaris, this is the original interactive installation. With this installation, you need to know more about Solaris and other software products before installing them. The Interactive program does not allow you to install all of the software (Solaris software and copackaged software) at once; it installs only the SunOS software. After you install the Solaris software, you must install the other copackaged software by using the copackaged installation programs.
If your system does not have a directly attached CD-ROM or DVD-ROM drive, you can specify a drive that is attached to another system. The only requirement is that both systems must be attached to the same subnet.
JumpStart provides the capability to install Solaris on a new system by inserting the CD-ROM into the CD-ROM drive and turning on power to the system. No interaction is required. The software components installed are specified by a default profile that is selected based on the model and disk size of the system.
All new SPARC-based systems have the JumpStart software (a preinstalled boot image) preinstalled on the boot disk. You can install the JumpStart software on existing systems by using the re-preinstall command.
The Custom JumpStart method, formerly called autoinstall, allows you to automatically—and identically—install many systems with the same configuration without having to configure each of them individually. Custom JumpStart requires upfront setup of configuration files before the systems can be installed, but it’s the most cost effective way to automatically install Solaris software for a large installation. Custom JumpStart provides the best solution for performing hands-off installation across the network.
Note
JumpStart Configuration on New Systems On a new system, the installation software is specified by a default profile based on the system’s model and the size of its disks; you don’t have a choice of the software to be installed. Make sure this JumpStart configuration is suited to your environment. The system loads the end-user distribution group and sets up minimal swap space. Slices and their sizes are set up by using default parameters that might not be suitable for the applications you plan to install.
When might you want to use JumpStart? For example, suppose you need to install the Solaris software on 50 systems. Of these 50 systems to be installed, 25 are in engineering as standalone systems with the entire distribution software group, and 25 are in the IT group with the developer distribution software group. JumpStart enables you to set up a configuration file for each department and install the operating system on all the systems. This process facilitates the installation by automating it, ensuring consistency between systems and saving you time and effort.
Exam Alert
JumpStart Exam Objective Custom JumpStart is an objective on the CX-310-202 exam and is described in detail in Chapter 13, “Solaris Zones.” However, there are a couple of basic questions about Custom JumpStart on the CX-310-200 exam which you need to know, such as
![]() Why would you use JumpStart over another type of installation such as Web Start Flash or interactive?
Why would you use JumpStart over another type of installation such as Web Start Flash or interactive?
![]() Which installation method is designed to allow hands off installation across the network?
Which installation method is designed to allow hands off installation across the network?
The Solaris Flash Archive installation enables you to use a single reference installation (Flash Archive) of the Solaris OE on a system, which is called the master system. After installing the operating system onto the master system, you can add or delete software and modify system configuration information as necessary. You then create a flash archive from this master system and can use this archive to replicate that installation on a number of systems, which are called clone machines. Then, you can replicate that installation on a number of systems, which are called clone systems.
You can also replicate (clone) systems with a Solaris Flash initial installation that overwrites all files on the system or with a Solaris Flash update that only includes the differences between two system images. A differential update changes only the files that are specified and is restricted to systems that contain software consistent with the old master image.
You may also be wondering what makes Web Start Flash different from custom JumpStart.
When you use any of the Solaris installation methods and you do not select to install a Solaris Flash archive, the installation method installs each Solaris package individually. The package-based installation method is time consuming because the installation method must extract each individual package from the installation media and then update the package map for each package. A Flash archive installs Solaris onto your system much faster because it is simply copying an image onto your drive and does not install the operating system package by package.
If you have many different Solaris configurations that you want to install on your systems, you need a Solaris Flash archive for each configuration. Solaris Flash archives are large files and require a significant amount of disk space. Also, after you create a Solaris Flash archive, you cannot change the archive. If you have many different installation configurations or if you want the flexibility to change your installation configuration, you might consider using the custom JumpStart installation method.
Custom JumpStart employs a command-line installation method that enables you to automatically install or upgrade several systems, based on profiles that you create. Custom Jumpstart can be configured to install Solaris from a Solaris Flash archive. The JumpStart configuration files define specific software installation requirements. You can also incorporate shell scripts to include preinstallation and postinstallation tasks. This is not a capability within the Solaris Flash archive.
If you have multiple systems to install, the custom JumpStart installation method might be the most efficient way for you to install your systems. However, if you plan to install only a few systems, the custom JumpStart installation method is less efficient. This is because the creation of a custom JumpStart environment and its associated configuration files is very time consuming.
The WAN boot installation method enables you to boot and install software over a wide area network (WAN) by using HTTP. Utilizing the WAN boot method of installation, you can install the Solaris OS on SPARC-based systems over a wide area network. WAN boot can be used with security features to protect data confidentiality and installation image integrity.
The WAN boot installation method enables you to transmit an encrypted Solaris Flash archive over a WAN to a remote SPARC-based client. The WAN boot programs then install the client system by performing a custom JumpStart installation.
WAN boot is an advanced installation method and is covered in Chapter 13.
Solaris Live Upgrade allows you to create a copy of the current operating environment and upgrade the copy while the system is running in the original environment. Solaris Live Upgrade utilizes Solaris Volume Manager (SVM) to create a mirror of the OS (SVM is covered in Chapter 10). Once complete, you’ll reboot to the upgraded version of the OS. If problems are encountered with the upgrade, you can boot back to the previous version, significantly reducing any downtime. For example, let’s say that you are upgrading the OS using the Upgrade option in the interactive installation. If the power failed halfway through the upgrade and the system was powered off, your operating system would be incomplete and you would be unable to boot. Using Live Upgrade, because you’re upgrading a copy of the OS, you simply boot to the original version of the OS and start over.
To perform a live upgrade, the SUNWlur and SUNWluu software packages must be installed. The packages are installed with the entire distribution software group in Solaris 10; however, the system you are upgrading is probably running an older version of the OS, therefore, you’ll need to install the Solaris 10 Live Upgrade packages on your current OS. The release of the Solaris Live Upgrade packages must match the release of the OS you are upgrading to. For example, if your current OS is the Solaris 8 release and you want to upgrade to the Solaris 10 release, you need to install the Solaris Live Upgrade packages from the Solaris 10 release. Solaris versions 7, 8, 9, or 10 can be upgraded to the most recent version of Solaris 10 using Live Upgrade.
Exam Alert
Performing a live upgrade is beyond the scope of this chapter and is not covered in detail on the exam. For the exam, you’ll need to describe a Solaris Live Upgrade and understand how it differs from the other installation methods, including a Solaris Interactive upgrade.
An operating system upgrade merges the new version of the Solaris operating environment with the existing files on the system’s disk. An upgrade saves as many modifications that you have made to the previous version of the Solaris operating environment as possible.
Note
Backups Make sure that you back up your entire system and check the backup before performing an upgrade.
You can upgrade any system that is running the Solaris 7, 8, or 9 software. You can also update the Solaris 10 Update release if your system is running an older version of the Solaris 10 software. In this chapter, I will be describing how to perform an initial installation and will not be performing an upgrade. You’ll see, however, in the later section “Using the Interactive Installation Process (suninstall),” that after the system identification portion of the installation process is complete, suninstall will ask you if you want to perform an upgrade.
You cannot upgrade your system to a software group that is not installed on the system. For example, if you previously installed the end-user Solaris software group on your system, you cannot use the upgrade option to upgrade to the developer Solaris Software group. However, during the upgrade, you can add software to the system that is not part of the currently installed software group.
If you are already running the Solaris 10 operating environment and have installed individual patches, be aware of the following when upgrading to a Solaris 10 Update release:
![]() Any patches that were supplied as part of the Solaris 10 Update release are reapplied to your system. You cannot back out these patches.
Any patches that were supplied as part of the Solaris 10 Update release are reapplied to your system. You cannot back out these patches.
![]() Any patches that were previously installed on your system and are not included in the Solaris 10 Update release are removed.
Any patches that were previously installed on your system and are not included in the Solaris 10 Update release are removed.
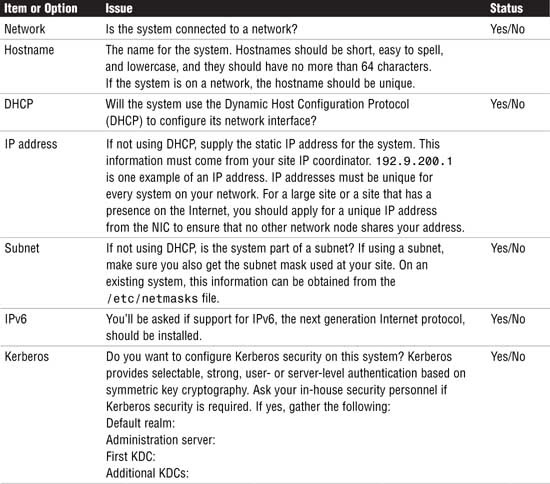
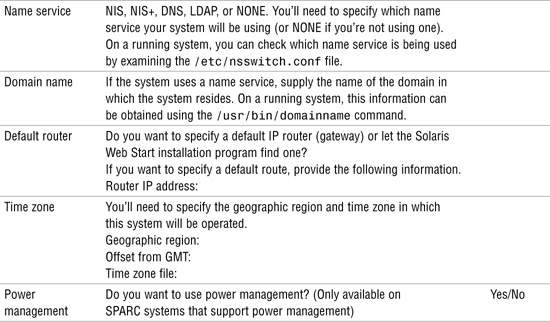
Before you begin installing the operating system, it’s important to make sure you have everything you’ll need. Adequate planning and preparation will save you time and trouble later. If the system is currently running a version of Solaris, make a full backup of all file systems before reloading the operating system. Even if the file systems are on separate disks than the operating system, make sure you have backups in place. As the saying goes, “better safe than sorry.” I recommend completing the installation worksheet in Table 2.2 so that all of the information you’ll need is handy during the installation.

You can use the sysidcfg file to preconfigure this information for a system. You must create a unique sysidcfg file for every system that requires different configuration information. You can use the same sysidcfg file to preconfigure parameters that are common between systems such as time zone, domain name, and so on. You’ll need a system specific sysidcfg file to specify parameters that are unique to each system, such as IP address, hostname, and root password. The sysidcfg file is covered in detail in Chapter 13.
Next, verify that you have enough disk space for Solaris 10 and all the co-packaged and third-party software you plan to add. (Refer to the section “Software Groups” earlier in this chapter.) Normally, a server would have several gigabytes (GB) of disk space available for the operating system, so you’ll be installing the full distribution software group. Also, you need to check with your software vendor regarding space requirements for any third-party software packages as well as swap space requirements.
After gathering the information for the installation worksheet, you are ready to begin the installation process. The following steps outline the process for installing Solaris 10 on a Sun SPARC system using the suninstall interactive installation method. With the conventional interactive installation, Solaris is installed by using the Solaris install tool, suninstall, a friendly and easy-to-use interface that will carry out a dialog for installing the operating system. The dialog will ask you several questions about the installation. This section provides an overview of the installation process using the conventional interactive installation program, suninstall.
suninstall brings up various menus and asks for your input. For this example, I’ll be using a character-based terminal. Those of you using a bitmapped display will see the same dialog, but it will be graphical. You’ll be able to use your mouse to click on your selections. The suninstall interface allows you to go back to previous screens if you make a mistake, and it doesn’t actually do anything to your system until the installation program reaches the end and tells you it is about to start the loading process. During the installation, help is always available via the Help button.
Caution
Reinstalling the OS Destroys Data The following procedure reinstalls your operating system. That means it destroys all data on the target file systems.
If you’re upgrading or installing Solaris on a running system, use the steps in Step by Step 2.1 to shut down and then perform the installation.
STEP BY STEP
2.1 Shutting Down and Installing on a Running System
1. Become root.
2. Issue the shutdown command. This command, described in Chapter 3, brings the system to a single-user state by halting the window system and leaving you with a single root prompt on the console. It takes about a minute.
3. Issue the halt command. This command puts you into the PROM. You’ll know you’re in the PROM when you receive either an ok or a > prompt.
4. Put the Solaris 10 CD-ROM 1 into the CD-ROM player and boot from the CD-ROM. If your system has a DVD-ROM, place the Solaris 10 DVD into the drive and boot from the DVD. For this example, I’ll be installing from CD-ROM media.
5. At the ok prompt, type boot cdrom.
This command will start the default GUI installation on a bit-mapped console if your system has at least 384MB of RAM installed. If your system has less than 384MB of ram, enter boot cdrom - nowin for the CLI (command line interface) version of the installation program. If the console does not support graphics, you’ll automatically be put into the CLI version of the installation.
Note
You can enter the installation program and complete all of the selections, but no changes will be made to the disk until you click the Begin Installation button at the end of the installation process.
The system starts from the CD-ROM, the installation program is loaded into memory, and it begins configuring devices. Ignore any messages such as cables not connected or network interfaces that fail to respond. After a few minutes, you’ll enter the system identification section of the installation. The installation program will open a dialog, asking you various questions about your locale and language as follows:
Select a Language
0. English
1. French
2. German
3. Italian
4. Japanese
5. Korean
6. Simplified Chinese
7. Spanish
8. Swedish
9. Traditional Chinese
Please make a choice (0 - 9), or press h or ? for help:
6. Select a language by entering the corresponding number and press Enter. In the example, I selected 0 for English. The system responded with the following menu querying your terminal type:
What type of terminal are you using?
1) ANSI Standard CRT
2) DEC VT52
3) DEC VT100
4) Heathkit 19
5) Lear Siegler ADM31
6) PC Console
7) Sun Command Tool
8) Sun Workstation
9) Televideo 910
10) Televideo 925
11) Wyse Model 50
12) X Terminal Emulator (xterms)
13) Other
Type the number of your choice and press Return:
This menu only comes up when you’re using a character-based screen. You will not see this menu if you’re using a bitmapped display.
7. For this example, I selected item 3 and pressed the Return key. The following menu displays next:
--The Solaris Installation Program--
The Solaris installation program is divided into a series of
short sections where you'll be prompted to provide information
for the installation. At the end of each section, you'll be able
to change the selections you've made before continuing.
About navigation...
- The mouse cannot be used
- If your keyboard does not have function keys, or they do not
respond, press ESC; the legend at the bottom of the screen
will change to show the ESC keys to use for navigation.
Again, this menu of options will only be displayed when using a character-based screen. On a bitmapped display, you will not see this menu.
8. I pressed the F2 key to continue. The following menu displays next:
----Identify This System ----
On the next screens, you must identify this system as networked or
non-networked, and set the default time zone and date/time.
If this system is networked, the software will try to find the
information it needs to identify your system; you will be prompted
to supply any information it cannot find.
> To begin identifying this system, press F2.
9. Press the F2 key to continue. The following menu will be displayed:
---Network Connectivity----
Specify Yes if the system is connected to the network by one of
the Solaris or vendor network/communication Ethernet cards that
are supported on the Solaris CD. See your hardware documentation
for the current list of supported cards.
Specify No if the system is connected to a network/communication card that is not
supported on the Solaris CD, and follow the instructions listed under Help.
Networked
[X] Yes
[ ] No
F2_Continue F6_Help
If the system is connected to a Sun-supported network/communication card, select Yes. If the system is connected to a network card that is not supported on the Solaris CD-ROM, select No and complete the installation of Solaris software as follows:
a. Install the unbundled network/communication card.
b. As root, run the /usr/sbin/sys-unconfig program to return the system to its “as-manufactured” state. This command is entered with no options and simply unconfigures your system’s hostname, network information, service domain name, time zone, IP address, subnet mask, and root password. When sys-unconfig is finished, it performs a system shutdown.
c. Attach the network adapter to the system.
d. At the ok prompt, type boot -r.
e. Provide network information as prompted on the screen, and the network will now be aware of the system.
f. After making your selection, press the F2 key to continue. The following menu will be displayed:
Primary Network Interface
On this screen you must specify which of the following network
adapters is the system's primary network interface.
Usually the correct choice is the lowest number.
However, do not guess; ask your system administrator
if you're not sure.
> To make a selection, use the arrow keys to highlight the
option and press Return to mark it [X].
Primary network interface
[X] hme0
[ ] qfe0
[ ] qfe1
[ ] qfe2
[ ] qfe3
F2_Continue F6_Help
Specify the primary network interface for your system. This information is requested if the software detects multiple Ethernet cards or network adapter cards on your system. This screen will be displayed if you’re installing a gateway from a CD-ROM; on this system, I have the primary network adapter and four additional network adapters installed.
In most cases, the correct choice is to select the lowest-numbered interface. However, if you don’t know, ask your system or network administrator.
Caution
Specify the Correct Network Interface If you specify the incorrect primary network interface, your system might not be able to find a name service.
In this example, I selected hme0 as the interface and pressed F2 to continue and the following menu was displayed:
---DHCP ----
On this screen you must specify whether or not this system
should use DHCP for network interface configuration.
Choose Yes if DHCP is to be used, or No if the interfaces
are to be configured manually.
NOTE: DHCP support will not be enabled, if selected, until
after the system reboots.
Use DHCP
[ ] Yes
[X] No
F2_Continue F6_Help
10. For more information on DHCP, see Chapter 12, “Naming Services.” For this example, I selected No and pressed F2 to continue. The following menu displays next:
---Host Name ----
Enter the host name which identifies this system on the network.
The name must be unique within your domain; creating a duplicate
host name will cause problems on the network after you install Solaris.
A host name must be at least two characters; it can contain
letters, digits, and minus signs (-).
Host name:___ultra5____________
F2_Continue F6_Help
11. Enter a unique hostname. In this example, I entered ultra5 for the hostname and pressed F2 to continue. The following menu displays next:
---IP Address----
Enter the Internet Protocol (IP) address for this network interface.
It must be unique and follow your site's address conventions, or a
system/network failure could result.
IP addresses contain four sets of numbers separated by periods
(for example 129.200.9.1).
IP address: 192.168.0.125
F2_Continue F6_Help
12. This menu displays if you did not select DHCP earlier in the process. Internet addresses are usually assigned by network or system administrators according to local and Internetwork policies. Because creating duplicate IP addresses can cause network problems, do not guess or make up a number; check with your system or network administrator for help. See Chapter 8, “The Solaris Network Environment,” for more information on IP addresses. For this example, I set the IP address to 192.168.1.198 and pressed F2 to continue. The following menu displays next:
---Subnets---
On this screen you must specify whether this system is
part of a subnet. If you specify incorrectly, the system
will have problems communicating on the network after you reboot.
> To make a selection, use the arrow keys to highlight
the option and press Return to mark it [X].
System part of a subnet
[ ] Yes
[X] No
F2_Continue F6_Help
13. Specify whether your system is on a network that has subnets. If the network to which your system is connected is divided into subnets (usually using routers or gateways), answer Yes. If you do not know if your network has subnets, do not guess; check with your system administrator for help. For this example, my system was not part of a subnet, so I selected No and pressed F2 to continue. The following menu displays next:
---IPv6---
Specify whether or not you want to enable IPv6, the next generation Internet
Protocol, on this network interface. Enabling IPv6 will have no effect if
this machine is not on a network that provides IPv6 service. IPv4 service
will not be affected if IPv6 is enabled.
To make a selection, use the arrow keys to highlight
the option and press Return to mark it [X].
Enable IPv6
[ ] Yes
[X] No
F2_Continue F6_Help
14. Specify whether this system will use IPv6, the next generation Internet protocol described in Chapter 8. This system will not use IPv6, so I selected No and pressed F2 to continue. The following menu displays next:
---Default Route---
To specify the default route, you can let the software try to detect one
upon reboot, you can specify the IP address of the router, or you can choose
None. Choose None if you do not have a router on your subnet.
To make a selection, use the arrow keys to highlight
your choice and press Return to mark it [X].
Default Route for hme0
[X] Detect one upon reboot
[ ] Specify one
[ ] None
F2_Continue F6_Help
15. Specify whether a default route is needed and, if so, specify an IP address to the router (gateway) in the network. The router is used to forward all network traffic that is not addressed to the local subnet. See Chapter 8, for more information. If you know the address of your default router, select Specify One. If not, you can select Find One, and the system will try to locate the default router. In this example, I selected Find One and pressed F2. The following summary menu displays next:
---Confirm Information for hme0 ---
> Confirm the following information. If it is correct, press F2;
to change any information, press F4.
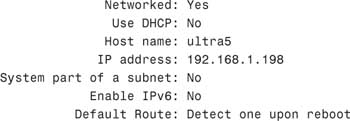
16. Confirm the settings by pressing F2 and the next menu is displayed:
Configure Security Policy:
Specify Yes if the system will use the Kerberos security
mechanism. Specify No if this system will use standard UNIX
security.
Configure Kerberos Security
[ ] Yes
[X] No
F2_Continue F6_Help
This specifies the type of security policy being implemented on this system. If no special security policy is desired, select No and normal Unix security will be implemented.
Note
Kerberos Security Using Kerberos requires coordination with your network administrator. You will need to know certain information, such as the fully qualified domain name of one or more KDCs. If you do not have this information or don’t know what this is, you can add it later to the /etc/krb5/krb5.conf file.
17. On this system, I will be using normal Unix security, so I selected No and pressed F2. The following confirmation menu displays next:
Confirm Information
> Confirm the following information. If it is correct,
press F2; to change any information, press F4.
Configure Kerberos Security: No
F2_Continue F4_Change F6_Help
18. If everything looks okay, press F2 to continue. The following menu displays next:
Name Service
On this screen you must provide name service information.
Select the name service that will be used by this system,
or None if your system will either not use a name service
at all, or if it will use a name service not listed here.
> To make a selection, use the arrow keys to highlight
the option and press Return to mark it [X].
Name service
[ ] NIS+
[ ] NIS
[ ] DNS
[ ] LDAP
[X] None
F2_Continue F6_Help
Specify the name service you will be using. Refer to Chapter 12, for more information.
19. This system will not be using a name service, only local /etc files, so I selected None and pressed F2 to continue. The following confirmation menu displays next:
Confirm Information
> Confirm the following information. If it is correct,
press F2; to change any information, press F4.
Name service: None
F2_Continue F4_Change F6_Help
20. If everything looks okay, press F2 to continue. The following menu displays next:
Subnets
On this screen you must specify whether this system is
part of a subnet. If you specify incorrectly, the system
will have problems communicating on the network after you reboot.
> To make a selection, use the arrow keys to highlight
the option and press Return to mark it [X].
System part of a subnet
[ ] Yes
[X] No
F2_Continue F6_Help
21. This question was asked earlier, and it’s asked again. If your system is part of a subnet, answer Yes. For this example, the system is not part of a subnet, so I answered No and pressed F2 to continue. The following menu displays next:
Time Zone
On this screen you must specify your default time zone.
You can specify a time zone in three ways: select one of
the geographic regions from the list, select other - offset
from GMT, or other - specify time zone file.
> To make a selection, use the arrow keys to highlight
the option and press Return to mark it [X].
Continents and Oceans
- [ ] Africa
[X] Americas
[ ] Antarctica
[ ] Arctic Ocean
[ ] Asia
[ ] Atlantic Ocean
[ ] Australia
[ ] Europe
[ ] Indian Ocean
F2_Continue F6_Help
22. The next two menus will ask you to provide information about your default time zone. First select your region and press F2 to continue. A subsequent menu will appear, asking for specifics about that particular region, as follows:
Time Zone
> To make a selection, use the arrow keys to highlight
the option and press Return to mark it [X].
Countries and Regions
- [X] United States
[ ] Anguilla
[ ] Antigua & Barbuda
[ ] Argentina
[ ] Aruba
[ ] Bahamas
[ ] Barbados
[ ] Belize
[ ] Bolivia
[ ] Brazil
[ ] Canada
[ ] Cayman Islands
[ ] Chile
F2_Continue F5_Cancel F6_Help
23. Continue to make your selection on subsequent menus to specify your time zone and press F2 to continue. The following menu will appear, asking you to verify the date and time:
Date and Time
> Accept the default date and time or enter new values.
Date and time: 2005-08-08 15:42
Year (4 digits) : 2005
Month ( 1-12 ) : 08
Day ( 1-31 ) : 08
Hour ( 0-23 ) : 15
Minute ( 0-59 ) : 42
F2_Continue F6_Help
24. Modify the time as required and press F2 to continue. The following confirmation screen will display:

25. If everything is correct, press F2 to continue and the following menu will open asking you to set the root password:
--Root Password -------------
Please enter the root password for this system.
The root password may contain alphanumeric and special characters. For
security, the password will not be displayed on the screen as you type it.
> If you do not want a root password, leave both entries blank.
Root password: ****
Root password: ****
26. Set the root password by entering it twice and press F2 to continue.
27. The system identification portion of the installation is complete. Following the system identification portion of the installation, you’ll see the following dialog displayed:
---Solaris Interactive Installation ----------------
On the following screens, you can accept the defaults or you can customize
how Solaris software will be installed by:
- Selecting the type of Solaris software to install
- Selecting disks to hold software you've selected
- Selecting unbundled products to be installed with Solaris
- Specifying how file systems are laid out on the disks
After completing these tasks, a summary of your selections (called a
profile) will be displayed.
There are two ways to install your Solaris software:
- "Standard" installs your system from a standard Solaris Distribution.
Selecting "Standard" allows you to choose between initial install
and upgrade, if your system is upgradable.
"Flash" installs your system from one or more Flash Archives.
F2_Standard F4_Flash F5_Exit F6_Help
Caution
The Initial Option Destroys Data All data on the operating system slices will be lost. These slices include / (root), /usr, /opt, and /var.
28. The upgrade option is available if you are currently running Solaris 7, 8, or 9 and you want to upgrade to Solaris 10. As described earlier in this chapter, the upgrade option preserves all customizations you made in the previous version of Solaris. For this example, I pressed F4 to select the Initial option, which is a complete reinstallation of the software, and the following menu was displayed:
--- Eject a CD/DVD Automatically?--------------------------------
During the installation of Solaris software, you may be using one or more
CDs/DVDs. You can choose to have the system eject each CD/DVD automatically
after it is installed or you can choose to manually eject each CD/DVD.
[X] Automatically eject CD/DVD
[ ] Manually eject CD/DVD
F2_Continue F3_Go Back F5_Exit
29. I selected the option to have the CD automatically ejected when complete. After pressing F2 to continue, you’ll be asked about rebooting after the installation completes as shown in the following menu:
--- Reboot After Installation? ------------------------------------
After Solaris software is installed, the system must be rebooted. You can
choose to have the system automatically reboot, or you can choose to
manually reboot the system if you want to run scripts or do other
customizations before the reboot. You can manually reboot a system by using
the reboot(1M) command.
[X] Auto Reboot
[ ] Manual Reboot
F2_Continue F3_Go Back F5_Exit
30. I selected Auto Reboot and pressed F2 to continue. You’ll get a message that the system is initializing and loading the install media. The system will hesitate for approximately 60 seconds as the media is being loaded from the CD followed by a license agreement as shown below:
--License ----------------------------------
Sun Microsystems, Inc. ("Sun")
SOFTWARE LICENSE AGREEMENT
READ THE TERMS OF THIS AGREEMENT ("AGREEMENT") CAREFULLY BEFORE
OPENING SOFTWARE MEDIA PACKAGE. BY OPENING SOFTWARE MEDIA
PACKAGE, YOU AGREE TO THE TERMS OF THIS AGREEMENT. IF YOU ARE
ACCESSING SOFTWARE ELECTRONICALLY, INDICATE YOUR ACCEPTANCE OF
THESE TERMS BY SELECTING THE "ACCEPT"(OR EQUIVALENT) BUTTON AT
THE END OF THIS AGREEMENT. IF YOU DO NOT AGREE TO ALL OF THE
TERMS, PROMPTLY RETURN THE UNUSED SOFTWARE TO YOUR PLACE OF
PURCHASE FOR A REFUND OR, IF SOFTWARE IS ACCESSED ELECTRONICALLY,
SELECT THE "DECLINE" (OR EQUIVALENT) BUTTON AT THE END OF THIS
AGREEMENT. IF YOU HAVE SEPARATELY AGREED TO LICENSE TERMS
("MASTER TERMS") FOR YOUR LICENSE TO THIS SOFTWARE, THEN SECTIONS
1-6 OF THIS AGREEMENT ("SUPPLEMENTAL LICENSE TERMS") SHALL
SUPPLEMENT AND SUPERSEDE THE MASTER TERMS IN RELATION TO THIS
SOFTWARE.
1. Definitions.
F2_Accept License F5_Exit
31. Read the Licensing terms and if you agree, press F2 to accept the agreement. The next menu that is displayed will ask you to select the geographic regions for which support will be installed as follows:
-- Select Geographic Regions -------------------------
Select the geographic regions for which support should be installed.
> [ ] Asia
> [ ] Northern Africa
> [ ] Middle East
> [ ] South America
> [ ] Central America
> [ ] Australasia
> [ ] Southern Europe
> [ ] Northern Europe
> [ ] Eastern Europe
> [ ] Central Europe
> [ ] North America
> [ ] Western Europe
32. A selection is optional. Select a region or leave it unselected and press F2. I did not select a region, I pressed F2 and the following menu was displayed:
--- Select System Locale ---------------------------
Select the initial locale to be used after the system has been installed.

33. Leaving the default selection of POSIX C as my locale, I pressed F2 to continue and the following screen is displayed:
--Solaris Interactive Installation ------
On the following screens, you can accept the defaults or you can customize
how Solaris software will be installed by:
- Selecting the type of Solaris software to install
- Selecting disks to hold software you've selected
- Selecting unbundled products to be installed with Solaris
- Specifying how file systems are laid out on the disks
After completing these tasks, a summary of your selections (called a
profile) will be displayed.
There are two ways to install your Solaris software:
- "Standard" installs your system from a standard Solaris Distribution.
Selecting "Standard" allows you to choose between initial install
and upgrade, if your system is upgradable.
- "Flash" installs your system from one or more Flash Archives.
F2_Standard F3_Go Back F4_Flash F5_Exit F6_Help
34. Press F2 to continue and the following software installation menu appears asking you to select additional products to install. These are Extra products and applications that can be installed from the Installation CD or DVD after the OS installation is complete.
---Select Products -----------------------------------
Select the products you would like to install.

Move left, right, up, down using the arrow keys
![]()
35. For the example, I did not select any additional software products to install. Select F2 to continue and the next window asks if there are any applications from other sources to install as follows:
---Additional Products ----------------------------------
To scan for additional products, select the location you wish to scan.
Products found at the selected location that are in a Web Start Ready
install form will be added to the Products list.
Web Start Ready product scan location:
[X] None
[ ] CD/DVD
[ ] Network File System
F2_Continue F3_Go Back F5_Exit
36. For the example, I have no other application to install so I selected none and pressed F2 to continue. The next window asks me to select the software group that I would like installed:
--- Select Software ----------------------------------
Select the Solaris software to install on the system.
NOTE: After selecting a software group, you can add or remove software by
customizing it. However, this requires understanding of software
dependencies and how Solaris software is packaged.
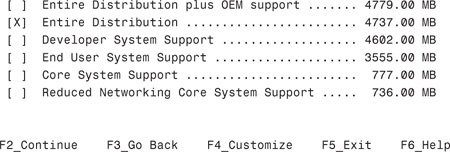
Note
Default Software Group The Entire Distribution software group is selected by default. After you select the software group you want to install, if you press F4, you will see an interactive menu that allows you to select and deselect software packages within a particular software group.
37. Unless you don’t have enough disk space, I recommend selecting the Entire Distribution so that the entire Solaris OE gets installed. After making your selection, press F2 to continue, and Select Disks menu will appear as follows:
---Select Disks ------------------------------
On this screen you must select the disks for installing Solaris software.
Start by looking at the Suggested Minimum field; this value is the
approximate space needed to install the software you've selected. Keep
selecting disks until the Total Selected value exceeds the Suggested Minimum
value.
NOTE: ** denotes current boot disk

38. Select the disk on which to install the operating system. This disk becomes your boot disk. Press the F2 key after making your selection and the Preserve Data menu will appear as follows:
--- Preserve Data? -----------------------------
Do you want to preserve existing data? At least one of the disks you've
selected for installing Solaris software has file systems or unnamed slices
that you may want to save.
![]()
39. If you wish to preserve data on any of your partitions, press F4. I backed up my data before starting the installation, so I had no data to preserve. I was completely reinstalling the OS and building new disk slices, so I pressed F2 to continue and all file systems were erased. This provides the most flexibility for laying out a new partition scheme on this disk. After pressing F2, the following menu is displayed:
---Automatically Layout File Systems? ----------------------------------
Do you want to use auto-layout to automatically layout file systems?
Manually laying out file systems requires advanced system administration
skills.
![]()
40. Press F2. The system automatically lays out the file systems. Sizes are determined by the software packages you selected. If you plan to add additional software, you can modify the file system sizes in later steps. You’ll next see the following dialog:
Automatically Layout File Systems
On this screen you must select all the file systems you want
auto-layout to create, or accept the default file systems shown.
NOTE: For small disks, it may be necessary for auto-layout to
break up some of the file systems you request into smaller file
systems to fit the available disk space. So, after auto-layout
completes, you may find file systems in the layout that you did
not select from the list below.

41. Make your selection(s) and press F2.
Note
/usr, /var, and /opt I recommend adding /usr, /var, and /opt as separate file systems. /usr provides a separate file system for most of the Solaris binary files. /var allows space for system log files, spooled software packages, and many other things that can take up a large amount of disk space. It’s not recommended that you make /var part of the root file system. /usr and /opt will provide space for additional software packages that you will add later. Again, it’s not recommended that /opt and /usr be part of the root file system.
For this example, I selected these additional file systems. You’ll see the following dialog:
--- File System and Disk Layout ------------------------------------
The summary below is your current file system and disk layout, based on the
information you've supplied.
NOTE: If you choose to customize, you should understand file systems, their
intended purpose on the disk, and how changing them may affect the operation
of the system.
File sys/Mnt point Disk/Slice Size
========================================================================
/ c0t0d0s0 193 MB
/var c0t0d0s1 111 MB
overlap c0t0d0s2 78528 MB
swap c0t0d0s3 513 MB
/opt c0t0d0s5 27 MB
/usr c0t0d0s6 4056 MB
/export/home c0t0d0s7 73625 MB
![]()
42. At this point, you can further customize the slice sizes by pressing F4. You’ll then be given a menu to select new sizes for each slice. I’m going to change a few slice sizes, so I’m going to press F4. The following menu displays:

43. I begin by decreasing the size of /export/home to 5,000MB. Then I’ll increase / to 1,000MB. I’ll allocate 3,000MB to /var, 8,000MB to /usr, and 1,000MB to /opt. I’m then going to add another slice called /data and make it 60,012MB. When you’re satisfied with the way the slices are sized, press F2 to continue. The following dialog will display:
--- File System and Disk Layout -------------------
The summary below is your current file system and disk layout, based on the
information you've supplied.
NOTE: If you choose to customize, you should understand file systems, their
intended purpose on the disk, and how changing them may affect the operation
of the system.
44. Double-check your selections and press F2 when you’re ready to go to the next step. This is a good time to verify all of your selections. Make sure swap is adequate for the type of server you are installing. It seems you can never have too much swap space or space on the /var, /opt, and /usr file systems. In other words, err on the side of being too large, not too small.
Note
Allow Space for Upgrades Sun recommends adding 30% to each file system that you create to enable you to upgrade to future Solaris versions. In the past, each new Solaris release has required approximately 10% more disk space than the previous release. By allowing 30% extra space, you can upgrade several times before you need to increase slice sizes.
Many servers today come with 72GB disk drives. I use the entire drive for the operating system. Most of my servers also run a third-party performance-monitoring package that can create huge log files in /var. Operating system patches can also use up a lot of space in /var. You’ll find that you’re constantly adding patches to a server because of the vast array of applications and hardware components you’re supporting. I usually go crazy a little and allocate a few gigabytes to each of the file systems.
Also, it’s difficult to estimate your swap requirements on a server. These servers can run for months without a reboot and might be supporting several database applications or users. Again, allocate ample swap—no less than twice the amount of RAM. System performance will not be degraded if you allocate too much swap space. Too much swap space will simply waste disk space. Disk space is cheap, however, compared to the cost of running out of swap and crashing an application during peak production times. When you’re satisfied with your selections, press F2 and the following dialog will display:
Mount Remote File Systems?
Do you want to mount software from a remote file server?
This may be necessary if you had to remove software because
of disk space problems.
![]()
45. Press F2 to continue, unless you want to set up remote mounts.
Note
Setting Up Mount Points I usually wait until after the initial software installation to set up these mounts. Many times, the system is not connected to a production network at this point, so the mount points are unavailable. It’s also a personal preference to save this task for the post-installation phase, when I set up users, printers, and so on. I have a checklist of all the things I need to do after software installation, and setting up mount points is one of them.
Next you’ll see the following dialog:
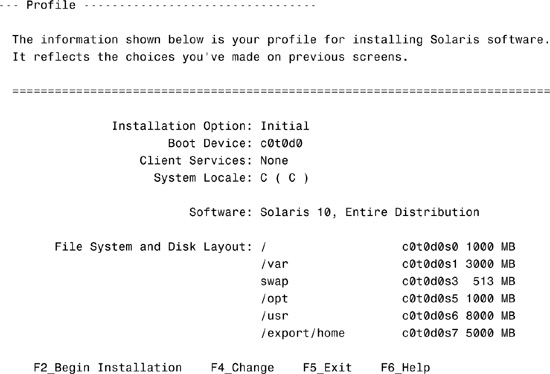
46. Verify the information and press F2 if you agree.
Caution
By pressing F2 to begin the installation, all file systems, except any that were preserved, will be destroyed. If you press F5 to cancel, the installation will be aborted, all changes will be lost, and the disk will be unchanged.
Note
Slice Sizing Slice sizes and disk space requirements were discussed earlier in this chapter. Review the sections titled “Software Groups” and “Disk Storage” if you are unsure of the slices and sizes that have been set up by the installation program.
You’ll see the following dialog as the software is being installed:
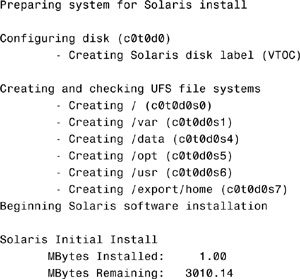
A meter will appear at the bottom of the screen, showing the progress of the installation. When it reaches 100%, the system will reboot. After it boots up, you’ll see the following screen:
This system is configured with NFS version 4, which uses a domain
name that is automatically derived from the system's name services.
The derived domain name is sufficient for most configurations. In a
few cases, mounts that cross different domains might cause files to
be owned by "nobody" due to the lack of a common domain name.
Do you need to override the system's default NFS version 4 domain
name (yes/no) ? [no] :
Respond with No to continue. The system will reboot and prompt you for the next media choice.
47. Select the CD option, insert the Solaris 2 CD-ROM and click OK to continue. As the installation continues, you’ll continue to be prompted to load and unload the remaining CDs. After the system completes loading all CDs, the system will reboot and the login screen will be displayed.
Note
Depending on the Energy Star version for your particular system, you may be prompted to enable the automatic power saving feature of your system. If your system uses Energy Star version 3 or later, you are not prompted for this information.
This completes the installation of the Solaris operating system.
You’ll find various log files associated with the installation in the /var/sadm directory. For example, the /var/sadm/install_data/install_log contains all messages generated by the installation program.
You can manually configure the power management configuration for your system by using the pmconfig command. A user has permission to change the Power Management configuration of his or her system using pmconfig only if the user is allowed to do so according to PMCHANGEPERM keyword of /etc/default/power file.
pmconfig first resets the Power Management state back to its default and then reads the new Power Management configuration from /etc/power.conf and issues the commands to activiate the new configuration. The pmconfig utility is run at system boot. This utility can also be run from the command line after manual changes have been made to the /etc/power.conf file. For editing changes made to the /etc/power.conf file to take effect, users must run pmconfig.
The following is what the /etc/power.conf file looks like on a system that has power management configured:
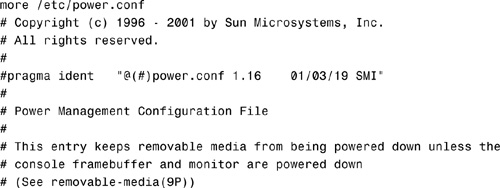

In this example, power management is configured to autoshutdown the system when it has been idle for 60 minutes anytime between the time of 5:00 p.m. and 7:00 a.m. To disable autoshutdown, change the following lines in the /etc/power.conf file:
![]()
Note that shutdown has been changed to noshutdown in the /etc/power.conf file.
The dtpower GUI also allows the configuration of /etc/power.conf file. For ease-of-use, it is recommended that you use dtpower GUI to configure the parameters in the /etc/power.conf file.
After installing the Solaris operating environment, you’ll find it necessary to install additional software packages, or perhaps remove software from the system. In addition, you’ll most likely need to install operating system patches on an on-going basis. Solaris provides the tools for adding and removing software from a system. These are described in Table 2.3.

Sun and its third-party vendors deliver software products in a form called a software package. As I described earlier, a package is a collection of files and directories in a defined format that conforms to the Application Binary Interface (ABI), a supplement to the System V Interface Definition. The Solaris operating environment provides a set of utilities that interpret the ABI format and provides the means to install or remove a package or to verify its installation.
Use the pkgadd or pkgrm commands directly from the command line to load or remove software packages. The pkgadd and pkgrm commands can be incorporated into scripts to automate the software-installation process. Many third-party vendors use pkgadd in scripts as a means of installing their software.
The Solaris Product Registry, also a front-end GUI for the software package commands described in Table 2.5, is a system for maintaining records of the software products installed on a Solaris system. The Product Registry includes a GUI tool to make managing your Solaris software easier. The Product Registry enables you to install, list, or uninstall Solaris software packages or clusters.
Also included on many CD-ROMs that ship with Solaris is the installer utility, which invokes a Web Start install wizard sequence that leads the user through a sequence of installation windows. This installer utility is found in the top-level directory on many CD-ROMs that ship with Solaris. When the installer is on a CD-ROM being accessed from a desktop file manager, double-click the installer to start the installation sequence. If the user is not currently the system’s root user, the system will request the root user password.
When you add a software package, the pkgadd command decompresses and copies files from the installation media, such as the CD-ROM, to a local system’s disk. When you use packages, files are delivered in package format and are unusable as they are delivered. The pkgadd command interprets the software package’s control files and then decompresses the product files and installs them on the system’s local disk.
You should know the following before installing additional application software:
![]() Sun packages always begin with the prefix SUNW, as in SUNWvolr, SUNWadmap, and SUNWtcsh. Third-party packages usually begin with a prefix that corresponds to the company’s stock symbol.
Sun packages always begin with the prefix SUNW, as in SUNWvolr, SUNWadmap, and SUNWtcsh. Third-party packages usually begin with a prefix that corresponds to the company’s stock symbol.
![]() You can use the
You can use the pkginfo command or the Solaris Product Registry to view software already installed on a system.
![]() Clients might have software that resides partially on a server and partially on the client. If this is the case, adding software for the client requires adding packages to both the server and the client.
Clients might have software that resides partially on a server and partially on the client. If this is the case, adding software for the client requires adding packages to both the server and the client.
![]() You need to know where the software will be installed, and you need to make sure you have a file system with enough disk space to store the application software. If you know the name of the software package, you can use the
You need to know where the software will be installed, and you need to make sure you have a file system with enough disk space to store the application software. If you know the name of the software package, you can use the pkgparam command to determine where the package will be loaded. For example, to find out information about the SUNWman package, type the following:
pkgparam -d /cdrom/sol_10_305_sparc_4/Solaris_10/Product SUNWman SUNW_PKGTYPE
SUNW_PKGTYPE is a special parameter that reports where a Solaris software package will be installed. If the package does not have the SUNW_PKGTYPE parameter set, the pkgparam command returns an empty string. For Sun packages, this usually means that the package will be installed in /opt.
The system responds with the location where the application will be stored:
usr
Note
Obtaining pkgid Information It’s not always clear what the pkgid is for a particular software package or application until it is actually installed. Sometimes the release documentation that comes with the package will tell you the name of the pkgid. Other times you might need to call the vendor to get the pkgid information.
Caution
Use pkgrm To Remove Software When you remove a package, the pkgrm command deletes all the files associated with that package unless those files are also shared with other packages. If the files are shared with other packages, a system message will warn you of that fact, and you will be asked if you want to remove them anyway. Be sure you do not delete application software without using pkgrm. For example, some system administrators delete an application simply by removing the directory containing the application software. With this method, files belonging to the application that might reside in other directories are missed. With pkgrm, you’ll be assured of removing all files associated with the application and not damaging installation of other packages.
Although the pkgadd and pkgrm commands do not log their output to a standard location, they do keep track of the product installed or removed. The pkgadd and pkgrm commands store information in a software product database about a package that has been installed or removed. By updating this database, the pkgadd and pkgrm commands keep a record of all software products installed on the system.
For convenience, you can copy frequently installed packages to a spool directory. If you copy packages to the default spool directory, /var/spool/pkg, you do not need to specify the source location of the package when using the pkgadd command. The pkgadd command, by default, will look in the /var/spool/pkg directory for any packages specified on the command line.
Note
Spooling Packages Versus Installing Them Copying packages to a spool directory is not the same as installing the packages on a system.
You can add a software package to a spool directory by following the steps described in Step by Step 2.2.
STEP BY STEP
2.2 Adding a Package to the Spool Directory
1. Log in as root.
2. Make sure the spool directory exists.
3. Add a software package to a spool directory using the pkgadd command, as follows:
pkgadd -d <device-name> -s <spool directory> <pkgid>
in which
![]()
-d <device-name> specifies the absolute path to the software package. <device-name> can be the path to a device, a directory, or a spool directory.
![]()
-s <spool directory> specifies the name of the spool directory where the software package will be spooled. You must specify a <spool directory>, a directory where the software will be put.
![]() <
<pkgid> is optional. It is the name of one or more packages, separated by spaces, to be added to the spool directory. If omitted, pkgadd copies all available packages.
4. Use the pkginfo command to verify that the package has been copied to the spool directory, as follows:
pkginfo -d <spool directory> | grep <pkgid>
The pkginfo command will return a line of information about the package if it has been copied to the spool directory properly. If it returns an empty command line, the package has not been successfully copied to the spool directory.
The following is an example of how to copy a software package to the /var/spool/pkg directory:
pkgadd -d /cdrom/sol_10_305_sparc_4/Solaris_10/Product -s /var/spool/pkg SUNNWman
The system responds with
Transferring <SUNWman> package instance
Now type the following to list the packages in the /var/spool/pkg directory:
pkginfo -d /var/spool/pkg <cr>
The system responds with
![]()
Use the pkgadd command to install additional software packages from the command line. In the previous section, we used pkgadd to add software to a spool directory. To install this software on the system, type
pkgadd <cr>
Any software that has been spooled to the /var/spool/pkg directory will be listed. In this example, I spooled a package named SFWgawk. After typing the pkgadd command, the system responds with

After pressing the Return key, you may see a message like the following:

Enter y to install the prerequisite package. When finished, you’ll see a message as follows:
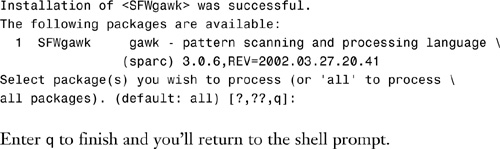
You can remove software packages from the command line using the pkgrm command. For example, to remove the software package named SUNWman, type
pkgrm SUNWman <cr>
The system responds with
The following package is currently installed:
![]()
Do you want to remove this package? [y,n,?,q]
Enter y and press the Enter key. You’ll see a list of files being removed followed by a message similar to this one:
## Updating system information.
Removal of <SUNWman> was successful.
The Solaris Product Registry enables you to do the following:
![]() View a list of installed and registered software and some software attributes.
View a list of installed and registered software and some software attributes.
![]() Find and launch an installer.
Find and launch an installer.
![]() Install additional software products.
Install additional software products.
![]() Uninstall software.
Uninstall software.
The main difference between the Product Registry and the other tools is that the Product Registry is designed to be compatible with more of the newer installation wizards and Web Start 3.0.
To start up the Solaris Product Registry, type the following:
/usr/bin/prodreg
The Product Registry window shown in Figure 2.1 appears.

To view the contents of the system registry, double-click the magnifying glass next to Solaris System Software. The registry will be expanded and the contents listed. Click any folder listed to get more information on that package. I clicked on Entire Distribution and then Apache Web Server, and the information shown in Figure 2.2 was displayed.

Along with listing information about all installed software products on your system, use the Solaris Product Registry to check the integrity of software products installed on the system. Follow the steps outlined for listing installed software. After you see the package you want to check, click its name in the window titled Software Installed in Solaris Registry. If all or part of the product is missing, the message Missing files in one or more components displays after the Installed From attribute.
You can install a software package with the Solaris Product Registry by following the steps described in Step by Step 2.3.
STEP BY STEP
2.3 Installing Software Using the Solaris Product Registry
1. Log in as root.
2. Insert the CD-ROM that contains the software you want to add to the system. When you insert the CD-ROM, the Volume Manager automatically mounts the CD-ROM.
3. Start the Solaris Product Registry as outlined earlier in this section.
4. Click the New Install button at the bottom of the Solaris Product Registry window. The Product Registry displays the Select Installer dialog box, which initially points to the /cdrom directory.
5. When you find the installer you want, click its name in the Files box and then click OK.
6. The installer you selected launches Web Start installer. Follow the directions displayed by the installer you selected to install the software. For more information on the Web Start Installer, see the next section.
You can also use the Product Registry to remove software by following these steps:
You can remove a software package with the Solaris Product Registry by following the steps described in Step by Step 2.4.
STEP BY STEP
2.4 Uninstalling Software Using the Solaris Product Registry
To uninstall software, go into the Solaris Product Registry window and follow these steps:
1. Click the System Registry folder in the window titled Software Installed in Solaris Registry and click the software package you want to remove. Read the software attributes to make sure this is the software you want to uninstall.
2. Click the Uninstall button at the bottom of the Solaris Product Registry window. The software product you selected is uninstalled.
The Web Start installer enables you to add software to a system on which you have installed the Solaris operating environment. The Solaris Web Start program installs only those components in the software groups that you skipped when you initially installed the Solaris operating environment. You cannot change to another software group after installing or upgrading.
To add software to your system using the Web Start installer, see Step by Step 2.5.
STEP UP STEP
2.5 Adding Software Using Web Start
1. Log in to the system as root.
2. Load the CD-ROM into the CD-ROM drive.
This procedure assumes that the system is running volume management (vold). See Chapter 1, “Managing File Systems,” for more details.
3. Change directories to find the Solaris Web Start installer. It is a file named “installer” that’s usually located in the top-level directory of the CD-ROM.
4. Execute the installer by typing ./installer or by double-clicking the Installer icon in the File Manager or Solaris Product Registry window (as described in the preceding section). You can run the installer in a GUI interface or from the command line. To run the installer from the command line, execute the installer as follows:
./installer -nodisplay
In the following example, I’ve installed the Solaris CD-ROM labeled “Solaris 10 Companion CD” into the CD-ROM drive. vold automatically mounts the CD-ROM
1. After inserting the CD into the CD-ROM drive, type the following to begin the installation:
/cdrom/cdrom0/installer -nodisplay
The following dialog begins:
Select the type of installation you want for each product.
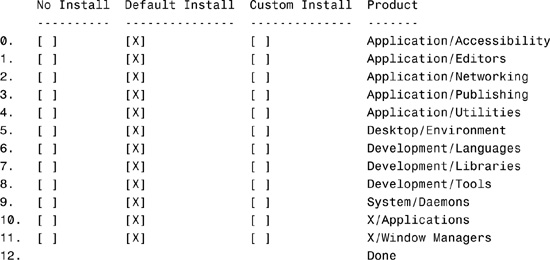
Enter the number next to the product you wish to change. Select "Done" when
finished [12]:
2. Deselect items 1–9 and press Enter to continue. The following messages are displayed on the screen:
Checking disk space.
The following items will be installed:

Ready to Install
1. Install Now
2. Start Over
3. Exit Installation
What would you like to do [1]?
3. Press Enter to Install Now and a license agreement is displayed. Press y to accept the agreement and continue the install. The system will show you the progress of the installation and, when complete, will display the following message:
![]()
Installation details:

4. Press Enter to complete the installation.
At any time, you can use the Software Product Registry or issue the pkginfo command from the command line to obtain a complete listing of the software installed on a system. The Product Registry GUI will display information about installed software, as described in the previous section and as shown in Figure 2.3.

Figure 2.3 illustrates the pkginfo command used from the command line, piped to more to show the display of information one page at a time.
Table 2.4 lists some of the files and directories used with package administration.
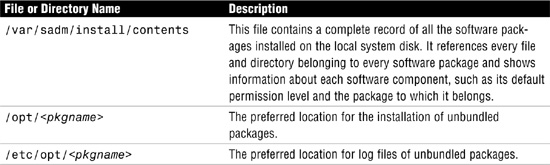
The /var/sadm directory is extremely important, especially when changes are made to the software installed on your system in any form. This directory is used to record the changes made to the system when installing or removing software and patches. Many Solaris change management utilities rely upon the information inside /var/sadm for an accurate picture of what actually resides on the system.
/var/sadm/install/contents is a file that can be used to determine which package an individual file belongs to. You can also use it to determine which files are associated with a certain software group. For example, to find out what things are associated with the format command:
grep /etc/format /var/sadm/install/contents
The system displays the following information:
/etc/format=../usr/sbin/format s none SUNWcsr
/etc/format.dat v none 0644 root sys 6986 55261 1106350052 SUNWcsr
/var/sadm/pkg/ <package name> is the directory where all the information about your software packages is stored. It is critical to keep this directory intact and up to date by using the standard package installation commands described in this section.
Quite often, system administrators may be tempted to remove the files from /var/sadm when their /var file system begins to fill up.
Caution
Do Not Remove Files from /var/sadm DO NOT remove files from /var/sadm. The removal of files from this directory may not impact the system for quite some time, but as soon as a patch or package needs to be applied or removed from the system, you will run into a variety of problems.
Another system administration task is managing system software patches. A patch is a fix to a reported software problem. Sun will ship several software patches to customers so that problems can be resolved before the next release of software. The existing software is derived from a specified package format that conforms to the ABI.
Patches are identified by unique alphanumeric strings. The patch base code comes first, and then a hyphen, and then a number that represents the patch revision number. For example, patch 110453-01 is a Solaris patch to correct a known problem.
You might want to know more about patches that have previously been installed. Table 2.5 shows commands that provide useful information about patches already installed on a system.

The tools in Table 2.5 are tools you might already be accustomed to if you’ve managed patches using earlier versions of the Solaris operating environment. In Solaris 10, Patch Manager helps you manage patches by displaying information about installed patches. It also assists you in adding patches to one or more systems concurrently, removes patches, analyzes a system’s patch requirements, and downloads patches from the SunSolve Online service.
I’ll first describe how to manage patches using the conventional tools described in Table 2.5, and then I’ll describe Patch Manager.
Sun customers can access security patches and other recommended patches via the World Wide Web or anonymous FTP. You can download patches from the SunSolve website, which (as of this writing) is at http://sunsolve.sun.com. Sun customers who have purchased a service contract can access an extended set of patches and a complete database of patch information. (This information is also available via the World Wide Web or FTP, and it is regularly distributed on CD-ROM.)
You can obtain individual patches or groups of patches called a patch cluster. Detailed information about how to install and remove a patch is provided in the README file included with each patch, which contains specific information about the patch.
Patches come in three different formats. Solaris 10 patches come in ZIP format, such as 104945-02.zip. For Solaris 10 patches, use the unzip command to extract the patch files, as follows:
/usr/bin/unzip 104945-02.zip
Other times, a patch may come in as a jar file indicated by a .jar suffix in the name, for example 120292-01.jar. To extract the jar file, type
jar xvf 120292-01.jar
For Solaris 2.6 and earlier operating environments, patches might come in compressed TAR format, such as 104945-02.tar.Z. Use the zcat command to decompress this type of patch file and the tar command to create the patch directories, as follows:
/usr/bin/zcat 104945-02.tar.Z | tar xvf -
Other Solaris patches might come as GZIP compressed TAR files, such as 102945-02.tar.gz. To extract a GZIP compressed TAR file, use the gzcat command to decompress and create the patch directories, as follows:
/usr/bin/gzcat 104945-02.tar.gz | tar xvf -
The patchadd command is used to install directory-format patches to a Solaris 10 system. It must be run as root. The syntax is as follows:
patchadd [ -d ] [ -u ] [ -B backout_dir]
The patchadd command is described in Table 2.6.

Note
patchadd Options Additional options to the patchadd command can be found online in the Solaris system manual pages.
The following examples describe how to add patches to your system. A word of caution is in order before you install patches, however. It has been my personal experience—Murphy’s Law, you might say—that things can go wrong. Because you’re modifying the operating system with a patch, I highly recommend that you back up your file systems before loading patches. Although it can be a time-consuming and seemingly unnecessary task, I once encountered a power failure during a patch installation that completely corrupted my system. Another time, the patch installation script was defective, and the patch did not load properly. Without a backup, I would have had to reinstall the entire operating system.
The following example installs a patch to a standalone machine:
patchadd /var/spool/patch/104945-02
The following example installs multiple patches. The patchlist file specifies a file containing a list of patches to install:
patchadd -M /var/spool/patch patchlist
Many times, a patch or patch cluster contains a script named install_patch or install_cluster. Simply executing this script will install the patch or patch cluster.
The following example displays the patches installed on a client system named client1:
patchadd -R /export/root/client1 -p
When you’re installing a patch, the patchadd command copies files from the patch directory to the local system’s disk. More specifically, patchadd does the following:
![]() It determines the Solaris version number of the managing host and the target host.
It determines the Solaris version number of the managing host and the target host.
![]() It updates the patch package’s
It updates the patch package’s pkginfo file with information about patches made obsolete by the patch being installed, other patches required by this patch, and about patches incompatible with this patch.
![]() It moves outdated files and directories to the
It moves outdated files and directories to the /var directory.
![]() It logs the patch installation to the
It logs the patch installation to the /var/sadm/patch/ (patch-id) directory.
![]() It updates the
It updates the /var/sadm/pkg/<pkg-name>/pkginfo file.
The patchadd command will not install a patch under the following conditions:
![]() If the package is not fully installed on the host.
If the package is not fully installed on the host.
![]() If the patch architecture differs from the system architecture.
If the patch architecture differs from the system architecture.
![]() If the patch version does not match the installed package version.
If the patch version does not match the installed package version.
![]() If an installed patch already exists with the same base code and a higher version number.
If an installed patch already exists with the same base code and a higher version number.
![]() If the patch is incompatible with another, already-installed patch. (Each installed patch keeps this information in its
If the patch is incompatible with another, already-installed patch. (Each installed patch keeps this information in its pkginfo file.)
![]() If the patch being installed requires another patch that is not installed.
If the patch being installed requires another patch that is not installed.
When a patch is installed, files that are replaced are moved into the /var/sadm/pkgs>/<pkgname>/save directory. Files in this directory are used if you ever need to back out of a patch. These files are used to restore the system to the prepatch installation state. Backing out a patch returns files and directories stored in the /var directory to their original locations and removes the versions installed by the patch. If you remove files in this directory, you will not be able to backout a patch.
showrev -p gets its information from /var/sadm/pkg/<pkgname>/save as well, specifically from the pkginfo file in each pkg directory. This directory contains old information about the package as it existed prior to a patch install and contains backups of critical files for the package.
The file that you see in this directory will be different depending on the package, but the save information for the patch IDs that have been installed should always exist and will look something like this:
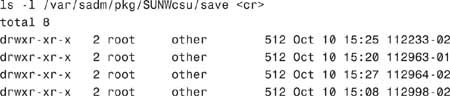
Looking into each directory, we see a file named undo.Z as follows:
1s 112233-02 <cr>
undo.Z
If a file doesn’t exist here, the patch was installed with the -d option. You did not save the backout information and the patch cannot be backed out. This file will not always be in .Z format. Sometimes it will be just a regular uncompressed file.
A patch cluster contains a selected set of patches, conveniently wrapped for one-step installation. Typically, they will be named “10_recommended”. Clusters consist of operating system patches (including security fixes) deemed to be of universal interest. To install a patch cluster, follow these steps:
Sometimes a patch does not work as planned and needs to be removed from the system. The utility used to remove, or “back out of,” a patch is the patchrm command, described in Table 2.7. Its syntax is as follows:
patchrm [ -f ] [ -B backout_dir]
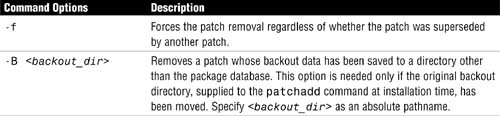
The following example removes a patch from a standalone system:
patchrm 104945-02
The patchrm command removes a Solaris 10 patch package and restores previously saved files—restoring the file system to its state before a patch was applied—unless any of the following four conditions exist:
![]() The patch was installed with
The patch was installed with patchadd -d. (The -d option instructs patchadd not to save copies of files being updated or replaced.)
![]() The patch has been made obsolete by a later patch.
The patch has been made obsolete by a later patch.
![]() The patch is required by another patch already installed on the system.
The patch is required by another patch already installed on the system.
![]() The
The patchrm command calls pkgadd to restore packages saved from the initial patch installation.
Historical information about all installed patches that are able to be uninstalled using patchrm is stored in the /var/sadm/patch directory.
Patch Manager is provided in Solaris 10 to assist you in managing patches on your system. Specifically, Patch Manager uses the /usr/sbin/smpatch utility to do the following:
![]() Analyze your system to determine if patches need to be installed.
Analyze your system to determine if patches need to be installed.
![]() Download patches.
Download patches.
![]() Install patches.
Install patches.
![]() Remove patches.
Remove patches.
The syntax for the smpatch utility is as follows:
smpatch subcommand <subcommand_option>
The smpatch requires you to enter a subcommand, which are outlined in Table 2.8

Each subcommand has specific options, which are described in Table 2.9.

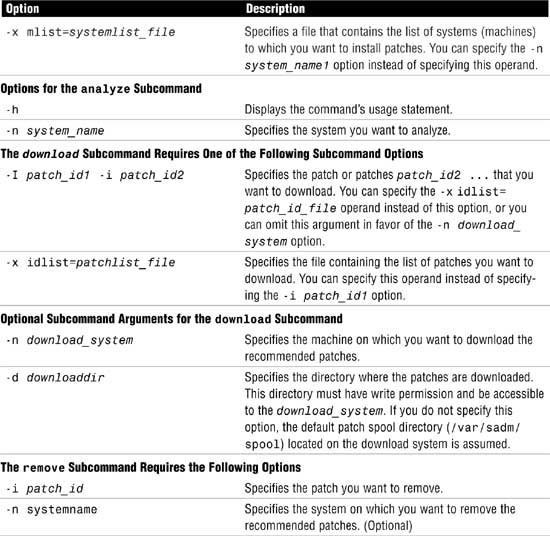
To use the analyze subcommand, the system needs to be connected to the Internet so that it can access the SunSolve site for patch information. To analyze a system, login as root and type the following command:
smpatch analyze
The system responds with a list of patches:

The following example analyzes the system named zeus and downloads the assessed patches from the SunSolve Online database to the default patch spool directory:
/usr/sadm/bin/smpatch download
The system responds with the following:

The patches get downloaded to the /var/sadm/spool directory as jar files. Extract the files using jar xvf as described earlier in this chapter.
After extracting the jar file, install a patch from the download directory, by typing
smpatch add -i 120469-01
The system responds with:

I’ve generated a list of the patches I downloaded and want to install onto this system. To install the patches in this list, I type the following:
smpatch add -x idlist=/var/sadm/spool/patchlist
The system responds with

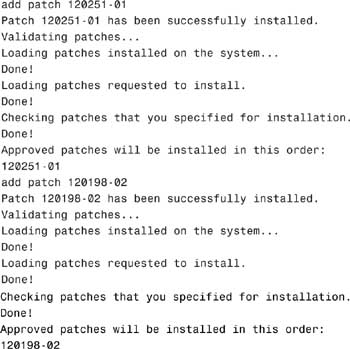
Patch Tool, a GUI-based tool for installing patches, is available in the Solaris Management Console (SMC), and mimics the smpatch command.
Access this Patch Tool by typing the following:
smc <cr>
The Solaris Management Tool is displayed as shown in Figure 2.4.

In the left pane, click on the This Computer icon. The icon will expand as shown in Figure 2.5, displaying icons for various SMC tools.

Click on the System Configuration icon. The System Configuration icon will expand and icons for the System Configuration tools will be displayed as shown in Figure 2.6.

Click on the Patches icon, shown in Figure 2.6, enter the root password when prompted, and the main window on the Management Console will display information about any patches installed on the system. If the window is blank, no patches are installed.
When you click on Action from the top toolbar, you have the option to add patches, analyze your system for patches, and download patches using the GUI as shown in Figure 2.7.
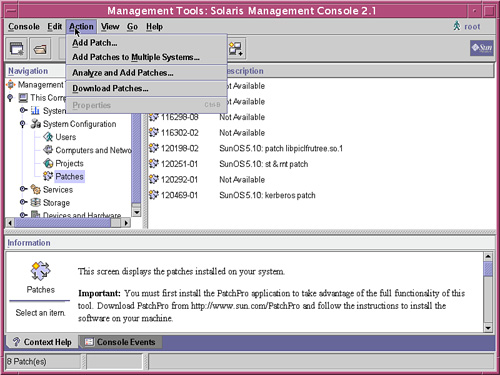
Some software packages do not conform to the ABI; therefore, they cannot be installed by using the Solaris Product Registry or the pkgadd command. For installation of products that do not conform to the ABI, follow the vendor’s specific installation instructions. Here are a few additional guidelines to follow when installing new software on a system:
![]() Always be cautious with third-party or public-domain software. Make sure the software has been tested and is free of trojans and malicious code before installing it on a production system.
Always be cautious with third-party or public-domain software. Make sure the software has been tested and is free of trojans and malicious code before installing it on a production system.
![]() Make sure the software package is supported under Solaris 10.
Make sure the software package is supported under Solaris 10.
![]() Always read the vendor’s release notes for special loading instructions. They might contain kernel parameters that need to be modified or suggest software patches that need to be applied.
Always read the vendor’s release notes for special loading instructions. They might contain kernel parameters that need to be modified or suggest software patches that need to be applied.
![]() Do not install patches unless directed by Sun or one of your software providers. Some patches have not been tested thoroughly, especially when used in conjunction with other software patches. Adverse system performance could result.
Do not install patches unless directed by Sun or one of your software providers. Some patches have not been tested thoroughly, especially when used in conjunction with other software patches. Adverse system performance could result.
Note
Recommended Patch Sets For each release of software, Sun usually has a prebundled set of patches called “Recommended and Security Patches.” These patches have been thoroughly tested, and Sun recommends adding these patches to every system after the initial software installation is complete.
Adding and removing software packages is one of the simpler tasks you will encounter in system administration. As with all computer software, you should first load new software packages or patches on a nonproduction system for test purposes. Only after the software has been thoroughly tested should you install it on a production system.
This chapter described how to prepare for and install the Solaris operating environment on a machine. You learned how to install the Solaris 10 operating environment onto a standalone system using the interactive installation program suninstall. The interactive installation program provides a dialog that allows the system administrator to select software packages and create file systems on the new server.
This chapter also described Software Package Administration, beginning with the methods Sun uses to package their bundled and unbundled operating system software. Then you learned about the tools and methods used to install, verify, and remove these software packages on a Solaris system.
The chapter also explained that occasionally, software deficiencies are discovered and need to be repaired. You learned how to obtain, install, and, if necessary, uninstall software patches.
Now that you understand how to install the Solaris operating environment, the next chapter will describe system startup and shutdown procedures.
![]() Platform name
Platform name
![]() Solaris Interactive installation
Solaris Interactive installation
![]() Upgrade (as it pertains to the Solaris Interactive method of installation)
Upgrade (as it pertains to the Solaris Interactive method of installation)
![]() Bundled software package
Bundled software package
![]() Unbundled software package
Unbundled software package
![]() Compressed jar file
Compressed jar file
![]() Patchlist file
Patchlist file
In this exercise, you will perform the steps necessary to prepare for a Solaris 10 operating system install on a networked standalone system.
Estimated time: 15 minutes
1. Identify your system type using the following command:
uname -m
Is it a supported platform type listed in Table 2.1, and do you have the Solaris 10 Installation media kit for that platform?
2. Identify the peripherals connected to your system and determine the device name for the CD-ROM and the disk drive that will be used as the boot device. Use the prtconf, sysdef, and dmesg commands to identify these devices.
Make sure your system meets the minimum system requirements for Solaris 10. If it does not meet the minimum requirements, you will not be able to install Solaris 10. Check the amount of RAM as follows:
prtconf|grep Memory
Does the system have a CD-ROM?
Check the amount of disk space using the format command and listing the size of slice 2, making sure that you select the correct device name for your boot disk.
Note
3. Determine the software cluster that you want to install and determine the amount of disk space it will require. Compare this value with the total size of your disk, which was determined in the previous step. For example, if the size of disk slice 2 is 1.3GB, and I want to install the Entire Distribution cluster, I do not have enough disk space to complete the installation.
4. Plan your storage requirements as described in the “Disk Storage” section of this chapter. Determine the file systems and slice sizes that you will want the installation program to create.
5. Obtain the following information that will be required by the Solaris 10 installation program:
![]() What is the hostname of the system? Use the
What is the hostname of the system? Use the hostname command to determine the hostname on an existing system or ask your network administrator to assign a hostname.
![]() Does it have a static IP address or DHCP? Use the
Does it have a static IP address or DHCP? Use the ifconfig command to determine the IP address on an existing system or ask your IP coordinator to assign an IP address. For more information on using the ifconfig command to determine a system’s IP address, see Chapter 8, “The Solaris Network Environment.”
![]() Does Ipv6, the next generation Internet protocol, need to be enabled?
Does Ipv6, the next generation Internet protocol, need to be enabled?
Note
Enabling the IPv6 Services Enabling IPv6 will have no effect if this machine is not on a network that provides IPv6 service. IPv4 service will not be affected if IPv6 is enabled.
![]() Is a name service used, such as NIS, NIS+, DNS, or LDAP? See Chapter 12, “Naming Services,” for more information on name services.
Is a name service used, such as NIS, NIS+, DNS, or LDAP? See Chapter 12, “Naming Services,” for more information on name services.
![]() Should Kerberos security be configured? Ask your in-house security personnel if this is required.
Should Kerberos security be configured? Ask your in-house security personnel if this is required.
![]() What is the geographic region of your time zone (Eastern, Central, Alaska)?
What is the geographic region of your time zone (Eastern, Central, Alaska)?
![]() During the installation, you will be asked to assign a password to the root user account.
During the installation, you will be asked to assign a password to the root user account.
![]() Determine the language to be used to install the Solaris 10 operating environment.
Determine the language to be used to install the Solaris 10 operating environment.
For this exercise, you’ll use the interactive installation program to install the Solaris 10 operating environment onto your system.
Estimated time: 1–2 hours depending on the speed of your system and CD-ROM
Warning: This exercise will destroy all data on your hard drive.
1. Insert the Solaris 10 CD #1 into the CD-ROM drive.
2. If the system is currently running, either log in as root and shut the system down or abort the operating system by pressing Stop+A.
3. Boot the operating system from the CD as follows:
boot cdrom <return>
4. The interactive installation program will begin. Refer to the section titled “Using the Interactive Installation Process (suninstall)” in this chapter, and follow the steps outlined in that section for installing the operating system.
This exercise takes you through the task of installing, verifying, and removing software on a Solaris system using the command line.
Estimated time: 20 minutes
1. List the software packages that are currently installed on your system by typing the following:
pkginfo
2. Display a long-format listing of information for the SUNWman package installed on your system:
pkginfo -l SUNWman
What is listed for the status, install date, number of files, and number of blocks used by this package?
3. Remove the SUNWman package from your system with the following:
pkgrm SUNWman
Verify that the software package has been removed by repeating step 1.
Now, we’ll reinstall the software package. Log in as root and insert Solaris 10 CD #4 into the CD-ROM drive. Use pkgadd to spool the SUNWman package into the default spool area as follows:
pkgadd -d /cdrom/sol_10_305_sparc_4/Solaris_10/Product
-s /var/spool/pkg SUNWman
4. Use the following commands to verify the presence of SUNWman in the default spool area:
pkginfo -d /var/spool/pkg
5. Observe the messages displayed and verify that the package is installed in /var/spool/pkg.
6. Reinstall the SUNWman package from the spool area as follows:
pkgadd
7. Select the SUNWman package when you are prompted and the package will be reinstalled.
8. To remove the SUNWman package from the spool area, type the following:
pkgrm -s /var/spool/pkg
Select the SUNWman package and it will be removed from the spool directory.
9. You can now use the pkgchk command to check the completeness, pathname, file contents, and file attributes of the SUNWman package:
pkgchk SUNWman
|
1. |
D. The system on which you will be installing Solaris 10 must have a minimum of 128MB of RAM; however, 256MB of RAM is recommended. For more information, see the “Minimum System Requirements” section. |
|
2. |
D. To determine your system type, use the |
|
3. |
B. Software packages are grouped into software clusters, which are logical collections of software packages. For more information, see the “Software Terminology” section. |
|
4. |
A. A software package is a collection of files and directories in a defined format. It is a group of files and directories that describe a software application. For more information, see the “Software Terminology” section. |
|
5. |
A. The six software groups are reduced networking support, core system support, end-user support, developer system support, entire distribution, and entire distribution plus OEM system support. For more information, see the “Software Groups” section. |
|
6. |
D. The default partition scheme setup with the interactive installation program is root ( |
|
7. |
D. Web Start is not a method of installing the OS. Web Start installers are used to install software packages, and Solaris Flash Archives are used when cloning systems. For more information on the methods of installation, refer to the section titled “Methods of Installing the Solaris 10 Software.” |
|
8. |
D. The |
|
9. |
D. The first step in installing the operating system, or a patch, is to run a full backup to tape because the installation process destroys all data on the disk. For more information, see the “The Solaris Installation Prechecklist” section. |
|
10. |
B. The six configuration groups are reduced networking support, core system support, end-user support, developer system support, entire distribution, and entire distribution plus OEM system support. For more information, see the “Software Groups” section. |
|
11. |
A. Custom JumpStart allows you to automatically and identically install many systems with the same configuration without having to configure each of them individually. For more information, see the “Custom JumpStart” section. |
|
12. |
A. A server is a system that provides services or file systems, such as home directories or mail files, to other systems on the network. For more information, see the “Servers” section. |
|
13. |
C. A client is a system that uses remote services from a server. Some clients have limited disk storage capacity, or perhaps none at all; these clients must rely on remote file systems from a server to function. For more information, see the “Servers” section. |
|
B. The Upgrade option updates the Solaris software to the new release, preserving data, and saving as many modifications to the previous version of Solaris software as possible. For more information, see the “Upgrading the Operating System” section. |
|
|
15. |
A. The three phases of the installation process are system configuration, installation, and post installation. For more information, see the “Introduction” section. |
|
16. |
D. During the interactive installation, the entire distribution software group is selected by default. For more information, see the “Using the Interactive Installation Process ( |
|
17. |
C. sun4u is the kernel architecture for all Sun UltraSPARC systems. For more information, see the “Requirements and Preparation for Installing the Solaris 10 Software” section. |
|
18. |
A. The server’s Ethernet address is not required to install a server system. During the installation, you will be prompted to enter the IP address, the hostname, and the geographic region. For more information, see the “The Solaris Installation Prechecklist” section. |
|
19. |
D. The |
|
20. |
B. The |
|
21. |
A. The |
|
22. |
B. Software package names usually start with the company’s stock symbol. For more information, see the “Adding and Removing Software Packages” section. |
|
23. |
C. Patches might come in compressed tar format, for example 104945-02.tar.Z. Use the |
|
24. |
A, C. Use the |
|
25. |
C. Use the |
|
26. |
A, B, C. Software patches are delivered to the customer in the following ways: from Sun’s FTP site, via email, or on CD-ROM. For more information, see the “Installing a Patch” section. |
|
27. |
A, B, C. The Solaris Product Registry enables you to view all installed software, uninstall software, or launch the installer to install additional software. For more information, see the “Tools for Managing Software” section. |
|
28. |
D. The |
|
A, B. The following conditions can prevent a patch from being installed:
For more information, see the “Installing a Patch” section. |
|
|
30. |
C. Live upgrade allows you to create a copy of the current operating environment and upgrade the copy while the system is running in the original environment. For more information, see the “Solaris Live Upgrade” section. |
1. Websites
![]()
docs.sun.com—Solaris 10 Installation Guide by Sun Microsystems
![]()
docs.sun.com—Solaris 10 System Administration Guide: Basic Administration by Sun Microsystems