
The following test objectives for Exam CX-310-200 are covered in this chapter:
Configure and administer Solaris 10 OS print services, including client and server configuration, starting and stopping the LP print service, specifying a destination printer, and using the LP print service.
![]() You need to be able to describe how printers function in the Solaris operating environment. You need to be familiar with the tools used to manage printer queues and the various files and directories that support the print function.
You need to be able to describe how printers function in the Solaris operating environment. You need to be familiar with the tools used to manage printer queues and the various files and directories that support the print function.
![]() Be prepared to explain how to configure printer classes, set the default printer, change the default printer class, remove a printer’s configuration, start the LP print service, and stop the LP print service using the appropriate commands.
Be prepared to explain how to configure printer classes, set the default printer, change the default printer class, remove a printer’s configuration, start the LP print service, and stop the LP print service using the appropriate commands.
![]() Understand how to manage printer queues, how to send jobs to a printer, and how to manage those jobs.
Understand how to manage printer queues, how to send jobs to a printer, and how to manage those jobs.
The following study strategies will help you prepare for the test:
![]() This chapter does not show many lengthy step-by-step procedures, but it does introduce several commands that you use to manage printers, and it provides examples on how to use these commands. You should practice the step-by-step procedures as well as the commands to make sure that you understand where and when to use them.
This chapter does not show many lengthy step-by-step procedures, but it does introduce several commands that you use to manage printers, and it provides examples on how to use these commands. You should practice the step-by-step procedures as well as the commands to make sure that you understand where and when to use them.
![]() You should pay close attention to the differences between the System V Release 4 (SVR4) and the Berkeley Software Distribution (BSD) print services. You need to understand the basic functions of the Solaris print service.
You should pay close attention to the differences between the System V Release 4 (SVR4) and the Berkeley Software Distribution (BSD) print services. You need to understand the basic functions of the Solaris print service.
![]() You need to make sure you understand the difference between a print server and a print client. You must understand the differences between local and networked printers, and you should pay close attention to the various configuration files that are used to define a printer.
You need to make sure you understand the difference between a print server and a print client. You must understand the differences between local and networked printers, and you should pay close attention to the various configuration files that are used to define a printer.
Printers are standard peripherals for many computer systems. One of the first devices added to almost any new system is a printer. The multi-user nature of the Solaris operating environment means that the Solaris printer software is more complex than that of a single-user operating system. This means that adding a printer to a Solaris system requires more than just plugging it in.
This chapter describes how to set up local printers, set up access to remote printers, and perform some printer administration tasks by using the Print Manager graphical user interface (GUI) or the command line. Print Manager should meet most of a system administrator’s needs for setting up printing services, adding printers to servers, or adding access from print clients to remote printers on print servers.
Setting up a printer from the command line can be a complex task. This chapter examines the hardware issues involved in connecting a printer to a Solaris system and then moves on to examine the more complex part of the process—configuring the software.
Objective:
Describe the purpose, features, and functionality of printer fundamentals, including print management tools, printer configuration types, Solaris LP print service, LP print service directory structure, and the Solaris operating environment printing process.
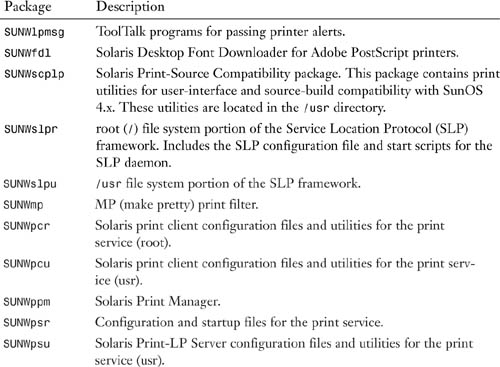
The Solaris print service is a default cluster that is installed when the operating system is initially installed. The function of the Solaris print service is described later in this chapter. To verify that the package is installed, you should look for the following software packages by using the pkginfo command as described in Chapter 2, “Installing the Solaris 10 Operating Environment”:
Note
SLP SLP is an Internet Engineering Task Force (IETF) protocol for discovering shared resources (such as printers, file servers, and networked cameras) in an enterprise network. The Solaris 10 operating environment contains a full implementation of SLP, including application programming interfaces (APIs) that enable developers to write SLP-enabled applications. SLP also provides system administrators with a framework for ease of network extensibility.
Setting up a Solaris printer involves setting up the spooler, the print daemon, and the hardware (that is, the printer and the printer port). The system administrator needs to verify that the computer has at least 200MB of disk space available for /var/spool/lp. Print files will be sent to this location to be prepared for printing. Other configuration files are created, but Solaris takes care of that part for you. When you are setting up a printer, Solaris makes the required changes in the system’s /etc/printers.conf file and the /etc/lp directory.
The LP print service includes the following directory structure, files, and logs:
![]()
/usr/bin—This directory contains the LP print service user commands.
![]()
/usr/sbin—This directory contains the LP print service administrative commands.
![]()
/usr/share/lib/terminfo—This directory contains the terminfo database, which describes the capabilities of devices such as printers and terminals. The terminfo database is discussed later in this chapter.
![]()
/usr/lib/lp—This directory contains the LP print service daemons, binary files used by the print service, PostScript filters, and default printer interface programs.
![]()
/usr/lib/lp/model—This directory contains default printer interface programs (shell scripts) called standard and netstandard. The print service runs the standard interface script on local printers to do the following:
![]() Initialize the printer port.
Initialize the printer port.
![]() Initialize the printer.
Initialize the printer.
![]() Print a banner page.
Print a banner page.
![]() Print the correct number of copies, as specified in the user’s print request.
Print the correct number of copies, as specified in the user’s print request.
The netstandard script is designed to support network printers. It collects the spooler and print database information and passes this information on to /usr/lib/lp/bin/netpr. netpr in turn opens the network connection and sends the data to the printer.
When a print request is sent to a printer queue, the print service runs through the printer’s standard script, which performs the following functions:
![]() Initialize the printer port.
Initialize the printer port.
![]() Initialize the actual printer, using the terminfo database to find the appropriate control sequences.
Initialize the actual printer, using the terminfo database to find the appropriate control sequences.
![]() Print a banner page if configured to do so.
Print a banner page if configured to do so.
![]() Print the specified number of copies.
Print the specified number of copies.
Printer interface file templates are located in the /usr/lib/lp/model directory. When a printer queue is created, this template file is copied to the /etc/lp/interfaces directory. The name of the interface file reflects the name of the printer. For example, a printer named hplet1 would have an interface file named /etc/lp/interfaces/hpljet1. Printer interface files are scripts that can be modified as needed to change the behavior of the printer, such as turning off the banner page and enabling two-sided printing.
![]()
/usr/lib/lp/postscript—This directory contains all the PostScript filter programs that the Solaris LP print service provides. Print filters are used to convert the content of the print request to a format that is accepted by the destination printer.
![]()
/etc/lp—This directory contains the LP service configuration files. These files are edited by using the print service configuration tools described later in this chapter.
![]()
/etc/lp/fd—This directory contains a set of print filter descriptor files. The files describe the characteristics of the filter and point to the actual filter program.
![]()
/etc/lp/interfaces—This directory contains each printer interface program file which is copied from the /usr/lib/lp/model directory as described earlier. Entries in this directory are specific for each printer installed on the system.
![]()
/etc/lp/printers—This directory contains subdirectories for each local printer attached to the system. Each subdirectory contains configuration information and alert files for each printer.
![]()
/var/spool/lp—All current print requests are stored here until they are printed.
![]()
/var/lp/logs—This directory contains a history log of print requests.
Spool stands for simultaneous peripheral operations online. The spooler is also referred to as the queue. Users execute the print spooler lp program when they want to print something. The print spooler then takes what the user wants to print and places it in the predefined /var/spool/lp print spooling directory.
Spooling space is the amount of disk space used to store and process requests in the print queue. The size of the /var directory depends on the size of the disk and how the disk is partitioned. If /var is not created as a separate partition, the /var directory uses some root partition space, which is likely to be quite small. A large spool directory could consume 600MB or more of disk space. To get a feel for this, you should look at the size and partitioning of the disks available on systems that could be designated as print servers.
When connecting printers, you need to first carefully evaluate the users’ printing needs and usage patterns. If users typically print only short ASCII files, without sophisticated graphics or formatting requirements, a print server with 200MB to 300MB of disk space allocated to /var is probably sufficient. However, if many users are printing lengthy PostScript files, they will probably fill up the spooling space quite frequently. When /var fills up and users cannot queue their jobs for printing, workflow is interrupted. The size of /var is set when the operating system is loaded and disks are partitioned.
Caution
Running Out of Space in /var Some print jobs consume large amounts of disk space. In fact, one of my clients had a report that consumed more than 800MB when it was spooled to the printer. When /var runs out of disk space, many system functions cannot continue, such as printing, message logging, and mail. Make sure you provide adequate space in /var when setting up your system.
The SVR4 lp program is equivalent to the BSD lpr print program. In SunOS the print spooler is located in /usr/spool.
Note
BSD Print Systems Throughout this chapter, I make reference to the BSD print system for system administrators who might be familiar with it. The BSD printing protocol is an industry standard. It is widely used and provides compatibility between different types of systems from various manufacturers.
For sites that have a mix of BSD and SVR4 Unix, Sun has provided compatibility for both print systems in Solaris.
The /usr/lib/lp/local/lpsched daemon, also called the print scheduler, is the Unix utility that is responsible for scheduling and printing in Solaris 10. The lpsched daemon is started by the service management facility command, svcadm. For example, to start the lpsched print service, type
svcadm enable application/print/server
To shut down the lp print service, type
svcadm disable application/print/server
For compatibility, the /usr/lib/lpsched and /usr/lib/lpshut scripts are still available for starting and stopping the lpsched daemon, but these commands simply run the appropriate svcadm enable and svcadm disable commands.
Each print server has one lpsched daemon, which is started by the svc:/application/print/server:default service when the system is booted (provided a printer has been configured on this server). lpsched is also started automatically when a printer is added using the lpadmin command and disabled when the last printer has been removed.
The lpsched daemon starts or restarts the lp print service. Sometimes lpsched is referred to as the lp daemon. The lpsched print daemon takes output from the spooling directory and sends it to the correct printer. lpsched also tracks the status of printers and filters on the print server. lpsched is equivalent to the line printer daemon (lpd) in BSD Unix.
The service that handles the incoming print request from the network is svc:/application/print/server:default. You can check the status of this service using the svcs command described in Chapter 3 as follows:
svcs svc:/application/print/server
You can enable or disable the service using the svcadm command described earlier in this section.
The Internet services daemon, /usr/sbin/inetd, is started at bootup by the SMF, and it listens for service requests that are currently enabled. When a request arrives, the inetd daemon executes the server program that is associated with the service. The inetd daemon is described in Chapter 8, “The Solaris Network Environment.” Print servers listen for print requests with the inetd daemon. When receiving a request, inetd starts the protocol adaptor in.lpd daemon, which is managed by the svc:/application/print/rfc1179:default service. The protocol adaptor translates the print request, communicates it to the print spooler, and returns the results to the requester. This protocol adaptor starts on demand and exits when it has serviced the network request, eliminating idle system overhead for printing.
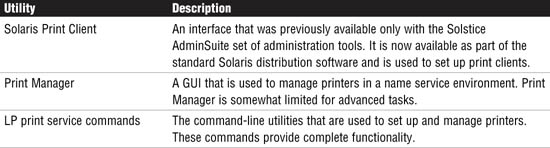
Many methods can be used to define a printer on a Solaris system. Table 6.1 describes the tools Solaris provides for adding printers.
Connecting printers to a Unix system is no one’s favorite activity because it can quickly become a time-consuming task. Many printers are on the market, each with a unique interface.
When connecting a printer locally to a Sun system, you have four options:
![]() Use an Ethernet connection.
Use an Ethernet connection.
![]() Use a parallel connection.
Use a parallel connection.
![]() Use a serial connection.
Use a serial connection.
![]() Use a universal serial bus (USB) connection.
Use a universal serial bus (USB) connection.
The type of connection depends on the connectivity options available on the printer. Most modern printers have either an Ethernet or USB connection. If Ethernet or USB connectivity is not an option, a parallel connection is the preferred method. If no parallel option exists, the final choice is a serial connection.
Most modern printers provide an option to add an Ethernet interface. A printer with an Ethernet connection is referred to as a network printer. A network printer is a hardware device that provides printing services to print clients without being directly cabled to a print server. It is a print server with its own system name and IP address, and it is connected directly to the network. The Ethernet interface might be internal or external to the printer. Using an Ethernet interface to install a printer is recommended in particular because of its speed (10Mbps or 100Mbps).
Most printers, with a few rare exceptions, have parallel interfaces. A parallel interface has a speed advantage over a serial interface, especially if it uses a Centronics interface.
If your system has a parallel port, you simply connect the printer to the Sun system by using a Centronics parallel cable. Some Sun systems do not have parallel interfaces at all, so you might have to add a parallel interface by purchasing a parallel interface from Sun.
Some printers support both parallel and serial connections. Sometimes a printer is connected via the serial interface because the Sun system does not have an available parallel interface. Connecting a device by using a serial interface requires a thorough understanding of serial transmission. This method of connecting a printer is the most difficult because of the complexity in establishing the proper communications settings between the computer and the printer. It is also slower than other methods.
Most modern printers support USB connection, but some older Sun systems do not. If your Sun system has a USB port, this option provides a plug-n-play interface that is also hotswappable, which allows devices to be plugged in and unplugged without the system being turned off. USB is intended to replace serial and parallel ports.
USB 1.0 has a maximum bandwidth of 12Mbps (which is equivalent to 1.5MBps) and up to 127 devices can be attached.
You use the vendor’s software to configure the operating system of a network printer. After you have completed the vendor software installation, you don’t need additional configuration. You must obtain this vendor software from the printer manufacturer and then install the printer on your system. Most network printers are easy to configure. The HP JetDirect print server is the most popular, but it is by no means the only print server available.
The first step in setting up the printer software is to connect the print server to the network and set its IP address and other network configuration settings. This process varies from one print server to another, so you need to follow the manufacturer’s guidelines for information on how to do this. Next, you need to install the print server software and follow the manufacturer’s guidelines for configuring the printer. The vendor’s software configures everything; usually no additional software configuration is required.
Caution
Be Careful Using Print Manager to Add a Network Printer Unless a printer uses the lpd protocol, you should not use Print Manager to add, modify, or delete a network-based printer that is connected directly to a network with its own network interface card. You won’t damage anything if you try this, but your printer will not be recognized by the system, even though the printer might appear in the printer tool window. You should always use the manufacturer-supplied software to manage the printer.
For printers that have parallel or serial connections, you must use the Solaris tools to configure the operating system to recognize the printer.
The BSD Unix and SVR4 Unix are similar and yet different when it comes to the software that drives the Unix printing process. The two print systems are similar in that both are based on the concept of spooling. Both SVR4 and BSD print services support the concept of an interface program, which acts as a filter through which all output sent to the printer is passed. The following are examples of the uses of interface programs:
![]() Adding a banner page—Most Unix systems automatically add a banner page to the front of a print job. The purpose of the banner page is to identify the owner of the printer output in a shared printer setting.
Adding a banner page—Most Unix systems automatically add a banner page to the front of a print job. The purpose of the banner page is to identify the owner of the printer output in a shared printer setting.
![]() Adding or removing a line-feed character—Unix uses just the line-feed character to separate lines. The first problem you might encounter when testing a printer is that the text might come out in a stair-step manner. This problem can be overcome by installing the vendor’s print software or interface file.
Adding or removing a line-feed character—Unix uses just the line-feed character to separate lines. The first problem you might encounter when testing a printer is that the text might come out in a stair-step manner. This problem can be overcome by installing the vendor’s print software or interface file.
The differences between BSD and SVR4 are in the configuration files and the spooling directories, which the Solaris operating environment configures automatically. Differences also exist in the way the lpsched daemon handles print jobs as compared to the way the lpd daemon handles them in BSD.
In SVR4, one lpsched daemon services all printers. The lpsched daemon is continually running, and it provides the power for the print service. Only one instance of lpsched should be running at any time.
The LP print service performs the following functions:
![]() Administers files and schedules local print requests
Administers files and schedules local print requests
![]() Receives and schedules network requests
Receives and schedules network requests
![]() Filters files (if necessary) so that they print properly
Filters files (if necessary) so that they print properly
![]() Starts programs that interface with the printers
Starts programs that interface with the printers
![]() Tracks the status of jobs
Tracks the status of jobs
![]() Tracks forms mounted on the printer
Tracks forms mounted on the printer
![]() Delivers alerts to mount new forms or different print wheels
Delivers alerts to mount new forms or different print wheels
![]() Delivers alerts about printing problems
Delivers alerts about printing problems
Most of the lp configuration files are located in the /var/spool/lp directory, except for the interface files, which are located in the /etc/lp/interfaces directory. A SCHEDLOCK file should be in /var/spool/lp; it is responsible for ensuring that only one instance of lpsched runs. You use the lpadmin command to add, configure, and delete printers from the system.
Information about printers can be found in the /etc/printers.conf file and in files located in the /etc/lp directory. Solaris Print Manager provides a graphical interface to many of the lp commands listed in Table 6.2.

Although Solaris uses the SVR4 print model, it still supports BSD-style printing to provide interoperability. The widely used BSD printing protocol provides compatibility between different types of Unix and non-Unix systems from various manufacturers.
A print server is a system that has a local printer connected to it and makes the printer available to other systems on the network. A print client is a remote system that can send print requests to a print server. A system becomes a print client when you install the print client software and enable access to remote printers on the system. Any networked Solaris system with a printer can be a print server, as long as the system has adequate resources to manage the printing load.
The print client issues print commands that allow it to initiate print requests. The print command locates a printer and printer configuration information.
When a print job is sent from the print client, the user issues either the SVR4-style lp command or the BSD-style lpr command. Any one of the styles shown in Table 6.3 can be used to submit a print request.

If the user doesn’t specify a printer name or class in a valid style, the command follows the search order defined in the /etc/nsswitch.conf file. By default, the command checks the user’s PRINTER or LPDEST environment variable for a default printer name. These variables can be set in the user’s startup file to specify a default printer to use. If neither environment variable for the default printer is defined, the command checks the .printers file in the user’s home directory for the default printer alias. If the command does not find a default printer alias in the .printers file, it then checks the print client’s /etc/printers.conf file for configuration information. If the printer is not found in the /etc/printers.conf file, the command checks the name service (NIS or NIS+), if any.
The print client software and the Print Manager application offer a graphical solution for setting up and managing printers in a networked environment. Print Manager provides a graphical interface to the lp commands listed in Table 6.2. The advantage of the Solaris Print Manager software is that it supports a name service (NIS or NIS+) that lets you centralize print administration for a network. If you’re using a name service, Solaris Print Manager is the preferred method for managing printer configuration information. Using a name service for storing printer configuration information is desirable because it makes printer information available to all systems on the network, and that makes printing administration easier. The two tools are similar to one another and require the same type of information.
You can also use the lpadmin command at the command line to configure printers on individual systems. The next few sections describe how to set up a printer by using Print Manager and the command line.
Solaris Print Manager is a Java-based GUI that enables you to manage local and remote printer configuration. As with any Solaris GUI, your terminal must be able to display the X11 window environment in order to use this tool and you must be logged in as root.
You can follow the procedure in Step by Step 6.1 to set up a printer by using the Printer Manager.
STEP BY STEP
6.1 Setting Up a Printer by Using Print Manager
1. Log in as root on the system to which you want to connect the printer. The system on which you install the printer becomes the printer server.
2. Connect your printer to the server and turn on power to the printer.
3. Start up Print Manager by typing the following:
/usr/sadm/admin/bin/printmgr &
The windows shown in Figure 6.1 appear.
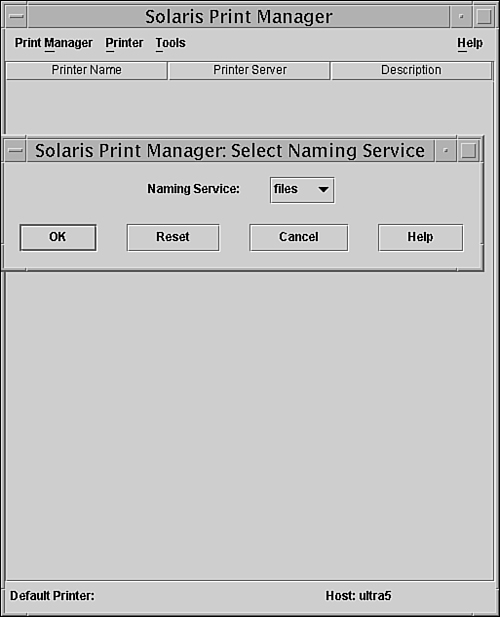
4. In the Select Naming Service window, select from the pull-down menu the name service you are using, as shown in Figure 6.2.

5. In the example in Figure 6.2, Files is selected from the pull-down menu because I am not using a name service at this time. After making your selection, click OK to continue. The Select Naming Service window closes.
6. From the main Solaris Print Manager window, click the Printer menu from the top toolbar and select New Attached Printer, as shown in Figure 6.3.
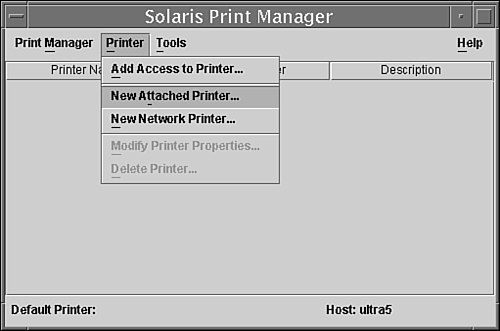
The New Attached Printer window appears, as shown in Figure 6.4.

7. Fill in the empty fields as follows:
![]() Printer Name—Enter the name you want to give this printer.
Printer Name—Enter the name you want to give this printer.
![]() Description—If you want to, enter a brief description of the printer.
Description—If you want to, enter a brief description of the printer.
![]() Printer Port—Click the button and select the port to which the printer is connected:
Printer Port—Click the button and select the port to which the printer is connected:
/dev/term/ais serial port A.
/dev/term/bis serial port B.
/dev/bpp0is the parallel port.
/dev/ecpp0is the parallel port on Sun Ultra systems.
Note
Select Other if you’ve connected an interface card with another device name.
![]() Printer Type—Click the button to select the printer type that matches your printer. The printer types here correspond to printers listed in the
Printer Type—Click the button to select the printer type that matches your printer. The printer types here correspond to printers listed in the /usr/share/lib/terminfo directory. The printer type you select must correspond to an entry in the terminfo database. Unix works best with PostScript printers because page formatting of text and graphics from within the common desktop environment (CDE) is for a PostScript printer. If you want to set your printer type as a PostScript printer, your printer must be able to support PostScript. If you’re using an HP LaserJet printer, you should choose HPLaserJet as the print type unless your LaserJet printer supports PostScript.
![]() File Contents—Click the button to select the format of the files that will be sent to the printer.
File Contents—Click the button to select the format of the files that will be sent to the printer.
![]() Fault Notification—Click the button to select how to notify the superuser in case of a printer error.
Fault Notification—Click the button to select how to notify the superuser in case of a printer error.
![]() Options—Choose to print a banner or make this the default printer.
Options—Choose to print a banner or make this the default printer.
Note
Default Printers One printer can be identified as the default printer for the system. If a user does not specify a printer when printing, the job goes to the default printer.
![]() User Access List—If you want to, enter the names of the systems that are allowed to print to this printer. If nothing is entered, all clients are allowed access.
User Access List—If you want to, enter the names of the systems that are allowed to print to this printer. If nothing is entered, all clients are allowed access.
After you fill in all the fields, click the OK button. The window closes, and the new printer name appears in the Solaris Print Manager window, as shown in Figure 6.5.

Printer types listed in the Print Manager window correspond to printers listed in the /usr/share/lib/terminfo directory. If a printer type is not available for the type of printer you are adding, you might need to add an entry in the /usr/share/lib/terminfo database. Each printer is identified in the terminfo database by a short name; for example, an HP LaserJet printer is listed under the /usr/share/lib/terminfo/h directory as HPLaserJet. The entries for PostScript printers are in /usr/share/lib/terminfo/P. The name found in the directory is the printer type you specify when setting up a printer.
If you cannot find a terminfo entry for your printer, you can try selecting a similar type of printer; however, you might have trouble keeping the printer set in the correct modes for each print request. If no terminfo entry exists for your type of printer and you want to keep the printer set in the correct modes, you can either customize the interface program used with the printer or add an entry to the terminfo database. You’ll find the printer interface program located in the /etc/lp/interfaces directory. Editing an interface file or adding an entry to the terminfo database is beyond the scope of this book. A printer entry in the terminfo database contains and defines hundreds of items. Refer to the Solaris System Administration Guide: Advanced Administration at http://docs.sun.com for information on performing this task. Another good reference for this topic is John Strang and Tim O’Reilly’s book termcap & terminfo, published by O’Reilly & Associates, Inc.
If you are unable to use Print Manager, you can add a printer directly from the command line by using the lpadmin command. This method of setting up a printer provides the most flexibility, so if you’re comfortable with using the command line, you should use it. The lpadmin command enables you to do the following:
![]() Define or remove printer devices and printer names.
Define or remove printer devices and printer names.
![]() Specify printer interface programs and print options.
Specify printer interface programs and print options.
![]() Define printer types and file content types.
Define printer types and file content types.
![]() Create and remove printer classes.
Create and remove printer classes.
![]() Define, allow, and deny user lists.
Define, allow, and deny user lists.
![]() Specify fault recovery.
Specify fault recovery.
![]() Set or change the system default printer destination.
Set or change the system default printer destination.
By using lpadmin, you can set all the print definitions, whereas Solaris Print Manager allows you to set only some of them when you install or modify a printer.
Before you use the lpadmin command to add a printer, you first need to gather the following information about the printer you are going to set up:
![]() Printer name
Printer name
![]() Port device
Port device
![]() Printer type
Printer type
![]() File content type
File content type
To set up a printer that is connected to the parallel port on a Sun Ultra system from the command line, you follow the procedure in Step by Step 6.2.
STEP BY STEP
6.2 Setting Up a Printer by Using lpadmin
1. Use the lpadmin command to define the printer name and the port device that the printer will use:
lpadmin -p ljet1 -v /dev/ecpp0
Note
lpadmin Error Message You might see an error such as this:
UX:lpadmin: WARNING: "/dev/ecpp0" is accessible by others.
TO FIX: If other users can access it you may get unwanted output. If this
is not what you want change the owner to "lp" and change the mode to 0600.
Processing continues.
You can choose to modify permissions on this device file or leave them as is. If you modify permissions on /dev/ecpp0, when the print server and the print client are the same machine, the interface scripts run as the user that submitted the job. Therefore, if a user other than lp or root submits a job, the job will not have write access to /dev/ecpp0.
2. Set the printer type of the printer:
lpadmin -p ljet1 -T PS
3. Specify the file content types to which the printer can print directly:
lpadmin -p ljet1 -I postscript
4. Accept print requests for the printer:
accept ljet1
The system responds with the following:
destination "ljet1" now accepting requests
5. Enable the printer:
enable ljet1
The system responds with the following:
printer "ljet1" now enabled
6. Add a description for the printer:
lpadmin -p ljet1 -D "Engineering PS Printer"
7. Verify that the printer is ready:
lpstat -p ljet1
The system responds with the following:
printer ljet1 is idle. enabled since Dec 12 11:17 2005. available.
You now know how to set up a printer by using the command line. Next you’ll learn how to manage printers by using the lpadmin command.
Objective:
Explain how to configure printer classes, set the default printer, change the default printer class, remove a printer’s configuration, start the LP print service, and stop the LP print service using the appropriate commands.
![]() Given a scenario, identify the appropriate commands to specify a destination printer, accept and reject print jobs, enable and disable printers, and move print jobs.
Given a scenario, identify the appropriate commands to specify a destination printer, accept and reject print jobs, enable and disable printers, and move print jobs.
Managing the print system involves monitoring the lp system and uncovering reasons it might not be working properly. Other routine tasks involve cancelling print jobs and enabling or disabling a printer while it’s being serviced. The following sections provide instructions for the daily tasks you will perform to manage printers and the print scheduler.
Note that the commands described in the following sections require superuser access.
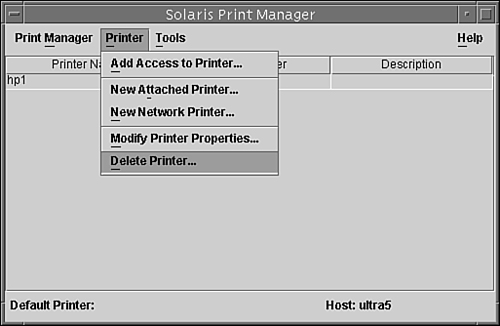
You can use Print Manager to delete a printer from the system. To do so, in the Print Manager main window, highlight the printer that you want to delete and, from the top toolbar, select Printer. From the pull-down menu, select Delete Printer, as shown in Figure 6.6. The printer queue is deleted from the system.
To delete a printer from the command line, you issue the following command on the system where the printer is connected:
lpadmin -x <printer-name>
The printer is deleted from the system.
Perhaps you do not want to remove the printer from the print server, but you want to keep a particular system from printing to the print server. In this case, you issue the following command on the print client from which you want to delete the printer:
lpsystem -r <print-server>
The print server is deleted from the print client’s /etc/lp/Systems file.
To stop accepting print requests on a particular printer—perhaps because a printer will be going offline for repairs—you type the following command on the system where the printer is physically connected:
reject <printer-name>
This command prevents any new requests from entering the printer’s queue while you are in the process of removing the printer. Use the accept command, described later in this section, to allow the queue to start accepting requests.
To allow a printer to keep taking requests but to stop the printer from printing the requests, you issue the following command on the system where the printer is physically connected:
disable <printer-name>
Printing will be halted on this system until you issue the following command:
enable <printer-name>
Note
Using enable in the bash Shell If you are using the bash shell, be aware that enable is a built-in shell command that conflicts with the LP system’s enable command. When using bash, you must give the full path to enable, /usr/bin/enable.
When stopping or disabling a printer, you might need to move existing jobs that have been queued to that printer. To move print jobs from one printer to another, you use the lpmove command, as follows:
lpmove <printer1> <printer2>
The arguments for the lpmove command are described in Table 6.4.

If you move all the print requests to another printer, the lpmove command automatically stops accepting print requests for printer1. The following command is necessary if you want to begin accepting new print requests for the printer:
accept printer1
In the following example, the lpmove command moves print requests from the printer eps1 to the printer eps2 (for example, when eps1 is being taken down for maintenance). When the eps1 printer is ready to start accepting print jobs again, you use the accept command to resume accepting print requests on eps1:
lpmove eps1 eps2
accept eps1
You can put several locally attached printers into a group called a printer class. This might be helpful if you have several printers sitting next to each other and it doesn’t matter which printer your job goes to. After you have set up a printer class, users can specify the class (rather than individual printers) as the destination for a print request. The first printer in the class that is free to print is used. The result is faster turnaround because all printers are utilized. You create printer classes by issuing the lpadmin command with the -c option, as follows:
lpadmin -p <printer name> -c <class name>
No default printer classes are known to the print service; printer classes exist only if you define them. The following are three ways you can define printer classes:
![]() By printer type (for example, PostScript)
By printer type (for example, PostScript)
![]() By location (for example, 5th floor)
By location (for example, 5th floor)
![]() By workgroup or department (for example, Accounting)
By workgroup or department (for example, Accounting)
Alternatively, a class might contain several printers that are used in a particular order. The LP print service always checks for an available printer in the order in which printers were added to a class. Therefore, if you want a high-speed printer to be accessed first, you would add it to the class before you added a low-speed printer. As a result, the high-speed printer would handle as many print requests as possible. The low-speed printer would be used as a backup printer for when the high-speed printer was in use.
Printer class names must be unique and can contain a maximum of 14 alphanumeric characters and underscores. You are not obliged to define printer classes. You should add them only if you determine that using printer classes would benefit the users on the network.
Step by Step 6.3 describes how to define a printer class.
STEP BY STEP
6.3 Defining Printer Classes
The arguments that are used with lpadmin to define printer classes are described in Table 6.5.

The specified printer is added to the end of the class’s list in the print server’s /etc/lp/classes/<printer-class> file. If the printer class does not exist, it is created. You can verify what printers are in a printer class by using the lpstat command:
lpstat -c <printer-class>
The following example adds the printer luna to the class roughdrafts:
lpadmin -p luna -c roughdrafts
You use the lpstat command to verify the status of a printer. You can use this command to determine which printers are available for use or to examine the characteristics of a particular printer. The lpstat command syntax is as follows:
lpstat [-a] [-d] [-p <printer-name> [-D] [-l]] [-t] [-u <logon_IDs>]
The lpstat command options are described in Table 6.6.

The following is an example of the lpstat command:
lpstat -p hplaser
The system responds with this:
printer hplaser is idle. enabled since Jun 16 10:09 2005.
available.
The following example requests a description of the printers hplaser1 and hplaser2:
lpstat -p "hplaser1 hplaser2" -D
printer hplaser1 faulted. enabled since Jun 16 10:09 2005.
available.
unable to print: paper misfeed jam
Description: Printer by finance.
printer hplaser2 is idle. enabled since Jun 16 10:09 2005.
available.
Description: Printer in computer room.
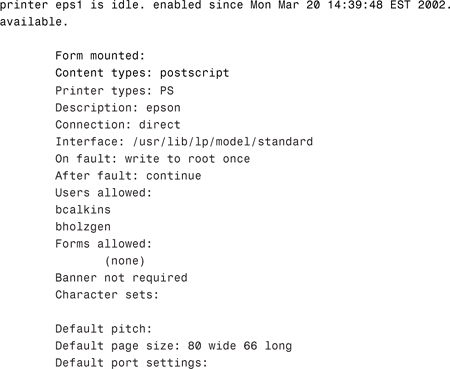
The following example requests the characteristics of the printer hplaser:
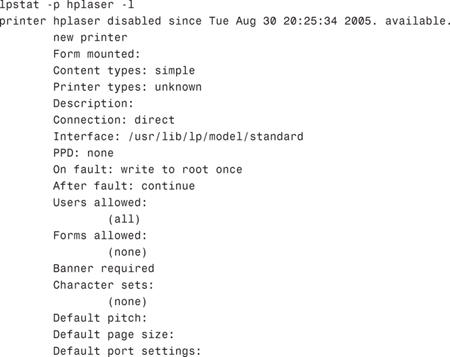
The routine task of managing printers involves managing their queues. Occasionally, large jobs are submitted that are not needed and can be aborted. Other times you might want to put a high-priority job ahead of other jobs that are waiting to be printed. The following sections outline some of the routine tasks you might want to perform on the printer queues.
To remove someone else’s print job from the print queue, you first need to become root. Then you need to determine the request ID of the print request to cancel, by using the lpstat command as follows:
lpstat -u bcalkins
The system displays this:
eps1-1 bcalkins 1261 Mar 16 17:34
In this example, the user bcalkins has one request in the queue. The request ID is eps1-1.
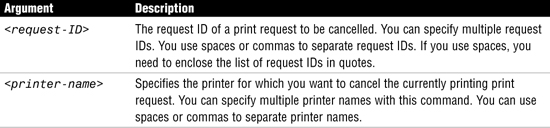
You can cancel a print request by using the cancel command, which has the following syntax:
cancel <request-ID> | <printer-name>
The arguments for the cancel command are described in Table 6.7.
The following example cancels the eps1-3 and eps1-4 print requests:
cancel eps1-3 eps1-4
The system responds with this:
request "eps1-3" cancelled
request "eps1-4" cancelled
The following example cancels the print request that is currently printing on the printer eps1:
cancel eps1
The system responds with this:
request "eps1-9" cancelled
The lp command with the -q option assigns the print request a priority in the print queue. You specify the priority level as an integer from 0 to 39. You use 0 to indicate the highest priority and 39 to indicate the lowest. If no priority is specified, the system administrator assigns the default priority for a print service.
The following example illustrates how to send a print job to the printer eps1, with the highest priority:
lp -d eps1 -q 0 file1
You can allow or deny users access to a printer by using the lpadmin command and adding usernames to an access list. The access list can be a list of specific users who are denied access (deny access list) or a list of users who are allowed access (allow access list). By default, all users are allowed access to a printer. This is the syntax for modifying access lists by using the lpadmin command:
lpadmin -p <printername> -u <lpadmin-argument>
The arguments for the lpadmin command that are used to control access to a printer are described in Table 6.8.

The specified users are added to the allow or deny user access list for the printer in one of the following files on the print server:
![]()
/etc/lp/printers/<printer-name>/users.allow
![]()
/etc/lp/printers/<printer-name>/users.deny
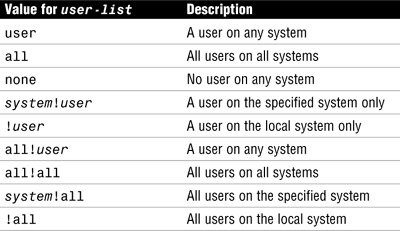
Table 6.9 provides the valid values for user-list.
Note
Specifying none in user-list If you specify none as the value for user-list in the allow user access list, the following files are not created for the print server:
/etc/lp/printers/<printer-name>/alert.sh
/etc/lp/printers/<printer-name>/alert.var
/etc/lp/printers/<printer-name>/users.allow
/etc/lp/printers/<printer-name>/users.deny
The following example gives only the users bcalkins and bholzgen access to the printer eps1:
lpadmin -p eps1 -u allow:bcalkins,bholzgen
The following example denies the users bcalkins and bholzgen access to the printer eps2:
lpadmin -p eps2 -u deny:"bcalkins bholzgen"
You can use the lpstat command to view access information about a particular printer. The following command displays access information for the printer named eps1:
lpstat -p eps1 -l
The system responds with this:
As root, you can stop accepting print requests for the printer by using the reject command. The command syntax is as follows:
reject [-r "reason"] <printer-name>
The arguments for the reject command are described in Table 6.10.

The following example stops the printer eps1 from accepting print requests:
reject -r "eps1 is down for repairs" eps1
The system responds with this:
destination "eps1" will no longer accept requests
Any queued requests will continue printing as long as the printer is enabled. The following example sets the printer eps1 to accept print requests again:
accept eps1
The system responds with this:
destination "eps1" now accepting requests
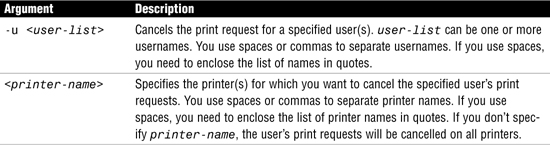
You need to be the root or lp user if you want to cancel print requests of other users. You cancel a print request from a specific user with the cancel command. The syntax is as follows:
cancel -u <user-list> <printer-name>
The arguments for the cancel command are described in Table 6.11.
The following example cancels all the print requests submitted by the user bcalkins on the printer luna:
cancel -u bcalkins luna
The system responds with this:
request "luna-23" cancelled
The following example cancels all the print requests submitted by the user bcalkins on all printers:
cancel -u bcalkins
The system responds with this:
request "asteroid-3" cancelled
request "luna-8" cancelled
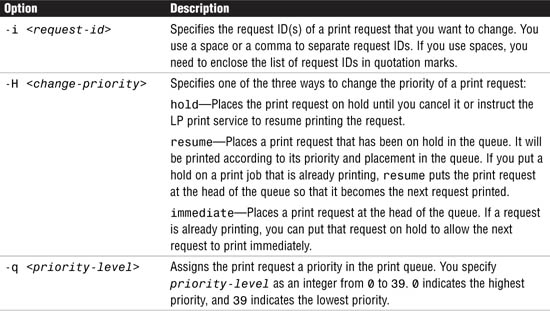
You can change the priority of a print request by using the following lp command:
lp -i <request-id> -H <change-priority> -q <priority-level>
The options for the lp command are described in Table 6.12.
In the following example, the command changes a print request with the request ID eps1-29 to priority level 1:
lp -i eps1-29 -q 1
The Solaris print scheduler, lpsched, schedules all print requests on print servers. If printouts are not coming out of the printer, you might need to restart the print scheduler. To restart the print scheduler, you use the svcadm restart scv:/application/print/server:default command. If a print request was printing when the print scheduler stopped running, that request would be printed in its entirety when you restart the print scheduler. You first stop the scheduler by typing the following:
svcadm disable -t scv:/application/print/server:default
To restart the scheduler, you type the following:
svcadm enable -t scv:/application/print/server:default
When you add a printer, you are given the option of selecting that printer as the default printer for that particular system. You might want to set the default printer at the user level so that, on a particular system, users can specify their own default printers. If a user doesn’t provide a printer name when sending a print job, the print command searches for the default printer in the following order:
1. LPDEST variable
2. PRINTER variable
3. System’s default printer
These variables can be set in the user’s .profile file. The lp command checks LPDEST and then PRINTER. If neither variable has been set, the print command searches for the variable named _default in the following file:
$HOME/.printers
An entry in this file that names printer1 as the default printer looks like this:
default printer1
If the $HOME/.printers file does not exist, the /etc/printers.conf file is checked. An entry in this file would look like this:
_default|lp:
:use=system1:
:bsdaddr=system1,printer1
If the _default variable is not set in the /etc/printers.conf file and if you’re running a name service, the name service database is checked as described in Chapter 12, “Naming Services.” If the destination printer name cannot be located in any of these files, the print request cannot be processed.
You can use Solaris Print Manager to modify a printer after it has been added to the system. Modifications that can be made to a printer via Print Manager include the following:
![]() Giving the printer description
Giving the printer description
![]() Indicating the printer port
Indicating the printer port
![]() Listing file contents
Listing file contents
![]() Providing fault notification
Providing fault notification
![]() Printing a banner page
Printing a banner page
![]() Accepting and processing print requests
Accepting and processing print requests
![]() Providing a user access list
Providing a user access list
To modify a printer via the Print Manager GUI, you select Printers from the top toolbar, and then you select Modify Printer Properties, as shown in Figure 6.7.
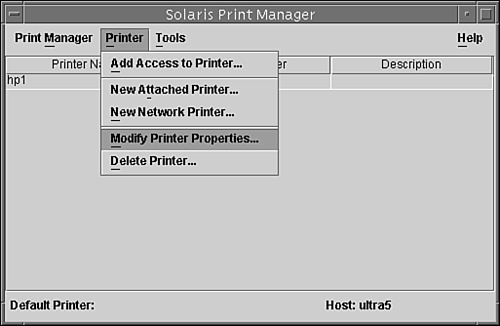
The Modify Printer Properties window appears, as shown in Figure 6.8.

You can modify the selected printer by selecting or filling in the appropriate fields in the Modify Printer Properties window.
The lpsched daemon keeps a log file of each print request that it processes and notes any errors that occur during the printing process. This log file is kept in the /var/lp/logs/lpsched file. By default, every Sunday at 3:13 a.m., the lp cron job renames the /var/lp/logs/lpsched file to a new lpsched.n file and starts a new log file. If errors occur or jobs disappear from the print queue, you can use the log files to determine what the lpsched daemon has done with a printing job.
As a system administrator, the majority of system problems I respond to are printer related. I could spend a great deal of time describing how to configure and troubleshoot the LP print service. I could explore a more in-depth discussion on configuring printer filters, creating terminfo databases, and troubleshooting printing problems, but that’s beyond the scope of this book. To be prepared for the certification exam and basic system administration, you need to understand the basics of the LP print service, including the print spooler, print daemons, and printer configuration files. Also, you need to know where the printer related files and programs are stored in the Solaris 10 directory structure.
In addition to understanding the LP print service, you need to know how to use all the utilities and programs that are available to manage the LP print service. You need to know how to start and stop the print service and how to enable or disable it using all the methods described in this chapter.
You should also become familiar with third-party applications and how they prepare print jobs to be sent to the spooler. Many of the problems you may encounter are not with the Solaris print service but have to do with the way that the application formats the print job. This chapter introduces you to the Solaris print system and the lpsched daemon. For a more detailed discussion of the lpsched daemon, refer to Solaris 10 System Administration Guide: Advanced Administration, from Sun Microsystems.
This exercise shows you how to add and remove a local LaserJet 5M printer on a print server. The commands in this example must be executed on the print server where the printer is connected. The following information is available for the installation:
Printer name: hp1
Port device: /dev/ecpp0
System type: Ultra5
Printer type: HP LaserJet5M
File content type: PostScript/PCL
Estimated time: 10 minutes
1. As root, use the lpadmin command to add the printer named hp1 to the parallel port (/dev/ecpp0), set the printer type as hplaser, and specify the file content type as any:
lpadmin -p hp1 -v /dev/ecpp0 -T hplaser -I any
Now, start accepting print requests for the printer and enable the printer:
enable hp1
accept hp1
2. Verify that the printer is set up and ready:
lpstat -p hp1 -l
3. Send a print job to the printer to test it:
lp -d hp1 /etc/hosts
4. Remove the printer:
lpadmin -x hp1
5. Verify that the printer has been removed:
lpstat -t
In this exercise, you add a LaserJet 5M printer to the print server by using the Print Manager GUI.
Estimated time: 5 minutes
1. As root, start up Print Manager:
/usr/sadm/admin/bin/printmgr &
2. From the Printer button at the top of Print Manager window, select New Attached Printer. Fill in the fields as follows:
Printer name: hp1
Description: Hplaser 5M
Printer port: /dev/eccp0
Printer type: HP Printer
File contents: Any
Fault notification: Mail to Superuser
Click OK when you’re finished, and then exit Print Manager.
3. Verify that the printer is set up and ready by typing the following:
lpstat -p hp1 -l
In this exercise, you use the svcadm disable command to stop and start the LP print service.
Estimated time: 5 minutes
1. Halt the LP print service:
svcadm disable application/print/server
Any printers that are currently printing when the command is invoked are stopped.
2. Use the svcadm enable command to start the LP print service:
svcadm enable application/print/server
Printers that are restarted by using this command reprint all jobs that were interrupted with the svcadm disable command.
This exercise illustrates how to configure a printer named hplaser that is connected directly to the network via its own network interface card that has the IP address 192.168.1.10. In this example, the printer is utilizing an HP JetDirect interface, and you use Hewlett-Packard’s JetAdmin software to configure the printer.
Estimated time: 15 minutes
1. Obtain the JetAdmin software from Hewlett-Packard’s website (www.hp.com) and install it using the pkgadd command, as described in Chapter 2, “Installing the Solaris 10 Operating Environment.” Make sure you get the correct version of JetAdmin. As of this writing, the current version is named SOLd621.PKG. Put the downloaded file in your /tmp directory.
2. Install the JetAdmin package into the /opt/hpnp directory by using the pkgadd command:
pkgadd -d /tmp/SOLd621.PKG
You should see the following output:
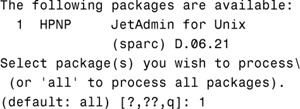
3. Type the following:

4. Keep all the default selections by pressing Enter <return> to install the JetAdmin package in the /opt/hpnp directory:

5. Enter 0 <return>, and the JetAdmin package is installed. You should see the following messages appear onscreen as the package is installing:
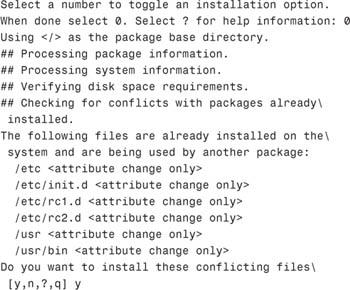
6. Enter y <return> to install the conflicting packages.
This package contains scripts which will be
executed with super-user permission during
the process of installing this package.
Do you want to continue with the installation
of <HPNP> [y,n,?] y
7. Enter y <return> to continue the installation. You should see a list of files being installed, followed by this message:
Installation of <HPNP> was successful.
8. Configure the HP LaserJet printer by using the JetAdmin utility that you just installed:
/opt/hpnp/jetadmin
The following information is displayed:

Enter 1 <return> to configure a new printer:
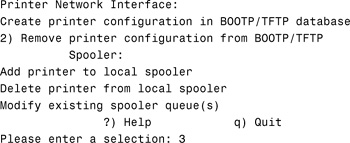
Enter 3 <return> to add your printer to the local spooler:
Enter the network printer name or IP address
(q - quit): 192.168.1.10
Enter the IP address for your printer. In this example, I entered 192.168.1.10:
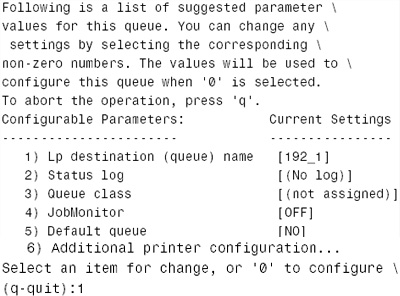
Enter 1 to change the name of the printer:
Currently used names:
hp1
Enter the lp destination name (default=192_1, q - quit): hplaser
Enter a name for the printer. In this example, I entered hplaser:
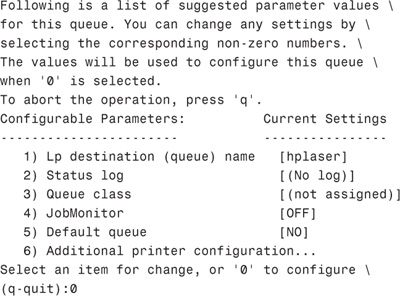
Enter 0 to configure the printer settings you’ve defined:
Ready to configure hplaser.
OK to continue? (y/n/q, default=y)y
Answer y to start the configuration process.
The system displays the following messages as the printer is being configured:
Finished adding "hplaser" to the spooler.
Press the return key to continue ...
Enter <return>, followed by q, and another q to exit the JetAdmin utility.
9. Verify that the printer is enabled and ready:
lpstat -p hplaser -l
The system displays information about the printer.
|
1. |
B. The Unix utility responsible for printing in SVR4 Unix is called |
|
2. |
B. For Solaris, the spool directory is located in |
|
3. |
C. The |
|
4. |
B, C. You can use Print Manager or |
|
5. |
B. The |
|
6. |
D. The |
|
7. |
A, C. A print server is a system that has a local printer connected to it. A print server makes a printer available to other systems on the network. For more information, see the section “Print Servers Versus Print Clients.” |
|
8. |
B, C. If the user doesn’t specify a printer name or class in a valid style, the print command checks the user’s |
|
9. |
A. When you use Print Manager to add a printer, the Printer Server field defines the name of the system (hostname) to which the printer is connected. For more information, see the section “Setting Up a Printer by Using Print Manager.” |
|
10. |
C. |
|
11. |
B, C. Valid printer ports on a Solaris system include |
|
12. |
C. The following command cancels all print requests for the user cancel -u bcalkins jetprint For more information, see the section “Cancelling a Print Request.” |
|
13. |
A, C. To delete a printer from the system, you can use either the |
|
14. |
B. You use the |
|
A. The print scheduler, |
|
|
16. |
A, B. When you set up a printer with Print Manager or |
|
17. |
A. The print server is a system that has a local printer connected to it and makes the printer available to other systems on the network. For more information, see the section “Print Servers Versus Print Clients.” |
|
18. |
A. To add a printer to a class, you use the following command syntax: |
|
19. |
A. You use the |
|
20. |
A. You use the |
For more information on this topic, refer to the Managing Print Services section of the Solaris 10 Advanced System Administration Guide by Sun Microsystems, part number 817-0403-10. This guide is available at http://docs.sun.com.
A good book on the topic of Unix printing in general is Network Printing, by Matthew Gast and Todd Radermacher.