
The following objectives for the Solaris System Administrator Exam are covered in this chapter:
Explain boot PROM fundamentals, including OpenBoot Architecture Standard, boot PROM, NVRAM, POST, Abort Sequence, and displaying POST to serial port on SPARC systems.
Explain the BIOS settings for booting, abort sequence, and displaying POST.
Execute basic boot PROM commands for a SPARC system.
Perform system boot and shutdown procedures, including identifying the system’s boot device, creating and removing custom device aliases, viewing and changing NVRAM parameters, and interrupting an unresponsive system.
Explain the Service Management Facility and the phases of the boot process.
Use Service Management Facility or legacy commands and scripts to control both the boot and shutdown procedures.
![]() You need to understand the primary functions of the OpenBoot environment, which includes the programmable read-only memory (PROM). You need to have a complete understanding of how to use many of the OpenBoot commands and how to set and modify all the configuration parameters that control system bootup and hardware behavior.
You need to understand the primary functions of the OpenBoot environment, which includes the programmable read-only memory (PROM). You need to have a complete understanding of how to use many of the OpenBoot commands and how to set and modify all the configuration parameters that control system bootup and hardware behavior.
![]() You must understand the entire boot process, from the proper power-on sequence to the steps you perform to bring the system into multi-user mode.
You must understand the entire boot process, from the proper power-on sequence to the steps you perform to bring the system into multi-user mode.
![]() You must be able to identify the devices connected to a system and recognize the various special files for each device.
You must be able to identify the devices connected to a system and recognize the various special files for each device.
![]() Occasionally, conventional shutdown methods might not work on an unresponsive system or on a system that has crashed. This chapter introduces when and how to use these alternative shutdown methods to bring the system down safely.
Occasionally, conventional shutdown methods might not work on an unresponsive system or on a system that has crashed. This chapter introduces when and how to use these alternative shutdown methods to bring the system down safely.
![]() You must understand how the Service Management Facility (SMF) controls which processes and services are started at various stages of the boot process. You need to understand how to use SMF or legacy commands and scripts to control both the boot and shutdown procedures.
You must understand how the Service Management Facility (SMF) controls which processes and services are started at various stages of the boot process. You need to understand how to use SMF or legacy commands and scripts to control both the boot and shutdown procedures.
The following study strategies will help you prepare for the exam:
![]() When studying this chapter, you should practice on a Sun system each step-by-step process that is outlined. In addition to practicing the processes, you should practice the various options described for booting the system.
When studying this chapter, you should practice on a Sun system each step-by-step process that is outlined. In addition to practicing the processes, you should practice the various options described for booting the system.
![]() You should display the hardware configuration of your Sun system by using the various OpenBoot commands presented in this chapter. You need to familiarize yourself with all the devices associated with your system. You should be able to identify each hardware component by its device pathname.
You should display the hardware configuration of your Sun system by using the various OpenBoot commands presented in this chapter. You need to familiarize yourself with all the devices associated with your system. You should be able to identify each hardware component by its device pathname.
![]() You should practice creating both temporary and permanent device aliases. In addition, you should practice setting the various OpenBoot system parameters that are described in this chapter.
You should practice creating both temporary and permanent device aliases. In addition, you should practice setting the various OpenBoot system parameters that are described in this chapter.
![]() You should practice booting the system by using the various methods described. You need to understand how to boot into single-user and multiuser modes and how to specify an alternate kernel or system file during the boot process.
You should practice booting the system by using the various methods described. You need to understand how to boot into single-user and multiuser modes and how to specify an alternate kernel or system file during the boot process.
![]() During the boot process, you should watch the system messages and familiarize yourself with every stage of the boot process. You should watch the system messages that are displayed at bootup. You need to understand each message displayed during the boot process from system power-on to bringing the system into multiuser mode.
During the boot process, you should watch the system messages and familiarize yourself with every stage of the boot process. You should watch the system messages that are displayed at bootup. You need to understand each message displayed during the boot process from system power-on to bringing the system into multiuser mode.
![]() You need to thoroughly understand the Service Management Facility (SMF), service states, and milestones. You’ll need to understand how the
You need to thoroughly understand the Service Management Facility (SMF), service states, and milestones. You’ll need to understand how the scv.startd daemon uses information from the service configuration repository to determine required milestones and how it processes the manifests located in the /var/svc/manifest directory. In addition you must understand legacy run control scripts, run levels, and how they affect the system services.
![]() You should practice shutting down the system. You should make sure you understand the advantages and disadvantages of each method presented.
You should practice shutting down the system. You should make sure you understand the advantages and disadvantages of each method presented.
System startup requires an understanding of the hardware and the operating system functions that are required to bring the system to a running state. This chapter discusses the operations that the system must perform from the time you power on the system until you receive a system logon prompt. In addition, it covers the steps required to properly shut down a system. After reading this chapter, you’ll understand how to boot the system from the OpenBoot programmable read-only memory (PROM) and what operations must take place to start up the kernel and Unix system processes.
Objective:
Explain the phases of the boot process.
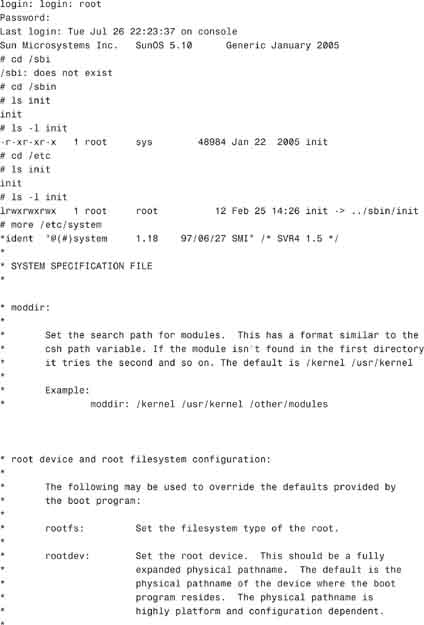
Bootstrapping is the process a computer follows to load and execute the bootable operating system. The term comes from the phrase “pulling yourself up by your bootstraps.” The instructions for the bootstrap procedure are stored in the boot PROM.
The boot process goes through the following phases:
1. Boot PROM phase—After you turn on power to the system, the PROM displays system identification information and runs self-test diagnostics to verify the system’s hardware and memory. It then loads the primary boot program, called bootblk from its location on the boot device into memory.
2. Boot programs phase—The bootblk program finds and executes the secondary boot program (called ufsboot) from the Unix file system (UFS) and loads it into memory. After the ufsboot program is loaded, the ufsboot program loads the two-part kernel.
3. Kernel initialization phase—The kernel initializes itself and begins loading modules, using ufsboot to read the files. When the kernel has loaded enough modules to mount the root file system, it unmaps the ufsboot program and continues, using its own resources.
4. init phase—The kernel creates a user process and starts the /sbin/init process. The /sbin/init process reads the /etc/inittab file for instructions on starting other processes, one of which is the svc.startd daemon (/lib/svc/bin/svc.startd).
5. svc.startd phase—The svc.startd daemon starts the system services and boots the system to the appropriate milestone. Specifically, svc.startd starts the following system services:
![]() Checks and mounts file systems
Checks and mounts file systems
![]() Configures the network and devices
Configures the network and devices
![]() Initiates various startup processes and performs system maintenance tasks
Initiates various startup processes and performs system maintenance tasks
![]() In addition,
In addition, svc.startd executes the legacy run control (rc) scripts for compatibility.
Tip
Boot Phases For the exam, you need to make sure you thoroughly understand each boot phase and the order in which each phase is run. The first two phases are described in this section, with the description of OpenBoot. The kernel, init, and svc.startd phases are described later in the chapter, in the sections “The Kernel” and “System Run States.”
Before you power on the system, you need to make sure everything is plugged in properly. Check the small computer system interface (SCSI) cables that connect any external devices to the system (such as disk drives and tape drives) to make sure they are properly connected. Check your network connection. Also make sure that the keyboard and monitor are connected properly. Loose cables can cause your system to fail during the startup process.
Caution
Connecting Cables with the Power Turned Off Always connect your cables before turning on the hardware; otherwise, you could damage your system.
The correct sequence for powering on your equipment is to first turn on any peripherals (that is, external disk drives or tape drives) and then turn on power to the system.
The bootstrap process begins after power-up, when the startup routines located in the hardware’s PROM chip are executed. Sun calls this the OpenBoot firmware, and it is executed immediately after you turn on the system.
The primary task of the OpenBoot firmware is to test the hardware and to boot the operating system either from a mass storage device or from the network. OpenBoot contains a program called the monitor that controls the operation of the system before the kernel is available and before the operating system has been booted. When a system is turned on, the monitor runs a power-on self-test (POST) that checks such things as the hardware and memory on the system.
If no errors are found, the automatic boot process begins. OpenBoot contains a set of instructions that locate and start up the system’s boot program and eventually start up the Unix operating system.
Note
Automatic System Recovery Sun server class systems can recognize failed components and disable the board that contains the failed component. If the server is configured with multiple central processing unit (CPU)/memory and input/output (I/O) boards, the system can boot in a degraded yet stable condition, even with failed components. See your server’s System Reference Manual for details on automatic system recovery.
The boot program is stored in a predictable area (sectors 1–15) on the system hard drive, CD-ROM, or other bootable device and is referred to as the bootblock (bootblk). The bootblock is responsible for loading the secondary boot program (ufsboot) into memory, which is located in the UFS file system on the boot device. The path to ufsboot is recorded in the bootblock, which is installed by the Solaris installboot utility.
ufsboot locates and loads the two-part kernel. The kernel (which is covered in detail later in this chapter) is the part of the operating system that remains running at all times until the system is shut down. It is the core and the most important part of the operating system. The kernel consists of a two-piece static core called genunix and unix. genunix is the platform-independent generic kernel file, and unix is the platform-specific kernel file. When the system boots, ufsboot combines these two files into memory to form the running kernel.
Objective:
Execute basic boot PROM commands for a SPARC system.
![]() Explain boot PROM fundamentals, including OpenBoot Architecture Standard, boot PROM, NVRAM, POST, Abort Sequence, and displaying POST to serial port on SPARC systems.
Explain boot PROM fundamentals, including OpenBoot Architecture Standard, boot PROM, NVRAM, POST, Abort Sequence, and displaying POST to serial port on SPARC systems.
The hardware-level user interface that you see before the operating system starts is called the OpenBoot PROM (OBP). OpenBoot is based on an interactive command interpreter that gives you access to an extensive set of functions for hardware and software development, fault isolation, and debugging. The OBP firmware is stored in the system’s PROM chip.
Sun UltraSPARC systems use a programmable boot PROM that allows new boot program data to be loaded into the PROM by “flashing” the PROM with software. This type of PROM is called a flash PROM (FPROM).
The NVRAM chip stores user-definable system parameters, also referred to as NVRAM variables or EEPROM parameters. The parameters allow administrators to control variables such as the default boot device and boot command. The NVRAM also contains writeable areas for user-controlled diagnostics, macros, and device aliases. NVRAM is where the system identification information is stored, such as the host ID, Ethernet address, and time-of-day (TOD) clock. On older systems, a single lithium battery backup provides backup for the NVRAM and clock. Newer systems contain a non-removable Serial Electronically Erasable Programmable Read-Only Memory (SEEPROM) chip that does not require a battery. Other newer systems may contain a removable system configuration card to hold the system configuration information. Many software packages use the host ID for licensing purposes; therefore, it is important that the NVRAM chip can be removed and placed into any replacement system board. Because NVRAM contains unique identification information for the machine, Sun sometimes refers to it as the identification programmable read-only memory (ID PROM).
OpenBoot is currently at version 5 but is available only on high-end Sun servers (SunFire and higher). Depending on the age of your system, you could have PROM version 3, 4, or 5 installed. The original boot PROM firmware, version 1, was first introduced on the Sun SPARCstation 1. The first version of the OpenBoot PROM was version 2, and it first appeared on the SPARCstation 2 system. OpenBoot versions 3 and 4 are the versions that are currently available on the Ultra series systems and Enterprise servers. Versions 3, 4 and 5 of the OpenBoot architecture provide a significant increase in functionality over the boot PROMs in earlier Sun systems. One notable feature of the OpenBoot firmware is a programmable user interface based on the interactive programming language Forth. In Forth, sequences of user commands can be combined to form complete programs. This capability provides a powerful tool for debugging hardware and software. Another benefit of versions 3, 4, and 5 is the Flash update feature. You can update the version 3, 4, and 5 firmware without replacing the PROM chip, but you will not be tested on updating the firmware on the exam.
To determine the version of the OpenBoot PROM, type
/usr/sbin/prtdiag
or
prtconf -v
Note
No OpenBoot Environment on the Intel Platform The Intel environment has no OpenBoot PROM or NVRAM. On Intel systems, before the kernel is started, the system is controlled by the basic input/output system (BIOS), the firmware interface on a PC. Therefore, many features provided by OpenBoot are not available on Intel systems.
Every Sun workstation and server except the midrange, midframe, and high-end servers has only one system board and holds only one boot PROM and NVRAM chip.
Sun’s midrange, midframe, and high-end servers, such as the Enterprise and Sun Fire, can be configured with multiple CPU/memory and I/O boards.
The following are some things you should be aware of on multiple-CPU systems:
![]() A multiple-CPU system has a clock board to oversee the backplane communications.
A multiple-CPU system has a clock board to oversee the backplane communications.
![]() The
The host ID and Ethernet address are on the clock board and are automatically downloaded to the NVRAM on all CPU boards when the POST is complete.
![]() PROM contents on each CPU are compared and verified via checksums.
PROM contents on each CPU are compared and verified via checksums.
![]() The CPU that is located in the lowermost card cage slot is the master CPU board.
The CPU that is located in the lowermost card cage slot is the master CPU board.
![]() Each CPU runs its own individual POST.
Each CPU runs its own individual POST.
![]() If these systems are configured with redundant CPU/memory and I/O boards, they can run in a degraded yet stable mode, even when some components have failed. Such systems are usually described as fault-tolerant or fault-resilient.
If these systems are configured with redundant CPU/memory and I/O boards, they can run in a degraded yet stable mode, even when some components have failed. Such systems are usually described as fault-tolerant or fault-resilient.
You can get to the OpenBoot environment by using any of the following methods:
![]() Halting the operating system.
Halting the operating system.
![]() Pressing the Stop and A keys simultaneously (Stop+A). On terminals that are connected to the serial port and do not have a Stop key, you press the Break key. This will stop the operating system and transfer control to the OpenBoot monitor. In some cases, this may lead to data loss or corruption, and therefore should be used with caution.
Pressing the Stop and A keys simultaneously (Stop+A). On terminals that are connected to the serial port and do not have a Stop key, you press the Break key. This will stop the operating system and transfer control to the OpenBoot monitor. In some cases, this may lead to data loss or corruption, and therefore should be used with caution.
![]() When the system is initially powered on. If your system is not configured to start up automatically, it stops at the user interface (the monitor prompt). If automatic startup is configured, you can make the system stop at the user interface by pressing Stop+A after the display console banner is displayed but before the system begins starting the operating system.
When the system is initially powered on. If your system is not configured to start up automatically, it stops at the user interface (the monitor prompt). If automatic startup is configured, you can make the system stop at the user interface by pressing Stop+A after the display console banner is displayed but before the system begins starting the operating system.
![]() When the system hardware detects an error from which it cannot recover. (This is known as a watchdog reset.)
When the system hardware detects an error from which it cannot recover. (This is known as a watchdog reset.)
On those servers with a power button and system control switch located on the system’s front panel, the ability to turn the system on or off is controlled by the key position on the system control switch.
The four-position system control switch (key) located on the system’s front panel controls the power-on modes of the system and prevents unauthorized users from powering off the system or reprogramming system firmware. Table 3.1 describes the function of each system control switch setting:

Note
Alternative Methods for Stopping a System An alternative sequence that can be used to stop the system is Enter+~+Ctrl+B, which is equivalent to Stop+A. There must be an interval of more than 0.5 seconds between characters, and the entire string must be entered in less than 5 seconds. You can use this method only with serial devices acting as consoles and not for systems with keyboards of their own. To enable this alternative sequence, you must first modify the /etc/default/kbd file by removing the # from the entry:
#KEYBOARD_ABORT=alternate
To disable the abort key sequence, make the following entry to the /etc/default/kbd file:
KEYBOARD_ABORT=disable
Remember to uncomment the line by removing the “#”.
Then you save the changes and, as root, type
kbd -i
to put the changes into effect.
On a server with a physical keyswitch, the alternative BREAK does not work when the key is set to the Secure position.
If your console is connected to the serial port via a modem, you can send a break (Stop+A or L1+A) through the tip window by typing ~# (tilde and then the pound sign).
Caution
Using Stop+A Sparingly Forcing a system into the OpenBoot PROM by using Stop+A or Break abruptly breaks execution of the operating system. You should use these methods only as a last resort to restart the system. When you access the ok prompt from a running system, you are suspending the operating environment software and placing the system under firmware control. Any processes that were running under the operating environment software are also suspended, and the state of such software may not be recoverable.
The diagnostics and commands that you run from the ok prompt have the potential to affect the state of the system. Don’t assume that you will be able to resume execution of the operating environment software from the point at which it was suspended. Although the go command will resume execution in most circumstances, as a rule, each time you drop the system down to the ok prompt, you should expect to have to reboot it to get back to the normal operating state.
The IEEE Standard 1275 defines the OpenBoot architecture and the primary tasks of the OpenBoot firmware are as follows:
![]() Test and initialize the system hardware.
Test and initialize the system hardware.
![]() Determine the hardware configuration.
Determine the hardware configuration.
![]() Start the operating system from either a mass storage device or a network.
Start the operating system from either a mass storage device or a network.
![]() Provide interactive debugging facilities for configuring, testing, and debugging.
Provide interactive debugging facilities for configuring, testing, and debugging.
![]() Allow modification and management of system startup configuration, such as NVRAM parameters.
Allow modification and management of system startup configuration, such as NVRAM parameters.
![]() Servers such as the Sun Fire provide environmental monitoring and control capabilities at both the operating system level and the OpenBoot firmware level to monitor the state of the system power supplies, fans, and temperature sensors. If it detects any voltage, current, fan speed, or temperature irregularities, the monitor generates a warning message to the system console and ultimately it will initiate an automatic system shutdown sequence.
Servers such as the Sun Fire provide environmental monitoring and control capabilities at both the operating system level and the OpenBoot firmware level to monitor the state of the system power supplies, fans, and temperature sensors. If it detects any voltage, current, fan speed, or temperature irregularities, the monitor generates a warning message to the system console and ultimately it will initiate an automatic system shutdown sequence.
Specifically, the following tasks are necessary to initialize the operating system kernel:
1. OpenBoot displays system identification information and then runs self-test diagnostics to verify the system’s hardware and memory. These checks are known as a POST—power-on self test.
2. OpenBoot will then probe system bus devices, interpret their drivers, build a device tree, and then install the console. After initializing the system, OpenBoot displays a banner on the console.
3. OpenBoot will check parameters stored in NVRAM to determine how to boot the operating system.
4. OpenBoot loads the primary startup program, bootblk, from the default startup device.
5. The bootblk program finds and executes the secondary startup program, ufsboot, and loads it into memory. The ufsboot program loads the operating system kernel.
Objective:
Explain boot PROM fundamentals, including OpenBoot Architecture Standard
Tip
The OpenBoot Device Tree In this section, pay close attention to the OpenBoot device tree. You’re likely to see this topic on the exam.
The OpenBoot architecture provides an increase in functionality and portability compared to the proprietary systems of some other hardware vendors. Although this architecture was first implemented by Sun Microsystems as OpenBoot on SPARC (Scaleable Processor Architecture) systems, its design is processor independent. The following are some notable features of OpenBoot firmware:
![]() Plug-in device drivers—A device driver can be loaded from a plug-in device such as an SBus card. The plug-in device driver can be used to boot the operating system from that device or to display text on the device before the operating system has activated its own software device drivers. This feature lets the input and output devices evolve without changing the system PROM.
Plug-in device drivers—A device driver can be loaded from a plug-in device such as an SBus card. The plug-in device driver can be used to boot the operating system from that device or to display text on the device before the operating system has activated its own software device drivers. This feature lets the input and output devices evolve without changing the system PROM.
![]() The FCode interpreter—Plug-in drivers are written in a machine-independent interpreted language called FCode. Each OpenBoot system PROM contains an FCode interpreter. This enables the same device and driver to be used on machines with different CPU instruction sets.
The FCode interpreter—Plug-in drivers are written in a machine-independent interpreted language called FCode. Each OpenBoot system PROM contains an FCode interpreter. This enables the same device and driver to be used on machines with different CPU instruction sets.
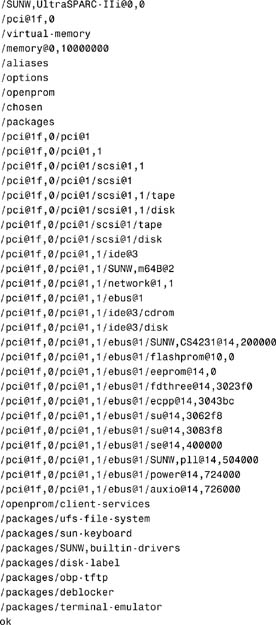
![]() The device tree—Devices called nodes are attached to a host computer through a hierarchy of interconnected buses on the device tree. A node representing the host computer’s main physical address bus forms the tree’s root node. Both the user and the operating system can determine the system’s hardware configuration by viewing the device tree.
The device tree—Devices called nodes are attached to a host computer through a hierarchy of interconnected buses on the device tree. A node representing the host computer’s main physical address bus forms the tree’s root node. Both the user and the operating system can determine the system’s hardware configuration by viewing the device tree.
Nodes with children usually represent buses and their associated controllers, if any. Each such node defines a physical address space that distinguishes the devices connected to the node from one another. Each child of that node is assigned a physical address in the parent’s address space. The physical address generally represents a physical characteristic that is unique to the device (such as the bus address or the slot number where the device is installed). The use of physical addresses to identify devices prevents device addresses from changing when other devices are installed or removed.
![]() The programmable user interface—The OpenBoot user interface is based on the programming language Forth, which provides an interactive programming environment. It can be quickly expanded and adapted to special needs and different hardware systems. Forth is used not only by Sun but also utilized in the OpenFirmware boot ROMs provided by IBM, Apple, and Hewlett-Packard.
The programmable user interface—The OpenBoot user interface is based on the programming language Forth, which provides an interactive programming environment. It can be quickly expanded and adapted to special needs and different hardware systems. Forth is used not only by Sun but also utilized in the OpenFirmware boot ROMs provided by IBM, Apple, and Hewlett-Packard.
Note
Forth If you’re interested in more information on Forth, refer to American National Standards Institute (ANSI) Standard X3.215-1994 (see www.ansi.org).
Objective:
Execute basic boot PROM commands for a SPARC system.
The OpenBoot firmware provides a command-line interface for the user at the system console called the Forth Monitor.
The Forth Monitor is an interactive command interpreter that gives you access to an extensive set of functions for hardware and software diagnosis. Sometimes you’ll also see the Forth Monitor referred to as new command mode. These functions are available to anyone who has access to the system console.
The Forth Monitor prompt is ok. When you enter the Forth Monitor mode, the following line displays:
Type help for more information
ok
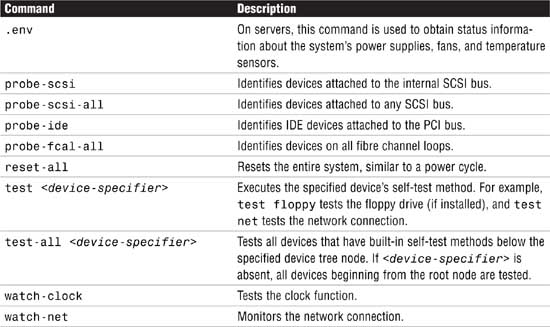
At any time, you can obtain help on the various Forth commands supported in OpenBoot by using the help command. The help commands from the ok prompt are listed in Table 3.2.
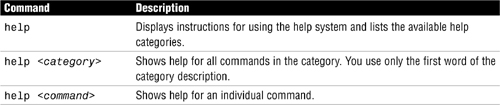
Because of the large number of commands, help is available only for commands that are used frequently.
The following example shows the help command with no arguments:
ok help
The system responds with the following:

If you want to see the help messages for all commands in the category diag, for example, you type the following:
ok help diag
The system responds with this:

The system responds with this:
The system responds with this:
Objective:
Display devices connected to the bus.
![]() Identify the system’s boot device.
Identify the system’s boot device.
Note
The Device Tree Versus Device Pathname The terms device tree and device pathname are often interchanged, and you’ll see both used. They both mean the same thing.
OpenBoot deals directly with the hardware devices in the system. Each device has a unique name that represents both the type of device and the location of that device in the device tree. The OpenBoot firmware builds a device tree for all devices from information gathered at the POST. Sun uses the device tree to organize devices that are attached to the system. The device tree is loaded into memory, to be used by the kernel during boot to identify all configured devices. The paths built in the device tree by OpenBoot vary, depending on the type of system and its device configuration. The following example shows a full device pathname for an internal disk on a peripheral component interconnect (PCI) bus system such as an Ultra 5:
/pci@1f,0/pci@1,1/ide@3/disk@0,0
Typically, the OBP uses disk and cdrom for the boot disk and CD-ROM drive.
The following example shows the disk device on an Ultra system with a PCI-SCSI bus and a SCSI target address of 3:
/pci@1f,0/pci@1/scsi@1,1/sd@3,0
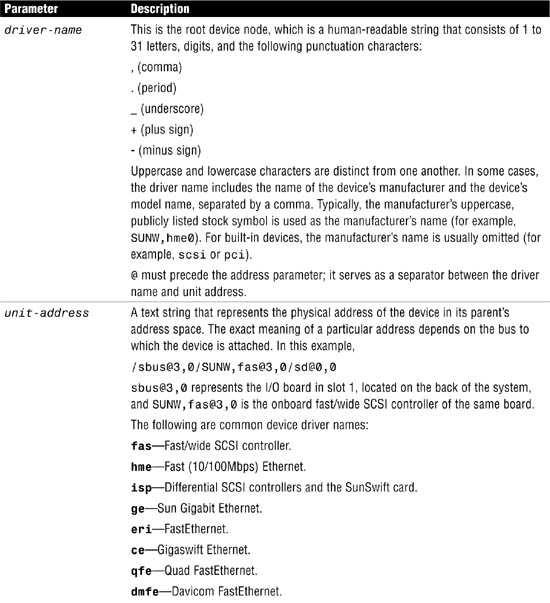
A device tree is a series of node names separated by slashes (/). The top of the device tree is the root device node. Following the root device node, and separated by a leading slash /, is a list of bus devices and controllers. Each device pathname has this form:
driver-name@unit-address:device-arguments
The components of the device pathname are described in Table 3.3.
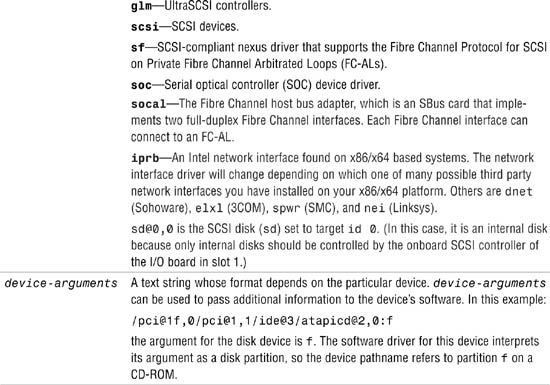
You use the OpenBoot command show-devs to obtain information about the device tree and to display device pathnames. This command displays all the devices known to the system directly beneath a given device in the device hierarchy. show-devs used by itself shows the entire device tree. The syntax is as follows:
ok show-devs
The system outputs the entire device tree, as follows:
Commands that are used to examine the device tree are listed in Table 3.4.

You can examine the device path from a Unix shell prompt by typing the following:
prtconf -p
The system displays the following information:

Objective:
Create and remove custom device aliases.
Device pathnames can be long and complex. Device aliases, like Unix file system aliases, allow you to substitute a short name for a long name. An alias represents an entire device pathname, not a component of it. For example, the alias disk0 might represent the following device pathname:
/pci@1f,0/pci@1,1/ide@3/disk@0,0
OpenBoot provides the predefined device aliases listed in Table 3.5 for commonly used devices, so you rarely need to type a full device pathname. Be aware, however, that device aliases and pathnames can vary on each platform. The device aliases shown in Table 3.5 are from a Sun Ultra 5 system.

If you add disk drives or change the target of the startup drive, you might need to modify these device aliases. Table 3.6 describes the devalias commands, which are used to examine, create, and change OpenBoot aliases.

Note
Don’t Use Existing devalias Names If an alias with the same name already exists, you’ll see two aliases defined: a devalias with the old value and a devalias with the new value. It gets confusing as to which devalias is the current devalias. Therefore, it is recommended that you do not reuse the name of an existing devalias, but choose a new name.
The following example creates a device alias named bootdisk, which represents an Integrated Drive Electronics (IDE) disk with a target ID of 3 on an Ultra 5 system:
devalias bootdisk /pci@1f,0/pci@1,1/ide@3/disk@3,0
To confirm the alias, you type devalias, as follows:
ok devalias
The system responds by printing all the aliases, like this:

You can also view device aliases from a shell prompt by using the prtconf -vp command.
User-defined aliases are lost after a system reset or power cycle unless you create a permanent alias. If you want to create permanent aliases, you can either manually store the devalias command in a portion of NVRAM called NVRAMRC or you can use the nvalias and nvunalias commands. The following section describes how to configure permanent settings in the NVRAM on a Sun system.
Objective:
List, change, and restore default NVRAM parameters.
![]() View and change NVRAM parameters from the shell.
View and change NVRAM parameters from the shell.
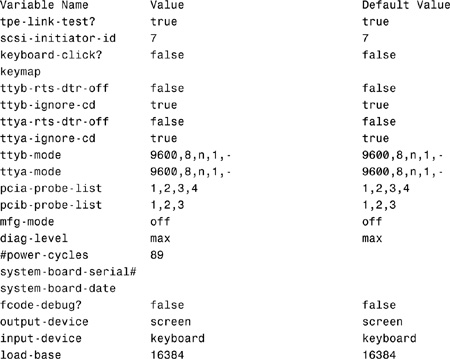
System configuration variables are stored in system NVRAM. These OpenBoot variables determine the startup machine configuration and related communication characteristics. If you modify the values of the configuration variables, any changes you make remain in effect even after a power cycle. Configuration variables should be adjusted cautiously, however, because incorrect settings can prevent a system from booting.
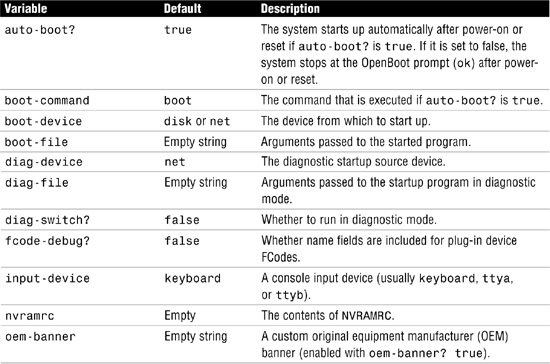
Table 3.7 describes OpenBoot’s NVRAM configuration variables, their default values, and their functions.

Note
OpenBoot Versions Because older SPARC systems use older versions of OpenBoot, they might use different defaults or different configuration variables from those shown in Table 3.7. This text describes OpenBoot version 4.
You can view and change the NVRAM configuration variables by using the commands listed in Table 3.8.

The following examples illustrate the use of the commands described in Table 3.8. All commands are entered at the ok OpenBoot prompt.
You use the printenv command, with no argument, to display the current value and the default value for each variable:
ok printenv
The system responds with this:

Note
The printenv Command Depending on the version of OpenBoot that you have on your system, the printenv command might show slightly different results. This example uses a system running OpenBoot version 3.31.
To set the auto-boot? variable to false, you type the following:
ok setenv auto-boot? false
The system responds with this:
![]()
You can verify the setting by typing the following:
ok printenv auto-boot?
The system responds with this:
![]()
To reset the variable to its default setting, you type the following:
ok set-default auto-boot?
The system does not respond with a message—only another OpenBoot prompt. You can verify the setting by typing the following:
ok printenv auto-boot?
The system responds with this:
![]()
To reset all variables to their default settings, you type the following:
ok set-defaults
The system responds with this:
Setting NVRAM parameters to default values.
It’s possible to set variables from the Unix command line by issuing the eeprom command. You must be logged in as root to issue this command, and although anyone can view a parameter, only root can change the value of a parameter. For example, to set the auto-boot? variable to true, you type the following at the Unix prompt (note the use of quotes to escape the ? from expansion by the shell):
eeprom 'auto-boot?=true'
Any non-root user can view the OpenBoot configuration variables from a Unix prompt by typing the following:
/usr/sbin/eeprom
For example, to change the OpenBoot parameter security-password from the command line, you must be logged in as root and issue the following command:
example# eeprom security-password=
Changing PROM password:
New password:
Retype new password:
Caution
Setting the OpenBoot Security Mode Setting the security mode and password can be dangerous: If you forget the password, the system is unable to boot. It is nearly impossible to break in without sending the CPU to Sun to have the PROM reset. OpenBoot security is discussed more in the section “OpenBoot Security,” later in this chapter.
The security mode password you assign must be between zero and eight characters. Any characters after the eighth are ignored. You do not have to reset the system after you set a password; the security feature takes effect as soon as you type the command.
With no parameters, the eeprom command displays all the OpenBoot configuration settings, similar to the OpenBoot printenv command.
Use the prtconf command with the -vp options to view OpenBoot parameters from the shell prompt as follows:
prtconf -vp
The system responds with a great deal of output, but you’ll see the following OpenBoot information embedded in the output:

Note
Resetting NVRAM Variables On non-USB style keyboards, not USB keyboards, if you change an NVRAM setting on a SPARC system and the system no longer starts up, you can reset the NVRAM variables to their default settings by holding down Stop+N while the machine is powering up. When you issue the Stop+N key sequence, you hold down Stop+N immediately after turning on the power to the SPARC system; you then keep these keys pressed for a few seconds or until you see the banner (if the display is available).
These are both good techniques for forcing a system’s NVRAM variables to a known condition.
You can use the NVRAM commands listed in Table 3.9 to modify device aliases so that they remain permanent, even after a restart.

For example, to permanently create a device alias named bootdisk that represents a SCSI disk with a target ID of 3 on an Ultra 5 system, you type the following:
nvalias bootdisk /pci@1f,0/pci@1,1/ide@3/disk@3,0
Because disk device pathnames can be long and complex, the show-disks command is provided to assist you in creating device aliases. Type the show-disks command and a list of disk devices is shown as follows:
ok show-disks
a) /pci@1f,0/pci@1,1/ide@3/cdrom
b) /pci@1f,0/pci@1,1/ide@3/disk
c) /pci@1f,0/pci@1,1/ebus@1/fdthree@14,3023f0
q) NO SELECTION
Enter Selection, q to quit:
Type b to select an IDE disk and the system responds with the following message:
/pci@1f,0/pci@1,1/ide@3/disk has been selected.
Type ^Y ( Control-Y ) to insert it in the command line.
e.g. ok nvalias mydev ^Y for creating devalias mydev for
/pci@1f,0/pci@1,1/ide@3/disk
Now create a device alias named mydisk followed by ctrl+y as follows:
nvalias mydisk ^Y
The system pastes the selected device path as follows:
ok nvalias mydisk /pci@1f,0/pci@1,1/ide@3/disk
Now all you need to do is add the target number and logical unit number (for example, sd@0,0 or disk@0,0) to the end of the device name as follows:
ok nvalias mydisk /pci@1f,0/pci@1,1/ide@3/disk@0,0
Note
Specifying the Disk Slice If the boot slice of the disk device that you wish to boot to is not slice 0, you will need to add the disk slice letter to the end of the device name as follows:
ok nvalias mydisk /pci@1f,0/pci@1,1/ide@3/disk@0,0:b
In the example, I used the letter “b,” which corresponds to disk slice 1. This is one area where you’ll find disk slices identified by an alpha character and not a number. The letter “a” corresponds to slice 0, “b” is slice 1, etc. If no letter is specified, “a” for slice 0 is assumed. For example, /pci@1f,0/pci@1,1/ide@3/disk@0,0 is the same as specifying /pci@1f,0/pci@1,1/ide@3/disk@0,0:a.
To remove an alias, type nvunalias <aliasname>. For example, to remove the devalias named mydisk, type
ok nvunalias mydisk
The alias named mydisk will no longer be listed after the next OpenBoot reset.
Optionally, you can use nvedit to create your device aliases. On systems with a PROM version of 1.x or 2.x, the nvalias command might not be available and you must use nvedit to create custom device aliases. nvedit is an OpenBoot line editor that edits the NVRAMRC directly, has a set of editing commands, and operates in a temporary buffer. The following is a sample nvedit session:
ok setenv use-nvramrc? true
Tip
Learning nvedit This section is included for information purposes, to show an additional method for modifying the NVRAM. The nvedit line editor will not be covered on the certification exam.
The system responds with the following:
use-nvramrc? = true
ok nvedit
0: devalias bootdisk /pci@1f,0/pci@1,1/ide@3/disk@0,0
1: <Control-C>
ok nvstore
ok reset-all
Resetting ......
ok boot bootdisk
The preceding example uses nvedit to create a permanent device alias named bootdisk. The example uses Ctrl+C to exit the editor. It also uses the nvstore command to make the change permanent in the NVRAMRC. Then, it issues the reset-all command to reset the system and then boots the system from bootdisk by using the boot bootdisk command.
Table 3.10 lists some of the basic commands you can use while in the nvedit line editor.

Anyone who has access to a computer keyboard can access OpenBoot and modify parameters unless you set up the security variables. These variables are listed in Table 3.11.

Caution
Setting the OpenBoot Security Mode It is important to remember your security password and to set it before setting the security mode. If you later forget this password, you cannot use your system; you must call your vendor’s customer support service to make your machine bootable again.
If you are able to get to a Unix prompt as root, you can use the eeprom command to either change the security-mode parameter to none or reset the security password.
To set the security password, you type the password at the ok prompt, as shown in the following:
New password (only first 8 chars are used): <enter password>
Retype new password: <enter password>
Earlier in this chapter you learned how to change the OpenBoot parameter security-password from the command line.
After you assign a password, you can set the security variables that best fit your environment.
You use security-mode to restrict the use of OpenBoot commands. When you assign one of the three values shown in Table 3.12, access to commands is protected by a password. The syntax for setting security-mode is as follows:
setenv security-mode <value>

The following example sets the OpenBoot environment so that all commands except boot and go require a password:
setenv security-mode command
With security-mode set to command, a password is not required if you enter the boot command by itself or if you enter the go command. Any other command requires a password, including the boot command with an argument.
The following are examples of when a password might be required when security-mode is set to command:

Note that with Password, the password is not echoed as it is typed.
If you enter an incorrect security password, there is a delay of about 10 seconds before the next startup prompt appears. The number of times that an incorrect security password can be typed is stored in the security-#badlogins variable, but you should not change this variable.
You can run various hardware diagnostics in OpenBoot to troubleshoot hardware and network problems. The diagnostic commands are listed in Table 3.13.
The following examples use some of the diagnostic features of OpenBoot.
To identify peripheral devices currently connected to the system, such as disks, tape drives, or CD-ROMs, you use OpenBoot probe commands. To identify the various probe commands and their syntax, you use the OpenBoot sifting command, as follows:
sifting probe
The system responds with this:

The OpenBoot sifting command, also called a sifting dump, searches OpenBoot commands to find every command name that contains the specified string.
This first example uses the OpenBoot probe command, probe-scsi, to identify all the SCSI devices attached to a particular SCSI bus:
ok probe-scsi
This command is useful for identifying SCSI target IDs that are already in use or to make sure that all devices are connected and identified by the system. The system responds with this:

Note
OpenBoot probe Commands The most common OpenBoot probe commands are probe-scsi and probe-scsi-all, which are used to obtain a free open SCSI target ID number before adding a tape unit, a CD-ROM drive, a disk drive, or any other SCSI peripheral. Only devices that are powered on will be located, so you need to make sure everything is turned on. You can use this command after installing a SCSI device to ensure that it has been connected properly and that the system can see it. You can also use this command if you suspect a faulty cable or connection. If you have more than one SCSI bus, you use the probe-scsi-all command, but only after a reset-all has been issued; otherwise the system is likely to lock up.
This example uses the probe-ide command to identify all IDE devices connected to the PCI bus:
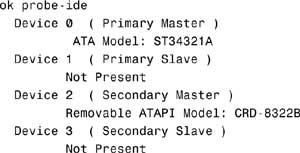
This example tests many of the system components, such as video, the network interface, and the floppy disk:
ok test all
To test the disk drive to determine whether it is functioning properly, you put a formatted, high-density disk into the drive and type the following:
ok test floppy
The system responds with this:
Testing floppy disk system. A formatted disk should be in the drive.
Test succeeded.
You type eject-floppy to remove the disk.
Table 3.14 describes other OpenBoot commands you can use to gather information about the system.

The following example uses the banner command to display the CPU type, the installed RAM, the Ethernet address, the host ID, and the version and date of the startup PROM:
ok banner
The system responds with this:
Sun Ultra 5/10 UPA/PCI (UltraSPARC-IIi 270MHz), No Keyboard
OpenBoot 3.31, 128 MB (60 ns) memory installed, Serial #10642306.
Ethernet address 8:0:20:a2:63:82, Host ID: 80a26382.
This example uses the .version command to display the OpenBoot version and the date of the startup PROM:
ok .version
The system responds with this:
Release 3.31 Version 0 created 2001/07/25 20:36
OBP 3.31.0 2001/07/25 20:36
POST 3.1.0 2000/06/27 13:56
Note
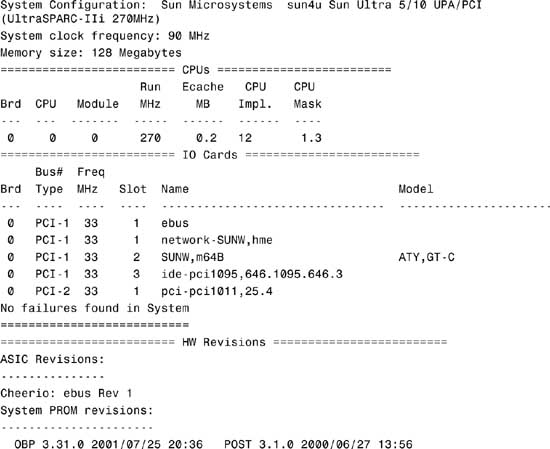
Checking the OpenBoot Version from a Shell Prompt You can display the OpenBoot version from a shell prompt by typing this:
/usr/sbin/prtdiag -v
The system displays the following system diagnostic information and the OpenBoot version is displayed at the end of the output:
This example shows how to use the .enet-addr command to display the Ethernet address:
ok .enet-addr
The system responds with this:
8:0:20:1a:c7:e3
To display the CPU information, type the following:
.speed
The system responds with this:

The console is used as the primary means of communication between OpenBoot and the user. The console consists of an input device that is used for receiving information supplied by the user and an output device that is used for sending information to the user. Typically, the console is either the combination of a text/graphics display device and a keyboard, or an ASCII terminal connected to a serial port.
The configuration variables that are related to the control of the console are listed in Table 3.15.
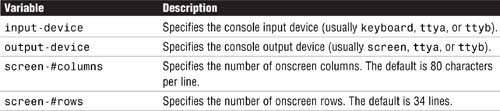
You can use the variables in Table 3.15 to assign the console’s power-on defaults. These values do not take effect until after the next power cycle or system reset.
If you select keyboard for input-device and the device is not plugged in, input is accepted from the ttya port as a fallback device. If the system is powered on and the keyboard is not detected, the system looks to ttya—the serial port—for the system console and uses that port for all input and output.
You can define the communication parameters on the serial port by setting the configuration variables for that port. These variables are shown in Table 3.16.
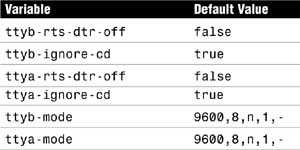
The value for each field of the ttya-mode variable is formatted as follows:
<baud-rate>,<data-bits>,<parity>,<stop-bits>,<handshake>

Before you can run Solaris 10, your version of OpenBoot must meet the minimum firmware level for your system.
Sun Ultra systems must have PROM version 3.25.xx or later to use the Dynamic Host Configuration Protocol (DHCP) network boot, and must be aware of milestones that are used by the Service Management Facility in Solaris 10 and described later in this chapter. For examples in this book, I’m using OpenBoot version 3.31.
On Sun Ultra systems, you can install an updated version of the PROM’s firmware to keep your PROM (and your version of OpenBoot) up-to-date. Updating your PROM is not covered on the exam, but if you would like more information on performing this procedure, visit http://sunsolve.sun.com and search the Sunsolve knowledgebase using the keywords flash prom.
Objective:
Boot the system; access detailed information.
![]() Explain how to perform a system boot.
Explain how to perform a system boot.
Up to this point, this chapter describes the OpenBoot diagnostic utilities, variables, and parameters. At the OpenBoot PROM, the operating system is not yet running. In fact, the OpenBoot PROM will work fine if the operating system is not even loaded. The primary function of the OpenBoot firmware is to start up the system. Starting up is the process of loading and executing a standalone program (for example, the operating system or the diagnostic monitor). In this discussion, the standalone program that is being started is the two-part operating system kernel. After the kernel is loaded, the kernel starts the Unix system, mounts the necessary file systems, and runs /sbin/init to bring the system to the initdefault state that is specified in /etc/inittab. This process is described in the “System Run States” section, later in this chapter.
Starting up can be initiated either automatically or with a command entered at the user interface. On most SPARC-based systems, the bootstrap process consists of the following basic phases:
1. The system hardware is powered on.
2. The system firmware (the PROM) executes a POST. (The form and scope of POSTs depend on the version of the firmware in the system.)
3. After the tests have been completed successfully, the firmware attempts to autoboot if the appropriate OpenBoot configuration variable (auto-boot?) has been set.
The OpenBoot startup process is shown here:
The startup process is controlled by a number of configuration variables, as described in Table 3.19.

Typically, auto-boot? is set to true, boot-command is set to boot, and OpenBoot is not in diagnostic mode. Consequently, the system automatically loads and executes the program and arguments described by boot-file from the device described by boot-device when the system is first turned on or following a system reset.
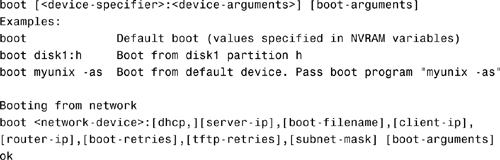
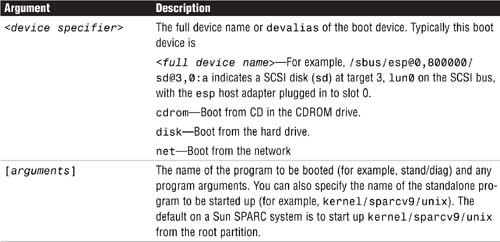
The boot command has the following syntax:
boot <device specifier> [arguments]
All arguments and options are optional.
The boot command and its options are described in Table 3.20.

A noninteractive boot (boot) automatically boots the system by using default values for the boot path. You can initiate a noninteractive boot by typing the following command from the OpenBoot prompt:
ok boot
The system boots without requiring any additional interaction.
An interactive boot (boot -a) stops and asks for input during the boot process. The system provides a dialog box in which it displays the default boot values and gives you the option of changing them. You might want to boot interactively to make a temporary change to the system file or kernel. Booting interactively enables you to test your changes and recover easily if you have problems. To do this, follow the process in Step by Step 3.1.
Tip
The Interactive Boot Process For the exam, you should make sure you understand what each step of an interactive boot process is asking for. For example, you should know the name of the default kernel, know what the default modules are and where they are located, understand what the /etc/system file is used for, and what is meant by the default root file system. Each of these are described in the section “The Kernel,” later in this chapter.
STEP BY STEP
3.1 The Interactive Boot Process
1. At the ok prompt, type boot -a and press Enter. The boot program prompts you interactively.
2. Press Enter to use the default kernel as prompted, or type the name of the kernel to use for booting and then press Enter.
3. Press Enter to use the default modules directory path as prompted, or type the path for the modules directory and then press Enter.
4. Press Enter to use the default /etc/system file as prompted, or type the name of the system file and then press Enter.
Note
A Missing /etc/system File If the /etc/system file is missing at bootup, you see this message:
Warning cannot open system file!
The system still boots, however, using all “default” kernel parameters. Because by default the lines in the /etc/system file are all commented by the asterisk (*) character, /etc/system is actually an “empty” file. The kernel doesn’t use anything from this file until you edit this file and enter an uncommented line. You can specify /dev/null (an empty file) for the system filename, and the system still boots. In fact, if the /etc/system file gets corrupted and the system won’t boot from the /etc/system file, you can specify a file named /dev/null to get the system to boot.
5. Press Enter to use the default root file system type as prompted (that is, ufs for local disk booting or nfs for diskless clients).
6. Press Enter to use the default physical name of the root device as prompted or type the device name.
The following output shows an example of an interactive boot session:

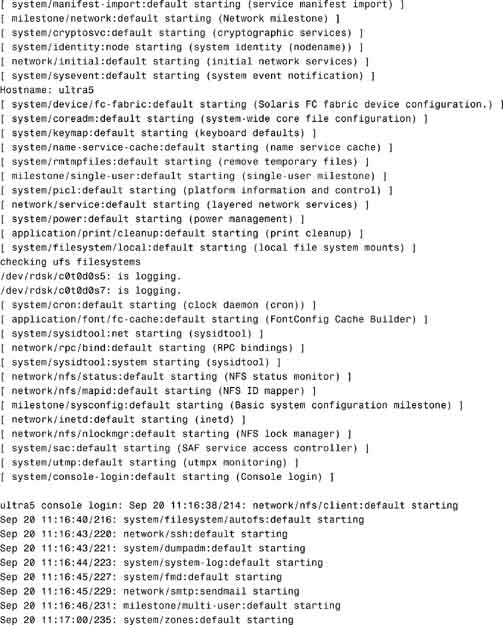
ultra5 console login: ultra5 console login:
If you are not at the system console to watch the boot information, you can use the Unix dmesg command to redisplay information that was displayed during the boot process, or you can view the information in the /var/adm/messages file. The dmesg command displays the contents of a fixed-size buffer. Therefore, if the system has been up for a long time, the initial boot messages may have been overwritten with other kernel log entries.
To view messages displayed during the boot process, you can use one of the following methods:
![]() At a Unix prompt, type
At a Unix prompt, type /usr/sbin/dmesg and press Enter.
Note
Viewing dmesg Output Several pages of information are displayed when you use this method, so I recommend that you pipe the dmesg command to more, as shown here: /usr/sbin/dmesg|more.
![]() At a Unix prompt, type
At a Unix prompt, type more /var/adm/messages and press Enter.
New in Solaris 10 is the concept of services, described in the Service Management Facility (SMF) section of this chapter. With SMF, there are additional tools for viewing system startup messages. Refer to the section on SMF for additional information.
When you specify an explicit device alias, such as disk3, with the boot command, the machine starts up from the specified startup device, using no startup arguments. Here’s an example:
boot disk3
In this case, the system boots from the disk drive defined by the device alias named disk3. It then loads kernel/sparcv9/unix as the default standalone startup program.
Various options affect the behavior of the boot command. You use the following syntax to specify any of the options listed in Table 3.20 with the boot command:
boot [options]
When you specify options with the boot command, the machine starts up from the default startup device. Here’s an example:
boot -a
The -a option instructs the boot command to ask for the name of the standalone program to load. If you specify kernel/sparcv9/unix, which is the default, you are prompted to enter the directory that contains the kernel modules. (See the section “The Kernel,” later in this chapter, for details on kernel modules.)
You can mix options and arguments with the boot command by using the following syntax:
boot [argument]<program filename> - <flags>
When you specify the boot command with an explicit startup device and option, the machine starts up from the specified device using the specified option. Here’s an example:
boot disk3 -a
This gives the same prompts as the previous example, except that you are specifying the boot device and not using the default boot device. The system starts up the bootblock from the disk drive defined by the device alias named disk3.
During the startup process, OpenBoot performs the following tasks:
1. The firmware resets the machine if a client program has been executed since the last reset. The client program is normally an operating system or an operating system’s loader program, but boot can also be used to load and execute other kinds of programs, such as diagnostics programs. For example, if you have just issued the test net command, when you next type boot, the system resets before starting up.
2. The boot program is loaded into memory, using a protocol that depends on the type of selected device. You can start up from disk, CD-ROM, or the network.
3. The loaded boot program is executed. The behavior of the boot program can be controlled by the argument string, if one is passed to the boot command on the command line.
The program that is loaded and executed by the startup process is a secondary boot program, the purpose of which is to load the standalone program. The second-level program is either ufsboot, when you’re starting up from a disk, or inetboot, when you’re starting up from the network.
If you’re starting up from disk, the bootstrap process consists of two conceptually distinct phases: primary startup and secondary startup. The PROM assumes that the program for the primary startup (bootblk) is in the primary bootblock, which resides in sectors 1 through 15 of the startup device. The bootblock is created by using the installboot command. The software installation process typically installs the bootblock for you, so you don’t need to issue this command unless you’re recovering a corrupted bootblock.
To install a bootblock on disk c0t3d0s0, for example, you type the following:
installboot /usr/platform/'uname -i'/lib/fs/ufs/bootblk
/dev/rdsk/c0t3d0s0
You cannot see the bootblock, as it resides outside the file system area. It resides in a protected area of the disk and will not be overwritten by a file system. The program in the bootblock area loads the secondary startup program, ufsboot.
When you’re executing the boot command, if you specify a filename, that filename is the name of the standalone startup program to be loaded. If the pathname is relative (that is, it does not begin with a slash), ufsboot looks for the standalone program in a platform-dependent search path which is /platform/'uname-m' and /platform/'uname -i'.
Note
Determining Your System’s Platform Name You can use the uname -i command to determine your system’s platform name. For example, on a Sun Ultra 5, the path is /platform/SUNW,Ultra-5_10. You use the command uname -m to find the hardware classname of a system; for an Ultra 5, the hardware classname is sun4u.ufsboot will search in both the /platform/'uname-m' and /platform/'uname -i' directories for the kernel files.
On the other hand, if the path to the filename is absolute, boot uses the specified path. The startup program then loads the standalone program and transfers control to it.
The following example shows how to specify the standalone startup program from the OpenBoot ok prompt:
ok boot disk5 kernel/sparcv9/unix -s
In this example, the PROM looks for the primary boot program (bootblk) on disk5 (/pci@1f,0/pci@1,1/ide@3/disk@5,0). The primary startup program then loads /platform/'uname -m'/ufsboot.ufsboot loads the appropriate two-part kernel. The core of the kernel is two pieces of static code called genunix and unix, where genunix is the platform-independent generic kernel file and unix is the platform-specific kernel file. When ufsboot loads these two files into memory, they are combined to form the running kernel. On systems running the 64-bit mode OS, the two-part kernel is located in the directory:
/platform/'uname -m'/kernel/sparcv9
Typical secondary startup programs, such as kernel/sparcv9/unix, accept arguments of the form <filename> -<flags>, where filename is the path to the standalone startup program and -<flags> is a list of options to be passed to the standalone program. The example starts up the operating system kernel, which is described in the next section. The -s flag instructs the kernel to start up in single-user mode.
After the boot command initiates the kernel, the kernel begins several phases of the startup process. The first task is for OpenBoot to load the two-part kernel. The secondary startup program, ufsboot, which is described in the preceding section, loads the operating system kernel. The core of the kernel is two pieces of static code called genunix and unix. genunix is the platform-independent generic kernel file, and unix is the platform-specific kernel file. The platform-specific kernel used by ufsboot for systems running in 64-bit mode is named /platform/'uname -m'/kernel/sparcv9/unix. Solaris 10 (on a SPARC system) only runs on 64-bit systems; however, on an ×86 system, Solaris 10 will run in 32-bit or 64-bit mode, depending on the processor type. On previous versions of Solaris, the 32-bit platform-specific kernel was named /platform/'uname -m'/kernel/unix. Now, in Solaris 10, /platform/'uname -m'/kernel/unix is merely a link to the 64-bit kernel located in the sparcv9 directory. When ufsboot loads genunix and unix into memory, they are combined to form the running kernel.
The kernel initializes itself and begins loading modules, using ufsboot to read the files. After the kernel has loaded enough modules to mount the root file system, it unmaps the ufsboot program and continues, using its own resources. The kernel creates a user process and starts the /sbin/init daemon, which starts other processes by reading the /etc/inittab file. (The /sbin/init process is described in the “System Run States” section, later in this chapter.)
The kernel is dynamically configured in Solaris 10. The kernel consists of a small static core and many dynamically loadable kernel modules. Many kernel modules are loaded automatically at boot time, but for efficiency, others—such as device drivers—are loaded from the disk as needed by the kernel.
A kernel module is a software component that is used to perform a specific task on the system. An example of a loadable kernel module is a device driver that is loaded when the device is accessed. Drivers, file systems, STREAMS modules, and other modules are loaded automatically as they are needed, either at startup or at runtime. This is referred to as autoconfiguration, and the kernel is referred to as a dynamic kernel. After these modules are no longer in use, they can be unloaded. Modules are kept in memory until that memory is needed. This makes more efficient use of memory and allows for simpler modification and tuning.
The modinfo command provides information about the modules that are currently loaded on a system. The modules that make up the kernel typically reside in the directories /kernel and /usr/kernel. Platform-dependent modules reside in the /platform/'uname -m'/kernel and /platform/'uname -i'/kernel directories.
When the kernel is loading, it reads the /etc/system file where system configuration information is stored. This file modifies the kernel’s parameters and treatment of loadable modules. It specifically controls the following:
![]() The search path for default modules to be loaded at boot time as well as the search path for modules not to be loaded at boot time
The search path for default modules to be loaded at boot time as well as the search path for modules not to be loaded at boot time
![]() The modules to be forcibly loaded at boot time rather than at first access
The modules to be forcibly loaded at boot time rather than at first access
![]() The root type and device
The root type and device
![]() The new values to override the default kernel parameter values
The new values to override the default kernel parameter values
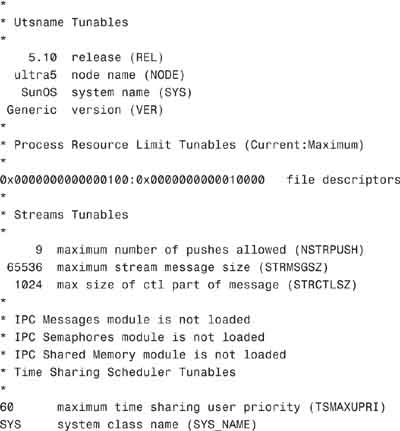
The following is an example of the default /etc/system file:

Caution
Modifying the /etc/system File A system administrator will modify the /etc/system file to modify the kernel’s behavior. By default, the contents of the /etc/system file are completely commented out and the kernel is using all default values. A default kernel is adequate for average system use and you should not modify the /etc/system file unless you are certain of the results. A good practice is to always make a backup copy of any system file you modify, in case the original needs to be restored. Incorrect entries could prevent your system from booting. If a boot process fails because of an unusable /etc/system file, you should boot the system by using the interactive option boot -a. When you are asked to enter the name of the system file, you should enter the name of the backup system filename or /dev/null, to use default parameters.
The /etc/system file contains commands that have this form:
set <parameter>=<value>
For example, the setting for the kernel parameter nfs:nfs4_nra is set in the /etc/system file with the following line:
set nfs:nfs_nra=4
This parameter controls the number of read-ahead operations that are queued by the NFS version 4 client.
Commands that affect loadable modules have this form:
set <module>:<variable>=<value>
Note
Editing the /etc/system File A command must be 80 or fewer characters in length, and a comment line must begin with an asterisk (*) or hash mark (#) and end with a hard return.
For the most part, the Solaris OE is self-adjusting to system load and demands minimal tuning. In some cases, however, tuning is necessary.
If you need to change a tunable parameter in the /etc/system file, you can use the sysdef command or the mdb command to verify the change. sysdef lists all hardware devices, system devices, loadable modules, and the values of selected kernel-tunable parameters. The following is the output that is produced from the sysdef command:


The mdb command is used to view or modify a running kernel and must be used with extreme care. The use of mdb is beyond the scope of this book; however, more information can be obtained from The Solaris Modular Debugger Guide available at http://docs.sun.com.
Note
Kernel Tunable Parameters in Solaris 10 You’ll find in Solaris 10 that many tunable parameters that were previously set in /etc/system have been removed. For example, IPC facilities were previously controlled by kernel tunables, where you had to modify the /etc/system file and reboot the system to change the default values for these facilities. Because the IPC facilities are now controlled by resource controls, their configuration can be modified while the system is running. Many applications that previously required system tuning to function might now run without tuning because of increased defaults and the automatic allocation of resources.
Configuring the kernel and tunable parameters is a complex topic to describe in a few sections of a chapter. This introduction to the concept provides enough information for the average system administrator and describes the topics you’ll need to know for the exam. If you are interested in learning more about the kernel and tunable parameters, refer to the additional sources of information described at the end of this chapter.
Objective:
The init phase has undergone major changes in Solaris 10. Even if you are experienced on previous versions of Solaris OE, this section introduces the svc.startd daemon and the Service Management Facility (SMF), which are new in Solaris 10 and will be tested heavily on the exam.
After control of the system is passed to the kernel, the system begins the last stage of the boot process—the init stage. In this phase of the boot process, the init daemon (/sbin/init) reads the /etc/default/init file to set any environment variables for the shell that init invokes. By default, the CMASK and TZ variables are set. These values get passed to any processes that init starts. Then, init reads the /etc/inittab file and executes any process entries that have sysinit in the action field so that any special initializations can take place before users log in.
After reading the /etc/inittab file, init starts the svc.startd daemon, which is responsible for starting and stopping other system services such as mounting file systems and configuring network devices. In addition, svc.startd will execute legacy run control (rc) scripts, which are described later in this section.
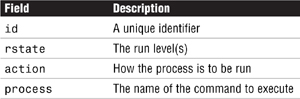
The /sbin/init command sets up the system based on the directions in /etc/inittab. Each entry in the /etc/inittab file has the following fields:
id:runlevel:action:process
Table 3.23 provides a description of each field.
Valid action keywords are listed in Table 3.24:

The following example shows a default /etc/inittab file:

The init process performs the following tasks based on the entries found in the default /etc/inittab file:
Line 1. Initializes the STREAMS modules used for communication services.
Line 2. Configures the socket transport providers for network connections.
Line 3. Initializes the svc.startd daemon for SMF.
Line 4. Describes the action to take when the init daemon receives a power fail shutdown signal.
Objective:
Explain the Service Management Facility and the phases of the boot process.
![]() Use Service Management Facility or legacy commands and scripts to control both the boot and shutdown procedures.
Use Service Management Facility or legacy commands and scripts to control both the boot and shutdown procedures.
In Solaris 10, the svc.startd daemon replaces the init process as the master process starter and restarter. Where in previous versions of Solaris, init would start all processes and bring the system to the appropriate “run level” or “init state.” Now SMF, or more specifically, the svc.startd daemon, assumes the role of starting system services.
Note
SMF Services A service can be described as an entity that provides a resource or list of capabilities to applications and other services. This entity can be running locally or remote, but at this phase of the boot process, the service is running locally. A service does not have to be a process; it can be the software state of a device or a mounted file system. Also, a system can have more than one instance of a service, such as with multiple network interfaces, multiple mounted file systems, or a set of other services.
The advantages of using SMF to manage system services over the traditional Unix startup scripts that, in the past, were run by the init process are
![]() SMF automatically restarts failed services in the correct order, whether they failed as the result of administrator error, software bug, or were affected by an uncorrectable hardware error. The restart order is defined by dependency statements within the SMF facility.
SMF automatically restarts failed services in the correct order, whether they failed as the result of administrator error, software bug, or were affected by an uncorrectable hardware error. The restart order is defined by dependency statements within the SMF facility.
![]() The system administrator can view and manage services as well as view the relationships between services and processes.
The system administrator can view and manage services as well as view the relationships between services and processes.
![]() Allows the system administrator to back up, restore, and undo changes to services by taking automatic snapshots of service configurations.
Allows the system administrator to back up, restore, and undo changes to services by taking automatic snapshots of service configurations.
![]() Allows the system administrator to interrogate services and determine why a service may not be running.
Allows the system administrator to interrogate services and determine why a service may not be running.
![]() Allows services to be enabled and disabled either temporarily or permanently.
Allows services to be enabled and disabled either temporarily or permanently.
![]() Allows the system administrator to delegate tasks to non-root users, giving these users the ability to modify, enable, disable, or restart system services.
Allows the system administrator to delegate tasks to non-root users, giving these users the ability to modify, enable, disable, or restart system services.
![]() Large systems boot and shutdown faster because services are started and stopped in parallel according to dependencies setup in the SMF.
Large systems boot and shutdown faster because services are started and stopped in parallel according to dependencies setup in the SMF.
![]() Allows customization of output sent to the boot console to be either be as quiet as possible, which is the default, or to be verbose by using
Allows customization of output sent to the boot console to be either be as quiet as possible, which is the default, or to be verbose by using boot -m verbose from the OpenBoot prompt.
![]() Provides compatibility with legacy RC scripts.
Provides compatibility with legacy RC scripts.
Those of you who have experience on previous versions of Solaris will notice a few differences immediately:
![]() The boot process creates fewer messages. All of the information that was provided by the boot messages in previous versions of Solaris is located in the
The boot process creates fewer messages. All of the information that was provided by the boot messages in previous versions of Solaris is located in the /var/svc/log directory. You still have the option of booting the system with the boot -v option, which provides more verbose boot messages.
![]() Because SMF is able to start services in parallel, the boot time is substantially quicker than in previous versions of Solaris.
Because SMF is able to start services in parallel, the boot time is substantially quicker than in previous versions of Solaris.
![]() Since services are automatically restarted if possible, it may seem that a process refuses to die. The
Since services are automatically restarted if possible, it may seem that a process refuses to die. The svcadm command should be used to disable any SMF service that should not be running.
![]() Many of the scripts in
Many of the scripts in /etc/init.d and /etc/rc*.d have been removed, as well as entries in the /etc/inittab file so that the services can be administered using SMF. You’ll still find a few RC scripts that still remain in the /etc/init.d directory such as sendmail, nfs.server, and dhcp, but most of these legacy RC scripts simply execute the svcadm command to start the services through the SMF. Scripts and inittab entries that may still exist from legacy applications or are locally developed will continue to run. The legacy services are started after the SMF services so that service dependencies do not become a problem.
The service instance is the fundamental unit of administration in the SMF framework, and each SMF service has the potential to have multiple versions of it configured. A service instance is either enabled or disabled with the svcadm command described later in this chapter. An instance is a specific configuration of a service, and multiple instances of the same service can run in the same Solaris instance. For example, a web server is a service. A specific web server daemon that is configured to listen on port 80 is an instance. Another instance of the web server service could have different configuration requirements listening on port 8080. The service has system-wide configuration requirements, but each instance can override specific requirements, as needed.
Services are represented in the SMF framework as service instance objects, which are children of service objects. These instance objects can inherit or override the configuration settings of the parent service object. Multiple instances of a single service are managed as child objects of the service object.
Services are not just the representation for standard long-running system services such as httpd or nfsd. Services also represent varied system entities that include third-party applications such as Oracle software. In addition, a service can include less traditional entities such as the following:
![]() A physical network device
A physical network device
![]() A configured IP address
A configured IP address
![]() Kernel configuration information
Kernel configuration information
The services started by svc.startd are referred to as milestones. The milestone concept replaces the traditional run levels that were used in previous versions of Solaris. A milestone is a special type of service that represents a group of services. A milestone is made up of several SMF services. For example, the services that instituted run levels S, 2, and 3 in previous version of Solaris are now represented by milestone services named:
milestone/single-user (equivalent to run level S)
milestone/multi-user (equivalent to run level 2)
milestone/multi-user-server (equivalent to run level 3)
Other milestones that are available in the Solaris 10 OE are
milestone/name-services
milestone/devices
milestone/network
milestone/sysconfig
An SMF manifest is an XML (Extensible Markup Language) file that contains a complete set of properties that are associated with a service or a service instance. The properties are stored in files and subdirectories located in /var/svc/manifest. Manifests should not be edited directly to modify the properties of a service. The service configuration repository is the authoritative source of the service configuration information, and the service configuration repository can only be manipulated or queried using SMF interfaces, which are command-line utilities described later in this section.
Each service instance is named with a Fault Management Resource Identifier or FMRI. The FMRI includes the service name and the instance name. For example, the FMRI for the ftp service is svc:/network/ftp:default, where network/ftp identifies the service and default identifies the service instance.
You may see various forms of the FMRI that all refer to the same service instance, as follows:
svc://localhost/network/inetd:default
svc:/network/inetd:default
network/inetd:default
An FMRI for a legacy service will have the following format:
lrc:/etc/rc3_d/S90samba
where the lrc (legacy run control) prefix indicates that the service is not managed by SMF. The pathname /etc/rc3_d refers to the directory where the legacy script is located, and S90samba is the name of the run control script. See the section titled “Using the Run Control Scripts to Stop or Start Services” later in this chapter for information on run control scripts.
The service names will include a general functional category which include the following:
![]() Application
Application
![]() Device
Device
![]() Milestone
Milestone
![]() Network
Network
![]() Platform
Platform
![]() Site
Site
![]() System
System
In earlier versions of Solaris, processes were started at bootup by their respective shell scripts, which ran in a pre-determined sequence. Sometimes, one of these shell scripts failed for various reasons. Perhaps it was an error in the script or one of the daemons did not start for various reasons. When a script failed, the other scripts were started regardless, and sometimes these scripts failed because a previous process failed to start. Tracking the problem down was difficult for the system administrator.
To remedy the problem with sequencing scripts, Sun uses the SMF to manage the starting and stopping of services. The SMF understands the dependencies that some services have on other services. With SMF, if a service managed by the SMF fails or is terminated, all dependent processes will be taken offline until the required process is restarted. The interdependency is started by means of a service contract, which is maintained by the kernel and is where the process interdependency, the restarter process, and the startup methods are all described.
Most service instances have dependencies on other services or files. Those dependencies control when the service is started and automatically stopped. When the dependencies of an enabled service are not satisfied, the service is kept in the offline state. When the service instance dependencies are satisfied, the service is started or restarted by the svc.startd daemon. If the start is successful, the service is transitioned to the online state. There are four types of service instance dependencies listed below.
![]()
require_allThe dependency is satisfied when all cited services are running (online or degraded), or when all indicated files are present.
![]()
require_any—The dependency is satisfied when one of the cited services is running (online or degraded), or when at least one of the indicated files is present.
![]()
optional_all—The dependency is satisfied when all of the cited services are running (online or degraded), disabled, in the maintenance state, or when cited services are not present. For files, this type is the same as require_all.
![]()
exclude_all—The dependency is satisfied when all of the cited services are disabled, in the maintenance state, or when cited services or files are not present.
Each service or service instance must define a set of methods that start, stop, and optionally refresh the service. These methods can be listed and modified for each service using the svccfg command described later in this chapter.
A service instance is satisfied and started when its criteria, for the type of dependency, are met. Dependencies are satisfied when cited services move to the online state. Once running (online or degraded), if a service instance with a require_all, require_any, or optional_all dependency is stopped or refreshed, the SMF considers why the service was stopped and uses the restart_on attribute of the dependency to decide whether to stop the service. restart_on attributes are defined in Table 3.25

A service is considered to have stopped due to an error if the service has encountered a hardware error or a software error such as a core dump. For exclude_all dependencies, the service is stopped if the cited service is started and the restart_on attribute is not none.
You can use the svcs command, described later in this chapter, to view service instance dependencies and to troubleshoot failures. You’ll also see how to use the svccfg command to modify service dependencies.
The SMF provides a set of command-line utilities used to administer and configure the SMF. Table 3.26 describes these utilities.

To report the status of all enabled service instances and get a list of the various services that are running, use the svcs command with no options as follows:
svcs | more
The svcs command obtains information about all service instances from the service configuration repository and displays the state, start time, and FMRI of each service instance as follows:
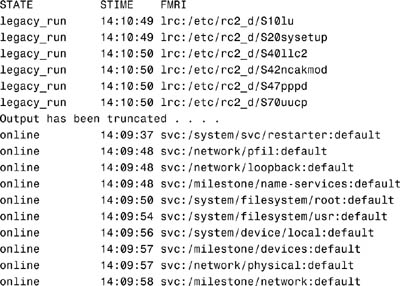
Note
Listing Legacy Services You’ll notice that the list includes legacy scripts that were used to start up processes. Legacy services can be viewed, but cannot be administered with SMF.
The state of each service is one of the following:
![]()
degraded—The service instance is enabled, but is running at a limited capacity.
![]()
disabled—The service instance is not enabled and is not running.
![]()
legacy_run—The legacy service is not managed by SMF, but the service can be observed. This state is only used by legacy services that are started with RC scripts.
![]()
maintenance—The service instance has encountered an error that must be resolved by the administrator.
![]()
offline—The service instance is enabled, but the service is not yet running or available to run.
![]()
online—The service instance is enabled and has successfully started.
![]()
uninitialized—This state is the initial state for all services before their configuration has been read.
Running the svcs command without options will display the status of all enabled services. Use the -a option to list all services, including disabled services as follows:
svcs -a
The result is a listing of all services as follows:
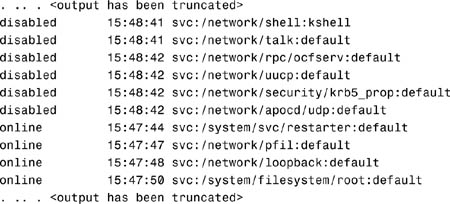
To display information on selected services, you can supply the FMRI as an argument to the svcs command as follows:
svcs -l network
With the -l option, the system displays detailed information about the network service instance. The network FMRI specified in the previous example is a general functional category and is also called the network milestone. The information displayed by the previous command is as follows:

Use the -d option to view which services are started at the network:default milestone, as follows:
svcs -d milestone/network:default
The system displays
![]()
Another milestone is the multi-user milestone, which is displayed as follows:
svcs -d milestone/multi-user
The system displays all of the services started at the multi-user milestone:
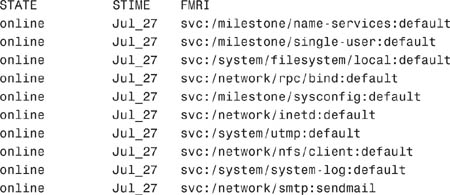
Many of these services have their own dependencies, services that must be started before they get started. We refer to these as sub-dependencies. For example, one of the services listed is the svc:/network/inetd:default service. A listing of the sub-dependencies for this service can be obtained by typing
svcs -d network/inetd
The system displays the following dependencies:
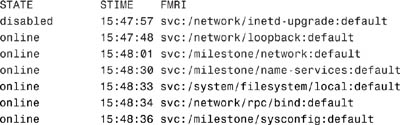
The -d option, in the previous example, lists the services or service instances upon which the multi-user service instance is dependent. These are the services that must be running before the multi-user milestone is reached. The -D option shows which other services depend on the milestone/multi-user service as follows:
svcs -D milestone/multi-user
The system displays the following output indicating that the dhcp-server and multi-user-server services are dependent on the multi-user service:
![]()
To view processes associated with a service instance, use the -p option as follows:
svcs -p svc:/network/inetd:default
The system displays processes associated with the svc:/network/inetd:default service. In this case, information about the inetd process is shown as follows:
![]()
Viewing processes using svcs -p instead of the traditional ps command makes it easier to track all of the processes associated with a particular service.
If a service fails for some reason and cannot be restarted, you can list the service using the -x option as follows:
svcs -x
The system will display:
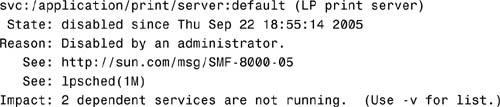
The example shows that the LP print service has not started and provides an explanation that the service has not been enabled.
To disable services in previous versions of Solaris, the system administrator had to search out and rename the relevant RC script(s) or comment out statements in a configuration file such as modifying the inetd.conf file when disabling ftp.
SMF makes it much easier to locate services and their dependencies. To start a particular service using SMF, the service instance must be enabled using the svcadm enable command. By enabling a service, the status change is recorded in the service configuration repository. The enabled state will persist across reboots as long as the service dependencies are met. The following example demonstrates how to use the svcadm command to enable the ftp server:
svcadm enable network/ftp:default
To disable the ftp service, use the disable option as follows:
svcadm disable network/ftp:default
To verify the status of the service, type
svcs network/ftp
The system displays the following:
![]()
The svcadm command allows the following subcommands:
![]()
Enable—Enables the service instances.
![]()
Disable—Disables the service instances.
![]()
Restart—Requests that the service instances be restarted.
![]()
Refresh—For each service instance specified, refresh requests that the assigned restarter update the service’s running configuration snapshot with the values from the current configuration. Some of these values take effect immediately (for example, dependency changes). Other values do not take effect until the next service restart.
![]()
Clear—For each service instance specified, if the instance is in the maintenance state, signal to the assigned restarter that the service has been repaired. If the instance is in the degraded state, request that the assigned restarter take the service to the online state.
The svcadm command can also be used to change milestones. In the following step by step, I’ll use the svcadm command to determine my current system state (milestone) and then change the system default milestone to single-user.
STEP BY STEP
3.2 Changing Milestones
1. First, check to see what the default milestone is set to for your system by using the svcprop command. This command will retrieve the SMF service configuration properties for my system
# svcprop restarter|grep milestone
The system responds with the following, indicating that my system is set to boot to the multi-user milestone by default:
options/milestone astring svc:/milestone/multi-user:default
2. I’ll check to see which milestone the system is currently running at:
svcs | grep milestone
The system responds with
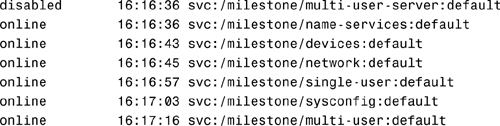
From the output, I see that multi-user-server is not running, but multi-user is running.
3. To start the transition to the single-user milestone, type
svcadm milestone single-user
The system responds with the following, prompting for the root password and finally entering single-user mode:
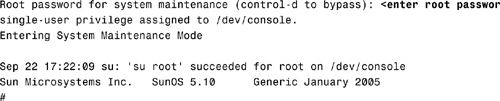
4. Verify the current milestone with the following command:
svcs -a | grep milestone
The system responds with:

The output indicates that the multi-user and multi-user-server milestones are disabled, and the single-user milestone is the only milestone that is currently online.
5. Finally, I’ll bring the system backup to the multi-user-server milestone:
svcadm milestone milestone/multi-user-server:default
Issuing the svcs command again shows that the multi-user-server milestone is back online:

At bootup, svc.startd retrieves the information in the service configuration repository and starts services when their dependencies are met. The daemon is also responsible for restarting services that have failed and for shutting down services whose dependencies are no longer satisfied.
In the following example, users cannot telnet into the server, so I check on the telnet service using the svcs -x command as follows:
svcs -x telnet
The results show that the service is not running:

I’ll enable the service using the svcadm command as follows:
svcadm enable svc:/network/telnet:default
After enabling the service, check the status using the svcs command as follows:
# svcs -x telnet
The system responds with:

Also, if a service that has been running but stops, try restarting the service using the svcadm restart command as follows:
svcadm restart svc:/network/telnet:default
Under SMF, the boot process is much quieter than previous versions of Solaris. This was done to reduce the amount of uninformative “chatter” that might obscure any real problems that might occur during boot.
Some new boot options have been added to control the verbosity of boot. One that you may find particularly useful is -m verbose, which prints a line of information when each service attempts to start up. This is similar to previous versions of Solaris where the boot messages were more verbose.
You can also boot the system using one of the milestones as follows:
boot -m milestone=single-user
The system will boot into single-user mode where only the basic services are started as shown when the svcs command is used to display services.

This method of booting is slightly different than using the boot -s command. When the system is explicitly booted to a milestone, exiting the console administrative shell will not transition the system to multi-user mode, as boot -s does. To move to multi-user mode after boot -m milestone=single-user, use the following command:
svcadm milestone milestone/multi-user-server:default
The milestones that can be specified at boot time are
![]() none
none
![]() single-user
single-user
![]() multi-user
multi-user
![]() multi-user-server
multi-user-server
![]() all
all
If you boot a system using one of the milestones and you do not include the -s option, the system will stay in the milestone state that you booted the system in. The system will not go into multi-user state automatically when you press Ctrl+D. You can however, get into the multi-user state by using the following command and all services will be restored:
svcadm milestone all
To boot the system without any milestones, type
boot -m milestone=none
The boot command instructs the svc.startd daemon to temporarily disable all services except for the master restarter named svc:/system/svc/restarter:default and start sulogin on the console. The “none” milestone can be very useful in troubleshooting systems that have failures early in the boot process.
To bring the system back down to single-user mode from multi-user mode, type
svcadm milestone milestone/single-user
The -d option can be used with the previous example to cause svcadm to make the given milestone the default boot milestone, which persists across reboots. This would be the equivalent of setting the default run level in the /etc/inittab file on previous versions of Solaris.
Other options that can be used with svcadm include
![]()
-r—Enables each service instance and recursively enables its dependencies.
![]()
-s—Enables each service instance and then waits for each service instance to enter the online or degraded state. svcadm will return early if it determines that the service cannot reach these states without administrator intervention.
![]()
-t—Temporarily enables or disables each service instance. Temporary enable or disable only lasts until reboot.
In addition to the system logging methods described earlier in this chapter, each service has a log file in the /var/svc/log directory (or the /etc/svc/volatile directory, for services started before the single-user milestone) indicating when and how the system was started, whether it started successfully, and any messages it may have printed during its initialization. If a severe problem occurs during boot, you will be able to log in on the console in maintenance mode, and you can use the svcs command to help diagnose the problem, even on problems which would have caused boot to hang. Finally, the new boot -m boot option allows the system administrator to configure the boot process to be more verbose, printing a simple message when each service starts.
Objective:
Use Service Management Facility or legacy commands and scripts to control both the boot and shutdown procedures.
As you customize your system, you’ll create custom scripts to start and stop processes or services on your system. The correct procedure for incorporating these scripts into the SMF is as follows:
![]() Determine the process for starting and stopping your service.
Determine the process for starting and stopping your service.
![]() Establish a name for the service and the category this service falls into.
Establish a name for the service and the category this service falls into.
![]() Determine whether your service runs multiple instances.
Determine whether your service runs multiple instances.
![]() Identify any dependency relationships between this service and any other services. Practically every service has a dependency so that the service does not startup too soon in the boot process.
Identify any dependency relationships between this service and any other services. Practically every service has a dependency so that the service does not startup too soon in the boot process.
![]() If a script is required to start and stop the process, create the script and place it in a local directory such as
If a script is required to start and stop the process, create the script and place it in a local directory such as /lib/svc/method.
![]() Create a service manifest file for your service in the
Create a service manifest file for your service in the /var/svc/manifest/site directory. This XML file describes the service and any dependency relationships. Service manifests are incorporated into the repository either by using the svccfg command or at boot time. See the service_bundle(4) manual page for a description of the contents of the SMF manifests.
![]() Incorporate the script into the SMF using the
Incorporate the script into the SMF using the svccfg utility.
The following step by step describes the process of setting up and enabling an existing service instance.
STEP BY STEP
3.3 Enable the NFS Server Service
In the following example, I’ll configure SMF to share the NFS resources on an NFS server.
1. Log in as root or use a role that includes the Service Management rights profile.
2. The NFS server services are not running as displayed by the following svcs command:
svcs -a| grep -i nfs
The system displays the following information about the NFS services:
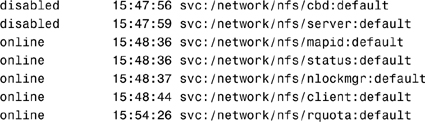
Notice that svc:/network/nfs/server:default is disabled.
3. Set up the required NFS configuration file on the server. To share a file system named /data, I need to configure the /etc/dfs/dfstab file as described in Chapter 9. I add the following line to the NFS server configuration file:
share -F nfs -o rw /data
4. Enable the NFS service as follows:
svcadm enable svc:/network/nfs/server
5. Verify that the NFS server service is running by typing:
svcs -a | grep -i nfs
The system displays the following information:
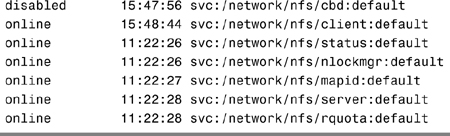
This next step by step describes how to create a new service and incorporate it into the SMF. Taking the time to convert your existing RC scripts to SMF allows them to take advantage of automated restart capabilities that could be caused by hardware failure, unexpected service failure, or administrative error. Participation in the service management facility also brings enhanced visibility with svcs (as well as future-planned GUI tools) and ease of management with svcadm and other Solaris management tools. The task requires the creation of a short XML file and making a few simple modifications to the service RC script. The following step by step will take you through the process.
STEP BY STEP
3.4 Converting an RC Script to SMF
Before I start, I’ll take an existing legacy RC script and place it under SMF control as a service. This script is named /etc/init.d/legacy and has the following entries:

I’ll move this script to /lib/svc/method/legacyservice.
The most complex part of this procedure is writing the SMF manifest in XML. Currently, these manifests need to be created with an editor, but in the future, expect a GUI-based tool to aid in the creation of the manifest file. The service_bundle(4) man page describes this XML-based file, but you need to be familiar with the XML programming language, and that is beyond the scope of this book. Here’s a copy of my manifest for the service we are going to implement; I named it /var/svc/manifest/site/legacyservice, and I’ll describe the contents of the file in this section.
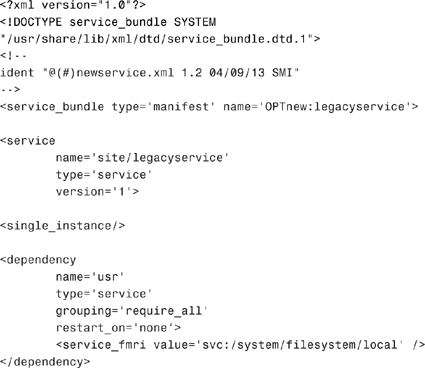
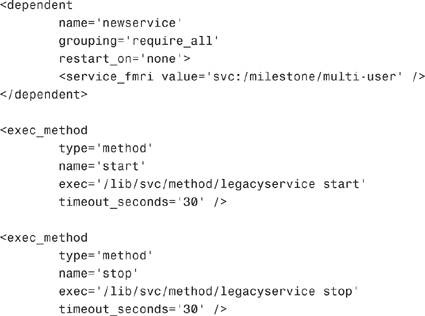
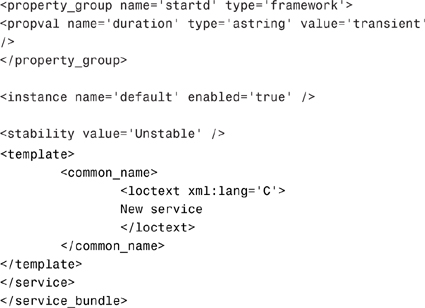
Now let’s take a closer look at the XML-based manifest file and the steps I took to create it.
1. My file starts out with a standard header. After the header, I specify the name of the service, the type of service, the package providing the service, and the service name as follows:

2. I specify the service category, type, name, and version. These categories aren’t used by the system, but help the administrator in identifying the general use of the service. These categories types are
application—Higher level applications, such as apache
milestone—Collections of other services, such as name-services
platform—Platform-specific services, such as Dynamic Reconfiguration daemons
system—Solaris system services, such as coreadm
device—Device-specific services
network—Network/Internet services, such as protocols
site—Site specific descriptions
The service name describes what is being provided, and includes both any category identifier and the actual service name, separated by ‘/’. Service names should identify the service being provided. In this example, the entry I’ll make to my manifest file is as follows:
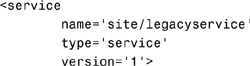
3. Identify whether your service will have multiple instances. The instance name describes any specific features about the instance. Most services deliver a “default” instance. Some (such as Oracle) may want to create instances based on administrative configuration choices. This service will have a single instance, so I’ll make the following entry in the manifest:
<single_instance />
4. Define any dependencies for this service. I added the following entry to the manifest:
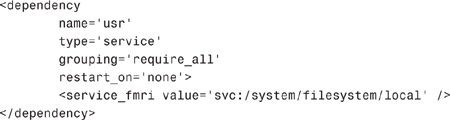
The first entry states that the legacyservice requires the filesystem/local service.
5. We now need to identify dependents. If I want to make sure that my service is associated with the multi-user milestone and that the multi-user milestone requires this service, I add the following entry to the manifest:
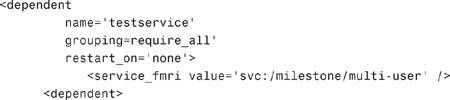
By having the ability to identify dependents, I’m able to deliver a service that is a dependency of another service (milestone/multi-user) which I don’t deliver. I can specify this in my legacyservice manifest without modifying the milestone/multi-user manifest, which I don’t own. It’s an easy way to have a service run before a Solaris default service.
If all the dependent services have not been converted to SMF, you’ll need to convert those too, as there is no way to specify a dependent on a legacy script.
To avoid conflicts, it is recommended that you preface the dependent name with the name of your service. For example, if you’re delivering a service (legacyservice) that must start before syslog, use the following entry:
![]()
6. Specify how the service will be started and stopped. SMF interacts with your service primarily by its methods. The stop and start methods must be provided for services managed by svc.startd, and can either directly invoke a service binary or a script which handles care of more complex setup. The refresh method is optional for svc.startd managed services. I’ll use the following start and stop methods:

Timeouts must be provided for all methods. The timeout should be defined to be the maximum amount of time in seconds that your method might take to run on a slow system or under heavy load. A method which exceeds its timeout will be killed. If the method could potentially take an unbounded amount of time, such as a large file system fsck, an infinite timeout may be specified as ‘0’.
7. Identify the service model—will it be started by inetd or svc.startd? My service will be started by svc.startd. svc.startd provides three models of service, which are
Transient services—These are often configuration services, which require no long-running processes to provide service. Common transient services take care of boot-time cleanup or load configuration properties into the kernel. Transient services are also sometimes used to overcome difficulties in conforming to the method requirements for contract or wait services. This is not recommended and should be considered a stopgap measure.
Wait services—These services run for the lifetime of the child process, and are restarted when that process exits.
Contract services—These are the standard system daemons. They require processes which run forever once started to provide service. Death of all processes in a contract service is considered a service error, which will cause the service to restart.
The default service model is contract, but may be modified. For this example, I’m going to start the service with svc.startd. As a transient service, it will be started once and not restarted by adding the following lines to the manifest:

8. The next step is to create the instance name for the service by making the following entry:
<instance name='default' enabled='true' />
9. Finally, create template information to describe the service providing concise detail about the service. I’ll assign a common name in the C locale. The common name should
Be short (40 characters or less)
Avoid capital letters aside from trademarks like Solaris
Avoid the word service (but do distinguish between client and server)
I make the following entry in the manifest to describe my service as “New service”:
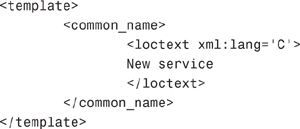
10. Once the manifest is complete, is a good idea to verify the syntax using the xmllint program as follows:
xmllint --valid /var/svc/manifest/site/legacyservice
The xmllint program will parse the XML file and identify any errors in the code before you try to import it into SMF. The scvcfg program also can validate your file as follows, but the output is not as verbose as the xmllint command:
svccfg validate /var/svc/manifest/site/legacyservice
11. Once you’ve validated the syntax of your XML file, the new service needs to be imported in SMF by issuing the svccfg command as follows:
svccfg import /var/svc/manifest/site/legacyservice
12. The service should now be visible using the svcs command as follows:
![]()
13. You can also see which services the legacyservice depends on by using the svcs -d command as follows:
![]()
14. As a final step, enable the service using the svcadm command as follows:
![]()
15. At any time, I can view the properties of a service using the svccfg command as follows:
svccfg -v -s legacyservice
The system responds with the following prompt:
svc:/site/legacyservice>
Use the listprop subcommand at the svccfg prompt to list the service properties:
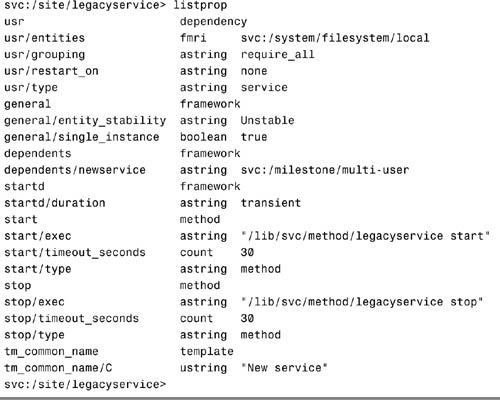
Objective:
Use Service Management Facility or legacy commands and scripts to control both the boot and shutdown procedures.
Solaris 10 still supports legacy RC scripts referred to as legacy services, but you will notice that the /etc/inittab file used by the init daemon has been significantly reduced. In addition, RC scripts that were located in the /etc/init.d directory and linked to the /etc/rc#.d directory have also been reduced substantially. For many of the scripts that remain, simply run the svcadm command to start the appropriate service.
SMF-managed services no longer use RC scripts or /etc/inittab entries for startup and shutdown, so the scripts corresponding to those services have been removed. In future releases of Solaris, more services will be managed by SMF, and these directories will become less and less populated. RC scripts and /etc/inittab entries that manage third-party–provided or locally developed services will continue to be run at boot. These services may not run at exactly the same point in boot as they had before the advent of SMF, but they are guaranteed to not run any earlier—any services which they had implicitly depended on will still be available.
For those readers who are experienced on Solaris versions prior to Solaris 10, you are accustomed to starting and stopping services via rc scripts. For instance, to stop and start the sshd daemon, you would type:
/etc/init.d/sshd stop
/etc/init.d/sshd start
In SMF, the correct procedure to start sshd is to type
svcadm enable -t network/ssh:default
To temporarily stop sshd, you would type
svcadm disable -t network/ssh:default
Or simply type
svcadm restart network/ssh:default
to stop and restart the sshd daemon.
Prior to Solaris 10, to send a HUP signal to the ssh daemon, we would have typed
kill -HUP 'cat /var/run/sshd.pid'
In Solaris 10, the correct procedure is to type
svcadm refresh network/ssh:default
Although it is recommended that you use SMF to start and stop services as described in the previous section, “Creating New Service Scripts,” functionality still exists to allow the use of run control scripts to start and stop system services at various run levels. Run control scripts were used in previous versions of Solaris to start and stop system services before SMF was introduced.
A run level is a system state (run state), represented by a number or letter that identifies the services and resources that are currently available to users. The who -r command can still be used to identify a systems run state as follows:
who -r
The system responds with the following indicating that run-level 3 is the current run state:
![]()
Since the introduction of SMF in Solaris 10, we now refer to these run states as milestones, and Table 3.26 describes how the legacy run states coincide with the Solaris 10 milestones.
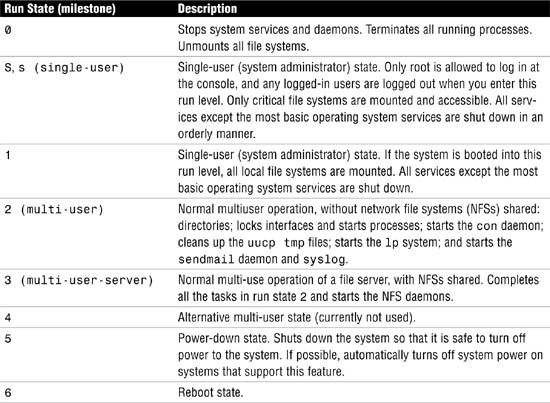
To support legacy applications that still use them, run control scripts have been carried over from Solaris 9. With run control scripts, each init state (milestone) has a corresponding series of run control scripts—which are referred to as rc scripts and are located in the /sbin directory—to control each run state. These rc scripts are as follows:
Note
Run Control Scripts Solaris startup scripts can be identified by their rc prefix or suffix, which means run control.
You can still use the init command to transition to between the various run states. The init daemon will simply pass the required run state to the svc.startd daemon for execution.
The SMF will execute the /sbin/rc<n> scripts, which in turn execute a series of other scripts that are located in the /etc directory. For each rc script in the /sbin directory, a corresponding directory named /etc/rc<n>.d contains scripts to perform various actions for that run state. For example, /etc/rc3.d contains files that are used to start and stop processes for run state 3.
The /etc/rc<n>.d scripts are always run in ASCII sort order shown by the ls command and have names of this form:
[K,S][#][filename]
A file that begins with K is referred to as a stop script and is run to terminate (kill) a system process. A file that begins with S is referred to as a start script and is run to start a system process. Each of these start and stop scripts is called by the appropriate /sbin/rc# script. For example, the /sbin/rc0 script runs the scripts located in the /etc/rc0.d directory. The /sbin/rc# script will pass the argument start or stop to each script, based on their prefix and whether the name ends in .sh. There are no arguments passed to scripts that end in .sh.
All run control scripts are also located in the /etc/init.d directory, and all scripts must be /sbin/sh scripts. These files are hard linked to corresponding run control scripts in the /etc/rc<n>.d directories.
These run control scripts can also be run individually to start and stop services. For example, you can turn off NFS server functionality by typing /etc/init.d/nfs.server stop and pressing Enter. After you have changed the system configuration, you can restart the NFS services by typing /etc/init.d/nfs.server start and pressing Enter. If you notice, however, many of these RC scripts simply have svcadm commands embedded in them to perform the task of stopping and starting the service.
In addition to the svcs -p command, you can still use the pgrep command to verify whether a service has been stopped or started:
pgrep -f <service>
The pgrep utility examines the active processes on the system and reports the process IDs of the processes. See Chapter 5, “Managing System Processes,” for details on this command.
If you add a script to the run control directories, you put the script in the /etc/init.d directory and create a hard link to the appropriate rc<n>.d directory. You need to assign appropriate numbers and names to the new scripts so that they will be run in the proper ASCII sequence, as described in the previous section.
To add a new run control script to a system, follow the process in Step by Step 3.5.
STEP BY STEP
3.5 Adding a Run Control Script

The following example creates an rc script named program that starts up at run level 2 and stops at run level 0. Note the use of hard links versus soft links:
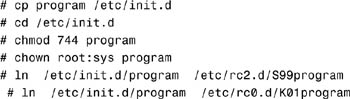
You can verify the links by typing this:
# ls -li /etc/init.d/program /etc/rc?.d/[SK]*program
The system displays the following:
![]()
Note
Disabling a Run Control Script If you do not want a particular script to run when the system is entering a corresponding init state, you can change the uppercase prefix (S or K) to some other character; I prefer to prefix the filename with an underscore. Only files beginning with uppercase prefixes of S or K are run. For example, you could change S99mount to _S99mount to disable the script.
Objective:
Complete a system shutdown.
![]() Interrupt a hung system.
Interrupt a hung system.
![]() Given a scenario involving a hung system, troubleshoot problems and deduce resolutions.
Given a scenario involving a hung system, troubleshoot problems and deduce resolutions.
Solaris has been designed to run continuously—7 days a week, 24 hours a day. Occasionally, however, you need to shut down the system to carry out administrative tasks. Very seldom, an application might cause the system to go awry, and the operating system must be stopped to kill off runaway processes, and then be restarted.
You can shut down the system in a number of ways, using various Unix commands. With Solaris, taking down the operating system in an orderly fashion is important. When the system boots, several processes are started; they must be shut down before you power off the system. In addition, information that has been cached in memory and has not yet been written to disk will be lost if it is not flushed from memory and saved to disk. The process of shutting down Solaris involves shutting down processes, flushing data from memory to the disk, and unmounting file systems.
Caution
Improper Shutdown Can Corrupt Data Shutting down a system improperly can result in loss of data and the risk of corrupting the file systems.
Note
Protecting Against Power Loss To avoid having your system shut down improperly during a power failure, you should use an uninterruptible power supply (UPS) that is capable of shutting down the system cleanly before the power is shut off. Be sure to follow the UPS manufacturer’s recommendations for maintenance to eliminate the risk of the UPS becoming the cause of an improper shutdown.
When you’re preparing to shut down a system, you need to determine which of the following commands is appropriate for the system and the task at hand:
/usr/sbin/shutdown
/sbin/init
/usr/sbin/halt
/usr/sbin/reboot
/usr/sbin/poweroff
Stop+A or L1+A
Caution
Aborting the Operating System Using the Stop+A key sequence (or L1+A) abruptly breaks execution of the operating system and should be used only as a last resort to restart the system.
The first three commands—/usr/sbin/shutdown, /sbin/init, and /usr/sbin/halt—initiate shutdown procedures, kill all running processes, write data to disk, and shut down the system software to the appropriate run level. The /usr/sbin/reboot command does all these tasks as well, and it then boots the system back to the state defined as initdefault in /etc/inittab. The /usr/sbin/poweroff command is equivalent to init state 5.
You use the shutdown command to shut down a system that has multiple users. The shutdown command sends a warning message to all users who are logged in, waits for 60 seconds (by default), and then shuts down the system to single-user state. The command option -g lets you choose a different default wait time. The -i option lets you define the init state to which the system will be shut down. The default is S.
The shutdown command performs a clean system shutdown, which means that all system processes and services are terminated normally, and file systems are synchronized. You need superuser privileges to use the shutdown command.
When the shutdown command is initiated, all logged-in users and all systems mounting resources receive a warning about the impending shutdown, and then they get a final message. For this reason, the shutdown command is recommended over the init command on a server with multiple users.
Note
Sending a Shutdown Message When using either shutdown or init, you might want to give users advance notice by sending an email message about any scheduled system shutdown.
The proper sequence of shutting down the system is described in Step by Step 3.6.
STEP BY STEP
3.6 Shutting Down a System
1. As superuser, type the following to find out if users are logged in to the system:
# who
2. A list of all logged-in users is displayed. You might want to send an email message or broadcast a message to let users know that the system is being shut down.
3. Shut down the system by using the shutdown command:
# shutdown -i<init-state> -g<grace-period> -y
Table 3.27 describes the options available for the shutdown command.
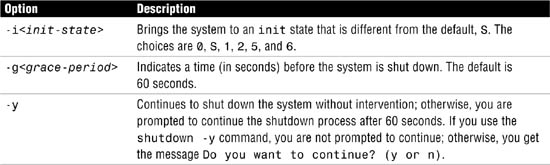
You use the init command to shut down a single-user system or to change its run level. The syntax is as follows:
init <run-level>
<run-level> is any run level described in Table 3.21. In addition, <run-level> can be a, b, or c, which tells the system to process only /etc/inittab entries that have the a, b, or c run level set. These are pseudo-states, which can be defined to run certain commands but which do not cause the current run level to change. <run-level> can also be the keyword Q or q, which tells the system to reexamine the /etc/inittab file.
You can use init to place the system in power-down state (init state 5) or in single-user state (init state 1). For example, to bring the system down to run level 1 from the current run level, you type the following:
init 1
The system responds with this:
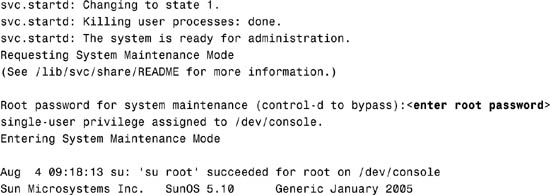
Note
The telinit Command The /etc/telinit command is the same as the init command. It is simply a link to the /usr/sbin/init command.
You use the halt command when the system must be stopped immediately and it is acceptable not to warn current users. The halt command shuts down the system without delay and does not warn other users on the system of the shutdown.
You use the reboot command to shut down a single-user system and bring it into multi-user state. reboot does not warn other users on the system of the shutdown.
The Solaris reboot, poweroff, and halt commands stop the processor and synchronize the disks, but they perform unconditional shutdown of system processes. These commands are not recommended because they do not shut down any services and unmount any remaining file systems. They will, however, attempt to kill active processes with a SIGTERM, but the services will not be shut down cleanly. Stopping the services without doing a clean shutdown should only be done in an emergency or if most of the services are already stopped.
The speed of such a reboot is useful in certain circumstances, such as when you’re rebooting from the single-user run state. Also, the capability to pass arguments to OpenBoot via the reboot command is useful. For example, this command reboots the system into run level s and reconfigures the device tables:
reboot -- -rs
The poweroff command is equivalent to the init 5 command. As with the reboot and halt commands, the poweroff command synchronizes the disks and immediately shuts down the system, without properly shutting down services and unmounting all file systems. Users are not notified of the shutdown. If the hardware supports it, the poweroff command also turns off power.
Note
The init and shutdown Commands Using init and using shutdown are the most reliable ways to shut down a system because these commands shutdown services in a clean orderly fashion and shut down the system with minimal data loss. The halt, poweroff, and reboot commands do not shutdown services properly and are not the preferred method of shutting down the system.
Occasionally, a system might not respond to the init commands described earlier in this chapter. A system that doesn’t respond to anything, including reboot or halt, is called a “crashed” or “hung” system. If you try to use the commands discussed in the preceding sections but get no response, on non-USB style keyboards, you can press Stop+A or L1+A to get back to the boot PROM. (The specific Stop key sequence depends on your keyboard type.) On terminals connected to the serial port, you can press the Break key, as described in the section “Accessing the OpenBoot Environment,” earlier in this chapter.
Some OpenBoot systems provide the capability of commanding OpenBoot by means of pressing a combination of keys on the system’s keyboard, referred to as a keyboard chord or key combination. These keyboard chords are described in Table 3.28. When issuing any of these commands, you press the keys immediately after turning on the power to your system, and you hold down the keys for a few seconds until the keyboard light-emitting diodes (LEDs) flash. It should be noted, however, that these keyboard chords only work on non-USB keyboards and not USB style keyboards.

Note
Disabling Keyboard Chords The commands in Table 3.26 are disabled if PROM security is on. Also, if your system has full security enabled, you cannot apply any of these commands unless you have the password to get to the ok prompt.
To change the default abort sequence on the keyboard, you need to edit the /etc/default/kbd file. In that file, you can enable and disable keyboard abort sequences, and change the keyboard abort sequence. After modifying this file, you issue the kbd -i command to update the keyboard defaults.
The process of breaking out of a hung system is described in Step by Step 3.7.
Tip
Interrupting a Hung System Step by Step 3.5 describes an objective that is sure to be on the exam. Make sure that you understand each step and the order in which the steps are executed.
STEP BY STEP
3.7 Breaking Out of a Hung System
1. Use the abort key sequence for your system (Stop+A or L1+A).
The monitor displays the ok PROM prompt.
2. Type the sync command to manually synchronize the file systems:
ok sync
The sync procedure synchronizes the file systems and is necessary to prevent corruption. During the sync process, the system will panic, synchronize the file systems, perform a crash dump by dumping the contents of kernel memory to disk, and finally perform a system reset to start the boot process.
3. After you receive the login: message, log in and type the following to verify that the system is booted to the specified run level:
# who -r
4. The system responds with the following:
run-level 3 Jun 9 09:19 3 0 S
Only after shutting down the file systems should you turn off the power to the hardware. You turn off power to all devices after the system is shut down. If necessary, you should also unplug the power cables. When power can be restored, you use the process described in Step by Step 3.8 to turn on the system and devices.
STEP BY STEP
3.8 Turning Off the Power
1. Plug in the power cables.
2. Turn on all peripheral devices, such as disk drives, tape drives, and printers.
3. Turn on the CPU and monitor.
This chapter provides a description of the OpenBoot environment, the PROM, NVRAM, and the kernel. It describes how to access OpenBoot and the various commands that are available to test and provide information about the hardware.
This chapter describes the OpenBoot architecture, and it explains how OpenBoot controls many of the hardware devices. By using the programmable user interface available in OpenBoot, you can set several parameters that control system hardware and peripherals.
The device tree and OpenBoot device names are explained in this chapter. Throughout this book, the text refers to various device names used in Solaris. It’s important that you understand each one of them. Along with device names, this chapter explains how to set temporary and permanent device aliases.
The system startup phases are described in this chapter, and you have learned how Solaris processes and services are started, from bootup, to loading and initializing the two-part kernel, to continuing to the multi-user milestone. You can further control these services through the Service Management Facility.
This chapter describes how important it is to shut down the system properly because the integrity of the data can be compromised if the proper shutdown steps are not performed. All the various commands used to shut down a system in an orderly manner are outlined.
Chapter 4, “User and Security Administration,” describes how to protect your system and data from unauthorized access.
Caution
Don’t Do This on a Production System! Because some of the steps involved in the following exercises could render a system unbootable if they’re not performed properly, you should not perform these exercises on a production system.
In this exercise, you will halt the system and use the OpenBoot commands to set parameters and gather basic information about your system.
Estimated time: 30 minutes
1. Issue the OpenBoot command to display the banner, as follows:
banner
2. Set parameters to their default values, as follows:
reset-all
3. Set the auto-boot? parameter to false to prevent the system from booting automatically after a reset. From the OpenBoot ok prompt, type the following:
setenv auto-boot? false
Verify that the parameter has been set by typing the following:
printenv auto-boot?
4. Display the list of OpenBoot help topics, as follows:
help
5. Use the banner command to get the following information from your system:
ROM revision
Amount of installed memory
System type
System serial number
Ethernet address
Host ID
6. Display the following list of OBP parameters by using the printenv command:
output-device
input-device
auto-boot?
boot-device
7. Use the following commands to display the list of disk devices attached to your system:
probe-scsi
probe-scsi-all
probe-ide
Explain the main differences between these commands.
Caution
Preventing a System Hang If any of these commands returns a message warning that your system will hang if you proceed, enter n to avoid running the command. Run reset-all before running probe- again and then respond y to this message.
8. List the target number and the device type of each SCSI device attached to your system by using the OpenBoot commands in step 7.
9. From the OpenBoot prompt, identify your default boot device as follows:
printenv boot-device
10. Use the show-disks OpenBoot command to get a listing of the disk drives on your system, as follows:
show-disks
11. Create a permanent device alias named bootdisk that points to the IDE master disk, as follows:
nvalias bootdisk /pci@1f,0/pci@1,1/ide@3/disk@0,0
You’ll need to select a SCSI disk if your system does not have IDE disks attached to it.
12. Reset the system and verify that the device alias is set properly by typing the following:
reset-all
After the system resets, type the following:
devalias bootdisk
13. Now, set the system up so that it boots into single-user mode without any user intervention:
setenv boot-command 'boot -s'
14. I suggest changing the auto-boot? parameter back to true and resetting the system to validate that your boot-command parameter is set properly as follows:
setenv auto-boot? true
reset-all
15. Boot the system, log on as root, and use the eeprom command to list all NVRAM parameters.
16. Use the eeprom command to list only the setting of the boot-device parameter, as follows:
eeprom boot-device
17. Reset boot-device to its default parameter from the OpenBoot prompt, as follows:
set-default boot-device
18. From the OpenBoot prompt, remove the alias bootdisk, as follows:
nvunalias bootdisk
19. Reset the system and verify that bootdisk is no longer set, as follows:
reset-all
printenv
20. Set all the OpenBoot parameters back to their default values, as follows:
set-defaults
This exercise takes you through the steps of powering on and booting the system.
Estimated time: 5 minutes
1. Turn on power to all the peripheral devices, if any exist.
2. If the OpenBoot parameter auto-boot is set to false, you should see the ok prompt shortly after you power on the system. If the system is set to auto-boot, you should see a message similar to the following displayed onscreen:
SunOS Release 5.10 Version Generic 64-bit
Copyright 1983-2005 Sun Microsystems, Inc. All rights reserved.
Use is subject to license terms.
You should see the system begin the boot process. Interrupt the boot process by pressing Stop+A. The ok prompt appears.
3. At the ok prompt, type boot to boot the system.
In this exercise, you’ll practice booting from a backup copy of the /etc/system file. You should use this process if your /etc/system file ever becomes corrupt or unbootable.
Estimated time: 15 minutes
1. Log in as root.
2. Create a backup copy of the /etc/system file by typing this:
cp /etc/system /etc/system.orig
3. Now remove the /etc/system file by typing this:
rm /etc/system
4. Halt the system by typing this:
/usr/sbin/shutdown -y -g0 -i0
5. At the ok prompt, boot the system by using the interactive option to supply the backup name of the /etc/system file. You do that by typing this:
boot -a
6. You are prompted to enter a filename for the kernel and a default directory for modules. Press Return to answer each of these questions. When you are prompted with this message to use the default /etc/system file
Name of system file [etc/system]:
enter the following:
/etc/system.orig
7. Later you’ll be asked to enter the root file system type and the physical name of the root device. At that point, press Return to answer both questions.
8. When the system is ready, log in as root and put the original /etc/system file back in place:
cp /etc/system.orig /etc/system
|
1. |
A. The hardware-level user interface that you see before the operating system starts is called the OpenBoot PROM (OBP). For more information, see the section “The OpenBoot Environment.” |
|
2. |
C. Non-Volatile RAM (NVRAM) is where the system identification information—such as the host ID, Ethernet address, and TOD clock—is stored. For more information, see the section “The OpenBoot Environment.” |
|
3. |
A, B. The two primary tasks of the OpenBoot firmware are to run the POST and to load the bootblock. For more information, see the section “The OpenBoot Environment.” |
|
4. |
B. OpenBoot runs POSTs to initialize the system hardware. It also loads the primary startup program, |
|
D. Devices called nodes are attached to a host computer through a hierarchy of interconnected buses on the device tree. A node that represents the host computer’s main physical address bus forms the tree’s root node. For more information, see the section “The OpenBoot Architecture.” |
|
|
6. |
A. A full device pathname is a series of node names separated by slashes ( driver-name@unit-address:device-arguments For more information, see the section “PROM Device Tree (Full Device Pathnames).” |
|
7. |
A. The OpenBoot command |
|
8. |
D. You use the devalias bootdisk /pci@1f,0/pci@1,1/ide@3/disk@0,0 For more information, see the section “OpenBoot Device Aliases.” |
|
9. |
B. or D. You use the |
|
10. |
A. The NVRAM variable named |
|
11. |
B. To reset the NVRAM variables to their default settings, you hold down the Stop+N keys simultaneously while the machine is powering up. For more information, see the section “OpenBoot NVRAM.” |
|
12. |
B. The OpenBoot command |
|
13. |
C. The OpenBoot command |
|
14. |
D. You issue the OpenBoot |
|
15. |
A. The bootblock resides in blocks 1–15 of the startup device. For more information, see the section “The |
|
16. |
A. The secondary startup program, |
|
D. You use the |
|
|
18. |
C. You interrupt a system that is not responding by pressing Stop+A. For more information, see the section “Stopping the System for Recovery Purposes.” |
|
19. |
A. |
|
20. |
C. |
|
21. |
C. At the OpenBoot prompt, you use the |
|
22. |
C. You use the |
|
23. |
A. When the kernel is loading, it reads the |
|
24. |
A. The boot process goes through the following five phases: boot PROM phase, boot programs phase, kernel initialization phase, |
|
25. |
A. The kernel consists of a two-piece static core that is made up of |
|
26. |
D. The |
|
27. |
D. The boot process creates fewer messages. All of the information that was provided by the boot messages in previous versions of Solaris is now located in the |
|
B, D. You issue the |
|
|
29. |
B. The |
|
30. |
A. The |
|
31. |
B. You use the |
|
32. |
C. An SMF manifest is an XML (Extensible Markup Language) file that contains a complete set of properties that are associated with a service or a service instance. The properties are stored in files and subdirectories located in |
|
33. |
A. Use the |
|
34. |
D. A valid FMRI instance names take the form of: svc://localhost/network/inetd:default
For more information, see the section “The Solaris Management Facility (SMF) Service.” |
|
35. |
B. Running the |
|
36. |
A. The offline status indicates that a service instance is enabled (configured to run), but the service is not yet running or available to run. A disabled service is configured not to start. For more information, see the section “SMF Command-line Administration Utilities.” |
|
37. |
A. The |
For more information on the OpenBoot environment and the boot process, refer to Inside Solaris 9 by Bill Calkins, 2002, New Riders.
For more information on the Service Management Facility (SMF), refer to the “Managing Services” section of the Solaris 10 System Administration Guide: Basic Administration, 2005, Sun Microsystems, Part Number Part No: 817-1985-11. This manual is available online at docs.sun.com.
For more information on the Solaris kernel and tuning the Solaris kernel parameters, refer to the following publications:
![]() The Solaris Tunable Parameters Reference Manual, 2005, Sun Microsystems, Part number 817-0404-10. This manual is available online at
The Solaris Tunable Parameters Reference Manual, 2005, Sun Microsystems, Part number 817-0404-10. This manual is available online at docs.sun.com.
![]() Sun Performance and Tuning: Java and the Internet, by Adrian Cockroft, 1998, Prentice Hall.
Sun Performance and Tuning: Java and the Internet, by Adrian Cockroft, 1998, Prentice Hall.
![]() Solaris Internals: Core Kernel Architecture, by Jim Mauro and Richard McDougall, 2000, Prentice Hall.
Solaris Internals: Core Kernel Architecture, by Jim Mauro and Richard McDougall, 2000, Prentice Hall.
![]() Resource Management, by Richard McDougall, Adrian Cockcroft, Evert Hoogendoorn, Enrique Vargas, Tom Bialaski, and Everet Hoogendoorn, 1999, Prentice Hall.
Resource Management, by Richard McDougall, Adrian Cockcroft, Evert Hoogendoorn, Enrique Vargas, Tom Bialaski, and Everet Hoogendoorn, 1999, Prentice Hall.