
Objectives
The following test objectives for Exam CX-310-200 are covered in this chapter:
Given a backup requirement, develop a backup strategy that includes scheduled backups, number of tapes required, naming conventions, command protocols, and backup frequency/levels.
![]() Solaris 10 provides several utilities for copying data between disks, tapes, and other types of media. You need to understand the capabilities of each utility and determine which is best for a particular circumstance. This chapter describes all the utilities and commands used to back up and restore data on a Solaris system. When you’re finished with this chapter, you should be able to develop a scheduled backup strategy and determine the number of tapes required, command protocols, and backup frequency/levels for any given scenario.
Solaris 10 provides several utilities for copying data between disks, tapes, and other types of media. You need to understand the capabilities of each utility and determine which is best for a particular circumstance. This chapter describes all the utilities and commands used to back up and restore data on a Solaris system. When you’re finished with this chapter, you should be able to develop a scheduled backup strategy and determine the number of tapes required, command protocols, and backup frequency/levels for any given scenario.
Back up a mounted file system by creating a UFS snapshot and performing a backup of the snapshot file.
![]() You need to understand how to create a read-only image of a mounted file system using the
You need to understand how to create a read-only image of a mounted file system using the fssnap command. You also need to know how to backup the UFS snapshot to tape.
Restore data from a UFS snapshot and delete the UFS snapshot.
![]() You need to understand the methods of restoring an entire file system from a snapshot and removing a snapshot when it is no longer needed.
You need to understand the methods of restoring an entire file system from a snapshot and removing a snapshot when it is no longer needed.
Explain how to perform UFS restores and special case recoveries.
![]() You need to understand all the steps required to restore a file or file system from tape for each of the various Solaris backup utilities.
You need to understand all the steps required to restore a file or file system from tape for each of the various Solaris backup utilities.
The following study strategies will help you prepare for the test:
![]() As you study this chapter, make sure that you thoroughly understand the various backup tools available in Solaris. On the exam, you’ll need to match the correct tool to the task it can perform or the correct description. The exam questions are primarily on
As you study this chapter, make sure that you thoroughly understand the various backup tools available in Solaris. On the exam, you’ll need to match the correct tool to the task it can perform or the correct description. The exam questions are primarily on ufsdump and ufsrestore. For the exam you need to develop various backup strategies by using ufsdump. You also need to know how to restore the operating system from a backup by using the ufsrestore command.
![]() You should practice the commands and all the options on a live Solaris 10 system (SPARC or x86). You should try to memorize the examples that are provided in this chapter. They illustrate the commands and options that are most likely to appear on the exam. It’s best if you have a tape drive with which to practice, but if you don’t have one, you can practice using the commands for moving files between two partitions on a disk. You need to pay special attention to the
You should practice the commands and all the options on a live Solaris 10 system (SPARC or x86). You should try to memorize the examples that are provided in this chapter. They illustrate the commands and options that are most likely to appear on the exam. It’s best if you have a tape drive with which to practice, but if you don’t have one, you can practice using the commands for moving files between two partitions on a disk. You need to pay special attention to the ufsdump and ufsrestore commands.
![]() You should familiarize yourself with the exercises in this chapter. You should memorize them because the material they cover is on the exam.
You should familiarize yourself with the exercises in this chapter. You should memorize them because the material they cover is on the exam.
Backing up a system involves copying data from the system’s hard disks onto removable media that can be safeguarded in a secure area. Backing up system data is one of the most crucial system administration functions and should be performed regularly. Backups are used to restore data if files become corrupted or if a system failure or another disaster destroys data. Having a fault-tolerant disk array is not enough. Disk mirroring and RAID 5 protect data in case of a hardware failure, but they do not protect against file corruption, natural disaster, or accidental deletion of a file. In other words, disk mirroring does not protect against flood damage or fire. In addition, if a program corrupts a particular file, the file will be just as corrupt on the mirrored copy as in the original. Therefore, you need to have in place some type of offline backup of your data. Backing up system data—the most important task you perform as a system administrator—must be done on a regular basis. Although even a comprehensive backup scheme can’t guarantee that information will not be lost, you can use backups to make sure the loss will be minimal.
This chapter describes the methods available to perform backups, the types of backups, how to develop a solid backup strategy, and how to restore data if you encounter a loss. This chapter begins with a look at backup media and then an explanation of the tar, dd, cpio, and pax commands, which are used to copy data from disk to disk or from disk to tape. Then you’ll learn about the ufsdump and ufsrestore utilities, the preferred methods of backing up data from a Solaris system to tape on a regular basis. This chapter also introduces a method of backing up live file systems, called fssnap. Finally, this chapter describes how to back up an entire Solaris operating environment by using the Solaris Flash Archive.
Many third-party backup applications are available for Solaris but are not covered on the exam. Therefore, this chapter describes only the methods that are available in the standard Solaris 10 distribution.
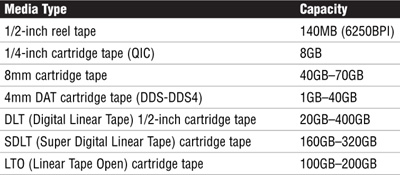
Selecting backup media is as critical as selecting the program to perform the backup. Your backup media should be removable so that the information can be taken to another site for safe storage in case of fire, flood, or other natural disaster. In some cases, the backup medium is simply another system on the network that’s located in a different building from the primary data. Most backup systems, however, use tape media. Magnetic tape still provides the lowest cost per megabyte for storing data. Table 7.1 lists some typical tape devices that are used for storing backed-up data.
To achieve high capacity, one or more of these tape drives are often combined into cabinets called tape libraries or tape silos, which are capable of storing several terabytes of data, spread across tens or even hundreds of tapes. Robotic arms are used to locate, retrieve, and load tapes into a tape drive automatically to eliminate human intervention.
Chapter 1, “Managing File Systems,” describes disk device names. Tape drives are also accessed through their logical device names. In fact, for each tape drive, you see 24 different logical device files assigned to each tape drive. These device files are located under the directory /dev/rmt and are comprised of numbers and letters:
/dev/rmt/#cn
The following are the numbers and letters in the device files:
![]()
#—This number refers to the tape drive’s logical device number. The first tape drive found by the system is given the designation 0, the second is 1, the third is 2, and so forth. These numbers do not correspond to SCSI ID numbers.
![]()
c—The letter following the device number is the tape density. This can be l (low), m (medium), h (high), c (compressed), or u (ultra compressed).
![]()
n—If an n is present after the tape density letter, it means “no rewind.” Sometimes after a tape drive is finished, you do not want the tape to automatically rewind. If the n is not present in the device name, the tape automatically rewinds when the backup is complete.
Table 7.2 describes 24 device files for a tape drive with a logical device number of 0. Beside each device file listed is a description of what the letters mean. All these device files contain different attributes but refer to the same physical tape drive, 0, and can be used at will.

Note
Compression Tape drives that support data compression contain internal hardware that performs the compression on the fly. You should check with your tape drive manufacturer to see if your tape drive supports compression.
Objective:
Explain how to perform incremental, full, and remote backups to tape for an unmounted file system using the ufsdump command or explain how to back up a mounted file system using UFS snapshot.
Solaris provides the utilities listed in Table 7.3. These backup utilities can be used to copy data from disk to removable media and to restore it.

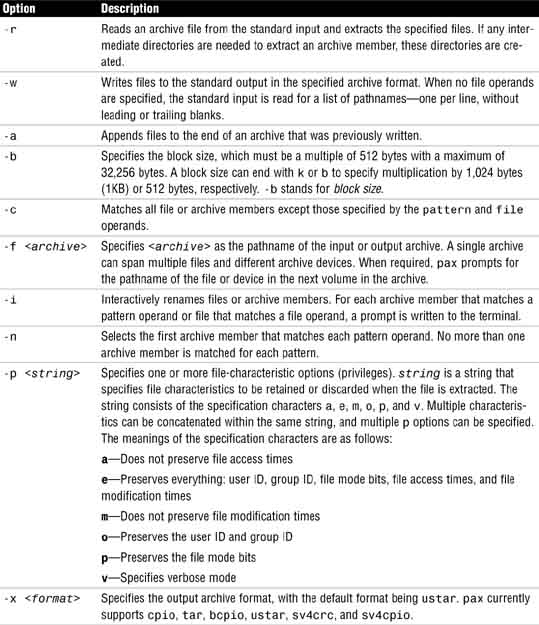
The primary use of the tar (which stands for tape archiver) command is to copy file systems or individual files between a hard disk and tape or from one file system to another. You can also use tar to create a tar archive on a floppy disk and to extract files from a tar archive on a floppy disk. The tar command is popular because it’s available on most Unix systems. If the data you are backing up requires more than one tape, you should use the cpio, pax, or ufsdump commands, which are described in the following sections. The tar command has the following syntax:
tar <options> <tar-filename> <file-list>
You can replace options with the list of command options in Table 7.4.

For a more complete listing of command options, see the Solaris online man pages.
<tar-filename> is used with the f option and can be any name you want. The filename can also be the name of a device, such as /dev/rmt/0 or /dev/rfd0. <file-list> is a list of files you want to include in the archive.
The following examples illustrate the use of the tar command.
To create a tape archive of everything in the /home/bcalkins directory on tape device /dev/rmt/0, you type the following:
tar cvf /dev/rmt/0 /home/bcalkins
To list the files in the archive, you type the following:
tar tvf /dev/rmt/0
To restore the file /home/bcalkins/.profile from the archive, you type the following:
tar xvf /dev/rmt/0 /home/bcalkins/.profile
You use tar to create an archive file on disk instead of tape. The tar filename is files.tar, as follows:
tar cvf files.tar /home/bcalkins
To extract files that were created using the preceding example, you type the following:
tar xvf files.tar
Notice the use of the full pathname when creating an archive with tar. Using the full pathname to create an archive ensures that the files will be restored to their original locations in the directory hierarchy. You will not be able to restore them elsewhere.
If you want to be able to restore files with a relative pathname in the preceding example, you can change to the /home/bcalkins directory and specify files to be archived as ./*. This puts the files into the archive, using a pathname that is relative to the current working directory rather than an absolute pathname (one beginning with a forward slash [/]). Files can then be restored into any directory. The use of relative pathnames is highly recommended so that you have the option of restoring an archive without overwriting files that exist but may be different from those in the archive.
The main advantage of the dd command is that it quickly converts and copies files with different data formats, such as differences in block size, record length, or byte order.
The most common use of dd is to transfer a complete file system or partition image from a hard disk to a tape. You can also use it to copy files from one hard disk to another. When you’re using it to copy data, the dd command makes an image copy (an exact byte-for-byte copy) of any medium, which can be either tape or disk. The syntax for the dd command is as follows:
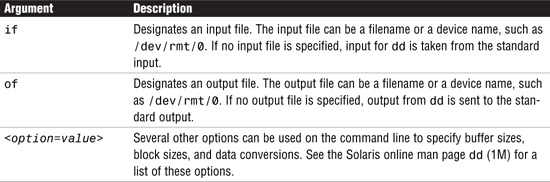
dd if=<input-file> of=<output-file> <option=value>
The command arguments for dd are described in Table 7.5.
The next few examples illustrate the use of the dd command to copy data. The first example shows how the dd command is used to duplicate tapes:
dd if=/dev/rmt/0 of=/dev/rmt/1
This procedure requires two tape drives—a source tape and a destination tape.
The next example uses dd to copy one entire hard disk to another hard disk:
dd if=/dev/rdsk/c0t1d0s2 of=/dev/rdsk/c0t4d0s2 bs=128K
In this example, you need two disks, and both must have the same geometry. Disk geometry is discussed in Chapter 1.
Caution
Using dd to Copy Data Between Dissimilar Disk Drives Be careful when using dd to copy data between two different types of disk drives. We have used dd to move data from a 4GB disk to an 18GB disk, and the data transferred fine. We were able to access the data, and the option seemed to have completed correctly. Then we noticed that when we went into the format utility, the 18GB disk was labeled as a 4GB disk. This is because “everything” on the 4GB disk transferred to the 18GB disk—including the disk label! All of our work was wasted. We had to re-identify the disk type, relabel, and repartition the disk to get it to recognize the disk as an 18GB disk.
In this example, the option bs=128K specifies a block size. A large block size, such as 128KB or 4096KB, can decrease the time to copy by buffering large amounts of data. Notice in the example that the raw device is specified. For this technique to work properly, you must use the raw (character) device to avoid the buffered (block) input/output (I/O) system.
You can use the dd command with tar to create an archive on a remote tape drive. In the next example, tar is used to create an archive on a remote system by piping the output to a tape drive called /dev/rmt/0 on a remote system named xena:
tar cvf - <files> | rsh xena dd of=/dev/rmt/0 obs=128
Another example would be to read tar data coming from another Unix system such as older Silicon Graphics systems. The Silicon Graphics system swaps every pair of bytes, making a tar tape unreadable on a Solaris system. To read a tar tape from a Silicon Graphics system, you type the following:
dd if=/dev/rmt/0 conv=swab | tar xvf -
Note that the argument for the conv option is swab (“swap bytes”) and not swap. In a similar way, a Solaris system can create a tar tape that a Silicon Graphics system can read:
tar cvf - <files> | dd of=/dev/rmt/0 conv=swab
The cpio command is used to copy data from one place to another. cpio stands for copy input to output. When copying files with cpio, you present a list of files to the system’s standard input and write the file archive to the system’s standard output. The principal advantage of cpio is its flexible syntax. The command acts as a filter program, taking input information from the standard input file and delivering its output to the standard output file. You can manipulate the input and output by using the shell to specify redirection and pipelines. The following are the advantages of cpio over other Unix utilities:
![]()
cpio can back up and restore individual files, not just whole file systems. (tar, pax, and ufsdump also have this capability.)
![]() Backups made by
Backups made by cpio are slightly smaller than those created with tar because the cpio header is smaller.
![]()
cpio can span multiple tapes; tar is limited to a single tape.
cpio has more options and is therefore perceived as a more complex command than tar.
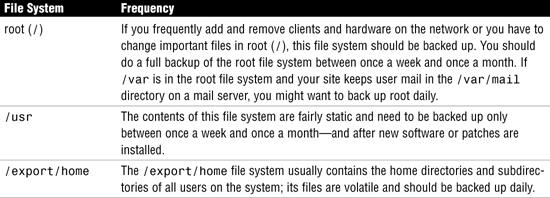
The cpio utility operates in one of three modes: copy out (cpio -o), copy in (cpio -i), or pass (cpio -p). You use copy-out mode when creating a backup tape and copy-in mode when restoring or listing files from a tape. The pass mode is generally used to copy files from one location to another on disk. You must always specify one of these three modes. The command syntax for the cpio command is as follows:
cpio <mode> <option>
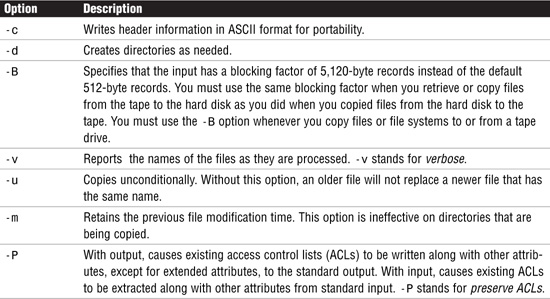
mode is -i, -o, or -p, and option is one of the options described in Table 7.6.
The following example shows how to copy the directory /work and its subdirectories to a tape drive with the device name /dev/rmt/0:
cd /work
-find . | cpio -ocB > /dev/rmt/0
In this example, the find command locates all of the files in the current working directory and pipes them to the cpio command. The -o option specifies copy-out mode, -c outputs the header information in ASCII format, and -B increases the blocking factor to 5,120 bytes to improve the speed.
The following example shows how to copy the files located on a tape back into the directory named /work on a hard disk:
cd /work
cpio -icvdB < /dev/rmt/0
The -i option specifies copy-in mode, -d creates directories as needed to restore the data to the original location, and -v displays all the output.
To use copy-out mode to make backups, you send a list of files to the cpio command via the standard input of cpio. You use the Unix find command to generate the list of files to be backed up. You specify copy-out mode by using the -o option on the cpio command line. In the following example, a file named list contains a short list of files to be backed up to tape:
cpio -ovB < list > /dev/rmt/1
Normally, as indicated in Table 7.6, cpio writes files to the standard output in 512-byte records. By specifying the -B option, you can increase the record size to 5,120 bytes to significantly speed up the transfer rate, as shown in the previous example. You can use Unix commands to generate a list of files for cpio to back up in a number of other ways, as shown in the following examples.
You can back up files by entering filenames via the keyboard. You press Ctrl+D when you have finished typing filenames. For example, enter the following:
cpio -oB > /dev/rmt/1
File1.txt
File2.txt
Ctrl+d
You can use the ls command to generate the list of files to be backed up by cpio. You type the following to back up all the files in the current directory but not the files in subdirectories:
cd /home/bcalkins
ls -d * | cpio -oB >/dev/rmt/1
You need to be careful when using ls to generate the list of files to back up. In particular, you should be sure that the ls command specifies the full path to the files that should be backed up. You will be dissatisfied with the results if you try to use ls -R or any other ls command on a directory unless you specify the -d option to ls.
In general, the best command to use for generating a file list is find. You can use the find command to generate a list of files that the user bcalkins created and modified in the past five days. The following is the list of files to be backed up:
find . -user bcalkins -mtime -5 -print | cpio -oB > /dev/rmt/1
If the current tape fills up, the cpio program prompts you for another tape. You see a message such as the following:
If you want to go on, type device/file name when ready
You should then change the tape and enter the name of the backup device (for example, /dev/rmt/1).
You use the copy-in mode of cpio to restore files from tape to disk. The following examples describe methods used to restore files from a cpio archive.
The following example restores all files and directories from tape to disk:
cd /users
cpio -icvumB < /dev/rmt/1
The cpio options specified restore files unconditionally (-u) to the /users directory and retain previous file modification times (-m).
The following example selectively restores files that begin with database:
cpio -icvdumB 'database*' < /dev/rmt/1
The -d option in this example creates directories as needed.
Note
Using Wildcards with cpio You must use standard shell escapes to pass the wildcard argument (*) to cpio. For example, the wildcard argument can appear within single quotes.
To obtain a list of files that are on tape, you use the following code:
cpio -ictB < /dev/rmt/1
The list of files on /dev/rmt/1 then appears onscreen.
Pass mode is generally not used for backups. The destination must be a directory on a mounted file system, which means that pass mode cannot be used to transfer files to tape. However, you can use pass mode to copy files from one directory to another. The advantage of using cpio over cp is that with it, original modification times and ownership are preserved. You specify pass mode by using the -p option with cpio.
The following example copies all files from /users to /bkup:
cd /users
mkdir /bkup
find . | cpio -pdumv /bkup
Files are listed onscreen as they are copied.
The pax command has been included in Solaris since version 2.5. pax is a POSIX-conformant archive utility that can read and write tar and cpio archives. It is available on all Unix systems that are POSIX compliant, such as IBM’s AIX, Hewlett-Packard’s HP-UX, and some Linux distributions.
pax can read, write, and list the members of an archive file and copy directory hierarchies. The pax utility supports a wide variety of archive formats, including tar and cpio.
If pax finds an archive that is damaged or corrupted while it is processing, pax attempts to recover from media defects. It searches the archive to locate and process the largest possible number of archive members.
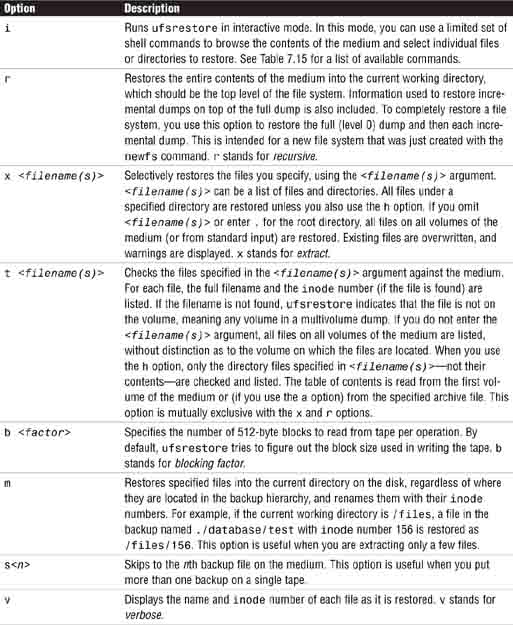
The action to be taken depends on the presence of the -r and -w options, which together form the four modes of operation: list, read, write, and copy (as described in Table 7.7). The syntax for the pax command is as follows:
pax <mode> <options>
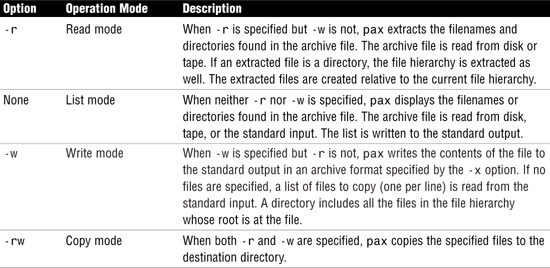
In addition to selecting a mode of operation, you can select one or more options to pax from Table 7.8.
For additional options to the pax command, see the Solaris man pages.
When you use pax, you can specify the file operand along with the options from Table 7.7. The file operand specifies a destination directory or file pathname. If you specify a directory operand that does not exist, that the user cannot write to, or that is not of type directory, pax exits with a nonzero exit status.
The file operand specifies the pathname of a file to be copied or archived. When the file operand does not select at least one archive member, pax writes the file operand pathnames in a diagnostic message to standard error and then exits with a nonzero exit status.
Another operand is the pattern operand, which is used to select one or more pathnames of archive members. Archive members are selected by using the filename pattern-matching notation described by fnmatch. The following are examples of pattern operands:

When a pattern operand is not supplied, all members of the archive are selected. When a pattern operand matches a directory, the entire file hierarchy rooted at that directory is selected. When a pattern operand does not select at least one archive member, pax writes the pattern operand pathnames in a diagnostic message to standard error, and then exits with a nonzero exit status.
The following examples illustrate the use of the pax command.
To copy files to tape, you issue the following pax command, using -w to copy the current directory contents to tape and -f to specify the tape device:
pax -w -f /dev/rmt/0
To list a verbose table of contents for an archive stored on tape device /dev/rmt/0, you issue the following command:
pax -v -f /dev/rmt/0
The tape device in these two examples could have been a filename to specify an archive on disk.
You use the following command to interactively select the files to copy from the current directory to the destination directory:
pax -rw -i . <dest-dir>
Because pax understands tar and cpio formats, it is a very helpful tool when a tar or cpio archive contains absolute pathnames and the files should not be restored to their original locations. The key is the -s option, which allows files to be programmatically renamed. The following example uses the -s option to extract files from a tar archive, stripping the leading slash from any absolute pathname:
pax -r -s ',^/,,' -f file.tar
As you become more familiar with the pax utility, you might begin to use it in place of tar and cpio for the following reasons:
![]() It is portable to other Unix systems.
It is portable to other Unix systems.
![]() It is capable of recovering damaged archives.
It is capable of recovering damaged archives.
![]() It is capable of spanning multiple volumes.
It is capable of spanning multiple volumes.
Objective:
Explain how to perform incremental, full, and remote backups to tape for an unmounted file system using the ufsdump command, or explain how to back up a mounted file system using UFS snapshot.
Given a backup requirement, develop a backup strategy that includes scheduled backups, number of tapes required, naming conventions, command protocols, and backup frequency/levels.
Whereas the other Solaris utilities discussed in this chapter can be used to copy files from disk to tape, ufsdump is designed specifically for backups and is the recommended utility for backing up entire Solaris file systems. The ufsdump command copies files, directories, or entire file systems from a hard disk to tape or from disk to disk. The only drawback of using ufsdump is that the file systems must be inactive (that is, unmounted or read-only) before you can conduct a full backup. If the file system is still active, nothing in the memory buffers is copied to tape, and you could end up with a corrupt backup.
You should back up any file systems that are critical to users, including file systems that change frequently. Table 7.9 gives suggestions on the file systems to back up and the suggested frequency.
The ufsdump command has many built-in features that the other archive utilities don’t have, including the following:
![]() The
The ufsdump command can be used to back up individual file systems to local or remote tape devices or disk drives. The device to which the files are being backed up can be on any system in the network. This command works quickly because it is aware of the structure of the Unix file system and it works directly through the raw device file.
![]()
ufsdump has built-in options to create incremental backups that back up only the files that have been changed since a previous backup. This saves tape space and time.
![]()
ufsdump has the capability to back up groups of systems over the network from a single system. You can run ufsdump on each remote system through a remote shell or remote login, and you can direct the output to the system on which the drive is located.
![]() With
With ufsdump, the system administrator can restrict user access to backup tables.
![]() The
The ufsdump command has a built-in option to verify data on tape against the source file system.
Backing up a file system with ufsdump is referred to as dumping a file system. When a file system is dumped, a level between 0 and 9 is specified. A level 0 dump is a full backup and contains everything on the file system. Levels 1 through 9 are incremental backups and contain only files that have changed since previous dumps at lower levels.
A recommended backup schedule involves a three-level dump strategy: a level 0 dump at the start of the month (manually), automated weekly level 5 dumps, and automated daily level 9 dumps. The automated dumps are performed at 4:30 a.m., for example—a time when most systems are typically idle. Automated daily dumps are performed Sunday through Friday mornings. Automated weekly dumps are performed on Saturday mornings. Backups are automated by creating a shell script and using cron to execute the script on a regular basis.
Table 7.10 shows the dump level performed on each day of a typical month. Note that the level 0 dump at the start of the month is performed manually because the entire system must be idle before you can back up the root file system. One way to ensure that the system is not being used is to put the system in single-user mode. The level 9 and 5 dumps are automated with cron, but also must be conducted when the file systems are not being used. See Chapter 5, “Managing System Processes,” for more information on cron.

The backup schedule in Table 7.10 accomplishes the following:
![]() Each weekday tape accumulates all files changed since the end of the previous week or the initial level 0 backup for the first week. All files that have changed since the lower-level backup at the end of the previous week are saved each day.
Each weekday tape accumulates all files changed since the end of the previous week or the initial level 0 backup for the first week. All files that have changed since the lower-level backup at the end of the previous week are saved each day.
![]() Each Saturday tape contains all files changed since the last level 0 backup.
Each Saturday tape contains all files changed since the last level 0 backup.
This dump schedule requires at least four sets of seven tapes—one set for each week and one tape for the level 0 dump. Each set will be rotated each month. The level 0 tapes should not be overwritten and should be saved for at least a year, depending on your company’s and jurisdiction’s data-retention policy.
Even with the backup schedule outlined in Table 7.10, data can still be lost. For example, if a hard disk fails at 3 p.m., all modifications since the preceding 4:30 a.m. backup will be lost. Also, files that were deleted midweek will not appear on the level 5 tapes. Or a user may accidentally delete a file and not realize it for several weeks, but when the user wants to use the file, it is not there. If he asks you to restore the file from backup, the only tape it appears on is the level 0 backup, and it could be too far out of date to be useful. By not overwriting the daily level 9 tapes frequently, you can minimize this problem.
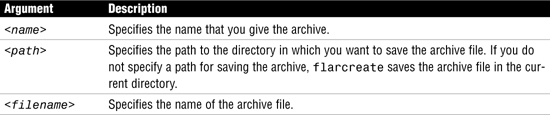
The syntax for the ufsdump command is as follows:
/usr/sbin/ufsdump <options> <arguments> <files-to-dump>
The options to the ufsdump command are described in Table 7.11.

Table 7.12 describes the options and arguments for the ufsdump command.


The ufsdump command uses these options by default:
ufsdump 9uf /dev/rmt/0 <files-to-back-up>
The following examples illustrate the use of the ufsdump command.
The following is an example of a full backup of the /users file system:
ufsdump 0ucf /dev/rmt/0 /users
DUMP: Writing 63 Kilobyte records
DUMP: Date of this level 0 dump: Thu Jul 25 10:43:25 2002
DUMP: Date of last level 0 dump: the epoch
DUMP: Dumping /dev/rdsk/c0t1d0s0 (pyramid1:/users) to /dev/rmt/0.
DUMP: Mapping (Pass I) [regular files]
DUMP: Mapping (Pass II) [directories]
DUMP: Estimated 10168 blocks (4.96MB).
DUMP: Dumping (Pass III) [directories]
DUMP: Dumping (Pass IV) [regular files]
DUMP: Tape rewinding
DUMP: 10078 blocks (4.92MB) on 1 volume at 107 KB/sec
DUMP: DUMP IS DONE
If you want to see how much space a backup is going to require, you issue the following command:
ufsdump S <filesystem>
The estimated number of bytes needed on tape to perform the level 0 backup is displayed.
In the following example, the local /export/home file system on a Solaris 10 system is backed up to a tape device on a remote Solaris 10 system called sparc1:

In this example, the -u option is used with the ufsdump command. This causes ufsdump to make an entry into the /etc/dumpdates file, which records the file system that was backed up, the level of the last backup, and the day, date, and time of the backup. Here’s an example of looking into the /etc/dumpdates file:
more /etc/dumpdates
The system responds with the following:
![]()
When incremental backups are made by using ufsdump, the ufsdump command consults the /etc/dumpdates file to find the date of the most recent backup at the next lower level. ufsdump then copies all files modified or added since the date of that lower-level backup. You can also determine whether backups are being done by viewing the contents of the /etc/dumpdates file. If a backup fails, it is not recorded in /etc/dumpdates.
Another useful example is using ufsdump to copy the contents of one file system to another. In the section “The dd Utility,” you learned how to copy data from one disk to another, but only when the disk geometry is exactly the same for each disk. In other words, dd works when you want to copy a 4GB disk to another 4GB disk. But if you want to replace an older 4GB disk with a new 18GB disk, you should not use dd to copy the data; a better option is to use ufsdump. Moving data from disk to tape and then back to disk again can be time consuming. Here’s a way to move data directly to that file system by using ufsdump without going to tape:
ufsdump 0f - /export/home | (cd /data; ufsrestore -xf - )
In this example, all data in the /export/home file system is copied to the /data file system. Instead of specifying a tape device, this example specifies a - (hyphen). The hyphen dumps the data to standard output and restores the data from standard input rather than from a file or device. This creates and extracts the dump file in memory, speeding up the entire process.
Objective:
Explain how to perform UFS restores and special case recoveries.
Tip
Restoring File Systems You need to understand each step described in Step by Step 7.1 and Step by Step 7.2, along with the order in which each step is performed. Also, you need to understand what the restoresymtable file is used for. These topics are likely to be on the exam.
The ufsrestore command copies files from backups created using the ufsdump command. As root, you can use ufsrestore to reload an entire file system from a level 0 dump and any incremental dumps that follow it, or to restore one or more single files from any dump tape. ufsrestore restores files with their original owner, last modification time, and mode (permissions).
The syntax for the ufsrestore command is as follows:
ufsrestore <options> <arguments> <filename(s)>
The options for the ufsrestore command are described in Table 7.13.

Table 7.14 describes some of the most common options and arguments for the ufsrestore command.
For a full listing of options for the ufsrestore command, see the Solaris man pages.
Table 7.15 lists the commands that can be used with ufsrestore when you’re using interactive mode (that is, ufsrestore -i).

The following examples illustrate how to restore data from a tape by using ufsrestore.
You can use the ufsrestore command to display the contents of a tape:

You can use ufsrestore to restore a file from a backup that was created using ufsdump:
ufsrestore f /dev/rmt/0 filename
You can restore entire directories from a remote drive located on the system called sparc1 by adding sparc1: to the front of the tape device name, as illustrated in the following example:
ufsrestore rf sparc1:/dev/rmt/0 filename
Occasionally, a file system becomes so damaged that you must completely restore it from a backup. If you have faithfully backed up file systems, you can restore them to the state of the last backup. The first step in recovering a file system is to delete everything in the damaged file system and re-create the file system by using the newfs command. To recover a damaged file system, follow the procedure described in Step by Step 7.1.
STEP BY STEP
7.1 Recovering and Restoring a Damaged File System
1. Unmount the corrupted file system /<filesystem>:
umount /<filesystem>
2. After you unmount the file system, issue the newfs command to create a new file system:
newfs /dev/rdsk/<disk-partition-name>
<disk-partition-name> is the name of the raw disk partition that contains the corrupted file system. Make sure you are using the correct device name; otherwise, you might destroy another file system.
3. Mount the file system to be restored and change to that directory:
mount /dev/dsk/<c?t?d?s?> <directory>
cd /<directory>
4. Load the tape and issue the following command:
ufsrestore rf /dev/rmt/0
The entire content of the tape is restored to the file system. All permissions, ownerships, and dates remain as they were when the last incremental tape was created.
The next two steps are optional.
5. Remove the restoresymtable file created by the ufsrestore command. This is a temporary file that is created whenever you restore an entire file system from tape. The restoresymtable file is used only by ufsrestore for “check-pointing” when information is passed between incremental restorations. The restoresymtable file is not required after the file system has been successfully restored.
6. Unmount the file system and run fsck again to check the repaired file system.
Sometimes a careless administrator with root access accidentally deletes part or all of the root or /usr file system. Other times the file system can become unusable because of a faulty disk drive or a corrupted file system. You can follow the procedure described in Step by Step 7.2 if you ever need to recover the root or /usr file system.
STEP BY STEP
7.2 Recovering the Root or /usr File System
1. Replace and partition the disk if it has failed.
2. Because the system cannot be booted from the boot disk, boot from the CD-ROM and re-create the failed file system by issuing the newfs command:
newfs /dev/rdsk/<disk-partition-name>
<disk-partition-name> is the name of the raw disk partition that contains the corrupted file system.
3. Check the new file system by using fsck:
fsck /dev/rdsk/<disk-partiton-name>
4. Mount the new file system on a temporary mount point:
mount /dev/dsk/<disk-partition-name>/mnt
5. Change to the /mnt directory:
cd /mnt
6. Write protect the tapes so that you don’t accidentally overwrite them.
7. Load the tape and issue the following command:
ufsrestore rf /dev/rmt/0
The entire content of the tape is restored to the file system. All permissions, ownerships, and dates remain as they were when the last incremental tape was created.
8. Verify that the file system is restored:
ls
9. Remove the restoresymtable file that is created and used by ufsrestore to checkpoint the restoration:
rm restoresymtable
10 Change to the root (/) directory:
cd /
11. Unmount the newly created file system:
umount /mnt
12. Check the new file system with fsck:
fsck /dev/rdsk/<disk-partition-name>
The restored file system is checked for consistency.
13 If you are recovering the root (/) file system, create the boot blocks on the root partition by using the installboot command:
installboot /usr/platform/'uname-I'/lib/fs/ufs/bootblk
/dev/rdsk/<disk-partition-name>
The installboot command installs the boot blocks onto the boot disk. Without the boot blocks, the disk cannot boot.
14. Insert a new tape into the tape drive and back up the new file system:
ufsdump 0uf /dev/rmt/n /dev/rdsk/<device-name>
A level 0 backup is performed. You should immediately make a backup of a newly created file system because ufsrestore repositions the files and changes the inode allocation.
15. Reboot the system with a reconfiguration reboot:
# shutdown -y -g0 -i0
ok boot -r
The system is rebooted.
The following example is an actual session that restores the root (/) file system from tape device /dev/rmt/0 to Small Computer System Interface (SCSI) disk target 3, slice 0, on controller 0:
# mount /dev/dsk/c0t3d0s0 /mnt
# cd /mnt
# devfsadm -c tape
# ufsrestore rf /dev/rmt/0
Note
devfsadm The devfsadm command with the -c tape option creates the /dev entries for the tape drive only. It creates links in /dev/rmt to the actual tape device special files. The devfsadm command is covered in Chapter 1.
Files are restored from tape. When this is complete, you are returned to a shell prompt. You can then remove the restoresymtable file, unmount the file system, and use fsck on the device:
# rm restoresymtable
# cd /
# umount /mnt
# fsck /dev/rdsk/c0t3d0s0
The system displays the fsck passes as the file system is checked:
# installboot
/usr/platform/'uname -i'/lib/fs/ufs/bootblk /dev/rdsk/c0t3d0s0
# ufsdump 0uf /dev/rmt/0 /dev/rdsk/c0t3d0s0
# shutdown -y -g0 -i0
The system is halted. At the ok prompt, you perform a reconfiguration reboot as follows:
boot -r
Performing a reconfiguration reboot ensures that all devices connected to the system have been configured properly in the kernel and in the /dev and /devices directories.
When you restore files in a directory other than the root directory of the file system, ufsrestore re-creates the file hierarchy in the current directory. For example, if you restore to /home files that were backed up from /users/bcalkins/files, the files are restored in the directory /home/users/bcalkins/files.
When you restore individual files and directories, it’s a good idea to restore them to a temporary directory such as /var/tmp. After you verify that you’ve retrieved the correct files, you can move them to their proper locations. You can restore individual files and directories to their original locations; however, if you do so, you should be sure that you do not overwrite newer files with older versions from the backup tape.
You should not forget to make regular backups of your operating system. Losing all the customization you do—such as adding user accounts, setting up printers, and installing application software—would be disastrous. Whenever you make modifications that affect the root (/),/usr, /opt, or other operating system directories, you should bring down the system into single-user mode and perform a level 0 dump.
Objective:
Explain how to perform incremental, full, and remote backups to tape for an unmounted file system using the ufsdump command, or explain how to back up a mounted file system using UFS snapshot.
You can use the fssnap command to create a read-only snapshot of a file system while the file system is mounted. A snapshot is a point-in-time image of a file system that provides a stable and unchanging device interface for backups. This snapshot uses the backing-store file. A few important points about the backing-store:
![]() The destination path of the backing store files must have enough free space to hold the file system data. The size of the backing store files vary with the amount of activity on the file system.
The destination path of the backing store files must have enough free space to hold the file system data. The size of the backing store files vary with the amount of activity on the file system.
![]() The backing store file location must be different from the file system that is being captured in a snapshot.
The backing store file location must be different from the file system that is being captured in a snapshot.
![]() The backing-store files can reside on any type of file system, including another UFS file system or an NFS file system.
The backing-store files can reside on any type of file system, including another UFS file system or an NFS file system.
![]() Multiple backing-store files are created when you create a snapshot of a UFS file system that is larger than 512 Gbytes.
Multiple backing-store files are created when you create a snapshot of a UFS file system that is larger than 512 Gbytes.
Unlike ufsdump, fssnap enables you to keep the file system mounted and the system in multi-user mode during backups. The snapshot is stored to disk, and then you can use Solaris backup commands such as ufsdump, tar, and cpio to back up the UFS snapshot. The result is a more reliable backup than you get with ufsdump alone.
When you use the fssnap command to create a file system snapshot, you should observe how much disk space the backing-store file consumes. The backing-store file itself uses no space initially, and then it grows quickly. As activity increases on the original file system, the backing-store file grows. This is because the size of the backing-store is activity related and is not related to the size of the original file system. It holds the original version of blocks that changed while the fssnap was active. If the file system has heavy use, the backing-store file increases in size quickly. On a heavily used file system, you need to make sure the backing-store file has enough space to grow.
Note
Disk Space for the Backing-Store File If the backing-store file runs out of disk space, the snapshot might delete itself, thus causing the backup to abort. If you are experiencing problems with the backup, you should examine the /var/adm/messages file for possible snapshot errors.
Step by Step 7.3 describes how to create snapshots.
STEP BY STEP
7.3 Creating Snapshots
1. Determine which file system you want to create the snapshot of. For this example, assume that you want to create a snapshot of /export/home.
2. Determine where you are going to store the backing-store file (that is, the snapshot). That file system should be large enough to hold an expanding backing-store file. In this example, you are going to use /var/tmp as a location to store the backing-store file.
3. Create the snapshot:
fssnap -F ufs -o backing-store=/var/tmp /export/home
backing-store can be abbreviated as bs (for example, bs=/var/tmp).
The system responds with the name of the virtual device that is created:
/dev/fssnap/0
4. Now you can back up the file system to tape (/dev/rmt/0) by specifying the virtual device (/dev/fssnap/0), as follows:
ufsdump 0ucf /dev/rmt/0 /dev/fssnap/0
The virtual device /dev/fssnap/0 is described later in this section.
Here’s what happens after you create the snapshot by using the fssnap command. A file, the backing-store file, is created in the /var/tmp file system. It’s a normal file that can be listed just like any other file, by using the ls command:
ls -l /var/tmp
The following backing-store file is listed:
-rw------- 1 root other 196665344 Mar 27 15:05 snapshot0
snapshot0 is the name of the backing-store file. The backing-store file is a bitmapped file that contains copies of presnapshot data that has been modified since the snapshot was taken. When you take the snapshot, the snapshot0 file is created. As the original file system changes, the snapshot’s backing-store file is updated, and the backing-store file grows.
Note
Limiting the Size of the Backing-Store File You can limit the size of the backing-store file by using the maxsize option, as follows:
fssnap -F ufs -o maxsize=600m,backing-store=/var/tmp /export/home
In this example, the size of the backing-store file is limited to 600MB; however, the backing-store file is a sparse file, which actually uses less disk space than the file system it represents
In addition, after you execute the fssnap command, two read-only virtual device files are created:
![]()
/dev/fssnap/0—Block virtual device
![]()
/dev/rfssnap/0—Raw virtual device
The virtual devices look and act like standard read-only devices, and you can use any of the existing Solaris commands with them. For example, you can mount the block virtual device by using the mount command, as follows:
mount -F ufs -o ro /dev/fssnap/0 /mnt
Note
Mounting the Snapshot Because the virtual devices are read-only, you need to mount the snapshot as read-only by using the -o ro option to the mount command.
You can go into the mount point and view the contents of the snapshot with the following:
ls -l /mnt
The contents of the snapshot are displayed:

In this case, there wasn’t much in the file system when the snapshot was created.
Now you can list the contents of the “real” file system named /export/home; remember that this is the live file system from which the snapshot was taken:

Notice in this example that things are changing. There is a new file named file1, and the dump file has a new time. The snapshot image, however, remains the way it was—none of the dates have changed, and none of the new files show up. When you back up the snapshot, you get a backup of the file system the way it was when you made the snapshot. Here’s how you back up the snapshot by using the ufsdump command:
ufsdump 0ucf /dev/rmt/0 /dev/rfssnap/0
Notice that you’re backing up the virtual device named /dev/fssnap/0. The backup that was created from the virtual device is a backup of the original file system and represents the state of the file system when the snapshot was taken. If you ever need to restore a file system from the backup, restore the data using ufsrestore, as if you had taken the backup directly from the original file system. For this recovery procedure, refer to the section titled “The ufsrestore Facility” earlier in this chapter.
To remove the snapshot, you issue the following command:
fssnap -d /export/home
/export/home was the name of the file system you created the snapshot of. The system responds with the following:
Deleted snapshot 0
When you create a UFS snapshot, you can specify that the backing-store file be unlinked, which means the backing-store file is removed after the snapshot is deleted. Here’s how you do this:
fssnap -F ufs -o unlink,backing-store=/var/tmp /export/home
When you use the unlink option, you cannot see the backing-store file. This might make administration more difficult because the file is not visible in the file system.
Earlier you did not specify the -o unlink option, so you have to delete the backing-store manually, as follows, after you run the fssnap -d command:
rm /var/tmp/snapshot0
The backing-store file occupies disk space until the snapshot is deleted, whether you use the -o unlink option to remove the backing-store file or you remove it manually.
Here are a few other facts about snapshots:
![]() The size of the backing-store file depends on how much data has changed since the snapshot was taken.
The size of the backing-store file depends on how much data has changed since the snapshot was taken.
![]() A snapshot does not persist across system reboots.
A snapshot does not persist across system reboots.
![]() Snapshots are meant to be used on UFSs only.
Snapshots are meant to be used on UFSs only.
For more information on options that can be used with the fssnap command to list and manage snapshots, refer to the man pages for fssnap and fssnap_ufs.
zip is a compression and file-packaging utility that is now available on Solaris. zip is used on Unix, Microsoft Windows, Macintosh, and many other operating systems to compress files and then put those files into an archive file. The zip program is useful for combining a set of files for distribution or for saving disk space by temporarily compressing unused files or directories. You are likely to see Solaris patches distributed in zip format. The section “Installing a Patch” in Chapter 2, “Installing the Solaris 10 Operating Environment,” provides information on patches.
You use the unzip command to extract the compressed files from an archive. Other than for installing patches, the zip and unzip commands are not covered on the exam. For more information, consult the online man pages.
You can back up your Solaris operating environment (not the data) by creating a Flash archive. Previously in this chapter, you learned how to back up your operating system by using ufsdump and specifying a level 0 dump of the root (/), /usr, and other operating system–related file systems. The Flash archive feature can be used as a backup or to replicate an installation on a number of systems, called clone systems. (A description of the Flash archive is provided in Chapter 2. Installing a Flash Archive is also described in Chapter 14, “Advanced Installation Procedures.”)
After the system has been set up and configured (but before it goes into production) is a good time to create the archive. While you’re in single-user mode, you use the flarcreate command to create the Solaris Flash archive. The following is the syntax for this command:
flarcreate -n <name> <options> <path>/<filename>
The arguments for the command are described in Table 7.16.
Many options are available for the flarcreate command, and they are described in Chapter 13. The following example shows the options you use to create an archive of the entire operating environment on the local tape drive:
flarcreate -n osarchive -t /dev/rmt/0
The -n option allows you to identify the archive with a unique name. It is not the name with which the archive will be stored, however. The -t option specifies that the archive will be stored to tape.
If the archive creation is successful, the flarcreate command returns the exit code 0. If the archive creation fails, the flarcreate command returns a nonzero exit code.
You can use the flar command to administer archives. The flar command includes subcommands for extracting information, splitting archives, and combining archives.
You can use the flar command with the -i option to get information about archives you have already created, as follows:
flar -i /data/vararchive
The system responds with the following:
files_archived_method=cpio
creation_date=20020327221216
creation_master=ultra5
content_name=vararchive
files_compressed_method=none
files_archived_size=34472960
content_architectures=sun4u
The Java archive (JAR) file format enables you to bundle multiple files into a single archive file, much the same way you can bundle files by using the tar utility. Typically, a JAR file contains the class files and auxiliary resources associated with Java applets and applications.
The benefits of using the JAR file format include the following:
![]() Security—You can digitally sign the contents of a JAR file. Users who recognize your signature can then optionally grant your files security privileges that they wouldn’t otherwise have.
Security—You can digitally sign the contents of a JAR file. Users who recognize your signature can then optionally grant your files security privileges that they wouldn’t otherwise have.
![]() Decreased download time—If your applet is bundled in a JAR file, the applet’s class files and associated resources can be downloaded to a browser in a single Hypertext Transfer Protocol (HTTP) transaction, without the need for opening a new connection for each file.
Decreased download time—If your applet is bundled in a JAR file, the applet’s class files and associated resources can be downloaded to a browser in a single Hypertext Transfer Protocol (HTTP) transaction, without the need for opening a new connection for each file.
![]() Compression—The JAR format enables you to compress files for efficient storage.
Compression—The JAR format enables you to compress files for efficient storage.
![]() Packaging for extensions—The extensions framework provides a means by which you can add functionality to the Java core platform, and the JAR file format defines the packaging for extensions. Java 3D and JavaMail are examples of extensions developed by Sun. By using the JAR file format, you can turn your software into extensions as well.
Packaging for extensions—The extensions framework provides a means by which you can add functionality to the Java core platform, and the JAR file format defines the packaging for extensions. Java 3D and JavaMail are examples of extensions developed by Sun. By using the JAR file format, you can turn your software into extensions as well.
![]() Package sealing—Packages stored in JAR files can optionally be sealed so that they can enforce version consistency. To seal a package within a JAR file means that all classes defined in that package must be found in the same JAR file.
Package sealing—Packages stored in JAR files can optionally be sealed so that they can enforce version consistency. To seal a package within a JAR file means that all classes defined in that package must be found in the same JAR file.
![]() Package versioning—A JAR file can hold data about the files it contains, such as vendor and version information.
Package versioning—A JAR file can hold data about the files it contains, such as vendor and version information.
![]() Portability—The mechanism for handling JAR files is a standard part of the Java platform’s core application programming interface (API).
Portability—The mechanism for handling JAR files is a standard part of the Java platform’s core application programming interface (API).
The jar command is similar to the tar command in that it packages several files into a single file, but it also compresses the resulting file. It is a Java application that combines multiple files into a single JAR file. It is also a general-purpose archiving and compression tool that is based on Zip and the ZLIB compression format. The jar command was originally created so that Java programmers could download multiple files with one request rather than having to issue a download request for each separate file. jar is standard with the Solaris 10 operating system, and it is also available on any system that has a Java Virtual Machine (JVM) installed.
This is the syntax for the jar command:
jar cf <jar-file> <input-file(s)>
Table 7.17 describes the options and arguments used with the jar command.
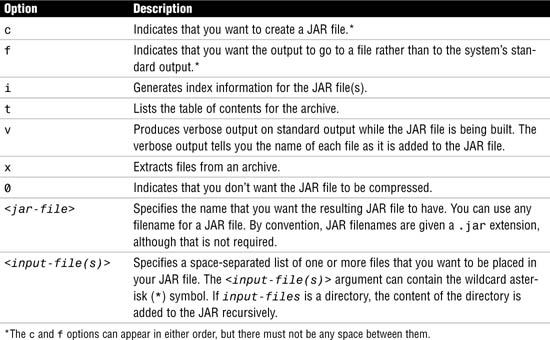
You use the following to create a JAR file:
jar cf <jar-file> <input-file(s)>
You use the following to view the contents of a JAR file:
jar tf <jar-file>
You use the following to extract the contents of a JAR file:
jar xf <jar-file>
You use the following to extract specific files from a JAR file:
jar xf <jar-file> <archived-file(s)>
Here’s an example of how to use jar to compress files located within two different directories. JAR files are packaged with the Zip file format, so you can use them for Zip-like tasks, such as lossless data compression, archiving, decompression, and archive unpacking. To package the audio and images directories into a single JAR file named files.jar in your default home directory, you would run the following command from inside the /export/home/bcalkins directory:
jar cvf ~/files.jar files.class audio images
The audio and images arguments represent directories, so the JAR tool recursively places them and their contents in the JAR file. The generated JAR file files.jar is placed in the user’s home directory. Because the command used the v option for verbose output, you see something similar to this output when you run the command:
adding: files.class (in=3825) (out=2222) (deflated 41%)
adding: audio/ (in=0) (out=0) (stored 0%)
adding: audio/beep.au (in=4032) (out=3572) (deflated 11%)
adding: audio/ding.au (in=2566) (out=2055) (deflated 19%)
adding: audio/return.au (in=6558) (out=4401) (deflated 32%)
adding: audio/yahoo1.au (in=7834) (out=6985) (deflated 10%)
adding: audio/yahoo2.au (in=7463) (out=4607) (deflated 38%)
adding: images/ (in=0) (out=0) (stored 0%)
adding: images/cross.gif (in=157) (out=160) (deflated -1%)
adding: images/not.gif (in=158) (out=161) (deflated -1%)
You can see from this output that the JAR file files.jar is compressed. The JAR tool compresses files by default. You can turn off the compression feature by using the 0 option; in that case, the command looks like this:
jar cvf0 files.jar files.class audio images
This chapter described the standard copy and backup utilities available in Solaris. It also describes the various types of backup media available. It discussed tar, dd, cpio, and pax, and it described how to use these utilities to copy and restore files, directories, and entire file systems.
This chapter also described how to use ufsdump and ufsrestore to perform regular backups on a system. It described a recommended backup schedule that you can implement to safeguard any system from deliberate or accidental loss of data. This chapter described how to recover data from backup media. It described the procedures to restore single files and entire file systems. The chapter also described how to use fssnap and Solaris Flash archive as further methods to back up information.
Finally, the chapter described methods used to package and compress files (such as zip and jar).
As you’re finding out with Solaris, there are often many ways to perform a task. You need to choose the method that best suits your environment. Although all the utilities described in this chapter do a good job of backing up your data, if your company has several servers and large storage pools, you might want to investigate some of the more robust backup packages available from third parties, such as Veritas and Legato. Sun also has a backup product, StorEdge Enterprise Backup, which is an optional package that can be purchased directly from Sun and added into your Solaris operating environment. Most of these add-on packages provide a comprehensive suite of utilities for conducting and managing backups in complex computing environments. In most cases, they allow single-point backups—not only for Solaris but for other operating systems as well.
These exercises utilize a tape drive connected as /dev/rmt/0. If your system does not have a tape drive attached to it, you should substitute the device /dev/rmt/0n for a filename such as /tmp/foo.
In this exercise, you use the tar command to copy files from disk to tape.
Estimated time: 15 minutes (depending on the size of /export/home)
1. Log in as root and insert a tape in the tape drive. The tape will be erased, so you should use a blank tape and make sure the tape is not write protected.
2. Create a tape archive of everything in the /export/home directory on tape device /dev/rmt/0:
tar cvf /dev/rmt/0 /export/home
3. List the contents of the archive:
tar tvf /dev/rmt/0
4. Add another tape archive to the same tape. This is referred to as a stacked tape. To do this, you first need to advance the tape past the first archive by using the mt command:
mt -f /dev/rmt/0n fsf 1
The mt utility sends commands to a magnetic tape drive. It can be used to rewind, retension, and fast forward a tape as well as many other operations. In the example, the fsf option will move the tape forward 1 record.
Notice the use of the “no rewind” device (that is, 0n rather than 0).
5. Add the next archive of the /var/adm directory:
tar cvf /dev/rmt/0n /var/adm
6. Rewind the tape:
mt -f /dev/rmt/0 rew
7. List the first archive on the tape:
tar tvf /dev/rmt/0n
8. List the contents of the second tape archive on the stacked tape:
tar tvf /dev/rmt/0
Note that it’s important to make a notation on the tape label that this is a stacked tape and also to record the order of each archive on the tape.
This exercise demonstrates how to copy user files that have been modified in the past 30 days to a tape drive with the device name /dev/rmt/0. You should specify a larger-than-default blocking factor to increase the transfer speed.
Estimated time: 15 minutes (depending on the size of /export/home)
1. Log in as root and insert a tape in the tape drive. The tape will be erased, so you should use a blank tape and make sure the tape is not write protected.
cd /export/home
2. Locate all files by using the find command and transfer them to tape by using cpio:
find . -mtime -30 -print | cpio -oB > /dev/rmt/0
3. List all the files that were backed up in step 2:
cpio -ict < /dev/rmt/0
4. Use the pax utility to list the contents of the tape that was created by using cpio:
pax -v -f /dev/rmt/0
In this exercise, you use the ufsdump command to back up an entire file system. You then use the ufsrestore command to restore a file.
Caution
This Exercise Destroys Data This exercise removes and overwrites files in the /var file system. Therefore, you should not do this exercise on a production system.
Estimated time: 20 minutes
1. Log in as root and insert a tape in the tape drive. The tape will be erased, so you should use a blank tape and make sure the tape is not write protected.
2. Back up the entire /var file system to tape:
ufsdump 0ucf /dev/rmt/0 /var
3. Remove the /var/adm/messages file:
rm /var/adm/messages
4. Restore the /var/sadm/README file by using ufsrestore:
cd /var
ufsrestore -ivf /dev/rmt/0
5. At the ufsrestore> prompt, verify that the messages file is on the tape:
ls sadm/README
6. Mark the file for extraction, and then extract the file:
add sadm/README
extract
When the system asks you to specify the next volume, type 1.
When the system says, set owner/mode for '.'?[yn], enter y.
Enter q to exit the ufsrestore utility.
7. Verify that the file has been restored to its proper location by using the ls -l command.
|
1. |
A. The first command changes your working directory, and the second creates the |
|
2. |
A. To restore the data from backups, you first load the level 0 tape created the first Monday of the month, followed by the level 2 tape, followed by the level 3 tape, and finally the level 4 tape. For more information, see the section “The |
|
3. |
B. You use the |
|
4. |
C. |
|
5. |
C. The |
|
6. |
B. The main advantage of the |
|
7. |
A, C, D. |
|
D. |
|
|
9. |
A. Unlike |
|
10. |
C. The following example backs up the root ( # ufsdump 0uf /dev/rmt/0 'fssnap -o bs=/export,raw /' Because |
|
11. |
B. The |