
Chapter 14. Advanced Installation Procedures
Objectives
The following test objectives for exam 310-202 are covered in this chapter:
Explain custom JumpStart configuration, including the boot, identification, configuration, and installation services.
![]() This chapter helps you understand the components of a JumpStart network installation. You’ll learn about setting up servers and clients to support a JumpStart installation including JumpStart related commands, configuration files, and services.
This chapter helps you understand the components of a JumpStart network installation. You’ll learn about setting up servers and clients to support a JumpStart installation including JumpStart related commands, configuration files, and services.
Configure a JumpStart including implementing a JumpStart server; editing the sysidcfg, rules, and profile files; and establishing JumpStart software alternatives (setup, establishing alternatives, troubleshooting, and resolving problems).
![]() This chapter shows you how to implement a JumpStart installation as well as the files and scripts that are modified and used.
This chapter shows you how to implement a JumpStart installation as well as the files and scripts that are modified and used.
Explain Flash, create and manipulate the Flash archive, and use it for installation.
![]() The Solaris Flash feature takes a snapshot of a Solaris operating environment, complete with patches and applications, if desired. It can only be used in initial installations, however, not upgrades.
The Solaris Flash feature takes a snapshot of a Solaris operating environment, complete with patches and applications, if desired. It can only be used in initial installations, however, not upgrades.
Given a Preboot Execution Environment (PXE) installation scenario, identify requirements and install methods, configure both the install and DHCP server, and boot the x86 client.
![]() This chapter shows how to use the Preboot Execution Environment (PXE) to boot and install an x86 client across the network.
This chapter shows how to use the Preboot Execution Environment (PXE) to boot and install an x86 client across the network.
The following strategies will help you prepare for the test:
![]() Practice the step-by-step examples provided in this chapter on a Solaris system. Be sure that you understand each step and can describe the process of setting up a boot server, an install server, and a configuration server. You should also be able to identify the events that occur during the JumpStart client boot sequence.
Practice the step-by-step examples provided in this chapter on a Solaris system. Be sure that you understand each step and can describe the process of setting up a boot server, an install server, and a configuration server. You should also be able to identify the events that occur during the JumpStart client boot sequence.
![]() Understand each of the commands described in this chapter. Get familiar with all of the options, especially the ones used in the examples. You’ll see questions on the exam related to the
Understand each of the commands described in this chapter. Get familiar with all of the options, especially the ones used in the examples. You’ll see questions on the exam related to the add_install_client and add_to_install_server scripts.
![]() State the purpose of the
State the purpose of the sysidcfg file, the class file, and the rules file. Given the appropriate software source, be prepared to explain how to create a configuration server with a customized rules file and class files.
![]() State the purpose of the JumpStart server and identify the main components of each type of server. Learn the terms listed in the “Key Terms” section of this chapter. Be prepared to provide a description of each term.
State the purpose of the JumpStart server and identify the main components of each type of server. Learn the terms listed in the “Key Terms” section of this chapter. Be prepared to provide a description of each term.
![]() State the features and limitations of Solaris Flash and be able to implement a Flash Archive. Practice the Flash Archive example in this chapter using two Solaris systems. Make sure you are comfortable with the concepts being introduced as well as the procedures to successfully use this powerful feature.
State the features and limitations of Solaris Flash and be able to implement a Flash Archive. Practice the Flash Archive example in this chapter using two Solaris systems. Make sure you are comfortable with the concepts being introduced as well as the procedures to successfully use this powerful feature.
![]() Become familiar with the Preboot Execution Environment (PXE) features, the requirements, and the procedures to follow in order to get an x86 client to successfully boot across the network. Also, make sure you understand what the DHCP symbols represent, and be prepared for a question in the exam that asks you to match a symbol with its corresponding description.
Become familiar with the Preboot Execution Environment (PXE) features, the requirements, and the procedures to follow in order to get an x86 client to successfully boot across the network. Also, make sure you understand what the DHCP symbols represent, and be prepared for a question in the exam that asks you to match a symbol with its corresponding description.
There are seven ways to install the Solaris software on a system: interactive installation, both GUI and command-line, JumpStart, WAN Boot (described in Chapter 2, “Installing the Solaris 10 Operating Environment”), custom JumpStart, Solaris Flash (described in this chapter), and installation over the network ( also described in Chapter 2). This chapter focuses on how to install the Solaris operating environment on clients using the custom JumpStart method. This method allows identical installations to be applied to many clients.
Another method of replicating installations is to use the Solaris Flash feature, which involves taking a complete snapshot of the Solaris operating environment, including patches and applications if you wish, and creating an archive that can be used to install other systems. This method effectively creates a clone.
This chapter looks at both the Custom JumpStart utility and the Solaris Flash feature of Solaris, showing how to use both to install the Solaris software.
Finally, this chapter introduces a new method of installing x86-based clients, namely the Preboot Execution Environment (PXE), which allows a full installation over the network using DHCP.
Caution
Terminology Warning You’ll see the class file referred to as the profile in many Sun documents, scripts, and programs that relate to JumpStart. In the Sun System Administration training classes, however, it is referred to as a class file. That’s how we refer to it throughout this chapter. On the exams, it is also referred to as a class file. The same is true for the configuration server. Sometimes Sun will refer to this server as a profile server.
Objectives:
Explain custom JumpStart configuration, including the boot, identification, configuration, and installation services.
![]() Configure a JumpStart including implementing a JumpStart server; editing the
Configure a JumpStart including implementing a JumpStart server; editing the sysidcfg, rules, and profile files; and establishing JumpStart software alternatives (setup, establishing alternatives, troubleshooting, and resolving problems).
There are two versions of JumpStart: JumpStart and custom JumpStart. JumpStart lets you automatically install the Solaris software on a SPARC-based system just by inserting the Solaris CD and powering on the system. You do not need to specify the boot command at the ok prompt. The software that is installed is specified by a default class file that is chosen based on the system’s model and the size of its disks; you can’t choose the software that is installed. For new SPARC systems shipped from Sun, this is the default method of installing the operating system when you first power on the system.
The custom JumpStart method of installing the operating system provides a way to install groups of similar systems automatically and identically. If you use the interactive method to install the operating system, you must interact with the installation program by answering various questions. At a large site with several systems that are to be configured exactly the same, this task can be monotonous and time consuming. In addition, there is no guarantee that each system is set up the same. Custom JumpStart solves this problem by providing a method to create sets of configuration files beforehand so that the installation process can use them to configure each system automatically.
Custom JumpStart requires up-front work, creating custom configuration files before the systems can be installed, but it’s the most efficient way to centralize and automate the operating system installation at large enterprise sites. Custom JumpStart can be set up to be completely hands off.
The custom configuration files that need to be created for JumpStart are the rules and class files. Both of these files consist of several keywords and values and are described in this chapter.
Another file that is introduced in this chapter is the sysidcfg file, which can be used to preconfigure the system identification information and achieve a fully hands-off installation.
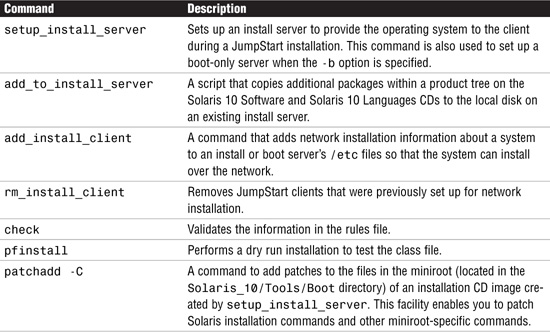
Table 14.1. lists the various commands that are introduced in this chapter.
There are three main components to JumpStart:
![]() Boot and Client Identification Services—These services are provided by a networked boot server and provide the information that a JumpStart client needs to boot using the network.
Boot and Client Identification Services—These services are provided by a networked boot server and provide the information that a JumpStart client needs to boot using the network.
![]() Installation Services—These are provided by a networked install server, which provides an image of the Solaris operating environment the JumpStart client uses as its source of data to install.
Installation Services—These are provided by a networked install server, which provides an image of the Solaris operating environment the JumpStart client uses as its source of data to install.
![]() Configuration Services—These are provided by a networked configuration server and provide information that a JumpStart client uses to partition disks and create file systems, add or remove Solaris packages, and perform other configuration tasks.
Configuration Services—These are provided by a networked configuration server and provide information that a JumpStart client uses to partition disks and create file systems, add or remove Solaris packages, and perform other configuration tasks.
Note
Server Configurations At times we describe the boot server, the install server, and the configuration server as though they are three separate systems. The reality, however, is that most sites will have one system that performs all three functions. This is described in more detail in the section “The Install Server,” later in this chapter.
Each of these components is described in this chapter. If any of these three components is improperly configured, the JumpStart clients can
![]() Fail to boot.
Fail to boot.
![]() Fail to find a Solaris Operating Environment to load.
Fail to find a Solaris Operating Environment to load.
![]() Ask questions interactively for configuration.
Ask questions interactively for configuration.
![]() Fail to partition disks, create file systems, and load the operating environment.
Fail to partition disks, create file systems, and load the operating environment.
The first step in preparing a custom JumpStart installation is to decide how you want the systems at your site to be installed. Here are some questions that need to be answered before you begin:
![]() Will the installation be an initial installation or an upgrade?
Will the installation be an initial installation or an upgrade?
![]() What applications will the system support?
What applications will the system support?
![]() Who will use the system?
Who will use the system?
![]() How much swap space is required?
How much swap space is required?
These questions will help you group the systems when you create the class and rules files later in this chapter.
Additional concerns to be addressed include what software packages need to be installed and what size the disk partitions need to be in order to accommodate the software. After you answer these questions, group systems according to their configuration (as shown in the example of a custom JumpStart near the end of this chapter).
The next step in preparing a custom JumpStart installation is to create the configuration files that will be used during the installation: the rules.ok file (a validated rules file) and a class file for each group of systems. The rules.ok file is a file that should contain a rule for each group of systems you want to install. Each rule distinguishes a group of systems based on one or more system attributes. The rule links each group to a class file, which is a text file that defines how the Solaris software is to be installed on each system in the group. Both the rules.ok file and the class files must be located in a JumpStart directory that you define.
The custom JumpStart configuration files that you need to set up can be located on either a diskette (called a configuration diskette) or a server (called a configuration server). Use a configuration diskette when you want to perform custom JumpStart installations on non-networked standalone systems. Use a configuration server when you want to perform custom JumpStart installations on networked systems that have access to the server. This chapter covers both procedures.
This section provides a quick overview of what takes place during a custom JumpStart installation. Each step is described in detail in this chapter.
To prepare for the installation, you create a set of JumpStart configuration files, the rules and class files, on a server that is located on the same network as the client you are installing. Next, you set up the server to provide a startup kernel that is passed to the client across the network. This is called the boot server (or sometimes it is referred to as the startup server).
After the client starts up, the boot server directs the client to the JumpStart directory, which is usually located on the boot server. The configuration files in the JumpStart directory direct and automate the entire Solaris installation on the client.
To be able to start up and install the operating system on a client, you need to set up three servers: a boot server, an install server, and a configuration server. These can be three separate servers; however, in most cases, one server provides all of these services.
The boot server, also called the startup server, is where the client systems access the startup files. This server must be on the local subnet (not across routers). Though it is possible to install systems over the network that are not on the same subnet as the install server, there must be a boot server that resides on the same subnet as the client.
When a client is first turned on, it does not have an operating system installed or an IP address assigned; therefore, when the client is first started, the boot server provides this information. The boot server running the RARP (Reverse Address Resolution Protocol) daemon, in.rarpd, looks up the Ethernet address in the /etc/ethers file, checks for a corresponding name in its /etc/hosts file, and passes the Internet address back to the client.
Note
Check rarpd Daemon rarpd is a daemon that is not always running. The inetd daemon is the network listener that starts rarpd automatically whenever a request is made. A corresponding entry for rarpd should exist in inetd.conf.
RARP is a method by which a client is assigned an IP address based on a lookup of its Ethernet address. After supplying an IP address, the server searches the /tftpboot directory for a symbolic link named for the client’s IP address expressed in hexadecimal format. This link points to a boot program for a particular Solaris release and client architecture. For SPARC systems, the file name is <hex-IP address.architecture>, for example:
C009C864.SUN4U -> inetboot.sun4u.Solaris_10-1
The boot server uses the in.tftpd daemon to transmit the boot program to the client via trivial file transfer protocol (TFTP). The client runs this boot program to start up.
The boot program tries to mount the root file system. To do so, it issues the whoami request to discover the client’s hostname. The boot server running the boot parameter daemon, rpc.bootparamd, looks up the hostname and responds to the client. The boot program then issues a getfile request to obtain the location of the client’s root and swap space. The boot server responds with the information obtained from the /etc/bootparams file.
Once the client has its boot parameters, the boot program on the client mounts the / (root) file system from the boot server. The client loads its kernel and starts the init program. When the boot server is finished bootstrapping the client, it redirects the client to the configuration server.
The client searches for the configuration server using the bootparams information. The client mounts the configuration directory and runs sysidtool. The client then uses the bootparams information to locate and mount the installation directory where the Solaris image resides. The client then runs the suninstall program and installs the operating system.
For boot operations to proceed, the following files and directories must be properly configured on the boot server:
The following sections describe each file.
When the JumpStart client boots, it has no IP address, so it broadcasts its Ethernet address to the network using RARP. The boot server receives this request and attempts to match the client’s Ethernet address with an entry in the local /etc/ethers file.
If a match is found, the client name is matched to an entry in the /etc/hosts file. In response to the RARP request from the client, the boot server sends the IP address from the /etc/hosts file back to the client. The client continues the boot process using the assigned IP address.
An entry for the JumpStart client must be created by editing the /etc/ethers file or using the add_install_client script described later in this chapter in the section titled “Setting Up Clients.”
The /etc/hosts file was described in Chapter 8, “The Solaris Network Environment.” The /etc/hosts file is the local file that associates the names of hosts with their IP addresses. The boot server references this file when trying to match an entry from the local /etc/ethers file in response to a RARP request from a client. In a name service environment, this file would be controlled by NIS. See Chapter 12, “Naming Services,” for more information on how this file can be managed by NIS.
The /etc/dfs/dfstab file lists local file systems to be shared to the network. This file is described in detail in Chapter 9, “Virtual File Systems, Swap, and Core Dumps.”
The /etc/bootparams file contains entries that network clients use for booting. JumpStart clients retrieve the information from this file by issuing requests to a server running the rpc.bootparamd program. See the section titled “Setting Up Clients” later in this chapter for more information on how this file is configured.
/tftpboot is a directory that contains the inetboot.SUN4x.Solaris_10-1 file that is created for each JumpStart client when the add_install_client script is run.
The client’s IP address is expressed in hexadecimal format. This link points to a boot program for a particular Solaris release and client architecture.
When booting over the network, the JumpStart client’s boot PROM makes a RARP request, and when it receives a reply, the PROM broadcasts a TFTP request to fetch the inetboot file from any server that responds and executes it. See how this directory is configured in the section titled “Setting Up Clients.”
The boot server is set up to answer RARP requests from clients using the add_install_client command. Before a client can start up from a boot server, the setup_install_server command is used to set up the boot server. If the same server is going to be used as a boot server and an install server, proceed to the next section titled “The Install Server.”
To setup the boot server, follow the steps in Step by Step 14.1.
Note
Booting on a Separate Subnet Normally, the install server also provides the boot program for booting clients. However, the Solaris network booting architecture requires you to set up a separate boot server when the install client is on a different subnet than the install server. Here’s the reason: SPARC install clients require a boot server when they exist on different subnets because the network booting architecture uses the reverse address resolution protocol (RARP). When a client boots, it issues a RARP request to obtain its IP address. RARP, however does not acquire the netmask number, which is required to communicate across a router on a network. If the boot server exists across a router, the boot will fail because the network traffic cannot be routed correctly without a netmask.
STEP BY STEP
14.1 Setting Up the Boot Server
1. On the system that is the boot server, log in as root. Ensure the system has an empty directory with approximately 350MB of available disk space.
2. Insert the Solaris 10 Software CD 1 into the CD-ROM drive, allowing vold to automatically mount the CD. Change the directory to the mounted CD. Following is an example:
cd /cdrom/cdrom0/s0/Solaris_10/Tools
3. Use the setup_install_server command to set up the boot server. The -b option copies just the startup software from the Solaris CD to the local disk. Enter this command:
./setup_install_server -b <boot_dir_path>
where -b specifies that the system is set up as a boot server and <boot_dir_path> specifies the directory where the CD image is to be copied. You can substitute any directory path, as long as that path is shared across the network.
For example, the following command copies the kernel architecture information into the /export/jumpstart directory:
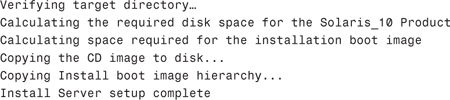
./setup_install_server -b /export/jumpstart
The system responds with this:

Note
Insufficient Disk Space The following error indicates that there is not enough room in the directory to install the necessary files. You’ll need to either clean up files in that file system to make more room or choose a different file system:
ERROR: Insufficient space to copy Install Boot image 362978 necessary -69372 available.
Note
Destination Must Be Empty The location in which you are trying to create the boot server must be empty. You’ll see the following error if the target directory is not empty:
The target directory /export/jumpstart is not empty. Please choose an empty directory or remove all files from the specifieddirectory and run this program again.
If no errors are displayed, the boot server is now set up. This boot server will handle all boot requests on this subnet. A client can only boot to a boot server located on its subnet. If you have JumpStart clients on other subnets, you’ll need to create a boot server for each of those subnets. The installation program will create a subdirectory named Solaris_10 in the <boot_dir_path> directory.
As explained in the previous section, the boot server and the install server are typically the same system. The exception is when the client on which Solaris 10 is to be installed is located on a different subnet than the install server. Then a boot server is required on that subnet.
The install server is a networked system that provides Solaris 10 CD images (or a single DVD image) from which you can install Solaris 10 on another system on the network. You can create an install server by copying the images on the Solaris installation media onto the server’s hard disk. This chapter focuses on using CD images, but you should be aware that Solaris 10 is also available on a single DVD.
By copying these CD images to the server’s hard disk, you enable a single install server to provide Solaris 10 CD images for multiple releases, including Solaris 10 CD images for different platforms. For example, a SPARC install server could provide the following:
![]() Solaris 10 Software CD 1 CD image
Solaris 10 Software CD 1 CD image
![]() Solaris 10 Software CD 2 CD image
Solaris 10 Software CD 2 CD image
![]() Solaris 10 Software CD 3 CD image
Solaris 10 Software CD 3 CD image
![]() Solaris 10 Software CD 4 CD image
Solaris 10 Software CD 4 CD image
![]() Solaris 10 Languages CD image (this CD is optional)
Solaris 10 Languages CD image (this CD is optional)
To set up a server as a boot and installer server, complete Step by Step 14.2. This Step by Step assumes that all systems are on the same subnet, and the boot and install server are to be on the same system.
STEP BY STEP
14.2 Setting Up a Server As a Boot and Install Server
1. The first step is to copy the Solaris 10 Software CD images to the server by performing the following steps:
Insert the CD labeled “Solaris 10 Software CD 1” into the CD-ROM and allow vold to automatically mount the CD. Change to the Tools directory on the CD as follows:
cd /cdrom/cdrom0/s0/Solaris_10/Tools
2. Use the setup_install_server command to install the software onto the hard drive. The syntax for the setup_install_server command is as follows:
./setup_install_server <install_dir_path>
<install_dir_path> is the path to which the CD images will be copied. This directory must be empty, and must be shared so that the JumpStart client can access it across the network during the JumpStart installation. Many system administrators like to put the CD images for the boot server and install server into /export/install and create a directory for each architecture being installed, such as sparc_10, or x86_10. This is because the install server could be used to hold multiple versions and multiple architectures. It’s a personal preference; just be sure that the target directory is empty, shared, and has approximately 3GB of space available, if all four CD images and the Language CD image are to be copied.
To install the operating environment software into the /export/install/sparc_10 directory, issue the following command:
./setup_install_server /export/install/sparc_10
The system responds with:
3. Eject the CD and insert the CD labeled “Solaris 10 Software CD 2” into the CD-ROM, allowing vold to automatically mount the CD.
Change to the Tools directory on the mounted CD as follows:
cd /cdrom/cdrom0/Solaris_10/Tools
4. Run the add_to_install_server script to install the additional software into the <install_dir_path> directory as follows:
./add_to_install_server <install_dir_path>
For example, to copy the software into the /export/install/sparc_10 directory, issue the following command:
./add_to_install_server /export/install/sparc_10
The system will respond with the following messages:

After checking for the required disk space, the image is copied from CD to disk. When it’s finished installing, repeat the process with the remaining CDs and then with the Solaris 10 Languages CD, if you are planning to support multiple languages.
After copying the Solaris CDs, you can use the patchadd -C command to patch the Solaris miniroot image on the install server’s hard disk. This option only patches the miniroot. Systems that are installed will still have to apply recommended patches if they are required.
If you are setting up custom JumpStart installations for systems on the network, you have to create a directory on a server called a configuration directory. This directory contains all the essential custom JumpStart configuration files, such as the rules file, the rules.ok file, the class file, the check script, and the optional begin and finish scripts.
The server that contains a JumpStart configuration directory is called a configuration server. It is usually the same system as the install and boot server, although it can be a completely different server. The configuration directory on the configuration server should be owned by root and should have permissions set to 755.
To set up the configuration server, follow Step by Step 14.3.
STEP BY STEP
14.3 Setting Up a Configuration Server
1. Choose the system that acts as the server, and log in as root.
2. Create the configuration directory anywhere on the server (such as /jumpstart).
3. To be certain that this directory is shared across the network, edit the /etc/dfs/dfstab file and add the following entry:
share -F nfs -o ro,anon=0 /jumpstart
3. Execute the svcadm enable network/nfs/server command. If the system is already an NFS server, you need only to type shareall and press Enter.
4. Place the JumpStart files (that is, rules, rules.ok, and class files) in the /jumpstart directory. The rules, rules.ok, and class files are covered later in this section. Sample copies of these files can be found in the Misc/jumpstart_sample subdirectory of the location where you installed the JumpStart install server.
You can also use the add_install_client script, which makes an entry into the /etc/dfs/dfstab file as part of the script. The add_install_client script is described in the section titled “Setting Up Clients.”
An alternative to setting up a configuration server is to create a configuration diskette (provided that the systems that are to be installed have diskette drives). If you use a diskette for custom JumpStart installations, the essential custom JumpStart files (the rules file, the rules.ok file, and the class files) must reside in the root directory on the diskette. The diskette that contains JumpStart files is called a configuration diskette. The custom JumpStart files on the diskette should be owned by root and should have permissions set to 755. See Step by Step 14.4 to set up a configuration disk.
STEP BY STEP
14.4 Setting Up a Configuration Disk
1. Format the disk by typing the following:
fdformat -U
2. If your system uses Volume Manager, insert the disk, and it will be mounted automatically.
3. Create a file system on the disk by issuing the newfs command:
newfs /vol/dev/aliases/floppy0
(The newfs command is covered in Chapter 1, “Managing File Systems.”)
4. Eject the disk by typing the following:
eject floppy
5. Insert the formatted disk into the disk drive.
You have completed the creation of a disk that can be used as a configuration disk. Now you can create the rules file and create class files on the configuration disk to perform custom JumpStart installations.
The rules file is a text file that should contain a rule for each group of systems you want to install automatically. Each rule distinguishes a group of systems based on one or more system attributes and links each group to a class file, which is a text file that defines how the Solaris software is installed on each system in the group.
After deciding how you want each group of systems at your site to be installed, you need to create a rules file for each specific group of systems to be installed. The rules.ok file is a validated version of the rules file that the Solaris installation program uses to perform a custom JumpStart installation.
After you create the rules file, validate it with the check script by changing to the /export/jumpstart directory and issuing the check command. If the check script runs successfully, it creates the rules.ok file. During a custom JumpStart installation, the Solaris installation program reads the rules.ok file and tries to find the first rule that has a system attribute matching the system being installed. If a match occurs, the installation program uses the class file specified in the rule to install the system.
A sample rules file for a Sun Ultra is shown next. You’ll find a sample rules file on the install server located in the <install_dir_path>/Solaris_10/Misc/jumpstart_sample directory, where <install_dir_path> is the directory that was specified using the setup_install_server script when the install server was set up. For the examples in this chapter, the install directory is /export/install/sparc_10.
Notice that almost all the lines in the file are commented out. These are simply instructions and sample entries to help the system administrator make the correct entry. The last, uncommented line is the rule we added for the example. The syntax is discussed later in this chapter. Each line in the code table has a rule keyword and a valid value for that keyword. The Solaris installation program scans the rules file from top to bottom. If the program matches an uncommented rule keyword and value with a known system, it installs the Solaris software specified by the class file listed in the class file field. Following is the sample rules file:
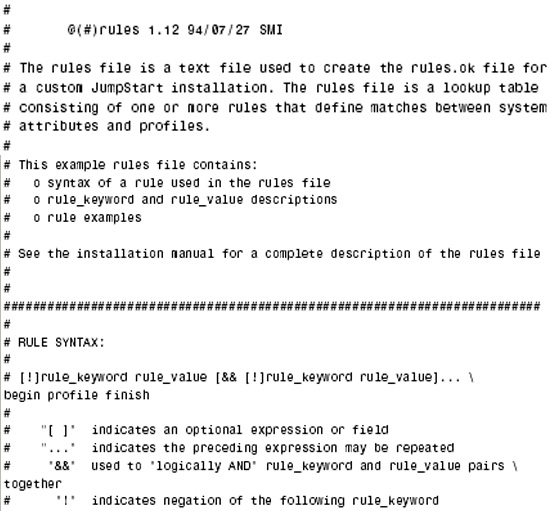

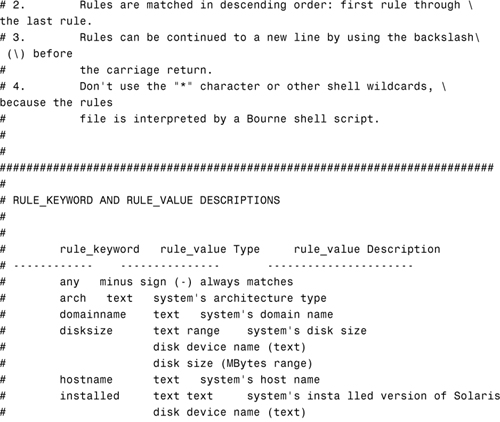
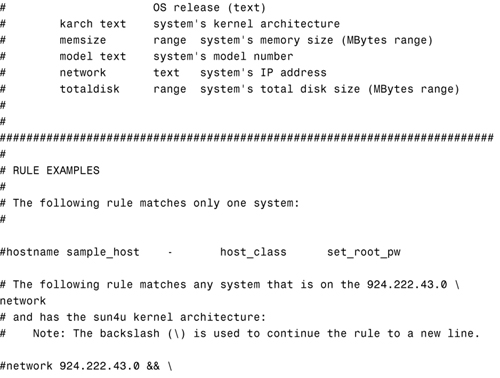
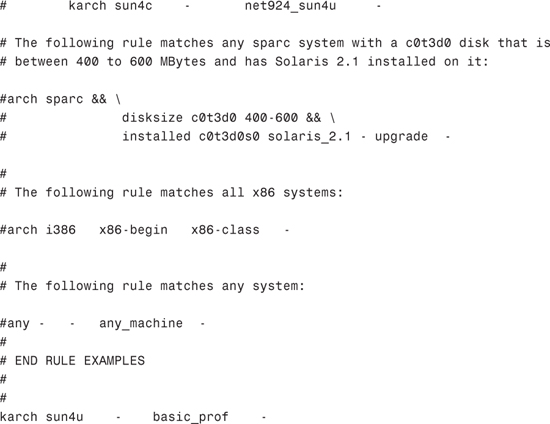
Table 14.2. describes the syntax that the rules file must follow.

The rules file must have the following:
![]() At least one rule
At least one rule
![]() The name “rules”
The name “rules”
![]() At least a rule keyword, a rule value, and a corresponding profile
At least a rule keyword, a rule value, and a corresponding profile
![]() A minus sign (
A minus sign (-) in the begin and finish fields if there is no entry
The rules file should be saved in the JumpStart directory, should be owned by root, and should have permissions set to 644.
The rules file can contain any of the following:
![]() A comment after the pound sign (
A comment after the pound sign (#) anywhere on a line. If a line begins with a #, the entire line is a comment. If a # is specified in the middle of a line, everything after the # is considered a comment.
![]() Blank lines.
Blank lines.
![]() Rules that span multiple lines. You can let a rule wrap to a new line, or you can continue a rule on a new line by using a backslash (
Rules that span multiple lines. You can let a rule wrap to a new line, or you can continue a rule on a new line by using a backslash () before pressing Enter.
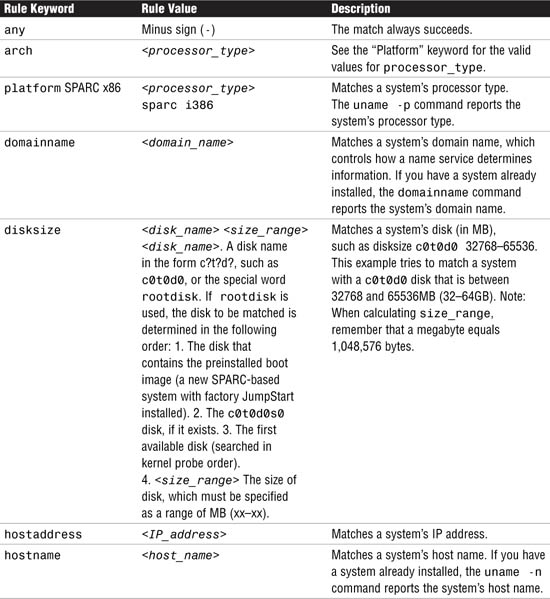
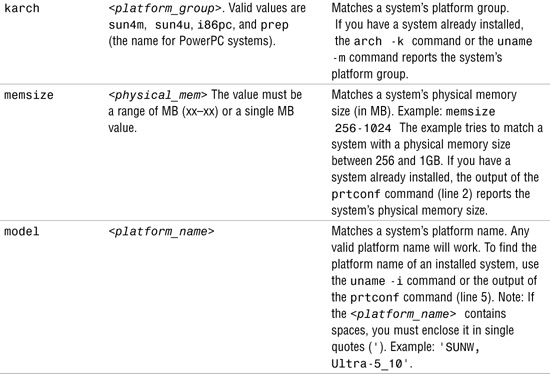
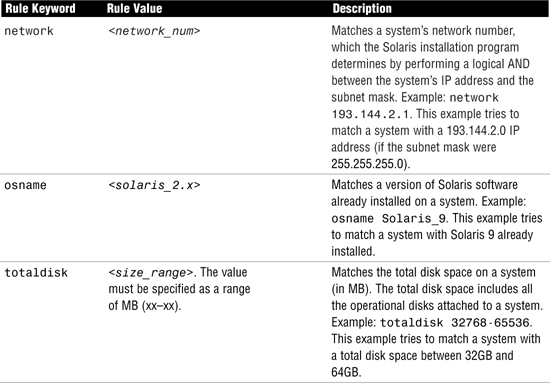
Table 14.3. describes the rule_keywords and rule_values that were introduced earlier.

During a custom JumpStart installation, the Solaris installation program attempts to match the system being installed to the rules in the rules.ok file in order—the first rule through the last rule.
A rule match occurs when the system being installed matches all the system attributes defined in the rule. As soon as a system matches a rule, the Solaris installation program stops reading the rules.ok file and begins installing the software based on the matched rule’s class file.
Here are a few sample rules:
karch sun4u - basic_prof -
The previous example specifies that the Solaris installation program should automatically install any system with the sun4u platform group based on the information in the basic_prof class file. There is no begin or finish script.
hostname pyramid2 - ultra_class -
The rule matches a system on the network called pyramid2. The class file to be used is named ultra_class. No begin or finish script is specified:
![]()
The third rule matches any system on the network that is not an Ultra 5 or Ultra 10. The class file to be used is named net_class, and the finish script to be run is named set_root_passwd.
any - - generic_class -
The last example matches any system. The class file to be used is named generic_class and there is no begin or finish script.
Before the rules file can be used, you must run the check script to validate that this file is set up correctly. If all the rules are valid, the rules.ok file is created.
To validate the rules file, use the check script provided in the <install_dir_path>/Solaris_10/Misc/jumpstart_sample directory on the install server.
Copy the check script to the directory containing your rules file and run the check script to validate the rules file:
cd /jumpstart
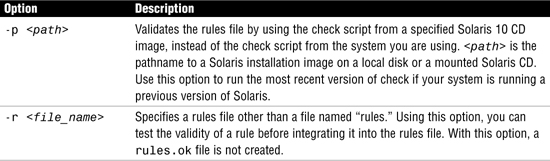
./check [-p path] [-r file_name]
<install_dir_path> is the directory that was specified using the setup_install_server script when the install server was set up.
When you use check to validate a rules file, the following things happen:
1. The rules file is checked for syntax. check makes sure that the rule keywords are legitimate, and the <begin>, <class>, and <finish> fields are specified for each rule.
2. If no errors are found in the rules file, each class file specified in the rules file is checked for syntax. The class file must exist in the JumpStart installation directory and is covered in the next section.
3. If no errors are found, check creates the rules.ok file from the rules file, removing all comments and blank lines, retaining all the rules, and adding the following comment line to the end:
version=2 checksum=<num>
As the check script runs, it reports that it is checking the validity of the rules file and the validity of each class file. If no errors are encountered, it reports the following:
The custom JumpStart configuration is ok.
The following is a sample session that uses check to validate a rules and class file. I named the rules file “rulestest” temporarily, the class file is named “basic_prof” and I am using the -r option. With -r, the rules.ok file is not created, and only the rulestest file is checked.
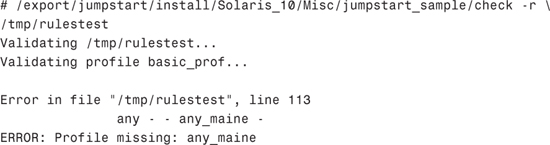
In this example, the check script found a bad option. “any_machine” had been incorrectly entered as “any_maine.” The check script reported this error.
In the next example, the error has been fixed, we copied the file from rulestest to /export/jumpstart/rules, and reran the check script:
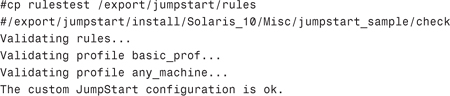
As the check script runs, it reports that it is checking the validity of the rules file and the validity of each class file. If no errors are encountered, it reports The custom JumpStart configuration is ok. The rules file is now validated.
After the rules.ok file is created, verify that it is owned by root and that it has permissions set to 644.
A begin script is a user-defined Bourne shell script, located in the JumpStart configuration directory on the configuration server, specified within the rules file, that performs tasks before the Solaris software is installed on the system. You can set up begin scripts to perform the following tasks:
![]() Backing up a file system before upgrading
Backing up a file system before upgrading
![]() Saving files to a safe location
Saving files to a safe location
![]() Loading other applications
Loading other applications
Output from the begin script goes to /var/sadm/system/logs/begin.log.
Caution
Beware of /a Be careful not to specify something in the script that would prevent the mounting of file systems to the /a directory during an initial or upgrade installation. If the Solaris installation program cannot mount the file systems to /a, an error occurs, and the installation fails.
begin scripts should be owned by root and should have permissions set to 744.
In addition to begin scripts, you can also have finish scripts. A finish script is a user-defined Bourne shell script, specified within the rules file, that performs tasks after the Solaris software is installed on the system but before the system restarts. finish scripts can be used only with custom JumpStart installations. You can set up finish scripts to perform the following tasks:
![]() Move saved files back into place.
Move saved files back into place.
![]() Add packages or patches.
Add packages or patches.
![]() Set the system’s root password.
Set the system’s root password.
Output from the finish script goes to /var/sadm/system/logs/finish.log.
When used to add patches and software packages, begin and finish scripts can ensure that the installation is consistent between all systems.
A class file is a text file that defines how to install the Solaris software on a system. Every rule in the rules file specifies a class file that defines how a system is installed when the rule is matched. You usually create a different class file for every rule; however, the same class file can be used in more than one rule.
A class file consists of one or more class file keywords (they are described in the following sections). Each class file keyword is a command that controls one aspect of how the Solaris installation program installs the Solaris software on a system. Use the vi editor (or any other text editor) to create a class file in the JumpStart configuration directory on the configuration server. You can create a new class file or edit one of the sample profiles located in /cdrom/cdrom0/s0/Solaris_10/Misc/jumpstart_sample on the Solaris 10 Software CD 1. The class file can be named anything, but it should reflect the way in which it installs the Solaris software on a system. Sample names are basic_install, eng_profile, and accntg_profile.
A class file must have the following:
![]() The
The install_type keyword as the first entry
![]() Only one keyword on a line
Only one keyword on a line
![]() The
The root_device keyword if the systems being upgraded by the class file have more than one root file system that can be upgraded
A class file can contain either of the following:
![]() A comment after the pound sign (#) anywhere on a line. If a line begins with a #, the entire line is a comment. If a # is specified in the middle of a line, everything after the # is considered a comment.
A comment after the pound sign (#) anywhere on a line. If a line begins with a #, the entire line is a comment. If a # is specified in the middle of a line, everything after the # is considered a comment.
![]() Blank lines.
Blank lines.
The class file is made up of keywords and their values. The class file keywords and their respective values are described in the following sections.
This keyword is used when installing a Solaris Flash Archive and specifies the source of the Flash Archive. The syntax for this option is shown here:
archive_location retrieval type location
The retrieval_type parameter can be one of the following:
![]() NFS
NFS
![]() HTTP or HTTPS
HTTP or HTTPS
![]() FTP
FTP
![]() Local Tape
Local Tape
![]() Local Device
Local Device
![]() Local File
Local File
The syntax for a Flash Archive located on an NFS server is as follows:
![]()
Where retry n specifies the maximum number of attempts to mount the archive.
The syntax for a Flash Archive located on an HTTP or HTTPS server is as follows:
![]()
Table 14.5. lists the optional keywords that can be used with this option:

The syntax for a Flash Archive located on an FTP server is as follows:
![]()
Table 14.6. lists the optional keywords that can be used with this option:

The syntax for a Flash Archive located on local tape is as follows:
archive_location local_tape device position
where device specifies the device path of the tape drive and position specifies the file number on the tape where the archive is located. The position parameter is useful because you can store a begin script or a sysidcfg file on the tape prior to the actual archive.
The syntax for a Flash Archive located on a local device is as follows:
![]()
The syntax for a Flash Archive located in a local file is as follows:
archive_location local_file path/filename
All that is needed for this option is to specify the full pathname to the Flash Archive file.
backup_media defines the medium that is used to back up file systems if they need to be re-allocated during an upgrade because of space problems. If multiple tapes or disks are required for the backup, you are prompted to insert these during the upgrade. Here is the backup_media syntax:
backup_media <type> <path>
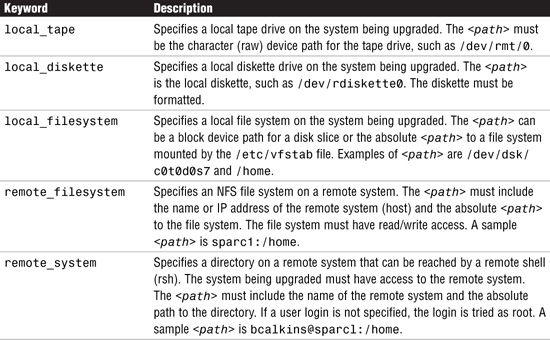
Here are some examples of class file keywords being used:
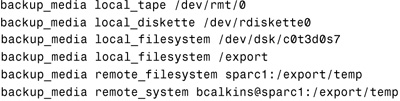
backup_media must be used with the upgrade option only when disk space re-allocation is necessary.
boot_device designates the device where the installation program installs the root file system and consequently what the system’s startup device is. The eeprom value also lets you update the system’s EEPROM if you change its current startup device so that the system can automatically start up from the new startup device.
Here’s the boot_device syntax:
boot_device <device> <eeprom>
The device and eeprom values are described in Table 14.8.

Note
X86 Preserve Only For x86 systems, the <eeprom> parameter must be preserve.
The installation program installs the root file system on c0t1d0s0 and updates the EEPROM to start up automatically from the new startup device. For more information on the boot device, see Chapter 3, “Perform System Boot and Shutdown Procedures.”
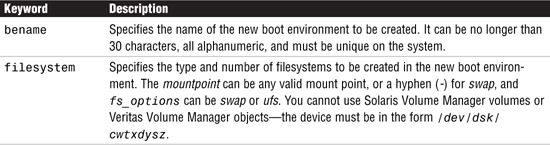
bootenv_createbe enables an empty, inactive boot environment to be created at the same time as installing the Solaris OS. You only need to create a / file system; other file system slices are reserved, but not populated. This kind of boot environment is installed with a Solaris flash archive, at which time the other reserved file system slices are created.
Here’s the bootenv createbe syntax:
![]()
The bename and filesystem values are described in Table 14.9.
client_arch indicates that the operating system server supports a platform group other than its own. If you do not specify client_arch, any diskless client that uses the operating system server must have the same platform group as the server. client_arch can be used only when system_type is specified as server. You must specify each platform group that you want the operating system server to support.
Here’s the client_arch syntax:
client_arch karch_value [karch_value...]
Valid values for <karch_value> are sun4u and i86pc.
Here’s an example:
client_arch sun4u
client_root defines the amount of root space, in MB, to allocate for each diskless client. If you do not specify client_root in a server’s profile, the installation software automatically allocates 15MB of root space per client. The size of the client root area is used in combination with the num_clients keyword to determine how much space to reserve for the /export/root file system. You can only use the client_root keyword when system_type is specified as server.
Here’s the syntax:
client_root <root_size>
<root_size> is specified in MB. Here’s an example:
client_root 20
Note
Don’t Waste Space When allocating root space, 20MB is an adequate size. 15MB is the minimum size required. Any more than 20MB is just wasting disk space.
client_swap defines the amount of swap space, in MB, to allocate for each diskless client. If you do not specify client_swap, 32MB of swap space is allocated. Physical memory plus swap space must be a minimum of 32MB. If a class file does not explicitly specify the size of swap, the Solaris installation program determines the maximum size that the swap file can be, based on the system’s physical memory. The Solaris installation program makes the size of swap no more than 20 percent of the disk where it resides, unless there is free space left on the disk after the other file systems are laid out.
Here’s the syntax:
client_swap <swap_size>
<swap_size> is specified in MB.
Here’s an example:
client_swap 64
This example specifies that each diskless client has a swap space of 64MB.
cluster designates which software group to add to the system. The software groups are listed in Table 14.10.
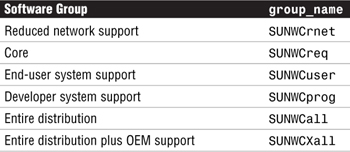
You can specify only one software group in a profile, and it must be specified before other cluster and package entries. If you do not specify a software group with cluster, the end-user software group, SUNWCuser, is installed on the system by default.
Here is cluster’s syntax:
cluster <group_name>
Here’s an example:
cluster SUNWCall
This example specifies that the Entire Distribution group should be installed.
The cluster keyword can also be used to designate whether a cluster should be added to or deleted from the software group that was installed on the system. add and delete indicate whether the cluster should be added or deleted. If you do not specify add or delete, add is set by default.
Here’s the syntax:
cluster <cluster_name> [add | delete]
<cluster_name> must be in the form SUNWCname.
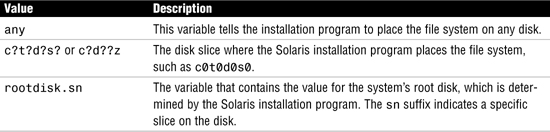
dontuse designates one or more disks that you don’t want the Solaris installation program to use. By default, the installation program uses all the operational disks on the system. <disk_name> must be specified in the form c?t?d? or c?d?, such as c0t0d0.
Here’s the syntax:
dontuse disk_name [disk_name...]
Here’s an example:
dontuse c0t0d0 c0t1d0
Note
dontuse and usedisk You cannot specify the usedisk keyword and the dontuse keyword in the same class file because they are mutually exclusive.
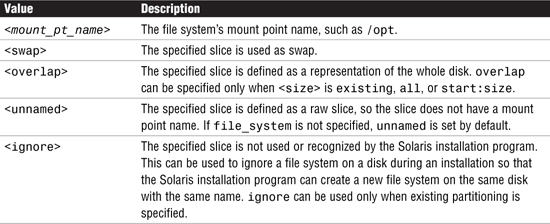
filesys can be used to create local file systems during the installation by using this syntax:
![]()
The values listed in Table 14.11. can be used for <slice>.
The values listed in Table 14.12. can be used for <size>.
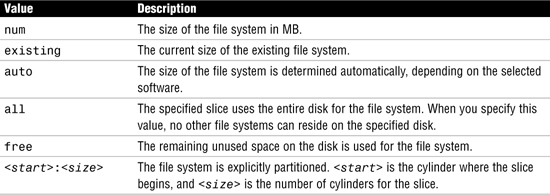
file_system is an optional field when slice is specified as any or c?t?d?s?. If file_system is not specified, unnamed is set by default, but you can’t specify the optional_parameters value.
The values listed in Table 14.13. can be used for file_system.
In the following example, the size of swap is set to 512MB, and it is installed on c0t0d0s1:
![]()
In the next example, /usr is based on the selected software, and the installation program determines what disk to put it on when you specify the any value:
![]()
The optional_parameters field can be one of the options listed in Table 14.14.

A new option to the filesys keyword in Solaris 10 is mirror, which facilitates the creation of RAID-1 volumes as part of the custom JumpStart installation. This facility allows the creation of mirrored filesystems. You can issue this keyword more than once to create mirrors for different file systems.
Note
Only on Initial Install The filesys mirror keyword is only supported for initial installations.
The syntax for the filesys mirror keyword is as follows:
![]()
Table 14.15. details the available options for the filesys mirror keyword.

filesys can also be used to set up the installed system to mount remote file systems automatically when it starts up. You can specify filesys more than once. The following syntax describes using filesys to set up mounts to remote systems:
filesys <server>:<path> <server_address> <mount_pt_name> [mount_options]
The filesys keywords are described in Table 14.16.

![]()
This keyword forces a Solaris Flash differential archive to be installed on a clone system even though the clone system is different than what the software expects. This option deletes files to bring the clone system to an expected state, so it should be used with caution.
install_type specifies whether to perform the initial installation option or the upgrade option on the system. install_type must be the first class file keyword in every profile.
Following is the syntax:
![]()
Select one of initial_install, upgrade, flash_install or flash_update.
Here’s an example:
install_type initial_install
The geo keyword followed by a locale designates the regional locale or locales you want to install on a system (or to add when upgrading a system). The syntax is geo <locale>
Values you can specify for locale are listed in Table 14.17.

Refer to the “International Language Environments Guide” in the “Solaris 10 International Language Support Collection” for a complete listing of locale values. This guide is available on the Solaris 10 documentation CD, or online at http://docs.sun.com.
Here’s an example where the locale specified is S_America:
geo S_America
layout_constraint designates the constraint that auto-layout has on a file system if it needs to be re-allocated during an upgrade because of space problems. layout_constraint can be used only for the upgrade option when disk space re-allocation is required.
With layout_constraint, you specify the file system and the constraint you want to put on it.
Here’s the syntax:
layout_constraint <slice> <constraint> [minimum_size]
The <slice> field specifies the file system disk slice on which to specify the constraint. It must be specified in the form c?t?d?s? or c?d?s?.
Table 14.18. describes the options for layout_constraint.

The following are some examples:
layout_constraint c0t0d0s3 changeable 1200
The file system c0t0d0s3 can be moved to another location, and its size can be changed to more than 1200MB but no less than 1200MB.
layout_constraint c0t0d0s4 movable
The file system on slice c0t0d0s4 can move to another disk slice, but its size stays the same:
layout_constraint c0t2d0s1 collapse
c0t2d0s1 is moved into its parent directory to reduce the number of file systems.
This keyword is used when installing Solaris Flash archives and can be used to create custom scripts to preserve local configurations on a clone system before installing a Solaris Flash Archive. The syntax for this option is
local_customization local_directory
The local_directory parameter specifies the directory on the clone system where any scripts are held.
locale designates which language or locale packages should be installed for the specified locale_name. A locale determines how online information is displayed for a specific language or region, such as date, time, spelling, and monetary value. Therefore, if you want English as your language but you also want to use the monetary values for Australia, you would choose the Australia locale value (en_AU) instead of the English language value (C).
The English language packages are installed by default. You can specify a locale keyword for each language or locale you need to add to a system.
Following is the locale syntax:
locale locale_name
Here’s an example:
locale es
This example specifies Spanish as the language package you want installed.
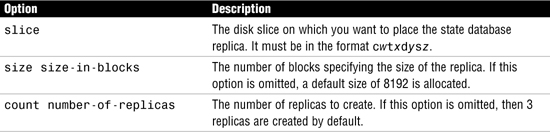
The metadb keyword allows you to create Solaris Volume Manager state database replicas as part of the custom JumpStart installation. You can use this keyword more than once to create state database replicas on several disk slices.
The syntax for this keyword is shown here:
![]()
This keyword is used when installing Solaris Flash Archives. When specified, it ignores file-by-file validation, which is used to ensure that a clone system is a duplicate of the master system. Only use this option if you are sure the clone is a duplicate of the master system, because files are deleted to bring the clone to an expected state if discrepancies are found.
This keyword is used when installing Solaris Flash Archives. When specified, it ignores the check to verify that a clone system was built from the original master system. Only use this option if you are sure the clone is a duplicate of the original master system.
When a server is installed, space is allocated for each diskless client’s root (/) and swap file systems. num_clients defines the number of diskless clients that a server supports. If you do not specify num_clients, five diskless clients are allocated. You can only use this option when system_type is set to server.
Following is the syntax:
num_clients client_num
Here’s an example:
num_clients 10
In this example, space is allocated for 10 diskless clients.
package designates whether a package should be added to or deleted from the software group that is installed on the system. add or delete indicates the action required. If you do not specify add or delete, add is set by default.
Following is the syntax:
![]()
The package_name must be in the form SUNWname.
The retrieval_type parameter can be one of the following:
![]() NFS
NFS
![]() HTTP or HTTPS
HTTP or HTTPS
![]() Local Device
Local Device
![]() Local File
Local File
The syntax for a package located on an NFS server is as follows:
![]()
where retry n specifies the maximum number of attempts to mount the directory.
The syntax for a package located on an HTTP or HTTPS server is as follows:
![]()
Table 14.20 lists the optional keywords that can be used with this option.

The syntax for a package located on a local device is as follows:
![]()
The syntax for a package located in a local file is as follows:
![]()
All that is needed for this option is to specify the full pathname to the directory containing the package.
Here’s an example:
![]()
In this example, SUNWxwman (X Window online man pages) is being installed on the system from a location on a remote NFS server.
partitioning defines how the disks are divided into slices for file systems during the installation. If you do not specify partitioning, the default is set.
Following is the syntax:
partitioning default|existing|explicit
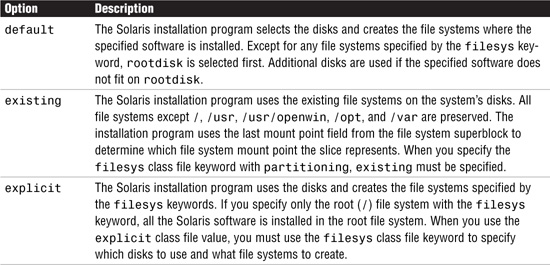
root_device designates the system’s root disk.
Following is the syntax:
root_device slice
Here’s an example:
root_device c0t0d0s0
Note
Specifying Mirrors If you are upgrading a RAID-1 (mirror) volume then the slice you specify should be one side of the mirror. The other side will be upgraded automatically.
system_type defines the type of system being installed. If you do not specify system_type in a class file, standalone is set by default.
Following is the syntax:
system_type [standalone | server]
Here’s an example:
system_type server
usedisk designates one or more disks that you want the Solaris installation program to use when the partitioning default is specified. By default, the installation program uses all the operational disks on the system. disk_name must be specified in the form c?t?d? or c?d?, such as c0t0d0. If you specify the usedisk class file keyword in a class file, the Solaris installation program uses only the disks that you specify.
Following is the syntax:
usedisk disk_name [disk_name]
Here’s an example:
usedisk c0t0d0 c0t1d0
Note
dontuse and usedisk You cannot specify the usedisk keyword and the dontuse keyword in the same class file because they are mutually exclusive.
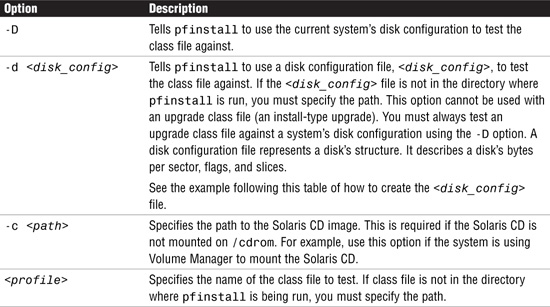
After you create a class file, you can use the pfinstall command to test it. Testing a class file is sometimes called a dry run installation. By looking at the installation output generated by pfinstall, you can quickly determine whether a class file will do what you expect. For example, you can determine whether a system has enough disk space to upgrade to a new release of Solaris before you actually perform the upgrade.
To test a class file for a particular Solaris release, you must test it within the Solaris environment of the same release. For example, if you want to test a class file for Solaris 10, you have to run the pfinstall command on a system running Solaris 10.
To test the class file, change to the JumpStart directory that contains the class file and type the following:
/usr/sbin/install.d/pfinstall -d
or type the following:
/usr/sbin/install.d/pfinstall -D
Caution
Install or Test? Without the -d or -D option, pfinstall actually installs the Solaris software on the system by using the specified class file, and the data on the system is overwritten.
Following is the syntax for pfinstall:
![]()
The pfinstall options are described in Table 14.22.
You can create a <disk_config> file by issuing the following command:
prtvtoc /dev/rdsk/<device_name> > <disk_config>
/dev/rdsk/<device_name> is the device name of the system’s disk. <device_name> must be in the form c?t?d?s2 or c?d?s2. <disk_config> is the name of the disk configuration file to contain the redirected output.
Note
Identifying Disks c?t?d?s2 designates a specific target for a SCSI disk, and c?d?s2 designates a non-SCSI disk.
Here’s an example:
prtvtoc /dev/rdsk/c0t0d0s2 > test
The file named “test” created by this example would be your <disk_config> file, and it would look like this:
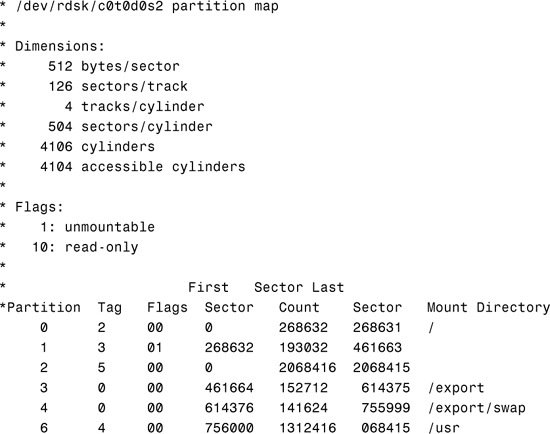
Note
Multiple Disks If you want to test installing Solaris software on multiple disks, concatenate single disk configuration files and save the output to a new file.
The following example tests the ultra_class class file against the disk configuration on a Solaris 10 system on which pfinstall is being run. The ultra_class class file is located in the /export/jumpstart directory, and the path to the Solaris CD image is specified because Volume Management is being used.
In addition, if you want to test the class file for a system with a specific system memory size, set SYS_MEMSIZE to the specific memory size in MB as follows:

The system tests the class file and displays several pages of results. Look for the following message, which indicates that the test was successful:
![]()
When a JumpStart client boots for the first time, the booting software first tries to obtain system identification information (such as the system’s hostname, IP address, locale, timezone, and root password) from a file named sysidcfg and then from the name service database. If you’re not using a name service, you’ll use this file to answer system identification questions during the initial part of the installation. If you’re using a name service, you’ll want to look over the section titled “Setting Up JumpStart in a Name Service Environment.”
You’ll use the sysidcfg file to answer system identification questions during the initial part of the installation. If the JumpStart server provides this information, the client bypasses the initial system identification portion of the Solaris 10 installation process. Without the sysidcfg file, the client displays the appropriate interactive dialog to request system identification information. You must create a unique sysidcfg file for every system that requires different configuration information.
The sysidcfg file can reside on a shared NFS directory or the root (/) directory on a UFS file system. It can also reside on a PCFS file system located on a diskette. Only one sysidcfg file can reside in a directory or on a diskette. The location of the sysidcfg file is specified by the -p argument to the add_install_client script used to create a JumpStart client information file.
Creating a sysidcfg file requires the system administrator to specify a set of keywords in the sysidcfg file to preconfigure a system. There are two types of keywords you use in the sysidcfg file: independent and dependent. Here’s an example illustrating independent and dependent keywords:
![]()
In this example, name_service is the independent keyword, while domain_name and name_server are the dependent keywords.
Note
Dependent Keywords Enclose all dependent keywords in curly braces {} to tie them to their associated independent keyword. Values can optionally be enclosed in single (‘) or double quotes (“).
To help explain sysidcfg keywords, we’ll group them in categories and describe each of them in detail.
The following keywords are related to the name service you will be using.
The name_service=<value> keyword is assigned one of five values which specify the name service to be used: NIS, NIS+, LDAP, DNS, and NONE. These are described below:
![]() NIS or NIS+—If you are using NIS as your name service, for example, then specify the following:
NIS or NIS+—If you are using NIS as your name service, for example, then specify the following:
name_service=NIS
For the NIS and NIS+ values, additional keywords are specified, which are
domain_name=<value>
The domain <value> in the previous line is the domain name such as pyramid.com.
name_server=<value>
The name_server <value> is the hostname or IP address for the name server. For the name_server <value>, you can specify up to three IP addresses for the name_server. For example:
name_server=192.168.0.1,192.168.0.2,192.168.0.3
![]() DNS—If you are using DNS for the
DNS—If you are using DNS for the name_service <value>, specify the following:
name_service=DNS
Then you’ll need to specify the following additional dependent keywords:
domain_name=<value>
Enter the domain name for the domain_name <value>. For example, if the domain name is pyramid.com, specify it as follows:
domain_name=pyramid.com
For the name_server <value>, you can specify up to three IP addresses for the name_server. For example:
name_server=192.168.0.1,192.168.0.2,192.168.0.3
The search option adds the values to the search path to use for DNS queries. Specify the following:
search=<value>
where <value> is the search entry, which cannot exceed 250 characters. Here’s a sample DNS search entry:
search=pyramid.com,east.pyramid.com,west.pyramid.com
![]() LDAP—If you are using LDAP for the
LDAP—If you are using LDAP for the name_service <value>, specify the following:
name_service=LDAP
Then you’ll need to specify the following additional dependent keywords:
domain_name=<value>
Enter the domain name for the domain_name <value>. For example, if the domain name is pyramid.com, specify it as follows:
domain_name=pyramid.com
The profile parameter can also be specified to identify an LDAP profile to use. Specify this as follows:
profile=<value>
where <value> is the profile name.
The profile server identifies the IP address of the profile server from which the LDAP profile can be obtained. Specify this as follows:
profile_server=<value>
where <value> is the IP address of the profile server.
Here’s an example LDAP entry with its dependent keywords:

Network related keywords relate to the network interface to be used. Specify this item as follows:
network_interface=<value>
Specify a <value> for the interface to be configured. You can enter a specific interface, such as hme0, or you can enter NONE (if there are no interfaces to configure) or PRIMARY (to select the primary interface) as follows:
network_interface=hme0
If you are not using DHCP, the dependent keywords for a PRIMARY interface are as follows:

For example, if your primary network interface is named hme0, here’s a sample sysidcfg file:

If you are using DHCP, the only keywords available are the following:
dhcp protocol_ipv6=<yes or no>
For example, here’s a sample entry:
![]()
Whether using DHCP or not, the protocol_ipv6 keyword is optional.
Note
Multiple Interfaces Allowed You can now enter multiple network interfaces into the sysidcfg file; just specify a separate network_interface entry for each one to be included.
The root password keyword is
root_password=<encrypted passwd>
The value for <encrypted passwd> is taken from the /etc/shadow file. For example, an entry might look like this:
root_password=XbcjeAgl8jLeI
The following is the security related keyword:
security_policy=<value>
Where <value> is either KERBEROS or NONE.
When specifying the KERBEROS value, you’ll need to also specify the following dependent keywords:

<value> can list a maximum of three key distribution centers (KDCs) for a security_policy keyword. At least one is required. Here’s an example using the security_policy keyword:

The keyword used to set the system locale is
system_locale=<value>
<value> is an entry from the /usr/lib/locale directory. The following example sets the value to English:
system_locale=en_US
The keyword to set the terminal type is as follows:
terminal=<terminal_type>
<terminal_type> is an entry from the /usr/share/lib/terminfo database. The following example sets the terminal type to vt100:
terminal=vt100
The keyword to set the time zone is as follows:
timezone=<timezone>
<timezone> is an entry from the /usr/share/lib/zoneinfo directory. The following entry sets the time zone to Eastern Standard Time:
timezone=EST
The keyword to set the time server is as follows:
timeserver=<value>
<value> can be LOCALHOST, HOSTNAME, or IP_ADDRESS. The following example sets the time server to be the localhost:
timeserver=localhost
The following rules apply to keywords in the sysidcfg file:
![]() Keywords can be in any order.
Keywords can be in any order.
![]() Keywords are not case sensitive.
Keywords are not case sensitive.
![]() Keyword values can be optionally enclosed in single quotes (‘).
Keyword values can be optionally enclosed in single quotes (‘).
![]() Only the first instance of a keyword is valid; if you specify the same keyword more than once, the first keyword specified will be used.
Only the first instance of a keyword is valid; if you specify the same keyword more than once, the first keyword specified will be used.
The following is a sample sysidcfg file, located in the configuration directory named /export/jumpstart:

As stated in the previous section, you can use the sysidcfg file to answer system identification questions during the initial part of installation regardless of whether a name service is used. When the sysidcfg file is used with the NIS naming service, identification parameters such as locale and time zone can be provided from the name service. The sysidcfg file necessary for installing a JumpStart client on a network running the NIS name service is typically much shorter, and a separate sysidcfg file for each client is unnecessary.
You’ll use the /etc/locale, /etc/timezone, /etc/hosts, /etc/ethers, and /etc/netmasks files as the source for creating NIS databases to support JumpStart client installations. See Chapter 12, “Naming Services,” for more information on NIS and how to create NIS maps.
Now you need to set up the clients to install over the network. After setting up the /export/jumpstart directory and the appropriate files, use the add_install_client command on the install server to set up remote workstations to install Solaris from the install server. The command syntax for the add_install_client command is as follows:
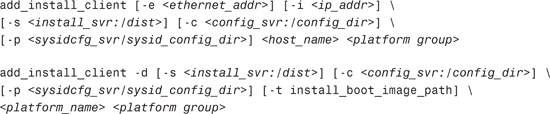
The add_install_client options are described in Table 14.23.

For additional options to the add_install_client command, see the Solaris online manual pages.
In Step by Step 14.5, you’ll create a JumpStart client that will boot from a system that is configured as both the boot and install server. In addition, the entire Solaris 10 media is copied to the local disk.
STEP BY STEP
14.5 Creating a JumpStart Client
Note
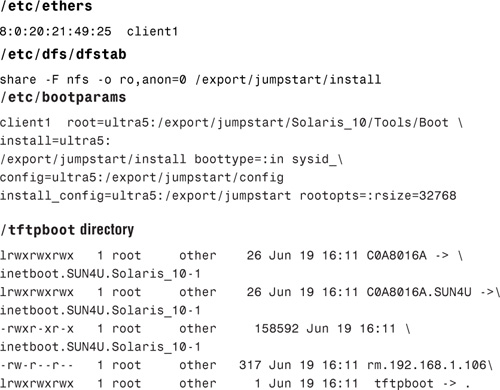
Example Setup In the following steps, the following associations have been made in the examples:
Install server name—ultra5
Distribution directory—/export/jumpstart/install
Configuration server name—ultra5
Configuration directory—/export/jumpstart/config
Boot server name—ultra5
Install client—client1
Install client’s MAC address—8:0:20:21:49:25
Client architecture—sun4u
1. On the install server, change to the directory that contains the installed Solaris 10 Operating Environment image as follows:
![]()
2. Create the JumpStart client using the add_install_client script found in the local directory as follows:
![]()
The system responds with
A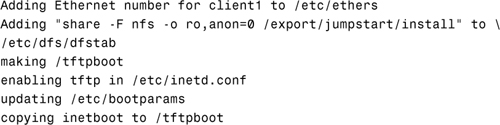
The add_install_client script automatically made entries into the following files and directory:
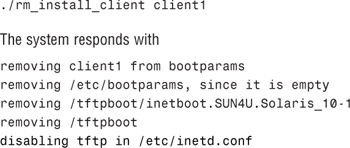
3. Use the rm_install_client command to remove a JumpStart client’s entries and configuration information from the boot server as follows:
Tip
Know your config files Make sure you are familiar with the differences between the rules file, a class file, and the sysidcfg file. It is quite common to get an exam question that displays the contents of one of them and asks the candidate to identify which one it is.
The most common problems encountered with custom JumpStart involve the setting up of the network installation, or booting the client. This section describes briefly some of the more popular errors and what to do if you are faced with them.
When running the add_install_client command to set up a new JumpStart client, you might get the following message:
Unknown client "hostname"
The probable cause of this error message is that the client does not have an entry in the hosts file (or table if using a name service).
Make sure the client has an entry in the hosts file, or table, and rerun the add_install_client command.
When you have setup the JumpStart Install server, make sure the relevant directories are shared correctly. It is a common problem to share the file systems at the wrong level, so that the table of contents file cannot be found when the client tries to mount the remote file system.
The following error message can appear if the Ethernet address of the JumpStart client has been specified incorrectly:
Timeout waiting for ARP/RARP packet...
Check the /etc/ethers file on the JumpStart server and verify that the client’s Ethernet address has been specified correctly.
When booting the client from the network, to initiate a custom JumpStart installation, you might get the following error message if more than one server attempts to respond to the boot request:
![]()
This error indicates that more than one server has an entry for the client in its /etc/bootparams file. To rectify this problem, you will need to check the servers on the subnet to find any duplicate entries and remove them, leaving only the entry required on the JumpStart server.
When booting the client from the network, you could get the following error message if the system cannot find the correct media required for booting:
The file just loaded does not appear to be executable
You will need to verify that the custom JumpStart server has been correctly set up as a boot and install server. Additionally, make sure you specified the correct platform group for the client when you ran add_install_client to set up the client to be able to use JumpStart.
The following example shows how you would set up a custom JumpStart installation for a fictitious site. The network consists of an Enterprise 3000 server and five Ultra1 workstations. The next section details how to start the JumpStart installation process by creating the install server.
The first step is to set up the install server (see Step by step 14.6). You’ll choose the Enterprise server. This is where the contents of the Solaris CD are located. The contents of the CD can be made available by either loading the CD in the CD-ROM drive or copying the CD to the server’s local hard drive. For this example, you will copy the files to the local hard drive. Use the setup_install_server command to copy the contents of the Solaris CD to the server’s local disk. Files are copied to the /export/install directory.
STEP BY STEP
14.6 Setting Up the Install Server
1. Insert the Solaris Software CD 1 into the server’s CD-ROM drive.
2. Type the following:
![]()
The system responds with this:

3. Eject the Solaris 10 Software CD 1 and put in the Solaris 10 Software CD 2. Let vold automatically mount the CD.
4. Change to the Tools directory on the CD as follows:
cd /cdrom/cdrom0/Solaris_10/Tools
5. Execute the add_to_install_server script as follows to copy the images from the CD to the /export/install directory:
./add_to_install_server /export/install
6. Repeat steps 3, 4, and 5 for the remaining CDs.
After you install the install server, you need to set up a JumpStart configuration directory on the server. This directory holds the files necessary for a custom JumpStart installation of the Solaris software. You set up this directory by copying the sample directory from one of the Solaris CD images that has been put in /export/install. Do this by typing the following:
![]()
Any directory name can be used. You’ll use /jumpstart for this example.
Follow the procedure in Step by Step 14.7 to set up a configuration server.
STEP BY STEP
14.7 Setting Up a Configuration Server
1. Log in as root on the server where you want the JumpStart configuration directory to reside.
2. Edit the /etc/dfs/dfstab file. Add the following entry:
share -F nfs -o ro, anon=0 /jumpstart
Note
NFS Server It may be necessary to run the svcadm enable nfs/server command if the NFS server daemons are not running. See Chapter 9, “Virtual File Systems, Swap Space, and Core Dumps,” for more information.
3. Type shareall and press Enter. This makes the contents of the /jumpstart directory accessible to systems on the network.
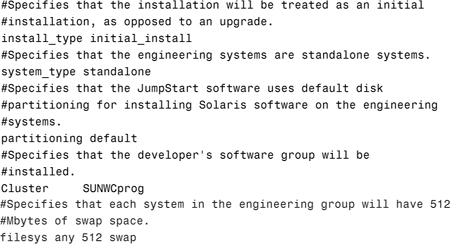
4. Working with the sample class file and rules files that were copied into the JumpStart directory earlier, use them to create configuration files that represent your network. For this example, I create a class file named engrg_prof. It looks like this:
The rules file contains the following rule:
network 192.9.200.0 - engrg_prof -
This rules file states that systems on the 192.9.200.0 network are installed using the engrg_prof class file.
5. Validate the rules and class files as follows:
![]()
If check doesn’t find any errors, it creates the rules.ok file. Look for the following message, which indicates that the pfinstall test was successful:
![]()
You are finished creating the configuration server.
Now, on the install server, set up each client as follows:
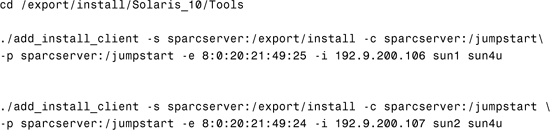
This example sets up two engineering workstations, sun1 and sun2, so that they can be installed over the network from the install server named sparcserver.
After the setup is complete, you can start up the engineering systems by using the following startup command at the OK (PROM) prompt of each system:
boot net - install
You’ll see the following displayed on the screen:
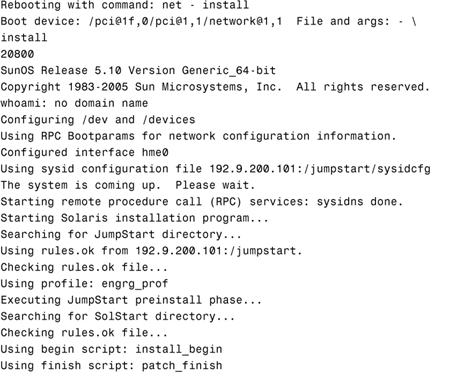
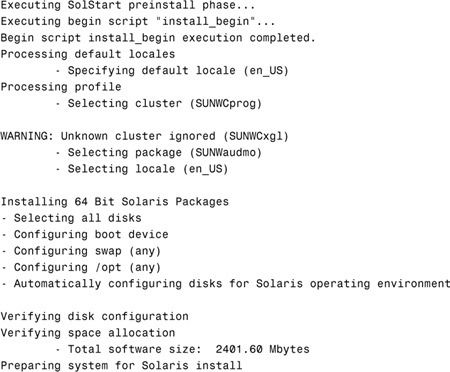
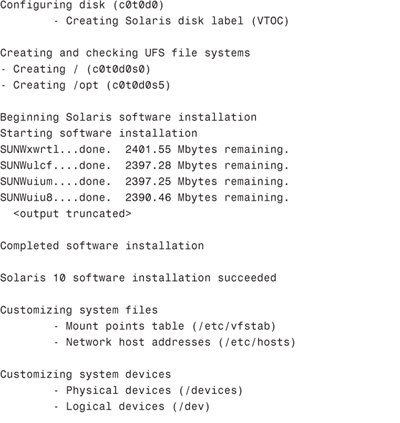

The client reads the sysidcfg file, then the class file, and then the rules.ok file on the server. If any system identification information is missing in the sysidcfg file, the client will display the appropriate dialog requesting identification information. The system then automatically installs the Solaris operating environment.
This completes the JumpStart configuration.
Objective:
Explain Flash, create and manipulate the Flash archive, and use it for installation.
The main feature of Solaris Flash is to provide a method to store a snapshot of the Solaris operating environment, complete with all installed patches and applications. This snapshot is referred to as the Flash archive and the system that the archive is taken from is referred to as the master machine. This archive can be stored on disk, CD-ROM, or tape media. You can use this archive for disaster recovery purposes or to replicate (clone) an environment on one or more other systems. When using a Flash archive to install the Solaris environment onto a system, the target system we are installing the environment on is referred to as the installation client.
When you’re ready to install the Solaris environment using the Flash archive, you can access the archive on either local media or across the network. Furthermore, when installing from a Flash archive onto the installation client, the install can be modified from the original archive to accommodate things such as kernel architecture, device differences, or partitioning schemes between the master machine and the installation client.
In this section, we describe how to create the Flash archive and how to install the operating system on an installation client from a Flash archive.
Note
Flash Install Enhancement A Flash installation can now be used to update a system, using a differential Flash Archive. Previously, a Flash Install could only be used to perform an initial installation. A new install_type of flash_update is available with Solaris 10.
The first step is to identify the master machine. This system will serve as the template for the archive and all software and data on the master machine, unless specifically excluded, will become part of the Flash archive that will be installed on the installation client.
Next, make sure that the master machine is completely installed, patched, and has all of its applications installed. Depending on the application, you may want to create the archive before the application is configured however. This will allow you to configure the application specifically for each system it is running on. To ensure that the archive is clean, it’s recommended that the archive be created before the master machine has ever gone into production and while the system is in a quiescent state.
Finally, determine where the archive will be stored. You can store the archive onto a disk, a CD-ROM, or a tape. Once the archive has been stored, you can even compress it so that it takes up less space. Because these archives can be used for disaster recovery, store the archive somewhere offsite.
You’ll use the flarcreate command to create the archive. The syntax for the command is as follows:

The options to the flarcreate command are described in Table 14.24. In the previous command syntax, <archive> is the name of the archive file to be created. If you do not specify a path, flarcreate saves the archive file in the current directory.


Additional options are available, such as for creating the archive on tape and adding some user-defined options. Information on these options is found in the online manual pages and in the Solaris 10 Installation Guide in the Solaris 10 Release and Installation Collection.
The following example shows how to use the flarcreate command to create the Flash archive:
![]()
In the previous example, we are creating a Flash archive named “Solaris 10 Ultra Archive.” We are specifying the author (creator) to be labeled as “WS Calkins.” The -R option specifies to recursively descend from the specified directory. We also specify the -x option to exclude /var/tmp. The last part of the command specifies which directory to store the archive in and what to name the archive.
After entering the command and pressing the Return key, the flarcreate command will display the status of the operation as follows:
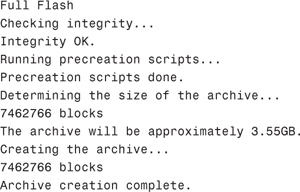
When the operation is complete, I can see the archive file by issuing the ls command as follows:
![]()
The flar command is used to administer Flash archives. With the flar command, you can
![]() Extract information from an archive
Extract information from an archive
![]() Split archives
Split archives
![]() Combine archives
Combine archives
To use the flar command to extract information from an archive, use the following command:
flar -i /u01/ultra.flar
The system displays the following information about the Flash archive:
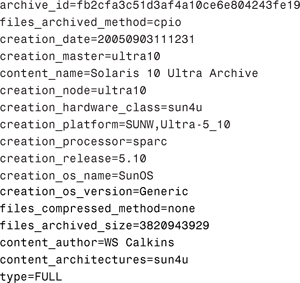
For additional information on the flarcreate or flar commands, refer to the online manual pages or the Solaris 10 Installation Guide in the Solaris 10 Release and Installation Collection.
In the previous section we described how to create a Flash archive. In this section, you learn how to install this archive on an installation client using the GUI-based Solaris installation program.
The Flash archive was created on a system named ultra10 with the IP address of 192.168.0.110 and placed into a file system named /u01. On ultra10 we need to share the /u01 file system so that the archive is available to other systems on the network via NFS. You use the share command to do this. NFS and the share command are described in Chapter 9.
Initiate a Solaris installation from CD-ROM. When prompted to select the Installation Media as shown in Figure 14.1, select Network File System.

Click on the Next button and you’ll be prompted to enter the path to the network file system that contains the Flash archive as shown in Figure 14.2.
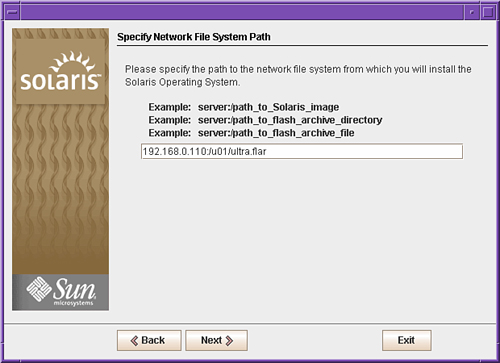
After entering the path, click on the Next button and the Flash Archive Summary window will appear as shown in Figure 14.3.
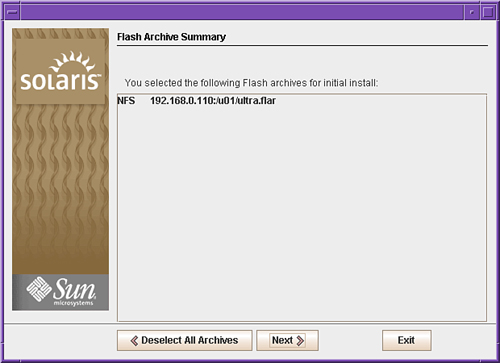
The selected archive will be listed. Verify that it is correct and then click on the Next button to continue. You’ll be prompted to enter any additional archives that you would like to install, as shown in Figure 14.4.

We have no additional archives to install, so you’ll click on the Next button and the system is initialized as shown in Figure 14.5.
After the system initialization is finished, you’ll see the Disk Selection window displayed as with a normal GUI-based installation. From this point forward, the installation will continue as a normal GUI-based installation. The difference is that you will not be asked to select the software that you want to install. Instead, the entire Flash archive will be installed. When the installation is complete, the system will reboot (if you selected this option during the earlier dialog), and the login message will appear. The final step is to log in as root, configure your applications, and make system-specific customizations. The system is now ready for production use.
Earlier in this chapter, we described how to set up a JumpStart installation. If you recall, we set up a boot server, which provided the information that a JumpStart client needed to boot across the network. We also set up an install server, which supplied the Solaris image, and we created the profile and rules configuration files which provided additional setup information such as disk partitions and software packages.
You can utilize a Solaris Flash archive in a JumpStart installation, but first you need to add the installation client to the JumpStart boot server as described earlier in this chapter.
The next step is to create a profile for the installation client. This was also described earlier in this chapter. However, when using JumpStart to install from a Flash archive, only the following keywords can be used in the profile:
![]()
archive_location
![]()
install_type—For a full flash archive install, specify this option as flash_install. For a differential flash archive, specify flash_update.
![]()
partitioning—Only the keyword values of explicit or existing must be used.
![]()
filesys—The keyword value auto must not be used.
![]()
forced_deployment
![]()
local_customization
![]()
no_content_check—Used only for a differential flash archive.
![]()
no_master_check—Used only for a differential flash archive.
![]()
package—Only used for a full flash installation; cannot be used with a differential flash archive.
![]()
root_device
Here’s an example profile for an installation client using a Flash archive:
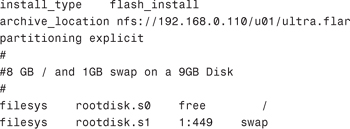
The rules and sysidcfg files for the Flash installation client would be the same as described earlier in this chapter.
When finished configuring the profile, rules, and sysidcfg files, and assuming the Flash archive is available on the install server in a shared file system, you can boot the installation client using
boot net - install
The automated installation will proceed without further intervention and the system will be installed using the Flash archive.
The Preboot Execution Environment, or PXE, is a direct form of network boot that can be used to install the Solaris Operating Environment over the network using DHCP. It does not require the client to have any form of local boot media.
PXE is only available to x86 systems that implement the Intel Preboot Execution Environment specification. You will need to consult the hardware documentation for your system to determine whether or not it supports the PXE network boot.
To use PXE, you need three systems. These are as follows:
![]() A configured install server containing the Solaris boot image and images of the Solaris CDs
A configured install server containing the Solaris boot image and images of the Solaris CDs
![]() A configured DHCP server from which to boot successfully
A configured DHCP server from which to boot successfully
![]() An x86 client that supports the PXE network boot
An x86 client that supports the PXE network boot
Note
Only One DHCP Server—You must make sure that there is only one DHCP server on the same subnet as the PXE client because the PXE network boot does not work properly on a subnet containing multiple DHCP servers.
As you saw in the previous section, three systems are required in order to be able to make use of the PXE network boot. The first of these is the install server. Setting up the install server is described earlier in this chapter in the section “The Install Server.” The procedure for an x86 install server is the same, but you will be storing x86 CD images instead of SPARC.
Note
You Can Still Use SPARC—Even though you are setting up an x86 installation, you can still use a SPARC system as your install server if you wish. All it does is share the CD images over the network, and a single install server can serve both SPARC and x86 clients. Remember that you cannot run setup install server on a SPARC system using an x86 CD, or vice versa, but you can from a DVD.
The third system is also very straightforward because you have to consult your hardware documentation to verify whether PXE network boot is supported by the BIOS. It is worth investigating whether an upgrade to the BIOS firmware is necessary as well.
It is the second of these systems that requires the most work. Configuring a DHCP server is beyond the scope of this exam and is covered completely in the Solaris 10 Network Administrator Exam (Exam 310-302). It is necessary, however, to create some vendor class macros so that the correct configuration information is passed to the client when booting across the network.
Note
DHCP Already Configured—You should note that a working DHCP server should already be configured. The details described in this section merely configure some parameters within the DHCP server.
There are a few parameters that need to be configured to ensure that the client, when booted, has all the information it requires in order to boot successfully, and then access the install server containing the correct CD images, required for the installation of the Solaris Operating Environment. Table 14.25. lists some of the most common parameters.

The fields are described here:
![]() Symbol Name—The name of the symbol.
Symbol Name—The name of the symbol.
![]() Code—A unique code number.
Code—A unique code number.
![]() Type—The data type of the entry.
Type—The data type of the entry.
![]() Granularity—The number of instances. For example, a symbol with a data type of
Granularity—The number of instances. For example, a symbol with a data type of IP Address and a Granularity of 2 means that the entry must contain two IP addresses.
![]() Max—The maximum number of values. For example, a symbol with a data type of
Max—The maximum number of values. For example, a symbol with a data type of IP Address, Granularity of 2, and Maximum of 2 means that the symbol can contain a maximum of two pairs of IP addresses.
![]() Description—A textual description of the symbol.
Description—A textual description of the symbol.
You can add these symbols to the DHCP server using either the command dhtadm or the GUI-based dhcpmgr commands. The example here shows how to add a symbol (SrootIP4) and Vendor Client Class (SUNW.i86pc) to the achilles macro using the GUI-based dhcpmgr.
1. Start dhcpmgr by entering /usr/sadm/admin/bin/dhcpmgr& from any CDE window. The DHCP manager window appears as shown in Figure 14.6

Note that the DHCP server is already configured to support 10 IP addresses and that the DHCP server name is achilles.
2. Select the Options tab and the Options window appears. From the Edit menu, select Create as shown in Figure 14.7
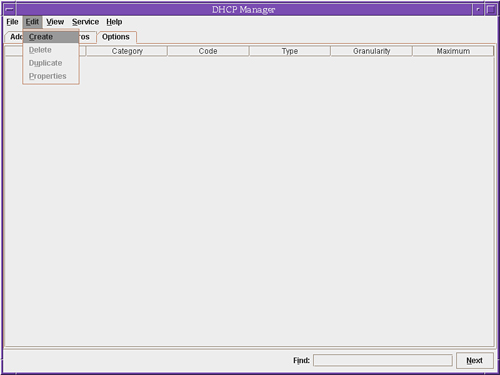
3. A sub window appears to create the option. Enter the name SrootIP4 in the Name field. The next field is a pull-down menu; select Vendor from this menu as shown in Figure 14.8.

4. Refer back to Table 14.25., which lists the valid values for the symbols to be added. In this case, the code value for the symbol SrootIP4 is 2. The type is currently set to IP Address, which is correct. Table 14.25. also states the values for Granularity and Maximum; enter these accordingly into their correct locations.
5. On the right side of the window is the Vendor Client Classes box. This is where you specify which class of systems the option applies to. For this example, if an x86 client is being used, the client class is SUNW . i86pc. Enter this in the box provided and click Add. The class now appears in the list as shown in Figure 14.9.
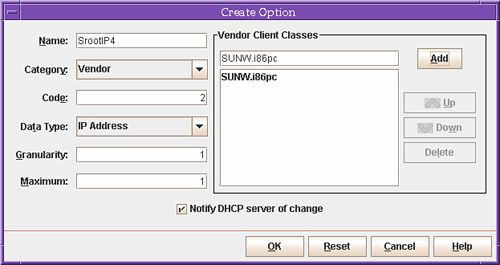
6. Make sure the box marked Notify DHCP server of change is checked and click OK to complete the operation.
7. You are returned to the Options window, which now includes the symbol just created. Figure 14.10 shows this.
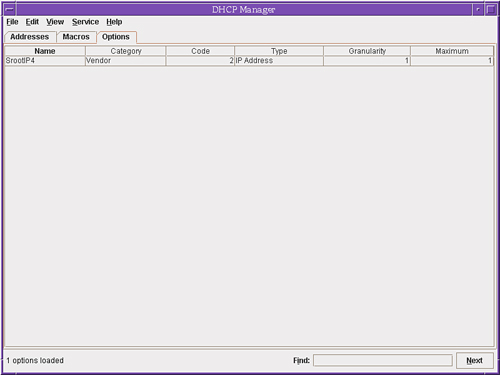
8. The remaining symbols can be added by repeating the previous steps.
9. To add the symbol SrootIP4 to the achilles macro, select the Macro tab and the achilles macro from the list on the left. Figure 14.11 shows the current contents of this macro.

10. From the Edit menu, select Properties. Figure 14.12 shows the Properties window.
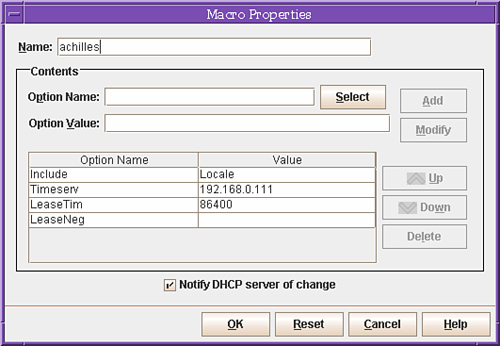
11. You need to locate the symbol that you want to add, so click on Select to the right of the Option Name field. The Select Option window appears as shown in Figure 14.13.

12. The symbol just created is a Vendor class symbol and the options being displayed are standard symbols. The selector field is a pull-down menu, so click on the menu and choose Vendor. The symbol SrootIP4 is now displayed as shown in Figure 14.14.

13. Click on the symbol SrootIP4 and then click OK to display the Macro Properties window. This symbol identifies the IP Address of the JumpStart root server, which is 192.168.0.110 for this example. Enter this in the Option Value field as shown in Figure 14.15.

14. Click Add to insert the symbol and value into the macro properties. Figure 14.16 demonstrates that the symbol SrootIP4 has been added to the macro.
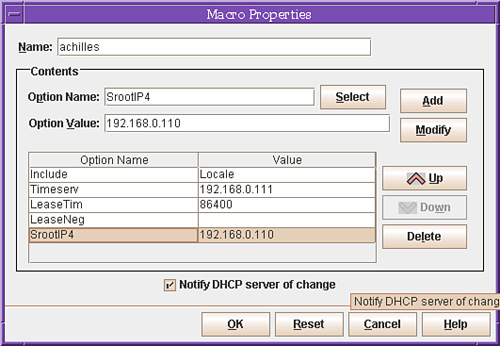
15. When you click OK to complete the operation, you are returned to the macro window, showing the contents of the achilles macro. Figure 14.17 shows the completed operation.
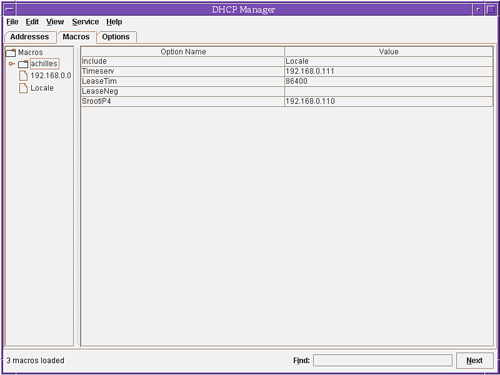
16. Repeat this operation for the other symbols that the DHCP server requires to properly support the PXE network boot.
When the macro and symbols have been configured, the DHCP server is ready to handle the client correctly when it boots across the network.
Having configured the DHCP server, the only remaining task is to add the client to the install server. This is carried out using the add_install_client command, virtually the same as for a custom JumpStart, but this time the majority of the configuration information will be supplied by the DHCP server. The following command adds support for the SUNW.i86pc class of system:
# cd /export/install/x86pc/Tools
# ./add_install_client -d SUNW.i86pc i86pc
When the install server and the DHCP server have been configured correctly and the x86 client has been added, the only remaining thing to do is to boot the x86 client to install over the network. The way in which this is done depends on the hardware that you have, but usually one of the following will have the desired effect:
![]() Enter the system BIOS by typing the appropriate keystrokes
Enter the system BIOS by typing the appropriate keystrokes
![]() Configure the BIOS to boot from the network
Configure the BIOS to boot from the network
![]() Adjust the boot device priority list, if present, so that a network boot is attempted first
Adjust the boot device priority list, if present, so that a network boot is attempted first
![]() Exit the system BIOS
Exit the system BIOS
The system should start booting from the network and should prompt you for the type of installation you want to run. The remainder of the installation process depends on which installation type you choose.
Note
Set Boot Options Back—Remember when the installation finishes and the system reboots, to re-enter the system BIOS and restore the original boot configuration.
It’s been my experience that JumpStart is not widely used, mainly because of its complexity. Many system administrators would rather go through an interactive installation for each system than automate the process. Many of the popular Unix systems have installation programs similar to JumpStart, and most are underutilized. System administrators could save a great deal of time if they would only learn more about this type of installation.
The key to using JumpStart is whether or not it will benefit you to spend the time learning and understanding what is required; and then creating the necessary class files, an install server, a configuration server; and editing a rules file to ensure all systems are accommodated. For system administrators managing large numbers of systems, say 100+, it is probably worth the effort, especially if the JumpStart installation is to be used more than once. A good example of this is in a test environment, where systems might have to be regularly reinstalled to a particular specification. If, on the other hand, the system administrator only manages three or four systems, and they only need to be installed once, then it is questionable as to whether the time will be worth investing. It might be more efficient to carry out interactive installations.
We’ve described the entire process of installing a networked system via JumpStart, including how to set up the boot server, the install server, and the configuration files located on the configuration server. We also described the necessary procedures that need to be performed for each client that you plan to install.
You also learned how to use the Solaris Flash archive feature to create an exact image of a particular Solaris environment and replicate this environment across many systems, or simply store it away in case you need to rebuild the system as a result of a system failure. You learned how the Flash archive can be used in a JumpStart session for a completely automated installation.
Finally in this chapter, you learned about a new facility, the Preboot Execution Environment (PXE), which facilitates the installing of x86 clients across the network using a DHCP server to provide the boot configuration information. You also learned how to configure a DHCP server to add the required symbols to properly support a booting x86 client.
This concludes the study material for the second exam. We encourage you to use the test exams on the enclosed CD-ROM to test your knowledge of the chapters you’ve read. If you fully understand all the material covered in this book, you should have no problem passing both exams. If you don’t score well on the enclosed CD-ROM, go back and review the topics you are weak in.
Before taking the exam however, visit www.pdesigninc.com and read up-to-date information about the exams, comments from others that have taken the exams, test-taking tips, and links to additional study materials to be sure you are adequately prepared before spending $150 for every exam.
When you’re confident that you understand all the material covered in this section, you are ready to take the real exam. Good luck!
In this exercise, you’ll create a JumpStart boot server, install server, configuration server, configuration files, and configure a JumpStart client to automatically install the Solaris 10 operating environment across the network.
For this exercise, you’ll need two systems connected on a network. One system will serve as the boot/install/configuration server, so it needs about 2.5GB of free disk space. The second system will be the client and will have the entire disk destroyed and the operating system reloaded.
Caution
Destructive Process This procedure destroys data on the disk. Be sure you have proper backups if you want to save any data on these systems.
Estimated time: 1 hour
1. On the system that will be used as the boot and install server, log in as root.
2. Edit the /etc/hosts file and make an entry for the JumpStart client.
3. Create the boot server as follows:
a) Insert the CD labeled Solaris 10 CD 1 and let vold automatically mount the CD.
b) Change to the Tools directory on the CD as follows:
cd /cdrom/cdrom0/s0/Solaris_10/Tools
c) Run the setup_install_server script and specify the location for the CD image. Be sure you have about 2.5GB of free space and the target directory is empty. In the following example, I’m using /export/install as the install directory:
./setup_install_server /export/install
4. Add the additional software as follows:
a) Eject the Solaris 10 CD 1 and put in the Solaris 10 CD 2. Let vold automatically mount the CD.
b) Change to the Tools directory on the CD as follows:
cd /cdrom/cdrom0/Solaris_10/Tools
c) Execute the add_to_install_server script as follows to copy the images from the CD to the /export/install directory:
./add_to_install_server /export/install
d) Repeat the procedure with the remaining CDs.
5. Now create the JumpStart configuration directory as follows:
mkdir /jumpstart
6. Add the following entry in the /etc/dfs/dfstab file for this directory to share it across the network:
share -F nfs -o ro,anon=0 /jumpstart
7. Start the NFS server as follows if the nfsd daemon is not already running:
svcadm enable nfs/server
8. In the /jumpstart directory, use the vi editor to create a class file named basic_class with the following entries:
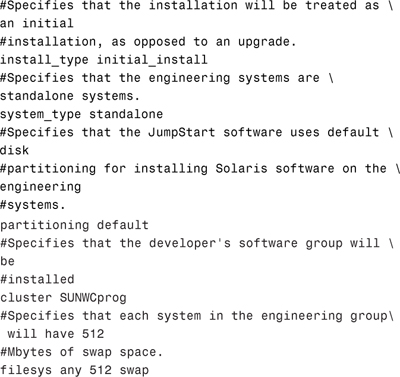
9. In the /jumpstart directory, use the vi editor to create a rules file named rules with the following entry:
hostname sun1 - basic_class -
10. Validate the class and rules files with the check and pfinstall commands as follows:

11. Now set up the JumpStart client as follows:
cd /export/install/Solaris_10/Tools
./add_install_client -s <SERVERNAME>:/export/install
-c <SERVERNAME>:/jumpstart -p <SERVERNAME>:/jumpstart -e <MAC ADDRESS>
<CLIENTNAME> <PLATFORM>
Where SERVERNAME is the hostname of your boot/install server, MAC ADDRESS is your client’s Ethernet address, CLIENTNAME is your client’s hostname, and PLATFORM is your client’s architecture (such as sun4u).
For example:
![]()
12. Go to the client, turn on the power, and at the boot PROM, issue the following command:
boot net - install
The JumpStart installation executes.
|
1. |
A. JumpStart lets you automatically install the Solaris software on a SPARC-based system just by inserting the Solaris CD and powering on the system. You do not need to specify the |
|
2. |
A. The custom JumpStart method of installing the operating system provides a way to install groups of similar systems automatically and identically. For more information, see the section “JumpStart.” |
|
3. |
D. The |
|
B. The |
|
|
5. |
A. The boot server is set up to answer RARP requests from a JumpStart client. For more information, see the section “Setting Up the Boot Server.” |
|
6. |
C. A configuration disk is used as an alternate to setting up a configuration directory. For more information, see the section “Setting Up a Configuration Diskette.” |
|
7. |
C. The |
|
8. |
D. A |
|
9. |
A. A |
|
10. |
B. After you create a class file, you can use the |
|
11. |
C. The |
|
12. |
D. |
|
13. |
A. The |
|
14. |
B. The |
|
15. |
B. The install server supplies the operating system during a JumpStart installation. For more information, see the section “The Install Server.” |
|
16. |
D. The configuration server contains all the essential custom JumpStart configuration files, such as the |
|
17. |
A. Use the |
|
18. |
C. |
|
19. |
A. |
|
B. The |
|
|
21. |
A. The |
|
22. |
B, C, and E. The requirements for a PXE network boot are that there is an install server, a configure DHCP server, and an x86 client that supports the Intel Preboot Execution Environment specification. For more information, see the section “Preboot Execution Environment.” |
|
23. |
B. The DHCP symbol |
1. Solaris 10 Documentation CD. “Solaris 10 Installation Guide: Custom JumpStart and Advanced Installations” manual.
2. http://docs.sun.com. Solaris 10 documentation set. “Solaris 10 Installation Guide: Custom JumpStart and Advanced Installations” book in the Solaris 10 Release and Installation collection.
3. Solaris 10 Documentation CD. “Solaris 10 Installation Guide: Solaris Flash Archives (Creation and Installation)” manual.
4. http://docs.sun.com. Solaris 10 documentation set. “Solaris 10 Installation Guide: Solaris Flash Archives (Creation and Installation)” book in the Solaris 10 Release and Installation collection.
5. Solaris 10 Documentation CD. “Solaris 10 Installation Guide: Network Based Installations” manual.
6. http://docs.sun.com. Solaris 10 documentation set. “Solaris 10 Installation Guide: Network Based Installations” book in the Solaris 10 Release and Installation collection.