
The following test objectives for exam 310-202 are covered in this chapter:
Explain consolidation issues, features of Solaris zones, and decipher between the different zone concepts, including zone types, daemons, networking, command scope and, given a scenario, create a Solaris zone.
![]() This chapter helps you understand the components of the new zones feature, first introduced in Solaris 10. It describes the zone concepts and how they fit into the overall container structure.
This chapter helps you understand the components of the new zones feature, first introduced in Solaris 10. It describes the zone concepts and how they fit into the overall container structure.
Given a zone configuration scenario, identify zone components and zonecfg resource parameters, allocate file system space, use the zonecfg command, describe the interactive configuration of a zone, and view the zone configuration file.
![]() This chapter explains the different components of a zone and how to carry out zone configuration. It also displays the zone configuration and the mechanism to verify that a zone has been configured correctly.
This chapter explains the different components of a zone and how to carry out zone configuration. It also displays the zone configuration and the mechanism to verify that a zone has been configured correctly.
Given a scenario, use the zoneadm command to view, install, boot, halt, reboot, and delete a zone.
![]() In this chapter, we create a zone. We’ll see how to install zones, check the status of installed zones, boot and reboot, as well as uninstall and remove zones. We also show how zones are viewed from a global zone.
In this chapter, we create a zone. We’ll see how to install zones, check the status of installed zones, boot and reboot, as well as uninstall and remove zones. We also show how zones are viewed from a global zone.
The following strategies will help you prepare for the test:
![]() Make sure you are familiar with all of the concepts introduced in this chapter, particularly the types of zones and the commands used to create, manipulate, and manage them.
Make sure you are familiar with all of the concepts introduced in this chapter, particularly the types of zones and the commands used to create, manipulate, and manage them.
![]() Practice the step-by-step examples provided in this chapter on a Solaris system. Be sure that you understand each step and can describe the process of setting up a zone, installing and booting a zone, as well as uninstalling and deleting a zone.
Practice the step-by-step examples provided in this chapter on a Solaris system. Be sure that you understand each step and can describe the process of setting up a zone, installing and booting a zone, as well as uninstalling and deleting a zone.
![]() You need to know all the terms listed in the “Key Terms” section at the end of this chapter.
You need to know all the terms listed in the “Key Terms” section at the end of this chapter.
![]() Understand each of the commands described in this chapter. Get familiar with all of the options, especially the ones used in the examples. You’ll see questions on the exam related to the
Understand each of the commands described in this chapter. Get familiar with all of the options, especially the ones used in the examples. You’ll see questions on the exam related to the zonecfg, zoneadm, and zlogin commands.
Solaris zones is a major new feature of Solaris 10 and provides additional facilities that were not available in previous releases of the Operating Environment. Zones allow virtual environments to run on the same physical system. Previously, the only way of compartmenting an environment was to purchase a separate server, or use an expensive high-end server, capable of physical partitioning, such as the E10K or E15K. Now you can create virtual environments on any machine capable of running the Solaris 10 Operating Environment.
Zones provide a virtual operating system environment within a single physical instance of Solaris 10. Applications can run in an isolated, and secure environment. This isolation prevents an application running in one zone from monitoring or affecting an application running in a different zone. A further important aspect of zones is that a failing application, such as one that would traditionally have leaked all available memory, or exhausted all CPU resources, can be limited to only affect the zone in which it is running. This is achieved by limiting the amount of physical resources on the system that the zone can use.
This chapter looks at the whole concept of Solaris zones and how to configure and create a zone, make it operational, and then remove it. Resource management is not an objective for exam 310-202, but a brief introduction is included in this chapter to help put the zones feature in the correct context.
Caution
Zones and Containers Some refer to zones and containers interchangeably as if they mean exactly the same thing. This is incorrect because containers is a technology that comprises the resource management features, such as resource pools and Solaris zones. Solaris zones is a subset of containers, so the two terms should not be used interchangeably.
Resource management is one of the components of the Solaris 10 containers technology. It allows you to do the following:
![]() Allocate specific computer resources, such as CPU time and memory.
Allocate specific computer resources, such as CPU time and memory.
![]() Monitor how resource allocations are being used, and adjust the allocations when required.
Monitor how resource allocations are being used, and adjust the allocations when required.
![]() Generate more detailed accounting information—the extended accounting feature of Solaris 10 provides this facility.
Generate more detailed accounting information—the extended accounting feature of Solaris 10 provides this facility.
![]() A new resource capping daemon (
A new resource capping daemon (rcapd) allows you to regulate how much physical memory is used by a project, by “capping” the overall amount that can be used. Remember that a project can be a number of processes or users, so it provides a useful control mechanism for a number of functions.
The resource management feature of Solaris containers is extremely useful when you want to consolidate a number of applications to run on a single server.
Consolidation has become more popular in recent years because it reduces the cost and complexity of having to manage numerous separate systems. You can consolidate applications onto fewer, larger, more scalable servers, and also segregate the workload to restrict the resources that each can use.
Previously, a number of applications would run on separate servers, with each application having full access to the system on which it is running. Using the resource management feature, multiple workloads can now be run on a single server, providing an isolated environment for each, so that one workload cannot affect the performance of another.
Resource pools can be utilized to group applications, or functions, together and control their resource usage globally, such as the maximum amount of CPU resource or memory. Additionally, the resource management feature can tailor the behavior of the Fair Share Scheduler (FSS) to give priority to specific applications. This is very useful if you need to allocate additional resources to a group of resources for a limited period of time. An example of this would be when a company runs end-of-month reports. Before resource management was introduced, this would have meant that a larger server would be needed to accommodate the resource requirement, even though it only would be used to its capacity once a month. Now the resources can be allocated according to priority, allowing the server to be more efficiently utilized.
Objectives:
Explain consolidation issues and features of Solaris zones, and decipher between the different zone concepts including zone types, daemons, networking, command scope, and given a scenario, create a Solaris zone.
![]() Given a zone configuration scenario, identify zone components and
Given a zone configuration scenario, identify zone components and zonecfg resource parameters, allocate file system space, use the zonecfg command, describe the interactive configuration of a zone, and view the zone configuration file.
![]() Given a scenario, use the
Given a scenario, use the zoneadm command to view, install, boot, halt, reboot, and delete a zone.
The zones technology provides virtual operating system services to allow applications to run in an isolated and secure environment. A zone is a virtual environment that is created within a single running instance of the Solaris Operating Environment. Applications running in a zone environment cannot affect applications running in a different zone, even though they exist and run on the same physical server. Even a privileged user in a zone cannot monitor or access processes running in a different zone.
There are two types of zones, global and non-global. Think of a global zone as the server itself, the traditional view of a Solaris system as we all know it, where you can login as root and have full control of the entire system. The global zone is the default zone and is used for system-wide configuration and control. Every system contains a global zone and there can only be one global zone on a physical Solaris server.
A non-global zone is created from the global zone and also managed by it. You can have up to 8192 non-global zones on a single physical system—the only real limitation is the capability of the server itself. Applications that run in a non-global zone are isolated from applications running in a separate non-global zone, allowing multiple versions of the same application to run on the same physical server.
Non-global zones are referred to simply as zones and can be in a number of states depending on the current state of configuration or readiness for operation. You should note that zone states only refer to non-global zones because the global zone is always running and represents the system itself. The only time the global zone is not running is when the server has been shut down.
Table 13.1 describes the six states that a zone can be in:

Exam Alert
Know Your Zone States There is often at least one question in the exam relating to different zone states. Pay particular attention to the differences between the configured, installed, ready, and running states. You may get a question that asks you to match the correct state to the correct description.
This section describes the features of both the global zone and non-global zones.
The global zone has the following features:
![]() The global zone is assigned zone ID 0 by the system.
The global zone is assigned zone ID 0 by the system.
![]() It provides the single bootable instance of the Solaris Operating Environment that runs on the system.
It provides the single bootable instance of the Solaris Operating Environment that runs on the system.
![]() It contains a full installation of Solaris system packages.
It contains a full installation of Solaris system packages.
![]() It can contain additional software, packages, file, or data that was not installed through the packages mechanism.
It can contain additional software, packages, file, or data that was not installed through the packages mechanism.
![]() Contains a complete product database of all installed software components.
Contains a complete product database of all installed software components.
![]() It holds configuration information specific to the global zone, such as the global zone hostname and the file system table.
It holds configuration information specific to the global zone, such as the global zone hostname and the file system table.
![]() It is the only zone that is aware of all file systems and devices on the system.
It is the only zone that is aware of all file systems and devices on the system.
![]() It is the only zone that is aware of non-global zones and their configuration.
It is the only zone that is aware of non-global zones and their configuration.
![]() It is the only zone from which a non-global zone can be configured, installed, managed, and uninstalled.
It is the only zone from which a non-global zone can be configured, installed, managed, and uninstalled.
Non-global zones have the following features:
![]() The non-global zone is assigned a zone ID by the system when it is booted.
The non-global zone is assigned a zone ID by the system when it is booted.
![]() It shares the Solaris kernel that is booted from the global zone.
It shares the Solaris kernel that is booted from the global zone.
![]() It contains a subset of the installed Solaris system packages.
It contains a subset of the installed Solaris system packages.
![]() It can contain additional software packages, shared from the global zone.
It can contain additional software packages, shared from the global zone.
![]() It can contain additional software packages that are not shared from the global zone.
It can contain additional software packages that are not shared from the global zone.
![]() It can contain additional software, files, or data that was not installed using the package mechanism, or shared from the global zone.
It can contain additional software, files, or data that was not installed using the package mechanism, or shared from the global zone.
![]() It contains a complete product database of all software components that are installed in the zone. This includes software that was installed independently of the global zone as well as software shared from the global zone.
It contains a complete product database of all software components that are installed in the zone. This includes software that was installed independently of the global zone as well as software shared from the global zone.
![]() It is not aware of the existence of other zones.
It is not aware of the existence of other zones.
![]() It cannot install, manage, or uninstall other zones, including itself.
It cannot install, manage, or uninstall other zones, including itself.
![]() It contains configuration information specific to itself, the non-global zone, such as the non-global zone hostname and file system table.
It contains configuration information specific to itself, the non-global zone, such as the non-global zone hostname and file system table.
A non-global zone contains its own root (/) file system. The size and contents of this file system depend on how you configure the global zone and the amount of configuration flexibility that is required.
There is no limit on how much disk space a zone can use, but the zone administrator, normally the system administrator, must ensure that sufficient local storage exists to accommodate the requirements of all non-global zones being created on the system.
The system administrator can restrict the overall size of the non-global zone file system by using any of the following:
![]() Standard disk partitions on a disk can be used to provide a separate file system for each non-global zone
Standard disk partitions on a disk can be used to provide a separate file system for each non-global zone
![]() Soft partitions can be used to divide disk slices or logical volumes into a number of partitions. Soft partitions were covered in Chapter 9, “Virtual File Systems, Swap Space, and Core Dumps.”
Soft partitions can be used to divide disk slices or logical volumes into a number of partitions. Soft partitions were covered in Chapter 9, “Virtual File Systems, Swap Space, and Core Dumps.”
![]() Use a
Use a lofi-mounted file system to place the zone on. For further information on the loopback device driver see the manual pages for lofi and lofiadm.
When you create a non-global zone, you have to decide how much of the global zone file system you want to be inherited from the global zone. A sparse root zone optimizes sharing by implementing read-only loopback file systems from the global zone and only installing a subset of the system root packages locally. The majority of the root file system is shared (inherited) from the global zone. Generally this model would require about 100 Megabytes of disk space when the global zone has all of the standard Solaris packages installed. A sparse root zone uses the inherit-pkg-dir resource, where a list of inherited directories from the global zone are specified.
This model provides the greatest configuration flexibility because all of the required (and any other selected) Solaris packages are copied to the zone’s private file system, unlike the sparse root model where loopback file systems are used. The disk space requirement for this model is considerably greater and is determined by evaluating the space used by the packages currently installed in the global zone.
On a system supporting zones the zones can communicate with each other over the network, but even though the zones reside on the same physical system, network traffic is restricted so that applications running on a specified zone cannot interfere with applications running on a different zone.
Each zone has its own set of bindings and zones can all run their own network daemons. As an example, consider three zones all providing web server facilities using the apache package. Using zones, all three zones can host websites on port 80, the default port for http traffic, without any interference between them. This is because the IP stack on a system supporting zones implements the separation of network traffic between zones.
The only interaction allowed is for ICMP traffic to resolve problems, so that commands such as ping can be used to check connectivity.
Of course, when a zone is running, it behaves like any other Solaris system on the network in that you can telnet or ftp to the zone as if it was any other system, assuming the zone has configured these network services for use.
When a zone is created, a dedicated IP address is configured that identifies the host associated with the zone. In reality though, the zone’s IP address is configured as a logical interface on the network interface specified in the zone’s configuration parameters. Only the global zone has visibility of all zones on the system and can also inspect network traffic, using for example, snoop.
The zone management service is managed through the Service Management Facility (SMF), the service identifier is called: svc:/system/zones:default
There are two daemon processes associated with zones,zoneadmd and zsched.
The zoneadmd daemon starts when a zone needs to be managed. An instance of zoneadmd will be started for each zone, so it is not uncommon to have multiple instances of this daemon running on a single server. It is started automatically by SMF and is also shut down automatically when no longer required. The zoneadmd daemon carries out the following actions:
![]() Allocates the zone ID and starts the
Allocates the zone ID and starts the zsched process
![]() Sets system-wide resource controls
Sets system-wide resource controls
![]() Prepares the zone’s devices if any are specified in the zone configuration
Prepares the zone’s devices if any are specified in the zone configuration
![]() Plumbs the virtual network interface
Plumbs the virtual network interface
![]() Mounts any loopback or conventional file systems
Mounts any loopback or conventional file systems
The zsched process is started by zoneadmd and exists for each active zone (a zone is said to be active when in the ready, running, or shutting down state. The job of zsched is to keep track of kernel threads running within the zone. It is also known as the zone scheduler.
Before a zone can be installed and booted it has to be created and configured. This section deals with the initial configuration of a zone and describes the zone components.
A zone is configured using the zonecfg command. The zonecfg command is also used to verify that the resources and properties that are specified during configuration are valid for use on a Solaris system. zonecfg checks that a zone path has been specified and that for each resource, all of the required properties have been specified.
The zonecfg command is used to configure a zone. It can run interactively, on the command-line, or using a command-file. A command-file is created by using the export subcommand of zonecfg. zonecfg carries out the following operations:
![]() Create, or delete, a zone configuration
Create, or delete, a zone configuration
![]() Add, or remove, resources in a configuration
Add, or remove, resources in a configuration
![]() Set the properties for a resource in the configuration
Set the properties for a resource in the configuration
![]() Query and verify a configuration
Query and verify a configuration
![]() Commit (save) a configuration
Commit (save) a configuration
![]() Revert to a previous configuration
Revert to a previous configuration
![]() Exit from a
Exit from a zonecfg session
When you enter zonecfg in interactive mode, the prompt changes to show that you are in a zonecfg session. If you are configuring a zone called apps, then the prompt changes as follows:
# zonecfg -z apps
zonecfg:apps>
This is known as the global scope of zonecfg. When you configure a specific resource, the prompt changes to include the resource being configured. The command scope also changes so that you are limited to entering commands relevant to the current scope. You have to enter an end command to return to the global scope.
Table 13.2 describes the subcommands that are available with the interactive mode of zonecfg:
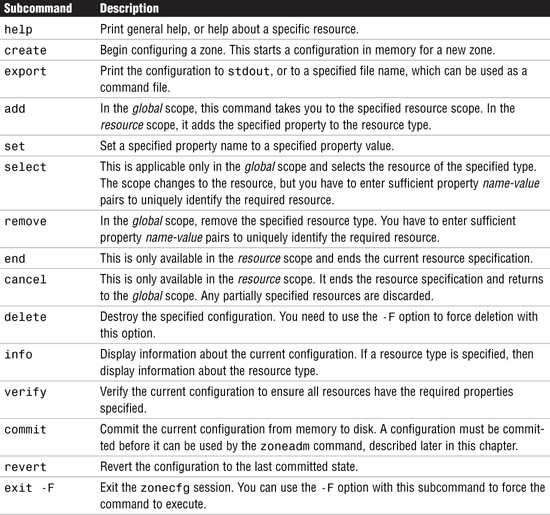
Table 13.3 lists the resource types that are applicable to the zonecfg command:

Some of the resource types described in Table 13.3 also have properties that need to be configured if the resource type is to be used. The following list describes the properties and the parameters, along with examples of usage:
![]() fs dir, special, raw, type, options
fs dir, special, raw, type, options
The following code gives an example of how these properties are used. The bold type indicates the keystrokes entered at the keyboard.
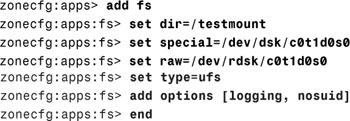
This code example specifies that /dev/dsk/c0t1d0s0 in the global zone is to be mounted on directory /testmount in the non-global zone and the raw device /dev/rdsk/c0t1d0s0 is the device to fsck before attempting the mount. The file system is of type ufs and a couple of mount options have been added too.
![]() inherit-pkg-dir dir
inherit-pkg-dir dir
This specifies the directory that is to be loopback mounted from the global zone. The following example shows that /opt/sfw is to be mounted:
![]()
![]() net address, physical
net address, physical
This specifies the setup of the network interface for the zone. The following code example specifies an IP address of 192.168.0.42 and that the physical interface to be used is hme0:

![]() device match
device match
This specifies a device to be included in the zone. The following code example includes a tape drive, /dev/rmt/0:

![]() rctl name, value
rctl name, value
There are two zone-wide resource controls, namely zone.cpu-shares and zone.max-lwps. The zone.cpu-shares limits the zone’s share of the CPU resources, and the zone.max-lwps limits the number of Lightweight Processes that the zone can run. These two controls prevent the zone from exhausting resources that could affect the performance or operation of other zones.
The following example sets the number of CPU shares to 20:

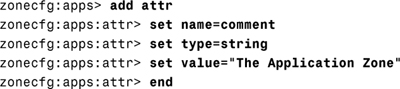
The attr resource type is mainly used for adding a comment to a zone. The following example adds a comment for the zone apps:
The zone configuration data can be viewed in two ways:
![]() Viewing a file
Viewing a file
![]() Using the
Using the export option of zonecfg
Both of these are described here:
The zone configuration file is held in the /etc/zones directory and is stored as an xml file. To view the configuration for a zone named testzone, you would enter:
# cat /etc/zones/testzone.xml
The alternative method of viewing the configuration is to use the zonecfg command with the export option. The following example shows how to export the configuration data for zone testzone:
# zonecfg -z testzone export
By default, the output goes to stdout, but this can be changed by entering a filename instead. If you save the configuration to a file, then it can be used at a later date, if required, as a command file input to the zonecfg command. This option is useful if you have to recreate the zone for any reason.
When a zone has been configured, the next step in its creation is to install it. This has the effect of copying the necessary files from the global zone and populating the product database for the zone. You should verify a configuration before it is installed to ensure that everything is set up correctly.
To verify the zone configuration for a zone named testzone enter the following command:
zoneadm -z testzone verify
If, for example, the zonepath does not exist, or it has not had the correct permissions set, then the verify operation will generate a suitable error message.
When the zone has been successfully verified it can be installed, as follows:
zoneadm -z testzone install
A number of status and progress messages are displayed on the screen as the files are copied and the package database is updated.
Notice that whilst the zone is installing, its state will change from configured to incomplete. The state will change to installed when the install operation has completed.
Before issuing the boot command, a zone needs to be transitioned to the ready state. This can be done using the zoneadm command as follows:
zoneadm -z testzone ready
The effect of the ready command is to establish the virtual platform, plumb the network interface and mount any file systems. At this point though, there are no processes running.
To boot the zone testzone, issue the following command:
zoneadm -z testzone boot
Confirm that the zone has booted successfully by listing the zone using the zoneadm command as follows:
zoneadm -z testzone list -v
The state of the zone will have changed to running if the boot operation was successful.
Note
To shut down a zone, issue the halt option of the zoneadm command as shown in the following:
zoneadm -z testzone halt
The zone state changes from running to installed when a zone is halted.
A zone can be rebooted at any time without affecting any other zone on the system. The reboot option of the zoneadm command is used to reboot a zone as shown here to reboot the zone testzone:
zoneadm -z testzone reboot
The state of the zone should be running when the reboot operation has completed.
When a zone is no longer required, it should be uninstalled before it is deleted. In order to uninstall a zone, it must first be halted. When this has been done, issue the uninstall command as shown here to uninstall the zone testzone:
zoneadm -z testzone uninstall -F
The -F option forces the command to execute without confirmation. If you omit this option, then you will be asked to confirm that you wish to uninstall the zone.
When a zone has been successfully uninstalled, its configuration can be deleted from the system. Enter the zonecfg command as shown here to delete the zone testzone from the system:
zonecfg -z testzone delete -F
The -F option forces the command to execute without confirmation. If you omit this option, then you will be asked to confirm that you wish to delete the zone configuration.
Exam Alert
Remember the Force Unlike most other Unix commands, zoneadm and zonecfg use an uppercase letter F to force the command to be executed without prompting you for confirmation. All other commands, such as mv, rm, and umount, for example, always use a lowercase letter f. Make sure you are aware of this anomaly when you sit for the exam.
When a zone is operational and running, the normal network access commands can be used to access a zone, such as telnet, rlogin, and ssh, but a non-global zone can also be accessed from the global zone using zlogin command. This is necessary for administration purposes and to be able to access the console session for a zone. Only the Superuser (root), or a role with the RBAC profile “Zone Management” can use the zlogin command from the global zone.
The syntax for the zlogin command is as follows:
![]()
zlogin works in three modes:
![]() Interactive—where a login session is established from the global zone.
Interactive—where a login session is established from the global zone.
![]() Non-interactive—where a single command or utility can be executed. Upon completion of the command (or utility), the session is automatically closed.
Non-interactive—where a single command or utility can be executed. Upon completion of the command (or utility), the session is automatically closed.
![]() Console—where a console session is established for administration purposes.
Console—where a console session is established for administration purposes.
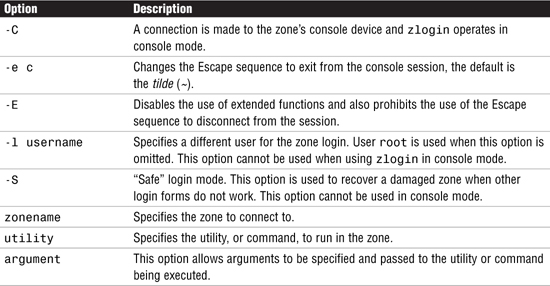
Table 13.4 describes the various options for zlogin:
When a zone has been installed and is booted for the first time, it is still not fully operational because the internal zone configuration needs to be completed. This includes setting the following:
![]() Language
Language
![]() Terminal Type
Terminal Type
![]() Host name
Host name
![]() Security Policy
Security Policy
![]() Name Service
Name Service
![]() Time Zone
Time Zone
![]() Root Password
Root Password
These settings are configured interactively the first time you use zlogin to connect to the zone console, similar to when you first install the Solaris 10 Operating Environment. The zone then reboots to implement the changes. When this reboot completes, the zone is fully operational.
Note
Instead of completing the zone configuration interactively, you can pre-configure the required options in a sysidcfg file. This enables the zone configuration to be completed without intervention. The sysidcfg file needs to be placed in the /etc directory of the zone’s root. For a zone named testzone with a zonepath of /export/zones/testzone, the sysidcfg file would be placed in /export/zones/testzone/root/etc.
The following example of a sysidcfg file sets the required parameters, but doesn’t use a naming service, or a security policy. Note that the root password entry needs to include the encrypted password:
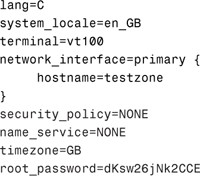
There is one other question that is asked by the zone configuration utility, relating to NFS version 4 domain parameter. To complete a hands-off configuration, create the following file in the zone’s root/etc directory:
# touch /export/zones/testzone/root/etc/.NFS4inst_state.domain
This file indicates that the NFSv4 domain has been set, so you don’t get asked to confirm it.
Note
You can access the console of a zone by using the zlogin -C <zonename> command. If you are completing a hands-off configuration, connect to the console before the initial boot and you will see the boot messages appear in the console as well as the reboot after the sysidcfg file has been referenced.
The following session shows what happens when the zone testzone is booted for the first time, using a sysidcfg file:

The Superuser (root), or a role with the RBAC profile “Zone Management”, can log directly into a zone from the global zone, without having to supply a password. The system administrator uses the zlogin command; the following example shows a zone login to the testzone zone, the command zonename is run and then the connection is closed:
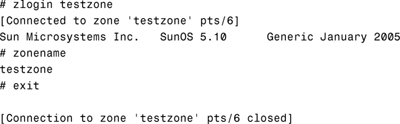
In the previous section an interactive login to a zone was achieved. Here, a non-interactive login is actioned and a single command is executed. The connection is automatically disconnected as soon as the command has completed. The following example shows how this works. First, the hostname command is run, demonstrating that we are on the host called global, then a non-interactive login to the testzone zone runs, which runs the zonename command and then exits automatically. Finally, the same hostname command is run, which shows we are back on the host called global:

Exam Alert
Now that we have seen the technicalities of configuring a zone, let’s put it all together and create a zone. Step by Step 13.1 configures the zone named testzone, installs it and boots it. Finally, we will list the zone configuration data.
STEP BY STEP
13.1 Creating a zone
1. Perform the initial configuration on a zone named testzone. The zonepath will be /export/zones/testzone and the IP address will be 192.168.0.43. This zone will be a sparse root zone with no additional file systems being mounted from the global zone. Create the zonepath and assign the correct permission (700) to the directory. The bold text identifies the keystrokes to be entered at the keyboard:
![]()
2. Enter the zonecfg command to configure the new zone.

3. Having entered the initial configuration information, use a separate login session to check to see if the zone exists using the zoneadm command.
![]()
At this point the zone configuration has not been committed and saved to disk, so it only exists in memory.
4. Verify and save the zone configuration. Exit zonecfg and then check to see if the zone exists using the zoneadm command.

Notice that the zone now exists and that it has been placed in the configured state.
5. Use the zoneadm command to verify that the zone is correctly configured and ready to be installed:
# zoneadm -z testzone verify
6. Install the zone:

7. The zone is now ready to be used operationally. Change the state to ready and verify that it has changed, then boot the zone and check that the state has changed to running.

8. View the configuration data by exporting the configuration to stdout.
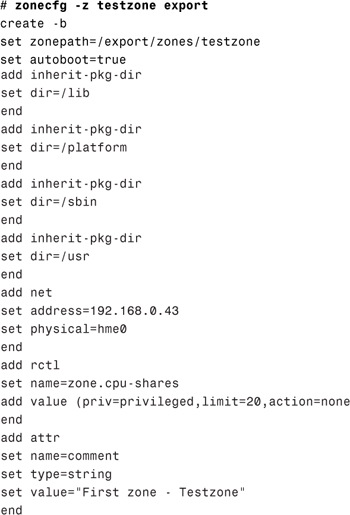
Notice the four default inherit-pkg-dir entries showing that this is a sparse root zone.
Exam Alert
Zone Configuration File You can also view the configuration file directly by viewing /etc/zones/<zonename>.xml. This file is created when you save the configuration using zonecfg. You might be asked this location in the exam.
The Solaris zones facility is a major step forward in the Solaris Operating Environment. It allows virtualization of Operating System services so that applications can run in an isolated and secure environment. Previously, this functionality has only been available on high-end, extremely expensive servers. One of the advantages of zones is that multiple versions of the same application can be run on the same physical system, but independently of each other. Solaris zones also protects the user from having a single application able to exhaust the CPU or memory resources when it encounters an error.
This chapter has described the concepts of Solaris zones and the zone components as well as the types of zone that can be configured.
You have seen how to configure a zone from scratch, and install and boot a zone. You also learned how to access the zone console, and login to a zone for system administration purposes.
In this exercise, you’ll see how to create a non-global zone, which copies the Solaris packages to the zone’s private file system. You will need a Solaris 10 workstation with approximately 3.5 Gigabytes of free disk space. Make sure you are logged in as root and are running a window system (either CDE or Gnome). The zone you are going to create will be called zone1 and its IP address will be 192.168.0.28.
Estimated Time: 1 hour
1. Open a terminal window and identify a file system with at least 3.5 Gigabytes of free disk space. For this example, we have used the /export file system. Create the zone directory. You also need to set the permissions on the directory. Enter the following commands at the command prompt:
![]()
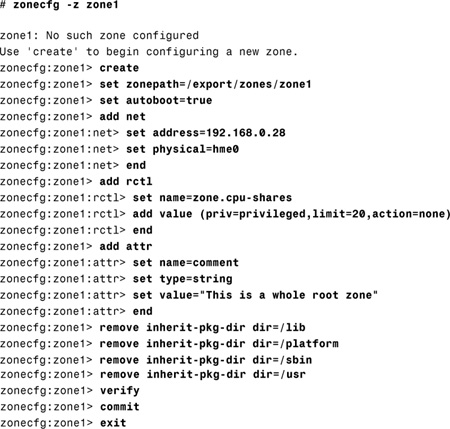
2. Now start creating the zone, using the zonecfg command. In this exercise, only the basic setup is required, but in order to create a whole root zone, the default inherited file systems must be removed. This is necessary to ensure the entire Solaris package collection is copied to the zone. Enter the commands as shown here in bold:
3. The zone has now been created and should be in the configured state. You can view the state by entering the following command:
# zoneadm -z zone1 list -v
4. Verify the zone and then enter the command to install the files from the global zone as follows:
![]()
5. Several messages inform you of the progress of the installation. When it has completed, verify that the zone state has now changed to installed by re-entering the following command:
# zoneadm -z zone1 list -v
6. The next thing to do is to make the zone ready and boot it so that it is running:
![]()
7. Add an entry to the global zone /etc/hosts file and try to connect to the hostname for the zone, using telnet. This will fail because the internal configuration of the zone has yet to be completed. Complete the installation by logging in to the console of the newly created zone:
# zlogin -C zone1
8. A console session will be established with the new zone. A number of questions need to be answered before the zone is fully operational. Enter the language, locale, terminal, the hostname for the zone, a security policy (if required), a naming service (choose “none” if a naming service is not being used), and a time zone. Finally, you will be asked to enter a root password.
9. When you have entered all of the required information, a final prompt appears concerning the NFSv4 domain name. Answer this question (“no” is the default).
10. The zone reboots to implement the configuration you have just specified. The reboot only takes a few seconds, when complete, you will be able to telnet to the zone as if it was any other remote system.
Answers to Exam Questions
|
1. |
C. The command |
|
2. |
B. The command |
|
3. |
A and D. Whole Root and Sparse Root are valid types of Root File System in the non-global zone. For more information, see the section “Non-global Zone Root File System Models.” |
|
4. |
B. The command |
|
5. |
D. The command |
|
6. |
C. The zone name “SUNWzone” is invalid because all zonenames beginning with “SUNW” are reserved. For more information, see the section “The |
|
7. |
B, C and E. The global zone is always assigned Zone ID 0, it contains a full installation of Solaris system packages, and it also provides the single bootable instance of the Solaris Operating Environment that runs on the system. For more information, see the section “Zone Features.” |
|
8. |
C. Networking in non-global zones is implemented by using a logical network interface and the zone is assigned a unique IP address. For more information, see the section “Networking in a Zone Environment.” |
|
9. |
B. The command |
|
10. |
A. The |
|
11. |
D. In order to get the non-global zone |
|
12. |
B. The zone state being described is |
|
13. |
C. The command |
|
14. |
B. The |
|
A, D, and F. The valid zone states are |
|
|
16. |
C and D. The non-global zone contains a subset of the installed Solaris system packages and its zone ID is assigned by the system when it boots. |
|
17. |
A and D. The two ways of displaying the zone configuration data for the zone |
1. “System Administration Guide: Solaris Containers—Resource Management and Solaris Zones” manual from the Solaris 10 Documentation CD.
2. “System Administration Guide: Solaris Containers—Resource Management and Solaris Zones” book in the System Administration Collection of the Solaris 10 documentation set. See http://docs.sun.com.