
The following test objectives for exam 310-202 are covered in this chapter:
Explain naming services (DNS, NIS, NIS+, and LDAP) and the naming service switch file (database sources, status codes, and actions).
![]() The name services in Solaris help to centralize the shared information on your network. This chapter describes the name services available in Solaris 10 so that you can identify the appropriate name service to use for your network. The name service switch file
The name services in Solaris help to centralize the shared information on your network. This chapter describes the name services available in Solaris 10 so that you can identify the appropriate name service to use for your network. The name service switch file /etc/nsswitch.conf is used to direct requests to the correct name service in use on the system or network. This chapter describes how to select and configure the correct file for use with the available naming services.
Configure, stop and start the Name Service Cache Daemon (nscd) and retrieve naming service information using the getent command.
![]() This chapter describes the use of the Name Service Cache Daemon (
This chapter describes the use of the Name Service Cache Daemon (nscd), which speeds up queries of the most common data and the getent command to retrieve naming service information from specified databases.
Configure name service clients during install, configure the DNS client, and set up the LDAP client (client authentication, client profiles, proxy accounts, and LDAP configurations) after installation.
![]() This chapter describes how to configure a DNS client and an LDAP client. It assumes, however, that a DNS server and an LDAP server have already been configured elsewhere.
This chapter describes how to configure a DNS client and an LDAP client. It assumes, however, that a DNS server and an LDAP server have already been configured elsewhere.
Explain NIS and NIS security including NIS namespace information, domains, processes, securenets, and password.adjunct.
![]() The NIS name service is covered along with what a domain is and which processes run to manage the domain from a master server, slave server, and client perspective. This chapter also discusses NIS security.
The NIS name service is covered along with what a domain is and which processes run to manage the domain from a master server, slave server, and client perspective. This chapter also discusses NIS security.
Configure the NIS domain: Build and update NIS maps, manage the NIS master and slave server, configure the NIS client, and troubleshoot NIS for server and client failure messages.
![]() This chapter describes how to configure and manage an NIS domain, including setting up an NIS master server, an NIS slave server, and an NIS client. NIS provides a number of default maps, which will also be examined, along with the failure messages that can be encountered both on a server and a client.
This chapter describes how to configure and manage an NIS domain, including setting up an NIS master server, an NIS slave server, and an NIS client. NIS provides a number of default maps, which will also be examined, along with the failure messages that can be encountered both on a server and a client.
The following strategies will help you prepare for the test:
![]() As you study this chapter, be prepared to state the purpose of a name service and the type of information it manages. You’ll need at least two networked Solaris systems to practice the examples and step-by-step exercises. We highly recommend that you practice the tasks until you can perform them from memory.
As you study this chapter, be prepared to state the purpose of a name service and the type of information it manages. You’ll need at least two networked Solaris systems to practice the examples and step-by-step exercises. We highly recommend that you practice the tasks until you can perform them from memory.
![]() NIS is covered in-depth as the main naming service, although you will have to know how to configure LDAP and DNS clients. See if you can make use of an existing LDAP or DNS server to practice client commands. The exam focuses mainly on NIS with only a few questions on the other name services. Be sure that you understand how to configure NIS master servers, slave servers, and clients. You’ll need to understand entries in the NIS name service switch file.
NIS is covered in-depth as the main naming service, although you will have to know how to configure LDAP and DNS clients. See if you can make use of an existing LDAP or DNS server to practice client commands. The exam focuses mainly on NIS with only a few questions on the other name services. Be sure that you understand how to configure NIS master servers, slave servers, and clients. You’ll need to understand entries in the NIS name service switch file.
![]() Be prepared to describe the characteristics of each naming service, compare their functionality, and identify the correct name service switch file associated with a naming service.
Be prepared to describe the characteristics of each naming service, compare their functionality, and identify the correct name service switch file associated with a naming service.
![]() Finally, study the terms provided at the end of this chapter in the “Key Terms” section. Also, be sure you can describe each command we’ve covered in this chapter, specifically the ones we’ve used as examples. On the exam you will be asked to match a command or term with the appropriate description.
Finally, study the terms provided at the end of this chapter in the “Key Terms” section. Also, be sure you can describe each command we’ve covered in this chapter, specifically the ones we’ve used as examples. On the exam you will be asked to match a command or term with the appropriate description.
This chapter concentrates mainly on how to configure and administer the servers and clients in an NIS (Network Information Service) domain. NIS is a huge topic that could potentially span several volumes. The purpose of this chapter is to prepare you for questions regarding NIS that might appear on the exam. We also want to provide an overview of NIS, complete enough so that you are equipped to set up a basic NIS network and understand its use. A brief overview of NIS+, originally designed as a replacement for NIS, is included in this chapter, but you should note that Sun does not intend to support this name service in future releases of the Solaris operating environment. It is included here for background information and comprehensiveness, as it is not specifically tested in the exam other than to explain what it is.
DNS and LDAP are also introduced in this chapter (LDAP is expected to replace NIS and NIS+ in the future). This chapter shows how to set up a client using the LDAP and DNS Naming Services.
Name services store information in a central location that users, systems, and applications must be able to access to communicate across the network. Information is stored in files, maps, or database tables. Without a central name service, each system would have to maintain its own copy of this information. Therefore, centrally locating this data makes it easier to administer large networks.
Note
DNS Exception The DNS name service can be thought of as an exception when considering its global nature because information is stored in hierarchical root servers and in many other servers around the world. The examples provided in this book relate to Local Area Networks, where a DNS server would contain host information relating to the local environment, and is therefore centrally located. The exception applies when the DNS server is connected to the Internet and is part of the global DNS name space.
The information handled by a name service includes, but is not limited to, the following:
![]() System (host) names and addresses
System (host) names and addresses
![]() User names
User names
![]() Passwords
Passwords
![]() Groups
Groups
![]() Automounter configuration files (
Automounter configuration files (auto.master, auto.home)
![]() Access permissions and RBAC database files
Access permissions and RBAC database files
The Solaris 10 release provides the name services listed in Table 12.1.
A name service enables centralized management of host files so that systems can be identified by common names instead of by numerical addresses. This simplifies communication because users do not have to remember to enter cumbersome numerical addresses such as 129.44.3.1.
Addresses are not the only network information that systems need to store. They also need to store security information, email addresses, information about their Ethernet interfaces, network services, groups of users allowed to use the network, services offered on the network, and so on. As networks offer more services, the list grows. As a result, each system might need to keep an entire set of files similar to /etc/hosts.
As this information changes, without a name service, administrators must keep it current on every system in the network. In a small network, this is simply tedious, but on a medium or large network, the job becomes not only time consuming but also nearly unmanageable.
A name service solves this problem. It stores network information on servers and provides the information to clients that ask for it.
The name service switch file controls how a client workstation or application obtains network information. The name service switch is often simply referred to as “the switch.” The switch determines which naming services an application uses to obtain naming information, and in what order. It is a file called nsswitch.conf, which is stored in each system’s /etc directory. Also in every system’s /etc directory, you’ll find templates that can be used as the nsswitch.conf file, as described in Table 12.2. Whatever name service you choose, select the appropriate name service switch template, copy it to nsswitch.conf, and customize it as required.

When you install Solaris 10, the correct template file is copied to /etc/nsswitch.conf. This template file contains the default switch configurations used by the chosen naming service. If during software installation you select “none” as the default name service, then the local /etc files will be used. In this case, /etc/nsswitch.conf is created from nsswitch.files, which looks like this:
If you decide to use a different name service after software installation, you can move the correct switch file into place manually. For example, if you start using NIS then copy /etc/nsswitch.nis as follows:
cp /etc/nsswitch.nis /etc/nsswitch.conf
The default /etc/nsswitch.nis file looks like this:
Each line of the /etc/nsswitch.nis file identifies a particular type of network information, such as host, password, and group, followed by one or more sources, such as NIS maps, the DNS hosts table, or the local /etc files. The source is where the client looks for the network information. For example, the system should first look for the passwd information in the /etc/passwd file. Then, if it does not find the login name there, it needs to query the NIS server.
The name service switch file lists many types of network information, called databases, with their name service sources for resolution, and the order in which the sources are to be searched. Table 12.3 lists valid sources that can be specified in this file.

As shown in the previous nsswitch.nis template file, the name service switch file can contain action values for several of the entries. When the naming service searches a specified source, such as local files or NIS, the source returns a status code. These status codes are described in Table 12.4.

For each status code, two actions are possible:
![]() Continue—Try the next source.
Continue—Try the next source.
![]() Return—Stop looking for an entry.
Return—Stop looking for an entry.
The default actions are as follows:
SUCCESS = return
UNAVAIL = continue
NOTFOUND = continue
TRYAGAIN = continue
Normally, a success indicates that the search is over and an unsuccessful result indicates that the next source should be queried. There are occasions, however, when you want to stop searching when an unsuccessful search result is returned. For example, the following entry in the nsswitch.nis template states that only the NIS hosts table in the NIS map is searched:
hosts: nis [NOTFOUND=return] files
If the NIS map has no entry for the host lookup, the system would not reference the local /etc/hosts file. Remove the [NOTFOUND=return] entry if you want to search the NIS hosts table and the local /etc/hosts file.
Note
/etc files are the traditional Unix way of maintaining information about hosts, users, passwords, groups, and automount maps, to name just a few. These files are text files located on each individual system that can be edited using the vi editor or the text editor within CDE.
Each file needs to be individually maintained and on a large network, this can be a difficult task. As IP addresses change, and users’ accounts are added and deleted, it can become difficult to maintain all these files and keep them in sync between each system. On a large changing network, the traditional approach to maintaining this information had to change; therefore, the following name services were introduced.
NIS, formerly called the Yellow Pages (YP), is a distributed database system that lets the system administrator administer the configuration of many hosts from a central location. Common configuration information, which would have to be maintained separately on each host in a network without NIS, can be stored and maintained in a central location and then propagated to all the nodes in the network. NIS stores information about workstation names and addresses, users, the network itself, and network services. This collection of network information is referred to as the NIS namespace.
Note
YP to NIS As stated, NIS was formerly known as Sun Yellow Pages (YP). The functionality of the two remains the same; only the name has changed.
Before beginning the discussion of the structure of NIS, you need to be aware that the NIS administration databases are called maps. An NIS domain is a collection of systems that share a common set of NIS maps.
The systems within an NIS network are configured in the following ways:
![]() Master server
Master server
![]() Slave servers
Slave servers
![]() Clients of NIS servers
Clients of NIS servers
The center of the NIS network is the NIS master server. The system designated as master server contains the set of maps that you, the NIS administrator, create and update as necessary. After the NIS network is set up, any changes to the maps must be made on the master server. Each NIS domain must have one, and only one, master server. The master server should be a system that can handle the additional load of propagating NIS updates with minimal performance degradation.
In addition to the master server, you can create backup servers, called NIS slave servers, to take some of the load off the master server and to substitute for the master server if it goes down. If you create an NIS slave server, the maps on the master server are transferred to the slave server. A slave server has a complete copy of the master set of NIS maps. If a change is made to a map on the master server, the updates are propagated among the slave servers. The existence of slave servers lets the system administrator evenly distribute the load that results from answering NIS requests. It also minimizes the impact of a server becoming unavailable.
Typically, all the hosts in the network, including the master and slave servers, are NIS clients. If a process on an NIS client requests configuration information, it calls NIS instead of looking in its local configuration files. For group and password information and mail aliases, the /etc files might be consulted first, and then NIS might be consulted if the requested information is not found in the /etc files. Doing this, for example, allows each physical system to have a separate root account password.
Any system can be an NIS client, but only systems with disks should be NIS servers, whether master or slave. Servers are also clients of themselves.
As mentioned earlier, the set of maps shared by the servers and clients is called the NIS domain. The master copies of the maps are located on the NIS master server, in the directory /var/yp/<domainname>, in which <domainname> is the chosen name for your own domain. Under the <domainname> directory, each map is stored as two files: <mapname>.dir and <mapname>.pag. Each slave server has an identical directory containing the same set of maps.
When a client starts up, it broadcasts a request for a server that serves its domain. Any server that has the set of maps for the client’s domain, whether it’s a master or a slave server, can answer the request. The client “binds” to the first server that answers its request, and that server then answers all its NIS queries.
Normally, an NIS master server supports only one NIS domain, but can be configured to support multiple domains. However, a master server for one domain might be a slave server for another domain. A host can be a slave server for multiple domains. A client, however, belongs to only one domain.
The following guidelines can be used to determine how many NIS servers you need in your domain:
![]() You should put at least one server on each subnet in your domain, depending on the total number of clients. When a client starts up, it broadcasts a message to find the nearest server. Solaris 10 does not require the server to be on the same subnet, but it is faster and more resilient to do so.
You should put at least one server on each subnet in your domain, depending on the total number of clients. When a client starts up, it broadcasts a message to find the nearest server. Solaris 10 does not require the server to be on the same subnet, but it is faster and more resilient to do so.
![]() In general, the number of NIS clients a server can handle is limited by the physical hardware specification and current load of the server. A fast, lightly loaded server can easily support hundreds of NIS clients, while a slower, heavily loaded database server, for example, would struggle to support 50 clients.
In general, the number of NIS clients a server can handle is limited by the physical hardware specification and current load of the server. A fast, lightly loaded server can easily support hundreds of NIS clients, while a slower, heavily loaded database server, for example, would struggle to support 50 clients.
Determine which systems on your network will be NIS servers as follows:
![]() Choose servers that are reliable and highly available.
Choose servers that are reliable and highly available.
![]() Choose fast servers that are not used for CPU-intensive applications. Do not use gateways or terminal servers as NIS servers.
Choose fast servers that are not used for CPU-intensive applications. Do not use gateways or terminal servers as NIS servers.
![]() Although it isn’t a requirement, it’s a good idea to distribute servers appropriately among client networks. In other words, each subnet should have enough servers to accommodate the clients on that subnet.
Although it isn’t a requirement, it’s a good idea to distribute servers appropriately among client networks. In other words, each subnet should have enough servers to accommodate the clients on that subnet.
As discussed, NIS stores information in a set of files called maps. Maps were designed to replace Unix /etc files, as well as other configuration files.
NIS maps are two-column tables. One column is the key, and the other column is the information value related to the key. NIS finds information for a client by searching through the keys. Some information is stored in several maps because each map uses a different key. For example, the names and addresses of systems are stored in two maps: hosts.byname and hosts.byaddr. If a server has a system’s name and needs to find its address, it looks in the hosts.byname map. If it has the address and needs to find the name, it looks in the hosts.byaddr map.
Maps for a domain are located in each server’s /var/yp/<domainname> directory. For example, the maps that belong to the domain pyramid.com are located in each server’s /var/yp/pyramid.com directory.
An NIS Makefile is stored in the /var/yp directory of the NIS server at installation time. If you run the /usr/ccs/bin/make command in that directory, makedbm creates or modifies the default NIS maps from the input files. For example, an input file might be /etc/hosts. Issue the following command to create the NIS map files:
cd /var/yp
/usr/ccs/bin/make
Note
Generate Maps on the Master Server Only Always make the maps on the master server and never on a slave server. If you run make on a slave server, the maps will be generated from data in the slave server’s local files and will be inconsistent with the rest of the domain. Additionally, NIS clients that are bound to the slave server will be querying inconsistent data and receiving unexpected results.
Creating NIS maps is described in more detail later in this chapter in the “Configuring an NIS Master Server” section.
Solaris provides a default set of NIS maps. They are described in Table 12.5, including the corresponding file that is used to create each of them. You might want to use all or only some of these maps. NIS can also use whatever maps you create or add, if you install other software products.
The information in these files is put into NIS databases automatically when you create an NIS master server. Other system files can also be managed by NIS if you want to customize your configuration.
NIS makes updating network databases much simpler than with the /etc file system. You no longer have to change the administrative /etc files on every system each time you modify the network environment. For example, if you add a new system to a network running NIS, you only have to update the input file on the master server and run /usr/ccs/bin/make from the /var/yp directory. This process automatically updates the hosts.byname and hosts.byaddr maps. These maps are then transferred to any slave servers and made available to all the domain’s client systems and their programs.
Just as you use the cat command to display the contents of a text file, you can use the ypcat command to display the values in a map. Here is the basic ypcat syntax:
ypcat [-k] <mapname>
If a map is composed only of keys, as in the case of ypservers, use ypcat -k—otherwise, ypcat prints blank lines.
In this case, mapname is the name of the map you want to examine.
You can use the ypwhich command to determine which server is the master of a particular map:
ypwhich -m <mapname>
In this case, mapname is the name of the map whose master you want to find. ypwhich responds by displaying the name of the master server.
These and other NIS commands are covered in the following sections.
Before you configure systems as NIS servers or clients, you must plan the NIS domain. Each domain has a domain name, and each system shares the common set of maps belonging to that domain. Step by Step 12.1 outlines the steps for planning an NIS domain.
STEP BY STEP
12.1 Planning Your NIS Domain
1. Decide which systems will be in your NIS domain.
2. Choose an NIS domain name. AN NIS domain name can be up to 256 characters long, although much shorter names are more practical. A good practice is to limit domain names to no more than 32 characters. Domain names are case sensitive. For convenience, you can use your Internet domain name as the basis for your NIS domain name. For example, if your Internet domain name is pdesigninc.com, you can name your NIS domain pdesigninc.com.
3. Before a system can use NIS, the correct NIS domain name and system name must be set. This must be done on the NIS servers as well as the clients. A system’s host name is set by the system’s /etc/nodename file, and the system’s domain name is set by the system’s /etc/defaultdomain file. These files are read at startup, and the contents are used by the uname -s and domainname commands, respectively. A sample /etc/nodename file would look like this:
more /etc/nodename
The system responds with this:
sparcserver
A sample /etc/defaultdomain file would look like this:
more /etc/defaultdomain
The system responds with this:
pdesigninc.com
In order to set the domain name, you would either have to run the domainname command, entering your domain name as the argument to the command, or reboot if you have edited /etc/defaultdomain. Whichever way you choose, you are now ready to configure your NIS master server.
Before configuring an NIS master server, be sure the NIS software cluster is installed. The package names are SUNWypu and SUNWypr. Use the pkginfo command to check for these packages. Both packages are part of the standard Solaris 10 release. The daemons that support the NIS are described in Table 12.6.
The commands that you use to manage NIS are shown in Table 12.7. We describe some of these commands in more detail later when we show examples of setting up NIS.
Exam Alert
Identifying Daemons Versus Commands Make sure you are familiar with what each daemon and command does. Exam questions are frequently presented by describing the daemon or command and asking you to identify it correctly.
An NIS master server holds the source files for all the NIS maps in the domain. Any changes to the NIS maps must be made on the NIS master server. The NIS master server delivers information to NIS clients and supplies the NIS slave servers with up-to-date maps. Before the NIS master server is started, some of the NIS source files need to be created.
The basic steps for setting up an NIS master server are as follows:
![]() Creating the master
Creating the master passwd file
![]() Creating the master group file
Creating the master group file
![]() Creating the master hosts file
Creating the master hosts file
![]() Creating other master files
Creating other master files
![]() Preparing the Makefile
Preparing the Makefile
![]() Setting up the master server with
Setting up the master server with ypinit
![]() Starting and stopping NIS on the master server
Starting and stopping NIS on the master server
![]() Setting up the name service switch
Setting up the name service switch
Each of these tasks is described in the following subsections.
The first task in setting up an NIS master server is to prepare the source file for the passwd map. However, be careful with this source file. The source files can be located either in the /etc directory on the master server or in some other directory. Locating the source files in /etc is undesirable because the contents of the maps are then the same as the contents of the local files on the master server. This is a special problem for passwd and shadow files because all users would have access to the master server maps, and because the root password would be passed to all YP clients through the passwd map.
Sun recommends that for security reasons, and to prevent unauthorized root access, the files used to build the NIS password maps should not contain an entry for root. Therefore, the password maps should not be built from the files located in the master server’s /etc directory. The password files used to build the passwd maps should have the root entry removed from them, and they should be located in a directory that can be protected from unauthorized access.
For this exercise, copy all the source files from the /etc directory into the /var/yp directory. Because the source files are located in a directory other than /etc, modify the Makefile in /var/yp by changing the DIR=/etc line to DIR=/var/yp. Also, modify the PWDIR password macro in the Makefile to refer to the directory in which the passwd and shadow files reside by changing the line PWDIR=/etc to PWDIR=/var/yp.
Now, to create the passwd source file, use a copy of the /etc/passwd file on the system that becomes the master NIS server. Create a passwd file that has all the logins in it. This file is used to create the NIS map. Step by Step 12.2 shows you how to create the passwd source file.
STEP BY STEP
12.2 Creating the Password Source File
1. Copy the /etc/passwd file from each host in your network to the /var/yp directory on the host that will be the master server. Name each copy /var/yp/passwd.<hostname>, in which <hostname> is the name of the host it came from.
2. Concatenate all the passwd files into a temporary passwd file, as follows:
![]()
3. Issue the sort command to sort the temporary passwd file by username, and then pipe it to the uniq command to remove duplicate entries:
![]()
Note
Sorting the passwd File NIS does not require that the passwd file be sorted in any particular way. Sorting the passwd file simply makes it easier to find duplicate entries.
4. Examine /var/yp/passwd.temp for duplicate usernames that were not caught by the previous uniq command. This could happen if a user login occurs twice, but the lines are not exactly the same. If you find multiple entries for the same user, edit the file to remove redundant ones. Be sure each user in your network has a unique username and UID (user ID).
5. Issue the following command to sort the temporary passwd file by UID:
![]()
6. Examine /var/yp/passwd.temp for duplicate UIDs once more. If you find multiple entries with the same UID, edit the file to change the UIDs so that no two users have the same UID.
Note
Duplicate UIDs and Usernames You will have to resolve duplicate UIDs (where the same UID has been used on more than one system) and usernames (where a user has previously had home directories on each system). The NIS-managed UID will have ownership of any duplicated UID’s files unless they are changed accordingly to match modifications made to this file.
7. Remove the root login from the /var/yp/passwd.temp file. If you notice that the root login occurs more than once, remove all entries.
8. After you have a complete passwd file with no duplicates, move /var/yp/passwd.temp (the sorted, edited file) to /var/yp/passwd. This file is used to generate the passwd map for your NIS domain. Remove all the /var/yp/passwd.<hostname> files from the master server.
Just like creating a master /var/yp/passwd file, the next task is to prepare one master /var/yp/group file to be used to create an NIS map. To create the master group file, follow Step by Step 12.3.
STEP BY STEP
12.3 Creating the Master Group File
1. Copy the /etc/group file from each host in your NIS domain to the /var/yp directory on the host that will be the master server. Name each copy /var/yp/group.<hostname>, in which <hostname> is the name of the host it came from.
2. Concatenate all the group files, including the master server’s group file, into a temporary group file:
![]()
3. Issue the following command to sort the temporary group file by group name:
![]()
NIS does not require that the group file be sorted in any particular way. Sorting the group file simply makes it easier to find duplicate entries.
4. Examine /var/yp/group.temp for duplicate group names. If a group name appears more than once, merge the groups that have the same name into one group and remove the duplicate entries.
5. Issue the following command to sort the temporary group file by GID:
![]()
6. Examine /var/yp/group.temp for duplicate GIDs. If you find multiple entries with the same GID, edit the file to change the GIDs so that no two groups have the same GID.
Note
Duplicate GIDs You will have to resolve duplicate GIDs (where the same GID has been used on more than one system) and group names (where a group has previously existed on each system). The NIS-managed GID will have group ownership of any duplicated GID’s files unless they are changed accordingly to match modifications made to this file.
7 Move /var/yp/group.temp (the sorted, edited file) to /var/yp/group. This file is used to generate the group map for your NIS domain. Remove the /var/yp/group.<hostname> files from the master server.
Now create the master /etc/hosts file the same way you created the master /var/yp/passwd and /var/yp/group files (see Step by Step 12.4).
STEP BY STEP
12.4 Creating the Master hosts File
1. Copy the /etc/hosts file from each host in your NIS domain to the /var/yp directory on the host that will be the master server. Name each copy /var/yp/hosts.<hostname>, in which <hostname> is the name of the host from which it came.
2. Concatenate all the host files, including the master server’s host file, into a temporary hosts file, as follows:
![]()
3. Issue the following command to sort the temporary hosts file so that duplicate IP addresses are on adjacent lines:
![]()
4. Examine /var/yp/hosts.temp for duplicate IP addresses. If you need to map an IP address to multiple hostnames, include them as aliases in a single entry.
5. Issue the following command to sort the temporary hosts file by hostname:
![]()
6. Examine /var/yp/hosts.temp for duplicate hostnames. A hostname can be mapped to multiple IP addresses only if the IP addresses belong to different LAN cards on the same host. If a hostname appears in multiple entries that are mapped to IP addresses on different hosts, remove all the entries but one.
7. Examine the /var/yp/hosts.temp file for duplicate aliases. No alias should appear in more than one entry.
8. Move /var/yp/hosts.temp (the sorted, edited file) to /var/yp/hosts. This file is used to generate the host’s map for your NIS domain. Remove the /var/yp/hosts.<hostname> files from the master server.
The following files, which were described in Table 12.2, can also be copied to the /var/yp directory to be used as source files for NIS maps, but first be sure that they reflect an up-to-date picture of your system environment:
Unlike other source files, the /etc/mail/aliases file cannot be moved to another directory. This file must reside in the /etc/mail directory. Be sure that the /etc/mail/aliases source file is complete by verifying that it contains all the mail aliases that you want to have available throughout the domain.
After checking the source files and copying them into the source file directory, you need to convert those source files into the ndbm format maps that NIS uses. This is done automatically for you by ypinit. We describe how to use ypinit in the next section.
The ypinit script calls the program make, which uses the file Makefile located in the /var/yp directory. A default Makefile is provided for you in this directory. It contains the commands needed to transform the source files into the desired ndbm format maps.
The function of the Makefile is to create the appropriate NIS maps for each of the databases listed under “all.” After passing through makedbm, the data is collected in two files, mapname.dir and mapname.pag. Both files are located in the /var/yp/<domainname> directory on the master server.
The Makefile builds passwd maps from the $PWDIR/passwd, $PWDIR/shadow, and $PWDIR/security/passwd.adjunct files, as appropriate.
The /usr/sbin/ypinit shell script sets up master and slave servers and clients to use NIS. It also initially runs make to create the maps on the master server. See Step by Step 12.5 to set up a master server using ypinit.
STEP BY STEP
12.5 Using ypinit to Set Up the Master Server
1. Become root on the master server and ensure that the name service receives its information from the /etc files, not from NIS, by typing the following:
cp /etc/nsswitch.files /etc/nsswitch.conf
2. Edit the /etc/hosts file to add the name and IP address of each of the NIS servers.
3. To build new maps on the master server, type
/usr/sbin/ypinit -m
ypinit prompts you for a list of other systems to become NIS slave servers. Type the name of the server you are working on, along with the names of your NIS slave servers. Enter the server name, and then press Enter. Do this for each server. Enter each server on a separate line. Press Ctrl+D when you’re finished. At this point, the entered list of servers is displayed and you are asked if it is correct. Type y if it is correct. If the list is not correct, then type n and you will be returned to the list of servers to add extra entries.
4. ypinit asks whether you want the procedure to terminate at the first nonfatal error or to continue despite nonfatal errors. Type y.
If you typed y, ypinit exits upon encountering the first problem; you can then fix the problem and restart ypinit. This procedure is recommended if you are running ypinit for the first time. If you prefer to continue, you can manually try to fix all the problems that might occur, and then restart ypinit.
Note
Nonfatal Errors A nonfatal error might be displayed if some of the map files are not present. These errors do not affect the functionality of NIS.
5. ypinit asks whether the existing files in the /var/yp/<domainname> directory can be destroyed.
This message is displayed only if NIS was previously installed. You must answer yes to install the new version of NIS.
6. After ypinit has constructed the list of servers, it invokes make.
The make command uses the instructions contained in the Makefile located in /var/yp. It cleans any remaining comment lines from the files you designated and then runs makedbm on them, creating the appropriate maps and establishing the name of the master server for each map.
7. To enable NIS as the naming service, type
cp /etc/nsswitch.nis /etc/nsswitch.conf
This command replaces the current switch file with the default NIS-oriented one. You can edit this file as necessary. The name service switch file /etc/nsswitch.conf is described later in this chapter.
Now that the master maps are created, you can start the NIS daemons on the master server.
Exam Alert
Selecting the Correct Command Option Exam questions are often based on the syntax of the ypinit command. You might be given a scenario where you are asked to select the correct command option to initialize either a master server, a slave server, or a client. Ensure that you are completely familiar with what each command option achieves.
To start up NIS on the master server, you need to start the ypserv process on the server and run ypbind. The daemon ypserv answers information requests from clients after looking them up in the NIS maps. You can start up NIS manually on the server by running the svcadm enable nis/server command from the command line, followed by svcadm enable nis/client. After you configure the NIS master server by running ypinit, the NIS server is is automatically invoked to start up ypserv whenever the system is started up. This is actioned via SMF.
To manually stop the NIS server processes, run the svcadm disable nis/server command on the server as follows:
![]()
Note
NIS and SMF You should note that the NIS service is now managed via the Service Management Facility (SMF) and can be stopped and started using the svcadm command. You can still use the ypstop and ypstart commands, but you might get unexpected results, especially as SMF could automatically restart the service if you stop it manually. The recommended way to start and stop NIS is via SMF.
As root, you must perform four tasks to set up a system as an NIS client:
![]() Ensure that user account information from the
Ensure that user account information from the /etc/passwd and /etc/group files on the client has already been taken into account in the master passwd and group files. If not, then refer back to the previous section “Setting Up the Master passwd File” and “Creating the Master Group File” for details on how to merge existing account information into the NIS-managed maps.
Note
Client Home Directories Home directories that have previously existed on separate systems need to be taken into account when NIS is introduced. Without correct handling, a user’s files might come under the ownership of another user, unless they are dealt with at the time of any passwd and group modifications.
![]() Set the domain name on the client.
Set the domain name on the client.
![]() Set up the
Set up the nsswitch.conf file on the client, as described earlier in this chapter.
![]() Configure the client to use NIS, as explained next.
Configure the client to use NIS, as explained next.
The first step is to remove from the /etc/passwd file all the user entries that are managed by the NIS server. Don’t forget to update the /etc/shadow file. Also, remove entries from /etc/group, /etc/hosts, and any other network files that are now managed by NIS.
After setting up the nsswitch.conf file and setting your domain name as described in the section titled “Planning Your NIS Domain,” you configure each client system to use NIS by logging in as root and running the /usr/sbin/ypinit command, as follows:
ypinit -c
You are asked to identify the NIS servers from which the client can obtain name service information. Enter each server name, followed by a carriage return. You can list one master and as many slave servers as you want. The servers that you list can be located anywhere in the domain. It is good practice to first list the servers closest (in network terms) to the system, followed by the more distant servers on the network because the client attempts to bind to the first server on the list.
When you enter a server name during the client setup, the file /var/yp/<domainname>/ypservers is populated with the list of servers you enter. This list is used each time the client is rebooted, to establish a “binding” with an NIS server. An alternative method is to rename the previously mentioned file and restart NIS. This causes the client to “broadcast” over the local subnet to try to find an NIS server to bind to. If no server responds, then the client will be unable to use the name service until either an NIS slave server is configured on the same subnet, or the list of servers is re-instated.
Test the NIS client by logging out and logging back in using a login name that is no longer in the /etc/passwd file and is managed by NIS. Test the host’s map by pinging a system that is not identified in the local /etc/hosts file.
Before setting up the NIS slave server, you must set it up as an NIS client. After you’ve verified that the NIS master server is functioning properly by testing the NIS on this system, you can set up the system as a slave server. Your network can have one or more slave servers. Having slave servers ensures the continuity of NIS if the master server is unavailable. Before actually running ypinit to create the slave servers, you should run the domainname command on each NIS slave to be sure that the domain name is consistent with the master server. Remember, the domain name is set by adding the domain name to the /etc/defaultdomain file.
To set up an NIS slaver server, see Step by Step 12.6.
STEP BY STEP
12.6 Setting Up the NIS Slave Server
1. As root, edit the /etc/hosts file on the slave server to add the name and IP address of the NIS master server. At this point, we are assuming that you’re not using DNS to manage hostnames (DNS is covered later in this chapter). Step 3 prompts you for the hostname of the NIS master server. You need an entry for this hostname in the local /etc/hosts file; otherwise, you need to specify the IP address of the NIS server.
2. Change directories to /var/yp on the slave server.
3. To initialize the slave server as a client, type the following:
/usr/sbin/ypinit -c
The ypinit command prompts you for a list of NIS servers. Enter the name of the local slave you are working on first and then the master server, followed by the other NIS slave servers in your domain, in order, from the physically closest to the farthest (in network terms).
4. Next, you need to determine whether ypbind is already running. If it is running, you need to stop and restart it. Check to see if ypbind is running by typing this:
pgrep -l ypbind
If a listing is displayed, ypbind is running. If ypbind is running, stop it by typing this:
svcadm disable nis/client
5. Type the following to restart ypbind:
svcadm enable nis/client
6. To initialize this system as a slave, type the following:
/usr/sbin/ypinit -s master
In this example, master is the system name of the existing NIS master server.
Repeat the procedures described in these steps for each system that you want configured as an NIS slave server.
7. Now you can start daemons on the slave server and begin the NIS. First, you must stop all existing yp processes by typing the following:
svcadm disable nis/server
To start ypserv on the slave server and run ypbind, you can either reboot the server or type the following:
svcadm enable nis/server
NIS provides a number of default maps, as we have already seen earlier in this chapter. You can also add your own map to be managed by NIS. This is a simple process where you first create the file with a normal text editor such as vi and then create the map. The following example shows how to create a fictional address book map called abook from the text file /etc/abook. We assume here that the domain being used is pdesigninc.com:
cd /var/yp
makedbm /etc/abook pdesigninc.com/abook
The map is now created and exists in the master server’s directory. You can now run such commands as ypcat to list the contents of the map. To distribute it to other slave servers, use the ypxfr command.
If you want to verify the contents of an NIS map, you can use the makedbm command with the -u flag. This will write the contents of the map to the screen, so redirect the output to another file if it’s going to produce a large amount of text.
To make a new NIS map permanent, you will have to add the details of the new map to the Makefile in /var/yp. Have a look at the Makefile to see how to modify it to add a new entry. When this has been done, any further changes to the new map will automatically be propagated to all other NIS servers when the make command is run.
NIS has been traditionally insecure because the passwd map contains the encrypted passwords for all user accounts. Any user can list the contents of the passwd map, so a potential attacker could easily gather the encrypted passwords for use with a password cracking program. This issue is partially addressed in two ways: by using the passwd.adjunct file to remove encrypted passwords from the passwd map, and using the securenets file to restrict the hosts, or networks, that can access the NIS maps.
If you copy the contents of your shadow file to passwd.adjunct in the same directory as your passwd and shadow files (/var/yp in the examples used in this chapter) then a separate map, passwd.adjunct.byname, will be created. This map is only accessible by the root user and protects the encrypted passwords from unauthorized users. In addition to creating the file, you will also have to modify the NIS Makefile (held in /var/yp) to add the passwd.adjunct entry to the “all” section. This ensures that the map is updated when changes are made.
Note
Extra Editing The only downside of using this option is that when a new user is created or an existing user modified, the passwd.adjunct file must be amended to correctly reflect the current shadow file. This is an overhead for the system administrator, but should be offset against the increased security that is achieved by doing this.
A further enhancement to NIS security is to restrict the hosts, or networks, that can access the NIS namespace. The file /var/yp/securenets achieves this.
Entries in this file consist of two fields, a netmask and a network.
An example securenets file is shown here:
![]()
This code shows that only hosts with IP addresses in the specified networks can access the NIS namespace.
You can also add entries for specific hosts. A modified securenets file is shown below adding two individual hosts:
![]()
![]()
Note
securenets Warning Don’t fall into the trap of not allowing your own NIS servers to access the NIS namespace. You should make sure that all NIS servers are covered by the network entries in the securenets file; otherwise they might not be authorized. If any servers are not on these networks then you will need to add individual host entries.
The securenets file is read by the ypserv and ypxfrd processes on startup. If you make any modifications to the securenets file then you must also restart the NIS daemons to allow the changes to take effect.
This section provides some details of how to troubleshoot NIS when problems occur, and the actions to take. It looks briefly at some of the errors seen on the server as well as some of the errors seen on a client.
Normally, when a client fails to bind with an NIS server, one of the following has occurred:
![]()
ypbind isn’t running on the client: In this case enter svcadm enable network/nis/client to start the process.
![]() The domain name is set incorrectly or not set at all: Check the contents of
The domain name is set incorrectly or not set at all: Check the contents of /etc/defaultdomain or run the domainname command. Frequently, this problem occurs because the domain name has been set manually, but not entered into the file /etc/defaultdomain, so when the system is rebooted, the domain name is lost.
![]() No NIS server is available: This would point to a possible network problem, particularly if you have several NIS servers configured in the domain. Check that the client has network connectivity. If only a single NIS server is present, then you should check that the
No NIS server is available: This would point to a possible network problem, particularly if you have several NIS servers configured in the domain. Check that the client has network connectivity. If only a single NIS server is present, then you should check that the ypserv daemon is running. Also, check that the client’s /etc/nsswitch.conf is configured correctly.
Problems encountered in an NIS environment normally point to network or hardware problems, especially when there are several NIS servers available. If you find that you cannot connect to an NIS server, or if you are not getting any response to NIS commands, try the following:
![]()
ping the server to make sure it is accessible across the network.
![]() Run
Run ypwhich to verify which server you are meant to be bound to.
![]() Check that the NIS daemons are running on the server and restart the service if necessary. You can restart the NIS server by executing
Check that the NIS daemons are running on the server and restart the service if necessary. You can restart the NIS server by executing svcadm restart network/nis/server.
![]() Check that the server isn’t busy or overloaded. Use commands such as
Check that the server isn’t busy or overloaded. Use commands such as vmstat, iostat, and netstat to monitor the server for possible performance issues.
NIS+ is similar to NIS, but with more features. NIS+ is not an extension of NIS, but a new system. It was designed to replace NIS.
Note
End of Life for NIS+ It is important to note that Sun Microsystems issued an end of support notice for NIS+ with the release of Solaris 9, and again with the release of Solaris 10. It is likely that Solaris 10 will be the last release to contain NIS+ as a naming service. Sun recommends that users of NIS+ migrate to LDAP—using the Sun Java System Directory Server. To this end, and because NIS+ is not mentioned as an objective for this exam, it is only briefly covered in this chapter.
NIS addresses the administrative requirements of small-to-medium client/server computing networks—those with less than a few hundred clients. Some sites with thousands of users find NIS adequate as well. NIS+ is designed for the now-prevalent larger networks in which systems are spread across remote sites in various time zones and in which clients number in the thousands. In addition, the information stored in networks today changes much more frequently, and NIS had to be updated to handle this environment. Last but not least, systems today require a higher level of security than provided by NIS, and NIS+ addresses many security issues that NIS did not.
NIS+ lets you store information about workstation addresses, security, mail, Ethernet interfaces, and network services in central locations where all workstations on a network can access it. This configuration of network information is referred to as the NIS+ namespace.
The NIS+ namespace is the arrangement of information stored by NIS+. The namespace can be arranged in a variety of ways to fit an organization’s needs. NIS+ can be arranged to manage large networks with more than one domain. Although the arrangement of an NIS+ namespace can vary from site to site, all sites use the same structural components: directories, tables, and groups. These components are called objects, and they can be arranged into a hierarchy that resembles a Unix file system.
Directory objects form the skeleton of the namespace. When arranged in a treelike structure, they divide the namespace into separate parts, much like Unix directories and subdirectories. The topmost directory in a namespace is the root directory. If a namespace is flat, it has only one directory: the root directory. The directory objects beneath the root directory are called directories.
A namespace can have several levels of directories. When identifying the relation of one directory to another, the directory beneath is called the child directory, and the directory above is the parent.
Although Unix directories are designed to hold Unix files, NIS+ directories are designed to hold NIS+ objects: other directories, tables, and groups. Any NIS+ directory that stores NIS+ groups is named groups_dir, and any directory that stores NIS+ system tables is named org_dir.
NIS+ security is enhanced in two ways. First, it can authenticate access to the service, so it can discriminate between access that is enabled to members of the community and other network entities. Second, it includes an authorization model that allows specific rights to be granted or denied based on this authentication.
Authentication is used to identify NIS+ principals. An NIS+ principal might be someone who is logged in to a client system as a regular user, someone who is logged in as superuser, or any process that runs with superuser permission on an NIS+ client system. Thus, an NIS+ principal can be a client user or a client workstation. Every time a principal (user or system) tries to access an NIS+ object, the user’s identity and password are confirmed and validated.
Authorization is used to specify access rights. Every time NIS+ principals try to access NIS+ objects, they are placed in one of four authorization classes, or categories:
![]() Owner—A single NIS+ principal
Owner—A single NIS+ principal
![]() Group—A collection of NIS+ principals
Group—A collection of NIS+ principals
![]() World—All principals authenticated by NIS+
World—All principals authenticated by NIS+
![]() Nobody—Unauthenticated principals
Nobody—Unauthenticated principals
The NIS+ server finds out what access rights are assigned to that principal by that particular object. If the access rights match, the server answers the request. If they do not match, the server denies the request and returns an error message.
NIS+ authorization is the process of granting NIS+ principals access rights to an NIS+ object. Access rights are similar to file permissions. Four types of access rights exist:
![]() Read—The principal can read the contents of the object.
Read—The principal can read the contents of the object.
![]() Modify—The principal can modify the contents of the object.
Modify—The principal can modify the contents of the object.
![]() Create—The principal can create new objects in a table or directory.
Create—The principal can create new objects in a table or directory.
![]() Destroy—The principal can destroy objects in a table or directory.
Destroy—The principal can destroy objects in a table or directory.
Access rights are displayed as 16 characters. They can be displayed with the command nisls -l and can be changed with the command nischmod.
The NIS+ security system lets NIS+ administrators specify different read, modify, create, and destroy rights to NIS+ objects for each class. For example, a given class could be permitted to modify a particular column in the passwd table but not read that column, or a different class could be allowed to read some entries of a table but not others.
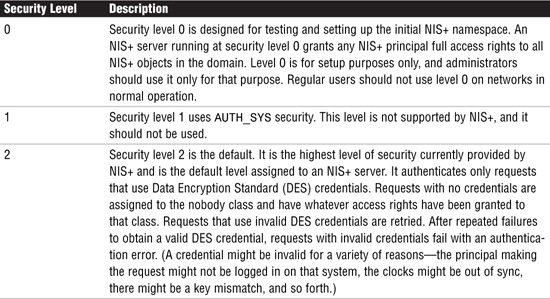
The implementation of the authorization scheme just described is determined by the domain’s level of security. An NIS+ server can operate at one of three security levels, summarized in Table 12.8.
DNS is the name service used by the Internet and other Transmission Control Protocol/Internet Protocol (TCP/IP) networks. It was developed so that workstations on the network can be identified by common names instead of Internet addresses. DNS is a system that converts domain names to their IP addresses and vice versa. Without it, users would have to remember numbers instead of words to get around the Internet. The process of finding a computer’s IP address by using its hostname as an index is referred to as name-to-address resolution, or mapping. DNS duplicates some of the information stored in the NIS or NIS+ tables, but DNS information is available to all hosts on the network.
The collection of networked systems that use DNS is referred to as the DNS namespace. The DNS namespace can be divided into a hierarchy of domains. A DNS domain is simply a group of systems. Two or more name servers support each domain: the primary, secondary, or cache-only server. Each domain must have one primary server and should have at least one secondary server to provide backup.
On the client side, DNS is implemented through a set of dynamic library routines, collectively called the resolver. The resolver’s function is to resolve users’ queries. The resolver is neither a daemon nor a single program; instead, it is a set of dynamic library routines used by applications that need to find IP addresses given the domain names.
The resolver library uses the file /etc/resolv.conf, which lists the addresses of DNS servers where it can obtain its information. The resolver reads this /etc/resolv.conf file to find the name of the local domain and the location of domain name servers. It sets the local domain name and instructs the resolver routines to query the listed name servers for information. Normally, each DNS client system on your network has a resolv.conf file in its /etc directory. (If a client does not have a resolv.conf file, it defaults to using a server at IP address 127.0.0.1, which is the local host.) Here’s an example of the /etc/resolv.conf file:
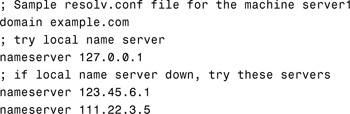
The first line of the /etc/resolv.conf file lists the domain name in this form:
domain <domainname>
<domainname> is the name registered with the Internet’s domain name servers.
Note
Domain Name Format No spaces or tabs are permitted at the end of the domain name. Make sure that you enter a hard carriage return immediately after the last character of the domain name.
The second line identifies the loopback name server in the following form:
nameserver 127.0.0.1
The remaining lines list the IP addresses of up to three DNS master, secondary, or cache-only name servers that the resolver should consult to resolve queries. (Do not list more than three primary or secondary servers.) Name server entries have the following form:
nameserver <IP_address>
<IP_address> is the IP address of a DNS name server. The resolver queries these name servers in the order they are listed until it obtains the information it needs.
Whenever the resolver must find the IP address of a host (or the hostname corresponding to an address), it builds a query package and sends it to the name servers listed in /etc/resolv.conf. The servers either answer the query locally or contact other servers known to them, ultimately returning the answer to the resolver.
After the resolver is configured, a system can request DNS service from a name server. If a system’s /etc/nsswitch.conf file specifies hosts: dns, the resolver libraries are automatically used. If the nsswitch.conf file specifies some other name service before DNS, such as NIS, that name service is consulted first for host information. Only if that name service does not find the host in question are the resolver libraries used.
For example, if the hosts line in the nsswitch.conf file specifies hosts: nis dns, the NIS name service is first searched for host information. If the information is not found in NIS, the DNS resolver is used. Because name services such as NIS and NIS+ contain only information about hosts in their own network, the effect of a hosts: nis dns line in a switch file is to specify the use of NIS for local host information and DNS for information on remote hosts on the Internet. If the resolver queries a name server, the server returns either the requested information or a referral to another server.
Name-to-address mapping occurs if a program running on your local system needs to contact a remote computer. The program most likely knows the hostname of the remote computer but might not know how to locate it, particularly if the remote system is in another network. To obtain the remote system’s address, the program requests assistance from the DNS software running on your local system, which is considered a DNS client.
The DNS client sends a request to a DNS name server, which maintains the distributed DNS database. Each DNS server implements DNS by running a daemon called in.named. When run without any arguments, in.named reads the default configuration file /etc/named.conf, loads DNS zones it is responsible for, and listens for queries from the DNS clients.
The files in the DNS database bear little resemblance to the NIS+ host table or even to the local /etc/hosts file, although they maintain similar information: the hostnames, IP addresses, and other information about a particular group of computers. The name server uses the hostname that your system sent as part of its request to find or “resolve” the IP address of the remote system. It then returns this IP address to your local system if the hostname is in its DNS database.
If the hostname is not in that name server’s DNS database, this indicates that the system is outside its authority—or, to use DNS terminology, outside the local administrative domain. If your network is connected to the Internet, then external servers will be consulted to try and resolve the hostname.
Because maintaining a central list of domain name/IP address correspondences would be impractical, the lists of domain names and IP addresses are distributed throughout the Internet in a hierarchy of authority. A DNS server that maps the domain names in your Internet requests or forwards them to other servers the Internet. It is probably provided by your Internet access provider.
LDAP is the latest name-lookup service to be added to Solaris. It can be used in conjunction with or in place of NIS+ or DNS. Specifically, LDAP is a directory service. A directory service is like a database, but it contains more descriptive, attribute-based information. The information in a directory is generally read, not written.
LDAP is used as a resource locator, but it is practical only in read intensive environments in which you do not need frequent updates. LDAP can be used to store the same information that is stored in NIS or NIS+. Use LDAP as a resource locator for an online phone directory to eliminate the need for a printed phone directory. This application is mainly read-intensive, but authorized users can update the contents to maintain its accuracy.
LDAP provides a hierarchical structure that more closely resembles the internal structure of an organization and can access multiple domains, similar to DNS or NIS+. NIS provides only a flat structure and is accessible by only one domain. In LDAP, directory entries are arranged in a hierarchical, tree-like structure that reflects political, geographic, or organizational boundaries. Entries representing countries appear at the top of the tree. Below them are entries representing states or national organizations. Below them might be entries representing people, organizational units, printers, documents, or just about anything else you can think of.
LDAP has provisions for adding and deleting an entry from the directory, changing an existing entry, and changing the name of an entry. Most of the time, though, LDAP is used to search for information in the directory.
Note
LDAP Information LDAP is a protocol that email programs can use to look up contact information from a server. For instance, every email program has a personal address book, but how do you look up an address for someone who has never sent you email? Client programs can ask LDAP servers to look up entries in a variety of ways. The LDAP search operation allows some portion of the directory to be searched for entries that match some criteria specified by a search filter.
LDAP servers index all the data in their entries, and filters may be used to select just the person or group you want and return just the information you want to see. Information can be requested from each entry that matches the criteria. For example, here’s an LDAP search translated into plain English: “Search people located in Hudsonville whose names contain ‘Bill’ and who have an email address. Return their full name and email address.”
Perhaps you want to search the entire directory subtree below the University of Michigan for people with the name Bill Calkins, retrieving the email address of each entry found. LDAP lets you do this easily. Or, you might want to search the entries directly below the U.S. entry for organizations with the string “Pyramid” in their names and that have a fax number. LDAP lets you do this.
Some directory services provide no protection, allowing anyone to see the information. LDAP provides a method for a client to authenticate, or prove, its identity to a directory server, paving the way for rich access control to protect the information the server contains.
LDAP was designed at the University of Michigan to adapt a complex enterprise directory system, called X.500, to the modern Internet. A directory server runs on a host computer on the Internet, and various client programs that understand the protocol can log in to the server and look up entries. X.500 is too complex to support on desktops and over the Internet, so LDAP was created to provide this service to general users.
Sun Java System Directory Server is a Sun product that provides a centralized directory service for your network and is used to manage an enterprise-wide directory of information, including the following:
![]() Physical device information, such as data about the printers in your organization. This could include information on where they are located, whether they support color or duplexing, the manufacturer and serial number, company asset tag information, and so on.
Physical device information, such as data about the printers in your organization. This could include information on where they are located, whether they support color or duplexing, the manufacturer and serial number, company asset tag information, and so on.
![]() Public employee information, such as name, phone number, email address, and department.
Public employee information, such as name, phone number, email address, and department.
![]() Logins and passwords.
Logins and passwords.
![]() Private employee information, such as salary, employee identification numbers, phone numbers, emergency contact information, and pay grade.
Private employee information, such as salary, employee identification numbers, phone numbers, emergency contact information, and pay grade.
![]() Customer information, such as the name of a client, bidding information, contract numbers, and project dates.
Customer information, such as the name of a client, bidding information, contract numbers, and project dates.
Sun Java System Directory Server meets the needs of many applications. It provides a standard protocol and a common application programming interface (API) that client applications and servers need to communicate with each another.
As discussed earlier, Java System Directory Server provides a hierarchical namespace that can be used to manage anything that has previously been managed by the NIS and NIS+ name services. The advantages of the Java System Directory Server over NIS and NIS+ are listed here:
![]() It gives you the capability to consolidate information by replacing application-specific databases. It also reduces the number of distinct databases to be managed.
It gives you the capability to consolidate information by replacing application-specific databases. It also reduces the number of distinct databases to be managed.
![]() It allows for more frequent data synchronization between masters and replicas.
It allows for more frequent data synchronization between masters and replicas.
![]() It is compatible with multiple platforms and vendors.
It is compatible with multiple platforms and vendors.
![]() It is more secure.
It is more secure.
Because LDAP is platform independent, it very likely will eventually replace NIS and NIS+, providing all the functionality once provided by these name services.
The Java System Directory Server runs as the ns-slapd process on your directory server. The server manages the directory databases and responds to all client requests. Each host in the domain that uses resources from the LDAP server is referred to as an LDAP client.
It’s not within the scope of this chapter to describe how to set up an LDAP server; this requires an in-depth working knowledge of LDAP. For background information on LDAP and Java System Directory Server, refer to the System Administration Guide: Naming and Directory Services (DNS, NIS, and LDAP) Guide available at http://docs.sun.com.
It’s assumed that the LDAP server has already been configured as a naming service with the appropriate client profiles in place. The scope of this chapter is to describe how to set up the LDAP client.
Before setting up the LDAP client, a few things must already be in place:
![]() The client’s domain name must be served by the LDAP server.
The client’s domain name must be served by the LDAP server.
![]() The
The nsswitch.conf file must point to LDAP for the required services. This would be achieved by copying the file /etc/nsswitch.ldap to /etc/nsswitch.conf.
![]() At least one server for which a client is configured must be up and running.
At least one server for which a client is configured must be up and running.
The ldapclient utility is used to set up LDAP client. ldapclient assumes that the server has already been configured with the appropriate client profiles. The LDAP client profile consists of configuration information that the client uses to access the LDAP information on the LDAP server. You must install and configure the LDAP server with the appropriate profiles before you can set up any clients.
To initialize a client using a profile, log in as root.
Run the ldapclient command as follows:
![]()
Where init initializes the host as an LDAP client, profileName refers to an existing profile on the LDAP server. domainName refers to the domain for which the LDAP server is configured.
The system responds with this:
System successfully configured
To initialize a client using a proxy account, run the ldapclient command as follows:
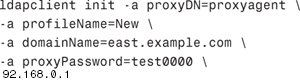
The proxyDN and proxyPassword parameters are necessary if the profile is to be used as a proxy. The proxy information is stored in the file /var/ldap_client_cred. The remaining LDAP client information is stored in the file /var/ldap_client_file.
After the LDAP client has been set up, it can be modified using the ldapclient mod command. One of the things you can change here is the authentication mechanism used by the client. If there is no particular encryption service being used then set this to simple as shown here:
ldapclient mod -a authenticationMethod=simple
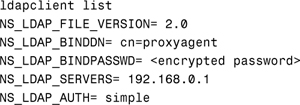
To list the properties of the LDAP client, use the ldapclient list command as shown here:
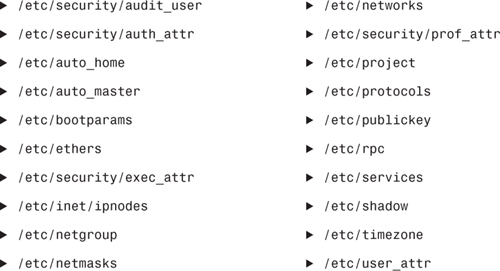
nscd is a daemon that runs on a Solaris system and provides a caching mechanism for the most common name service requests. It is automatically started when the system boots to a multi-user state. nscd provides caching for the following name service databases:
![]()
passwd
![]()
group
![]()
hosts
![]()
ipnodes
![]()
exec_attr
![]()
prof_attr
![]()
user_attr
Because nscd is running all the time as a daemon, any nscd commands that are entered are passed to the already running daemon transparently. The behavior of nscd is managed via a configuration file /etc/nscd.conf. This file lists a number of tunable parameters for each of the supported databases listed above.
The syntax for the nscd command is shown as follows:
![]()
The options for the nscd command are described in Table 12.9.

Whenever a change is made to the name service switch file, /etc/nsswitch.conf, the nscd daemon must be stopped and started so that the changes take effect. The commands to stop and start nscd have changed because the cache daemon is now managed by the Service Management Facility (SMF). The commands to use are as follows:
svcadm restart system/name-service-cache
Statistics can be obtained from nscd by running the command with the -g flag. This is the only option that can be run by a nonprivileged user. The truncated output that follows shows the results of the cache statistics for the hosts database:

The getent command is used to get a list of entries from a name service database. The information comes from one of the sources pointed to by the /etc/nsswitch.conf file.
The syntax for the getent command is shown in the following code:
getent database [key...]
The options for the getent command are described in Table 12.10.

The getent command displays the entries of the specified database that match each of the keys. If no key is specified, then all entries are printed. The following example looks at the root entry of the passwd database:
![]()
This chapter covered all the name service topics that are included in the Solaris 10 System Administrator exams. This includes the local files in the /etc directory, NIS, NIS+, DNS, and LDAP.
This chapter described how to configure the master server, slave servers, and clients for the most commonly used name service, NIS. Configuring clients for DNS and LDAP were also covered briefly. The name service switch file used by the operating system for any network information lookups was covered.
In addition, this chapter described the Sun Java System Directory Server that could soon replace NIS+, and eventually NIS. If you will be migrating from NIS+, you can refer to the section titled “Transitioning from NIS+ to LDAP” in the Solaris 10 System Administration Guide: Naming and Directory Services (NIS+), which is available on the Solaris Documentation CD and the online documentation site http://docs.sun.com.
Finally in this chapter, we described the Name Service Cache Daemon used to speed up requests for the most common name service requests, and also the getent command, which is used to retrieve entries from specified name service databases.
Of course, better understanding of the naming services will come as you use the systems described and become experienced over time. Many large networks that use a name service are heterogeneous, meaning that they have more than just Solaris systems connected to the network. Refer to the vendor’s documentation for each particular system to understand how each different operating system implements name services. You will see that most are similar in their implementation, with only subtle differences.
![]() NIS+ authorization (four classes and four types of access rights)
NIS+ authorization (four classes and four types of access rights)
![]() NIS+ security levels (three levels)
NIS+ security levels (three levels)
![]()
nscd (Name Service Cache Daemon)
![]() Slave NIS server
Slave NIS server
For these exercises, you’ll need two Solaris systems attached to a network. One system will be configured as the NIS master server, and the other will be the NIS client.
In this exercise, you’ll go through the steps to set up your NIS master server.
Estimated Time: 20 minutes
1. Login as root.
2. Set your domain name if it is not already set:
domainname <yourname>.com
Populate the /etc/defaultdomain file with your domain name.
domainname > /etc/defaultdomain
3. On the system that will become your master NIS server, create the master /var/yp/passwd, /var/yp/group, and /var/yp/hosts files. Follow the instructions described in this chapter to create these files.
4. Change entries for /etc to /var/yp in /var/yp/makefile as follows:
Change the following:
DIR = /etc
PWDIR = /etc
into the following:
DIR = /var/yp
PWDIR = /var/yp
5. Create the name service switch file by copying the NIS template file as follows:
cp /etc/nsswitch.nis /etc/nsswitch.conf
6. Run the ypinit command as follows to set up this system as the NIS master:
ypinit -m
When asked for the next host to add as an NIS slave server, enter CTRL+D. For this exercise, we will not be adding an NIS slave server.
Indicate you do not want ypinit to quit on nonfatal errors by typing N when asked.
You’ll know the process was successful when you get the message indicating that the current system was set up as a master server without any errors.
7. Start up the NIS service on the master server by running
svcadm enable network/nis/server
8. Verify that the NIS master server is up by typing
ypwhich -m
In this exercise, you’ll go through the steps to set up your NIS client.
Estimated time: 10 minutes
1. Login as root.
2. Set your domain name if it is not already set:
domainname <yourname>.com
Populate the /etc/defaultdomain file with your domain name:
domainname > /etc/defaultdomain
3. Create the name service switch file by copying the NIS template file as follows:
cp /etc/nsswitch.nis /etc/nsswitch.conf
4. Configure the client system to use NIS by running the ypinit command as follows:
ypinit -c
You will be asked to identify the NIS server from which the client can obtain name service information. Type the NIS master server name, followed by a carriage return.
When asked for the next host to add, press Ctrl+D.
5. Start the NIS daemons by executing the following script:
svcadm enable network/nis/server
6. Verify that the NIS client is bound to the NIS master by typing
ypwhich
The master server name should be displayed.
7. Test the NIS client by logging out and logging back in using a login name that is no longer in the local /etc/passwd file and is managed by NIS.
|
1. |
A. NIS stores information about workstation names, addresses, users, the network itself, and network services. For more information, see the “Name Services Overview” section. |
|
2. |
A. DES is not a Solaris name service. For more information, see the “Name Services Overview” section. |
|
3. |
D. |
|
4. |
C. The NIS administration databases are called maps. For more information, see the “Name Services Overview” section. |
|
5. |
C. The set of maps shared by the servers and clients is called the NIS domain. For more information, see the “Name Services Overview” section. |
|
6. |
B. To update the input file in the master server with a new system name, you’ll execute the |
|
A. Just as you use the |
|
|
8. |
D. You can use the |
|
9. |
B. The command |
|
10. |
C. The |
|
11. |
A. In setting up the NIS, set up the name service switch, which involves editing the |
|
12. |
B. Each line of the |
|
13. |
B. The following entry in the hosts: nis [NOTFOUND=return] files For more information, see the “Setting Up the Name Service Switch” section. |
|
14. |
A, C. The following template files are available: nsswitch.files, |
|
15. |
D. Access rights are similar to file permissions. There are four types of access rights: |
|
16. |
A. DNS is the name service provided by the Internet for Transmission Control Protocol/Internet Protocol (TCP/IP) networks. For more information, see the “DNS” section. |
|
17. |
B. Each server implements DNS by running a daemon called |
|
18. |
B. The process of finding a computer’s IP address by using its hostname as an index is referred to as name-to-address resolution, or mapping. The primary task of DNS is to provide name-to-address resolution. For more information, see the “DNS” section. |
|
19. |
A. Authentication is used to identify NIS+ principals. An NIS+ principal can be a client user or a client workstation. Every time a principal (user or system) tries to access an NIS+ object, the user’s identity and secure RPC password are confirmed and validated. Authorization is used to specify access rights. For more information, see the “NIS+ Security” section. |
|
A. The |
|
|
21. |
C. There are five name services that Solaris 10 supports: |
|
22. |
A. DNS is the name service used by the Internet. For more information, see the “DNS” section. |
|
23. |
D. To build new maps on the master server, type |
Solaris 10 Documentation CD—System Administration Guide: Advanced Administration and System Administration Guide: Naming and Directory Services manuals.
http://docs.sun.com. Solaris 10 documentation set. System Administration Guide: Advanced Administration and System Administration Guide: Naming and Directory Services books in the System Administration collection.