
The following test objectives for exam 310-202 are covered in this chapter:
Explain virtual memory concepts and, given a scenario, configure and manage swap space.
![]() The Solaris operating environment can use disk space, called swap areas or swap space, for temporary memory storage when a system does not have enough physical memory to handle currently running processes. A system’s memory requirements change, and you must be knowledgeable in swap space management in order to monitor these resources and make ongoing adjustments, as needed.
The Solaris operating environment can use disk space, called swap areas or swap space, for temporary memory storage when a system does not have enough physical memory to handle currently running processes. A system’s memory requirements change, and you must be knowledgeable in swap space management in order to monitor these resources and make ongoing adjustments, as needed.
Manage crash dumps and core file behaviors.
![]() You can configure the creation and storage of crash dump and core files, depending on the requirement. You can create application core files on a global or per-process basis. You must be able to customize the configuration according to various circumstances.
You can configure the creation and storage of crash dump and core files, depending on the requirement. You can create application core files on a global or per-process basis. You must be able to customize the configuration according to various circumstances.
Explain NFS fundamentals, and configure and manage the NFS server and client including daemons, files, and commands.
![]() Network File System (NFS) facilitates the sharing of data between networked systems. NFS servers share resources that are to be used by NFS clients. This chapter describes NFS and the tasks required to administer NFS servers and clients.
Network File System (NFS) facilitates the sharing of data between networked systems. NFS servers share resources that are to be used by NFS clients. This chapter describes NFS and the tasks required to administer NFS servers and clients.
Troubleshoot various NFS errors.
![]() You must have a thorough understanding of the problems that can arise within the NFS client/server process and how to address them. This chapter describes a number of problem areas and what to do in order to rectify them.
You must have a thorough understanding of the problems that can arise within the NFS client/server process and how to address them. This chapter describes a number of problem areas and what to do in order to rectify them.
Explain and manage AutoFS and use automount maps (master, direct, and indirect) to configure automounting.
![]() AutoFS allows NFS directories to be mounted and unmounted automatically. It also provides for centralized administration of NFS resources. This chapter describes AutoFS and how to configure the various automount maps.
AutoFS allows NFS directories to be mounted and unmounted automatically. It also provides for centralized administration of NFS resources. This chapter describes AutoFS and how to configure the various automount maps.
The following study strategies will help you prepare for the test:
![]() As you study this chapter, it’s important that you practice on a Solaris system each Step by Step and each command that is presented. Practice is very important on these topics, so you should practice until you can repeat each procedure from memory.
As you study this chapter, it’s important that you practice on a Solaris system each Step by Step and each command that is presented. Practice is very important on these topics, so you should practice until you can repeat each procedure from memory.
![]() You need to understand each command in this chapter and be prepared to match the command to the correct description.
You need to understand each command in this chapter and be prepared to match the command to the correct description.
![]() You need to know all the terms listed in the “Key Terms” section at the end of this chapter.
You need to know all the terms listed in the “Key Terms” section at the end of this chapter.
![]() You must understand the concept of a virtual file system, including how it works, how to configure additional swap space, and how to use tools to monitor it.
You must understand the concept of a virtual file system, including how it works, how to configure additional swap space, and how to use tools to monitor it.
Swap space is used to supplement the use of physical memory when a running process requires more resources than are currently available. This chapter describes how to monitor the use of swap space as well as how to add more when necessary and how to delete additional swap space if it is no longer required. Swap space can be allocated either as a dedicated disk slice or in an existing file system as a normal file. The latter option is often only used as an emergency solution. Both of these methods for adding swap space are described in this chapter.
Core files are produced when a process encounters an unexpected error. When this happens, the memory contents of the process are dumped to a file for further analysis. This chapter describes the configuration of core files and how they can be managed effectively. This chapter also describes crash dump files and how to manage and configure them. Crash dump files are produced when a system encounters a failure that it cannot recover from. The contents of kernel memory is dumped to a temporary location (normally the swap device) before the system reboots and is moved to a permanent location to save it from being overwritten.
Network File System (NFS) is a means of sharing file systems across the network. NFS allows multiple systems to make use of the same physical file system without having to maintain numerous copies of the data, which could cause consistency problems. NFS is discussed in this chapter, as is AutoFS, a method of automatically mounting file systems on demand and unmounting them when a specified amount of time has elapsed during which no activity has occurred. This chapter describes how to configure automount maps and make use of this extremely useful feature.
Objective:
Explain virtual memory concepts and, given a scenario, configure and manage swap space.
Physical memory is the random-access memory (RAM) installed in a computer. To view the amount of physical memory installed in your computer, type the following:
prtconf| grep "Memory size"
The system displays a message similar to the following:
Memory size: 384 Megabytes
Not all physical memory is available for Solaris processes. Some memory is reserved for kernel code and data structures. The remaining memory is referred to as available memory. Processes and applications on a system can use available memory.
Physical memory is supplemented by specially configured space on the physical disk that is known as swap space; together they are referred to as virtual memory. Swap space is configured either on a special disk partition known as a swap partition or on a swap file system (swapfs). In addition to swap partitions, special files called swap files can also be configured in existing Unix file systems (UFS) to provide additional swap space when needed.
Every process running on a Solaris system requires space in memory. Space is allocated to processes in units known as pages. Some of a process’s pages are used to store the process executable, andand other pages are used to store the process’s data.
Physical memory is a finite resource on any computer, and sometimes there are not enough pages in physical memory for all of a system’s processes. When a physical memory shortfall is encountered, the virtual memory system begins moving data from physical memory out to the system’s configured swap areas. When a process requests data that has been sent to a swap area, the virtual memory system brings that data back into physical memory. This process is known as paging.
The Solaris virtual memory system maps the files on disk to virtual addresses in memory—this is referred to as virtual swap space. As data in those files is needed, the virtual memory system maps the virtual addresses in memory to real physical addresses in memory. This mapping process greatly reduces the need for large amounts of physical swap space on systems with large amounts of available memory.
The virtual swap space provided by swapfs reduces the need for configuring large amounts of disk-based swap space on systems with large amounts of physical memory. This is because swapfs provides virtual swap space addresses rather than real physical swap space addresses in response to the requests to reserve swap space.
With the virtual swap space provided by swapfs, real disk-based swap space is required only with the onset of paging, because when paging occurs, processes are contending for memory. In this situation, swapfs must convert the virtual swap space addresses to physical swap space addresses in order for paging to actual disk-based swap space to occur.
The temporary file system (TMPFS) makes use of virtual memory for its storage—this can be either physical RAM or swap space; it is transparent to the user. /tmp is a good example of a TMPFS file system where temporary files and their associated information are stored in memory (in the /tmp directory) rather than on disk. This speeds up access to those files and results in a major performance enhancement for applications such as compilers and database management system (DBMS) products that use /tmp heavily.
TMPFS allocates space in the /tmp directory from the system’s virtual memory resources. This means that as you use up space in /tmp, you are also using up virtual memory space. So if your applications use /tmp heavily and you do not monitor virtual memory usage, your system could run out of this resource.
The amount of swap space required on a system is based on the following criteria:
![]() Application programs need a minimum amount of swap space to operate properly. This information is usually contained in the documentation that comes with the application. You should follow the manufacturer’s recommendation for swap space requirements.
Application programs need a minimum amount of swap space to operate properly. This information is usually contained in the documentation that comes with the application. You should follow the manufacturer’s recommendation for swap space requirements.
![]() You need to determine whether large applications (such as compilers) will be using the
You need to determine whether large applications (such as compilers) will be using the /tmp directory. Then you need to allocate additional swap space to be used by TMPFS.
![]() To prevent any possible panic dumps resulting from fatal system failures, there must be sufficient swap space to hold the necessary kernel memory pages in RAM at the time of a failure. Kernel memory accounts for around 20% of total memory, so if you have 1GB of physical memory, you will need about 256MB of disk-based space for a worst-case crash dump.
To prevent any possible panic dumps resulting from fatal system failures, there must be sufficient swap space to hold the necessary kernel memory pages in RAM at the time of a failure. Kernel memory accounts for around 20% of total memory, so if you have 1GB of physical memory, you will need about 256MB of disk-based space for a worst-case crash dump.
Note
Movement of Swap Starting with the release of Solaris 9, the installation program allocates swap at the first available cylinder on the disk (this is normally cylinder 0). This practice allows the root file system the maximum space on the disk and allows for expansion of the file system during an upgrade.
The amount of disk-based swap space on a system must be large enough to be able to accommodate a kernel memory dump, plus the requirements of any concurrently running processes, including third-party applications and compilers. Many other factors also contribute to the amount of swap space you need to configure, such as the number of concurrent users and the naming service, Network Information System Plus (NIS+). It is quite rare nowadays to need more swap space than RAM, which used to be a recommendation with older versions of SunOS; in fact the opposite is often true—you now often need less swap space than physical RAM.
If you are prepared to keep track of your swap space and administer it regularly, you can run with much less swap space than in older versions of SunOS. (How to monitor swap space and how to add additional space to a running system are discussed in the next few sections.)
Note
Reducing Swap Space Problems If the amount of swap space is equal to the amount of physical RAM, you should generally experience no swap space problems, although the type of application being used on the system will be a major factor.
If you run into a swap shortfall due to heavy demand on memory, you get error messages on your system’s console. The error might look something like this:
<application> is out of memory
malloc error O
messages.1:SJul 18 15:12:47 ultra genunix: [ID 470503 kern.warning]
WARNING: Sorry, no swap space to grow stack for pid 100295 (myprog)
This error means that an application is trying to get more memory and there is no swap space available to back it.
You could fill up a TMPFS due to the lack of available swap and get the following error message:
<directory>: File system full, swap space limit exceeded
or this one:
<directory>: File system full, memory allocation failed
This type of message is displayed if a page cannot be allocated when a file is being written. This can occur, for example, when TMPFS tries to write more than it is allowed or when TMPFS runs out of physical memory while attempting to create a new file or directory.
You need to regularly monitor your swap space. This helps you determine whether you are running on the edge and need to increase the resource or maybe you have too much swap space allocated and are wasting disk space. Most commercial performance monitoring tools keep track of swap space or can be configured to generate warnings when it gets low. Besides these commercial tools, you can use the helpful tools that Solaris provides (see Table 9.1). System performance monitoring is not covered on the administrator certification exams, so this chapter describes only the /usr/sbin/swap command.

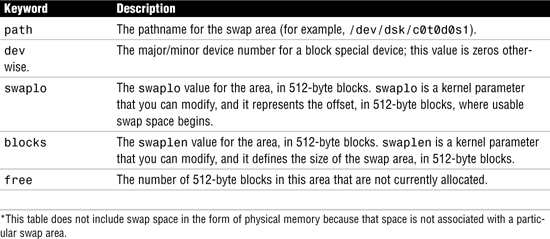
You can use two options with the /usr/sbin/swap command to monitor swap space. You can use the -l option to list swap space and to determine the location of a system’s swap areas:
swap -l
The system displays details of the system’s physical swap space. This system has a 512MB swap slice allocated, as shown below:
![]()
This output is described in Table 9.2.
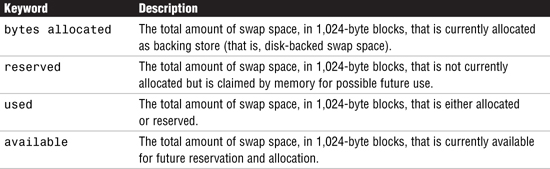
You use the -s option to list a summary of the system’s virtual swap space:
swap -s
The system displays the following information, which shows the details of the system’s physical swap space and includes physical memory too. This system has 384MB of physical memory and a 512MB swap slice:
total: 67648k bytes allocated + 19032k reserved = 86680k used, 724512k
available
This output is described in Table 9.3
You can use the amounts of swap space available and used (in the swap -s output) as a way to monitor swap space usage over time. If a system’s performance is good, you can use swap -s to see how much swap space is available. When the performance of a system slows down, you can check the amount of swap space available to see if it has decreased. Then you can identify what changes to the system might have caused swap space usage to increase.
Keep in mind when using the swap command that the amount of physical memory available for swap usage changes dynamically as the kernel and user processes reserve and release physical memory.
Note
Swap Space Calculations The swap -l command displays swap space in 512-byte blocks, and the swap -s command displays swap space in 1,024-byte blocks. If you add up the blocks from swap -l and convert them to kilobytes, you’ll see that it is less than the swap space used plus available (as shown in the swap -s output) because swap -l does not include physical memory in its calculation of swap space.
Swap space is initially configured during software installation through the installation program. If you use the installation program’s automatic layout of disk slices and do not manually change the size of the swap slice, the Solaris installation program allocates a default swap slice of 512MB.
Note
Crash Dumps As described later in this chapter, a crash dump is a disk copy of the kernel memory of the computer at the time of a fatal system error. When a fatal operating system error occurs, a message describing the error is printed to the console. The operating system then generates a crash dump by writing the contents of kernel memory to a predetermined dump device, which is typically a local disk partition. You can then analyze this crash dump to determine the cause of the system error. By default, the dump device is configured to be an appropriate swap partition. Therefore, it’s necessary to make sure that your swap area is at least as large as about 25% of your physical RAM; otherwise, the system may not have enough room to store the crash dump. Crash dumps and core files are discussed later in this chapter, in the sections “Core File Configuration” and “Crash Dump Configuration.”
The software installation program adds entries for swap slices and files in the /etc/vfstab file. These swap areas are activated each time the system is booted by /sbin/swapadd.
As system configurations change, more users are added, and new software packages are installed, you might need to add more swap space. There are two methods for adding more swap to a system:
![]() Create a secondary swap partition.
Create a secondary swap partition.
![]() Create a swap file in an existing UFS.
Create a swap file in an existing UFS.
Creating a secondary swap partition requires additional, unused disk space. You use the format command as described in Chapter 1, “Managing File Systems,” to create a new partition and file system on a disk. After you create the swap partition, you make an entry in the /etc/vfstab file so that the swap space is activated at bootup. The process is described in Step by Step 9.1.
STEP BY STEP
9.1 Creating a Secondary Swap File
1. Add an additional 512MB of swap space to your system. You don’t have any more room on the disk for more swap space, but the /data directory (currently mounted on slice 4 of disk c0t1d0) is 512MB in size. Move all the data in /data to another server to free up the partition so that you can use it as a swap partition. You can use any one of the methods described in Chapter 7, “Performing System Backups and Restorations,” to do this.
2. After freeing up the /data directory and unmounting /dev/dsk/c0t1d0s4, use the format utility to set the tag name to swap and the permission flag to wu (writable and unmountable), as follows:

The bold text here identifies the keystrokes entered by the user during execution of the command.
Label the disk, as follows:
Partition> la
Ready to label disk? Y
3. Make an entry to the /etc/vfstab file, where the fields are as follows:

/dev/dsk/c0t1d0s4 - - swap - no -
4. Run the swapadd script to add the swap to your system:
/sbin/swapadd
5. Verify that the swap has been added:
swap -l
The system responds with this:
![]()
/dev/dsk/c0t1d0s4 has been added to the list of available swap areas.
Exam alert
/etc/vfstab syntax You should be familiar with the entry for swap files in /etc/vfstab. The syntax can be tricky, especially because of the hyphens.
The following are additional notes that explain how to add swap partitions:
![]() On systems running the 32-bit version of Solaris, swap areas must not exceed 2GB. If you wanted to add a 9GB disk to a swap area, you should slice it up into 2GB chunks. Then, you need to put a separate entry in
On systems running the 32-bit version of Solaris, swap areas must not exceed 2GB. If you wanted to add a 9GB disk to a swap area, you should slice it up into 2GB chunks. Then, you need to put a separate entry in /etc/vfstab for each slice. On systems running the 64-bit version of Solaris 10, you can use a block device larger than 2GB.
![]() You get a large performance benefit from having swap partitions spread across separate disks. Swap space is allocated in a round-robin fashion from swap partition to swap partition, and it is not possible to prioritize usage of the various swap areas. Swap space is allocated 1MB at a time from each swap partition in turn, unless one is full.
You get a large performance benefit from having swap partitions spread across separate disks. Swap space is allocated in a round-robin fashion from swap partition to swap partition, and it is not possible to prioritize usage of the various swap areas. Swap space is allocated 1MB at a time from each swap partition in turn, unless one is full.
![]() It is not worth making a striped metadevice to swap on; that would just add overhead and slow down paging.
It is not worth making a striped metadevice to swap on; that would just add overhead and slow down paging.
The easiest way to add more swap space is to use the mkfile and swap commands to designate a part of an existing UFS as a supplementary swap area. You can do this as a temporary or semi-temporary solution for a swap shortage. Although you can do this for longer durations as well, it has a few disadvantages:
![]() A swap file is considered a file within a file system; therefore, when you back up a file system, a rather large swap file (empty file) is also backed up if you don’t specifically exclude it.
A swap file is considered a file within a file system; therefore, when you back up a file system, a rather large swap file (empty file) is also backed up if you don’t specifically exclude it.
![]() Because a swap file is simply a file in some file system, you are not able to unmount that file system while the swap file is in use.
Because a swap file is simply a file in some file system, you are not able to unmount that file system while the swap file is in use.
![]() This method of creating a swap file has a negative effect on system performance because the swap file is slower than a dedicated swap slice.
This method of creating a swap file has a negative effect on system performance because the swap file is slower than a dedicated swap slice.
Step by Step 9.2 explains how to add more swap space without repartitioning a disk.
STEP BY STEP
9.2 Adding Swap Space Without Repartitioning a Disk
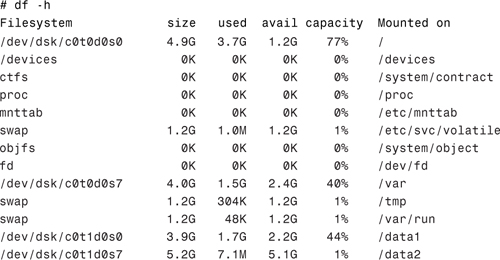
1. As root, use the df -h command to locate a file system that has enough room to support a swap file that’s the size that you want to add:
Note
Swap Permissions You can create a swap file without root permissions, but it is a good idea for root to be the owner of the swap file, to prevent someone from accidentally overwriting it.
2. Use the mkfile command to add a 512MB swap file named swapfile in the /data2 partition:
mkfile 512m /data2/swapfile
Use the ls -l /data2 command to verify that the file has been created:
ls -l /data2/swapfile
-rw------T 1 root root 536870912 Aug 19 23:31 /data2/swapfile
The system shows the file named swapfile along with the file size. Notice that the sticky bit (which is described in Chapter 4, “User and Security Administration”) has automatically been set.
3. Activate the swap area by using the swap command:
/usr/sbin/swap -a /data2/swapfile
You must use the absolute pathname to specify the swap file. The swap file is added and available until the file system is unmounted, the system is rebooted, or the swap file is removed. Keep in mind that you can’t unmount a file system while the swap file is still being used or a process is swapping to the swap file.
4. Verify that the new swap area was added:
swap -l
The system should respond with a message such as the following that shows the swap file:
![]()
5. If this will be a permanent swap area, add to the /etc/vfstab file an entry for the swap file that specifies the full pathname of the swap file and designate swap as the file system type:
/data2/swapfile - - swap - no -
There is some disagreement as to which type of swap area provides the best performance: a swap partition or a swap file. There are factors in favor of both scenarios; however, these are two of the best reasons in favor of swap partitions:
![]() A partition provides contiguous space and can be positioned between the specific cylinders that will provide the best performance.
A partition provides contiguous space and can be positioned between the specific cylinders that will provide the best performance.
![]() A swap file has to work through the file system when updates are made, whereas a swap partition has data written to it at a lower level, bypassing the interaction with the file system; this makes a swap partition slightly faster than a swap file.
A swap file has to work through the file system when updates are made, whereas a swap partition has data written to it at a lower level, bypassing the interaction with the file system; this makes a swap partition slightly faster than a swap file.
Sun’s official statement, and the general consensus in the user community, is that there will be a performance impact if you go the swap file route rather than the partition route. Sun recommends that you use swap files only as a temporary solution, until you can add a swap partition.
Note
Swap Files on NFS In an emergency, when no other local space is available, it’s possible to add a swap file to a networked file system by using NFS; this is described later in this chapter. Using NFS to access swap space on another host is not recommended, however, because it puts an increased load on your network and makes performance unacceptable. If you do need to use NFS for additional swap files, try using the -n option when you run mkfile, as this will only allocate disk blocks as they are written.
Swap files can be deleted as well as added. For example, you might determine that you have allocated too much swap space and that you need that disk space for other uses. Alternatively the additional swap space might have been temporarily added to accommodate a one-off large job. The steps involved in removing a swap file are outlined in Step by Step 9.3.
STEP BY STEP
9.3 Removing a Swap File
1. As root, use the swap -d command to remove the swap area:
![]()
2. Issue the swap -l command to ensure that the swap area is gone:

The swap file filename is removed from the list, so you know it is no longer available for swapping. The file itself is not deleted.
3. In the /etc/vfstab file, delete the entry for the swap file.
4. Remove the swap file to recover the disk space:
rm /data2/swapfile
If the swap area was in a partition, you can now allocate this disk space as you would a normal file system.
Objective:
Manage crash dumps and core file behaviors.
Core files are created when a program or an application terminates abnormally. The default location for a core file to be written is the current working directory. However, as the system administrator, you might want to configure the system so that all core files are written to a central location. This would make administration and management of core files much easier because core files can sometimes take up a significant amount of disk space.
You manage core files by using the coreadm command:

The options for the coreadm command are described in Table 9.4.

Running coreadm with no options displays the current configuration, which you can determine by reading the file /etc/coreadm.conf.
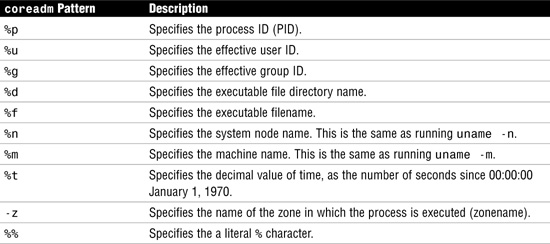
A core file name pattern consists of a file system pathname, along with embedded variables. These variables are specified with a leading % character. The values are then expanded when a core file is created. Valid pattern variables are described in Table 9.5.
The -d and -e flags of the coreadm command can take several options. These are listed in Table 9.6.
To modify the core file configuration so that all files are dumped into the directory /cores and named core, followed by the system name and then the name of the program being run, you can follow the procedure described in Step by Step 9.4.
STEP BY STEP
9.4 Configuring Core Files


The coreadm process is now configured by the Service Management Facility (SMF) at system boot time. Use the svcs command to check its status. The service name for this process is svc:/system/coreadm:default.
Objective:
Manage crash dumps and core file behaviors.
When a serious error is encountered, the system displays an error message on the console, dumps the entire contents of physical memory to the disk, and then reboots the system. A crash dump is a snapshot of the physical memory, saved on disk, at the time that a fatal system error occurs.
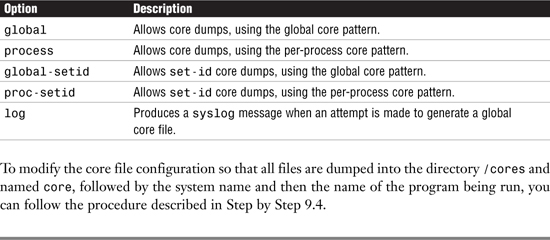
Normally, crash dumps are configured to use the swap partition to write the contents of memory. The savecore program runs when the system reboots and saves the image in a predefined location, usually /var/crash/<hostname>, where <hostname> represents the name of the system.
You configure crash dump files by using the dumpadm command. Running this command with no options, as follows, displays the current configuration, which is obtained from the file /etc/ dumpadm.conf:
# dumpadm
The system responds with this:
The following is the syntax of the dumpadm command:
![]()
The options for the dumpadm command are described in Table 9.7.

To set up a dedicated disk slice named c0t2d0s2 for crash dumps, you issue the following command:
# dumpadm -d /dev/dsk/c0t2d0s2
The system responds with this:

The dumpadm process is now configured by the Service Management Facility (SMF) at system boot time. Use the svcs command to check its status. The service name for this process is svc:/system/dumpadm:default.
Objectives:
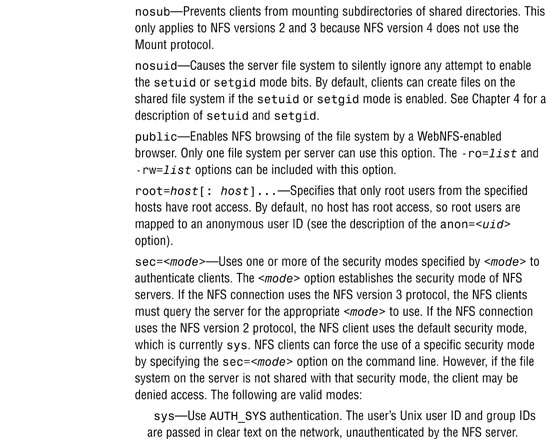
Explain NFS fundamentals, and configure and manage the NFS server and client including daemons, files, and commands.
![]() Troubleshoot various NFS errors.
Troubleshoot various NFS errors.
The NFS service lets computers of different architectures, running different operating systems, share file systems across a network. Just as the mount command lets you mount a file system on a local disk, NFS lets you mount a file system that is located on another system anywhere on the network. Furthermore, NFS support has been implemented on many platforms, ranging from MS-DOS on personal computers to mainframe operating systems, such as Multiprogramming using Virtual Storage (MVS). Each operating system applies the NFS model to its file system semantics. For example, a Sun system can mount the file system from a Windows NT or Linux system. File system operations, such as reading and writing, function as though they are occurring on local files. Response time might be slower when a file system is physically located on a remote system, but the connection is transparent to the user regardless of the hardware or operating systems.
The NFS service provides the following benefits:
![]() Lets multiple computers use the same files so that everyone on the network can access the same data. This eliminates the need to have redundant data on several systems.
Lets multiple computers use the same files so that everyone on the network can access the same data. This eliminates the need to have redundant data on several systems.
![]() Reduces storage costs by having computers share applications and data.
Reduces storage costs by having computers share applications and data.
![]() Provides data consistency and reliability because all users access the same data.
Provides data consistency and reliability because all users access the same data.
![]() Makes mounting of file systems transparent to users.
Makes mounting of file systems transparent to users.
![]() Makes accessing remote files transparent to users.
Makes accessing remote files transparent to users.
![]() Supports heterogeneous environments.
Supports heterogeneous environments.
![]() Reduces system administration overhead.
Reduces system administration overhead.
The NFS service makes the physical location of the file system irrelevant to the user. You can use NFS to allow users to see all the data, regardless of location. With NFS, instead of placing copies of commonly used files on every system, you can place one copy on one computer’s disk and have all other systems across the network access it. Under NFS operation, remote file systems are almost indistinguishable from local ones.
Solaris 10 introduced a new version of the NFS protocol, which has the following features:
![]() The User ID and Group ID are represented as strings. A new daemon process,
The User ID and Group ID are represented as strings. A new daemon process, nfsmapid, maps these IDs to local numeric IDs. The nfsmapid daemon is described later in this chapter, in the section “NFS Daemons.”
![]() The default transport for NFS version 4 is the Remote Direct Memory Access (RDMA) protocol, a technology for memory-to-memory transfer over high speed data networks. RDMA improves performance by reducing load on the CPU and I/O. If RDMA is not available on both server and client then TCP is used as the transport.
The default transport for NFS version 4 is the Remote Direct Memory Access (RDMA) protocol, a technology for memory-to-memory transfer over high speed data networks. RDMA improves performance by reducing load on the CPU and I/O. If RDMA is not available on both server and client then TCP is used as the transport.
![]() All state and lock information is destroyed when a file system is unshared. In previous versions of NFS, this information was retained.
All state and lock information is destroyed when a file system is unshared. In previous versions of NFS, this information was retained.
![]() NFS version 4 provides a pseudo file system to give clients access to exported objects on the NFS server.
NFS version 4 provides a pseudo file system to give clients access to exported objects on the NFS server.
![]() NFS version 4 is a stateful protocol in that both the client and the server hold information about current locks and open files. When a crash or failure occurs, the client and the server work together to re-establish the open or locked files.
NFS version 4 is a stateful protocol in that both the client and the server hold information about current locks and open files. When a crash or failure occurs, the client and the server work together to re-establish the open or locked files.
![]() NFS version 4 no longer uses the
NFS version 4 no longer uses the mountd, statd, or nfslogd daemons.
![]() NFS version 4 supports delegation, a technique where management responsibility of a file can be delegated by the server to the client. Delegation is supported in both the NFS server and the NFS client. A client can be granted a read delegation, which can be granted to multiple clients, or a write delegation, providing exclusive access to a file.
NFS version 4 supports delegation, a technique where management responsibility of a file can be delegated by the server to the client. Delegation is supported in both the NFS server and the NFS client. A client can be granted a read delegation, which can be granted to multiple clients, or a write delegation, providing exclusive access to a file.
With NFS, systems have a client/server relationship. The NFS server is where the file system resides. Any system with a local file system can be an NFS server. As described later in this chapter, in the section “Setting Up NFS,” you can configure the NFS server to make file systems available to other systems and users. The system administrator has complete control over which file systems can be mounted and who can mount them.
An NFS client is a system that mounts a remote file system from an NFS server. You’ll learn later in this chapter, in the section “Mounting a Remote File System,” how you can create a local directory and mount the file system. As you will see, a system can be both an NFS server and an NFS client.
NFS uses a number of daemons to handle its services. These services are initialized at startup from the svc:/network/nfs/server:default and svc:/network/nfs/client:default startup service management functions. The most important NFS daemons are described in Table 9.8.

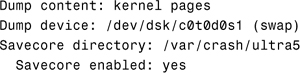
Servers let other systems access their file systems by sharing them over the NFS environment. A shared file system is referred to as a shared resource. You specify which file systems are to be shared by entering the information in the file /etc/dfs/dfstab. Entries in this file are shared automatically whenever you start the NFS server operation. You should set up automatic sharing if you need to share the same set of file systems on a regular basis. Most file system sharing should be done automatically; the only time manual sharing should occur is during testing or troubleshooting.
The /etc/dfs/dfstab file lists all the file systems your NFS server shares with its NFS clients. It also controls which clients can mount a file system. If you want to modify /etc/dfs/dfstab to add or delete a file system or to modify the way sharing is done, you edit the file with a text editor, such as vi. The next time the computer enters the multi-user-server milestone, the system reads the updated /etc/dfs/dfstab to determine which file systems should be shared automatically.
Each line in the dfstab file consists of a share command, as shown in the following example:
more /etc/dfs/dfstab
The system responds by displaying the contents of /etc/dfs/dfstab:
The /usr/sbin/share command exports a resource or makes a resource available for mounting. If it is invoked with no arguments, share displays all shared file systems. The share command can be run at the command line to achieve the same results as the /etc/dfs/dfstab file, but you should use this method only when testing.
This is the syntax for the share command:
![]()
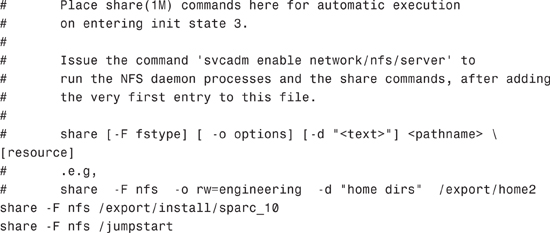
where <pathname> is the name of the file system to be shared. Table 9.9 describes the options of the share command.

To share a file system as read-only every time the system is started up, you add this line to the /etc/dfs/dfstab file:
share -F nfs -o ro /data1
After you edit the /etc/dfs/dfstab file, restart the NFS server by either rebooting the system or by typing this:
svcadm restart nfs/server
You need to run the svcadm enable nfs/server command only after you make the first entry in the /etc/dfs/dfstab file. This is because at startup, when the system enters the multi-user-server milestone, mountd and nfsd are not started if the /etc/dfs/dfstab file is empty. After you have made an initial entry and have executed the svcadm enable nfs/server command, you can modify /etc/dfs/dfstab without restarting the daemons. You simply execute the shareall command, and any new entries in the /etc/dfs/dfstab file are shared.
Note
Sharing Even if you share a file system from the command line by typing the share command, mountd and nfsd still won’t run until you make an entry into /etc/dfs/dfstab and run the svcadm enable nfs/server command.
When you have at least one entry in the /etc/dfs/dfstab file and when both mountd and nfsd are running, you can share additional file systems by typing the share command directly from the command line. Be aware, however, that if you don’t add the entry to the /etc/dfs/dfstab file, the file system is not automatically shared the next time the system is restarted.
Exam Alert
File System Sharing There is often at least one question on the exam related to the sharing of file systems. Remember that the NFS server must be running in order for the share to take effect.
The dfshares command displays information about the shared resources that are available to the host from an NFS server. Here is the syntax for dfshares:
dfshares <servername>
You can view the shared file systems on a remote NFS server by using the dfshares command, like this:
dfshares apollo
If no servername is specified, all resources currently being shared on the local host are displayed. Another place to find information on shared resources is in the server’s /etc/dfs/sharetab file. This file contains a list of the resources currently being shared.
Chapter 1 describes how to mount a local file system by using the mount command. You can use the same mount command to mount a shared file system on a remote host using NFS. Here is the syntax for mounting NFS file systems:
![]()
In this syntax, server is the name of the NFS server in which the file system is located, file-system is the name of the shared file system on the NFS server, and mount-point is the name of the local directory that serves as the mount point. As you can see, this is similar to mounting a local file system. The options for the mount command are described in Table 9.10.


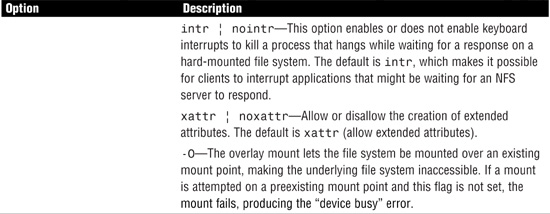
File systems mounted with the bg option indicate that mount is to retry in the background if the server’s mount daemon (mountd) does not respond when, for example, the NFS server is restarted. From the NFS client, mount retries the request up to the count specified in the retry=<n> option. After the file system is mounted, each NFS request made in the kernel waits a specified number of seconds for a response (specified with the timeo=<n> option). If no response arrives, the timeout is multiplied by 2, and the request is retransmitted. If the number of retransmissions has reached the number specified in the retrans=<n> option, a file system mounted with the soft option returns an error, and the file system mounted with the hard option prints a warning message and continues to retry the request. Sun recommends that file systems mounted as read-write or containing executable files should always be mounted with the hard option. If you use soft-mounted file systems, unexpected I/O errors can occur. For example, consider a write request: If the NFS server goes down, the pending write request simply gives up, resulting in a corrupted file on the remote file system. A read-write file system should always be mounted with the specified hard and intr options. This lets users make their own decisions about killing hung processes. You use the following to mount a file system named /data located on a host named thor with the hard and intr options:
mount -F nfs -o hard,intr thor:/data /data
If a file system is mounted hard and the intr option is not specified, the process hangs when the NFS server goes down or the network connection is lost. The process continues to hang until the NFS server or network connection becomes operational. For a terminal process, this can be annoying. If intr is specified, sending an interrupt signal to the process kills it. For a terminal process, you can do this by pressing Ctrl+C. For a background process, sending an INT or QUIT signal, as follows, usually works:
kill -QUIT 3421
Note
Overkill Won’t Work Sending a KILL signal (-9) does not terminate a hung NFS process.
To mount a file system called /data that is located on an NFS server called thor, you issue the following command, as root, from the NFS client:
mount -F nfs -o ro thor:/data /thor_data
In this case, the /data file system from the server thor is mounted read-only on /thor_data on the local system. Mounting from the command line enables temporary viewing of the file system. If the umount command is issued or the client is restarted, the mount is lost. If you would like this file system to be mounted automatically at every startup, you can add the following line to the /etc/vfstab file:
thor:/data - /thor_data nfs - yes ro
Note
Mount Permissions The mount and umount commands require root access. The umount command and /etc/vfstab file are described in Chapter 1.
To view resources that can be mounted on the local or remote system, you use the dfmounts command, as follows:
dfmounts sparcserver
The system responds with a list of file systems currently mounted on sparcserver:

Sometimes you rely on NFS mount points for critical information. If the NFS server were to go down unexpectedly, you would lose the information contained at that mount point. You can address this issue by using client-side failover. With client-side failover, you specify an alternative file system to use in case the primary file system fails. The primary and alternative file systems should contain equivalent directory structures and identical files. This option is available only on read-only file systems.
To set up client-side failover, on the NFS client, mount the file system by using the -ro option. You can do this from the command line or by adding an entry to the /etc/vfstab file that looks like the following:
![]()
If multiple file systems are named and the first server in the list is down, failover uses the next alternative server to access files. To mount a replicated set of NFS file systems, which might have different paths to the file system, you use the following mount command:
![]()
Replication is discussed further in the “AutoFS” section, later in this chapter.
A feature that first appeared in Solaris 8 is NFS server logging (refer to Chapter 1). NFS server logging provides event and audit logging functionality to networked file systems. The daemon nfslogd provides NFS logging, and you enable it by using the log=<tag> option in the share command, as described earlier in this chapter, in the section “Setting Up NFS.” When NFS logging is enabled, the kernel records all NFS operations on the file system in a buffer. The data recorded includes a timestamp, the client Internet Protocol (IP) address, the UID of the requestor, the file handle of the resource that is being accessed, and the type of operation that occurred. The nfslogd daemon converts this information into ASCII records that are stored in ASCII log files.
Note
No Logging in NFS Version 4 Remember that NFS logging is not supported in NFS version 4.
To enable NFS server logging, follow the procedure described in Step by Step 9.5.
STEP BY STEP
9.5 Enabling NFS Server Logging
Exam alert
NSF Server Logging Configuration You should be familiar with the concept of NFS server logging, especially the location of the configuration file (/etc/nfs/nfslog.conf). The nfs directory in the path can be easily forgotten, and you lose an exam point unnecessarily if you leave it out.
You can change the file configuration settings in the NFS server logging configuration file /etc/nfs/nfslog.conf. This file defines pathnames, filenames, and types of logging to be used by nfslogd. Each definition is associated with a tag. The global tag defines the default values, but you can create new tags and specify them for each file system you share. The NFS operations to be logged by nfslogd are defined in the /etc/default/nfslogd configuration file.
Note
Logging Pros and Cons NFS server logging is particularly useful for being able to audit operations carried out on a shared file system. The logging can also be extended to audit directory creations and deletions. With logging enabled, however, the logs can become large and consume huge amounts of disk space. It is necessary to configure NFS logging appropriately so that the logs are pruned at regular intervals.
Objective:
Explain how to configure AutoFS using automount maps.
When a network contains even a moderate number of systems, all trying to mount file systems from each other, managing NFS can quickly become a nightmare. The AutoFS facility, also called the automounter, is designed to handle such situations by providing a method by which remote directories are mounted automatically, only when they are being used. AutoFS, a client-side service, is a file system structure that provides automatic mounting.
When a user or an application accesses an NFS mount point, the mount is established. When the file system is no longer needed or has not been accessed for a certain period, the file system is automatically unmounted. As a result, network overhead is lower, the system boots faster because NFS mounts are done later, and systems can be shut down with fewer ill effects and hung processes.
File systems shared through the NFS service can be mounted via AutoFS. AutoFS is initialized by automount, which is run automatically when a system is started. The automount daemon, automountd, runs continuously, mounting and unmounting remote directories on an as-needed basis.
Mounting does not need to be done at system startup, and the user does not need to know the superuser password to mount a directory (normally file system mounts require superuser privilege). With AutoFS, users do not use the mount and umount commands. The AutoFS service mounts file systems as the user accesses them and unmounts file systems when they are no longer required, without any intervention on the part of the user.
However, some file systems still need to be mounted by using the mount command with root privileges. For example, on a diskless computer you must mount / (root), /usr, and /usr/kvm by using the mount command, and you cannot take advantage of AutoFS.
Two programs support the AutoFS service: automount and automountd. Both are run when a system is started by the svc:/system/filesystem/autofs:default service identifier.
The automount service sets up the AutoFS mount points and associates the information in the /etc/auto_master files with each mount point. The automount command, which is called at system startup time, reads the master map file /etc/auto_master to create the initial set of AutoFS mounts. These mounts are not automatically mounted at startup time. They are trigger points, also called trigger nodes, under which file systems are mounted in the future. The following is the syntax for automount:
automount -t <duration> -v
Table 9.11 describes the syntax options for the automount command.

If it is not specifically set, the value for duration of an unused mount is set to 10 minutes. In most circumstances, this value is good; however, on systems that have many automounted file systems, you might need to decrease the duration value. In particular, if a server has many users, active checking of the automounted file systems every 10 minutes can be inefficient. Checking AutoFS every 300 seconds (5 minutes) might be better. You can edit the /etc/default/autofs script to change the default values.
If AutoFS receives a request to access a file system that is not currently mounted, AutoFS calls automountd, which mounts the requested file system under the trigger node.
The automountd daemon handles the mount and unmount requests from the AutoFS service. The syntax of this command is as follows:
automountd < -Tnv > < -D name=value >
Table 9.12 describes the syntax options for the automountd command.

The automountd daemon is completely independent from the automount command. Because of this separation, it is possible to add, delete, or change map information without first having to stop and start the automountd daemon process.
When AutoFS runs, automount and automountd initiate at startup time from the svc:/system/filesystem/autofs service identifier. If a request is made to access a file system at an AutoFS mount point, the system goes through the following steps:
1. AutoFS intercepts the request.
2. AutoFS sends to the automountd daemon a message for the requested file system to be mounted.
3. automountd locates the file system information in a map and performs the mount.
4. AutoFS allows the intercepted request to proceed.
5. AutoFS unmounts the file system after a period of inactivity.
Note
Automatic, Not Manual, Mounts Mounts managed through the AutoFS service should not be manually mounted or unmounted. Even if the operation is successful, the AutoFS service does not check that the object has been unmounted, and this can result in possible inconsistency. A restart clears all AutoFS mount points.
To see who might be using a particular NFS mount, you use the showmount command. The syntax for showmount is shown here:
showmount <options>
The options for the showmount command are described in Table 9.13.

The following example illustrates the use of showmount to display file systems currently mounted from remote systems. On the NFS server named neptune, you could enter the following command:
showmount -a
The system would display the following information:
apollo:/export/home/neil
showmount says that the remote host, apollo, is currently mounting /export/home/neil on this server.
The behavior of the automounter is governed by its configuration files, called maps. AutoFS searches maps to navigate its way through the network. Map files contain information, such as the location of other maps to be searched or the location of a user’s home directory, for example.
There are three types of automount maps: the master map, the direct map, and the indirect map. Each of these is described in the following sections.
To start the navigation process, the automount command reads the master map at system startup. This map is what tells the automounter about map files and mount points. The master map lists all direct and indirect maps and their associated directories.
The master map, which is in the /etc/auto_master file, associates a directory with a map. The master map is a list that specifies all the maps that AutoFS should check. The following example shows what an auto_master file could contain:

This example shows the default auto_master file. The lines that begin with # are comments. The line that contains +auto_master specifies the AutoFS NIS table map, which is explained in Chapter 12, “Naming Services.” Each line thereafter in the master map, /etc/auto_master, has the following syntax:
<mount-point> <map-name> <mount-options>
Each of these fields is described in Table 9.14.

Note
Map Format A line that begins with a pound sign (#) is a comment, and everything that follows it until the end of the line is ignored. To split long lines into shorter ones, you can put a backslash () at the end of the line. The maximum number of characters in an entry is 1,024.
Every Solaris installation comes with a master map, called /etc/auto_master, that has the default entries shown in Table 9.14. Without any changes to the generic system setup, clients should be capable of accessing remote file systems through the /net mount point. The following entry in /etc/auto_master allows this to happen:
/net -hosts -nosuid,nobrowse
For example, let’s say that you have an NFS server named apollo that has the /export file system exported. Another system, named zeus, exists on the network. This system has the default /etc/auto_master file; by default, it has a directory named /net. If you type the following, the command comes back showing that the directory is empty—nothing is in it:
ls /net
Now type this:
ls /net/apollo
The system responds with this:
export
Why was the /net directory empty the first time you issued the ls command? When you issued ls /net/apollo, why did it find a subdirectory? This is the automounter in action. When you specified /net with a hostname, automountd looked at the map file—in this case, /etc/hosts—and found apollo and its IP address. It then went to apollo, found the exported file system, and created a local mount point for /net/apollo/export. It also added this entry to the /etc/mnttab table:
![]()
This entry in the /etc/mnttab table is referred to as a trigger node (because changing to the specified directory, the mount of the file system is “triggered”).
If you enter mount, as follows, you won’t see anything mounted at this point:
mount
The system responds with this:

Now type this:
ls /net/apollo/export
You should have a bit of a delay while automountd mounts the file system. The system then responds with this:
files lost+found
The files listed are files located on apollo, in the /export directory. If you enter mount, you see a file system mounted on apollo that wasn’t listed before:

The automounter automatically mounted the /export file system that was located on apollo. Now look at the /etc/mnttab file again, and you will see additional entries:
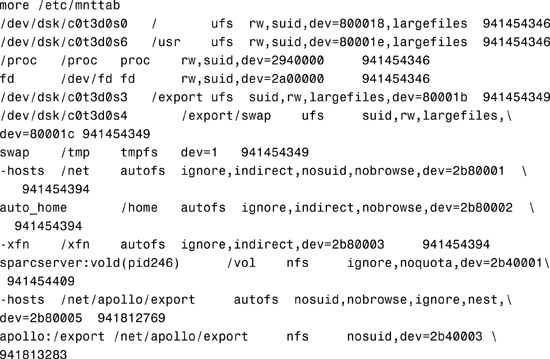
If the /net/apollo/export directory is accessed, the AutoFS service completes the process, with these steps:
1. It pings the server’s mount service to see if it’s alive.
2. It mounts the requested file system under /net/apollo/export. Now the /etc/mnttab file contains the following entries:

Because the automounter lets all users mount file systems, root access is not required. AutoFS also provides for automatic unmounting of file systems, so there is no need to unmount them when you are done.
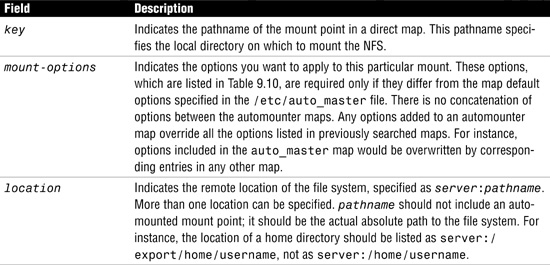
A direct map lists a set of unrelated mount points that might be spread out across the file system. A complete path (for example, /usr/local/bin, /usr/man) is listed in the map as a mount point. A good example of where to use a direct mount point is for /usr/man. The /usr directory contains many other directories, such as /usr/bin and /usr/local; therefore, it cannot be an indirect mount point. If you used an indirect map for /usr/man, the local /usr file system would be the mount point, and you would cover up the local /usr/bin and /usr/etc directories when you established the mount. A direct map lets the automounter complete mounts on a single directory entry such as /usr/man, and these mounts appear as links with the name of the direct mount point.
A direct map is specified in a configuration file called /etc/auto_direct. With a direct map, there is a direct association between a mount point on the client and a directory on the server. A direct map has a full pathname and indicates the relationship explicitly. This is a typical /etc/auto_direct map:

Note
Map Naming The direct map name /etc/auto_direct is not a mandatory name; it is used here as an example of a direct map. The name of a direct map must be added to the /etc/auto_master file, but it can be any name you choose, although it should be meaningful to the system administrator.
Lines in direct maps have the following syntax:
<key> <mount-options> <location>
The fields of this syntax are described in Table 9.15.
In the previous example of the /etc/auto_direct map file, the mount points, /usr/man and /usr/spool/news, list more than one location:
![]()
Multiple locations, such as those shown here, are used for replication, or failover. For the purposes of failover, a file system can be called a replica if each file is the same size and it is the same type of file system. Permissions, creation dates, and other file attributes are not a consideration. If the file size or the file system types are different, the remap fails and the process hangs until the old server becomes available.
Replication makes sense only if you mount a file system that is read-only because you must have some control over the locations of files that you write or modify. You don’t want to modify one server’s files on one occasion and, minutes later, modify the “same” file on another server. The benefit of replication is that the best available server is used automatically, without any effort required by the user.
If the file systems are configured as replicas, the clients have the advantage of using failover. Not only is the best server automatically determined, but, if that server becomes unavailable, the client automatically uses the next-best server.
An example of a good file system to configure as a replica is the manual (man) pages. In a large network, more than one server can export the current set of man pages. Which server you mount them from doesn’t matter, as long as the server is running and exporting its file systems. In the previous example, multiple mount locations are expressed as a list of mount locations in the map entry. With multiple mount locations specified, you could mount the man pages from the apollo, zeus, or neptune servers. The best server depends on a number of factors, including the number of servers supporting a particular NFS protocol level, the proximity of the server, and weighting. The process of selecting a server goes like this:
1. During the sorting process, a count of the number of servers supporting the NFS version 2, 3, and 4 protocols is done. The protocol supported on the most servers is the protocol that is supported by default. This provides the client with the maximum number of servers to depend on. If version 3 servers are most abundant, the sorting process becomes more complex because they will be chosen as long as a version 2 server on the local subnet is not being ignored. Normally servers on the local subnet are given preference over servers on a remote subnet. A version 2 server on the local subnet can complicate matters because it could be closer than the nearest version 3 server. If there is a version 2 server on the local subnet, and the closest version 3 server is on a remote subnet, the version 2 server is given preference. This is checked only if there are more version 3 servers than version 2 servers. If there are more version 2 servers than version 3 servers, only a version 2 server is selected.
2. After the largest subset of servers that have the same protocol version is found, that server list is sorted by proximity. Servers on the local subnet are given preference over servers on a remote subnet. The closest server is given preference, which reduces latency and network traffic. If several servers are supporting the same protocol on the local subnet, the time to connect to each server is determined, and the fastest time is used.
You can influence the selection of servers at the same proximity level by adding a numeric weighting value in parentheses after the server name in the AutoFS map. Here’s an example:
![]()
Servers without a weighting have a value of 0, which makes them the most likely servers to be selected. The higher the weighting value is, the less chance the server has of being selected. All other server-selection factors are more important than weighting. Weighting is considered only in selections between servers with the same network proximity.
With failover, the sorting is checked once at mount time, to select one server from which to mount, and again if the mounted server becomes unavailable. Failover is particularly useful in a large network with many subnets. AutoFS chooses the nearest server and therefore confines NFS network traffic to a local network segment. In servers with multiple network interfaces, AutoFS lists the hostname associated with each network interface as if it were a separate server. It then selects the nearest interface to the client.
In the following example, you set up a direct map for /usr/local on zeus. Currently, zeus has a directory called /usr/local with the following directories:
ls /usr/local
The following local directories are displayed:
bin etc files programs
If you set up the automount direct map, you can see how the /usr/local directory is overwritten by the NFS mount. Follow the procedure shown in Step by Step 9.6.
STEP BY STEP
9.6 Creating a Direct Map
1. Add the following entry in the master map file called /etc/auto_master:
/- /etc/auto_direct
2. Create the direct map file called /etc/auto_direct with the following entry:
/usr/local zeus:/usr/local
3. Because you’re modifying a direct map, run automount to reload the AutoFS tables, as follows:
# automount
If you have access to the /usr/local directory, the NFS mount point is established by using the direct map you have set up. The contents of /usr/local have changed because the direct map has covered up the local copy of /usr/local:
ls /usr/local
You should see the following directories listed:
fasttrack answerbook
Note
Overlay Mounting The local contents of /usr/local have not been overwritten. After the NFS mount point is unmounted, the original contents of /usr/local are redisplayed.
If you enter the mount command, you see that /usr/local is now mounted remotely from zeus:

Indirect maps are the simplest and most useful AutoFS maps. An indirect map uses a key’s substitution value to establish the association between a mount point on the client and a directory on the server. Indirect maps are useful for accessing specific file systems, such as home directories, from anywhere on the network. The following entry in the /etc/auto_master file is an example of an indirect map:
/share /etc/auto_share
With this entry in the /etc/auto_master file, /etc/auto_share is the name of the indirect map file for the mount point /share. For this entry, you need to create an indirect map file named /etc/auto_share, which would look like this:

If the /share directory is accessed, the AutoFS service creates a trigger node for /share/ws, and the following entry is made in the /etc/mnttab file:
-hosts /share/ws autofs nosuid,nobrowse,ignore,nest,dev=###
If the /share/ws directory is accessed, the AutoFS service completes the process with these steps:
1. It pings the server’s mount service to see if it’s alive.
2. It mounts the requested file system under /share. Now the /etc/mnttab file contains the following entries:
![]()
Lines in indirect maps have the following syntax:
<key> <mount-options> <location>
The fields in this syntax are described in Table 9.16.

For example, say an indirect map is being used with user home directories. As users log in to several different systems, their home directories are not always local to the system. It’s convenient for the users to use the automounter to access their home directories, regardless of what system they’re logged in to. To accomplish this, the default /etc/auto_master map file needs to contain the following entry:
![]()
/etc/auto_home is the name of the indirect map file that contains the entries to be mounted under /home. A typical /etc/auto_home map file might look like this:

Note
Indirect Map Names As with direct maps, the actual name of an indirect map is up to the system administrator, but a corresponding entry must be placed in the /etc/auto_master file, and the name should be meaningful to the system administrator.
Now assume that the /etc/auto_home map is on the host oak. If user neil has an entry in the password database that specifies his home directory as /home/neil, whenever he logs in to computer oak, AutoFS mounts the directory /export/home/neil, which resides on the computer peach. Neil’s home directory is mounted read-write, nosuid. Anyone, including Neil, has access to this path from any computer set up with the master map referring to the /etc/auto_home map in this example. Under these conditions, user neil can run login, or rlogin, on any computer that has the /etc/auto_home map set up, and his home directory is mounted in place for him.
Another example of when to use an indirect map is when you want to make all project-related files available under a directory called /data that is to be common across all workstations at the site. Step by Step 9.7 shows how to do this.
STEP BY STEP
9.7 Setting Up an Indirect Map
1. Add an entry for the /data directory to the /etc/auto_master map file:
![]()
The auto_data map file, named /etc/auto_data, determines the contents of the /data directory.
2. Add the -nosuid option as a precaution. The -nosuid option prevents users from creating files with the setuid or setgid bit set.
3. Create the /etc/auto_data file and add entries to the auto_data map. The auto_data map is organized so that each entry describes a subproject. Edit /etc/auto_data to create a map that looks like the following:
Note
Using the Entry Key The ampersand (&) at the end of each entry is an abbreviation for the entry key. For instance, the first entry is equivalent to the compiler apollo:/export/data/compiler.
Because the servers apollo and zeus view similar AutoFS maps locally, any users who log in to these computers find the /data file system as expected. These users are provided direct access to local files through loopback mounts instead of NFS mounts.
4. Because you changed the /etc/auto_master map, the final step is to reload the AutoFS tables, as follows:
# automount
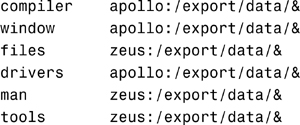
Now, if a user changes to the /data/compiler directory, the mount point to apollo:/export/data/compiler is created:
cd /data/compiler
5. Type mount to see the mount point that was established:
mount
The system shows that /data/compiler is mapped to apollo:/export/data/compiler:
![]()
If the user changes to /data/tools, the mount point to zeus:/export/data/tools is created under the mount point /data/tools.
Note
Directory Creation There is no need to create the directory /data/compiler to be used as the mount point. AutoFS creates all the necessary directories before establishing the mount.
You can modify, delete, or add entries to maps to meet the needs of the environment. As applications (and other file systems that users require) change location, the maps must reflect those changes. You can modify AutoFS maps at any time. However, changes do not take place until the file system is unmounted and remounted. If a change is made to the auto_master map or to a direct map, those changes do not take place until the AutoFS tables are reloaded, as follows:
# automount
Exam Alert
Direct Versus Indirect Maps Remember the difference between direct and indirect maps. The /- entry in /etc/auto_master signifies a direct map because there is no mount point specified. This means that an absolute pathname is specified in the map. Indirect maps contain relative addresses, so the starting mount point, such as /home, appears in the /etc/auto_master entry for an indirect map.
The most common and most advantageous use of automount is for mounting infrequently used file systems on an NFS client, such as online reference man pages. Another common use is accessing user home directories anywhere on the network. This works well for users who do not have a dedicated system and who tend to log in from different locations. Without the AutoFS service, to permit access, a system administrator has to create home directories on every system that the user logs in to. Data has to be duplicated everywhere, and it can easily become out of sync. You certainly don’t want to create permanent NFS mounts for all user home directories on each system, so mounting infrequently used file systems on an NFS client is an excellent use for automount.
You also use automount if a read-only file system exists on more than one server. By using automount instead of conventional NFS mounting, you can configure the NFS client to query all the servers on which the file system exists and mount from the server that responds first.
You should avoid using automount to mount frequently used file systems, such as those that contain user commands or frequently used applications; conventional NFS mounting is more efficient in this situation. It is quite practical and typical to combine the use of automount with conventional NFS mounting on the same NFS client.
In this chapter, you have learned how a Solaris system utilizes the swapfs file system as virtual memory storage when the system does not have enough physical memory to handle the needs of the currently running processes. You have learned how to add, monitor, and delete swap files and partitions. You have also learned how to manage core files and crash dumps.
This chapter also described what NFS is and how to share resources on an NFS server. Accessing resources on the NFS client from a server was discussed, as was configuring NFS to record all activity via the NFS logging daemon, nfslogd.
Finally, this chapter described AutoFS and the many options that are available when you’re mounting NFS resources so that user downtime is minimized by unplanned system outages and unavailable resources.
In this exercise, you’ll create a swap file to add additional, temporary swap space on your system.
Estimated time: 15 minutes
1. As root, use the df -h command to locate a file system that has enough room to support a 512MB swap file.
2. Use the mkfile command to add a 512MB swap file named swapfile in a directory, as follows:
mkfile 512m /<directory>/swapfile
3. Use the ls -l /<directory> command to verify that the file has been created.
4. Activate the swap area with the swap command:
/usr/sbin/swap -a /<directory>/swapfile
5. Use the swap -l command to verify that the new swap area was added:
swap -l
6. Use the swap -d command to remove the swap area:
swap -d /<directory>/swapfile
7. Issue the swap -l command to verify that the swap area is gone:
swap -l
8. Remove the swapfile that was created:
rm /<directory>/swapfile
The following two exercises require a minimum of two networked Solaris systems. You need to determine in advance which system will serve as the NFS server and which system will be the NFS client. The NFS server must have man pages installed in the /usr/share/man directory.
In this exercise, you’ll set up an NFS server to share the contents of the /usr/share/man directory for read-only access.
Estimated time: 30 minutes
1. Make the following entry in the /etc/dfs/dfstab file:
share -F nfs -o ro /usr/share/man
2. Restart the NFS server service to start the nfsd and mountd daemons:
svcadm restart nfs/server
3. Verify that the NFS server service is online by typing this:
svcs nfs/server
4. Verify that the resource is shared by typing this:
share
The system displays this:
- /usr/share/man ro ""
5. On the NFS client, rename the /usr/share/man directory so that man pages are no longer accessible:
cd /usr/share
mv man man.bkup
6. Verify that the manual pages are no longer accessible by typing this:
man tar
7. Create a new man directory to be used as a mount point:
mkdir man
8. Verify that you are able to see the shared resource on the NFS server by typing this:
dfshares <nfs-server-name>
The system should display a message similar to the following:
![]()
9. Mount the /usr/share/man directory located on the NFS server to the directory you created in step 8:
![]()
10. Now see if the man pages are accessible by typing this:
man tar
11. Verify the list of mounts that the server is providing by typing this:
dfmounts <nfs-server-name>
The system should display something like this:
![]()
12. Unmount the directory on the NFS client:
umountall -r
The -r option specifies that only remote file system types are to be unmounted.
13. Verify that the file system is no longer mounted by typing this:
dfmounts <nfs-server-name>
14. On the NFS server, unshare the /usr/share/man directory:
unshare /usr/share/man
15. On the NFS client, try to mount the /usr/share/man directory from the NFS server, as follows:
mount <nfs-server-name>:/usr/share/man
/usr/share/man
The NFS server should not allow you to mount the file system.
16. Check the shared resources on the NFS server by typing this:
dfshares <nfs-server-name>
The file system can no longer be mounted because it is no longer shared.
This exercise demonstrates the use of AutoFS.
Estimated time: 30 minutes
1. The NFS server should already have an entry in the /etc/dfs/dfstab file from the previous exercise. It looks like this:
share -F nfs -o ro /usr/share/man
The nfsd and mountd daemons should also be running on this server. On the NFS client, verify that the man pages are not working by typing this:
man tar
2. On the NFS client, remove the directory you created in Exercise 9.2:
rmdir /usr/share/man
3. On the NFS client, edit the /etc/auto_master file to add the following line for a direct map:
/- auto_direct
4. On the NFS client, use vi to create a new file named /etc/auto_direct. Add the following line to the new file:
/usr/share/man <nfs-server-name>:/usr/share/man
5. Run the automount command to update the list of directories managed by AutoFS:
automount -v
6. Now see if man pages are working on the NFS client by typing this:
man tar
7. On the NFS client, use mount to see whether AutoFS automatically mounted the remote directory on the NFS server:
mount
8. On the NFS server, unshare the shared directory by typing this:
unshareall
9. On the NFS server, shut down the NFS server daemons:
svcadm disable nfs/server
10. On the NFS client, edit the /etc/auto_master file and remove this line:
/- auto_direct
11. On the NFS client, remove the file named /etc/auto_direct:
rm /etc/auto_direct
12. On the NFS client, run the automount command to update the list of directories managed by AutoFS:
automount -v
13. On the NFS client, return /usr/share/man to its original state, like this:
cd /usr/share
rmdir man
mv man.bkup man
|
1. |
A. After you create and add additional swap space, you can add an entry for that swap space in the |
|
2. |
C. You use the |
|
3. |
C. The |
|
4. |
B. Swap areas are activated by the |
|
5. |
A, C, D. These statements are all true of a swap area: An NFS file system can be used for a swap area; a swap file is created in any ordinary file system; and you cannot unmount a file system while a swap file is in use. For more information, see the section “Setting Up Swap Space.” |
|
6. |
A. If you execute the |
|
7. |
C. To restart NFS to enable a new share, you type |
|
8. |
C. The |
|
9. |
D. With a |
|
10. |
A, B. NFS uses a number of daemons to handle its services. These services are initialized at startup from the |
|
11. |
A. |
|
A, B, D. The NFS daemons found only on the NFS server are |
|
|
13. |
B. A shared file system is referred to as a shared resource. You specify which file systems are to be shared by entering the information in the file |
|
14. |
B. The |
|
15. |
C. The |
|
16. |
C. File systems mounted with the |
|
17. |
B. After the file system is mounted, each NFS request made in the kernel waits a specified number of seconds for a response (which is specified with the |
|
18. |
A. Sun recommends that file systems that are mounted as read-write or that contain executable files should always be mounted with the |
|
19. |
A. From the NFS client, |
|
20. |
C. If a file system is mounted hard and the |
|
21. |
A, B. File systems that are shared through the NFS service can be mounted by using AutoFS. AutoFS, a client-side service, is a file system structure that provides automatic mounting. AutoFS is initialized by |
|
22. |
B. Two programs support the AutoFS service: |
|
23. |
C. To see who is using a particular NFS mount, you use the |
|
24. |
A. A master map, which is in the |
|
B. Without any changes to the generic system setup, clients should be able to access remote file systems through the |
|
|
26. |
B. Indirect maps are the simplest and most useful maps. Indirect maps are useful for accessing specific file systems, such as home directories, from anywhere on the network. For more information, see the section “AutoFS Maps.” |
|
27. |
A. The |
|
28. |
B. The three types of AutoFS maps are master, direct, and indirect maps. For more information, see the section “AutoFS Maps.” |
|
29. |
B. The |
|
30. |
A. The |
|
31. |
D. The |
“System Administration Guide: Advanced Administration,” and “System Administration Guide: Network Services” manuals from the Solaris 10 documentation CD.
“System Administration Guide: Network Services,” and “System Administration Guide: Advanced Administration” books in the System Administration Collection of the Solaris 10 documentation set. See http://docs.sun.com.