
The following test objectives for Exam CX-310-202 are covered in this chapter:
Configure Role-Based Access Control (RBAC), including assigning rights, profiles, roles, and authorizations to users.
![]() This chapter describes Role-Based Access Control (RBAC), and identifies the four main databases involved with RBAC. The system administrator needs to understand the function and structure of each of these databases and how to apply the RBAC functionality in real-world situations.
This chapter describes Role-Based Access Control (RBAC), and identifies the four main databases involved with RBAC. The system administrator needs to understand the function and structure of each of these databases and how to apply the RBAC functionality in real-world situations.
Analyze RBAC configuration file summaries and manage RBAC using the command line.
![]() You will see how to assign a role to a user and use rights profiles by using commands that are described in this chapter. These can greatly assist the system administrator when managing a large number of rights that are to be assigned to a number of users.
You will see how to assign a role to a user and use rights profiles by using commands that are described in this chapter. These can greatly assist the system administrator when managing a large number of rights that are to be assigned to a number of users.
Explain syslog() function fundamentals, and configure and manage the /etc/syslog.conf file and syslog messaging.
![]() This chapter describes the basics of system messaging in the Solaris operating environment, introduces the daemon responsible for managing the messaging, and describes the configuration file that determines what information is logged and where it is stored. It also describes the new method of restarting/refreshing the
This chapter describes the basics of system messaging in the Solaris operating environment, introduces the daemon responsible for managing the messaging, and describes the configuration file that determines what information is logged and where it is stored. It also describes the new method of restarting/refreshing the syslog process when changes are made to its configuration file.
The following strategies will help you prepare for the test:
![]() As you study this chapter, it’s important that you practice each exercise and each command that is presented on a Solaris system. Hands-on experience is important when learning these topics, so practice until you can repeat the procedures from memory.
As you study this chapter, it’s important that you practice each exercise and each command that is presented on a Solaris system. Hands-on experience is important when learning these topics, so practice until you can repeat the procedures from memory.
![]() Be sure you understand each command and be prepared to match the command to the correct description.
Be sure you understand each command and be prepared to match the command to the correct description.
![]() Be sure you know all of the terms listed in the “Key Terms” section at the end of this chapter. Pay special attention to the databases used in Role-Based Access Control (RBAC) and the uses and format of each. Be prepared to match the terms presented in this chapter with the correct description.
Be sure you know all of the terms listed in the “Key Terms” section at the end of this chapter. Pay special attention to the databases used in Role-Based Access Control (RBAC) and the uses and format of each. Be prepared to match the terms presented in this chapter with the correct description.
![]() Finally, you must understand the concept of system messaging—its purpose, how it works, and how to configure and manage it.
Finally, you must understand the concept of system messaging—its purpose, how it works, and how to configure and manage it.
This chapter covers two main topics—Role-Based Access Control (RBAC) and system messaging (syslog). These are both related in that they participate in the securing and monitoring of systems in a Solaris environment. The use of Role-Based Access Control makes the delegation of authorizations much easier for the system administrator to manage, as groups of privileges can easily be given to a role through the use of profiles. Also, the use of roles means that a user has to first log in using his or her normal ID, then use the su command to gain access to the role (and therefore assigned privileges). This has the advantage of being logged and so helps to establish accountability. The system messaging service (syslog) stores important system and security messages and is fully configurable. The system administrator can tune the service so that certain messages are delivered to several places (such as a log file, a message, and the system console), greatly increasing the chances of it being noticed quickly.
Objectives:
Configure Role-Based Access Control (RBAC) including assigning rights, profiles, roles, and authorizations to users.
![]() Analyze RBAC configuration file summaries and manage RBAC using the command line.
Analyze RBAC configuration file summaries and manage RBAC using the command line.
Granting superuser access to non-root users has always been an issue in Unix systems. In the past, you had to rely on a third-party package, such as sudo, to provide this functionality. The problem was that sudo was an unsupported piece of freeware that had to be downloaded from the Internet and installed onto your system. In extreme cases, the system administrator had to set the setuid permission bit on the file so that a user could execute the command as root.
With Role-Based Access Control (RBAC) in the Solaris 10 operating environment, administrators can not only assign limited administrative capabilities to non-root users, they can also provide the mechanism where a user can carry out a specific function as another user (if required). This is achieved through three features:
![]() Authorizations—User rights that grant access to a restricted function.
Authorizations—User rights that grant access to a restricted function.
![]() Execution profiles—Bundling mechanisms for grouping authorizations and commands with special attributes; for example, user and group IDs or superuser ID.
Execution profiles—Bundling mechanisms for grouping authorizations and commands with special attributes; for example, user and group IDs or superuser ID.
![]() Roles—Special type of user accounts intended for performing a set of administrative tasks.
Roles—Special type of user accounts intended for performing a set of administrative tasks.
Caution
Assigning Superuser Access Using RBAC Most often, you will probably use RBAC to provide superuser access to administrative tasks within the system. Be careful to exercise caution and avoid creating security lapses by providing access to administrative functions by unauthorized users.
To better describe RBAC, it’s easier to first describe how a system administrator would utilize RBAC to delegate an administrative task to a non-root user in a fictional setting at Acme Corp.
At Acme Corp., the system administrator is overwhelmed with tasks. He is going to delegate some of his responsibility to Neil, a user from the engineering department who helps out sometimes with system administration tasks.
The system administrator first needs to define which tasks he wants Neil to help out with. He has identified three tasks:
![]() Change user passwords, but do not add or remove accounts.
Change user passwords, but do not add or remove accounts.
![]() Mount and share file systems.
Mount and share file systems.
![]() Shut down the system.
Shut down the system.
In RBAC, when we speak of delegating administrative tasks, it is referred to as a role account. A role account is a special type of user account that is intended for performing a set of administrative tasks. It is like a normal user account in most respects except that users can gain access to it only through the su command after they have logged in to the system with their normal login account. A role account is not accessible for normal logins, for example, through the CDE login window. From a role account, a user can access commands with special attributes, typically the superuser privilege, which are not available to users in normal accounts.
At Acme Corp, the system administrator needs to define a role username for the tasks he wants to delegate. Let’s use the role username “adminusr.” After Neil logs in with his normal login name of ncalkins, he then needs to issue the su command and switch to adminusr whenever he wants to perform administrative tasks. In this chapter, you learn how to create a role account using the command line interface, although you should note that the Solaris Management Console can also be used.
So far we have determined that we want to name the role account adminusr. The system administrator creates the role account using the roleadd command. The roleadd command adds a role account to the /etc/passwd, etc/shadow, and /etc/user_attr files. The syntax for the roleadd command is as follows:
![]()
You’ll notice that roleadd looks a great deal like the useradd command described in Chapter 4, “User and Security Administration.” Table 11.1 describes the options for the roleadd command.
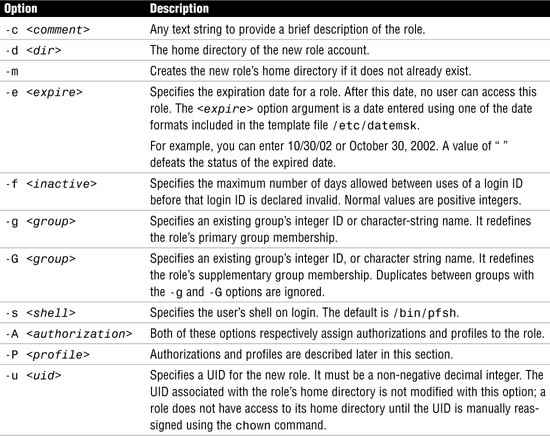
The other options are the same options that were described for the useradd command, outlined in Chapter 4.
When creating a role account with the roleadd command, you need to specify an authorization and profile to the role. An authorization is a user right that grants access to a restricted function. It is a unique string that identifies what is being authorized as well as who created the authorization.
Certain privileged programs check the authorizations to determine whether users can execute restricted functionality. Following are the predefined authorizations from the /etc/security/auth_attr file that apply to the tasks to be delegated:

All authorizations are stored in the auth_attr database, so the system administrator needs to use one or more of the authorizations that are stored in that file. For the Acme Corp. example, the system administrator needs to specify the authorizations shown here:

The system administrator would therefore issue the roleadd command as follows:
![]()
A role account named adminusr with the required directory structures has been created. The next step is to set the password for the adminusr role account by typing the following:
passwd adminusr
You are prompted to type the new password twice.
Now we need to set up Neil’s account so he can access the new role account named adminusr. With the usermod command, we assign the role to the user account using the –R option as follows:
usermod -R adminusr neil
Note
No Need to Be Logged Out Previously, you needed to ensure that the user was not logged in at the time of assigning a role; otherwise you received an error message and the role was not assigned. This is no longer the case and a role can be assigned to a user whilst the user is still logged in.
To access the administrative functions, Neil needs to first log in using his regular user account named neil. Neil can check which roles he has been granted by typing the following at the command line:
roles
The system responds with the roles that have been granted to the user account neil as follows:
adminusr
Neil then needs to su to the adminusr account by typing the following:
su adminusr
Neil is prompted to type the password for the role account.
Now Neil can modify user passwords, shut down the system, and mount and share file systems. Any other user trying to su to the adminusr account gets this message:

If later on, the system administrator wants to assign additional authorizations to the role account named adminusr, he would do so using the rolemod command. The rolemod command modifies a role’s login information on the system. The syntax for the rolemod command is as follows:
rolemod [-u uid] [-o] [-g group] [-G group] [-d dir] [-m] [-s shell]
[-c comment] [-l new_name] [-f inactive] [-e expire] [-A Authorization]
[-P profile] <role account>
Options for the rolemod command where they differ from the roleadd command are described in Table 11.2.

To add the ability to purge log files, you need to add solaris.admin.logsvc.purge to the list of authorizations for adminusr. To do this, issue the rolemod command as follows:
![]()
You can verify that the new authorizations have been added to the role by typing the auths command at the command line as shown below:

Caution
rolemod Warning The rolemod command does not add to the existing authorizations; it replaces any existing authorization setting.
If you want to remove a role account, use the roledel command as follows:
roledel [-r] <role account name>
The -r option removes the role’s home directory from the system. For example, to remove the adminusr role account, issue the following command:
roledel -r adminusr
The next section discusses each of the RBAC databases in detail, describing the entries made when we executed the roleadd and usermod commands.
RBAC relies on the following four databases to provide users access to privileged operations:
![]()
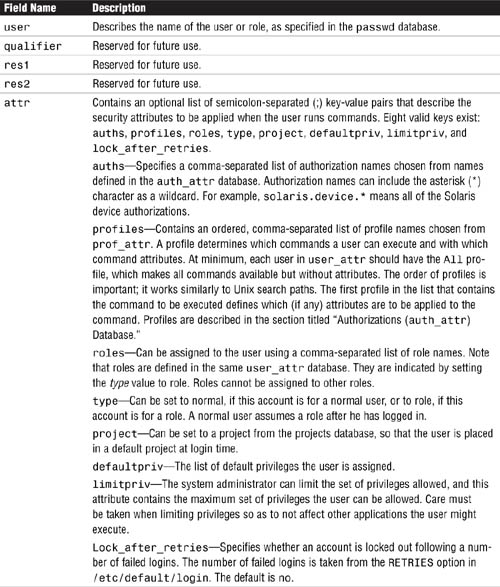
/etc/user_attr (extended user attributes database)—Associates users and roles with authorizations and profiles.
![]()
/etc/security/auth_attr (authorization attributes database)—Defines authorizations and their attributes and identifies the associated help file.
![]()
/etc/security/prof_attr (rights profile attributes database)—Defines profiles, lists the profile’s assigned authorizations, and identifies the associated help file.
![]()
/etc/security/exec_attr (profile attributes database)—Defines the privileged operations assigned to a profile.
These four databases are logically interconnected.
Exam Alert
RBAC Database Functions You need to be able to correctly identify the function and location of each RBAC database. A common exam question is to match the description with the relevant RBAC database. Remember that the user_attr database resides in the /etc directory and not in the /etc/security directory.
The /etc/user_attr database supplements the passwd and shadow databases. It contains extended user attributes, such as authorizations and profiles. It also allows roles to be assigned to a user. Following is an example of the /etc/user_attr database:
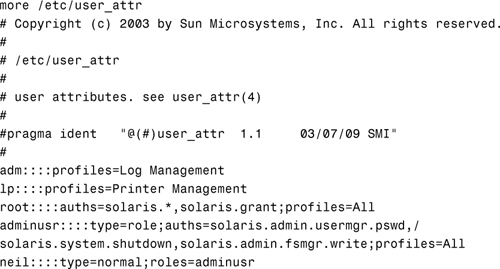
The following fields in the user_attr database are separated by colons:
user:qualifier:res1:res2:attr
Each field is described in Table 11.3.
In the previous section, we issued the following roleadd command to add a role named adminusr:

The roleadd command made the following entry in the user_attr database:
![]()
We can then issue the following usermod command to assign the new role to the user neil:
usermod -R useradmin neil
and then make the following entry to the user_attr database:
neil::::type=normal;roles=adminusr
An authorization is a user right that grants access to a restricted function. In the previous section, the system administrator wanted to delegate some of the system administrative tasks to Neil. Assigning authorizations to the role named adminusr did this. An authorization is a unique string that identifies what is being authorized as well as who created the authorization. Remember that we used the following authorizations to give Neil the ability to modify user passwords, shut down the system, and mount and share file systems:

Certain privileged programs check the authorizations to determine whether users can execute restricted functionality. For example, the solaris.jobs.admin authorization is required for one user to edit another user’s crontab file.
All authorizations are stored in the auth_attr database. If no name service is used, the database is located in a file named /etc/security/auth_attr. Authorizations can be assigned directly to users (or roles), in which case they are entered in the user_attr database. Authorizations can also be assigned to profiles, which in turn are assigned to users. They are described in the “Rights Profiles (prof_attr) Database” section, later in this chapter.
The fields in the auth_attr database are separated by colons, as shown here:
authname:res1:res2:short_desc:long_desc:attr
Each field is described in Table 11.4.
The following are some typical values found in the default auth_attr database:

Look at the relationship between the auth_attr and the user_attr databases for the adminusr role we added earlier:
![]()
Notice the authorization entries that are bold. These authorization entries came out of the auth_attr database, shown previously. The solaris.system.shutdown authorization, which is defined in the auth_attr database, gives the role the right to shut down the system.
We referred to rights profiles, or simply profiles, earlier in this chapter. Up until now, we assigned authorization rights to the role account. Defining a role account that has several authorizations can be tedious. In this case, it’s better to define a profile, which is several authorizations bundled together under one name called a profile name. The definition of the profile is stored in the prof_attr database. Following is an example of a profile named Operator, which is in the default prof_attr database. Again, if you are not using a name service, the prof_attr file is located in the /etc/security directory.
![]()
Several other profiles are defined in the prof_attr database. Colons separate the fields in the prof_attr database, as follows:
profname:res1:res2:desc:attr
The fields are defined in Table 11.5.

Perhaps the system administrator wants to create a new role account and delegate the task of printer management and backups. He could look through the user_attr file for each authorization and assign each one to the new role account using the roleadd command, or he could use the Operator profile currently defined in the prof_attr database, which looks like this:
The Operator profile consists of three other profiles:
![]()
Printer Management
![]()
Media Backup
![]()
All
Let’s look at each of these profiles as defined in the prof_attr database:

Printer Management has the following authorizations assigned to it:
![]()
solaris.admin.printer.read
![]()
solaris.admin.printer.modify
![]()
solaris.admin.printer.delete
When you look at these three authorizations in the auth_attr database, you see the following entries:
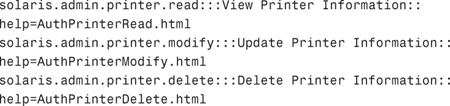
Assigning the Printer Management profile is the same as assigning the three authorizations for viewing, updating, and deleting printer information.
The Media Backup profile provides authorization for backing up data, but not restoring data. The Media Backup profile does not have authorizations associated with it like the Printer Management profile has. I’ll describe how this profile is defined in the next section when I describe execution attributes.
The All profile grants the right for a role account to use any command when working in an administrator’s shell. These shells can only execute commands that have been explicitly assigned to a role account through granted rights. We’ll explore this concept further when I describe execution attributes in the next section.
To create a new role account named admin2 specifying the Operator profile, use the roleadd command with the -P option, as follows:
![]()
The following entry is added to the user_attr database:
admin2::::type=role;profiles=Operator
At any time, users can check which profiles have been granted to them with the profiles command, as follows:
profiles
The system lists the profiles that have been granted to that particular user account.
An execution attribute associated with a profile is a command (with any special security attributes) that can be run by those users or roles to which the profile is assigned. For example, in the previous section, we looked at the profile named Media Backup in the prof_attr database. Although no authorizations were assigned to this profile, the Media Backup profile was defined in the exec_attr database as follows:

The fields in the exec_attr database are as follows and are separated by colons:
name:policy:type:res1:res2:id:attr
The fields are defined in Table 11.6.

Note
Trusted Solaris You will see an additional security policy if you are running Trusted Solaris, a special security-enhanced version of the operating environment. The policy tsol is the trusted solaris policy model.
Looking back to the Media Backup profile as defined in the exec_attr database, we see that the following commands have an effective UID of 0 (superuser):
![]()
Therefore, any user that has been granted the Media Backup profile can execute the previous backup commands with an effective user ID of 0 (superuser).
In the prof_attr database, we also saw that the Operator profile consisted of a profile named All. Again, All did not have authorizations associated with it. When we look at the exec_attr database for a definition of the All profile, we get the following entry:
All:suser:cmd:::*:
Examining each field, we see that All is the profile name, the security policy is suser, and the type of entity is cmd. The attribute field has an *.
It’s common to grant all users the All profile. The * is a wildcard entry that matches every command. In other words, the user has access to any command while working in the shell. Without the All profile, a user would have access to the privileged commands, but no access to normal commands such as 1s and cd. Notice that no special process attributes are associated with the wildcard, so the effect is that all commands matching the wildcard run with the UID and GID of the current user (or role).
Note
The All Profile Always assign the All profile last in the list of profiles. If it is listed first, no other rights are consulted when you look up command attributes.
Objective:
Explain syslog function fundamentals and configure and manage the /etc/syslog.conf file and syslog messaging.
A critical part of the system administrator’s job is monitoring the system. Solaris uses the syslog message facility to do this. syslogd is the daemon responsible for capturing system messages. The messages can be warnings, alerts, or simply informational messages. As the system administrator, you customize syslog to specify where and how system messages are to be saved.
The syslogd daemon receives messages from applications on the local host or from remote hosts and then directs messages to a specified log file. To each message that syslog captures, it adds a timestamp, the message type keyword at the beginning of the message, and a newline at the end of the message. For example, the following messages were logged in the /var/adm/messages file:

syslog enables you to capture messages by facility (the part of the system that generated the message) and by level of importance. Facility is considered to be the service area generating the message or error (such as printing, email, or network), whereas the level can be considered the level of severity (such as notice, warning, error, or emergency). syslog also enables you to forward messages to another machine so that all your messages can be logged in one location. The syslogd daemon reads and logs messages into a set of files described by the configuration file /etc/syslog.conf. When the syslogd daemon starts up, it preprocesses the /etc/syslog.conf file through the m4 macro processor to get the correct information for specific log files. syslogd does not read the /etc/syslog.conf file directly. syslogd starts m4, which parses the /etc/syslog.conf file for ifdef statements that can be interpreted by m4. The function ifdef is an integral part of m4 and identifies the system designated as LOGHOST. The macro is then able to evaluate whether log files are to be held locally or on a remote system, or a combination of both.
If m4 doesn’t recognize any m4 commands in the syslog.conf file, output is passed back to syslogd. syslogd then uses this output to route messages to appropriate destinations. When m4 encounters ifdef statements that it can process, the statement is evaluated for a true or false condition and the message is routed relative to the output of the test.
Exam Alert
/etc/syslog.conf and ifdef statements Make sure you become familiar with the facilities and values listed in the tables in this section. An exam question might provide a sample file and ask where a specific type of message, such as a failed login, will be logged. Also watch out for the ifdef statements to see if the logging is being carried out on a remote system.
An entry in the /etc/syslog.conf file is composed of two fields:
selector action
The selector field contains a semicolon-separated list of priority specifications of this form:
facility.level [ ; facility.level ]
The action field indicates where to forward the message. Many defined facilities exist.
Exam Alert
Separate with Tabs The separator between the two fields must be a tab character. Spaces will not work and will give unexpected results. This is a very common mistake to make.
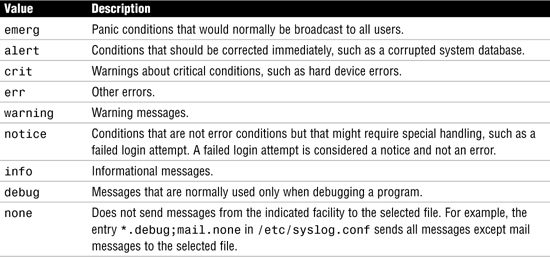
The facilities are described in Table 11.7.

Table 11.8 lists recognized values for the syslog level field. They are listed in descending order of severity.
Note
Levels Include All Higher Levels Too When you specify a syslog level, it means that the specified level and all higher levels. For example, if you specify the err level, then this will include crit, alert and emerg levels as well.
Values for the action field can have one of four forms:
![]() A filename, beginning with a leading slash. This indicates that messages specified by the selector are to be written to the specified file. The file is opened in append mode and must already exist.
A filename, beginning with a leading slash. This indicates that messages specified by the selector are to be written to the specified file. The file is opened in append mode and must already exist. syslog will not create the file if it doesn’t already exist.
![]() The name of a remote host, prefixed with a
The name of a remote host, prefixed with a @. An example is @server, which indicates that messages specified by the selector are to be forwarded to syslogd on the named host. The hostname loghost is the hostname given to the machine that will log syslogd messages. Every machine is its own loghost by default. This is specified in the local /etc/hosts file. It is also possible to specify one machine on a network to be loghost by making the appropriate host table entries. If the local machine is designated as loghost, syslogd messages are written to the appropriate files. Otherwise, they are sent to the machine loghost on the network.
![]() A comma-separated list of usernames, which indicates that messages specified by the selector are to be written to the named users if they are logged in.
A comma-separated list of usernames, which indicates that messages specified by the selector are to be written to the named users if they are logged in.
![]() An asterisk, which indicates that messages specified by the selector are to be written to all logged-in users.
An asterisk, which indicates that messages specified by the selector are to be written to all logged-in users.
Blank lines are ignored. Lines in which the first nonwhitespace character is a # are treated as comments.
All of this becomes much clearer when you look at sample entries from an /etc/syslog.conf file:
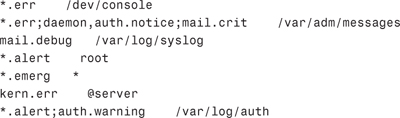
In this example, the first line prints all errors on the console.
The second line sends all errors, daemon and authentication system notices, and critical errors from the mail system to the file /var/adm/messages.
The third line sends mail system debug messages to /var/log/syslog.
The fourth line sends all alert messages to user root.
The fifth line sends all emergency messages to all users.
The sixth line forwards kernel messages of err (error) severity or higher to the machine named server.
The last line logs all alert messages and messages of warning level or higher from the authorization system to the file /var/log/auth.
The level none may be used to disable a facility. This is usually done in the context of eliminating messages. For example:
*.debug;mail.none /var/adm/messages
This selects debug messages and above from all facilities except those from mail. In other words, mail messages are disabled. The mail system, sendmail, logs a number of messages. The mail system can produce a large amount of information, so some system administrators disable mail messages or send them to another file that they clean out frequently. Before disabling mail messages, however, remember that sendmail messages come in very handy when you’re diagnosing mail problems or tracking mail forgeries.
As of Solaris 10, the mechanism for stopping, starting, and refreshing syslogd has changed. The syslog function is now under the control of the Service Management Facility (SMF), which is described in detail in Chapter 3.
To stop or start syslogd, use the svcadm command with the appropriate parameter, enable or disable as follows:
![]()
The syslog facility reads its configuration information from /etc/syslog.conf whenever it receives a refresh command from the service administration command, svcadm, and when the system is booted. You can make your changes to /etc/syslog.conf, then run the following command to cause the file to be re-read by the syslogd daemon:
# svcadm refresh system-log
Exam Alert
No More kill -HUP Make sure you remember that the kill -HUP facility should no longer be used to try to cause a daemon process to re-read its configuration file, even though it still works. The svcadm refresh command is now the recommended way of achieving this.
The first message in the logfile is logged by the syslog daemon itself to show when the process was started.
syslog logs are automatically rotated on a regular basis. In previous Solaris releases, this was achieved by the program newsyslog. A new method of log rotation was introduced with Solaris 9—logadm, a program normally run as a root-owned cron job. A configuration file /etc/logadm.conf is now used to manage log rotation and allows a number of criteria to be specified. See the logadm and logadm.conf manual pages for further details.
The logger command provides the means of manually adding one-line entries to the system logs from the command line. This is especially useful in shell scripts.
The syntax for the logger command is as follows:
![]()
Options to the logger command are described in Table 11.9.

As an example, to log a message to the default system log file stating that the backups have completed successfully, enter the following:
logger "Backups Completed Successfully"
In this chapter you learned about Role-Based Access Control (RBAC), which allows the system administrator to delegate administrative responsibilities to users without having to divulge the root password. A number of profiles allow privileges to be grouped together so that a user can easily be granted a restricted set of additional privileges. There are four main RBAC databases that interact with each other to provide users with access to privileged operations:
![]()
/etc/security/auth_attr—Defines authorizations and their attributes and identifies the associated help file.
![]()
/etc/security/exec_attr—Defines the privileged operations assigned to a profile.
![]()
/etc/security/prof_attr—Defines the profiles, lists the profile’s assigned authorizations, and identifies the associated help file.
![]()
/etc/user_attr—Associates users and roles with authorizations and execution profiles.
Also in this chapter, you learned about the system logging facility (syslog) and the configuration that facilitates routing of system messages according to specific criteria, as well as determining where the messages are logged. The logger command was covered, which allows the system administrator to enter ad-hoc messages into the system log files.
In this exercise, you’ll create a new role named admin1 and a profile called Shutdown. The Shutdown profile will be added to the role. A user account trng1 will be created and have the admin1 role assigned to it. The user will then assume the role and execute a privileged command to shut down the system.
Estimated time: 20 minutes
To create a user and a role, perform the following steps:
1. Create the role named admin1, as shown here:
![]()
You will be prompted to enter the password twice.
2. Create a profile to allow the user to shut down a system.
Edit the /etc/security/prof_attr file and enter the following line:
Shutdown:::Permit system shutdown:
Save and exit the file.
3. Add the Shutdown and All profiles to the role as follows:
rolemod -P Shutdown,All admin1
4. Verify that the changes have been made to the user_attr database:
more /etc/user_attr
5. Create the user account and assign it access to the admin1 role:
![]()
6. Assign a password to the new user account as follows:
passwd trng1
You will be prompted to enter the password twice.
7. Verify that the entry has been made to the passwd, shadow, and user_attr files as follows:

8. Assign commands to the Shutdown profile:
Edit the /etc/security/exec_attr file and add the following line:
Shutdown:suser:cmd:::/usr/sbin/shutdown:uid=0
Save and exit the file.
9. Test the new role and user account as follows:
a. Log in as trng1.
b. List the roles that are granted to you by typing the following:
roles
c. Use the su command to assume the role admin1:
su admin1
You will be prompted to enter the password for the role.
d. List the profiles that are granted to you by typing the following:
profiles
e. Shut down the system:
/usr/sbin/shutdown -i 0 -g 0
|
1. |
C. Use the |
|
2. |
B. |
|
3. |
A, B. The |
|
4. |
A. |
|
5. |
D. |
|
D. Four valid keys exist: |
|
|
7. |
A. If a role is not associated with a correct profile, the only commands that can be executed within the role are the privileged commands that you have set up. Ordinary non-privileged commands are unavailable. For more information, see the “RBAC Components” section. |
|
8. |
B, C, D. The three valid RBAC databases are |
|
9. |
C. To enable a user to administer all user |
|
10. |
C, D. Use the |
|
11. |
E. The |
|
12. |
A, C. |
|
13. |
A, B. The following entry in the Media Restore:suser:cmd:::/usr/lib/fs/ufs/ufsrestore:euid=0 Any role that has Media Restore as a profile can execute the |
|
14. |
A. Execution profiles are bundling mechanisms for grouping authorizations and commands with special attributes. For more information, see the “RBAC Components” section. |
1. Solaris 10 Documentation CD—“Security Services” and “System Administration Guide: Advanced Administration” manuals.
2. http://docs.sun.com. Solaris 10 documentation set—“Security Services” and “System Administration Guide: Advanced Administration” books in the System Administration collection.