
8
Creating and Configuring PowerPivot for SharePoint Services Applications
PowerPivot is a tool new in Office 2010 that provides a type of in memory OLAP tool, which is available in the familiar interface of Excel. It gives end users the ability to analyze data in a similar fashion that an Analysis Services cube would provide. For the purposes of this lesson though we will focus on the configuration of PowerPivot with SharePoint, but for a more in depth discussion on PowerPivot and when it is appropriate to use, read Lesson 13.
PowerPivot is one of the most difficult and time consuming of the Business Intelligence tools to configure for SharePoint. It requires a separate install of an Analysis Services instance and special considerations depending on whether SharePoint is installed on a standalone machine or on an existing farm. In this lesson's Try It section you walk through the steps for properly configuring a standalone instance, which is the best way to get you up-and-running the fastest.
SQL SERVER AND SHAREPOINT INSTALLATIONS
Before you can begin installing SQL Server or SharePoint you will need to ensure your machine is properly prepared. You will also need to have the proper editions of products to install. Use this checklist before beginning the installation:
- The operating system is Windows Server 2008 R2 or Windows Server 2008 Service Pack 2 or higher and must be 64-bit.
- SharePoint 2010 Enterprise.
- SQL Server R2 Enterprise Edition.
- Domain account available that can be used for configuration and setup.
Standalone vs. Existing Farm
Performing a standalone installation on a single server is the simplest way to start learning PowerPivot in SharePoint. This type of installation is performed when you know ahead of time that you would like to have the PowerPivot functionality as part of your SharePoint instance.
This installation has two major steps:
- Install a SharePoint 2010 instance without running the configuration wizard.
- Install SQL Server 2008 R2 and select SQL Server PowerPivot for SharePoint for a New Server on the Setup Role page.
After the SQL Server install is complete you will find your SharePoint site is configured and a PowerPivot site has become your homepage. You can use the Try It section of the lesson as a detailed step-by-step guide for following this installation type, so here the emphasis is more on the setup for an existing farm.
The alternative to the standalone install is to perform the PowerPivot installation on an existing SharePoint farm to which you would like to add the feature. You would do this if you have already installed SharePoint and have decided now to add the PowerPivot functionality.
This installation method follows many of the same steps as the standalone method, but following the completion of the SQL Server install your SharePoint site will not be ready.
Installing SQL Server PowerPivot for SharePoint
To get install SQL Server PowerPivot for SharePoint, follow these steps:
- Log on to the computer that has the SharePoint 2010 instance already installed and start the SQL Server 2008 R2 installer.
- When the setup menu opens click Installation
 New Installation or add features to an existing Installation.
 - Click OK after the Setup Support Rules complete.
- Install the Setup Support Files and click Next when the support files complete installation.
- If you already have an instance of SQL Server installed on this server an Installation Type page will appear. If this is true for you, select New installation or features. PowerPivot for SharePoint must have its own instance. If you have not previously installed SQL Server then this page will not appear.
- On the next dialog you will be required to enter your product key. After entering your key click Next.
- You will then be required to accept the licensing terms. Click the checkbox to accept and click Next.
- Click Install to install all the Setup Support Files to be installed.
- In the Setup Support Rules dialog click Next.
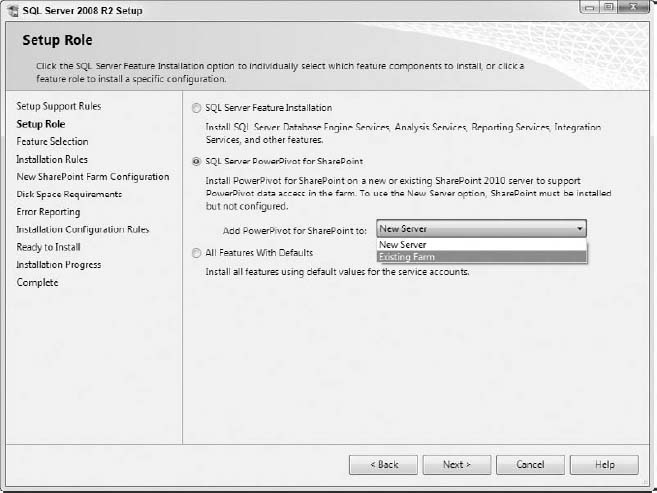
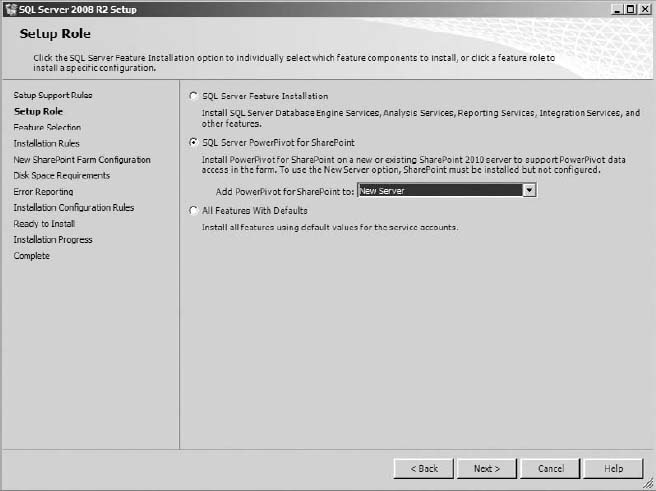
- Select SQL Server PowerPivot for SharePoint and set the Add PowerPivot for SharePoint To drop-down box to Existing Farm, as shown in Figure 8-1.
- In the Feature Selection dialog click Next.
- Click Next again in the Installation Rule dialog after the Install Rules Check completes.
- The instance name that will be created for the SQL Server Analysis Server will be PowerPivot. Accept the defaults and click Next.
- On the Disk Space Requirements dialog click Next.
- On the Server Configuration page provide a domain account for Analysis Services. This account must be a domain account (a Windows administrator account is not good enough here) and can be changed later from SharePoint Central Administration. Click Next when this is complete.
- Click Add Current User so the account you are logged in as will be added as an Analysis Services administrator, then click Next.
- Click Next on the Error Reporting dialog to continue.
- In the Installation Configuration Rules dialog click Next.
- Click Install after reviewing the summary information.
Deploying the PowerPivot Solution to SharePoint
To deploy a PowerPivot workbook, follow these steps:
- Open SharePoint Central Administration and select the System Settings heading.
- Click Manage Farm Solutions under the Farm Management heading.
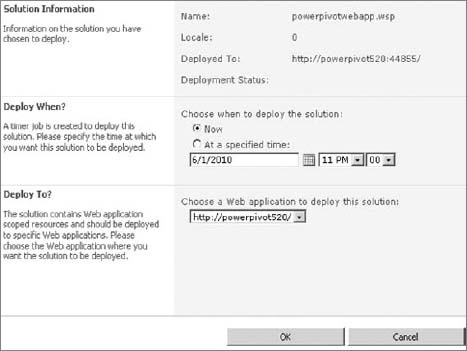
- Click powerpivotwebapp.wsp and select Deploy Solution.
- Choose the SharePoint web application to add the PowerPivot feature in the Deploy To drop-down box and click OK, as shown in Figure 8-2. These steps must be repeated for all SharePoint sites you wish to allow the PowerPivot features.
Creating the PowerPivot Service Application
To create a PowerPivot service application, follow these steps:
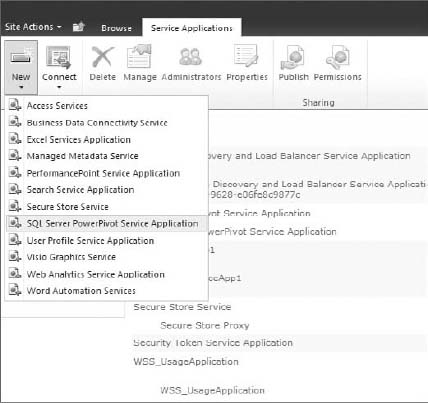
- Open SharePoint Central Administration and select Manage Service Applications under the Application Management heading.
- Click New and select SQL Server PowerPivot Service Application, as shown in Figure 8-3.
- Give the Application pool a name and check Add the proxy for this PowerPivot service application to the default proxy group. Click OK.
Activating the PowerPivot Feature on Site Collections
To activate PowerPivot on a SharePoint site, follow these steps:
- Open your web browser and enter the URL http://<YourServerName>.
- Click Site Actions and then Site Settings.
- Click Site Collection Features under the Site Collection Administration heading.
- Click Activate next to the PowerPivot Feature Integration Site Collections, as shown in Figure 8-4.

You have now successfully configured PowerPivot for an existing farm. As you can see many more steps are involved in doing an existing farm installation. When the standalone install completes you can start working, whereas the existing farm installation has several configuration steps even after completion of the installer. Make sure to walk through the Try It section for the step-by-step instructions on configuring a standalone install.
The next section describes how you can set up a Secure Store Service, which will be used for scheduling a data refresh of your PowerPivot data.
POWERPIVOT AUTHENTICATION
As you have just found out, both installation types require that you skip the configuration wizard that comes with SharePoint. A side effect of this is that some settings that would be configured automatically must now be manually set. The most important of these settings is the Secure Store Service, which is most often used for the scheduling of a data refresh to automatically update PowerPivot data inside an Excel workbook. This is done by setting up a Secure Store Target Application in SharePoint Central Administration.
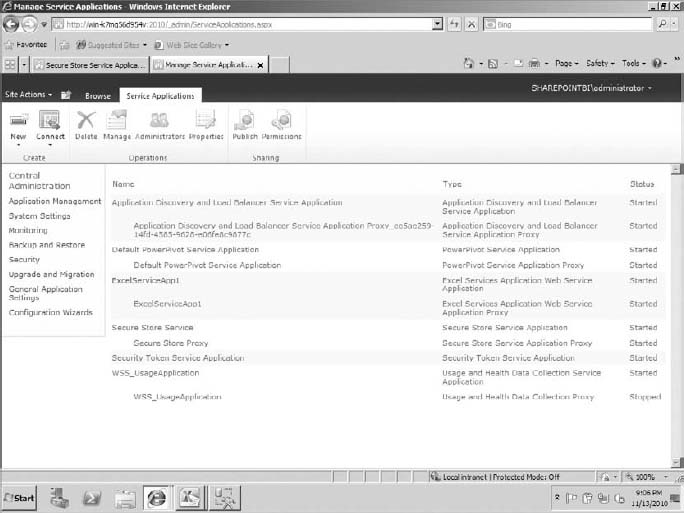
After opening SharePoint Central Administration, navigate to Manage Service Applications under the Application Management heading. From the service applications list as shown in Figure 8-5 select the Secure Store Service.
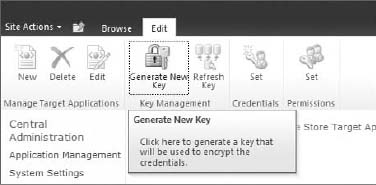
You must first select Generate New Key as shown in Figure 8-6, which is generated from a passphrase you provide. It is very important for you to record this passphrase because it will not be stored for later reference.
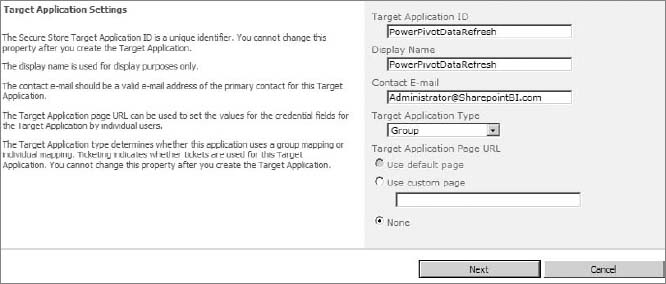
Next, click New in Manage Target Applications. The Target Application ID is the name that users will type in when setting up a data refresh that uses credentials that are stored, so make sure it is a name that is easy to remember. Provide a Target Application ID, Display Name, and Contact E-mail, and change the Target Application Type to Group as shown in Figure 8-7. Click Next.
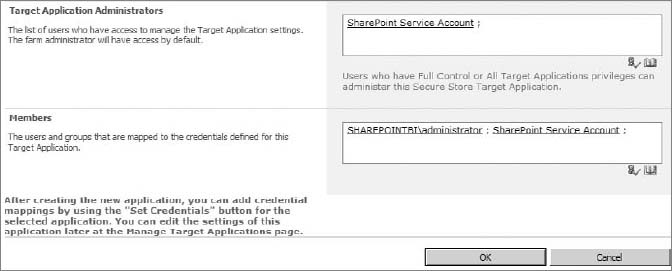
Leave the defaults for the field names of Windows User Name and Windows Password and click Next. In the Target Application Administrators box provide the users who should have administrative access to the application settings. In the Members section provide either user and/or group accounts that will be entering this target application for data refreshes and click OK, as shown in Figure 8-8.
The Target Application has now been created and can be used for scheduling PowerPivot workbook data refreshes.
Return to Manage Service Applications under the Application Management heading. Select the PowerPivot Service Application and then click Configure Service Application Settings under the Actions heading. Find the Data Refresh section and change the PowerPivot Unattended Data Refresh Account to the Target Application ID created in the earlier steps, shown in Figure 8-9.

TESTING YOUR CONFIGURATION
Now that the Secure Store Target Application is configured you can test it by attempting to schedule a data refresh on an Excel workbook with PowerPivot data using the Secure Store Service. Navigate to the PowerPivot Gallery on your PowerPivot site and find an Excel workbook that you have already deployed. You may be required to install Silverlight to continue. Click the Manage Data Refresh button as shown in Figure 8-10.
When the Manage Data Refresh page opens, turn on data refresh by checking the Enable box. Set Schedule Details to Once, set Earliest Start Time to Specific Earliest Start Time, and set it to 15 minutes from your current time for testing purposes. Normally you would leave this option at the default After Business Hours.
Next, provide an e-mail in the E-mail Notification section that will be notified in the event of a data refresh failure. Finally, in the Credentials section select Connect Using the Credentials Saved in Secure Store Service (SSS) to Log On to the Data Source. Enter the ID Used to Look up the Credentials in the SSS ID Box. In the ID box provide the Target Application ID that you created in the previous section and click OK. Your configuration should look similar to Figure 8-11.


You can verify that the data refresh was successful by clicking Manage Data Refresh again to see the list of refreshes that have occurred, as shown in Figure 8-12.

TRY IT
In this Try It, you learn how to successfully install and configure a PowerPivot-ready standalone SharePoint instance. You then test the setup by deploying a PowerPivot workbook to a SharePoint PowerPivot Gallery.
Lesson Requirements
Install SharePoint and SQL Server so that they fully integrate with PowerPivot documents that are deployed to the server.
Hints
- Install SharePoint 2010 without running the configuration wizard.
- Install Microsoft SQL Server 2008 R2.
- Install Office 2010 with the PowerPivot add-in.
- Create a basic PowerPivot example based on the AdventureWorksDW2008R2 database and deploy to a PowerPivot Gallery.
Step-by-Step
- Log on as the administrator to the desired server for the installation of SharePoint.
- Run the PrerequisiteInstaller.exe from the SharePoint install DVD to ensure all the necessary prerequisites are installed prior to running the full setup. When this is complete restart the machine and log back in as the administrator.
- Run the setup.exe from the SharePoint install DVD and select Install SharePoint Server.
- After accepting the licensing agreement click Continue.
- Figure 8-13 shows the next dialog, which asks if you would like to do a Standalone or Server Farm installation. Here you must choose Server Farm because PowerPivot is supported only in Server Farm mode.

- In the Server Type dialog choose Complete — Install All Components, then click Install Now to begin the installation as shown in Figure 8-14.
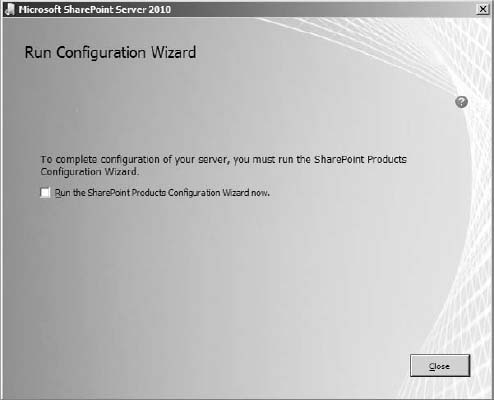
- When this installation completes you will be given the option to configure SharePoint by checking Run the SharePoint Products Configuration Wizard Now, as shown in Figure 8-15. Do not check this option because you will use the PowerPivot for SharePoint SQL Server installer, which configures SharePoint as part of the New Farm install option.
- Exit the SharePoint installation and launch the SQL Server 2008 R2 installer.
- Select the Installation page and click New installation or add features to an existing installation.
- Click OK once the Setup Support Rules complete.
- On the next dialog you will be required to enter your product key. After entering your key click Next.
- You will then be required to accept the licensing terms. Click the checkbox to accept and click Next.
- Click Install to install all the Setup Support Files to be installed.
- In the Setup Support Rules dialog click Next.
- Select SQL Server PowerPivot for SharePoint, as shown in Figure 8-16, and click Next.
- In the Feature Selection dialog click Next.
- Click Next again in the Installation Rule dialog after the Install Rules Check completes.
- The instance name that will be created for the SQL Server Engine and SQL Server Analysis Server will be PowerPivot. Accept the defaults and click Next.
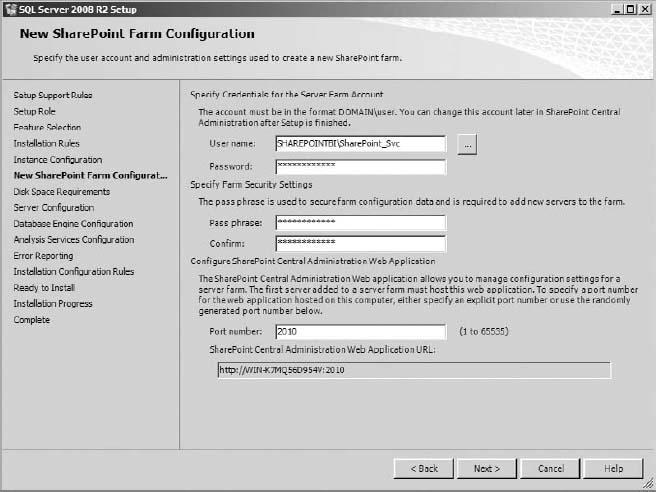
- Specify credentials for the Server Farm Account, as shown in Figure 8-17. This account must be a domain account (Windows administrator account is not good enough here) and can be changed later from SharePoint Central Administration.
- You will also be required to provide a passphrase, which will be used when adding additional servers to the farm.
- Provide a port number, which will be used for hosting SharePoint Central Administration, and click Next.
- On the Disk Space Requirements dialog click Next.
- Select the account name and password that will be used to run each service and click Next.
- Click Add Current User so the account you are logged in as will be added as an administrator of the Database Engine and click Next.
- Click Add Current User so the account you are logged in as will be added as an administrator of the Analysis Server and click Next.
- Click Next on the Error Reporting dialog to continue.
- In the Installation Configuration Rules dialog click Next.
- Click Install after reviewing the summary information.
- After the installation process completes, test your SharePoint site. Open Internet Explorer and enter the URL http://<YourServerName>. This may take up to several minutes to load the first time, but will look like Figure 8-18 once it completes.
- Ensure that the PowerPivot add-in for Excel 2010 has been downloaded and installed. You can find the download at http://tinyurl.com/PowerPivotDownload.
- Open Excel 2010 where you will create a basic PowerPivot document that can be deployed to your new SharePoint instance.
- Select the PowerPivot tab and click the PowerPivot Window button in the ribbon.
- After the PowerPivot for Excel window opens select From SQL Server in the From Database drop-down box.
- Type in the server name where the Adventure Works sample database has been installed and select AdventureWorksDW2008R2 from the Database Name drop-down box. Click Next.
- On the Choose How to Import the Data page leave the default Select from a list of tables and views to choose the data to import and click Next.
- From the table list select FactInternetSales and click the Select Related Tables button. This should give you a total of six tables selected. Click Finish when this is correct.
- After the wizard completes, import the data from these tables into PowerPivot and click Close.
- Click the PivotTable button in the ribbon and click OK when it asks to create the PivotTable in a new worksheet.
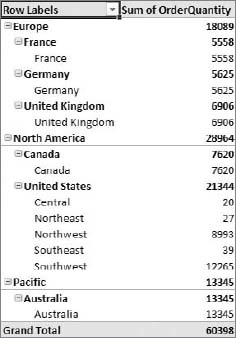
- From the FactInternetSales table check the Order Quantity field.
- From the DimSalesTerritory table check the fields SalesTerritoryGroup, SalesTerritoryCountry, and SalesTerritoryRegion. Your worksheet should look like Figure 8-19.
- To deploy this to the PowerPivot site select the File tab and choose Save & Send.
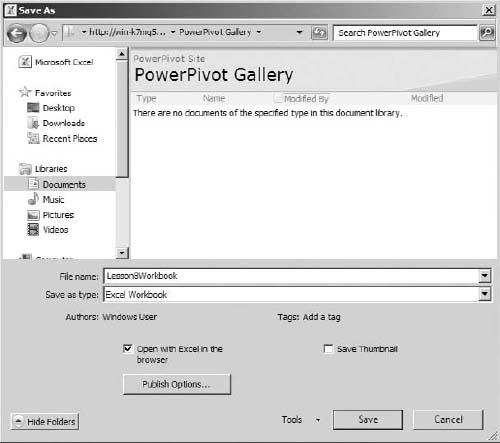
- Click Save to SharePoint and click the Save As button. In the top of the Save As window, type in the SharePoint site that was created earlier: http://<YourServerName>.
- Open the PowerPivot Gallery and rename the file Lesson8Workbook, as shown in Figure 8-20, and click Save.
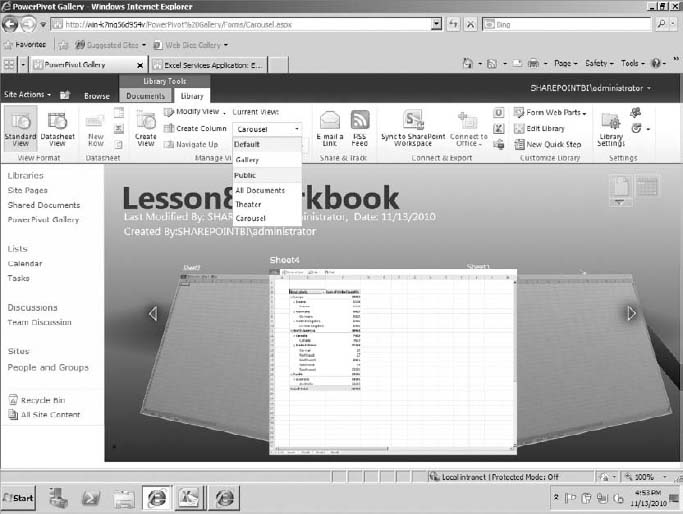
- This will automatically open Lesson8Workbook in the web browser. You can optionally navigate to the PowerPivot Gallery through the SharePoint site and select the gallery from the navigation bar. This will allow you to view your documents in the carousel view as shown in Figure 8-21. (You may be prompted to install Silverlight to view the PowerPivot Gallery.)


Congratulations! You have configured a standalone instance of SharePoint with PowerPivot integration and deployed your first PowerPivot workbook to a PowerPivot Gallery.
 Please select Lesson 8 on the DVD to view the video that accompanies this lesson.