
10
Configuring Reporting Services for SharePoint Integration
Reporting Services integration with SharePoint has been available for several iterations of both tools now. With each version, configuring the integration has become much less problematic. Major steps have been taken to simplify the process so the integration is seamless. In this lesson you walk through the steps needed to configure either a new instance of Reporting Services for SharePoint integration or change an existing native mode instance of Reporting Services to SharePoint integrated mode.
CONFIGURING REPORTING SERVICES FOR SHAREPOINT INTEGRATED MODE
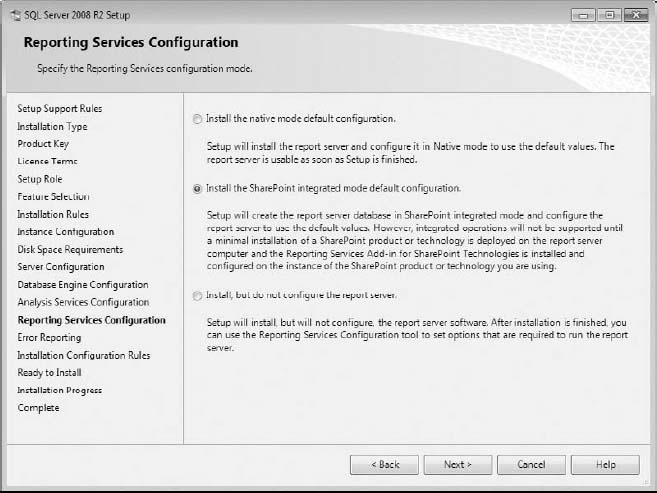
You may have noticed while stepping through the SQL Server installer that, if you included Reporting Services as part of the installation, the installer asked whether you would like to install in SharePoint integrated mode. Selecting Install the SharePoint Integrated Mode Default Configuration, shown in Figure 10-1, will save you the trouble of manually converting the report server databases, which are created with every installation of Reporting Services, to be in SharePoint integrated mode. When installing Reporting Services for the very first time this is all you must do to have it ready for SharePoint integration.
If you have previously installed Reporting Services in native mode, without SharePoint integration, you must manually make the switch to integrate the two products. To start the process of manually converting from native mode to integrated mode, open the Reporting Services Configuration Manager and connect to the instance of Reporting Services you want to change. The Reporting Services Configuration Manager is found by navigating to Start ![]() All Programs
All Programs ![]() Microsoft SQL Server 2008 R2
Microsoft SQL Server 2008 R2 ![]() Configuration Tools
Configuration Tools ![]() Reporting Services Configuration Manager. Ensure the service is started and then select the Database page, shown in Figure 10-2.
Reporting Services Configuration Manager. Ensure the service is started and then select the Database page, shown in Figure 10-2.
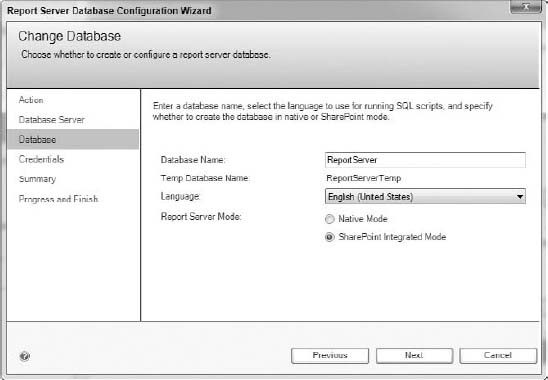
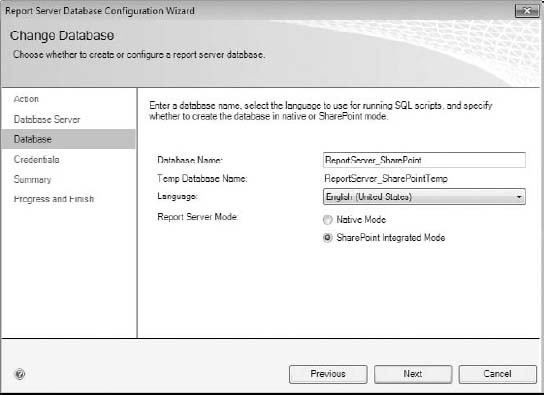
Click the Change Database button, which opens the Report Server Database Configuration Wizard. Select Create a New Report Server Database, and click Next. Choose the database engine instance on which you want to create the new integrated report server database, and click Next. Figure 10-3 shows that you must switch the Report Server Mode property from Native Mode to SharePoint Integrated Mode, and click Next. Complete the rest of the wizard using the defaults.
You have now configured Reporting Services to work in SharePoint integrated mode, and if you attempt to view reports using the Report Manager (http://ServerName/Reports) you will receive the following error:
This operation is not supported on a report server that is configured to run in
SharePoint integrated mode. (rsOperationNotSupportedSharePointMode)
You have a few more steps to do on the SharePoint side to complete the integration, which are discussed in the next section.

CONFIGURING THE SHAREPOINT 2010 REPORTING SERVICES ADD-IN
First, download and install the Reporting Services add-in for Microsoft SharePoint Technologies 2010. Go to the Microsoft download site (www.microsoft.com/downloads) and search for SharePoint 2010 Reporting Services Add-in to ensure you get the most up-to-date version. After downloading the add-in, run the installer, in which you will be able to specify whether you will be deploying to a SharePoint farm or a standalone instance of SharePoint.
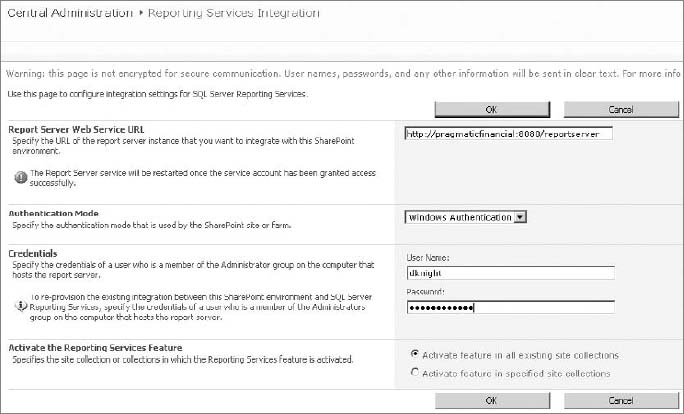
With the add-in installation complete, you can now configure the feature by opening SharePoint Central Administration and clicking General Application Settings. Look for the Reporting Services section: if this section is missing, the add-in did not properly install. Select Reporting Services Integration and specify the report server site in the Report Server Web Service URL (http://servername/reportserver), shown in Figure 10-4. You will also need to set up security credentials before you click OK.
You then have the option to configure the “Set server” defaults to change some of the default options set for Reporting Services. These include, but are not limited to, a property to limit report snapshots and a property to configure which version of Report Builder launches when you click Report Builder in SharePoint.
Now that you have completed the configuration needed to integrate Reporting Services and SharePoint, you are ready to test it by attempting to deploy reports.
TESTING THE REPORTING SERVICES CONFIGURATION
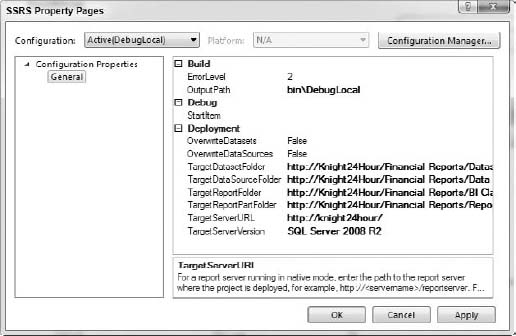
Deploying to SharePoint is a lot like deploying to the regular report server. After you have opened Business Intelligence Development Studio (BIDS), right-click the Report Server project and select Properties. In the Deployment section, shown in Figure 10-5, first point the TargetServerURL property to the SharePoint URL. Then point the four properties labeled Target above this one to the appropriate library to which you want to deploy. Once you have finished configuring, right-click the project, and, this time, select Deploy.
Once your reports complete deployment you can navigate to the SharePoint library to which you just chose to deploy and select the report to view it in SharePoint.
TRY IT
In this lesson, you learned when installing Reporting Services for the first time that it is very simple to make it SharePoint ready. It only requires that you select Install the SharePoint Integrated Mode Default Configuration during installation.
So, this Try It focuses on the more difficult task of changing an existing Report Server configuration from native mode to SharePoint integrated. Then you will configure SharePoint to use this newly reconfigured Report Server database.
Lesson Requirements
This lesson assumes that Reporting Services has already been installed previously but you would like to change it from native mode to SharePoint integrated. You will then install the Reporting Services add-in for Microsoft SharePoint Technologies 2010 and configure SharePoint to complete the integration.
Hints
- Use the Reporting Services Configuration Manager to change the Report Server database type.
- Install the Reporting Services add-in for Microsoft SharePoint Technologies 2010.
- Use SharePoint Central Administration to configure the add-in.
Step-by-Step
- Go to Start
 All Programs Microsoft SQL Server 2008 R2 Configuration Tools Reporting Services Configuration Manager.
 - Click Connect after selecting the Report Server instance you would like to change from native mode to SharePoint integrated.
- If the Report Server is not already started you must click Start on the Report Server Status page.
- Select the Database page, shown in Figure 10-6, and click Change Database.
- Select Create a New Report Server Database and click Next.
- Provide the Server Name where this new SharePoint integrated Report Server database will be created. Click Test Connection to ensure you have access to the server before you click Next.
- Give the Report Server database a name, as shown in Figure 10-7, select SharePoint Integrated Mode, and click Next.
- Set the permissions that will be used for Reporting Services accessing the SQL Server Report Server database and click Next.
- Click Next on the Summary page.
- The last screen will actually create the new Report Server database for you. Once this completes click Finish and close out of the configuration manager. You are now ready to install and configure the SharePoint integration.
- Go to www.microsoft.com/downloads and search for the latest version of the Reporting Services add-in for Microsoft SharePoint Technologies 2010. Download and install the add-in.
- Configure the add-in on SharePoint Central Administration by selecting General Application Settings.
- Under the Reporting Services heading select Reporting Services Integration.
- Provide your Reporting Services Web Service URL, which usually looks like http://servername/reportserver, and change the Authentication Mode to Windows Authentication.
- Specify an account of a user that is an Administrator on the machine that hosts the Report Server, as shown in Figure 10-8. And click OK. This will configure the feature and by default will also activate it on all existing sites.


Congratulations! You have configured an existing instance of Reporting Services for SharePoint integration.
 Please select Lesson 10 on the DVD to view the video that accompanies this lesson.