
24
Controlling Your Reporting with Versioning, Auditing, and Content Expiration
Now that your reports are developed and deployed to your SharePoint site, you must ensure that the site can consistently provide a stable environment in which your users can work. To do this, certain policies and principles should be put in place that govern how and when items are developed and implemented. This should guarantee that things such as navigation, look and feel, and menus are common across the entire site. If the menus on one Business Intelligence site differ from that of another common site, imagine how much confusion would have to be resolved among the end users. In this lesson you will learn how to implement strategies that will assist you in applying governance policies and procedures in regard to your SharePoint design and deployment methodologies.
SHAREPOINT GOVERNANCE AS APPLIED TO BUSINESS INTELLIGENCE
As mentioned, when designing your SharePoint Business Intelligence solution and the corresponding objects, you and your team should adhere to a certain set of predefined policies and procedures. These policies and procedures are also known as governance. This governance is the driving force behind your design standards, version control, and auditing. When creating your PowerPivot Workbooks, SQL Reports, and PerformancePoint Dashboards, you should follow any design principles that have been defined as part of your governance.
Often the most difficult part of SharePoint governance is getting started. Typically the starting point is creating a governance committee, which should consist of individuals from the entire company. As a team, this group should be able to define the policies and procedures and meet the needs of the entire organization. In addition, this group creates a process that reviews, in this case, all the Business Intelligence initiatives and structure that support all end user questions, concerns, and issues. One of the final, but probably most significant products of this teamwork is a framework lifecycle, which will be used to develop all Business Intelligence content. There may be multiple frameworks, which will depend on the type of content that will be developed and deployed.
REPORTING LIFECYCLE FOR SELF-SERVICE BI ENVIRONMENT
As mentioned in the previous section, it is important to develop a lifecycle framework for your BI SharePoint environment. This lifecycle should ensure that each step in the report definition, creation, deployment, and management is identical for all reports. The framework will also enforce use of the governance that has already been put in place. A typical report lifecycle resembles Figure 24-1.
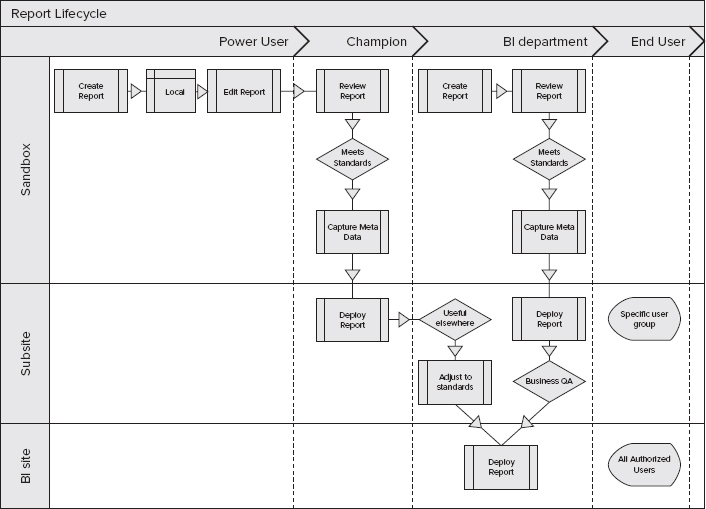
The first step is the creation of the report by a power user. This typically occurs on their local machine or in a sandbox environment. The sandbox is not a development or production environment. Once the user is satisfied with the report, he or she may decide that the report should be deployed. Prior to deployment, a member of the governance team reviews the report and ensures that it meets all the policies, procedures, and standards. In addition, documentation will be created for the report and its content. Finally, the report is deployed. In some environments there is a subsite, which may be a location specific for individual users, groups, or departments. If this is the case, the report will be deployed there. If not, the report will go the BI department.
The BI department may simply deploy the report to a site for Quality Assurance or they may determine that it could be useful in other areas. If the latter is the case, the report will undergo another round of standards review. Once the review is complete, the report will be deployed to the BI site. At this point those authorized users will have access to view the report.
USING ANALYTICS AND CONTENT EXPIRATION
Now that you have implemented a Self-Service BI Environment lifecycle framework, how are you going to manage all the reports that your end users create and deploy into SharePoint? Fortunately for you, SharePoint 2010 provides a centralized way to manage, maintain, and monitor this type of environment. For example, using the PowerPivot Management Dashboard, which is part of the Central Administration console, you can view various metrics about all the PowerPivot workbooks that have been created and deployed.
To access the dashboard, open the Central Administration console, click General Application Settings, and click Management Dashboard under the PowerPivot heading. The first graph, as shown in Figure 24-2, displays overall server health.
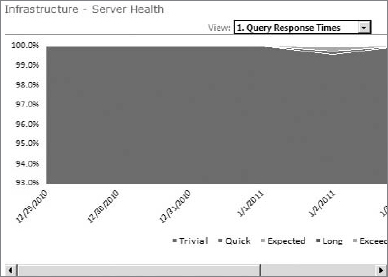
By default the graph shows Query Response Time. You can change the view of the graph by changing the selected value in the drop-down list labeled View, which is located directly above the graph.
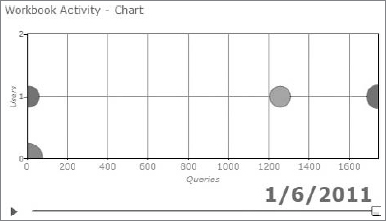
Below the Server Health graph is the Workbook Activity chart, as shown in Figure 24-3. In this chart you see a time-series visualization that shows you PowerPivot workbook activity over time.
The size of each circle represents the size of each workbook. If you hover over a circle on the chart, it displays a tooltip that provides detailed information about a certain workbook. You can actually play the timeline to see changes in how workbooks are being used and how many users are using them. To play the timeline, click the slide and drag it back to the beginning of the chart. Then click the green play button, which is located below the chart.
Now that your users are creating and deploying reports, you will need to know how to manage all this new content. Because the reports are all stored in a somewhat centralized repository, the process of managing the content should not be too difficult. As with most administrative items, SharePoint 2010 contains features that assist the IT staff in accomplishing this task. Typically when end users are given the ability to create reports, the end result is an enormous amount of unused or out-of-date items. In an effort to proactively mitigate this problem, Microsoft includes the concept of policies. Four types of polices can be created: Expiration, Auditing, Labels, and Barcodes. This book focuses on the Expiration policy.
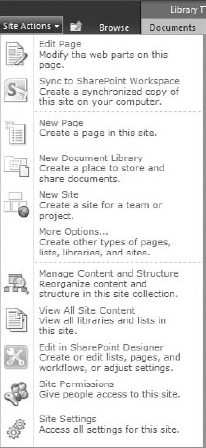
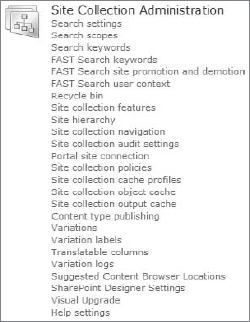
The Expiration policy should help organizations delete or remove out-of-date content from their sites in a manner that is consistent and that can be tracked. To configure an Expiration policy, browse to your main BI site. Locate Site Actions in the top-left corner and click the drop-down arrow to the right. Select Site Settings from the list of available choices. You will be presented with several choices on the Site Settings page. Under the Site Collection Administration category click Site Collection Policies. On the Policies page, as shown in Figure 24-4, click Create.

You will be directed to the Edit Policy page, as shown in Figure 24-5.
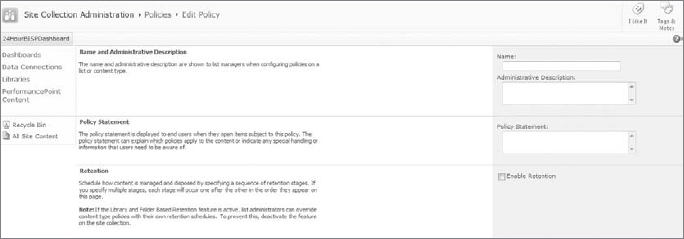
On this page, as mentioned earlier, you can specify policies for retention (expiration) auditing, labels, and barcodes. However, before specifying either you need to name your policy and specify an Administrative Description and a Policy Statement. The Administrative Description is what list managers will see. The Policy Statement will be seen by end users when they open items that are subject to that policy. Next you should check the box labeled Enable Retention. Doing this will allows you to schedule how the content is managed and disposed. Then click Add a Retention Stage, which appears after Enable Retention is checked. You will then be presented with the Stage Properties Webpage Dialog box, which is shown in Figure 24-6.

On this page you must first select the date that will determine the retention period and how many years, days, or months to add to that date. For example, if you want content to be deleted 30 days after it was created in a specific library, type 30 in the text box after the plus sign and select Days from the drop-down list. Finally, in the Action section you must specify what to do with the content if it meets the Expiration policy. You have several choices to choose from. In this case, select Move to Recycle Bin.
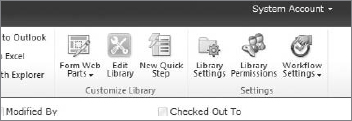
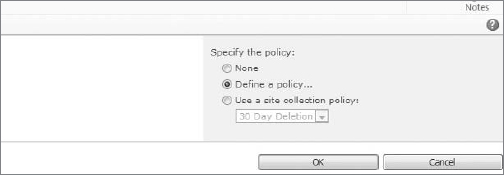
Once the policy is created, you must apply it to a list or library. To do this, locate a content library, and on the ribbon locate the Library Tools tab and select Library. On the Library ribbon select Library Settings. In the Permissions and Manage section click Information Management Policy Settings. Select Document or Folder from the Content Type column. For this example, we selected Document. On the right side of the Document page, shown in Figure 24-7, you can specify a policy by defining a new one or using a site collection policy.
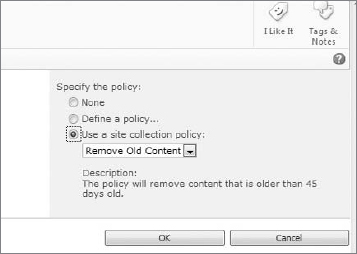
Because you have already created one, select the radio button next to Use a Site Collection Policy. Select the name of the policy that was created earlier and click OK.
TRY IT
In this Try It you first create a site collection policy and then apply the policy to a document library.
Lesson Requirements
In this lesson, you create a site collection policy. The policy will delete the content that exists in a document library 30 days after its creation. In addition, you apply the policy to an existing document library.
Hints
- Use the Site Actions button on your main Business Intelligence site.
- The site collection policy is located under the Site Collection Administration section of the Site Settings page.
- Use the Library Settings item to apply the policy to a specific document library.
Step-by-Step
- Navigate to your main Business Intelligence site.
- Locate the Site Actions button on the top-left corner of the page.
- Click the drop-down arrow located to the right of the work Site Actions box.
- Click Site Settings, which is the last item in the list, as shown in Figure 24-8.
- Under the Site Collection Administration section, locate and click Site Collection Policies as shown in Figure 24-9.
- Click the button labeled Create on the Policies page.
- In the text box labeled Name, which is located on the right side of the page, enter 30 Day Deletion.
- In the text box labeled Administrative Description enter This policy will delete content 30 days after the creation date.
- In the text box labeled Policy Statement enter This policy will delete content 30 days after you create it.
- Check the box labeled Enable Retention. Once done, Add a Retention Stage will appear as shown in Figure 24-10.

- Click Add a Retention Stage and the Stage Properties dialog box will appear.
- In the drop-down list labeled Time Period select Create Date and enter 30 in the next text box. Finally, select Days from the drop-down list that currently contains Years.
- In the Action section select Move to Recycle Bin in the drop-down list labeled “When this stage is triggered, perform the following action.”
- Click OK to close the Stage properties dialog box.
- Click OK to close the Edit Policy Page.
- On the left side of the Policies page click the item labeled All Site Content, as shown in Figure 24-11.
- Click the document library named Documents.
- On the top ribbon under the Library Tools tab select Library.
- Click the item labeled Library Settings, as shown in Figure 24-12.

- Under the Permissions and Management section click Information Management Policy Settings.
- In the list on the Policy Setting page click Document.
- On this page, select the radio button labeled Use a Site Collection Policy, which is located in the right section of the page, as shown in Figure 24-13, and select the 30 Day Deletion policy you just created.
- Click OK.
 Please select Lesson 24 on the DVD to view the video that accompanies this lesson.