
7
Creating and Configuring Visio Services Applications
Visio Services is a new service application in SharePoint 2010 designed for sharing Visio Web Drawings. Similar to other service applications in SharePoint 2010, Visio Services allows distribution and viewing of Visio Web Drawings in the browser, eliminating the need to have Microsoft Visio installed on the client machine. This means that one developer can create Visio documents and share them across the company. Visio Services also allows for interactivity to be included in drawings. By using the Visio Access Web Part, an end user will have the ability to navigate from one Visio drawing to the next through built-in links. Data refreshes are also handled by the Visio Services application, allowing for visual updates to be pushed down each time the Visio drawing is opened.
It is worth noting that only Visio Web Drawings are rendered in the browser by Visio Services. These are files that have the extension .vdw and can be uploaded to a document library or sent to the SharePoint site directly from Visio Professional Premium. Visio documents with the extension .vsd, which are standard drawings, are not supported to be shown in the browser by Visio Services. Web Drawings cannot be created using the Standard version of Microsoft Visio, only Premium and Professional.
CREATING A VISIO SERVICES APPLICATION
Before you are able to use all the features of Visio Services in your SharePoint site, you must create a Visio Services application. In SharePoint 2010 application management is handled through the SharePoint Central Administration site. This is the location where you will need to go to create your new Visio Services application. To open the Central Administration site, click the Start menu and navigate to the Microsoft SharePoint 2010 Products folder under the Programs section. Next, click SharePoint 2010 Central Administration and enter your credentials or an administrator's credentials when prompted. From the homepage, open the Application Management section and click the link for Manage Service Applications under the Service Applications heading.
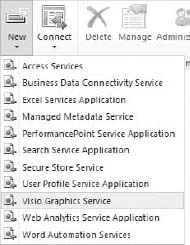
This page contains a list of all the service applications currently configured. Click New on the ribbon at the top of the page and select Visio Graphics Service. The New Visio Graphics Service Application wizard opens as shown in Figure 7-1.

Fill out the form, provide a name, and create a new application pool for this service application.
ENABLING VISIO SERVICES
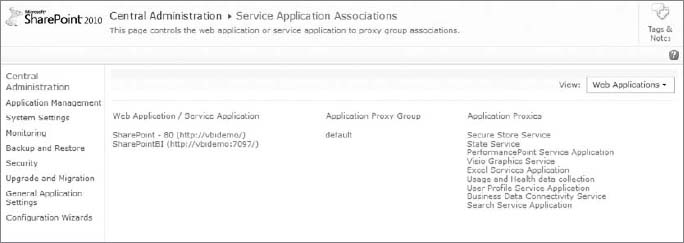
Once the Visio Service application has been created, it needs to be added to your site's Application Proxies. To do this, open the Application Management page in the Central Administration site. Click Configure Service Application Associations in the Service Application section. Find your web application in the list and check to be sure the Visio Services application is listed in the Application Proxies list as shown in Figure 7-2. If it is not listed, click the link in the Application Proxy Group column and place a check in the box next to the Visio Services application.
CONFIGURING VISIO SERVICES SECURITY AND AUTHENTICATION
Two situations need to be addressed when dealing with Visio Services security. The first is a drawing that has no external data, and the second is a drawing that does contain external data. All Visio drawings need to be stored inside a SharePoint library in order for Visio Services to render the drawing in the browser. That said, if there is no external data, meaning no data connections are present in the file, all security is handled by the SharePoint library.
In the event that the drawing has external data, be it from a SharePoint list, an Excel workbook, or from a database, other security methods are used. If the data is stored in a SharePoint list, the drawing and list must be in the same farm and the user's credentials will be used and therefore must have access to the list. The same situation holds true for Excel workbooks. They must be in the same farm and the user needs access to both. In each of these situations all security is handled by SharePoint.
In the event that a drawing uses a connection to a database, a number of different connection methods may be used, including Windows authentication, Secure Store Service, and the unattended service account. With the Windows authentication method the current user's credentials will be used for the connection. For both the other methods an .odc (Office Data Connectivity file created in Excel) file will need to be generated and stored on the SharePoint server. This will determine if the secure store or unattended service account will be used. With the secure store option a user will be mapped to another account for the connection. These can be assigned based on a single user or a group level. In similar fashion, the unattended service account will map your credentials to another account and use that for authentication. The difference is that everyone is mapped to the same account when using the unattended service account.
To configure the unattended service account, open SharePoint Central Administration and navigate to the Manage Service Applications page under Application Management. If a Secure Store Service application does not exist, click New and create one. Before creating an account, you must generate a new key as shown in the error message in Figure 7-3.

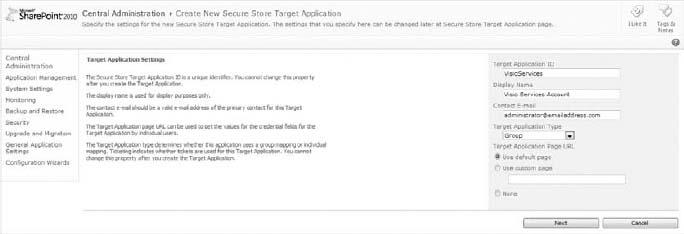
Be sure to make note of the passphrase because it will not be stored anywhere automatically for you to reference later. Next, click New on the ribbon and enter an Application ID, Display Name, and Contact Email, and switch the drop-down from Individual to Group. Click Next and be sure that the resulting page shows Windows User Name and Windows Password as the fields. Click Next and enter the application administrators and the application members. Administrators have the option to add and remove members at a later date. Click OK. The next step is to assign the account to be used. Place a check in the box next to the Application ID desired, choose Set Credentials from the ribbon, enter the user name and password for the Windows account to be used, and click OK. Finally, back in the Global Settings for the Visio Services application enter the Application ID in the box at the bottom of the screen.
REPORTING AND CACHING OPTIONS
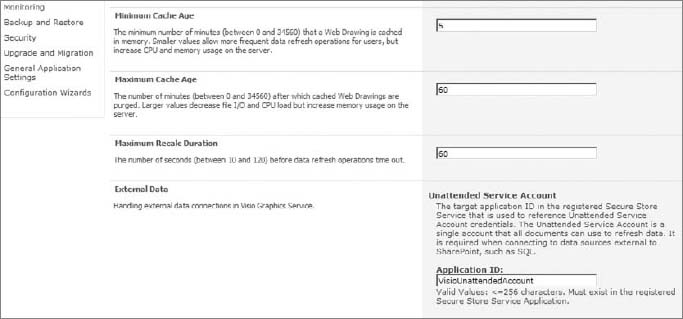
Several caching options are available to your Visio Services application. These can have a large effect on performance and should be monitored in the initial site setup so that a happy medium can be found among them. All caching options are found under the Global Settings section of the application, which you can access through Central Administration ![]() Application Management
Application Management ![]() Manage Service Applications. See the location of the Manage Service Applications link in Figure 7-4.
Manage Service Applications. See the location of the Manage Service Applications link in Figure 7-4.

The setting for Maximum Web Drawing Size will limit how large of a drawing can be rendered in the browser by Visio Services. Though allowing for larger drawings will allow more files to be opened, this could have a detrimental effect on server performance. Drawings that are opened will stay in the cache up to the amount of time entered in the setting for Maximum Cache Age. This value is in minutes and has a maximum of 34,560 minutes or 24 days.
OTHER CONSIDERATIONS
Many factors will affect the performance of your Visio Services application. These are further affected by the setting chosen in the Global Settings section of the service application but also include things such as the amount of memory on the server where the service is running. Always be sure to plan for the maximum server impact. This means that you want to plan for the time when the most users will be rendering the largest Visio drawings. This becomes more important when your SharePoint farm has more than one application server. If everyone is preparing for a 10 AM status meeting on Monday morning, a lot of users may be hitting Visio applications, PerformancePoint applications, and Excel applications all at the same time. It would be wise to spread these service applications out so they are not all running on the same server to boost overall system performance. Therefore, each server is processing one item at a time instead of three. You have many other factors to keep in mind as well, which include but are not limited to:
- Number of drawings
- Size of each drawing
- Whether your drawings are pulling from external data sources
- If external data sources are used, performance will be tied to those sources as well.
Now that you know how to configure a Visio Services application, go to the Try It section and test out your new knowledge.
TRY IT
In this Try It you learn how to create a new Visio Services application and associate it with your SharePoint site.
Lesson Requirements
For this lesson you need access to the Central Administration site to create a new Visio Services application. You also need to have an account to map to for the unattended service account.
Hints
- You need to create an account in the Secure Store Service application for the unattended service account.
- You need credentials for mapping the unattended service account.
- The Visio Services application will be created in Central Administration.
Step-by-Step
- Open SharePoint 2010 Central Administration from the Start menu.
- Authenticate your session when prompted with the credentials of an Administrator.
- Click the Application Management link on the left menu.
- Click Manage Service Applications in the Service Applications section.
- Click New on the ribbon at the top of the screen and select Visio Graphics Service as shown in Figure 7-5.
- When the New Visio Graphics Service Application Wizard opens, enter Visio Services as the name for your application.
- Keep the button next to Create New Application Pool selected and enter a name for the pool.
- Select a security account for the application pool from either the predefined list or a custom account from the Configurable list.
- Click OK to create the application.
- You will be brought back to the Manage Service Applications screen. Click Secure Service Store on the list of applications.
- If this is the first time you have set up an account in the Secure Service Store, you will need to generate a new key. Follow the onscreen instructions to create a new key. Be sure to store the passphrase in a secure location because it will not be stored automatically and it may need to be referenced from time to time.
- Click New from the ribbon to create a new account.
- Enter VisioUnattendedAccount or another unique value in the Target Application ID. Make note of this value because you will need it soon.
- Enter Visio Services in the Display Name box. This will show in the list of the Secure Store applications.
- Enter the Visio Services' primary contact e-mail address in the Contact E-mail box.
- Change the drop-down for Target Application Type to Group.
- When your screen looks like Figure 7-6, click Next.
- When the next screen loads, be sure it has the fields listed as Windows User Name and Windows Password. Click Next.
- Add a list of application administrators in the Target Application Administrators box.
- In the Members box add all users and user groups that should be mapped to the unattended credentials and click OK.
- Check the box next to the newly created entry and click the Set icon above Credentials on the ribbon, as shown in Figure 7-7.

- Enter the user name and password of the account you want to map to and click OK.
- Return to the Manage Service Applications page (available by clicking Application Management on the left pane).
- Select the Visio Services application from the list and click Global Settings.
- Scroll down to the Unattended Service Account option and enter VisioUnattendedAccount in the Application ID box.
- Your settings screen should now look like Figure 7-8. When it does, click OK.
- Go back to the Application Management section one last time and select Configure Service Application Associations.
- If the Visio Services application is not listed in the far-right column, click the link in the Application Proxy Group column.
- Check the box next to the Visio Services application and click OK.
You are now ready to upload a few .vdw drawings for Visio Services to render and for your users to see.
 Please select Lesson 7 on the DVD to view the video that accompanies this lesson.