
6
Creating and Configuring PerformancePoint Services Applications
Using PerformancePoint in your SharePoint site requires installing the PerformancePoint Service application, as well as its dependencies, which in this case is the Secure Store Service. The Secure Store Service is a service used to store credentials for connecting to data sources using PerformancePoint.
In this lesson you learn how to install and configure the PerformancePoint and Secure Store service applications in order to enable PerformancePoint functionality on your SharePoint site.
ENABLING PERFORMANCEPOINT SERVICES
You have a series of steps to take in configuring PerformancePoint Services for use in a SharePoint 2010 environment.
Note that running the Farm Configuration Wizard will do many of the initial configuration steps.
The first step in installing PerformancePoint Services is to ensure that the Enterprise Features are installed. To do this, go to Upgrade and Migration in the Central Administration site, and click Enable Enterprise Features. This is necessary only once for any Enterprise Features. Once you have done this, enable these features on any existing sites by clicking Enable Features on Existing Sites. This will enable the Enterprise Features across all existing sites — you can do this manually if you want to enable the features only on some sites.
The next steps will be done for you if you run the configuration wizard, but are covered here for completeness. Return to the Central Administration site, and under System Settings, select Manage Services on server. Ensure that both PerformancePoint Services and Secure Store Service are running.
Next up, you need to check that the service application is associated with your web application.
Under Application Management is a link to Configure Service Application Associations, where the web applications are linked to specific services as shown in Figure 6-1.

If the PerformancePoint service application is not associated with your web application, you will add it here by clicking the link under Application Proxy Group and selecting it from the list.
As the final installation step, you will need to create a Service Application for the PerformancePoint Services. Under the Application Management heading, select Manage Service Applications. Click New and select PerformancePoint Service. Set the Service Application Name to PerformancePoint Service.
You will also need to set the application pool — create a new application pool for each service application even if they share service accounts.
CONFIGURING PERFORMANCEPOINT SERVICES SECURITY AND AUTHENTICATION
In a web server environment, you experience what is known as a “double hop” when connecting to a database, as shown in Figure 6-2.

In the double hop problem, when connecting to a web server that connects to a database, the initial connection to the web server is made under your own credentials, and then the connection to the database is made using the credentials that the web service runs under — in the case of PerformancePoint, this is the service account for PerformancePoint.
This is not always the desired outcome, because giving a service account access to a database is not a good security practice.
You have two possible solutions: Kerberos and the Secure Store Service, each with its own advantages and disadvantages
Kerberos, Per-User, Unattended Service Account
Kerberos, a solution developed at MIT, is one of the solutions often used for this. When Kerberos is set up (a task that is outside the scope of this book), a Kerberos token is given to the web server by the Kerberos server, allowing it to delegate (pass on) the user account used to authenticate as shown in Figure 6-3. Without this token, the web server cannot use the user account.
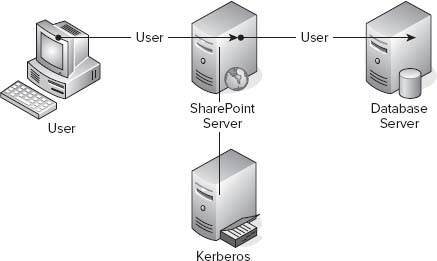
The advantage to Kerberos is that the authentication is “Per-User,” that is, the authentication that is used is the account the user uses. The disadvantage is that the setup is complex, requires Active Directory changes, and needs to be set up for each server involved.
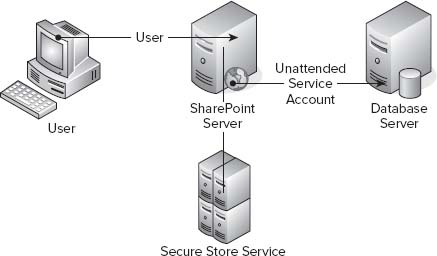
The Secure Store Service, shown in Figure 6-4, is SharePoint's answer to the authentication challenge. A secure store is used to store user credentials that applications will use to connect to data sources. PerformancePoint Services, however, makes an idiosyncratic use of the Secure Store Service, and will always use the credentials assigned to a specific Secure Store Service application, rather than allowing one to specify which service to use.
As you did for PerformancePoint, you need to check that the Secure Store Service application is associated with your web application.
Under Application Management is a link to Configure Service Application Associations, where the web applications are linked to specific services.
You will need to create a Service Application for the Secure Store Service. Under the Application Management heading, select Manage Service Applications. Click New, then select Secure Store Service. Set the Service Application Name to Secure Store Services.
Set the application pool — create a new application pool for each service application even if they share service accounts.
Finally, choose a database to use, and click OK.
Now that the Secure Store Service is set up, you need to create a Secure Store Service Application. As opposed to “the” secure store service application, this application is the credential store for other applications.
The steps to be taken are:
- Create a key for encryption.
- Create a new Secure Store Application.
- Assign credentials to the new application.
From Central Administration, choose the Manage Service Applications option under Application Management and click the Secure Store Service.
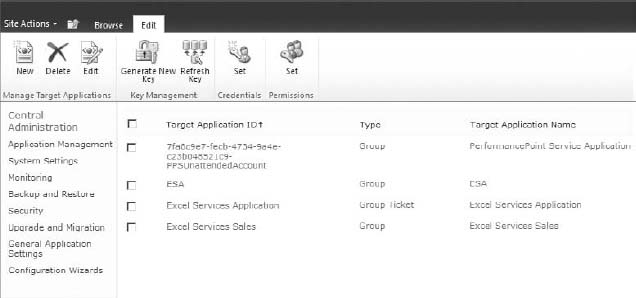
Figure 6-5 shows the applications that have been set up to use the Secure Store Service — remember that PerformancePoint will always use the first application.
If no applications are listed, you will need to start by generating a new key. This is the key that will be used to encrypt the credentials stored in the Secure Store Service, so ensure that you save the passphrase in a secure location.
Now that you have created a key to encrypt the user names, you will create the secure store application that PerformancePoint will use to authenticate when connecting to data sources.
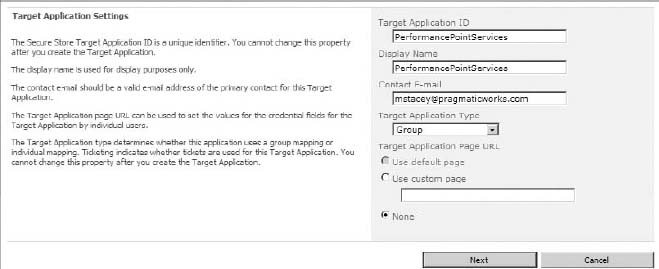
Click New, and then enter the settings for the application. The Target Application ID should be descriptive, and normally using the same name for the ID and the Display name is suggested.
The contact e-mail needs to be a mail address of someone responsible for administering SharePoint.
The Target Application Type is an important step — always choose Group. The other options are intended for purposes in applications unlike the usage PerformancePoint makes of this service.
The next page, Add Field, is also intended for custom applications making use of the Secure Store Service, and thus you should leave the two fields (Windows User Name and Windows Password) as they are, then click Next.
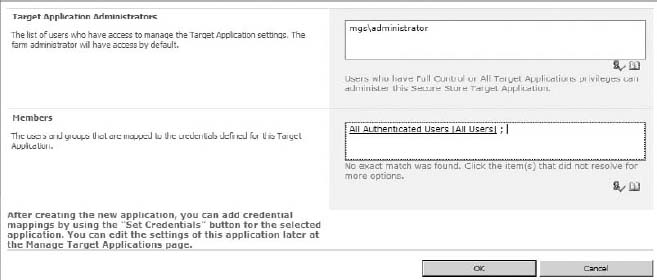
In this step, Specify The Membership Settings, you will be setting up the administrators for this application — set yourself and any user who will be changing the user account in the Target Application Administrators field.
The other item set up here is the group or groups of users that will use the application, in the Members field. Make sure to include any users that will be using PerformancePoint in any manner. If this will potentially be your entire user base (for example, if you intend to have dashboards on your intranet) you can use the All Authenticated Users windows group.
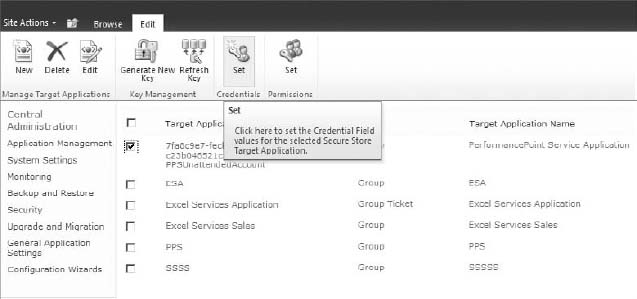
The final step in setting up your Secure Store Service application is assigning the credentials it will use when connecting to a data store. To do so, click the checkbox next to your application, and then click the Set Credentials button in the ribbon. These will be the credentials PerformancePoint uses to connect to data sources.
REPORTING AND CACHING OPTIONS
In the Central Administration homepage, go to the Manage Service Applications link under Application Management. Click PerformancePoint Service Application. Of the three settings links, you can safely ignore Trusted Data Source Locations and Trusted Content Locations, because they default to All SharePoint locations.
You can also ignore the Import PerformancePoint Server 2007 Content option.
Click PerformancePoint Service Application Settings.
The settings that you are interested in here are the Unattended Service account and the Cache setting.
First, the unattended service account: Click Edit User and you will be asked to enter a user name and password — this will set the user used by PerformancePoint Services to access data sources.
PerformancePoint does caching at a data source level, and the only caching option available at this level is the KPI Icon Cache option. The default here is 10 seconds, and, unless you have long running dashboards (that is, they take longer than 10 seconds to load), you will most likely not need to change this.
TRY IT
In this Try It you install and configure the Secure Store Service and PerformancePoint Services features in SharePoint.
Lesson Requirements
In this lesson, you will enable Enterprise Features in order to use PerformancePoint, and install the PerformancePoint and Secure Store services.
You will then configure the Secure Store Service to support PerformancePoint, and configure PerformancePoint to use an unattended service account.
You will not create a new site or site collection.
Hints
- Run the Farm Configuration Wizard, and then review the settings.
Step-by-Step
- Open the Central Administration site by clicking Windows
 All Programs Microsoft SharePoint 2010 Products SharePoint 2010 Central Administration.
 - Click Upgrade and Migration in the left-hand menu.
- Click Convert Farm License Type.
- If the Current License does not say SharePoint Server with Enterprise Client Access License, enter your product key and click OK.
- Click Upgrade and Migration in the left-hand menu.
- Click Enable Enterprise Features.
- If Use these Features is not grayed out, click the Enterprise (Requires Enterprise client license) radio button and click OK.
- Click Configuration Wizards in the left menu.
- Click Launch the Farm Configuration Wizard.
- Click the Start the Wizard button.
- If no existing managed account is available, click Create New Managed Account and enter the managed account and password.
- Ensure that the check boxes for Secure Store Service and PerformancePoint Service Application are checked — a service that is already installed will be checked and grayed out. A Processing window will be shown — this may take some time.
- A window to create a new top-level website will be shown — click Skip.
- The final window will document what is installed on the farm — click Finish to complete the wizard.
- Click Application Management in the menu on the left.
- Click Manage Services on the Server.
- Click Start next to the Secure Store Service if it is stopped.
- Click Start next to the PerformancePoint Service if it is stopped.
- Click Application Management in the menu on the left.
- Click Manage Services Applications as shown in Figure 6-6.

- Click Secure Store Service.
- If the list of applications is empty, click Generate New Key.
- Enter a passphrase, and store it in a safe location.
- Click New to create a new Secure Store Service Application.
- Set the Target Application ID and Display Name, add a Contact E-mail, and set Target Application Type to Group as shown in Figure 6-7. Click Next.
- On the Add Field page, click Next.
- Set the Target Application Administrators field to the user you are logged in with, and set the Members field to All Authenticated Users [All Users] as shown in Figure 6-8.
- Check the check box next to the newly created application, and click Set Credentials in the ribbon as shown in Figure 6-9.
- Select the user to use for accessing data sources when using this Secure Store Service application.
- Click Application Management on the left-hand menu.
- Click Manage Service Applications.
- Click PerformancePoint Service Application.
- Click PerformancePoint Service Application Settings.
- Click Edit User. Set the user name and password to the password used for accessing data sources as shown in Figure 6-10.

 Please select Lesson 6 on the DVD to view the video that accompanies this lesson.