7. Using Time-Saving Features
A memorized transaction is a transaction, such as a check you have written or a form that you have filled in, to which you assign a name. After you name the transaction, you can recall and repeat the transaction without typing all the same information each time, and that makes your work more efficient. When you take the time to create a form that you plan to use again, remember to use the memorization feature to save it. A great side benefit of this feature is that the forms can then be made accessible to other QuickBooks users at your company to simplify their work as well.
If several transactions go together and are used repeatedly, such as a group of bill payments that you make each month or a group of monthly invoices you send to rental tenants, you can memorize all the transactions as a group, and then execute them all together.
Do you want to take this simplification technique one step further? Set up your memorized transactions as recurring transactions and QuickBooks will do the work for you. With recurring transactions, you can have a reminder sent to yourself, letting you know it’s time to execute a transaction, or you can have QuickBooks create the whole transaction set for you automatically. How easy is that? QuickBooks can create invoices, repetitive bills, and purchase orders, or it can enter journal entries for recurring expenses such as depreciation.
Memorizing Transactions
In QuickBooks, you can memorize any transaction you want. You can memorize transactions that you re-use frequently or memorize a transaction that you might not use often but that is time-consuming or complicated to create. This task uses an example of a purchase order for several items you frequently order. Consider creating a purchase order for all the items you order from a single vendor. Then, when it’s time to place an order, you just open the memorized transaction and fill in the quantities.
![]() Select Vendors, Create Purchase Orders.
Select Vendors, Create Purchase Orders.
Timesaver
Click the Purchase Orders icon in the Vendors section of the Home page to open the Create Purchase Order window.
![]() Choose or type a name in the Vendor field.
Choose or type a name in the Vendor field.

![]() Enter the items you normally purchase from this vendor, leaving the quantities blank.
Enter the items you normally purchase from this vendor, leaving the quantities blank.
![]() Press Ctrl+M to begin the memorization process, or you can choose Memorize from the Edit menu.
Press Ctrl+M to begin the memorization process, or you can choose Memorize from the Edit menu.
![]() Type a unique name for this transaction.
Type a unique name for this transaction.
![]() Select Don’t Remind Me.
Select Don’t Remind Me.

![]() Click OK to memorize the transaction.
Click OK to memorize the transaction.
![]() Continue using the Purchase Order form if you like. Or, press Esc and select No to close the form without creating an actual purchase order.
Continue using the Purchase Order form if you like. Or, press Esc and select No to close the form without creating an actual purchase order.
Memorizing a Group of Transactions
If you frequently perform the same transactions together, memorize them as a group and execute the whole group at once! For example, you might have several fixed monthly expenses that are due at the same time, such as rent, security service, insurance, loan payment, and so on. You can save all these expenses as a group called “Monthly Expenses,” and then with one easy click, all the transactions will be executed at once.
Memorize a Group
![]() Create each of the memorized transactions that you plan to execute as a group, as shown in “Memorizing Transactions” previously in this chapter.
Create each of the memorized transactions that you plan to execute as a group, as shown in “Memorizing Transactions” previously in this chapter.
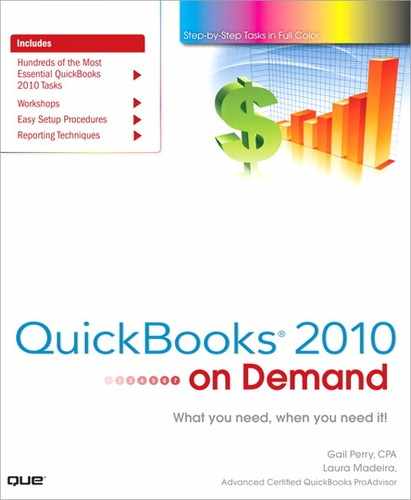
![]() Press Ctrl+T to open the Memorized Transaction List, or choose Memorized Transaction List from the Lists menu.
Press Ctrl+T to open the Memorized Transaction List, or choose Memorized Transaction List from the Lists menu.
![]() Click the Memorized Transaction button, and then select New Group.
Click the Memorized Transaction button, and then select New Group.

![]() Enter a unique name for your memorized group.
Enter a unique name for your memorized group.

![]() Select Remind Me if you want QuickBooks to issue a reminder when the group is due.
Select Remind Me if you want QuickBooks to issue a reminder when the group is due.
![]() If you ask for a reminder, choose a frequency in the How Often field.
If you ask for a reminder, choose a frequency in the How Often field.
![]() If you ask for a reminder, choose a date in the Next Date field for the next reminder to be issued.
If you ask for a reminder, choose a date in the Next Date field for the next reminder to be issued.
![]() Click OK to establish your new group.
Click OK to establish your new group.
Add a Transaction to the Group
![]() With the Memorized Transaction List window still open, click once on the memorized transaction that you want to add to the group.
With the Memorized Transaction List window still open, click once on the memorized transaction that you want to add to the group.

![]() Click the Memorized Transaction button at the bottom of the list and select Edit Memorized Transaction.
Click the Memorized Transaction button at the bottom of the list and select Edit Memorized Transaction.
Timesaver
From the Memorized Transaction List, you can quickly open the selected transaction for editing by pressing Ctrl+E.
![]() Click the With Transactions in Group option.
Click the With Transactions in Group option.

![]() In the Group Name field, select the name of the group to which this transaction is to be added.
In the Group Name field, select the name of the group to which this transaction is to be added.
![]() Click OK to save the group assignment you have made for this transaction. You now have a group of recurring transactions.
Click OK to save the group assignment you have made for this transaction. You now have a group of recurring transactions.
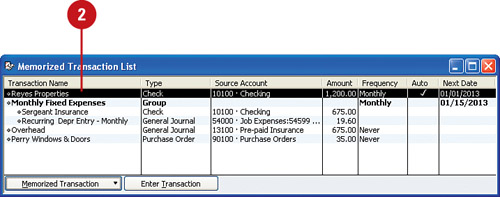
![]() You now have a new Monthly Fixed Expenses Group. When it is time to enter these transactions, double-click on the bold group name (see next task).
You now have a new Monthly Fixed Expenses Group. When it is time to enter these transactions, double-click on the bold group name (see next task).
![]() Repeat Steps 1–5 for each transaction you want to include in the group.
Repeat Steps 1–5 for each transaction you want to include in the group.
Using Memorized Transactions
Okay, you’ve memorized some transactions—now what? You can take advantage of your memorized transactions by remembering to use them when you want to save time. Any time you want to use a memorized transaction, just open the list of memorized transactions, select the transaction, and use it as you do any other QuickBooks form.
![]() Press Ctrl+T to open the Memorized Transaction List window.
Press Ctrl+T to open the Memorized Transaction List window.
![]() Double-click a memorized transaction that you want to use. The original form will appear.
Double-click a memorized transaction that you want to use. The original form will appear.

![]() Now use the form as you use any QuickBooks form, making any necessary adjustments. In this example, I’ve entered the quantities of items I want to order.
Now use the form as you use any QuickBooks form, making any necessary adjustments. In this example, I’ve entered the quantities of items I want to order.
![]() Select a save option to finalize the transaction.
Select a save option to finalize the transaction.

Scheduling Recurring Transactions
The next level of convenience after having QuickBooks memorize a transaction for you is to have QuickBooks take care of executing the transaction, too. After you get the hang of this procedure, you can let QuickBooks do all your work! Seriously, it’s nice not to have to worry about paying the rent on time—ask for a friendly reminder or just let your program do your chores automatically. This example sets up your monthly rent or mortgage payment as a recurring transaction.
![]() Open the transaction window. For this example, press Ctrl+W to open the Write Checks window.
Open the transaction window. For this example, press Ctrl+W to open the Write Checks window.
![]() Enter the name of the vendor or payee—in this case, your landlord or mortgage company.
Enter the name of the vendor or payee—in this case, your landlord or mortgage company.

![]() Enter the amount of the payment.
Enter the amount of the payment.
![]() Enter the account to which the payment will be charged.
Enter the account to which the payment will be charged.
![]() Indicate whether this check is to be printed or if the payment is to be made online.
Indicate whether this check is to be printed or if the payment is to be made online.
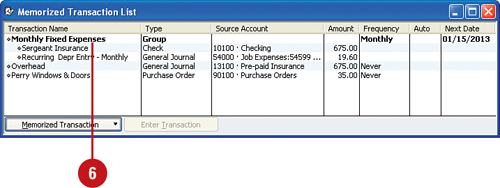
![]() Press Ctrl+M to memorize the transaction.
Press Ctrl+M to memorize the transaction.
![]() Select Automatically Enter to have QuickBooks create the transactions for you.
Select Automatically Enter to have QuickBooks create the transactions for you.
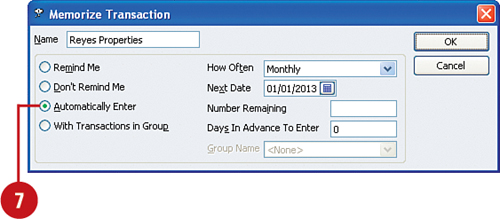
![]() Choose a frequency in the How Often field to indicate how often you want this transaction to occur.
Choose a frequency in the How Often field to indicate how often you want this transaction to occur.
![]() Choose a date in the Next Date field for when this transaction will occur again.
Choose a date in the Next Date field for when this transaction will occur again.
![]() If there is a fixed number of occurrences for this transaction—for example, 24 loan payments remaining—enter that in the Number Remaining field. Otherwise, leave this field blank.
If there is a fixed number of occurrences for this transaction—for example, 24 loan payments remaining—enter that in the Number Remaining field. Otherwise, leave this field blank.
![]() In the Days in Advance To Enter, choose when you want this transaction to be executed.
In the Days in Advance To Enter, choose when you want this transaction to be executed.
![]() Click OK.
Click OK.
Add a Memorized Transaction to Your Icon Bar
If you use the QuickBooks Icon Bar (displayed by selecting Icon Bar from the View menu), you might want to take advantage of this shortcut. When you want to use one of your memorized transactions, you’ll save yourself the step of opening the Memorized Transaction List and searching for your transaction. Instead, all you have to do is click a button, and the memorized transaction appears. Any form or check can appear as a button on your Icon Bar when you follow these simple steps:
1. Open the form or check you want to add to the Icon Bar.
2. Select Add [“active window”] to Icon Bar from the View menu. (Note: The Icon Bar must be displayed to execute this step. If the Icon Bar is not displayed, choose View, Icon Bar, and then you can complete this step.)
3. In the Add Window to Icon Bar dialog box that appears, scroll through the list at the left to select an icon for this transaction. Click the icon you want to use.

4. Enter a label for the transaction. This is the text that appears beneath the button on the Icon Bar.
5. Enter a description for the transaction. This is the text that appears briefly when you pass your mouse over the button on the Icon Bar.
6. Click OK. The icon for your transaction becomes a permanent part of your Icon Bar.
Important
This process can be used for saving frequently used reports, including memorized reports, on your Icon Bar as well. See Chapter 18, “Working with Reports in QuickBooks,” for more information about creating, customizing, and memorizing reports.
Changing Memorized and Scheduled Transactions
Isn’t it funny how some things never seem to stay the same? Rents increase, payment due dates change, companies you did business with close or are bought by other companies, and customers move on. Your memorized and scheduled transactions don’t have to be trashed when the facts change. Just tweak the transaction to keep up with the times.
Change a Memorized Transaction
![]() Press Ctrl+T to view the Memorized Transaction List.
Press Ctrl+T to view the Memorized Transaction List.
![]() Double-click a transaction to open the actual form.
Double-click a transaction to open the actual form.

![]() Make any necessary changes to the form.
Make any necessary changes to the form.
![]() Press Ctrl+M to rememorize the revised form.
Press Ctrl+M to rememorize the revised form.
![]() Click Replace.
Click Replace.

Change a Recurring Transaction
![]() Press Ctrl+T to view the Memorized Transaction List. Remember, all your recurring transactions are also memorized transactions.
Press Ctrl+T to view the Memorized Transaction List. Remember, all your recurring transactions are also memorized transactions.
![]() Click once to select the transaction you want to change.
Click once to select the transaction you want to change.
![]() Press Ctrl+E to edit the recurrence information for this transaction.
Press Ctrl+E to edit the recurrence information for this transaction.
![]() Select a different reminder option, if necessary.
Select a different reminder option, if necessary.

![]() Change the frequency of the recurrence, if necessary.
Change the frequency of the recurrence, if necessary.
![]() Change the next scheduled date for this transaction, if necessary.
Change the next scheduled date for this transaction, if necessary.
![]() Change the number of transactions remaining, if necessary.
Change the number of transactions remaining, if necessary.
![]() Change the number of days in advance of the due date that this transaction should be entered.
Change the number of days in advance of the due date that this transaction should be entered.
![]() Click OK.
Click OK.
Removing Memorized Transactions
The time might come when you no longer need a transaction you memorized. Maybe you’ve finished paying the monthly car payments, or maybe you’ve purchased a building or moved out and are through paying rent. When that time comes, remove the transactions you no longer need from your Memorized Transaction List and also remove the reminders for those transactions so that you no longer see the transactions on your reminders list.
![]() Press Ctrl+T to open the Memorized Transaction List window.
Press Ctrl+T to open the Memorized Transaction List window.
![]() Click once on the transaction you want to remove.
Click once on the transaction you want to remove.

![]() Click the Memorized Transaction button at the bottom of the window, and then select Delete Memorized Transaction.
Click the Memorized Transaction button at the bottom of the window, and then select Delete Memorized Transaction.
Timesaver
From the Memorized Transaction List, you can quickly open the selected transaction for editing by pressing Ctrl+E. To quickly delete a memorized transaction, select a transaction (see Step 2) and then press Ctrl+D.
![]() Click OK when asked if you are sure you want to delete the memorized transaction.
Click OK when asked if you are sure you want to delete the memorized transaction.
Setting Reminders Preferences
QuickBooks has a feature called Reminders that helps you keep track of everything that needs to be done. You can be reminded of bills to pay, checks and other forms to print, customers who are late with their payments, money waiting to be deposited, and even your brother’s birthday. Use the Reminders to help organize your tasks. By setting certain preferences, the Reminders feature will behave just the way you want it to.
Set Personal Reminders Preferences
![]() Select Preferences from the Edit menu.
Select Preferences from the Edit menu.
![]() Click the Reminders icon at the left side of the window.
Click the Reminders icon at the left side of the window.
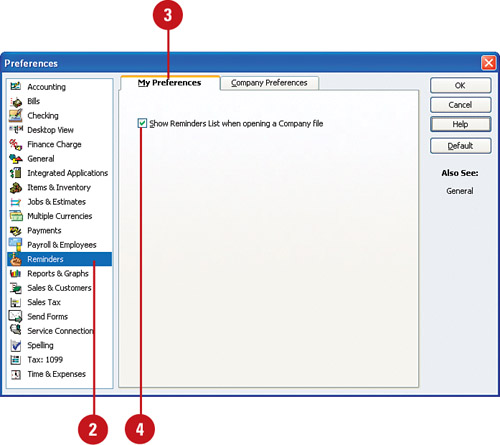
![]() Click the My Preferences tab.
Click the My Preferences tab.
![]() Check the Show Reminders List When Opening a Company File box to have reminders displayed when you open your company file in QuickBooks.
Check the Show Reminders List When Opening a Company File box to have reminders displayed when you open your company file in QuickBooks.
Set Company Reminders Preferences
![]() Click the Company Preferences tab.
Click the Company Preferences tab.

![]() Click in the Show Summary column for each type of information you want to display in your Reminders list. These items will display on a single line with a total amount.
Click in the Show Summary column for each type of information you want to display in your Reminders list. These items will display on a single line with a total amount.
![]() Click in the Show List column for each type of information for which you want the details to display in your Reminders list. These items will display with a summary and a detail of every individual item that makes up the summary.
Click in the Show List column for each type of information for which you want the details to display in your Reminders list. These items will display with a summary and a detail of every individual item that makes up the summary.
![]() Click in the Don’t Remind Me column for each type of information that will be excluded from your Reminders list.
Click in the Don’t Remind Me column for each type of information that will be excluded from your Reminders list.
![]() Indicate how many days in advance of the due date these items will appear in your Reminders list.
Indicate how many days in advance of the due date these items will appear in your Reminders list.
![]() Click OK.
Click OK.
Using Reminders
Paper to-do lists are so passé! Use the QuickBooks Reminders list to keep your desk space clean and your tasks organized. QuickBooks will remind you to notify your customers when their invoice payments are overdue, pay your bills, print your checks and other forms, follow up on unfilled purchase orders, deposit the money you’ve collected, execute memorized transactions, and more.
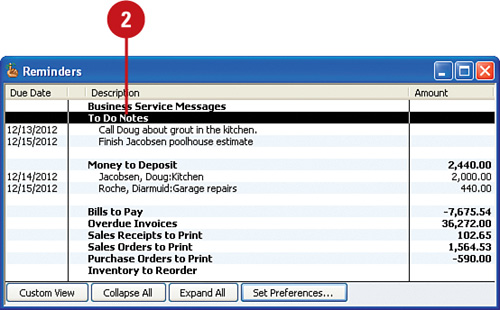
![]() If the Reminders list is not visible on your screen, select Company, Reminders.
If the Reminders list is not visible on your screen, select Company, Reminders.
![]() Double-click any summary entry (shown in bold) to see the detail that makes up that total.
Double-click any summary entry (shown in bold) to see the detail that makes up that total.
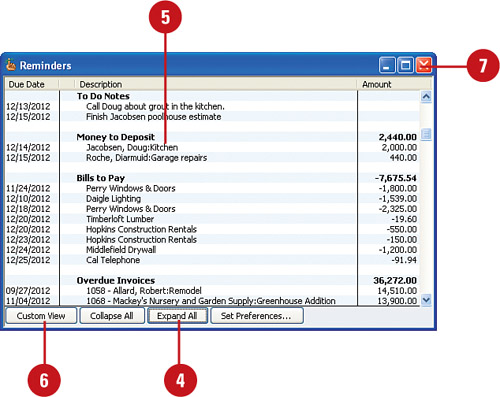
![]() Click Collapse All to show only the summary information for each type of entry.
Click Collapse All to show only the summary information for each type of entry.

![]() Click Expand All to see details of all summary entries.
Click Expand All to see details of all summary entries.
![]() Double-click a detail entry to go to the original form for that entry or to execute a command associated with that entry.
Double-click a detail entry to go to the original form for that entry or to execute a command associated with that entry.
![]() Click Custom View to return to the display you chose in Reminders Preferences.
Click Custom View to return to the display you chose in Reminders Preferences.
![]() Press Esc or click the X to close the window.
Press Esc or click the X to close the window.