3. Adding or Changing Information After the EasyStep Interview Is Completed
In the first chapter, you learned how to set up your company using the EasyStep Interview. Because the interview gathers the basic start-up information necessary to use your QuickBooks program, you can now use QuickBooks on a daily basis in a style that fits your business needs, without having to continually re-enter those pieces of information.
That said, you might find that you need to enter more information into your QuickBooks company file after the interview is completed. Using the information presented in this chapter, you’ll be able to customize your QuickBooks experience so that the program produces exactly the results your company requires, as well as being able to add additional information that you might have skipped over or not thought of during the interview process.
QuickBooks uses lists to keep track of everything, including your chart of accounts, your company’s vendors and customers, employees, jobs on which you’re working, different options for terms of payment, payroll items that are used for paychecks, and more. All the information that’s entered on QuickBooks forms is stored in a list. In this chapter, you’ll learn how to add to lists, change information already existing on lists, change the placement of list entries, sort lists, remove entries from lists, and combine list entries. When you change an item on a list, those changes carry through to the forms you use in QuickBooks and the reports you create.
Setting General Preferences
QuickBook’s general preferences affect the way the program works and provide you with an opportunity to set technical performance options, such as what happens when you press the Enter key, how information displays on your screen, and how the editing features work. After you’ve used QuickBooks for a while, you might want to revisit the general preferences and make changes to those preferences to make your time spent in QuickBooks easier or more efficient.
Set Personal General Preferences
![]() Open the Preferences dialog box by selecting Edit, Preferences.
Open the Preferences dialog box by selecting Edit, Preferences.
![]() Click the General preference on the left side of the Preferences dialog box.
Click the General preference on the left side of the Preferences dialog box.
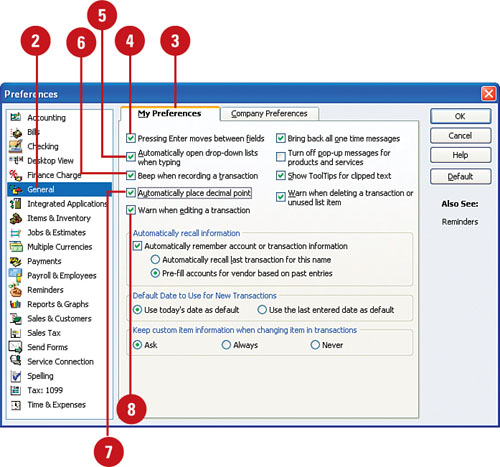
![]() Click the My Preferences tab at the top of the dialog box if that tab is not already selected.
Click the My Preferences tab at the top of the dialog box if that tab is not already selected.
![]() Check the Pressing Enter Moves Between Fields box if you want to use the Enter key to move between fields the way the Tab key works; otherwise, pressing Enter typically completes a transaction.
Check the Pressing Enter Moves Between Fields box if you want to use the Enter key to move between fields the way the Tab key works; otherwise, pressing Enter typically completes a transaction.
![]() Check the Automatically Open Drop-Down Lists When Typing box if you want QuickBooks to always display a list of options for your data fields.
Check the Automatically Open Drop-Down Lists When Typing box if you want QuickBooks to always display a list of options for your data fields.
![]() If Beep When Recording a Transaction is checked, you’ll hear a “beep” sound every time you complete a transaction.
If Beep When Recording a Transaction is checked, you’ll hear a “beep” sound every time you complete a transaction.
![]() If you want to type 1234 and have it appear as 12.34, check the Automatically Place Decimal Point box; otherwise, 1234 will appear as 1,234.00.
If you want to type 1234 and have it appear as 12.34, check the Automatically Place Decimal Point box; otherwise, 1234 will appear as 1,234.00.
![]() Checking the Warn When Editing a Transaction option results in a pop-up box appearing every time you make changes to a previously saved transaction.
Checking the Warn When Editing a Transaction option results in a pop-up box appearing every time you make changes to a previously saved transaction.
![]() Check Bring Back All One Time Messages to restore the pop-up reminder messages that gave you an option to not see the messages again.
Check Bring Back All One Time Messages to restore the pop-up reminder messages that gave you an option to not see the messages again.
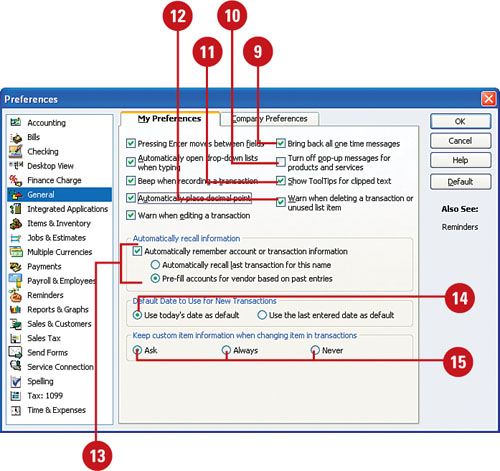
![]() Click here to Turn Off Pop-up Messages for Products and Services (or uncheck if you want to start seeing them again).
Click here to Turn Off Pop-up Messages for Products and Services (or uncheck if you want to start seeing them again).
![]() When you check the ToolTips option and then place your mouse over a field where the text is too long, QuickBooks displays the extended text.
When you check the ToolTips option and then place your mouse over a field where the text is too long, QuickBooks displays the extended text.
![]() The Warn When Deleting option causes a pop-up warning to appear whenever you attempt to delete a transaction or an item that hasn’t been used.
The Warn When Deleting option causes a pop-up warning to appear whenever you attempt to delete a transaction or an item that hasn’t been used.
![]() Check Automatically Remember Account or Transaction Information if you want QuickBooks to read your mind. When using the recall options, as soon as you start typing, QuickBooks finds the customer or vendor that matches your entry and fills in the appropriate information.
Check Automatically Remember Account or Transaction Information if you want QuickBooks to read your mind. When using the recall options, as soon as you start typing, QuickBooks finds the customer or vendor that matches your entry and fills in the appropriate information.
![]() Select Use Today’s Date as Default for new transactions, or you can choose the Use the Last Entered Date as Default box instead.
Select Use Today’s Date as Default for new transactions, or you can choose the Use the Last Entered Date as Default box instead.
![]() Choose how you want QuickBooks to treat customized descriptions that you enter on forms—keep the description you enter on a form even if you change the item selection (Always), remove the description when an item is changed (Never), or Ask with each circumstance.
Choose how you want QuickBooks to treat customized descriptions that you enter on forms—keep the description you enter on a form even if you change the item selection (Always), remove the description when an item is changed (Never), or Ask with each circumstance.
Set Company General Preferences
![]() With General still selected on the left side of the Preferences dialog box, click the Company Preferences tab at the top of the box.
With General still selected on the left side of the Preferences dialog box, click the Company Preferences tab at the top of the box.

![]() Choose whether you prefer to have time shown in Decimal or Minutes format. The Minutes choice is significant if you use QuickBooks for tracking time.
Choose whether you prefer to have time shown in Decimal or Minutes format. The Minutes choice is significant if you use QuickBooks for tracking time.
![]() Check the Always Show Years as 4 Digits (1999) box, or uncheck the box if you want to display two-digit years.
Check the Always Show Years as 4 Digits (1999) box, or uncheck the box if you want to display two-digit years.
![]() If you change the vendor or customer information on a form, QuickBooks prompts you to update the customer or vendor record. You may select the Never Update option to prevent changes to the customer or vendor information.
If you change the vendor or customer information on a form, QuickBooks prompts you to update the customer or vendor record. You may select the Never Update option to prevent changes to the customer or vendor information.
![]() Checking the box to Save Transactions Before Printing will automatically save your forms when you press the print button on the form.
Checking the box to Save Transactions Before Printing will automatically save your forms when you press the print button on the form.
![]() Click OK.
Click OK.
Timesaver
You can quickly update customer or vendor information while filling out a form. With your cursor in the customer or vendor field, press Ctrl+L to open the Customer or Vendor List. Double-click the name of the customer or vendor you want to edit, make your changes, click OK to save the changes, and then press Esc to close the list.
Important
Save your changes. Any changes you make in the QuickBooks preferences dialog box are ignored by the program if you click the “X” or press Esc to close the preferences window. Be sure to click the OK button to save all your changes.
For Your Information
Easy Keyboard Shortcuts for Entering Dates in QuickBooks
You don’t have to use any special keys such as Ctrl or Alt to take advantage of these shortcuts. Just place your cursor in a date field and type the letter or symbol listed here:

Setting Desktop View Preferences
If you use QuickBooks on someone else’s computer, you might see a program that looks different from your own. The reason is that there is a variety of ways in which you can customize the appearance of your QuickBooks program. You might prefer to see a separate QuickBooks window on your screen for each transaction that is in progress, whereas other users might want to fill the screen with a single window or choose a different color scheme. If you use QuickBooks on a network, each user can have separate desktop settings. For that reason, you will see that there are only My Preferences available among the desktop view choices, and no Company Preferences from which to choose.
![]() Select Edit, Preferences and then click the Desktop View option on the left side of the dialog box.
Select Edit, Preferences and then click the Desktop View option on the left side of the dialog box.
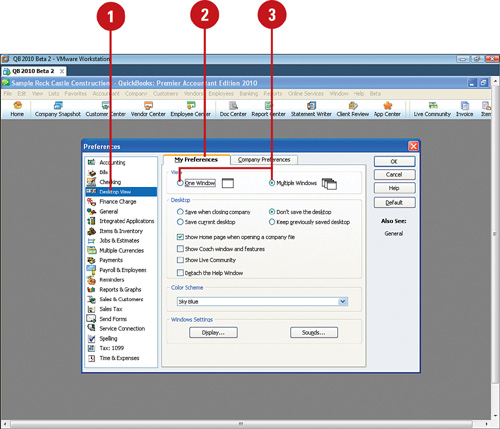
![]() Click the My Preferences tab.
Click the My Preferences tab.
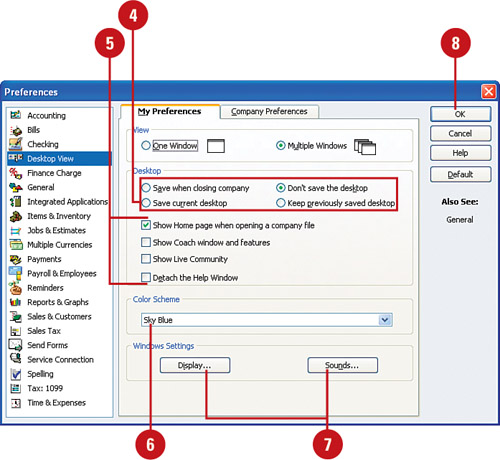
![]() Choose whether you want to see one QuickBooks window at a time or multiple windows. Note that if you select One Window, you can still open multiple windows in QuickBooks; the windows just layer instead of appearing separately.
Choose whether you want to see one QuickBooks window at a time or multiple windows. Note that if you select One Window, you can still open multiple windows in QuickBooks; the windows just layer instead of appearing separately.
![]() Select an option for the display of your desktop. If you choose the Save When Closing Company option, every time you open QuickBooks, the program will reinstate the way your screen looked the last time you closed the program. Select Save Current Desktop to select items you want QuickBooks to restore when you open the program. A new selection, Keep Previously Saved Desktop, will be automatically added. Select Don’t Save the Desktop and your desktop will return to the QuickBooks start-up desktop each time you reopen the program.
Select an option for the display of your desktop. If you choose the Save When Closing Company option, every time you open QuickBooks, the program will reinstate the way your screen looked the last time you closed the program. Select Save Current Desktop to select items you want QuickBooks to restore when you open the program. A new selection, Keep Previously Saved Desktop, will be automatically added. Select Don’t Save the Desktop and your desktop will return to the QuickBooks start-up desktop each time you reopen the program.
Important
Saving a desktop can slow your program’s performance. The more items you have open on your desktop, the more time it will take QuickBooks to open if you choose one of the options to save open items on your desktop.
![]() Check the Show Home Page When Opening a Company File box if you want to display the new Home page each time you open QuickBooks. Selecting the box to Show Coach Window and Features will add these features to the Home page. Selecting the Show Live Community box will place the new help bar on the right of your screen. Optionally, select Detach the Help Window. This is useful if you work with dual monitors and want to move the help window to the other monitor.
Check the Show Home Page When Opening a Company File box if you want to display the new Home page each time you open QuickBooks. Selecting the box to Show Coach Window and Features will add these features to the Home page. Selecting the Show Live Community box will place the new help bar on the right of your screen. Optionally, select Detach the Help Window. This is useful if you work with dual monitors and want to move the help window to the other monitor.
![]() Select from a variety of color schemes for your desktop display.
Select from a variety of color schemes for your desktop display.
![]() The two buttons in the Windows Settings area open Windows program dialog boxes that give you format options that affect Windows on your computer, not just in QuickBooks.
The two buttons in the Windows Settings area open Windows program dialog boxes that give you format options that affect Windows on your computer, not just in QuickBooks.
![]() Click OK.
Click OK.
Setting Accounting Preferences
Accounting preferences are rules for your QuickBooks program that relate to your company’s unique way of using this program. Included in this section are explanations of how to turn on or off the account numbering feature and how to use other important features such as class tracking and automatically assigning numbers to journal entries. The option to require users to enter account numbers on QuickBooks forms is also described here.
![]() Open the Preferences window by selecting Edit, Preferences. Click the Accounting icon on the left side of the window.
Open the Preferences window by selecting Edit, Preferences. Click the Accounting icon on the left side of the window.

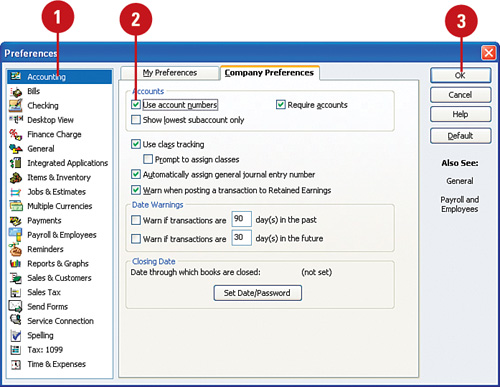
![]() Click the Company Preferences tab at the top of the window.
Click the Company Preferences tab at the top of the window.
![]() Check the Use Account Numbers box to turn on the account numbers feature.
Check the Use Account Numbers box to turn on the account numbers feature.
![]() Check the Show Lowest Subaccount Only box if you use account numbers and you want to shorten the account name that displays on a transaction.
Check the Show Lowest Subaccount Only box if you use account numbers and you want to shorten the account name that displays on a transaction.
![]() Check the Require Accounts box to prevent a user from exiting a form without entering related account information. When this box is left unchecked, transaction information not assigned to accounts gets placed in the Uncategorized Income or Uncategorized Expense accounts.
Check the Require Accounts box to prevent a user from exiting a form without entering related account information. When this box is left unchecked, transaction information not assigned to accounts gets placed in the Uncategorized Income or Uncategorized Expense accounts.
![]() Check the Use Class Tracking box to enable the Class feature in QuickBooks. If you check this feature, you have an option of requesting that the user be prompted to assign classes.
Check the Use Class Tracking box to enable the Class feature in QuickBooks. If you check this feature, you have an option of requesting that the user be prompted to assign classes.

![]() Check the Automatically Assign General Journal Entry Number box if you want QuickBooks to keep track of the last journal entry number you used and automatically increment the number for the next journal entry.
Check the Automatically Assign General Journal Entry Number box if you want QuickBooks to keep track of the last journal entry number you used and automatically increment the number for the next journal entry.
![]() Check the Warn When Posting a Transaction to Retained Earnings box if you want QuickBooks to provide a pop-up warning when changes are about to be made to Retained Earnings.
Check the Warn When Posting a Transaction to Retained Earnings box if you want QuickBooks to provide a pop-up warning when changes are about to be made to Retained Earnings.
![]() Check the Date Warnings options and set a range of days in the past and the future if you want to receive a warning box alerting you to transactions that have dates outside the designated range.
Check the Date Warnings options and set a range of days in the past and the future if you want to receive a warning box alerting you to transactions that have dates outside the designated range.
![]() Click Set Date/Password to set up a closing date and password protection for entries that occurred before your closing date.
Click Set Date/Password to set up a closing date and password protection for entries that occurred before your closing date.
![]() Indicate a date in the Closing Date field after which no entries can be made to your company file unless a password is entered.
Indicate a date in the Closing Date field after which no entries can be made to your company file unless a password is entered.

![]() Enter a password to protect entries that occurred before your closing date.
Enter a password to protect entries that occurred before your closing date.
![]() Re-enter the password.
Re-enter the password.
![]() Click OK.
Click OK.
![]() Click OK to close the Preferences window.
Click OK to close the Preferences window.
Adding Accounts
There are many reasons to add accounts to your existing list of accounts. The standard account list provided by QuickBooks might not be sufficient or your company might have grown to add new types of income and you need accounts to reflect that change. You might have incurred a new expense that doesn’t fit into any of the existing account categories or you might simply want to change the names of the accounts. Whatever the reason, adding or changing account names is a simple process.
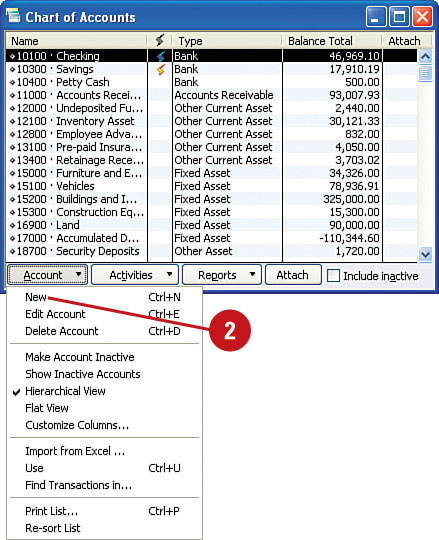
![]() Open the Chart of Accounts window by selecting Chart of Accounts from the Lists menu or Company menu.
Open the Chart of Accounts window by selecting Chart of Accounts from the Lists menu or Company menu.
Timesaver
You can also open the Chart of Accounts window by clicking on the Chart of Accounts icon in the Company section of the Home page, or by pressing Ctrl+A.
![]() Click the Account button at the bottom of the window and select New from the drop-down menu, or press Ctrl+N.
Click the Account button at the bottom of the window and select New from the drop-down menu, or press Ctrl+N.
![]() In the Add New Account: Choose Account Type window, select the type of account. Cost of Goods Sold has been selected in the figure. The information that displays in the next screen is determined by the type of account you choose.
In the Add New Account: Choose Account Type window, select the type of account. Cost of Goods Sold has been selected in the figure. The information that displays in the next screen is determined by the type of account you choose.
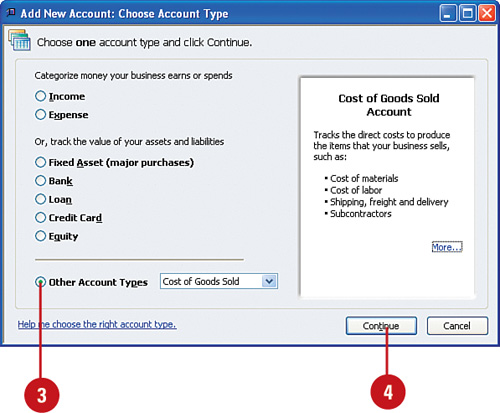
![]() Click Continue.
Click Continue.
![]() Enter a unique name for this account. The name you enter will appear on company financial statements, so be sure the spelling and capitalization is correct.
Enter a unique name for this account. The name you enter will appear on company financial statements, so be sure the spelling and capitalization is correct.
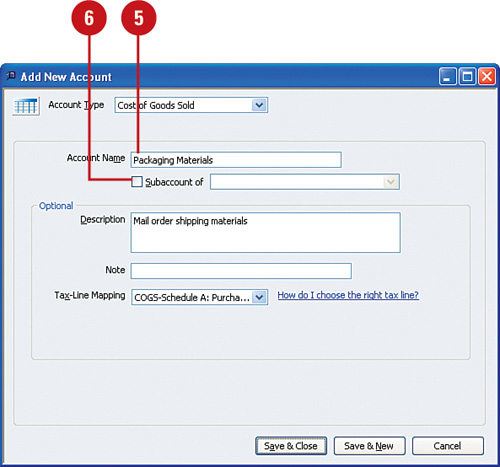
![]() If this account is to appear on financial statements as a subaccount of another account, check the Subaccount Of check box and select the parent account from the drop-down list.
If this account is to appear on financial statements as a subaccount of another account, check the Subaccount Of check box and select the parent account from the drop-down list.
![]() Enter an optional description for this account. The Description field, and, if visible, the Note or Bank account fields are optional fields.
Enter an optional description for this account. The Description field, and, if visible, the Note or Bank account fields are optional fields.

![]() Use the Tax-Line Mapping drop-down list to select a tax line for this account if you plan to use QuickBooks to prepare information for your company’s income tax return. Pick the line on which information from this account is to be summarized on your tax return.
Use the Tax-Line Mapping drop-down list to select a tax line for this account if you plan to use QuickBooks to prepare information for your company’s income tax return. Pick the line on which information from this account is to be summarized on your tax return.
![]() Your new account window might include an Opening Balance field. If there is a balance in the account when you begin using QuickBooks, enter that balance in this field.
Your new account window might include an Opening Balance field. If there is a balance in the account when you begin using QuickBooks, enter that balance in this field.
![]() Click a save option.
Click a save option.
Using Account Numbers
QuickBooks automatically assigns account numbers to your standard list of accounts. (These numbers aren’t displayed initially.) You can accept these numbers or change them. You can see a list of suggested account numbers by going to Help and typing in the search box “account numbering.” Follow the link to view an example of the standard account numbers.
![]() Turn on account numbering by selecting Edit, Preferences, and selecting Accounting in the Preferences window.
Turn on account numbering by selecting Edit, Preferences, and selecting Accounting in the Preferences window.
![]() Click the Company Preferences tab, and then check the Use Account Numbers option to make account numbering available for your company.
Click the Company Preferences tab, and then check the Use Account Numbers option to make account numbering available for your company.
![]() Click OK to save this change.
Click OK to save this change.
![]() View account numbers by pressing Ctrl+A to open the Chart of Accounts window.
View account numbers by pressing Ctrl+A to open the Chart of Accounts window.
![]() Add or change an account number by clicking once on the account name, and then pressing Ctrl+E to edit the account.
Add or change an account number by clicking once on the account name, and then pressing Ctrl+E to edit the account.
Timesaver
You can also click the account name. Click the Account button at the bottom of the Chart of Accounts window, and select Edit Account from the menu.
![]() Enter the account number for this account.
Enter the account number for this account.

![]() Click Save & Close to save the new account number.
Click Save & Close to save the new account number.
Sorting Lists
Sometimes the list you see isn’t the list you need. There are several ways that you can change how your list is sorted. If you’ve sorted a list and decide that the result isn’t what you need, you can easily return your list to the way it was originally sorted. If your list contains subaccounts, you can choose to retain the subaccount indentations when sorting.
![]() Select a list from the Lists menu to display that list on your screen.
Select a list from the Lists menu to display that list on your screen.
![]() Click the heading of one of the columns to sort the list by that column. Notice that an up arrow displays at the top of the column, indicating that the list is sorted by that column alphabetically or numerically (depending on the type of content) in ascending order.
Click the heading of one of the columns to sort the list by that column. Notice that an up arrow displays at the top of the column, indicating that the list is sorted by that column alphabetically or numerically (depending on the type of content) in ascending order.
![]() Click the column arrow once to change the direction of the arrow and change to a descending sort order.
Click the column arrow once to change the direction of the arrow and change to a descending sort order.
![]() Click the heading of any other column to sort by that column.
Click the heading of any other column to sort by that column.
![]() Click the diamond that displays to the left of the first column to return the list to the default sort order.
Click the diamond that displays to the left of the first column to return the list to the default sort order.
Displaying Lists on Forms
When you’re filling out a form, remember that all the information you enter on the form comes from your lists. Customers, vendors, product names, types of service, account names, shipping options, and payment terms all reside on lists. You don’t have to guess how a vendor’s name is spelled or the specific name of a product. You can display the appropriate list, select the item you need, and then close the list and complete your form.
![]() Open a form. For this example, an invoice has been opened.
Open a form. For this example, an invoice has been opened.
![]() Place your cursor in a field (for example, the vendor field, customer field, or item field) on your form.
Place your cursor in a field (for example, the vendor field, customer field, or item field) on your form.
![]() Method #1: Click the drop-down arrow that displays in the field.
Method #1: Click the drop-down arrow that displays in the field.
![]() Click an item on the list. The list closes and the item displays in the appropriate field.
Click an item on the list. The list closes and the item displays in the appropriate field.
![]() Method #2: With your cursor in the field you want to fill, press Alt+down arrow on your keyboard.
Method #2: With your cursor in the field you want to fill, press Alt+down arrow on your keyboard.
![]() Arrow up or down on your keyboard to the item you want.
Arrow up or down on your keyboard to the item you want.
![]() Method #3: Simply begin typing the list name, and QuickBooks will autofill the field with a name that begins with the matching letter.
Method #3: Simply begin typing the list name, and QuickBooks will autofill the field with a name that begins with the matching letter.
![]() Press Enter to select the item. The list closes and the item displays in the appropriate field.
Press Enter to select the item. The list closes and the item displays in the appropriate field.
![]() Method #4: With your cursor in the field you want to fill, press Ctrl+L. A separate list window displays.
Method #4: With your cursor in the field you want to fill, press Ctrl+L. A separate list window displays.
![]() Arrow down to the item you want.
Arrow down to the item you want.
![]() Press Ctrl+U. The item is selected and placed in the appropriate field.
Press Ctrl+U. The item is selected and placed in the appropriate field.
Adding Customers
By using QuickBooks to keep track of your customers, you can personalize their billings, send invoices and mailings effortlessly, and see at a glance the status of their accounts. QuickBooks provides you with built-in fields for entering detailed information about each of your customers.
Add Customers
![]() Click the Customer Center icon on the toolbar.
Click the Customer Center icon on the toolbar.
Timesaver
Alternatively, you can click the Customers icon on the Home page or press Ctrl+J.
![]() Click the New Customer & Job button at the top of the Customer Center window, and then click New Customer from the drop-down menu (or press Ctrl+N).
Click the New Customer & Job button at the top of the Customer Center window, and then click New Customer from the drop-down menu (or press Ctrl+N).
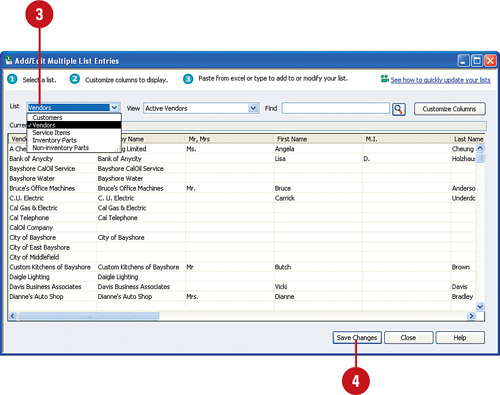
![]() If the New Feature dialog opens, click Take Me There and continue with Step 4. If you do not want to use the new Add/Edit Multiple List Entries feature, click OK and continue to Step 6.
If the New Feature dialog opens, click Take Me There and continue with Step 4. If you do not want to use the new Add/Edit Multiple List Entries feature, click OK and continue to Step 6.
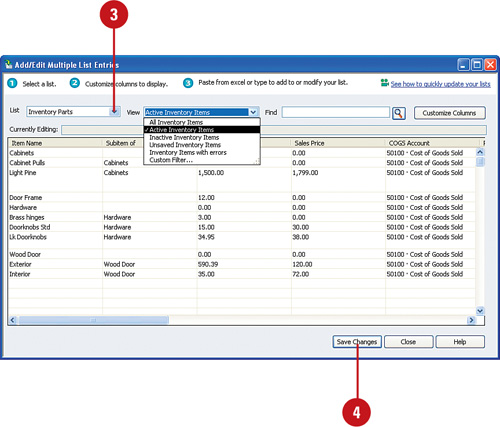
![]() Select Customers, and begin typing in the spreadsheet, or you can copy and paste from an existing spreadsheet of data (Not shown; to see more information on this new feature, read the section “Adding Vendors” on page 83).
Select Customers, and begin typing in the spreadsheet, or you can copy and paste from an existing spreadsheet of data (Not shown; to see more information on this new feature, read the section “Adding Vendors” on page 83).
![]() To learn more about this new feature, for more detailed information click on the See How to Update Your Lists link. Click Save Changes when your spreadsheet entry is complete.
To learn more about this new feature, for more detailed information click on the See How to Update Your Lists link. Click Save Changes when your spreadsheet entry is complete.
![]() Enter all the information you have about this customer, including name, address, billing and shipping addresses, phone and fax numbers, and email address. Note that you can add more than one Ship To address.
Enter all the information you have about this customer, including name, address, billing and shipping addresses, phone and fax numbers, and email address. Note that you can add more than one Ship To address.
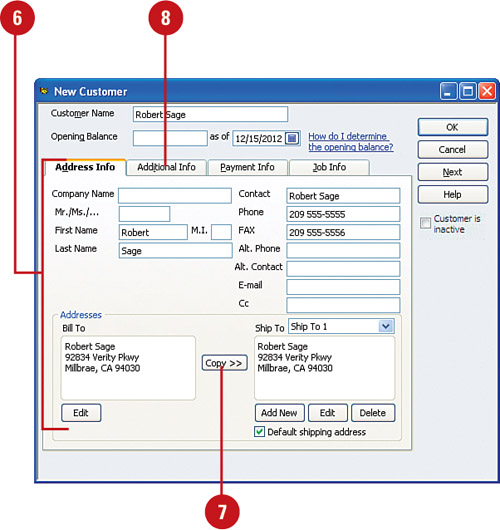
![]() Clicking the Copy button enables you to quickly transfer address information from the Bill To address field to the Ship To field.
Clicking the Copy button enables you to quickly transfer address information from the Bill To address field to the Ship To field.
![]() Click the Additional Info tab to progress to the next customer information screen.
Click the Additional Info tab to progress to the next customer information screen.
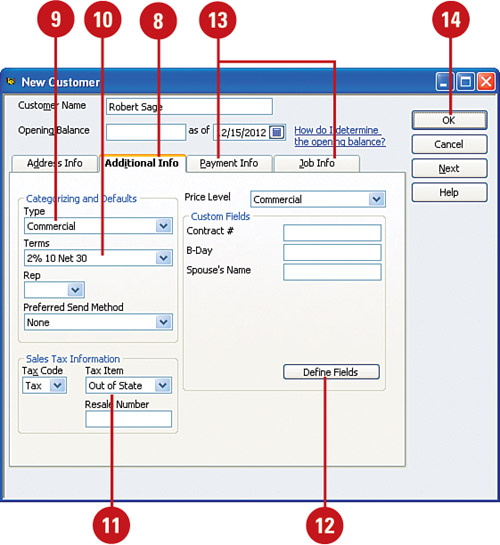
![]() If you plan to track customer type, choose from your drop-down type menu options or click Add New to create a new type.
If you plan to track customer type, choose from your drop-down type menu options or click Add New to create a new type.
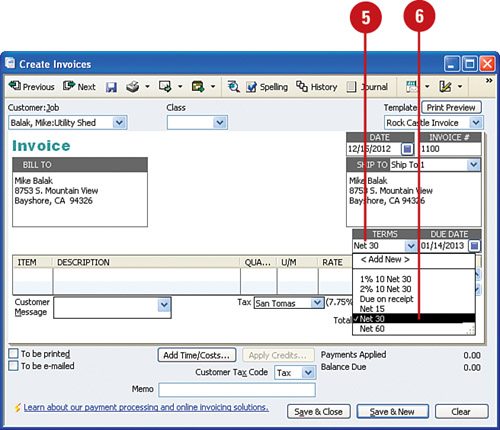
![]() Enter the terms you’ve made available to this customer. You can select Add New to add your own options to this and the other drop-down lists.
Enter the terms you’ve made available to this customer. You can select Add New to add your own options to this and the other drop-down lists.
![]() If your company is required to collect sales tax from this customer, you should identify the type of sales tax that applies to this customer and indicate that the customer is taxable in the Sales Tax Information section of the window.
If your company is required to collect sales tax from this customer, you should identify the type of sales tax that applies to this customer and indicate that the customer is taxable in the Sales Tax Information section of the window.
![]() You can use the Custom Fields area to create useful fields of your own. Click the Define Fields button to add your own fields to this area.
You can use the Custom Fields area to create useful fields of your own. Click the Define Fields button to add your own fields to this area.
![]() Click the other tabs to enter information such as credit limit, credit card number, status of job, and so on.
Click the other tabs to enter information such as credit limit, credit card number, status of job, and so on.
![]() Click OK.
Click OK.
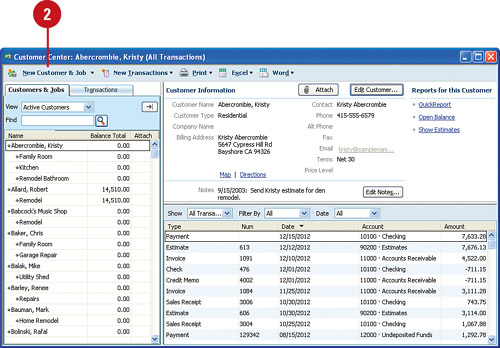
Working with the Customer Center
When using the Customer Center, you can easily see detailed information about your customers, such as the amount the customer owes you, jobs in progress, informational notes, and pending estimates. This information is readily available by simply clicking on the Customer Center icon, even when you are working on a customer form.
![]() From the icon bar, select Customer Center.
From the icon bar, select Customer Center.
![]() Arrow or scroll down to select the particular customer whose information you want to view.
Arrow or scroll down to select the particular customer whose information you want to view.

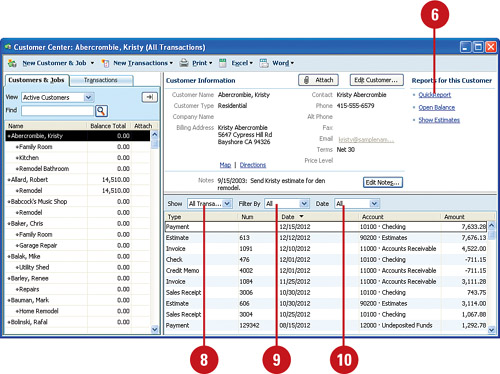
![]() View the job information, contact information, and transaction history for the customer or job selected.
View the job information, contact information, and transaction history for the customer or job selected.
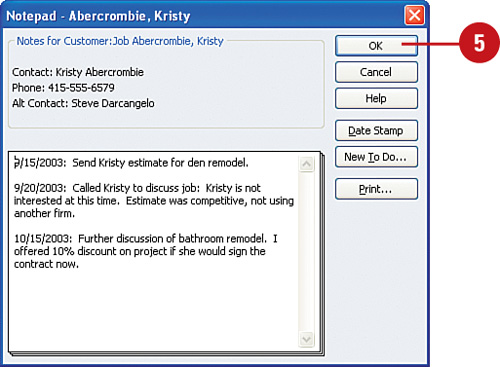
![]() Click the Edit Notes button to retrieve or enter informational notes about this customer or related jobs.
Click the Edit Notes button to retrieve or enter informational notes about this customer or related jobs.
![]() Click OK (or press Esc) to close the Notepad window.
Click OK (or press Esc) to close the Notepad window.
![]() Click the customer name and then click the QuickReport button to view the details of transactions relating to this customer.
Click the customer name and then click the QuickReport button to view the details of transactions relating to this customer.
![]() Press Esc to close the QuickReport.
Press Esc to close the QuickReport.
![]() Alternatively, click the Show drop-down list to select from a variety of transaction displays.
Alternatively, click the Show drop-down list to select from a variety of transaction displays.
![]() Depending on the option you choose in Step 8, there are filtering options available to you for customizing the data.
Depending on the option you choose in Step 8, there are filtering options available to you for customizing the data.
![]() Filter for a specific date range.
Filter for a specific date range.
![]() Right-click one of the jobs for this customer and select Show Estimates to see a report of the estimates for that particular job.
Right-click one of the jobs for this customer and select Show Estimates to see a report of the estimates for that particular job.

![]() Double-click any estimate to open the original estimate form.
Double-click any estimate to open the original estimate form.

![]() Press Esc to close each of the windows you displayed.
Press Esc to close each of the windows you displayed.
![]() Click the Transactions tab in the Customer Center to view a list of transactions for all customers.
Click the Transactions tab in the Customer Center to view a list of transactions for all customers.
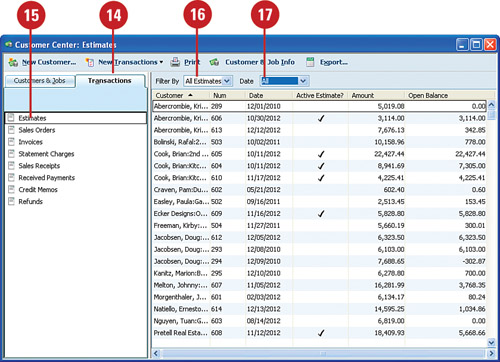
![]() Choose the type of transaction you want to view.
Choose the type of transaction you want to view.
![]() Click the Filter By drop-down arrow to choose whether you want to see all the transactions for the type you selected, or particular transactions. For example, you can choose to filter the list by All Estimates or Open Estimates.
Click the Filter By drop-down arrow to choose whether you want to see all the transactions for the type you selected, or particular transactions. For example, you can choose to filter the list by All Estimates or Open Estimates.
![]() Click the Date field to select a date range for the transactions that appear on the list.
Click the Date field to select a date range for the transactions that appear on the list.
Adding Vendors
Vendors are businesses and people who regularly sell you goods and services. When you enter vendor information in QuickBooks, you have all the details you need to contact your vendors, prepare purchase forms, process year-end 1099 forms, write checks, and create reports of your company’s spending.
Enter Vendor Address Information
![]() Click the Vendor Center button on the toolbar. In the Vendor Center, select the Vendors tab. Click the New Vendor button at the top of the Vendor List.
Click the Vendor Center button on the toolbar. In the Vendor Center, select the Vendors tab. Click the New Vendor button at the top of the Vendor List.
![]() If the New Feature dialog opens, click Take Me There and continue with Step 3. If you do not want to use the new Add/Edit Multiple List Entries feature, click OK and continue to Step 5.
If the New Feature dialog opens, click Take Me There and continue with Step 3. If you do not want to use the new Add/Edit Multiple List Entries feature, click OK and continue to Step 5.
![]() Select Vendors, and begin typing in the spreadsheet or copy and paste from an existing spreadsheet of data. Quickly enter repeating data by selecting a row and right clicking with your mouse to duplicate information.
Select Vendors, and begin typing in the spreadsheet or copy and paste from an existing spreadsheet of data. Quickly enter repeating data by selecting a row and right clicking with your mouse to duplicate information.
![]() Click Save Changes when completed.
Click Save Changes when completed.
Timesaver
You can also click the Vendors icon on the Home page to open the Vendor Center. To open the New Vendor window, press Ctrl+N from within the Vendor Center.
![]() Enter a name for the vendor. This is the name you will use to select the vendor from your Vendor List. It doesn’t have to be the name printed on vendor forms or checks.
Enter a name for the vendor. This is the name you will use to select the vendor from your Vendor List. It doesn’t have to be the name printed on vendor forms or checks.

![]() If a balance is due to this vendor at your company’s QuickBooks start date, enter the amount and the start date in the Opening Balance field. (I usually recommend that you enter these amounts on a vendor bill form).
If a balance is due to this vendor at your company’s QuickBooks start date, enter the amount and the start date in the Opening Balance field. (I usually recommend that you enter these amounts on a vendor bill form).
![]() Enter the vendor’s legal name in the Company Name field. This is the name that displays on forms you prepare for this vendor.
Enter the vendor’s legal name in the Company Name field. This is the name that displays on forms you prepare for this vendor.
![]() Enter the name of a personal contact, if applicable, and the mailing address of the vendor.
Enter the name of a personal contact, if applicable, and the mailing address of the vendor.
![]() Enter other pertinent information that you want to save.
Enter other pertinent information that you want to save.
![]() If there is a name other than the company name that needs to appear on checks to this vendor, enter that name in the space provided.
If there is a name other than the company name that needs to appear on checks to this vendor, enter that name in the space provided.
![]() Click OK.
Click OK.
Enter Additional Vendor Information
![]() Click the Additional Info tab to access another page of information for the vendor.
Click the Additional Info tab to access another page of information for the vendor.

![]() Enter an account number. This is the number that this vendor has assigned to your company. If you print your checks from your QuickBooks program, the account number displays on the memo line of the checks.
Enter an account number. This is the number that this vendor has assigned to your company. If you print your checks from your QuickBooks program, the account number displays on the memo line of the checks.
![]() For categorizing purposes, enter the type of goods or service you acquire from this vendor in the Type field.
For categorizing purposes, enter the type of goods or service you acquire from this vendor in the Type field.
![]() In the Terms field, enter the terms your vendor has given you, if applicable. The payment terms you enter allow your QuickBooks program to calculate the due date of payments owed to this vendor.
In the Terms field, enter the terms your vendor has given you, if applicable. The payment terms you enter allow your QuickBooks program to calculate the due date of payments owed to this vendor.
![]() If the vendor has assigned a credit limit to your account, enter that amount in the Credit Limit field.
If the vendor has assigned a credit limit to your account, enter that amount in the Credit Limit field.
![]() If you are required to supply this vendor with a 1099 form, check the Vendor Eligible for 1099 box and enter the vendor’s tax identification number.
If you are required to supply this vendor with a 1099 form, check the Vendor Eligible for 1099 box and enter the vendor’s tax identification number.
![]() You can use the Define Fields button to create new fields that are customized to your business needs.
You can use the Define Fields button to create new fields that are customized to your business needs.
![]() Click Account Prefill to assign default expense accounts (not shown).
Click Account Prefill to assign default expense accounts (not shown).
![]() Click OK to complete the entries for this vendor.
Click OK to complete the entries for this vendor.
Adding Items
An item is a description that displays on your purchase and sales forms. Services and products that you buy and sell are items, as are the charges related to those services and products, including discounts, freight charges, late fees, and sales tax. At any time you can add to your item list, increasing the number of items that can be entered on your company’s forms.
![]() To create a new item, open the Item List by clicking Item List on the Lists menu or the Customers menu. Press Ctrl+N to open the New Item window.
To create a new item, open the Item List by clicking Item List on the Lists menu or the Customers menu. Press Ctrl+N to open the New Item window.
![]() If the New Feature dialog opens, click Take Me There and continue with Step 3. If you do not want to use the new Add/Edit Multiple List Entries feature, click OK and continue to Step 5.
If the New Feature dialog opens, click Take Me There and continue with Step 3. If you do not want to use the new Add/Edit Multiple List Entries feature, click OK and continue to Step 5.
![]() Select from Service Items, Inventory Parts or Non-inventory Parts, and begin typing in the spreadsheet or copy and paste from an existing spreadsheet of data.
Select from Service Items, Inventory Parts or Non-inventory Parts, and begin typing in the spreadsheet or copy and paste from an existing spreadsheet of data.
![]() Click Save Changes when completed.
Click Save Changes when completed.
Timesaver
You can also open the Item List from the Home page by clicking the Items & Services icon.
![]() Select the type of item from the Type drop-down list. Your item type must be selected from one of the ten categories offered in this list. Inventory Part has been selected in this example. Your screen might differ if you select a different item type.
Select the type of item from the Type drop-down list. Your item type must be selected from one of the ten categories offered in this list. Inventory Part has been selected in this example. Your screen might differ if you select a different item type.

Important
Be careful when selecting an item type. Most item types are permanent choices and cannot be changed after they’ve been selected.
![]() Enter a name by which you will identify this item when you enter the item on purchase and sales forms.
Enter a name by which you will identify this item when you enter the item on purchase and sales forms.
![]() If the item is to be a subitem of another item, check the Subitem Of box and enter the parent item.
If the item is to be a subitem of another item, check the Subitem Of box and enter the parent item.
![]() Enter the description you use for this item on purchase forms such as purchase orders and bills.
Enter the description you use for this item on purchase forms such as purchase orders and bills.
![]() In the Cost field, enter the amount you pay when you purchase this item. If the cost varies with each purchase, leave the field blank and enter the cost on the bill when you enter the actual purchase in QuickBooks.
In the Cost field, enter the amount you pay when you purchase this item. If the cost varies with each purchase, leave the field blank and enter the cost on the bill when you enter the actual purchase in QuickBooks.
![]() Enter the account to which you will charge the expense for this item in the COGS Account field.
Enter the account to which you will charge the expense for this item in the COGS Account field.
![]() If you purchase this item from the same vendor time after time, enter the vendor name in the Preferred Vendor field. Otherwise, leave this field blank and enter the vendor name on the bill each time you purchase the item.
If you purchase this item from the same vendor time after time, enter the vendor name in the Preferred Vendor field. Otherwise, leave this field blank and enter the vendor name on the bill each time you purchase the item.
![]() If you are creating an inventory item, in the Asset Account field, enter the account to which this item is added when purchases are made. This field might not appear, depending on the type of item you are creating.
If you are creating an inventory item, in the Asset Account field, enter the account to which this item is added when purchases are made. This field might not appear, depending on the type of item you are creating.
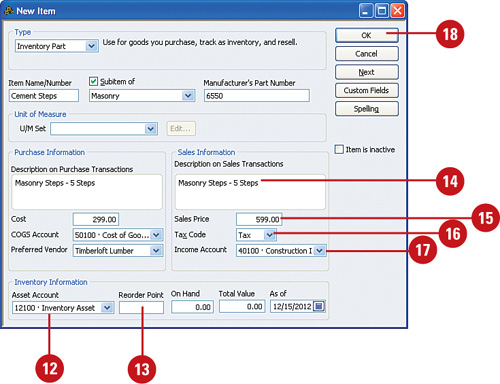
![]() If you are entering an inventory item, enter the number of the items necessary to trigger a reorder in the Reorder Point field. Enter also the quantity of items currently on hand.
If you are entering an inventory item, enter the number of the items necessary to trigger a reorder in the Reorder Point field. Enter also the quantity of items currently on hand.
![]() Enter the description of the item as it displays on an invoice.
Enter the description of the item as it displays on an invoice.
![]() In the Sales Price field, enter the amount you normally charge for this item. If the sales price varies with each sale, leave the price blank and enter the price on the actual invoice when the item is sold.
In the Sales Price field, enter the amount you normally charge for this item. If the sales price varies with each sale, leave the price blank and enter the price on the actual invoice when the item is sold.
![]() Indicate whether the item is taxable in the Tax Code field.
Indicate whether the item is taxable in the Tax Code field.
![]() Enter the account to which income from the item’s sale is credited in the Income Account field.
Enter the account to which income from the item’s sale is credited in the Income Account field.
![]() Click OK.
Click OK.
Using Items on Forms
An item is a description that displays on your purchase and sales forms. An amount is associated with the item, and QuickBooks uses the amount to perform calculations on your forms and also records the accounting “behind the scenes.” When you create a list of items, you also instruct QuickBooks where to record the income and the expense for the item. Things you buy and sell are items. Discounts you apply and services you perform are also items, as are the sales tax you charge and the cost of freight.
Important
Not all item windows will default to selecting both an income and an expense account. I recommend for all items that you select the box This Service Is Used... or This Item Is Used.... The resulting New Item or Edit Item dialog allows you to select both an income and expense account.
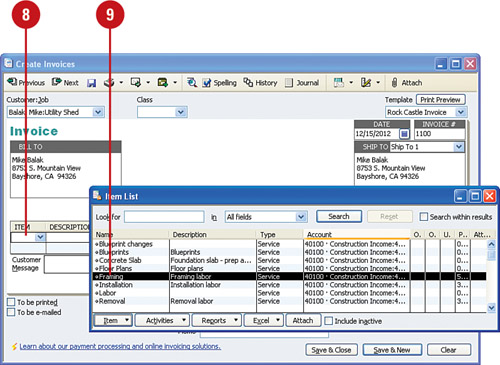
For an example of working with items, look at an invoice form. If you plan to invoice a customer for some construction-related labor, such as installation and repair work, you must first enter descriptions of the labor as items in QuickBooks. These are service items. Each of these items represents a type of service you provide and sell to customers. Other types of items are described in the “Types of Items” section that preceded this section.
Click on the Invoice icon from the Home page and enter the customer information. Click in the Item column and then click the drop-down arrow that displays. Click an item from the list—in this case, Installation. If you entered a sales price when you created the item, the item description and rate per hour are filled in automatically. You can modify the descriptions on your invoice forms if necessary. For a service item, enter the number of hours charged to this job in the Amount column; the total amount for the invoice is calculated automatically.
Next, click the line under Installation and click the drop-down arrow that displays. Select Repairs from the list and then enter the appropriate number of hours. If a specific rate does not appear, enter the hourly rate you want to charge for these repairs. Modify the description if necessary.
Continue in this manner until all the items for this invoice have been entered.

Adding Information “On-the-Fly”
When you need to add an item to your Items List, a customer to your Customer List, a vendor to your Vendor List, or any other piece of information to a list in QuickBooks, you can open the list and add the item, a process that has been described in this chapter. Alternatively, you can add the item “on-the-fly,” which is to say that you can open a form, such as an invoice or a bill, and simply enter the name of the piece of information you want to add to a list. When that name represents a new entry on the list, a window displays on your screen telling you this information is not found on your company lists and asking you whether you want to add the information now. Choosing to do so makes your job a bit more efficient. For purposes of this demonstration, the next example adds a customer “on-the-fly.” The technique shown here can be used on any QuickBooks form, for any QuickBooks List.
![]() Open an invoice by selecting Create Invoices from the Customers menu.
Open an invoice by selecting Create Invoices from the Customers menu.
Timesaver
You can also open an invoice by clicking the Invoices icon on the Home page.
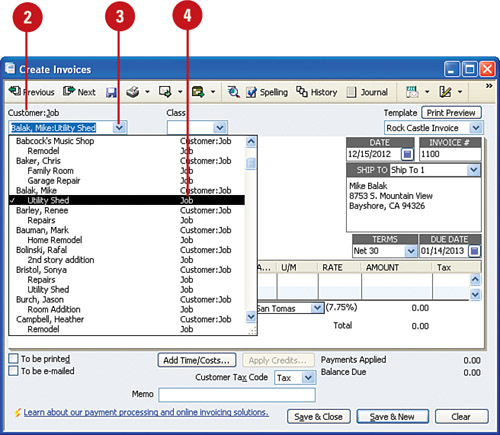
![]() In the Customer:Job field, enter the name of a customer not already in your Customer:Job List.
In the Customer:Job field, enter the name of a customer not already in your Customer:Job List.

![]() Click in another field of the form, or press Tab to move to the next field. A Customer:Job Not Found window displays.
Click in another field of the form, or press Tab to move to the next field. A Customer:Job Not Found window displays.
![]() You have three choices relating to this customer. Clicking Quick Add adds only the customer name to your Customer:Job list, and you are ready to complete the form.
You have three choices relating to this customer. Clicking Quick Add adds only the customer name to your Customer:Job list, and you are ready to complete the form.
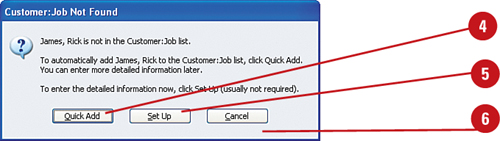
![]() Clicking Set Up opens the New Customer dialog box, where you can enter all the pertinent information about this customer.
Clicking Set Up opens the New Customer dialog box, where you can enter all the pertinent information about this customer.
![]() Clicking Cancel closes the Customer:Job window. You cannot complete the invoice form until you either add this customer to your Customer:Job list or enter a different customer name.
Clicking Cancel closes the Customer:Job window. You cannot complete the invoice form until you either add this customer to your Customer:Job list or enter a different customer name.
Moving Items on a List
By default, QuickBooks sorts lists in a particular order. The Customer and Vendor Lists are alphabetized; the Item List is sorted first by type of item and then alphabetized within each type. The list order is carried over to reports and statements. You can change the order of items on your lists. When you change the order on a list, the change remains permanent and carries through to your reports.
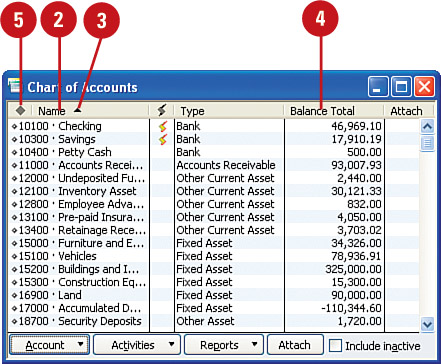
![]() Open a list by selecting the list from the Lists menu. For purposes of this example, the Chart of Accounts List has been selected.
Open a list by selecting the list from the Lists menu. For purposes of this example, the Chart of Accounts List has been selected.
![]() Scroll to the area of the list you want to reorder.
Scroll to the area of the list you want to reorder.
![]() Place your mouse pointer on the small diamond to the left of the account you want to move. The mouse pointer becomes a four-sided arrow.
Place your mouse pointer on the small diamond to the left of the account you want to move. The mouse pointer becomes a four-sided arrow.

![]() Drag the account diamond to the new location on the list.
Drag the account diamond to the new location on the list.

![]() Release the mouse. The account has been moved. The next time you open the list, the account will still be in its new location.
Release the mouse. The account has been moved. The next time you open the list, the account will still be in its new location.
Creating Subitems
You might have noticed that when you set up a new item, customer, vendor, or account, you can designate that the item is a subitem, a lower-level item under a parent, or leader item. If you didn’t designate the substatus when you first entered the information, you can do so at any time. Open the appropriate list and simply drag the item to its new parent, and then drag to indent.
![]() Open a list. This example uses the Chart of Accounts List. You can open this list quickly by pressing Ctrl+A.
Open a list. This example uses the Chart of Accounts List. You can open this list quickly by pressing Ctrl+A.
![]() Place your mouse pointer over the diamond to the left of the item that is to become the subitem. The mouse pointer turns into a black four-sided arrow.
Place your mouse pointer over the diamond to the left of the item that is to become the subitem. The mouse pointer turns into a black four-sided arrow.

![]() Drag the mouse pointer so that the item is located directly beneath the item that will be its parent. A dashed horizontal black line displays where the item is to move. In this example, subitems can only be placed with other accounts of the same type.
Drag the mouse pointer so that the item is located directly beneath the item that will be its parent. A dashed horizontal black line displays where the item is to move. In this example, subitems can only be placed with other accounts of the same type.
![]() Release the mouse pointer.
Release the mouse pointer.
![]() Again, place your mouse pointer over the diamond to the left of the item that is to become the subitem.
Again, place your mouse pointer over the diamond to the left of the item that is to become the subitem.

![]() Drag the mouse pointer slightly to the right. A dashed vertical black line displays where the item is to move.
Drag the mouse pointer slightly to the right. A dashed vertical black line displays where the item is to move.
![]() Release the mouse pointer. The item is now indented beneath its parent.
Release the mouse pointer. The item is now indented beneath its parent.
Editing Information on a List
From time to time, you will need to edit information on your lists. You might notice a spelling error, need to change an address, add notes, or add other information that you want to save.
![]() Open a list. For this example, the Item List is used. You can open this list by selecting Item List from the Lists menu.
Open a list. For this example, the Item List is used. You can open this list by selecting Item List from the Lists menu.
![]() Scroll to the item you want to edit. Some of the item information is displayed to the right of the item name.
Scroll to the item you want to edit. Some of the item information is displayed to the right of the item name.
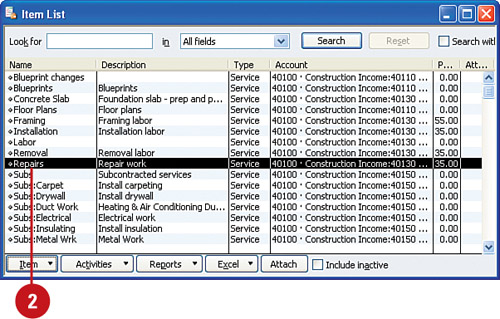
![]() Double-click the name of the item. The Edit Item window displays.
Double-click the name of the item. The Edit Item window displays.
![]() Make your changes or enter new information about this item. In this example, the rate for repair work has been changed from $35.00 to $40.00.
Make your changes or enter new information about this item. In this example, the rate for repair work has been changed from $35.00 to $40.00.
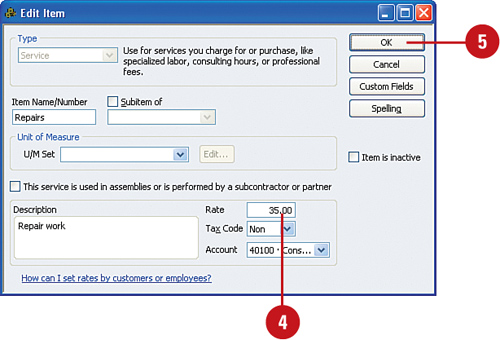
![]() Click OK to save the information.
Click OK to save the information.
Marking List Items Inactive
If you have a vendor who is no longer available as a current supplier, you can hide the vendor’s name so it no longer displays on the list. This way, you won’t run the risk of choosing that vendor by mistake. Also, the vendor you hide is no longer included in reports, although if you prepare a report that includes a time period where the vendor was still active, it will show up on the report.
Marking a List Item Inactive
![]() Open a list. This example uses the Vendor List, found by opening the Vendor Center.
Open a list. This example uses the Vendor List, found by opening the Vendor Center.
![]() Click the name of a vendor you want to mark as inactive.
Click the name of a vendor you want to mark as inactive.
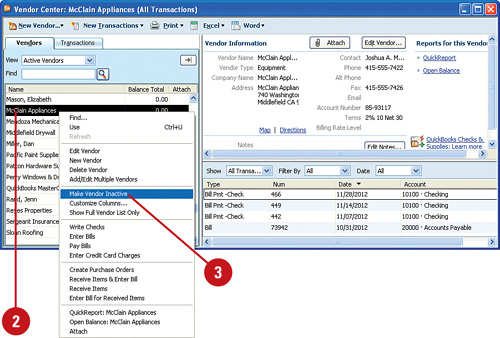
![]() Right-click on the vendor name, and then select Make Vendor Inactive.
Right-click on the vendor name, and then select Make Vendor Inactive.
Change the Inactive Status of List Entries
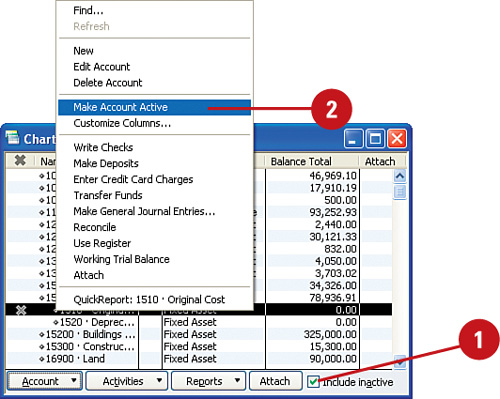
![]() Hiding information on a list is not a permanent situation. Display hidden entries by checking the Include Inactive box that displays in some lists, or choose to display the entire list as I have done here by selecting All Vendors.
Hiding information on a list is not a permanent situation. Display hidden entries by checking the Include Inactive box that displays in some lists, or choose to display the entire list as I have done here by selecting All Vendors.

Timesaver
When you display inactive members of a list, those entries appear with an X to the left of the listing. Displaying the inactive members does not change their inactive status.
![]() Right-click an inactive list entry, and then select the Make Account Active choice to change the status back to Active.
Right-click an inactive list entry, and then select the Make Account Active choice to change the status back to Active.
Deleting Entries on a List
You can remove list entries that have never been used. This option generally applies to account names that QuickBooks entered when you first set up your company and that you never intend to use, but this procedure can also be used for other information you don’t need. For example, if you open the Terms List and see several options for payment terms that your company doesn’t use, you can delete the unwanted choices.
Delete a List Entry
![]() Open a list. This example uses the Chart of Accounts List.
Open a list. This example uses the Chart of Accounts List.
![]() Click the account you want to delete.
Click the account you want to delete.

![]() Click the Account button at the bottom of the dialog box; then select Delete Account from the drop-down menu. On a list that displays in one of the Centers, right-click on the list entry you want to delete, and then choose Delete from the pop-up menu.
Click the Account button at the bottom of the dialog box; then select Delete Account from the drop-down menu. On a list that displays in one of the Centers, right-click on the list entry you want to delete, and then choose Delete from the pop-up menu.
![]() Click OK when the Delete Account window displays.
Click OK when the Delete Account window displays.
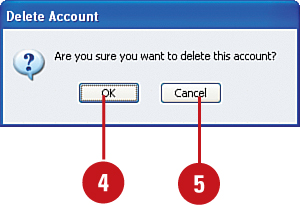
![]() Click Cancel if you change your mind and want to keep the account.
Click Cancel if you change your mind and want to keep the account.
Timesaver
There’s a shortcut fordeleting list entries. Select the entry you want to delete, and then press Ctrl+D.
Merging Entries on a List
If you tried to delete an entry from one of your lists and were prevented from doing so, it is because the entry was used at some time in the past on at least one of your company’s forms. QuickBooks does not allow you to remove any member of a list that displays on a form. In lieu of deleting, you can make that list entry inactive by hiding it (see “Hiding Entries on Lists” previously in the chapter), or you can merge the entry into another entry on the same list.
When you merge, you combine the unwanted entry into a different entry that you want to keep. For example, say you have a customer named Allard, Robert, but when you originally set up the customer, you entered the name as Robert Allard and used that name on an invoice form. Later you created a new customer named Robert Allard and assigned transactions to that name. These steps teach you how to merge two records for the same customer into one customer record. Be careful with this task. It is not reversible, so be sure you have made a backup of your data.
![]() Open a list. This example uses the Customer List.
Open a list. This example uses the Customer List.
![]() Click the customer name you want to remove from the list but can’t because it has been used before.
Click the customer name you want to remove from the list but can’t because it has been used before.
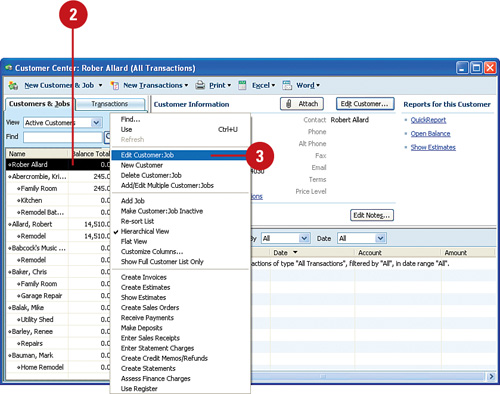
![]() Right-click the customer name and then select Edit Customer:Job from the drop-down menu.
Right-click the customer name and then select Edit Customer:Job from the drop-down menu.
Timesaver
You can press Ctrl+E instead to get to the Edit Center window.
![]() When the Edit Customer window displays, change the Customer Name at the top of the window to the name of the customer with whom you want to merge this customer information. In this example, the customer name is changed from James Rock to James A. Rock, Publishing.
When the Edit Customer window displays, change the Customer Name at the top of the window to the name of the customer with whom you want to merge this customer information. In this example, the customer name is changed from James Rock to James A. Rock, Publishing.

Important
Be sure to spell the name of the customer correctly. When merging one customer’s information into another’s, or when merging any two list entries, take extra care with the spelling and, if applicable, the punctuation of the name. QuickBooks recognizes a merge attempt only when the name matches exactly the name of the entry to which you are merging.
![]() Click the OK button.
Click the OK button.
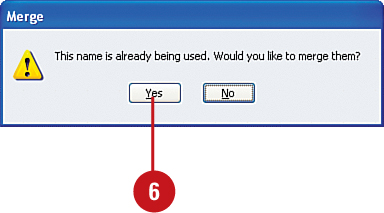
![]() Click Yes to execute the merge. The unwanted customer name is removed from the customer list and all transactions from that customer are transferred to the customer into which you merged.
Click Yes to execute the merge. The unwanted customer name is removed from the customer list and all transactions from that customer are transferred to the customer into which you merged.
![]() Click Yes if presented with an alert telling you that this change will affect closed periods and previous financial reports.
Click Yes if presented with an alert telling you that this change will affect closed periods and previous financial reports.

Printing Lists
Printing a paper copy of your list provides you with a printed snapshot of the list as of today. You might want to print monthly copies of certain lists to save for comparison purposes. Or perhaps you need a printed copy of your customer list that includes telephone numbers. You can easily print your lists whenever you need them.
Print a List
![]() Open the list you want to print, such as the Chart of Accounts, Item List, Vendors List in the Vendors Center, and so on.
Open the list you want to print, such as the Chart of Accounts, Item List, Vendors List in the Vendors Center, and so on.
![]() To print a simple copy of the list, without adding any formatting, press Ctrl+P.
To print a simple copy of the list, without adding any formatting, press Ctrl+P.
![]() In the Print Lists window that displays, click the Print button to print the list.
In the Print Lists window that displays, click the Print button to print the list.

![]() Alternatively, click the Reports button at the bottom of the list to see a selection of reports you can produce and print.
Alternatively, click the Reports button at the bottom of the list to see a selection of reports you can produce and print.
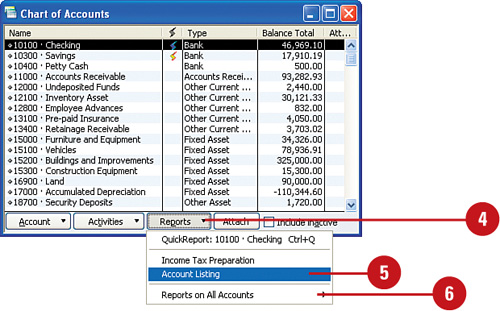
![]() Depending on the list you opened, the choices vary. Select the list you want to print.
Depending on the list you opened, the choices vary. Select the list you want to print.
![]() Click the Reports on All Accounts option at the bottom of the Reports menu to see other options. After selecting a report, click the Print button on the report.
Click the Reports on All Accounts option at the bottom of the Reports menu to see other options. After selecting a report, click the Print button on the report.
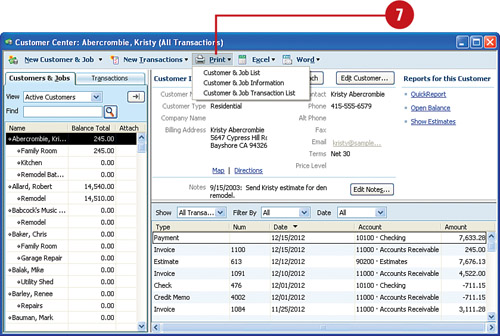
![]() To print a list that opens in one of the centers, such as the Customer:Job List, open the Center and then click the Print button that displays at the top of the list. Choose from the menu options that appear.
To print a list that opens in one of the centers, such as the Customer:Job List, open the Center and then click the Print button that displays at the top of the list. Choose from the menu options that appear.
Searching for Transactions
If you are looking for a particular transaction, such as a payment you received or check you wrote, you can find the transaction by searching in your check register.
![]() Select Lists, Chart of Accounts to open the Chart of Accounts (or press Ctrl+A).
Select Lists, Chart of Accounts to open the Chart of Accounts (or press Ctrl+A).
![]() Double-click the name of the cash account you use for your payments and deposits. The account register displays.
Double-click the name of the cash account you use for your payments and deposits. The account register displays.
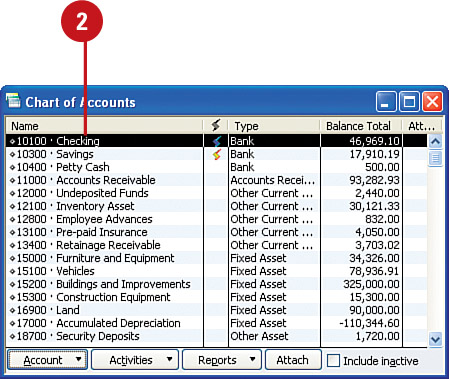
![]() Click the Go To button.
Click the Go To button.

![]() Click the arrow next to Which Field to display a list of field choices.
Click the arrow next to Which Field to display a list of field choices.
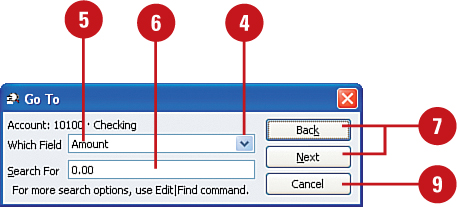
![]() Click the field in which you want to conduct your search.
Click the field in which you want to conduct your search.
![]() In the Search For area, enter the payee name, account name, or amount for which you are searching.
In the Search For area, enter the payee name, account name, or amount for which you are searching.
![]() Click Back to search backward in the register, or click Next to search forward.
Click Back to search backward in the register, or click Next to search forward.
![]() Continue clicking Back or Next until you find the transaction you want.
Continue clicking Back or Next until you find the transaction you want.
![]() Click Cancel when you’re ready to close the Go To window.
Click Cancel when you’re ready to close the Go To window.
![]() Double-click the register transaction to display the original form that was used to create the transaction.
Double-click the register transaction to display the original form that was used to create the transaction.
Important
Be careful when editing transactions. If you edit a transaction that has already been recorded, you run the risk of changing information that has already been used on financial statements or in bank reconciliations. Proceed with caution whenever you change a QuickBooks transaction.