1. Setting Up Your Company Accounts with the EasyStep Interview
For many, the most unpleasant part of owning a small business is the necessity of dealing with the accounting for money coming in and out of the business. When your skill is in providing services or producing inventory, finding the time or inclination to set up and maintain a bookkeeping system is difficult. But as we all know, it is only with a quality bookkeeping system that you will keep track of how much money your company is making and how successful you really are.
Years ago, Intuit came to the rescue of many small business owners with its QuickBooks software. QuickBooks is a bookkeeping program that is so sophisticated, it provides all the record keeping and reporting opportunities you need to keep on top of your company’s progress. At the same time, QuickBooks is so easy to use that someone with little or no accounting background can start using the program right out of the box.
You might already have started making excuses and finding other projects to do so you can avoid taking the time to set up your company’s bookkeeping records in QuickBooks. Let me tell you right now that you’re making a mistake if you don’t get this project under way. In the long run, you will save time and you will save money if your company’s financial records are easy to update and easy to access. QuickBooks installation and setup is a swift process. Although it varies by the size of the company, much of the setup work can be done after the initial process is complete, so you can allocate part of an afternoon to setup instead of several days. So let’s get started!
Installing QuickBooks
If QuickBooks has not yet been installed on your computer, you’ll need to install the program before you can begin any of the setup procedures. Installation is easy—but beware! During installation, you are required to enter the license and product numbers. You’ll get these numbers from the back of the packaging or during the download process.
Install QuickBooks
![]() Insert the QuickBooks CD in the CD-ROM drive of your computer or follow the instructions provided with the Intuit Download Manager to download the software from the Internet.
Insert the QuickBooks CD in the CD-ROM drive of your computer or follow the instructions provided with the Intuit Download Manager to download the software from the Internet.
![]() The Intuit QuickBooks Installer dialog displays.
The Intuit QuickBooks Installer dialog displays.
![]() Click Next.
Click Next.
Important
Make appropriate installation choices. The installation choices presented to you can differ depending on the edition of QuickBooks that you purchased. Read the installation screens carefully, making the choices that correspond to the program you purchased. You might be presented with an opportunity to upgrade to a different edition of QuickBooks, such as the retail or contractors’ editions. Make sure you select the version you want to use.
![]() When you reach the screen that displays the QuickBooks License Agreement, make sure you read the agreement and understand its terms. Then click I Accept the Terms in the License Agreement when you are ready to proceed.
When you reach the screen that displays the QuickBooks License Agreement, make sure you read the agreement and understand its terms. Then click I Accept the Terms in the License Agreement when you are ready to proceed.
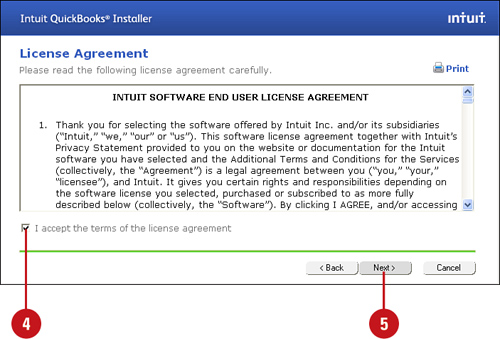
![]() Click Next.
Click Next.
![]() Choose the installation type, Express (recommended) or Custom and Network options, which allows you to manually select the location and advanced server options.
Choose the installation type, Express (recommended) or Custom and Network options, which allows you to manually select the location and advanced server options.
![]() Click Next.
Click Next.

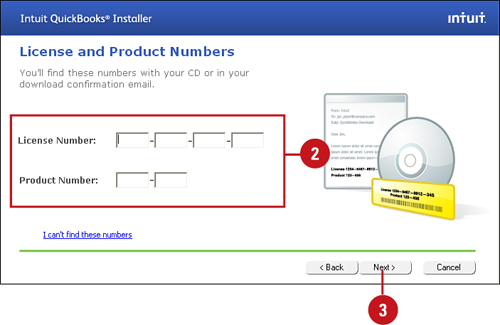
![]() Enter your license number and product number. This information can be found on a yellow sticker on the back of the QuickBooks CD packaging or was included in your download instructions.
Enter your license number and product number. This information can be found on a yellow sticker on the back of the QuickBooks CD packaging or was included in your download instructions.
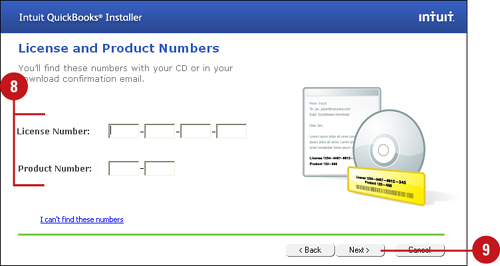
![]() Click Next.
Click Next.
![]() The Ready to Install dialog displays with your unique License and Product numbers. Click the Print icon if you want to print the details.
The Ready to Install dialog displays with your unique License and Product numbers. Click the Print icon if you want to print the details.
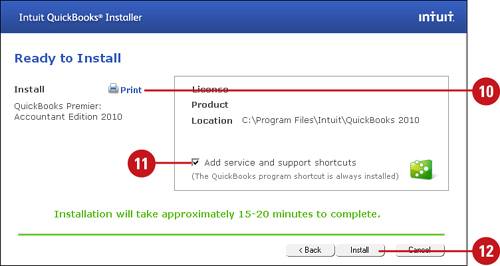
![]() If you want to have the service and support icons on your desktop, put a check mark in the box to add them.
If you want to have the service and support icons on your desktop, put a check mark in the box to add them.
![]() Click Install. QuickBooks will install the necessary files to your computer’s hard drive. When the installation is complete, a Congratulations dialog displays.
Click Install. QuickBooks will install the necessary files to your computer’s hard drive. When the installation is complete, a Congratulations dialog displays.
![]() If not automatically selected, place a check mark in the Open QuickBooks box. Place a check mark in the Help Me Get Started check box if you want QuickBooks to provide useful links to help with the startup process.
If not automatically selected, place a check mark in the Open QuickBooks box. Place a check mark in the Help Me Get Started check box if you want QuickBooks to provide useful links to help with the startup process.

![]() Click the Finish button.
Click the Finish button.
Registering QuickBooks
QuickBooks gives you access to QuickBooks technical support, as well as online features of the program. In addition, when you register your program, you are signed up to receive information about product upgrades. As an added benefit, after you register your program, you no longer see the pop-up window reminding you to register. You are allowed to use QuickBooks for 30 days without registering; then you are required to register to continue using the program.
Register QuickBooks
![]() Click the Begin Registration button in the registration reminder window, or select Help, Register QuickBooks from the program menu.
Click the Begin Registration button in the registration reminder window, or select Help, Register QuickBooks from the program menu.

![]() If online registration is available, enter the requested information about your company, and click Next. (Not shown).
If online registration is available, enter the requested information about your company, and click Next. (Not shown).
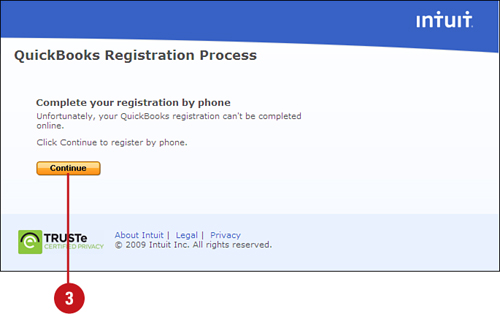
![]() If no online registration is available, click Continue to register by phone.
If no online registration is available, click Continue to register by phone.
![]() Click the option to look up the existing registration or to call Intuit to register your software.
Click the option to look up the existing registration or to call Intuit to register your software.
![]() If you choose to look up your previous registration information, you will need to type your business telephone number and ZIP Code to locate your records. Click Continue.
If you choose to look up your previous registration information, you will need to type your business telephone number and ZIP Code to locate your records. Click Continue.
Important
Registration screen doesn’t appear, or Register QuickBooks doesn’t appear on the Help menu. Some registration is automatic. If you’ve registered a version of QuickBooks previously on your computer, you might not be asked to register your program. If an option to register QuickBooks does not appear on your Help menu, the program is already registered. With your QuickBooks program open, you can see your license number and product number by pressing Ctrl+1.
Setting Up QuickBooks in a Multiuser Office
You must have QuickBooks Pro or QuickBooks Premier if you plan to use QuickBooks in a multiuser environment where more than one person can access the company file at once. A maximum of five users can access the QuickBooks company file simultaneously; however, there is no limit to the number of users who can access the company file at different times. The multiuser license authorizes you to install the software on up to five different computers. Each workstation must have access to the company file. Another alternative for a multiuser office is QuickBooks Enterprise Solutions, which allows up to 30 simultaneous users.
Set Up QuickBooks in a Multiuser Office
![]() Following the steps in the “Installing QuickBooks” task shown previously in this chapter, install QuickBooks on each computer that will access the company file.
Following the steps in the “Installing QuickBooks” task shown previously in this chapter, install QuickBooks on each computer that will access the company file.
Important
The company file is stored on only one computer. All computers that are to have access to the company file need to be networked in such a way that they have read/write access to the computer or file server on which your QuickBooks company file resides.
![]() When asked, enter the license number and product number for each computer.
When asked, enter the license number and product number for each computer.
![]() Click Next.
Click Next.
Transferring Data from Older Versions of QuickBooks
If you’ve used an older version of QuickBooks and want to update your old QuickBooks company data to the latest version of QuickBooks, you’ll find that the process is quick and simple. But beware! After you transfer a company file forward to a newer version of QuickBooks, you can never reopen that company file in an older version of QuickBooks. So, in a multiuser environment, make sure all computers are upgraded to the new version of QuickBooks before you open your company file on one of the upgraded computers.
Update Data from an Older Version of QuickBooks
Important
Your older version of QuickBooks will no longer be functional. When you upgrade an older version of QuickBooks to a newer version, the older version is no longer available on your computer. All data files are updated to the new version as soon as you open them, and you can’t use those files in an older version of QuickBooks. If, instead of upgrading, you choose to install the new version of QuickBooks and leave the older version on your computer as well, a window appears asking you from which version to copy preferences.
![]() The Open or Restore Company dialog displays. Select the appropriate choice for your needs (in this example, a company file).
The Open or Restore Company dialog displays. Select the appropriate choice for your needs (in this example, a company file).

![]() Click Next.
Click Next.
![]() QuickBooks locates the folder where your data is stored, or you can browse to the correct folder. Optionally, from the No Company Open dialog, select the data file and click Open or Restore an Existing Company. If your prior version data file required a username and password, you will be prompted to enter it here. Click OK to continue.
QuickBooks locates the folder where your data is stored, or you can browse to the correct folder. Optionally, from the No Company Open dialog, select the data file and click Open or Restore an Existing Company. If your prior version data file required a username and password, you will be prompted to enter it here. Click OK to continue.
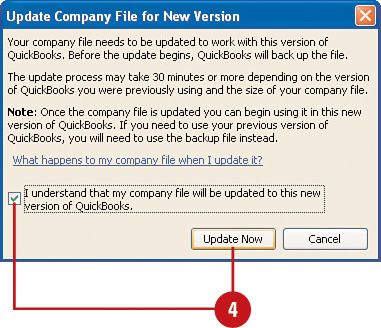
![]() The Update Company File for New Version dialog displays. Place a check mark in the I Understand box and click Update Now. If you need to use the prior version at a later date, you will need to restore it from the backup.
The Update Company File for New Version dialog displays. Place a check mark in the I Understand box and click Update Now. If you need to use the prior version at a later date, you will need to restore it from the backup.
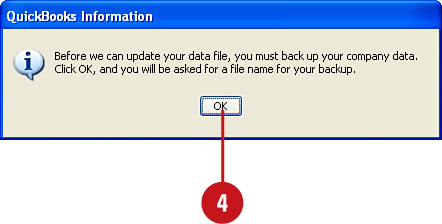
![]() QuickBooks prompts you to save a backup before updating. Click Next to browse to a folder where you want to save the backup file. Click OK to save it.
QuickBooks prompts you to save a backup before updating. Click Next to browse to a folder where you want to save the backup file. Click OK to save it.
![]() If prompted, click Change Location or Use This Location when prompted for the best location for a data backup. (This prompt displays if you are backing up to the same computer as your original data.)
If prompted, click Change Location or Use This Location when prompted for the best location for a data backup. (This prompt displays if you are backing up to the same computer as your original data.)
![]() Click OK to the message advising you how to use this backup file.
Click OK to the message advising you how to use this backup file.
![]() Click Yes to the warning that you are opening your data file with a new version of QuickBooks.
Click Yes to the warning that you are opening your data file with a new version of QuickBooks.
Transferring Data from Quicken
Quicken and QuickBooks are both products of Intuit Corporation, and the programs are compatible with one another. If you’ve been keeping track of your business accounting records in Quicken, you don’t have to start from scratch when you begin using QuickBooks. You can transfer your Quicken records right into your QuickBooks program.
Prepare Your Quicken Data for the Transfer
Important
You cannot use your QuickBooks company file in Quicken. When you transfer files from Quicken to QuickBooks, the conversion copies your Quicken data to a new QuickBooks company file, leaving your original Quicken data file unchanged for continued use. After converting your Quicken file, you will have two sets of data: your original, unchanged Quicken file and your new QuickBooks company file.
![]() Open the Account List in Quicken by pressing Ctrl+A.
Open the Account List in Quicken by pressing Ctrl+A.
![]() Delete any accounts you don’t want to transfer to QuickBooks. To delete an account, right-click the account name and select Delete; then type the word Yes when asked to confirm the deletion.
Delete any accounts you don’t want to transfer to QuickBooks. To delete an account, right-click the account name and select Delete; then type the word Yes when asked to confirm the deletion.

![]() Record any overdue scheduled transactions in Quicken. Press Ctrl+J in Quicken to open the Scheduled Transaction List. For any transaction you want to record, click the Enter button that appears to the right of the transactions.
Record any overdue scheduled transactions in Quicken. Press Ctrl+J in Quicken to open the Scheduled Transaction List. For any transaction you want to record, click the Enter button that appears to the right of the transactions.
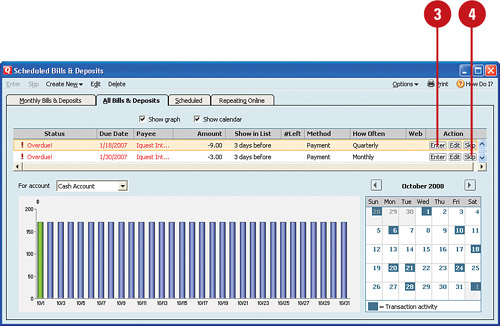
![]() Skip any overdue scheduled transactions that you don’t want to record by clicking the Skip button.
Skip any overdue scheduled transactions that you don’t want to record by clicking the Skip button.
![]() Close Quicken.
Close Quicken.
Perform the Conversion from Quicken to QuickBooks
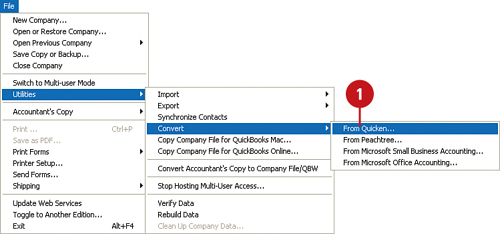
![]() In QuickBooks, select File, Utilities, Convert, From Quicken.
In QuickBooks, select File, Utilities, Convert, From Quicken.
Important
If you are setting up your company in QuickBooks for the first time, you can convert data from Quicken, Peachtree, Microsoft Small Business Accounting, or Microsoft Office Accounting as part of the EasyStep Interview process. On the introductory screen of the EasyStep Interview, click the Convert button, then choose the software you are converting from, and follow the onscreen instructions for converting your data.
![]() Click Convert.
Click Convert.

![]() Click the name of the Quicken file to be converted. Unless you have changed the default filename in Quicken, this file is named Qdata.qdf. You might have to browse until you find the folder that contains your Quicken file.
Click the name of the Quicken file to be converted. Unless you have changed the default filename in Quicken, this file is named Qdata.qdf. You might have to browse until you find the folder that contains your Quicken file.
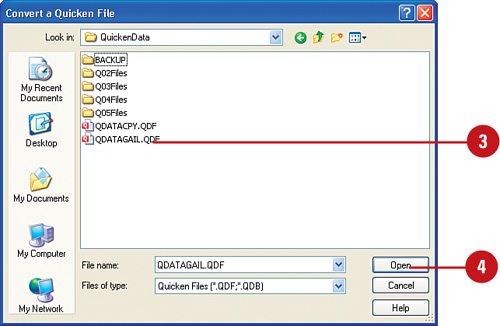
![]() Click Open.
Click Open.
Practicing with the Sample Company Files
At any time, either before or after you have set up your company in QuickBooks, you can open one of the sample company files that comes with your QuickBooks program and experiment with various features of QuickBooks without altering information in your own company file. Use the sample program to create sample invoices, design reports, try out the reminders, or use any of the features while your company data is safe.
Practice with the Sample Company Files
![]() The first time you open QuickBooks, you see the Welcome to QuickBooks screen. Later you might see a different welcome screen with the same options. Click the option to Explore QuickBooks. If no welcome screen appears, skip to Step 7.
The first time you open QuickBooks, you see the Welcome to QuickBooks screen. Later you might see a different welcome screen with the same options. Click the option to Explore QuickBooks. If no welcome screen appears, skip to Step 7.

![]() Select one of the files for a sample business.
Select one of the files for a sample business.
![]() If you are upgrading from an earlier version of QuickBooks, you might be asked to update your sample files to the new version. Click Yes to perform the update.
If you are upgrading from an earlier version of QuickBooks, you might be asked to update your sample files to the new version. Click Yes to perform the update.
![]() Click OK.
Click OK.
![]() If you were required to upgrade your sample files from an earlier version, QuickBooks requires you to create a backup file before the upgrade can be completed. Click Yes to proceed with creating the backup. (If you are asked to accept the defaults, click OK.)
If you were required to upgrade your sample files from an earlier version, QuickBooks requires you to create a backup file before the upgrade can be completed. Click Yes to proceed with creating the backup. (If you are asked to accept the defaults, click OK.)
![]() Continue clicking Yes on the next screens to complete the backup process.
Continue clicking Yes on the next screens to complete the backup process.
![]() If the introductory screen did not appear automatically, select File, Close Company from the QuickBooks menu.
If the introductory screen did not appear automatically, select File, Close Company from the QuickBooks menu.
![]() From the No Company Open dialog, select Open a Sample File.
From the No Company Open dialog, select Open a Sample File.

![]() Click the name of the sample file you want to use.
Click the name of the sample file you want to use.
![]() You are reminded that this is a sample file. Click OK to gain access to the sample file data.
You are reminded that this is a sample file. Click OK to gain access to the sample file data.
Entering Data for a New Company
The process of entering company data has the effect of customizing QuickBooks so the program becomes a unique financial information resource for your company. Use the checklist that follows this section to help gather the information you need to make the setup process smooth and efficient. When you open QuickBooks for the first time, you are given several choices of actions to take. Select the option to Create a New Company File, and you’ll be ready to begin entering your company data.
The company file is the term QuickBooks gives to the place on your computer where your company’s financial information is stored. When you select the option to open a new company file, the EasyStep Interview begins. Follow along, answering each question as well as you can. You can make corrections later if necessary.
Open a New Company File and Follow the Interview Questions
![]() Select the Create a New Company File option from the No Company Open dialog. Selecting this option opens the EasyStep Interview. If the Welcome Screen doesn’t open automatically, choose File, New Company from the menu.
Select the Create a New Company File option from the No Company Open dialog. Selecting this option opens the EasyStep Interview. If the Welcome Screen doesn’t open automatically, choose File, New Company from the menu.

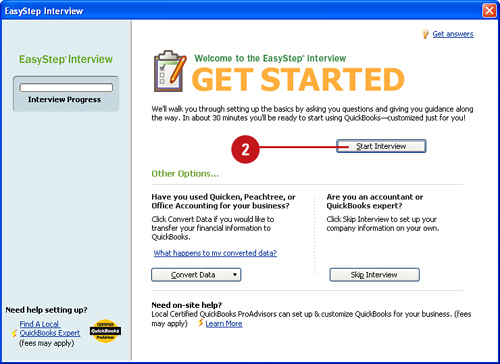
![]() Click the Start Interview button to begin the EasyStep Interview.
Click the Start Interview button to begin the EasyStep Interview.
![]() Enter the name under which your company does business and the legal name of your company.
Enter the name under which your company does business and the legal name of your company.
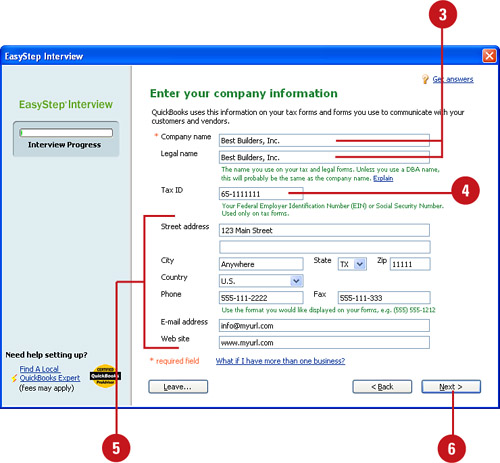
![]() Enter the federal identification number for your company. This will be needed if you will be preparing payroll in your QuickBooks file.
Enter the federal identification number for your company. This will be needed if you will be preparing payroll in your QuickBooks file.
![]() Enter the address, phone number, and other requested information about your company; this information can then be added to your business forms, such as a customer invoice.
Enter the address, phone number, and other requested information about your company; this information can then be added to your business forms, such as a customer invoice.
![]() Click the Next button to proceed through the EasyStep Interview.
Click the Next button to proceed through the EasyStep Interview.
![]() Choose an industry from the list provided if you would like QuickBooks to take care of the basic setup of accounts for your company. Any accounts created by QuickBooks can be changed, removed, or customized later.
Choose an industry from the list provided if you would like QuickBooks to take care of the basic setup of accounts for your company. Any accounts created by QuickBooks can be changed, removed, or customized later.

![]() Click Next.
Click Next.
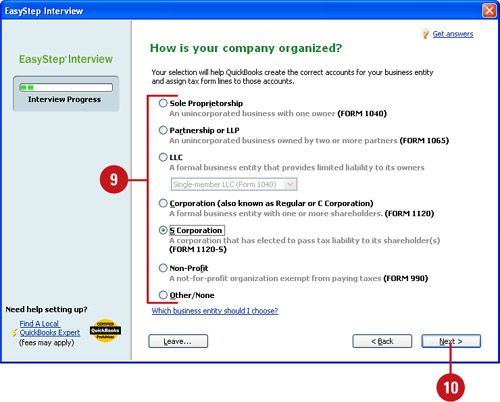
![]() You will be prompted to identify the type of legal organization that describes your company, such as sole proprietorship, LLC, and so on.
You will be prompted to identify the type of legal organization that describes your company, such as sole proprietorship, LLC, and so on.
![]() Click Next.
Click Next.
![]() You will be prompted to enter the first month in your business year (typically, January). Click Next.
You will be prompted to enter the first month in your business year (typically, January). Click Next.

![]() The administrator password step is optional. You can enter an administrator password or leave the field blank. If you enter a password, re-enter the password to make sure there is no error, and then click Next. (Not shown).
The administrator password step is optional. You can enter an administrator password or leave the field blank. If you enter a password, re-enter the password to make sure there is no error, and then click Next. (Not shown).
![]() Click Next (not shown) to create the file. You are asked to give your company file a filename. All your company data is stored in this file.
Click Next (not shown) to create the file. You are asked to give your company file a filename. All your company data is stored in this file.
![]() Click Save (not shown). From this point forward, you can exit the interview at any time (see “Stopping, Restarting, and Completing the Interview,” later in this chapter) and your data is saved.
Click Save (not shown). From this point forward, you can exit the interview at any time (see “Stopping, Restarting, and Completing the Interview,” later in this chapter) and your data is saved.
Setting Up a Bank Account
No matter what type of company yours is, you no doubt have a bank account where your receipts are deposited and from which your payments are made. Early in the EasyStep Interview, you are asked to set up your bank account.
Set Up a Bank Account
![]() Enter the name of your bank account. You can use either the actual name of the bank or a descriptive name for the account (such as Checking Account or Savings Account).
Enter the name of your bank account. You can use either the actual name of the bank or a descriptive name for the account (such as Checking Account or Savings Account).

![]() You can enter the bank account number and routing number. This information is required if you plan to activate the account for online banking.
You can enter the bank account number and routing number. This information is required if you plan to activate the account for online banking.
![]() Indicate whether you opened this account before or after your start date.
Indicate whether you opened this account before or after your start date.
![]() Click Next.
Click Next.
![]() If you indicated that you opened this account before your start date, enter the date of the last bank statement you received prior to your start date. If you are setting up a new bank account where your first bank statement was issued after your start date, use your start date as the bank statement date.
If you indicated that you opened this account before your start date, enter the date of the last bank statement you received prior to your start date. If you are setting up a new bank account where your first bank statement was issued after your start date, use your start date as the bank statement date.
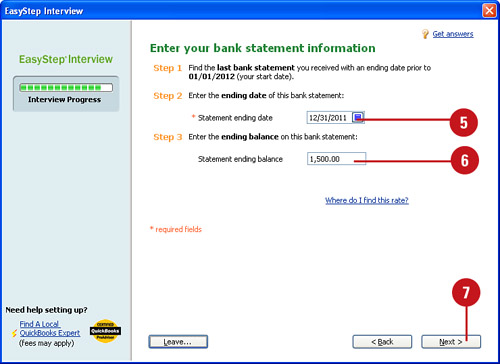
![]() Enter the ending balance amount from the last bank statement prior to your start date. If you are setting up a new bank account, enter
Enter the ending balance amount from the last bank statement prior to your start date. If you are setting up a new bank account, enter 0 as the balance at the start date.
![]() Click Next to proceed to the next part of the EasyStep Interview.
Click Next to proceed to the next part of the EasyStep Interview.
Setting Up Income and Expense Accounts
As you progress through the EasyStep Interview, you reach the point where you are asked to review your company’s income and expense accounts. Income and expense accounts are used to categorize your company’s cash in and cash out. In addition to these types of accounts that QuickBooks provides with its standard chart of accounts, you will no doubt need to add accounts that are unique to your business. When the EasyStep Interview is completed, you can add your own income and expense accounts and remove any unwanted accounts from the standard list assigned by QuickBooks.
Setting Up Income and Expense Accounts
![]() Scroll through the list of income and expense accounts provided by QuickBooks, comparing the accounts on that list to those you need for your business. Make a note of any income or expense accounts you need to add and those you want to remove.
Scroll through the list of income and expense accounts provided by QuickBooks, comparing the accounts on that list to those you need for your business. Make a note of any income or expense accounts you need to add and those you want to remove.
![]() Place a check mark next to any accounts you want to add to your own list of accounts. Uncheck those accounts you won’t need.
Place a check mark next to any accounts you want to add to your own list of accounts. Uncheck those accounts you won’t need.

![]() Click Restore Recommendations if you decide you want to remove the changes you added to the standard list of accounts chosen by QuickBooks.
Click Restore Recommendations if you decide you want to remove the changes you added to the standard list of accounts chosen by QuickBooks.
![]() Click Next to proceed through the EasyStep Interview.
Click Next to proceed through the EasyStep Interview.
Stopping, Restarting, and Completing the Interview
You don’t have to complete the EasyStep Interview in one session. If you need to take a break, you can exit from the EasyStep Interview without losing your place. When you return to QuickBooks, you’ll start right where you left off in the interview.
Stop and Restart the EasyStep Interview
![]() Click the Leave button in the EasyStep Interview window.
Click the Leave button in the EasyStep Interview window.

![]() Click OK (not shown).
Click OK (not shown).
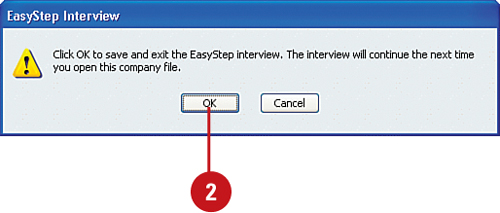
Timesaver
Pressing Alt+L accomplishes the same thing. The Interview window closes, but the place where you left off is remembered.
![]() Open QuickBooks, and you are automatically returned to the EasyStep Interview where you left off.
Open QuickBooks, and you are automatically returned to the EasyStep Interview where you left off.