14. Using Inventory Features
Merchandise that you own and expect to sell to others is called inventory. QuickBooks provides a full, interactive inventory feature that constantly tracks and updates your company’s inventory totals. Each time you receive new items in stock, your inventory quantity increases and your inventory cost is recalculated to reflect the average cost of all items in stock. Each time you sell an item, your inventory decreases. The cost of an inventory item you sell is recorded in your QuickBooks records at the current average cost of the item.
A reorder feature reminds you when supplies are getting low and tells you when you need to order more. QuickBooks also provides a warning message if you try to sell more inventory items than you have in stock.
Activating Inventory
Before you can use the QuickBooks inventory features, you must turn them on. You might have already encountered questions about inventory when you used the EasyStep Interview, and as a result, your inventory might already be activated. If you still need to activate your access to the program’s inventory features, this task leads you through the necessary steps.
![]() Select Edit, Preferences.
Select Edit, Preferences.
![]() Click the Items & Inventory icon.
Click the Items & Inventory icon.
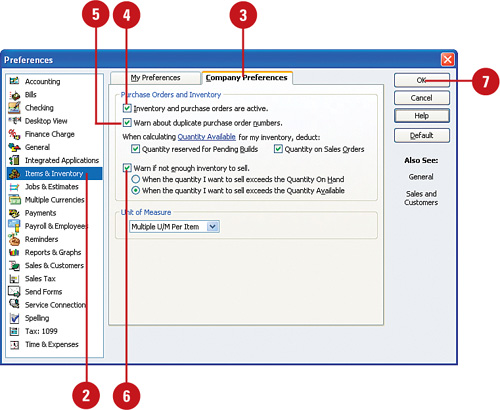
![]() Click the Company Preferences tab.
Click the Company Preferences tab.
![]() Check Inventory and Purchase Orders Are Active.
Check Inventory and Purchase Orders Are Active.
![]() While you’re here, you can check the box to have QuickBooks warn you if you are about to issue a purchase order with a number that duplicates another order.
While you’re here, you can check the box to have QuickBooks warn you if you are about to issue a purchase order with a number that duplicates another order.
![]() Also, you can check the box to have QuickBooks warn you if you try to issue an invoice for inventory items you do not have in stock.
Also, you can check the box to have QuickBooks warn you if you try to issue an invoice for inventory items you do not have in stock.
![]() Click OK.
Click OK.
Accounting for Inventory
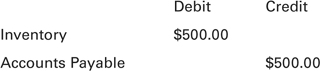
When you record the order of inventory items with a purchase order, no change is made to your company’s accounts. Until the receipt of the order is recorded, the inventory items are not accounted for on your company financial statements.
When you receive inventory items, you record the event and enter a bill for the items on an Enter Bills form. Here is an example of the accounts that are affected when you purchase and receive inventory items valued at $500:
When you pay the bill, these accounts are affected:

Setting Up Inventory Items
When you set up an inventory item in QuickBooks, you provide descriptive information about the item, as well as basic facts such as cost, sales price, sales tax treatment, and preferred vendor. In addition, you have the option of indicating how many of these items you prefer to keep in stock so QuickBooks can warn you when stock is running low. All inventory items must be set up in this manner before you can refer to the items on forms such as purchase orders, invoices, and bills. For an existing business with inventory already in place, this method of setting up inventory items is the most expedient. After you’ve set up your entire existing inventory using the features on the Item List as described in this task, you can enter new inventory items directly from your bills or purchase orders, as described in Chapter 5, “Making Purchases and Recording Payments,” or by using the Receive Items form, as described in the task that follows this one.
![]() Select Item List from either the Lists or the Customers menu.
Select Item List from either the Lists or the Customers menu.
Timesaver
You can also click the Items & Services icon found in the Company area of the home page.
![]() If the New Feature dialog displays (not shown), click Take Me There if you want to enter your new inventory items in a table format, or click OK and continue with Step 9.
If the New Feature dialog displays (not shown), click Take Me There if you want to enter your new inventory items in a table format, or click OK and continue with Step 9.
![]() If you are continuing from Step 2, the Add/Edit Multiple List Entries dialog displays. (You can also access this feature from Lists, Items List, selecting the Item drop-down menu and choosing the Add/Edit Multiple Items.)
If you are continuing from Step 2, the Add/Edit Multiple List Entries dialog displays. (You can also access this feature from Lists, Items List, selecting the Item drop-down menu and choosing the Add/Edit Multiple Items.)
![]() From the Add/Edit Multiple List Entries dialog, select Inventory Parts from the drop-down list.
From the Add/Edit Multiple List Entries dialog, select Inventory Parts from the drop-down list.
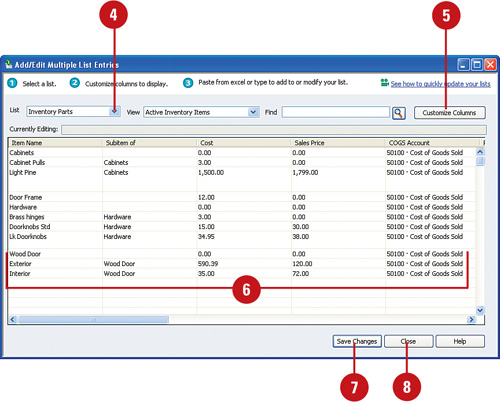
![]() Click Customize Columns if you want to change the order of the information to be entered or the selection of information displayed on this dialog.
Click Customize Columns if you want to change the order of the information to be entered or the selection of information displayed on this dialog.
![]() Enter an Item Name, choose from the list of subitems, enter an optional default cost and sales price, and select the proper COGS (Cost of Goods Sold) account from the drop-down menu. Right-click to duplicate rows, copy down, or even clear a column of data.
Enter an Item Name, choose from the list of subitems, enter an optional default cost and sales price, and select the proper COGS (Cost of Goods Sold) account from the drop-down menu. Right-click to duplicate rows, copy down, or even clear a column of data.
Important
You can use the handy Copy and Paste features of Microsoft programs to enter data into this Add/Edit Multiple List Entries tool that’s new in QuickBooks 2010.
![]() Click Save Changes to save your work.
Click Save Changes to save your work.
![]() Click Close.
Click Close.
![]() Press Ctrl+N. If the New Feature menu displays, click OK. The New Item dialog displays.
Press Ctrl+N. If the New Feature menu displays, click OK. The New Item dialog displays.
![]() Select Inventory Part from the Type drop-down list.
Select Inventory Part from the Type drop-down list.
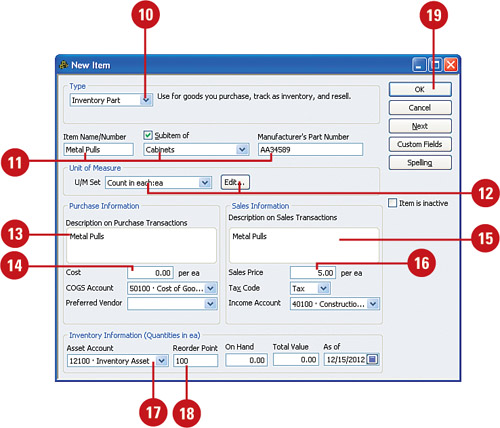
![]() Enter the name of the item as it will appear on your inventory list. Choose to associate with another item by selecting Subitem of, and enter an optional manufacturer’s part number.
Enter the name of the item as it will appear on your inventory list. Choose to associate with another item by selecting Subitem of, and enter an optional manufacturer’s part number.
![]() Choose an optional unit of measure for this item. Click Edit to define a unit of measure (only available with QuickBooks Premier or Enterprise).
Choose an optional unit of measure for this item. Click Edit to define a unit of measure (only available with QuickBooks Premier or Enterprise).
![]() Enter the description of the item as you want it to appear on purchase orders and bills when you purchase this item.
Enter the description of the item as you want it to appear on purchase orders and bills when you purchase this item.
![]() Enter the cost you pay when you purchase this item, indicate the Cost of Goods Sold account, and enter your preferred vendor if you have one.
Enter the cost you pay when you purchase this item, indicate the Cost of Goods Sold account, and enter your preferred vendor if you have one.
![]() Enter the description of the item that should appear on invoices when you sell this item to your customers, or accept the default description from the purchase information entered in Step 14.
Enter the description of the item that should appear on invoices when you sell this item to your customers, or accept the default description from the purchase information entered in Step 14.
![]() Enter the sales price you charge for this item. If the price varies, you should leave this field blank.
Enter the sales price you charge for this item. If the price varies, you should leave this field blank.
![]() Change the Tax Code option if necessary to indicate whether the sale of this item is subject to sales tax.
Change the Tax Code option if necessary to indicate whether the sale of this item is subject to sales tax.
![]() Enter the income account that is credited when a customer purchases this item.
Enter the income account that is credited when a customer purchases this item.
![]() Enter the asset account that is increased when you add this item to your inventory, or accept the default.
Enter the asset account that is increased when you add this item to your inventory, or accept the default.
![]() If you want to be reminded to reorder this item, enter the quantity of items that represents the cutoff for reordering. Although you can enter the On Hand quantity here, it is recommended that you use an Inventory Adjustment to do this. See the section titled “Adjusting Inventory Quantities” (later in this chapter).
If you want to be reminded to reorder this item, enter the quantity of items that represents the cutoff for reordering. Although you can enter the On Hand quantity here, it is recommended that you use an Inventory Adjustment to do this. See the section titled “Adjusting Inventory Quantities” (later in this chapter).
![]() Click OK.
Click OK.
Adding to Your Inventory
When you record the receipt of inventory items from your vendors, those items are added to your QuickBooks inventory. You can record the receipt of items from a vendor’s bill, or if you haven’t yet received a bill, the items can be entered from a packing slip. As soon as the bill arrives, one check mark turns the QuickBooks record of received items into a bill that needs to be paid.
![]() Select Vendors, Receive Items.
Select Vendors, Receive Items.
Timesaver
Click the Receive Inventory icon in the Vendor section of the home page and then choose Receive Inventory without Bill from the pop-up menu that displays.
![]() Enter the name of the vendor.
Enter the name of the vendor.
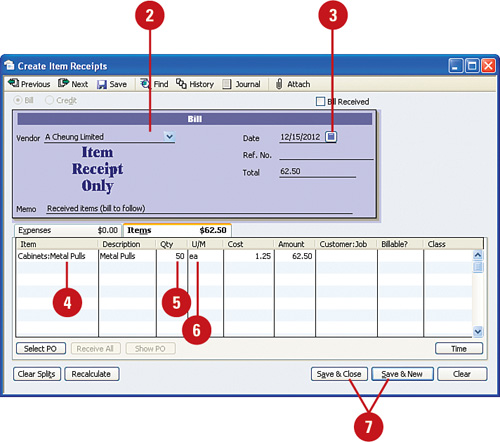
![]() Enter the date the items were received.
Enter the date the items were received.
![]() Enter the name of the item(s) received.
Enter the name of the item(s) received.
![]() Enter the quantity of items received.
Enter the quantity of items received.
![]() You can enter the cost of the items if you have this information, or you can leave this area blank.
You can enter the cost of the items if you have this information, or you can leave this area blank.
![]() Click one of the save options; the items are immediately added to your inventory.
Click one of the save options; the items are immediately added to your inventory.
Editing Inventory Items
If the information you recorded about your inventory items changes, you can easily edit the information in your QuickBooks records. You can change information about the item, including item description, the cost, the sales price, a preferred vendor, and the sales tax status. You cannot change the item’s on-hand quantity or the average cost. You also can’t change the item’s type. After an item is designated as an inventory part item, it must keep that designation.
![]() Select Lists, Item List. If the Add/Edit Multiple List Entries dialog displays, click OK.
Select Lists, Item List. If the Add/Edit Multiple List Entries dialog displays, click OK.
![]() Click the name of the item you want to change.
Click the name of the item you want to change.

![]() Press Ctrl+E.
Press Ctrl+E.
![]() Change any of the information in the white areas of the Edit Item window, except the Type, which cannot be changed (see the following “Did You Know?”). Note that the information that displays in the edit window varies, depending on the type of item you choose. The window shown here is for an inventory part item.
Change any of the information in the white areas of the Edit Item window, except the Type, which cannot be changed (see the following “Did You Know?”). Note that the information that displays in the edit window varies, depending on the type of item you choose. The window shown here is for an inventory part item.
![]() Click OK.
Click OK.

Creating an Inventory Group
Sometimes you might want to group several inventory items into one mega-item, so you can refer to the group as a whole. For example, suppose you are a retailer who sells dishware. Your inventory might include plates, cups, saucers, and bowls, all of which could be sold individually. Alternatively, you could group together one place setting of a plate, cup, saucer, and bowl and sell the group as a single item. Construction and manufacturing companies can use this feature, too. In this example, a construction company creates a group of items that together make up the supplies and labor required to build a wooden deck.
Set Up the Inventory Group
![]() Select Lists, Item List. If the Add/Edit Multiple List Entries dialog displays, click OK.
Select Lists, Item List. If the Add/Edit Multiple List Entries dialog displays, click OK.
![]() Press Ctrl+N.
Press Ctrl+N.
![]() Select Group as the Type.
Select Group as the Type.

![]() Enter a name for the group.
Enter a name for the group.
![]() Enter a description for the group.
Enter a description for the group.
![]() Check the Print Items in Group box if you want all the details of the group to appear on customer invoices. If you leave this unchecked, only the name of the group prints.
Check the Print Items in Group box if you want all the details of the group to appear on customer invoices. If you leave this unchecked, only the name of the group prints.
![]() Enter the individual items that form the group.
Enter the individual items that form the group.
![]() Click OK.
Click OK.
Use the Inventory Group
![]() Open a new invoice by pressing Ctrl+I.
Open a new invoice by pressing Ctrl+I.
Timesaver
You can also get to a new invoice by clicking the Invoices icon on the home page.
![]() Enter the customer name.
Enter the customer name.
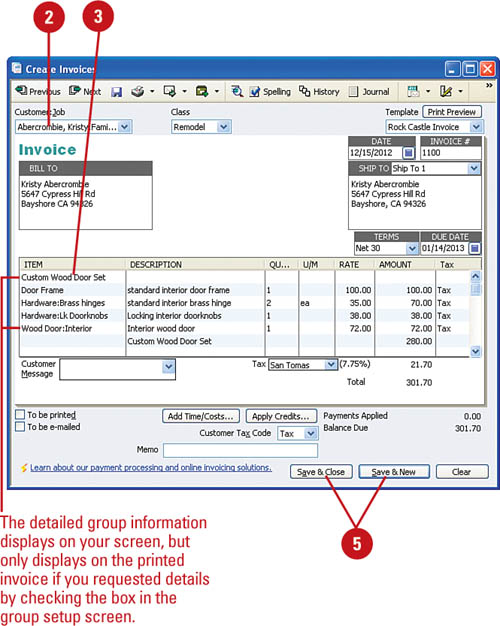
![]() Enter the name of the group.
Enter the name of the group.
![]() Verify that all other information is correct.
Verify that all other information is correct.
![]() Click one of the Save buttons.
Click one of the Save buttons.
Managing Sales Orders
QuickBooks Premier and Enterprise versions offer a feature called Sales Orders whereby you can track all the inventory sales orders that have yet to be filled or invoiced. This feature is advantageous for companies that make repeat sales to customers and don’t want to invoice the customers separately for each sale, and for companies that need to create worksheets for organizing order fulfillment from a warehouse or other inventory storage facility. Fill out a sales order much like you would fill out a purchase order, and then track the progress of your sales orders through the Sales Order Fulfillment Worksheet.
Manage Sales Orders
![]() Choose Customers, Create Sales Orders from the menu.
Choose Customers, Create Sales Orders from the menu.
![]() Enter customer name, date, and order information, just as you would if you were entering information directly on the customer’s invoice.
Enter customer name, date, and order information, just as you would if you were entering information directly on the customer’s invoice.
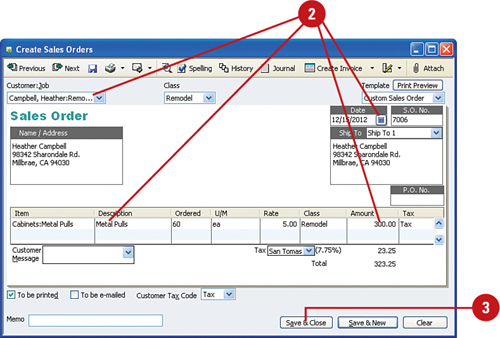
![]() Click Save & Close to save the sales order.
Click Save & Close to save the sales order.
![]() Choose Customers, Sales Order Fulfillment Worksheet.
Choose Customers, Sales Order Fulfillment Worksheet.
![]() Note the fulfillment status codes in the Sales Orders portion of the worksheet.
Note the fulfillment status codes in the Sales Orders portion of the worksheet.
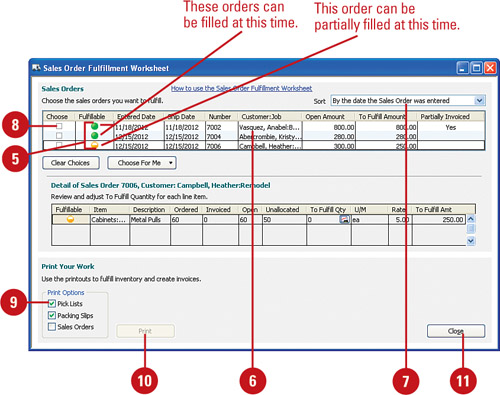
![]() Click on an item to see the detail of the sales order.
Click on an item to see the detail of the sales order.
![]() Select from several options for sorting the report.
Select from several options for sorting the report.
![]() Check off orders you want to fulfill.
Check off orders you want to fulfill.
![]() Check the boxes for any forms you want to print.
Check the boxes for any forms you want to print.
![]() Click Print to print the selected forms.
Click Print to print the selected forms.
![]() Click Close to close the report. Note that nothing you enter on this report is saved.
Click Close to close the report. Note that nothing you enter on this report is saved.
![]() Press Ctrl+I to open an invoice form.
Press Ctrl+I to open an invoice form.
![]() Enter the customer name.
Enter the customer name.

![]() Open sales orders for this customer appear in the Available Sales Orders dialog box that displays.
Open sales orders for this customer appear in the Available Sales Orders dialog box that displays.
![]() Check off any sales orders that you want to invoice at this time.
Check off any sales orders that you want to invoice at this time.
![]() Click OK to close the Available Sales Orders dialog and return to the invoice.
Click OK to close the Available Sales Orders dialog and return to the invoice.
![]() You will be asked to indicate if you want to invoice for all items or only selected items on the sales order (not shown). If you choose Selected Items, you can enter the quantity of items that you will invoice at this time.
You will be asked to indicate if you want to invoice for all items or only selected items on the sales order (not shown). If you choose Selected Items, you can enter the quantity of items that you will invoice at this time.
![]() Information from the sales order displays on your invoice. Complete the invoice and choose a save option.
Information from the sales order displays on your invoice. Complete the invoice and choose a save option.
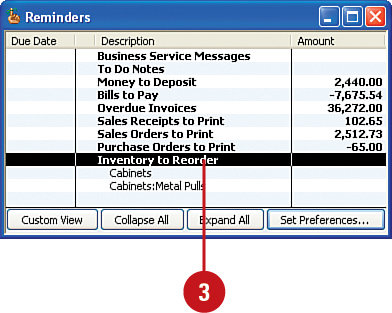
Setting Up Reminders to Replenish Your Inventory
If you didn’t designate a reorder point when you set up your inventory items, now’s the time to do so. Edit your inventory items and enter how many of each item you want to keep in stock. Then use the reminders list to send yourself messages to reorder. Every time the level of an inventory item in stock drops below the reorder point, a reminder to reorder is added to your reminders list.
Create a Reminder to Replenish Inventory
![]() Select Lists, Item List. If the Add/Edit Multiple List Entries dialog displays, click OK.
Select Lists, Item List. If the Add/Edit Multiple List Entries dialog displays, click OK.
![]() Click the item for which you want to establish a reorder point.
Click the item for which you want to establish a reorder point.
![]() Press Ctrl+E.
Press Ctrl+E.
![]() Enter the reorder point.
Enter the reorder point.
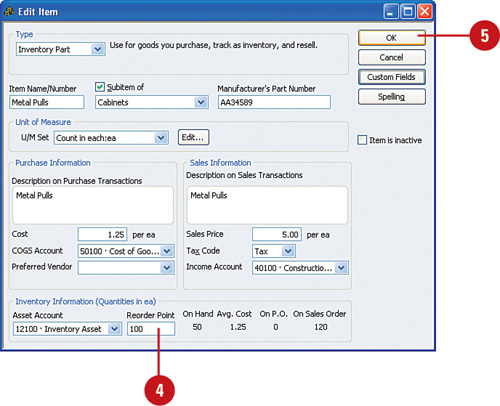
![]() Click OK.
Click OK.
View Reminders
![]() Select Company, Reminders.
Select Company, Reminders.
![]() Scroll down if necessary until you find the Inventory To Reorder reminder.
Scroll down if necessary until you find the Inventory To Reorder reminder.
![]() Double-click Inventory to Reorder. All items that have passed their reorder point now appear.
Double-click Inventory to Reorder. All items that have passed their reorder point now appear.
Preparing Inventory Reports
You can produce several standard inventory reports in QuickBooks. You can then use these reports to keep track of how many items are on hand, the value of your inventory, and pricing information. A detailed description of each type of inventory report is included. Remember that you can customize these reports to fit your needs, and you can export reports to Microsoft Excel if you need to present reports in a format not supported by QuickBooks.
![]() Select Reports, Inventory, or view the inventory report selections in the Report Center; then open one of the following inventory reports:
Select Reports, Inventory, or view the inventory report selections in the Report Center; then open one of the following inventory reports:
• Inventory Valuation Summary
• Inventory Valuation Detail
• Inventory Stock Status by Item
• Inventory Stock Status by Vendor
• Physical Inventory Worksheet
• Pending Builds

![]() See the next page for a description of each of these reports.
See the next page for a description of each of these reports.
Counting Your Inventory
Although QuickBooks keeps meticulous records of the inventory you purchase and the sales you enter, differences will occur between the amounts entered during the year and the actual quantity of items on your shelves. The more frequently you count inventory, the more likely you are to be aware of any loss or damage to your inventory. You should try to account for material discrepancies between your books versus your actual inventory records. To assist you in taking a physical inventory count, QuickBooks provides a Physical Inventory Worksheet that you can print out and use while you count your inventory. In this example, the column that displays the QuickBooks count of inventory items is removed so the person making the physical count will be less inclined to rely on the computer-supplied numbers when counting inventory.
![]() Select Reports, Inventory; then select Physical Inventory Worksheet.
Select Reports, Inventory; then select Physical Inventory Worksheet.
![]() To remove the On Hand column, place the mouse pointer over the small diamond to the right of the On Hand column heading.
To remove the On Hand column, place the mouse pointer over the small diamond to the right of the On Hand column heading.

![]() Drag the diamond over the words On Hand, to the diamond on the left of the column heading.
Drag the diamond over the words On Hand, to the diamond on the left of the column heading.
![]() Release the mouse; the On Hand column disappears.
Release the mouse; the On Hand column disappears.
![]() Slide the diamonds as necessary so that the full text of each column is visible.
Slide the diamonds as necessary so that the full text of each column is visible.
![]() Click the Print button.
Click the Print button.
![]() Click Print in the Print Reports window.
Click Print in the Print Reports window.
Adjusting Inventory Quantities
After you take a physical count of your inventory, you might find that some of your QuickBooks inventory records don’t agree with the actual count at your business premises. You might need to make adjustments in the count recorded in QuickBooks. Check with your company’s accountant before making any adjustment in inventory quantities to ensure that such an adjustment is accounted for properly. Some financial and tax considerations must be addressed when making such an adjustment.
![]() Select Lists, Item List.
Select Lists, Item List.
![]() Click the Activities button.
Click the Activities button.
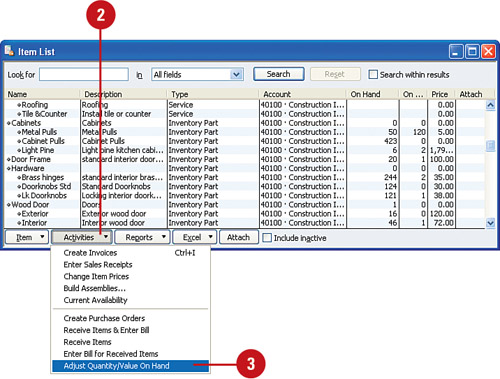
![]() Select Adjust Quantity/Value On Hand.
Select Adjust Quantity/Value On Hand.
![]() Enter the date on which you want the adjustment to affect your financial records. Often, this type of adjustment is recorded as a year-end adjustment.
Enter the date on which you want the adjustment to affect your financial records. Often, this type of adjustment is recorded as a year-end adjustment.

![]() Choose an account in the Adjustment Account list.
Choose an account in the Adjustment Account list.
![]() For each inventory item that needs to be changed, enter the actual quantity on hand.
For each inventory item that needs to be changed, enter the actual quantity on hand.
![]() QuickBooks calculates the change in quantity.
QuickBooks calculates the change in quantity.
![]() Check Value Adjustment if you want to display a new column that shows the dollar amount of the change by individual item. You can also enter a specific value of an item in the New Value column that displays.
Check Value Adjustment if you want to display a new column that shows the dollar amount of the change by individual item. You can also enter a specific value of an item in the New Value column that displays.
![]() Enter an optional memo describing the reason for the adjustment.
Enter an optional memo describing the reason for the adjustment.
![]() Click one of the Save buttons.
Click one of the Save buttons.
Adjusting the Default Price of Inventory
When you enter inventory items in QuickBooks, you have the option of entering the sales price for each item. When the price for an item has already been entered, you don’t have to remember prices when you create invoices for customers because QuickBooks automatically enters the price information for you. And here’s an even greater timesaver: If you need to change the sales prices on any or all of your inventory items, you don’t have to edit the items individually. Instead, you can bring up a window that shows all your inventory items and their prices and then go down the list, making changes to any of the items. Or you can select the items to change and order QuickBooks to change everything at once by a certain markup or markdown percentage or amount.
![]() Select Lists, Item List. If the Add/Edit Multiple List Entries dialog displays, click OK.
Select Lists, Item List. If the Add/Edit Multiple List Entries dialog displays, click OK.
![]() Click the Activities button.
Click the Activities button.
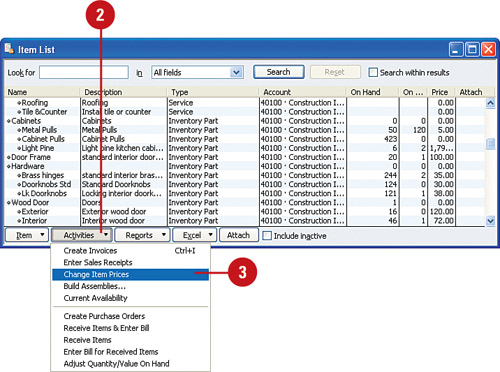
![]() Select Change Item Prices.
Select Change Item Prices.
![]() Choose from the Item Type list what you want to display on this report.
Choose from the Item Type list what you want to display on this report.

![]() Click to place a check mark in the column to the left of any individual item you want to change.
Click to place a check mark in the column to the left of any individual item you want to change.
![]() Make the price change in the New Price column.
Make the price change in the New Price column.
![]() Alternatively, click Mark All to change all the inventory items at once.
Alternatively, click Mark All to change all the inventory items at once.
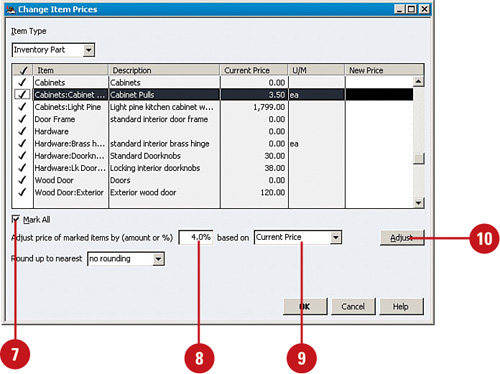
![]() Change the price of all marked items at once by entering a percent or dollar amount by which you want to change the price of the selected items. Use a minus sign if the change is to be a markdown instead of a markup.
Change the price of all marked items at once by entering a percent or dollar amount by which you want to change the price of the selected items. Use a minus sign if the change is to be a markdown instead of a markup.
![]() Select whether the price change is to be based on sales price (Current Price) or cost (Unit Cost).
Select whether the price change is to be based on sales price (Current Price) or cost (Unit Cost).
![]() Click the Adjust button (even if the change is to be a markdown).
Click the Adjust button (even if the change is to be a markdown).
![]() The new marked-up (or marked-down) prices are assigned to all checked items.
The new marked-up (or marked-down) prices are assigned to all checked items.

![]() Click OK.
Click OK.