6. Collecting and Paying Sales Tax
If you sell items at retail and the items you sell qualify for sales tax, you are expected to collect sales tax from your customers at the time of the sale and remit that tax to the government on a timely basis.
Because sales tax displays as a separate item on your invoice forms, you must set up a Sales Tax Item so that QuickBooks will accurately calculate the tax on sales forms. After you’ve set up a sales tax item, the tax calculates on your sales forms so you can charge your customers for the tax.
In some states, various goods are exempt from sales tax. New Jersey, for example, doesn’t tax the sale of clothing. Illinois doesn’t tax the sale of newspapers and magazines. QuickBooks enables you to specify which of the items you sell are subject to the tax and which are not.
Some customers are exempt from sales tax. For those customers, QuickBooks gives you an option of exempting the customers or particular sales from sales tax.
After you’ve collected the tax, you are required to remit it to your state or local government. QuickBooks provides you with a form that summarizes your tax collections. You can use this form to calculate your sales tax, and then you can make your payment. You can also fill out your state sales tax form with the aid of a liability report and record an early payment discount in QuickBooks if your tax collection agency allows such a discount.
Setting Sales Tax Preferences
Before you can apply sales tax on your sales to customers, you need to set up preferences that indicate your sales tax requirements. In the Preferences window, you indicate when tax is charged to your customers, the frequency with which you pay sales tax to the government, and the name of the taxing jurisdiction(s) to whom you pay tax. You can also indicate whether you want taxable items to be tagged on invoices.
![]() Select Edit, Preferences to open the Preferences window.
Select Edit, Preferences to open the Preferences window.
![]() Click the Sales Tax icon.
Click the Sales Tax icon.

![]() Click the Company Preferences tab.
Click the Company Preferences tab.
![]() Select Yes to indicate that your company charges sales tax.
Select Yes to indicate that your company charges sales tax.
![]() Click Add Sales Tax Item to set up a new sales tax item (see the next task).
Click Add Sales Tax Item to set up a new sales tax item (see the next task).
![]() Indicate the name of the sales tax item you most frequently charge to customers.
Indicate the name of the sales tax item you most frequently charge to customers.
![]() Indicate the terms you want to use to see taxable and non-taxable sales.
Indicate the terms you want to use to see taxable and non-taxable sales.
![]() Check the Identify Taxable Amounts box if you want a T to appear on sales forms to identify taxable items.
Check the Identify Taxable Amounts box if you want a T to appear on sales forms to identify taxable items.
![]() Indicate when you actually owe sales tax.
Indicate when you actually owe sales tax.
![]() Select the frequency of your sales tax remittances.
Select the frequency of your sales tax remittances.
![]() Click OK to save your changes.
Click OK to save your changes.
Creating a Sales Tax Item
Remember, items are the pieces of information listed on sales and purchase forms, such as the goods you purchase. Sales tax is an item, too, because it occupies a line on your sales forms. Before you can charge a customer sales tax, you have to set up the Sales Tax Item, indicating the name of the tax, the taxing authority that ultimately receives the tax payment, and the rate at which tax is calculated. After all this is set up, charging sales tax becomes automatic.
![]() Open the New Item window by selecting Lists, Item List, and then pressing Ctrl+N. If the New Feature dialog opens, click OK to close that dialog. The Add/Edit Multiple Items does not currently allow you to create a Sales Tax item type.
Open the New Item window by selecting Lists, Item List, and then pressing Ctrl+N. If the New Feature dialog opens, click OK to close that dialog. The Add/Edit Multiple Items does not currently allow you to create a Sales Tax item type.
Timesaver
Click the Items & Services icon on the Home page to open the Item List.
![]() Select Sales Tax Item as the item type.
Select Sales Tax Item as the item type.

![]() Give your sales tax a name. “Sales Tax” is fine if there is only one tax and only one rate. If you pay tax at multiple rates or to different government offices, select a name that distinguishes this tax from the others.
Give your sales tax a name. “Sales Tax” is fine if there is only one tax and only one rate. If you pay tax at multiple rates or to different government offices, select a name that distinguishes this tax from the others.
![]() Enter a description of the tax and, if applicable, to what it applies.
Enter a description of the tax and, if applicable, to what it applies.
![]() Enter the rate for this tax.
Enter the rate for this tax.
![]() Select the name of the agency to which you pay the tax from the drop-down list. This agency is added to your vendor list. If the tax agency does not appear on the list, select Add New at the top of the drop-down list to enter the agency name.
Select the name of the agency to which you pay the tax from the drop-down list. This agency is added to your vendor list. If the tax agency does not appear on the list, select Add New at the top of the drop-down list to enter the agency name.
![]() Click OK to save your changes.
Click OK to save your changes.
Creating a Sales Tax Group
Some companies have to remit sales tax to multiple sales tax authorities. If your company is required to charge and remit sales tax to more than one taxing authority, you can group the sales taxes together and apply them at once to the item being taxed. Each sales tax is set up as a separate sales tax item in QuickBooks, but on your invoices, the sales tax group displays as if it were one tax.
![]() Select Lists, Item List from the menu.
Select Lists, Item List from the menu.
![]() Press Ctrl+N to create a new item. If the New Feature dialog opens, you can optionally create multiple sales tax items in the Add/Edit Multiple List Entries feature. Click OK to close this dialog.
Press Ctrl+N to create a new item. If the New Feature dialog opens, you can optionally create multiple sales tax items in the Add/Edit Multiple List Entries feature. Click OK to close this dialog.
![]() Select Sales Tax Group as the item type.
Select Sales Tax Group as the item type.
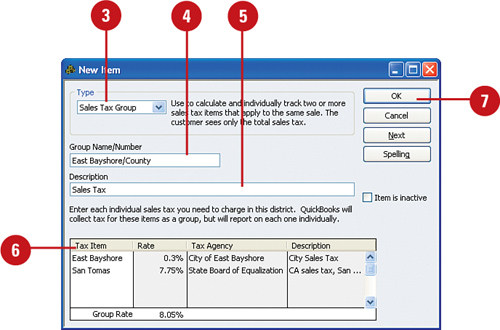
![]() Enter a name for the sales tax group.
Enter a name for the sales tax group.
![]() Enter an optional description for the group.
Enter an optional description for the group.
![]() Enter each of the sales tax items you want to include in the group.
Enter each of the sales tax items you want to include in the group.
![]() Click OK.
Click OK.
Charging Sales Tax to Customers
QuickBooks calculates sales tax based on the rate you enter. All items on an invoice that are subject to tax are added together and the tax rate is applied. Items that have been designated as non-taxable are exempted from the tax calculation. Customers who are set up in your system should already have the appropriate sales tax rate assigned to them (see “Adding Customers” in Chapter 3, “Adding or Changing Information After the Interview Is Completed”). If the sales tax rate has not been assigned to your customer, you can indicate which tax rate to use right on the invoice. If you charge the same tax rate on everything you sell, the process of charging sales tax is easier still.
![]() Open an invoice (press Ctrl+I).
Open an invoice (press Ctrl+I).
![]() Enter the customer name and the item(s) you plan to sell.
Enter the customer name and the item(s) you plan to sell.

![]() Verify that the correct tax displays or select the correct tax. If you pay tax at only one rate and to only one government office, only one tax will be listed here.
Verify that the correct tax displays or select the correct tax. If you pay tax at only one rate and to only one government office, only one tax will be listed here.
![]() Save the invoice.
Save the invoice.
Entering Tax Status of Inventory Items
It’s not unusual to prepare an invoice that includes both taxable and non-taxable items. For example, your invoice might be for services and inventory items. The inventory items might be taxable, but the services might not be subject to sales tax in your state. When you set up your items (see “Adding Items” in Chapter 3), you indicate whether each item is taxable. If the sales tax status of an item has changed, or if the tax status was not entered at the time you set up the item, you can edit the item to enter the correct sales tax status.
![]() Select Lists, Item List from the menu. If the New Feature dialog displays, click OK to close and resume with Step 2. Select Take Me There if you wish to do your editing in the new Add/Edit Multiple Items dialog (not shown).
Select Lists, Item List from the menu. If the New Feature dialog displays, click OK to close and resume with Step 2. Select Take Me There if you wish to do your editing in the new Add/Edit Multiple Items dialog (not shown).
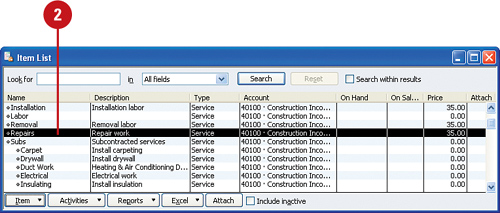
![]() Click an item for which you want to identify the tax status.
Click an item for which you want to identify the tax status.
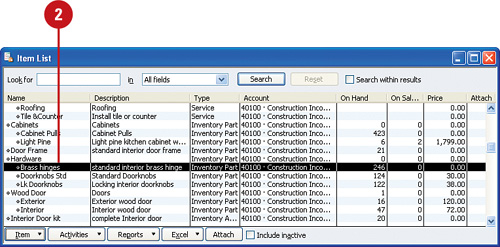
![]() Press Ctrl+E to edit the item.
Press Ctrl+E to edit the item.
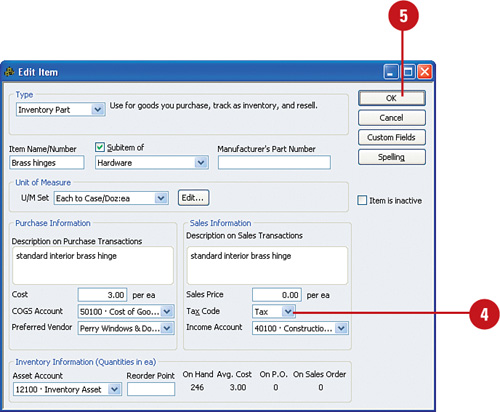
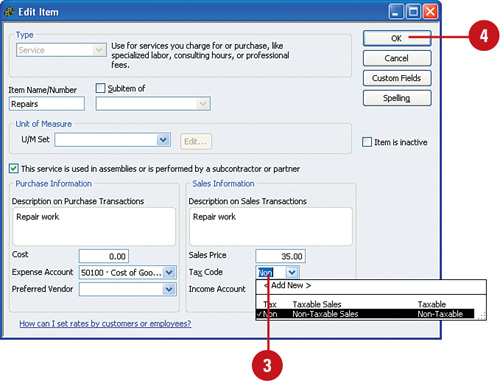
![]() Set the Tax Code to Tax or Non, depending on the tax status of the item.
Set the Tax Code to Tax or Non, depending on the tax status of the item.
![]() Click OK.
Click OK.
![]() Repeat this for all the items for which you want to assign tax status.
Repeat this for all the items for which you want to assign tax status.
![]() Press Esc or click the Close button to close the Item List when you are finished.
Press Esc or click the Close button to close the Item List when you are finished.
Selling Tax-Exempt Items
If your state’s tax law allows you to exempt certain items from the sales tax calculation, you can make this exemption automatic when you set up the non-taxable items. Each state has different rules about what is and isn’t taxable. For example, some states exempt sales of clothing from sales tax. Find out the rules for your state, and then set up your items accordingly.
![]() Open the Item List by selecting Lists, Item List from the menu.
Open the Item List by selecting Lists, Item List from the menu.
![]() Double-click the item that you want to make tax-exempt. The Edit Item window displays.
Double-click the item that you want to make tax-exempt. The Edit Item window displays.
![]() Change the Tax Code to Non to indicate that this is a non-taxable item.
Change the Tax Code to Non to indicate that this is a non-taxable item.
![]() Click OK.
Click OK.
Selling Items to Tax-Exempt Customers
Some customers are exempt from paying sales tax. You need to acquire a tax-exempt number from the customers who are exempt. QuickBooks provides a place where you can enter this number. When you issue an invoice to that customer, tax is not charged.
![]() Click the Customer Center button on the Home page or icon bar.
Click the Customer Center button on the Home page or icon bar.
![]() Click the Customers & Jobs tab.
Click the Customers & Jobs tab.

![]() Double-click the name of the customer not subject to sales tax, or press Ctrl+E to open the Edit Customer window.
Double-click the name of the customer not subject to sales tax, or press Ctrl+E to open the Edit Customer window.
![]() Click the Additional Info tab.
Click the Additional Info tab.

![]() Change the Tax Code to Non for non-taxable status.
Change the Tax Code to Non for non-taxable status.
![]() If applicable, enter the customer’s resale number.
If applicable, enter the customer’s resale number.
![]() Click OK to save your changes.
Click OK to save your changes.
Important
Double-click on Customer, not Job. When making changes such as indicating a tax-exempt customer, be sure you open the Customer’s edit window, not the edit window for a Job. There is no option for setting sales tax information in the Job windows.
Producing Monthly Sales Tax Reports
Every state has a different form that accompanies sales tax payments. Although QuickBooks does not prepare the sales tax form for each state, the program does provide a sales tax report. This report helps you fill out the sales tax form for the state or states to which you must make payments.
![]() From the Home page click the Manage Sales Tax icon.
From the Home page click the Manage Sales Tax icon.

![]() Select the link for the Sales Tax Liability report in the Pay Sales Tax pane.
Select the link for the Sales Tax Liability report in the Pay Sales Tax pane.
![]() Change the dates to reflect the time period that is covered by your current sales tax bill.
Change the dates to reflect the time period that is covered by your current sales tax bill.

![]() Click the Print button if you need to print the report.
Click the Print button if you need to print the report.
![]() Close the report.
Close the report.
Paying Sales Tax
When it’s time for you to pay your sales tax, open the Pay Sales Tax window. From there, you can issue checks for sales tax payments and relieve your sales tax liability at the same time. By using the QuickBooks sales tax payment process, all accounts are charged properly. At any time, you can examine the information in this window if you want to know the status of your sales tax payable.
![]() From the Home page select Manage Sales Tax.
From the Home page select Manage Sales Tax.
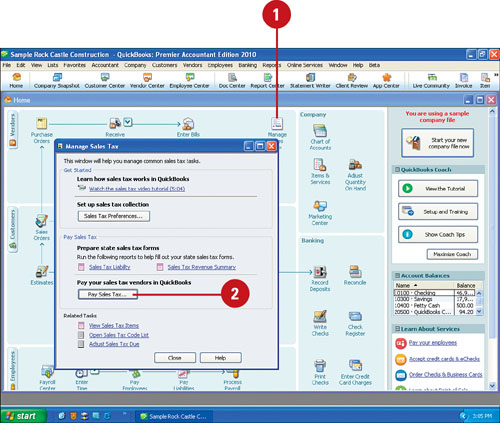
![]() Click the Pay Sales Tax button.
Click the Pay Sales Tax button.
![]() Verify that the bank account is correct.
Verify that the bank account is correct.
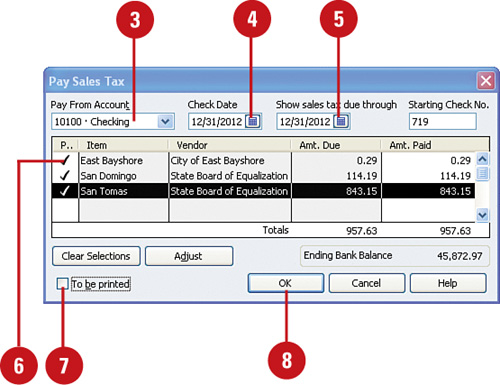
![]() Verify the date that will appear on the check.
Verify the date that will appear on the check.
![]() Verify the date through which sales tax is due.
Verify the date through which sales tax is due.
![]() Click to check each sales tax item you want to pay.
Click to check each sales tax item you want to pay.
![]() Check the To Be Printed box if you plan to use QuickBooks to print this check.
Check the To Be Printed box if you plan to use QuickBooks to print this check.
![]() Click OK to execute the payment.
Click OK to execute the payment.
Taking a Discount for Early Payment
If you pay your sales tax early or on time, you might have an opportunity to take a discount for the timely payment. If you simply reduce the amount you pay in QuickBooks, it will look like you didn’t pay the entire bill and you’ll still carry a liability on the books. Instead, you can record the amount of the discount first, offsetting the amount you owe; and then when you’re ready to pay the tax, the correct amount displays.
![]() From the Home page, click Manage Sales Tax.
From the Home page, click Manage Sales Tax.

![]() Select the Adjust Sales Tax Due link from the Manage Sales Tax window.
Select the Adjust Sales Tax Due link from the Manage Sales Tax window.
![]() Enter the date on which the discount is taken.
Enter the date on which the discount is taken.

![]() Enter the name of the government agency to which you pay the sales tax.
Enter the name of the government agency to which you pay the sales tax.
![]() Enter the account in which you record discounts.
Enter the account in which you record discounts.
![]() Click the Reduce Sales Tax By option.
Click the Reduce Sales Tax By option.
![]() Enter the amount of the discount.
Enter the amount of the discount.
![]() Click OK.
Click OK.
Accounting for Sales Tax
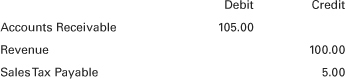
When you create an invoice for a taxable sale, several accounts are affected. Not only do you increase your sales revenue account and your accounts receivable account (or cash, if it is a cash sale), but your sales tax liability account is affected as well. Then, at the end of the month, when you pay your sales tax, the liability account is reduced. Here’s how a sample transaction is recorded in QuickBooks.
An invoice is issued for the sale of $100 of taxable items and $5 sales tax, for a total of $105. Here are the accounts that are affected:
Note that if the item you sold is an inventory item that cost you $60, these accounts are affected as well:

When you ultimately pay your sales tax, these accounts are affected for the total amount of your current liability:
