Workshops
You’ve learned the steps for performing everyday tasks in QuickBooks. Now it’s time to stretch your QuickBooks legs a bit and pick up some new pointers for making your QuickBooks experience more robust.
This section of the book contains a handful of interesting projects that go beyond the day-to-day experience. Included in these projects are workshops to help you learn to create your own Favorites menu, use the new Document Manager, and see critical information about your business by viewing the Company Snapshot.
Project 1: Creating Your Own Favorites Menu
At various points in this book, we’ve discussed memorizing commonly used reports. We have also provided instructions for adding commonly used reports and forms to the icon bar. New for QuickBooks 2010 is your very own Favorites menu.
You can add both reports and forms directly to the Favorites menu. If your QuickBooks file is used by multiple users, trust that your Favorites menu is only seen by you when you log into the QuickBooks file with a user name unique to you. The Favorites menu is also company file specific, meaning if you have multiple company files, the Favorites menu you create in one file will not be available in the other company file.
Begin using QuickBooks more efficiently by creating your own user- and file-specific Favorites menu.
The Project
With the steps shown in this project, you can add or remove the Favorites menu, and customize and organize your very own Favorites menu.
The Process
![]() Click View, and select Favorites Menu to show or to hide the Favorites menu.
Click View, and select Favorites Menu to show or to hide the Favorites menu.

![]() From the menu bar, click Favorites, Customize Favorites (not shown).
From the menu bar, click Favorites, Customize Favorites (not shown).
![]() On the Customize Your Menus dialog, click on a form or report in the Available Menu Items list on the left side of the dialog.
On the Customize Your Menus dialog, click on a form or report in the Available Menu Items list on the left side of the dialog.

![]() Click Add to include the selected item on your Chosen Menu Items list.
Click Add to include the selected item on your Chosen Menu Items list.
![]() Click an item in the right pane.
Click an item in the right pane.
![]() Click Remove to take a selected item off of your Chosen Menu Items list.
Click Remove to take a selected item off of your Chosen Menu Items list.
![]() Select one of the Chosen Menu Items and click Move Up or Move Down to arrange the items on the list.
Select one of the Chosen Menu Items and click Move Up or Move Down to arrange the items on the list.
![]() Click OK.
Click OK.
Project 2: Customizing the Company Snapshot
The QuickBooks Company Snapshot feature is available in the 2010 versions of QuickBooks Pro, QuickBooks Premier, and QuickBooks Enterprise Solutions. When you display the Company Snapshot, you see all of the vital information about your company on one screen without losing the ability to drill down to the original documents supporting any of the items or amounts displayed on the snapshot screen.
You can customize the selection of information that appears on the snapshot, and if you really like this feature, you can even turn it into your QuickBooks home page. If you work with multiple users in the same QuickBooks data file, your Company Snapshot is only seen by you when you log into the data file with your own username.
The Project
Display the Company Snapshot, add new content, rearrange the content, and examine details of the data. You can set the snapshot as your QuickBooks home page.
The Process
![]() Click the Company Snapshot button on the QuickBooks Icon Bar or choose Company Snapshot from the Company menu (not shown).
Click the Company Snapshot button on the QuickBooks Icon Bar or choose Company Snapshot from the Company menu (not shown).
![]() Click Add Content to view and select additional reports for viewing on your personalized Company Snapshot.
Click Add Content to view and select additional reports for viewing on your personalized Company Snapshot.

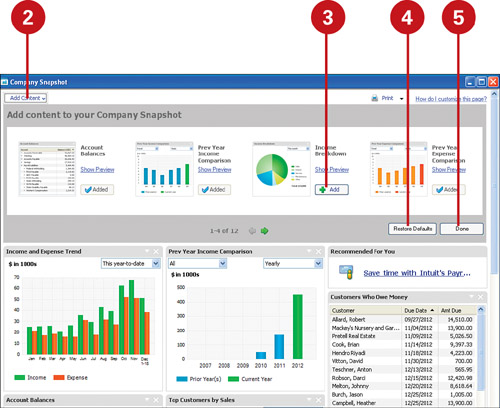
![]() Click the (+) sign to select a new report or graph for display on your Company Snapshot.
Click the (+) sign to select a new report or graph for display on your Company Snapshot.
![]() Click Restore Defaults to remove additional content that was added.
Click Restore Defaults to remove additional content that was added.
![]() Click Done.
Click Done.
![]() Click Print to print a hard copy of your company snapshot.
Click Print to print a hard copy of your company snapshot.

![]() Click the header of any graph or report displayed on the Company Snapshot. A move icon displays.
Click the header of any graph or report displayed on the Company Snapshot. A move icon displays.
![]() With the move icon mouse cursor displayed, drag and drop the content to any other location on the Company Snapshot.
With the move icon mouse cursor displayed, drag and drop the content to any other location on the Company Snapshot.
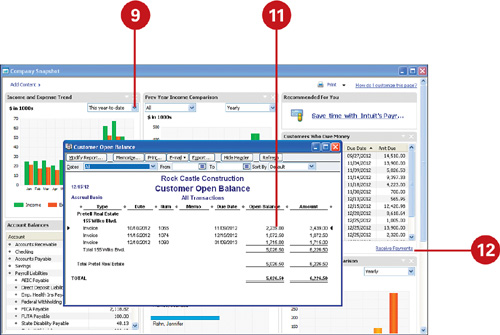
![]() Change the information displayed on any graph or report by choosing a different date range in the drop-down menu.
Change the information displayed on any graph or report by choosing a different date range in the drop-down menu.
![]() Hover over any bar on the graph to see the actual amount represented by the bar (not shown).
Hover over any bar on the graph to see the actual amount represented by the bar (not shown).
![]() Double-click on any information displayed on a report or graph to get more detailed information.
Double-click on any information displayed on a report or graph to get more detailed information.
![]() Click additional links to useful related tasks. Shown here is the Receive Payments link; click it to record money received from your customers.
Click additional links to useful related tasks. Shown here is the Receive Payments link; click it to record money received from your customers.
![]() To set the Company Snapshot as your home page, first make sure the Company Snapshot screen is open on your computer screen.
To set the Company Snapshot as your home page, first make sure the Company Snapshot screen is open on your computer screen.
![]() Choose Edit, Preferences, and click Desktop View on the left side of the Preferences window.
Choose Edit, Preferences, and click Desktop View on the left side of the Preferences window.
![]() Choose Save Current Desktop.
Choose Save Current Desktop.
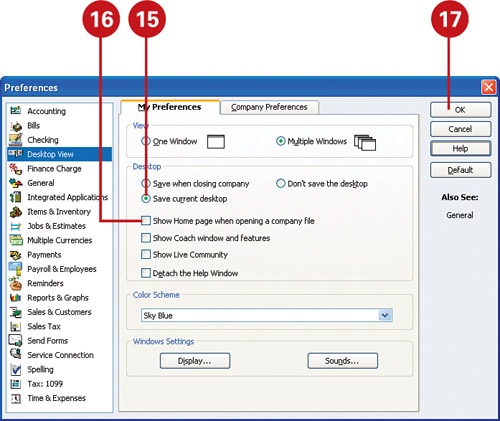
![]() Uncheck Show Home Page When Opening A Company File.
Uncheck Show Home Page When Opening A Company File.
![]() Click OK.
Click OK.
Project 3: Using Document Management
Beginning with QuickBooks 2010, electronically “paperclip” your documents to QuickBooks transactions to stay organized and save time with QuickBooks Document Management. Organize receipts, contracts, statements, and more by attaching electronic or scanned files to any customer, vendor, employee, account, or transaction. Store documents online so that they are easy to find and share.
The Project
Attach a vendor’s original copy of the bill to the recorded QuickBooks transaction and view the source document at a later date. Set up multiple users, including your accountant, and assign privileges for adding, removing, or viewing stored documents. You need a scanner and an Internet connection to use this service.
To learn more about QuickBooks Document Management, select Company, Document Management and choose Learn About Document Management. You will prompted to sign up for an Intuit Workplace Account, which is free. An Internet connection is required.
The Process
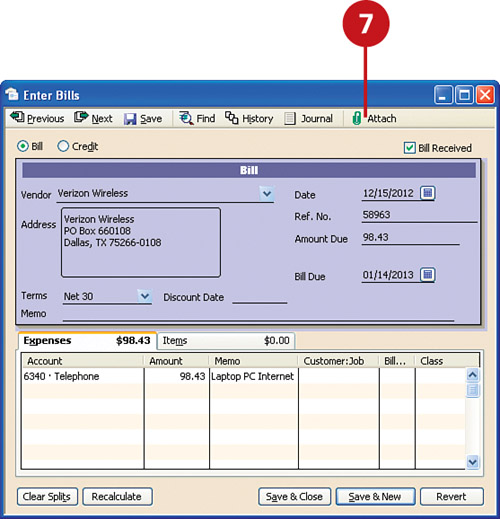
![]() After signing up for an Intuit Workspace Account (not shown), create a transaction in QuickBooks (this example is a vendor bill).
After signing up for an Intuit Workspace Account (not shown), create a transaction in QuickBooks (this example is a vendor bill).
![]() Click Attach on the transaction; you might be prompted to save your transaction first (not shown).
Click Attach on the transaction; you might be prompted to save your transaction first (not shown).
![]() On the Attachments dialog, click Local Files if you are attaching a previously scanned document.
On the Attachments dialog, click Local Files if you are attaching a previously scanned document.
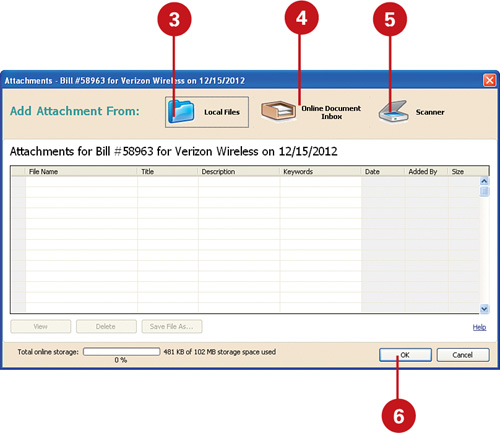
![]() Click Online Document Inbox if you are attaching a scanned document that was previously stored online.
Click Online Document Inbox if you are attaching a scanned document that was previously stored online.
![]() Click Scanner to scan your source document directly from within QuickBooks (the scanner must be accessible by the computer running QuickBooks).
Click Scanner to scan your source document directly from within QuickBooks (the scanner must be accessible by the computer running QuickBooks).
![]() Click OK.
Click OK.
![]() The transaction with the attachment displays with a green paperclip icon.
The transaction with the attachment displays with a green paperclip icon.
![]() To manage your documents online, click Company, Document Management, Document Management Center (not shown). Sign in with your Intuit Workspace Account ID (an email might be sent to you initially with steps to verify your email address).
To manage your documents online, click Company, Document Management, Document Management Center (not shown). Sign in with your Intuit Workspace Account ID (an email might be sent to you initially with steps to verify your email address).
![]() From the QuickBooks Document Management Center, you can choose how many documents to display in your inbox or shared folder. You can also filter the documents listed by transaction type, company, customer, or vendor.
From the QuickBooks Document Management Center, you can choose how many documents to display in your inbox or shared folder. You can also filter the documents listed by transaction type, company, customer, or vendor.
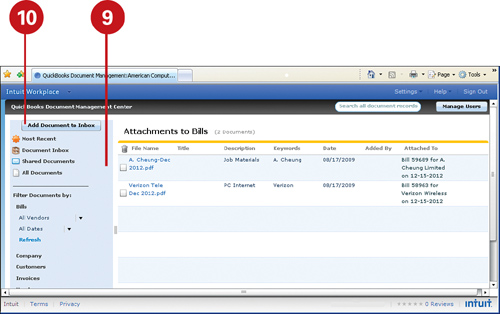
![]() Click Add Document to Inbox. The Document Record dialog displays. Browse to the folder on your computer where you previously scanned and stored the document.
Click Add Document to Inbox. The Document Record dialog displays. Browse to the folder on your computer where you previously scanned and stored the document.
![]() Click OK to close.
Click OK to close.

![]() Click Company, Document Management, Set Up and Manage Users (not shown). You will be prompted to sign into your Intuit Workplace Account. You can assign full, view only, or custom access to up to 30 individuals.
Click Company, Document Management, Set Up and Manage Users (not shown). You will be prompted to sign into your Intuit Workplace Account. You can assign full, view only, or custom access to up to 30 individuals.
![]() Click Sign Out when completed (not shown).
Click Sign Out when completed (not shown).
Project 4: Color Coding Your Accounts
If you have multiple bank accounts in QuickBooks, you might find that it’s easy to make an entry in the wrong account. By color-coding your accounts, you can have a visual reminder of which account you’re working with, thus making it less likely you’ll make an error by using the wrong account. When you change the color of a cash account, for example, not only does the account register change, but so do the forms associated with that account. When you prepare to write a check, the check color will match the account color.
The Project
Assign a new background color to an account from within the account register. For this example, we are using a cash account; however, this procedure works for any balance sheet account.
The Process
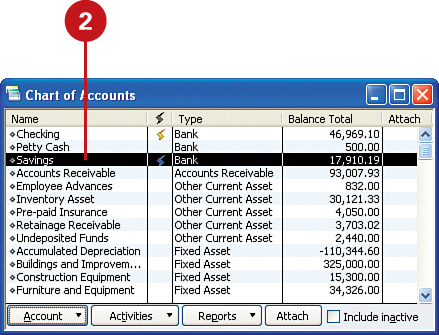
![]() Press Ctrl+A to open the Chart of Accounts window.
Press Ctrl+A to open the Chart of Accounts window.
![]() Double-click the account for which you want to change the color.
Double-click the account for which you want to change the color.
![]() With the account register open, choose Edit, Change Account Color from the main menu.
With the account register open, choose Edit, Change Account Color from the main menu.
![]() Click a Basic Color or click the Define Custom Colors button to choose from the complete array of colors.
Click a Basic Color or click the Define Custom Colors button to choose from the complete array of colors.
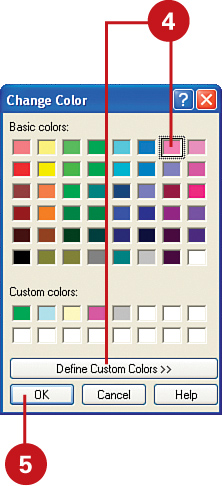
![]() Click OK.
Click OK.
![]() Your color is now applied to the account register.
Your color is now applied to the account register.

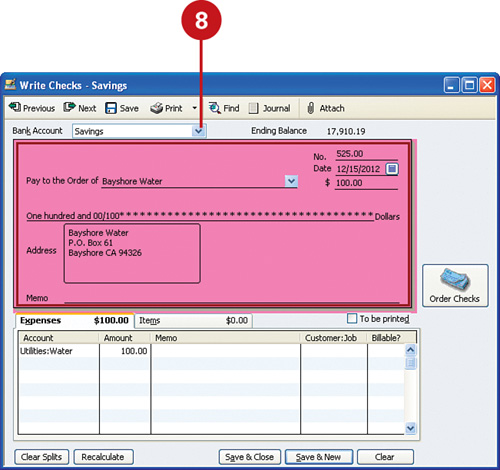
![]() Press Ctrl+W to open a check form.
Press Ctrl+W to open a check form.
![]() Change the bank account to the account whose color you just changed. The new color appears on the check form.
Change the bank account to the account whose color you just changed. The new color appears on the check form.
Project 5: Using To Do Notes
As part of the QuickBooks Reminders feature, you can create To Do Notes to remind yourself of, well, actually anything. Just like you might keep a list on your desk to remind you of calls to make, errands to run, gifts to purchase, and so on, you can use the To Do Notes in the QuickBooks Reminders and record all of your To Do items in your QuickBooks program. Not only does this save paper, but it also organizes your personal and business To Do lists in one convenient spot and adds the To Do items to your daily tasks.
As described in the previous project, your Reminders list is part of the Company Snapshot dashboard that you can choose to have displayed on your QuickBooks desktop at all times. Use the To Do Notes feature to make QuickBooks your one-stop place for all of your tasks, not just your QuickBooks tasks.
The Project
Create a To Do Note, establish when you want to be reminded of this task, edit the task, and remove the note once the task is executed.
The Process
![]() Choose Company, To Do List to display your To Do List.
Choose Company, To Do List to display your To Do List.
![]() Choose To Do, New, or press Ctrl+N to open the New To Do window.
Choose To Do, New, or press Ctrl+N to open the New To Do window.

![]() Enter your task in the Note area.
Enter your task in the Note area.

![]() Enter the date on which you want to be reminded.
Enter the date on which you want to be reminded.
![]() Click OK.
Click OK.
![]() Open your To Do Note for editing by clicking the note in the To Do List and then choosing To Do, Edit To Do Note from the drop-down menu. You can also press Ctrl+E or double-click the note to open it.
Open your To Do Note for editing by clicking the note in the To Do List and then choosing To Do, Edit To Do Note from the drop-down menu. You can also press Ctrl+E or double-click the note to open it.

![]() Make your changes to your To Do Note.
Make your changes to your To Do Note.

![]() If the task has been completed and you want to continue to keep the task visible on your To Do List, check the Done checkbox.
If the task has been completed and you want to continue to keep the task visible on your To Do List, check the Done checkbox.
![]() To keep your To Do Note in your QuickBooks file but make it invisible on your To Do List, check the To Do Note Is Inactive checkbox.
To keep your To Do Note in your QuickBooks file but make it invisible on your To Do List, check the To Do Note Is Inactive checkbox.
![]() Click OK.
Click OK.
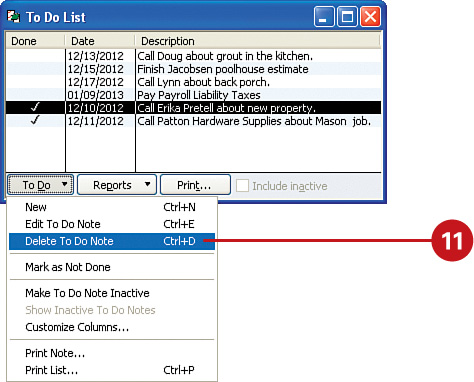
![]() To remove a To Do Note permanently, click the note and then choose To Do, Delete To Do Note from the drop-down menu.
To remove a To Do Note permanently, click the note and then choose To Do, Delete To Do Note from the drop-down menu.
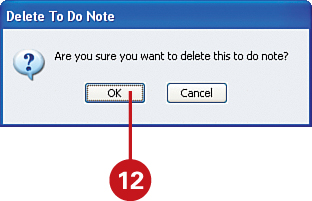
![]() Click OK when asked to confirm the deletion.
Click OK when asked to confirm the deletion.
![]() View your To Do Notes on the Company Snapshot.
View your To Do Notes on the Company Snapshot.
