15. Recording Your Assets
Anything your company owns that has value is considered to be an asset. Assets can be used in the production of income, and they are available to pay your company’s debts. They include cash, investments, receivables, inventory, prepaid amounts, and fixed assets.
Fixed assets are belongings of yours that are expected to last for more than a year and that are used for the production of goods and services, including such items as buildings, furniture, farm animals, vehicles, machinery, land, and mineral resources. The management of fixed assets in your QuickBooks company file includes recording the cost of the assets and monitoring their use and deterioration through regular deductions of depreciation.
Rather than taking an expense deduction for the entire cost of the asset in the year in which it is acquired, accounting and tax rules require us to spread the cost of the asset over the asset’s useful life, associating the cost of the asset with the income it produces over a period of years. Use a depreciation expense account to record the current year’s expense associated with the use of your fixed assets.
Reconciling Your Bank Statement
QuickBooks provides a reconciliation screen that enables you to quickly match your cash transactions with those that appear on your monthly bank account statement. You sort your transactions in the same order in which they appear on the bank statement, going down the list, checking off each transaction that agrees with the bank statement, and correcting errors if necessary:
![]() Select Banking, Reconcile.
Select Banking, Reconcile.
Timesaver
You can also click the Reconcile button in the Banking area of the home page to begin the reconciliation process.
![]() Select the account for which you received a bank statement.
Select the account for which you received a bank statement.

![]() Verify the statement date and change if necessary.
Verify the statement date and change if necessary.
![]() Verify that the beginning balance matches the beginning balance on your bank statement.
Verify that the beginning balance matches the beginning balance on your bank statement.
![]() Enter the ending balance from your bank statement.
Enter the ending balance from your bank statement.
![]() Enter the date, amount, account, and class (if you’re tracking by class) for the service charge.
Enter the date, amount, account, and class (if you’re tracking by class) for the service charge.
![]() Enter the date, amount, account, and class (if you’re tracking by class) for the interest earned.
Enter the date, amount, account, and class (if you’re tracking by class) for the interest earned.
![]() Click Continue.
Click Continue.
![]() Click to check off all the items that appear on your bank statement.
Click to check off all the items that appear on your bank statement.

![]() Click the column header title to sort transactions in that column.
Click the column header title to sort transactions in that column.
![]() Click to select Highlight Marked, and all transactions marked in the Reconcile - <account name> dialog will be highlighted
Click to select Highlight Marked, and all transactions marked in the Reconcile - <account name> dialog will be highlighted
![]() Click Reconcile Now.
Click Reconcile Now.
![]() If you did not reconcile to the penny, the Reconcile Adjustment window displays. Click Enter Adjustment to have QuickBooks enter a reconciling adjustment in your register. The amount of the reconcile adjustment will be sent to an expense account on the general ledger named Reconciliation Discrepancies.
If you did not reconcile to the penny, the Reconcile Adjustment window displays. Click Enter Adjustment to have QuickBooks enter a reconciling adjustment in your register. The amount of the reconcile adjustment will be sent to an expense account on the general ledger named Reconciliation Discrepancies.

![]() Choose Summary, Detail, or Both to choose the type of reconciliation report.
Choose Summary, Detail, or Both to choose the type of reconciliation report.
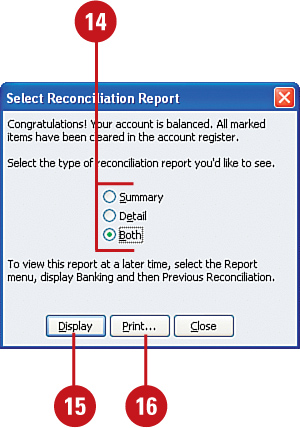
![]() Click Display to view the report onscreen.
Click Display to view the report onscreen.
![]() Click Print if you want to print a copy of this report (recommended).
Click Print if you want to print a copy of this report (recommended).
Accounting for Assets
When you acquire an asset, the cost of the asset is recorded on your company balance sheet. If you spent cash to acquire the asset, your cash account is reduced. If you borrowed money, your liabilities are increased. Here are some examples of how asset acquisitions are recorded in QuickBooks. Fortunately, QuickBooks does all this accounting for you when you use the proper Purchase and Sales forms.
You write a check to place a $400 deposit with your utility company:

You take out a $100,000 mortgage on a building and also make a $10,000 cash down payment:

When you create a journal entry to record depreciation expense, these accounts are affected:

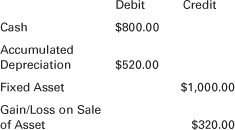
If you sell a fixed asset that cost $1,000 for $800 and you had previously recorded a depreciation expense of $520, here are the accounts that are affected:
Recording Bank Account Transfers
Many businesses have more than one bank account at the same financial institution. If your bank allows you to transfer money online or over the phone, you will need to record this information in QuickBooks.
![]() Select Banking, Transfer Funds.
Select Banking, Transfer Funds.
![]() Enter the date of the transfer.
Enter the date of the transfer.
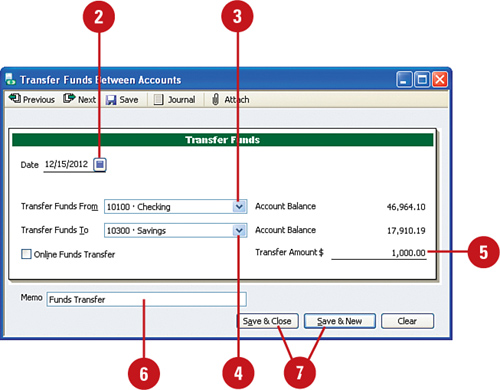
![]() Click the drop-down list to select the account to Transfer Funds From.
Click the drop-down list to select the account to Transfer Funds From.
![]() Click the drop-down list to select the account to Transfer Funds To.
Click the drop-down list to select the account to Transfer Funds To.
![]() Enter the Transfer Amount.
Enter the Transfer Amount.
![]() Enter an optional memo.
Enter an optional memo.
![]() Click a save option.
Click a save option.
Tracking Petty Cash
If your company keeps cash on the premises, be it a petty cash fund for incidental expenses or money for the cash register, you need to account for that money and for the way in which it is spent. By keeping track of the way in which this money is spent, you gain tighter control on how your company uses all its resources. One way to track petty cash is to keep a notebook or notepad with your petty cash fund and record all your expenditures. As the fund is depleted, reimburse it with cash transfers from an existing bank account, as described in the previous example.
![]() Press Ctrl+A to open the Chart of Accounts.
Press Ctrl+A to open the Chart of Accounts.
Timesaver
Clicking the Chart of Accounts icon on the home page will also take you directly to the Chart of Accounts window.
![]() Double-click the Petty Cash account (or whatever the account name is that you use) to open the account register.
Double-click the Petty Cash account (or whatever the account name is that you use) to open the account register.
![]() Enter the date of a transaction.
Enter the date of a transaction.

![]() Enter the name of the person or company who was paid in the Payee column.
Enter the name of the person or company who was paid in the Payee column.
![]() Enter the amount of the expense in the Payment column.
Enter the amount of the expense in the Payment column.
![]() Enter the account that should be charged.
Enter the account that should be charged.
![]() Enter optional descriptive information.
Enter optional descriptive information.
![]() Click Record.
Click Record.
![]() Repeat Steps 3–8 for each transaction you need to record.
Repeat Steps 3–8 for each transaction you need to record.
Important
Be sure to have a procedure for authorizing petty cash expenditures. Cash is the easiest thing to lose track of in a business. You need to have controls in place to protect your cash. Don’t allow employees to access cash without authorization.
Receiving Credit Card Payments
If your customers pay you with credit cards, the credit card amount is deposited directly into your bank, much like a check. Later, you might have to reconcile to record fees deducted by the credit card company. At the time you receive the credit card payment, you need to open the Receive Payments window and record the payment, using the credit card information supplied by your customer.
![]() Select Customers, Receive Payments. If presented with the Get More From QuickBooks Payment Interview, complete the survey or click the red X in the top right to close the box.
Select Customers, Receive Payments. If presented with the Get More From QuickBooks Payment Interview, complete the survey or click the red X in the top right to close the box.
Timesaver
Click the Receive Payments icon on the home page to quickly jump to the Receive Payments window.
![]() Enter the customer name in the Received From field.
Enter the customer name in the Received From field.

![]() Enter the amount of the payment.
Enter the amount of the payment.
![]() Verify the date of the transaction.
Verify the date of the transaction.
![]() Select the type of credit card used from the Pmt. Method drop-down list.
Select the type of credit card used from the Pmt. Method drop-down list.
![]() Enter the credit card number.
Enter the credit card number.
![]() Enter the expiration date.
Enter the expiration date.
![]() Click to check the invoices to which this payment applies, adjusting the amounts if necessary. (Note: QuickBooks assumes that the oldest invoice is paid first. You can override the checkmarks that are inserted by QuickBooks.)
Click to check the invoices to which this payment applies, adjusting the amounts if necessary. (Note: QuickBooks assumes that the oldest invoice is paid first. You can override the checkmarks that are inserted by QuickBooks.)
![]() Click a save option.
Click a save option.
Important
Get paid more quickly by processing your customer payments by credit card directly in QuickBooks. For more information, click the Edit payment preferences to enable Credit Card Processing (separate fees apply).
Recording Deposits as Assets
You might need to pay a deposit or retainer to establish credit or as an advance or a reserve against future services you will receive. This type of payment held by the vendor is considered to be an asset of yours and should be recorded as such. Deposits of this nature technically belong to you and increase the value of the company. The first time you write a check to pay for a deposit, you might need to set up a new account to track your company’s deposits.
![]() Press Ctrl+W to open the Write Checks window.
Press Ctrl+W to open the Write Checks window.
Timesaver
You can click the Write Checks icon on the home page to open the Write Checks window.
![]() Verify the bank account from which the money will be drawn.
Verify the bank account from which the money will be drawn.

![]() Enter the Payee information.
Enter the Payee information.
![]() Verify the date.
Verify the date.
![]() Enter the amount of the deposit.
Enter the amount of the deposit.
![]() Type
Type Deposits as the account name (or whatever name you choose for this asset).
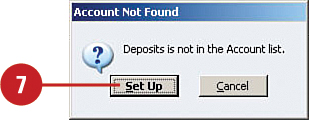
![]() If this is a new account, an Account Not Found window displays. Click Set Up.
If this is a new account, an Account Not Found window displays. Click Set Up.
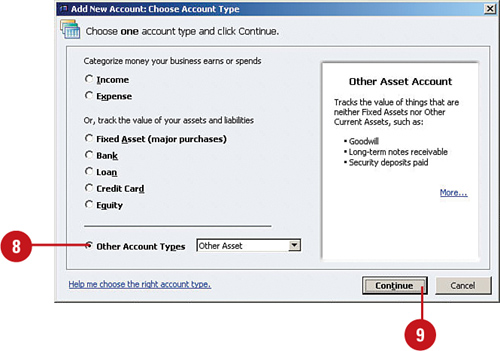
![]() Select Other Asset as the account type.
Select Other Asset as the account type.
![]() Click Continue.
Click Continue.
![]() On the Add New Account screen that displays, enter the name of the new account, subaccount information (if applicable), an optional account description, the account number (optional), and a tax line reference if required; then click Save & Close (not shown).
On the Add New Account screen that displays, enter the name of the new account, subaccount information (if applicable), an optional account description, the account number (optional), and a tax line reference if required; then click Save & Close (not shown).
![]() Complete the check by clicking a save option.
Complete the check by clicking a save option.
Purchasing Fixed Assets
When you purchase a fixed asset, you need to set up an account to keep track of the asset. You can create this fixed asset account by entering a new account in the Chart of Accounts or by adding to the Fixed Asset Item List.
Enter a Fixed Asset in the Chart of Accounts
![]() Press Ctrl+A to open the Chart of Accounts; then press Ctrl+N to open the Add New Account: Select Account Type window.
Press Ctrl+A to open the Chart of Accounts; then press Ctrl+N to open the Add New Account: Select Account Type window.
![]() Select Fixed Asset for the account type.
Select Fixed Asset for the account type.

![]() Click Continue.
Click Continue.
![]() Enter a name for this asset.
Enter a name for this asset.

![]() If you have enabled Accounting Numbering in your preferences, type an account number.
If you have enabled Accounting Numbering in your preferences, type an account number.
![]() Check the Subaccount Of box and enter a subaccount name if this asset is to be categorized as a subaccount of another account.
Check the Subaccount Of box and enter a subaccount name if this asset is to be categorized as a subaccount of another account.
![]() Enter optional information in the Description and Note fields to provide additional information about the asset.
Enter optional information in the Description and Note fields to provide additional information about the asset.
![]() If you plan to use QuickBooks to assist in your tax preparation, you might want to assign a tax line to this asset at this time. Depending on your type of business, the tax line might not be necessary for a fixed asset.
If you plan to use QuickBooks to assist in your tax preparation, you might want to assign a tax line to this asset at this time. Depending on your type of business, the tax line might not be necessary for a fixed asset.
![]() If you’re entering an asset you owned prior to creating your QuickBooks file, you can click the Enter Opening Balance button and enter the beginning balance and date acquired. If you plan to enter the purchase of this asset separately, skip this step.
If you’re entering an asset you owned prior to creating your QuickBooks file, you can click the Enter Opening Balance button and enter the beginning balance and date acquired. If you plan to enter the purchase of this asset separately, skip this step.
![]() Click Save & Close.
Click Save & Close.
Enter a Fixed Asset in the Fixed Asset Item List
![]() Select Lists, Fixed Asset Item List; and then press Ctrl+N to open the New Item window.
Select Lists, Fixed Asset Item List; and then press Ctrl+N to open the New Item window.
![]() Enter a name for this asset.
Enter a name for this asset.

![]() Indicate whether the asset was new or used when you acquired it.
Indicate whether the asset was new or used when you acquired it.
![]() Enter the asset description that displays on the bill you received from your vendor.
Enter the asset description that displays on the bill you received from your vendor.
![]() Enter the date you acquired this asset.
Enter the date you acquired this asset.
![]() Enter the cost of the asset.
Enter the cost of the asset.
![]() Enter the vendor from whom you purchased the asset.
Enter the vendor from whom you purchased the asset.
![]() Enter the account where you will record the cost of the asset.
Enter the account where you will record the cost of the asset.
![]() Enter an optional description for the asset.
Enter an optional description for the asset.
![]() Enter optional information about the asset, including location, numbers, and warranty expiration date, as well as optional notes.
Enter optional information about the asset, including location, numbers, and warranty expiration date, as well as optional notes.
![]() Click OK.
Click OK.
Calculating Depreciation
The rules for computing depreciation are complicated. Therefore, this section is designed to provide an overview of the depreciation process, but should not take the place of more thorough reading or the advice of an accounting professional. If you want to read more about depreciation, take a look at the Internal Revenue Service Publication 946, “How to Depreciate Property,” which is available online at www.irs.gov or by calling the IRS at 1-800-TAX-FORM.
Most assets are expensed for tax purposes using the Modified Accelerated Cost Recovery System (MACRS) method of calculating depreciation. Under MACRS, the cost of an asset is expensed over a period of years based on percentage tables provided by the IRS. The accelerated method of depreciation produces a greater expense in the earlier years of asset use. A different depreciation method, such as a straight-line method, can be used for financial statement presentation.
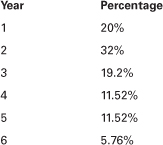
Here are sample MACRS percentage tables for five-year and seven-year assets. Five-year assets include automobiles and trucks, computers, and other office equipment. Seven-year property includes office furniture and fixtures.
MACRS Depreciation Expense for Five-Year Property:
MACRS Depreciation Expense for Seven-Year Property:
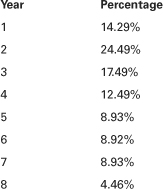
Note: The previous tables employ the half-year convention. Under this convention, all property is treated as if it is acquired and disposed of at the midpoint of the year.
Entering Depreciation
Depreciation expense is the current deduction for the allocation of the cost of a fixed asset, spread over the useful life of the asset. Use the general journal entry feature to enter depreciation in your accounting records. You might want to confer with your accountant before making this entry because accountants often provide their clients with the entries needed for recording depreciation. You can enter depreciation monthly, quarterly, or annually; typically, the frequency of the depreciation entry coincides with the frequency with which you issue financial statements for your company.
![]() Select Company, Make General Journal Entries.
Select Company, Make General Journal Entries.
![]() Verify that the date and journal entry number are correct, and make any necessary changes.
Verify that the date and journal entry number are correct, and make any necessary changes.
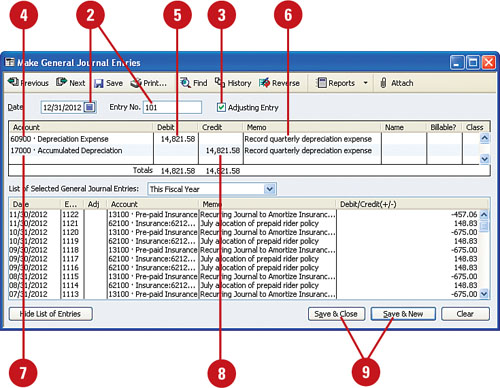
![]() Check the Adjusting Entry checkbox if it is not already checked.
Check the Adjusting Entry checkbox if it is not already checked.
![]() Enter the account you use for recording depreciation expense.
Enter the account you use for recording depreciation expense.
![]() Enter the amount of the depreciation expense in the Debit column.
Enter the amount of the depreciation expense in the Debit column.
![]() Enter a brief, descriptive memo.
Enter a brief, descriptive memo.
![]() Enter the asset account you use to record accumulated depreciation.
Enter the asset account you use to record accumulated depreciation.
![]() Verify the accuracy of the credit amount that automatically displays, or enter the correct amount.
Verify the accuracy of the credit amount that automatically displays, or enter the correct amount.
![]() Click a save option.
Click a save option.
Selling Fixed Assets
When you sell a fixed asset, you need to record the income from the sale and remove the asset and associated with accumulated depreciation from your company’s financial records. You can use an invoice form to record the sale of a fixed asset, or you can enter the entire sales event in a general journal entry. If you use the Fixed Asset Manager, you should enter the asset sale in an invoice because that process ensures that the specific asset is removed from your accounting records.
Enter a Fixed Asset Sale on an Invoice
![]() Press Ctrl+I to open an invoice form.
Press Ctrl+I to open an invoice form.
Timesaver
Clicking the Invoices icon on the home page also opens an invoice form.
![]() Verify the date and invoice number, and make any necessary changes.
Verify the date and invoice number, and make any necessary changes.

![]() Enter the name of the customer who is purchasing the asset.
Enter the name of the customer who is purchasing the asset.
![]() Click in the Item column; then scroll down the Item list and click the asset you want to sell.
Click in the Item column; then scroll down the Item list and click the asset you want to sell.
![]() Enter the sales price of the asset in the Amount column. Note: You might see a window informing you that the sales price in the fixed asset item differs from the sale price you entered here. Click Yes to close that window and continue with your transaction.
Enter the sales price of the asset in the Amount column. Note: You might see a window informing you that the sales price in the fixed asset item differs from the sale price you entered here. Click Yes to close that window and continue with your transaction.
![]() Verify the tax status of this customer, and make any necessary changes to the name of the sales tax authority that displays.
Verify the tax status of this customer, and make any necessary changes to the name of the sales tax authority that displays.
![]() Click a save option. You might see a window informing you that the fixed asset item has not been updated to reflect the sale. Click Yes to update the item in your records.
Click a save option. You might see a window informing you that the fixed asset item has not been updated to reflect the sale. Click Yes to update the item in your records.
Enter a Fixed Asset Sale in a Journal Entry
![]() Select Company, Make General Journal Entries.
Select Company, Make General Journal Entries.
![]() Verify that the date and journal entry number are correct, and make any necessary changes.
Verify that the date and journal entry number are correct, and make any necessary changes.

![]() Enter the account you use for recording the deposit of cash, or enter your undeposited funds account.
Enter the account you use for recording the deposit of cash, or enter your undeposited funds account.
![]() Enter the amount of money you received in the Debit column.
Enter the amount of money you received in the Debit column.
![]() Enter a brief, descriptive memo.
Enter a brief, descriptive memo.
![]() Enter the asset account you used to record the cost of this asset.
Enter the asset account you used to record the cost of this asset.
![]() Enter the original cost of the asset in the Credit column.
Enter the original cost of the asset in the Credit column.
![]() Enter the asset account you used to record the accumulated depreciation for this asset.
Enter the asset account you used to record the accumulated depreciation for this asset.
![]() Enter the amount of depreciation you previously recorded for this asset as a debit. This might or might not be as much as the cost you entered in Step 7.
Enter the amount of depreciation you previously recorded for this asset as a debit. This might or might not be as much as the cost you entered in Step 7.
![]() Enter the account you use to record the income or loss from the sale of fixed assets. If you have not yet created such an account, click the Add New option at the top of the account list and set up a new account.
Enter the account you use to record the income or loss from the sale of fixed assets. If you have not yet created such an account, click the Add New option at the top of the account list and set up a new account.
![]() QuickBooks automatically computes the income or loss from the sale of this asset. Verify that this amount is correct.
QuickBooks automatically computes the income or loss from the sale of this asset. Verify that this amount is correct.
![]() Click a save option.
Click a save option.