8. Job Cost Estimating and Tracking
If you use one of the QuickBooks versions that contain the job cost estimating feature, you can create estimates for your work and track income and expenses on a job-by-job basis. In fact, this is often the one feature that causes people to bypass the Simple Start version of QuickBooks as compared with the other versions on the market.
An estimate is a bid or quote for a job. You create an estimate and then invoice the customer either at the completion of the job or as the job progresses. Estimates can be revised as work on the job advances, and QuickBooks enables you to create more than one estimate for the same job.
Keep in mind that an estimate is not the final word on what a job will cost. Consider placing a disclaimer in the message area of the estimate form indicating that the numbers presented in the estimate are based on reasonable assumptions but that you reserve the right to change the estimate prior to the completion of the job and with the approval of the customer.
Setting Jobs and Estimate Preferences
To take full advantage of the Estimates feature in QuickBooks Pro or Premier, you need to set the preferences for jobs and estimates. Here you can turn on the access to estimates and progress billing and protect yourself against accidentally issuing two estimates with the same number. If you use progress billing, you might appreciate a feature that enables you to leave zero-balance amounts from partially billed estimates off your invoices.
![]() Select Edit, Preferences.
Select Edit, Preferences.
![]() Click the Jobs & Estimates icon on the left side of the Preferences window.
Click the Jobs & Estimates icon on the left side of the Preferences window.

![]() Click the Company Preferences tab. (The My Preferences tab has no options for Jobs & Estimates.)
Click the Company Preferences tab. (The My Preferences tab has no options for Jobs & Estimates.)
![]() If you plan to track jobs by status, check to see whether these status descriptions are appropriate to your work and make any necessary changes.
If you plan to track jobs by status, check to see whether these status descriptions are appropriate to your work and make any necessary changes.
![]() Click Yes to turn on the estimates feature.
Click Yes to turn on the estimates feature.
![]() Click Yes to turn on the progress invoicing feature.
Click Yes to turn on the progress invoicing feature.
![]() Check Warn About Duplicate Estimate Numbers to have QuickBooks give you a warning if you attempt to issue a duplicate. This option is not available if you do not choose to use estimates.
Check Warn About Duplicate Estimate Numbers to have QuickBooks give you a warning if you attempt to issue a duplicate. This option is not available if you do not choose to use estimates.
![]() Check Don’t Print Items That Have Zero Amount to remove zero-balance items from printed invoices. (The zero balance items will still appear on the screen version of the invoice.) This option is not available if you do not choose to use progress invoicing.
Check Don’t Print Items That Have Zero Amount to remove zero-balance items from printed invoices. (The zero balance items will still appear on the screen version of the invoice.) This option is not available if you do not choose to use progress invoicing.
![]() Click OK to save your settings.
Click OK to save your settings.
Accounting for Jobs
When you use the QuickBooks estimates feature, no transactions are recorded on your company income statement or balance sheet. The estimate is not treated as a sale, so the form is for your information only. You can create reports that display pending estimates, but your company’s financial statements contain only completed transactions.
When jobs are invoiced to customers, even if the job is still in progress, the amount that has been invoiced increases both your income and your Accounts Receivable accounts. Any unbilled portion of the estimate continues to remain off your books.
Partial completion of a job, invoiced to a customer for $500, is recorded like this when you issue the invoice:

Setting Up a Job
Depending on the type of business you have, you might need to track revenues and expenses on a job-by-job basis. You can track multiple jobs for the same customer and then create invoices and record your expenses as they relate to the individual jobs. Before allocating revenue and expenses to a particular job, you must set up the job and identify with which customer the job is associated.
Enter New Job Information
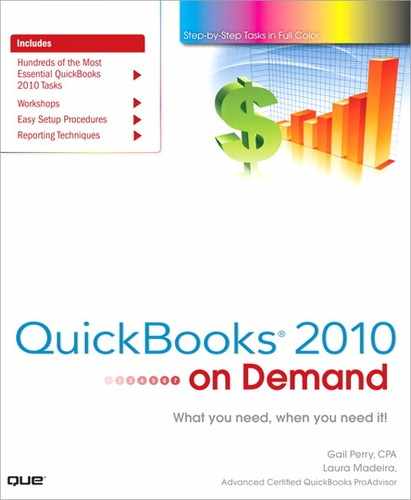
![]() Display the Customers & Jobs list by clicking the Customer Center icon (or choose Customers, Customer Center) and then clicking the Customers & Jobs tab.
Display the Customers & Jobs list by clicking the Customer Center icon (or choose Customers, Customer Center) and then clicking the Customers & Jobs tab.

![]() Click the name of the customer to whom this job relates.
Click the name of the customer to whom this job relates.
![]() Right-click on the customer name; then choose Add Job from the pop-up menu.
Right-click on the customer name; then choose Add Job from the pop-up menu.
Timesaver
You can also open the New Job window by clicking the New Customer & Job option at the top of the list and then clicking Add Job.
![]() Enter a name in the Job Name field.
Enter a name in the Job Name field.
![]() Verify the contact name and address for this customer and make any necessary changes.
Verify the contact name and address for this customer and make any necessary changes.
Important
Be sure to click the customer name before selecting Add Job. Although you can change the customer name in the Add Job window, the related customer information, such as address and contact information, is not automatically updated. Rather than trying to change all this information each time you add a new job, select the customer name first and then open the Add Job window.
![]() If this is all the information you plan to add at this time, click OK to save your entries.
If this is all the information you plan to add at this time, click OK to save your entries.
Enter Additional Information for a New Job
![]() If the New Job window is still open, click the Additional Info tab to enter other information relating to the job. If you need to re-open the New Job window, right-click on the job and then choose Edit Customer:Job.
If the New Job window is still open, click the Additional Info tab to enter other information relating to the job. If you need to re-open the New Job window, right-click on the job and then choose Edit Customer:Job.

![]() Select the customer type. If the type you want to use does not appear, select Add New from the drop-down menu to add a new type to the available options.
Select the customer type. If the type you want to use does not appear, select Add New from the drop-down menu to add a new type to the available options.
![]() If applicable, select from the Preferred Send Method list for sending invoices and other forms to this customer.
If applicable, select from the Preferred Send Method list for sending invoices and other forms to this customer.
![]() If applicable, make a choice in the Price Level field for this customer.
If applicable, make a choice in the Price Level field for this customer.
Enter Payment Information for a New Job
![]() Click the Payment Info tab to enter more information relating to the job.
Click the Payment Info tab to enter more information relating to the job.

![]() If you use account numbers for your jobs, enter the number in the Account No. field.
If you use account numbers for your jobs, enter the number in the Account No. field.
![]() If applicable, enter a number in the Credit Limit field if your company has assigned a limit to this customer. You will be warned if you attempt to issue an invoice for more than the customer’s credit limit.
If applicable, enter a number in the Credit Limit field if your company has assigned a limit to this customer. You will be warned if you attempt to issue an invoice for more than the customer’s credit limit.
![]() Indicate the payment method typically used by this customer in the Preferred Payment Method field. If a credit card is chosen, you can enter the customer’s credit card information.
Indicate the payment method typically used by this customer in the Preferred Payment Method field. If a credit card is chosen, you can enter the customer’s credit card information.
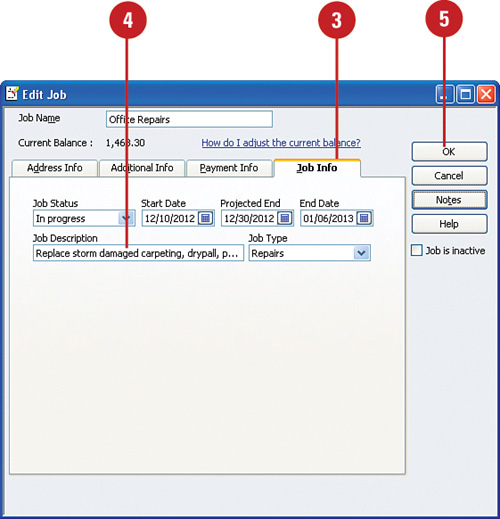
Enter Specific Job Information
![]() Click the Job Info tab to enter more information relating to the job.
Click the Job Info tab to enter more information relating to the job.

![]() Choose an option from Job Status if you track this information.
Choose an option from Job Status if you track this information.
![]() Type or select a date in the Start Date field.
Type or select a date in the Start Date field.
![]() Type or select a date in the Projected End field.
Type or select a date in the Projected End field.
![]() Type or select the actual end date in the End Date field.
Type or select the actual end date in the End Date field.
![]() Enter a description for the job in the Job Description field.
Enter a description for the job in the Job Description field.
![]() Select a job type for this job. If the applicable job type does not appear in the Job Type list, select the Add New option in the list to enter a new type of job.
Select a job type for this job. If the applicable job type does not appear in the Job Type list, select the Add New option in the list to enter a new type of job.
![]() Click OK to save your entries.
Click OK to save your entries.
Tracking Job Status and Type
If your company works on only a handful of jobs at a time, you can probably keep track of the status of those jobs in your head. But for those companies with many balls in the air, QuickBooks provides a job status feature to keep track of how close to completion each job is. You might also want to filter reports for type of job. For example, a construction company might perform commercial, residential, or government work. This is an excellent use for job types.
Set Job Status Preference
![]() Select Edit, Preferences.
Select Edit, Preferences.
![]() Click the Jobs & Estimates icon.
Click the Jobs & Estimates icon.

![]() Click the Company Preferences tab.
Click the Company Preferences tab.
![]() If you want, change the name of any job status by deleting the name you see and entering your own choice for a job status.
If you want, change the name of any job status by deleting the name you see and entering your own choice for a job status.
![]() Click OK.
Click OK.
![]() Display the Customers & Jobs list by clicking on the Customer Center icon, and then clicking the Customers & Jobs tab.
Display the Customers & Jobs list by clicking on the Customer Center icon, and then clicking the Customers & Jobs tab.
![]() Double-click a job name if you want to change its status.
Double-click a job name if you want to change its status.
![]() Click the Job Info tab.
Click the Job Info tab.

![]() Select the appropriate job status from the Job Status drop-down list.
Select the appropriate job status from the Job Status drop-down list.
![]() Click OK.
Click OK.
Using the Job Type Feature
You have the option to define the Job Type field for each job. Unlike the Job Status field, no standard entries are available in the Job Type field; therefore, you can customize job types to go with your business. For example, a construction company’s job types might include New Construction, Repairs, and Renovation. Job types can also be subtypes of other job types; for example, the New Construction job type might include the subtypes Commercial and Residential. After you enter a job type, that type stays in your company file and becomes available as a selection on other jobs.
![]() Display the Customers & Jobs list by clicking on the Customer Center icon, and then clicking the Customers & Jobs tab.
Display the Customers & Jobs list by clicking on the Customer Center icon, and then clicking the Customers & Jobs tab.
![]() Double-click a job name.
Double-click a job name.
![]() Click the Job Info tab.
Click the Job Info tab.

![]() Click the down arrow in the Job Type field.
Click the down arrow in the Job Type field.
![]() Select an existing job type, or click Add New to enter a type that is not listed.
Select an existing job type, or click Add New to enter a type that is not listed.
![]() Click OK.
Click OK.
Tracking Other Job Info
You can use the Job Dates feature in QuickBooks to keep track of the dates on which you start jobs, the projected end date of each job, and the actual end date of each job.
QuickBooks gives you the option of entering a narrative description for each job. This is an optional feature. There is no menu of standard descriptions from which you can choose, so you can create your own description for each job.
Job Dates and Description
![]() Display the Customers & Jobs list by clicking on the Customer Center icon, then clicking the Customers & Jobs tab.
Display the Customers & Jobs list by clicking on the Customer Center icon, then clicking the Customers & Jobs tab.
![]() Double-click a job name.
Double-click a job name.
![]() Click the Job Info tab.
Click the Job Info tab.
![]() Enter or update the dates for this job.
Enter or update the dates for this job.
![]() Click OK.
Click OK.
![]() Enter a brief description in the Job Description field or update an existing description. You are limited to 99 characters, including spaces.
Enter a brief description in the Job Description field or update an existing description. You are limited to 99 characters, including spaces.
![]() Click OK.
Click OK.
Working With Estimates
You can use the Estimates form to create estimates that provide preliminary planning information for each of your jobs. The forms QuickBooks provides for your estimates look very similar to invoice forms. Fill out an estimate showing the anticipated time, items, and expenses you plan to allocate to this job. Estimates are saved, referred to, revised, and (ultimately) used to create invoices as the job is completed. Be sure you have enabled the Estimates feature before starting this task (see “Setting Jobs and Estimate Preferences” earlier in this chapter).
Create an Estimate
![]() Select Customers, Create Estimates.
Select Customers, Create Estimates.
Timesaver
You can also open the Create Estimates window by clicking the Estimates icon on the Home page. Or, you can click the New Transactions option at the top of the Customer Center and choose Estimates.
![]() Indicate the customer and, if applicable, the job for which you are preparing an estimate in the Customer:Job field.
Indicate the customer and, if applicable, the job for which you are preparing an estimate in the Customer:Job field.

![]() Verify that the correct date appears on the form.
Verify that the correct date appears on the form.
![]() Enter all the items and expenses that relate to this estimate.
Enter all the items and expenses that relate to this estimate.
![]() Select a save option to complete the estimate.
Select a save option to complete the estimate.
Revise Estimates
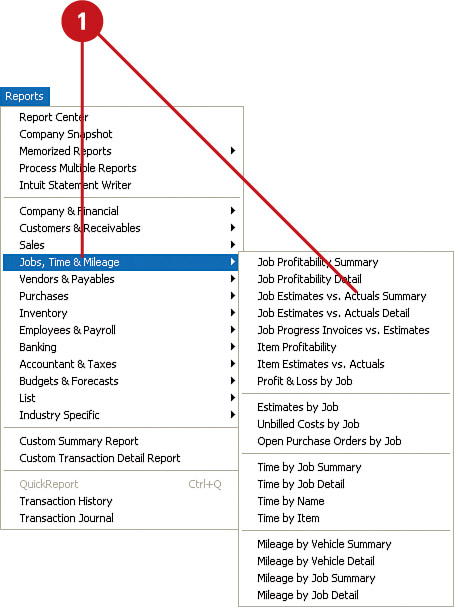
![]() Select Reports, Jobs, Time & Mileage, Estimates by Job.
Select Reports, Jobs, Time & Mileage, Estimates by Job.
![]() Double-click the estimate you need to change.
Double-click the estimate you need to change.

Timesaver
Alternatively, you can click the Customer Center icon to open the Customer Center, click the Transactions tab, and then click Estimates. Double-click on the estimate you want to revise.
![]() Make changes on the estimate form.
Make changes on the estimate form.
![]() Click a save option to save your changes.
Click a save option to save your changes.
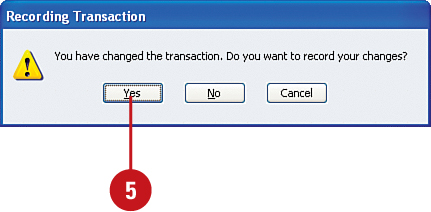
![]() Confirm that you want to make the changes to the estimate by clicking Yes.
Confirm that you want to make the changes to the estimate by clicking Yes.
![]() If the Add Change Order window appears (not available in all QuickBooks versions), click Add to add text to the bottom of your estimate describing the exact change(s) and the date of the change. Click Do Not Add if you want to change the estimate without calling attention to the change. With this choice, no descriptive text will appear on the revised estimate.
If the Add Change Order window appears (not available in all QuickBooks versions), click Add to add text to the bottom of your estimate describing the exact change(s) and the date of the change. Click Do Not Add if you want to change the estimate without calling attention to the change. With this choice, no descriptive text will appear on the revised estimate.
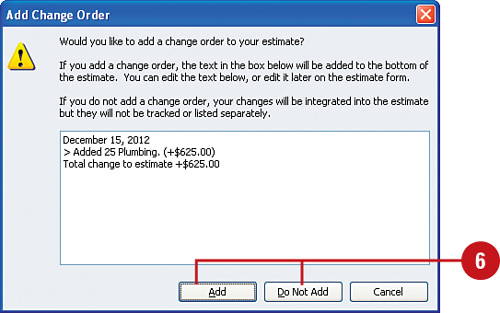
![]() If Add was selected, the Estimate now includes the change order text.
If Add was selected, the Estimate now includes the change order text.

Invoicing Against an Estimate
After you have an estimate in your QuickBooks file, you can refer to that estimate when you’re ready to prepare an invoice. When you prepare an invoice for a job that has been estimated, you have the option of invoicing for the complete estimate, a percentage of the estimate, or specific items on the estimate. The concept of invoicing a portion of the estimate is called progress invoicing.
Invoice for Percentage of Estimate
![]() Press Ctrl+I to open an invoice form.
Press Ctrl+I to open an invoice form.
![]() Enter the name of the customer and, if applicable, the job. If an estimate exists, the Available Estimates window displays.
Enter the name of the customer and, if applicable, the job. If an estimate exists, the Available Estimates window displays.
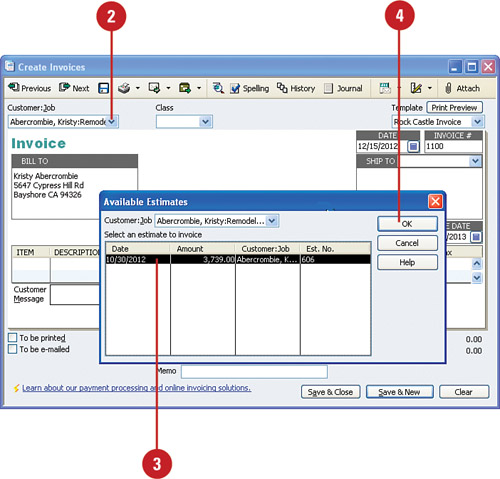
![]() Click to select the estimate against which you want to invoice.
Click to select the estimate against which you want to invoice.
![]() Click OK.
Click OK.
![]() Select the option to Create Invoice for the Entire Estimate (100%) or Create Invoice for a Percentage.
Select the option to Create Invoice for the Entire Estimate (100%) or Create Invoice for a Percentage.
![]() Click OK; the amounts from the estimate are entered on the invoice.
Click OK; the amounts from the estimate are entered on the invoice.

![]() Verify that all amounts on the invoice are correct. Make any necessary changes to the amounts on the invoice.
Verify that all amounts on the invoice are correct. Make any necessary changes to the amounts on the invoice.

![]() Select a save option to complete the invoice.
Select a save option to complete the invoice.
Prepare an Invoice for Selected Items
![]() Follow Steps 1–4 from the previous example.
Follow Steps 1–4 from the previous example.
![]() Select Create Invoice for Selected Items or for Different Percentages of Each Item.
Select Create Invoice for Selected Items or for Different Percentages of Each Item.

![]() Click OK.
Click OK.
![]() Click Show Quantity and Rate to show the quantities and prices (rates) of the estimated items.
Click Show Quantity and Rate to show the quantities and prices (rates) of the estimated items.

![]() Click Show Percentage to show the percentages of the estimated items.
Click Show Percentage to show the percentages of the estimated items.
![]() In the appropriate column, indicate the percent, quantities, or prices of each item you want to include on the invoice.
In the appropriate column, indicate the percent, quantities, or prices of each item you want to include on the invoice.
![]() Click OK.
Click OK.
![]() Depending on the choices you made in Step 6, you might see a warning indicating that some invoice items display a zero amount and suggesting that you not delete these items. After you read the warning, click OK to close the warning window.
Depending on the choices you made in Step 6, you might see a warning indicating that some invoice items display a zero amount and suggesting that you not delete these items. After you read the warning, click OK to close the warning window.
![]() Save your invoice (not shown).
Save your invoice (not shown).
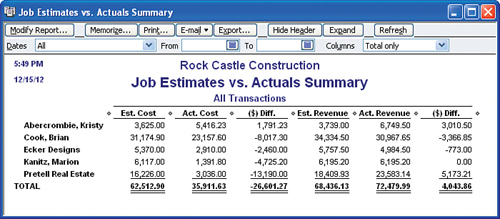
Reporting on Job Estimates vs. Actual
After you’ve entered estimates into your QuickBooks file, you can produce a report that displays all outstanding jobs, the amount of estimates on these jobs, and a comparison of the budgeted costs to the invoiced amounts. Use this report to ensure your job’s profitability.
![]() Select Reports, Jobs, Time & Mileage, Job Estimates vs. Actual Summary.
Select Reports, Jobs, Time & Mileage, Job Estimates vs. Actual Summary.
![]() Click OK to display the report.
Click OK to display the report.