
9. Pictures
Picture basics
In QuarkXPress, a picture can be imported into a variety of different-shaped picture boxes. First you create a box of any shape using one of the Picture Box tools, then you import a picture into it.
File formats that can be imported include TIFF, EPS, GIF, JPEG, DCS, PCX, PDF, PNG, PSD, PhotoCD, SWF, WMF, XLS, PICT, and BMP (for more information, see “Formats you can import” on page 163).
To create a picture box
- Choose any standard Picture Box tool
 (the Rectangle, Rounded Corner, Concave Corner, Beveled Corner, or Oval Picture Box tool). The cursor will temporarily turn into a crosshair icon.
The Picture Box tools
(the Rectangle, Rounded Corner, Concave Corner, Beveled Corner, or Oval Picture Box tool). The cursor will temporarily turn into a crosshair icon.
The Picture Box tools - Drag in any direction
 –
– .
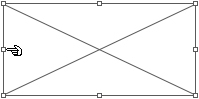
Drag to create a picture box. An empty picture box has an “X” through its center.
.
Drag to create a picture box. An empty picture box has an “X” through its center.


Tip
Shift-drag a handle to turn a rectangular picture box into a square or an oval picture box into a circle. This also works with a text box.
Tip
To apply a frame to a picture box, use Item > Frame (Cmd-B/Ctrl-B).
Tip
Need more than one? Use the Item > Duplicate, Step and Repeat, or Super Step and Repeat command to create multiples of any item.
When a picture is imported into a picture box, a screen preview version of it is saved with the QuarkXPress file, for display purposes. Also saved with the QuarkXPress file is information about changes made to the picture within the layout, such as cropping or scaling. The original picture file isn’t modified by such changes. Instead, a link is created to the original picture file, which the QuarkXPress file accesses when the layout is printed. If the link to the original picture file is broken (the original picture is missing) or the picture itself is modified, you must update the picture or it won’t output properly (see pages 183–184).
To import a picture
- Choose the Item or Content tool, then click a picture box .
Click a picture box with the Item tool or Content tool. If the box already contains a picture, the picture you import will replace the existing one.
- Choose File > Import Picture (Cmd-E/Ctrl-E).
- Locate and click a picture file name .
- Optional: Check Preview to display a thumbnail of the picture (the picture has to have been saved with a preview).
- Optional: Check Maintain Picture Attributes if you’re replacing an existing picture but want to use its attributes (such as scale and placement) for the new picture.
- Click Open. If it looks as though the picture isn’t there, see –, next page. There’s a lot you can do to a picture, such as scaling, cropping, and rotating, and you can also scale, rotate, or distort the picture box. Instructions begin on page 167.
 The picture is imported using File > Import Picture—but you’re not seeing what you want. If the picture has a large white background, you may not see anything! Simply Control-click/Right-click the picture box and choose Scale Picture To Box or Fit Box To Picture.
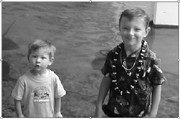 After fitting the picture to the box, repositioning the picture by dragging it with the Content tool, and then adjusting the scale using the Classic tab of the Measurements palette, we finally see what we want.


Tip
You can also import a picture using the context menu. Control-click/Right-click a picture box and choose Import Picture from the context menu.
Tip
To import a picture into a table picture cell or a picture box within a group, select the cell or box with the Content tool.
Formats you can import
You can import pictures in the following file formats: TIFF, EPS, GIF, JPEG, DCS, PCX, PDF, PNG, PSD, PhotoCD, SWF, WMF, XLS, PICT, and BMP. (In Mac OS X, a Windows Metafile will convert into a PICT when it’s imported.)
To import pictures in some formats (including PNG, PSD, SWF, and XLS), the import filter that comes with QuarkXPress needs to be enabled. For example, to import an Excel chart, you need the Table Import filter. If the required filter is disabled, you will get an error message: “This file requires XTensions software to be read properly.” Use the Utilities > XTensions Manager to enable/disable filters.
Other picture import options
The Color Management pane in the Import Picture dialog box lets you specify how colors in the picture are handled. If the OPI and PDF Filter XTensions that come with QuarkXPress are enabled, the OPI and PDF Import panes display as well. To read about OPI, see the QuarkXPress documentation. For a PDF, enter the number of the page you want to import in the PDF Page field.
Pictures come in two basic flavors
A picture that is created in a bitmap program (such as Adobe Photoshop), or that is scanned, is actually composed of tiny pixels. You’ll see the individual pixels only if you zoom way in on the image. The important thing to remember about a bitmap image is that enlarging it above 100% in QuarkXPress will diminish its resolution and output quality, whereas shrinking it will increase its resolution and output quality. If you’re preparing an image in a bitmap program or scanning it for output from QuarkXPress, you should plan ahead and save it at the appropriate resolution, orientation, and size.
A picture that’s created in a drawing program, such as Illustrator or FreeHand, is composed of mathematically defined objects. This type of picture is called “vector” or “object-oriented.” A vector picture can be moved, scaled, recolored, and enlarged without affecting its output quality at all. It will be crisp at 20% and crisp at 120% (though enlarging it much beyond 100% may lengthen its print time). The higher the resolution of the output device, the sharper a vector picture prints. A vector picture can’t be edited in QuarkXPress, however; it can be scaled, rotated, or skewed, but not colored.
Choosing the right resolution for a bitmap picture
For onscreen output, save the image in RGB color mode in its original application and at a resolution of 72 ppi.
For print output, choose one-and-a-half to two times the lpi (lines per inch) your commercial printer plans to use. For example, let’s say your printer plans to use a 133 line screen. A color picture should be saved at twice the line screen. 133 times 2 equals 266, so you should save the picture in its original application at 266 ppi. For a grayscale picture, one-and-a-half times the line screen is sufficient (200 ppi, in our example).
Every rule has its exceptions. A bitmap image that contains sharp linear elements will require a higher resolution (600 ppi or higher). For a very painterly picture that contains amorphous shapes, on the other hand, a resolution value that’s less than twice the output line screen may suffice.
A vector-based picture from a drawing application is resolution independent, which means it will print at the resolution of the output device. Just make sure it’s saved in a file format that QuarkXPress can read.
If you’re going to output a QuarkXPress file to a color inkjet printer, save the images at a high resolution in RGB color mode.
Tip
A picture’s file size, dimensions, color depth, and other information are listed in the Import Picture dialog box ![]() . For information about an already imported picture, click it, choose Utilities > Usage > Pictures, and click More Information.
. For information about an already imported picture, click it, choose Utilities > Usage > Pictures, and click More Information.

Enlarge or shrink?
Scaling a bitmap picture in QuarkXPress affects its output resolution. If you shrink a bitmap picture in QuarkXPress, its output resolution will increase; if you enlarge a bitmap picture, its output resolution will decrease. Here’s an example: Take a 150 ppi image and shrink it by half. Its ppi will increase to 300. Why should you bother paying attention to this? Because enlarging a bitmapped picture above 100% will diminish its print quality. A vector-based image (such as an Illustrator EPS) won’t degrade in quality if it’s enlarged in QuarkXPress, but it may take longer to print. You can also take a large picture and shrink it down in a layout, but the picture will add significantly to the project’s file size and also prolong its print time. So the moral of the story is...plan ahead.
EPS preview options
Every EPS picture has a PICT or TIFF preview built into it (unless it’s specifically saved without one) so it can be viewed onscreen or printed on a non-PostScript printer. The higher a picture preview’s bit depth, the longer it may take to render onscreen and the larger the file storage size of the project into which it’s imported.
When you save an EPS image for export to QuarkXPress, save it with a preview, if that option is available (both Illustrator and FreeHand offer this option). Any EPS picture that doesn’t have a built-in preview will appear as a gray box in QuarkXPress, but it will print normally. To have QuarkXPress generate a full-resolution preview for the picture, see below.
Tip
To choose display options for TIFF picture previews, go to QuarkXPress (Edit, in Windows) > Preferences > Application > Display (see page 363).
Using full resolution preview
For the sake of speed, QuarkXPress imports low-resolution previews of picture files. If you have a zippy computer (as most of us do today), if you’re not using very many images, or if you just really need to see what’s going on in a picture, you can display picture previews at the full resolution of the original file.
To turn on full resolution preview for selected pictures
- Choose the Item or Content tool, then click the picture you want displayed at full resolution. (To select multiple pictures, Shift-click them.)
- Control-click/Right-click the picture (or one of the selected pictures) and choose Preview Resolution > Full Resolution -.
With a standard preview, it’s hard to make out the details in this grayscale TIFF. Choosing Item > Preview Resolution > High Resolution makes all the difference onscreen.
or
Choose Item > Preview Resolution > Full Resolution.


To turn off full resolution preview for selected pictures
If displaying full resolution previews takes too long, select the pictures and choose Item > Preview Resolution > Low Resolution.
Note: Full resolution preview is not available for pictures in GIF, PICT, or WMF format. If the original picture file has a relatively low resolution to begin with, you’ll get an error message when you try to choose the Full Resolution option.
Scaling and positioning picture boxes
The dimensions of a picture box can be changed independently of the picture.
To scale a picture box manually
- Choose the Item or Content tool.
- Click a picture box.
- Drag any handle –. Hold down Option-Shift/Alt-Shift while dragging to preserve the original proportions of the box.
Drag any of the four corner handles of a box... ...or drag any of the four midpoint handles of a box.

Tip
To resize a Bézier picture box, turn off Item > Edit > Shape (Shift-F4/F10 toggles this command on and off).
To scale a picture box using the Measurements palette
- Choose the Item or Content tool.
- Click a picture box.
- Display the Classic tab of the Measurements palette.
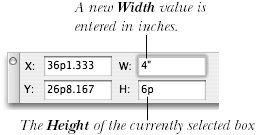
- To modify the width of the box, double-click the W field, enter a number in an increment as small as .001 , then press Return/Enter.
and/or
To modify the height of the box, double-click the H field, enter a number, then press Return/Enter.
As with all the fields in QuarkXPress, you can enter values in the Width and Height fields in any measurement unit used in QuarkXPress. If you’re using a different measurement system than the one selected for the rulers, enter the unit abbreviation (such as “pt” or ″) after the value.
Tip
To enlarge or reduce the dimensions of a box by a specified amount, insert the cursor after the current value in the W or H field, enter a plus (+) or minus (−) sign, then enter the amount you want to add or subtract in any measurement unit used in QuarkXPress. You can also use / (slash) to divide the current value or * (asterisk) to multiply it.
Tip
You can also scale a picture box by entering new values in the Width and Height fields in the Box pane of the Modify dialog box (Item > Modify).
To delete a picture box
Tip
A picture box that’s selected with the Item tool can also be deleted by pressing Delete/Backspace on the keyboard or by choosing Edit > Clear.
To delete a picture (and keep the box)
- Choose the Content tool, then click a picture box.
- Press Delete/Backspace.
To move a picture box manually
- Choose the Item tool or hold down Cmd/Ctrl if the Content tool is currently chosen.
- With the pointer inside the picture box, drag in any direction. Pause before dragging to display the picture as it’s moved (see the sidebar) or drag without pausing to display only the outline of the box as it’s moved .
To move a box, drag inside it with the Item tool. To see the picture as you move it, pause before dragging until the Live Refresh cursor
 displays. Or drag without pausing to see only the outline of the box as it’s moved.

Tip
You can drag a picture box or any other item from one page to another. To help you reach the desired page, you can force scrolling by knocking the pointer into the edge of the project window.
To reposition a picture box using the Measurements palette
- Choose the Item or Content tool.
- Click a picture box.
- Display the Classic tab of the Measurements palette.
- To change the horizontal position of the box relative to the ruler origin, which is normally located in the upper-left corner of the layout, change the X value .
and/or
To change the vertical position of the box, change the Y value.
The Classic tab of the Measurements palette

Tip
To move a box a specified horizontal or vertical distance, insert the cursor to the right of the current X or Y value, type a plus (+) or minus (−) sign, then enter a value in any measurement unit used in QuarkXPress ![]() -
-![]() .
.


![]() The two numbers are added together and the box is repositioned.
The two numbers are added together and the box is repositioned.
Tip
To nudge a picture box or any other item 1 point at a time, select it with the Item tool, then press any of the four arrow keys on the keyboard. Or Option-press/Alt-press an arrow key to move an item in .1-point increments.
A bleed is the positioning of items so that they partially overhang the edge of the page. The overhanging portion is trimmed by the print shop after printing.
To create a bleed
To create a bleed, position any item so that part of the item is on the page and part of it extends onto the pasteboard ![]() . Items that are completely on the pasteboard won’t print.
. Items that are completely on the pasteboard won’t print.

![]() These items are positioned for a bleed.
These items are positioned for a bleed.
When you’re ready to output your layout, you or your print shop will enter the width of the bleed area that you want to print and choose other print options in the Bleed pane in File > Print (see page 387).
Fitting pictures into their boxes
To scale a picture using the Measurements palette
- Choose the Item or Content tool.
- Click a picture.
- Display the Classic tab of the Measurements palette.
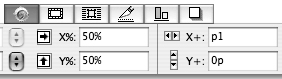
- Enter new X% (scale across) and/or Y% (scale down) values –
 .
When the X scale percentage is different from the Y scale percentage, it means the picture’s proportions don’t match those of the original. When the X and Y scale percentages match, it means the picture’s proportions do match those of the original. X and Y scale of 100%
.
When the X scale percentage is different from the Y scale percentage, it means the picture’s proportions don’t match those of the original. When the X and Y scale percentages match, it means the picture’s proportions do match those of the original. X and Y scale of 100% X scale 95%, Y scale 100%: a more subtle distortion
 X and Y scale of 50% X scale 85%, Y scale 50%


Tip
Press Tab to move from field to field on the Measurements palette (or press Shift-Tab to reverse your steps).
Tip
You can copy values from one field on the Measurements palette and paste them into another field, such as from the X% field into the Y% field, or vice versa.
To scale a picture using the keyboard
- Choose the Item or Content tool.
- Click a picture.
- Hold down Cmd-Option-Shift/Ctrl-Alt-Shift and press the > key to enlarge the picture by 5% or the < key to shrink it.
To center a picture in its box
- Choose the Item or Content tool.
- Click a picture.
- Choose Style > Center Picture.
or
Press Cmd-Shift-M/Ctrl-Shift-M.
To fit a picture to its box, maintaining proportions
- Choose the Item or Content tool.
- Click a picture.
- To scale the picture to fit completely within the box while maintaining its original proportions, Control-click/Right-click the picture and choose Scale Picture to Box (Cmd-Option-Shift-F/Ctrl-Alt-Shift-F) .
Use Style > Scale Picture to Box to scale the picture proportionally (in this case by 10%). The gray background of the box peeps out at the sides.

Tip
You can accomplish the same task by choosing Style > Scale Picture To Box.
To fit a picture to its box, distorting proportions
- Choose the Item or Content tool.
- Click a picture.
- To fit the picture into the box, but with its proportions altered relative to the original, choose Style > Stretch Picture To Fit Box (Cmd-Shift-F/Ctrl-Shift-F) .
Using Style > Stretch Picture to Fit Box forces the picture to fit the box, sacrificing proportions (in this case, not too bad at X: 13.5% and Y: 10%).

Follow these instructions if the picture fits nicely in its box but you want to scale the whole shebang—picture and box.
To scale a picture and its box
- Choose the Item or Content tool.
- Hold down Cmd-Option-Shift/Ctrl-Alt-Shift, press a handle, pause briefly for the picture to redraw, then drag .
Once you have carefully scaled a picture and positioned it in the box, you can resize both proportionally by pressing Cmd-Option-Shift/Ctrl-Alt-Shift as you drag a box handle.

Tip
If it’s a Bézier picture box, turn off Item > Edit > Shape (Shift-F4/F10) to scale the box and picture.
Cropping pictures
Along with resizing, cropping a picture can dramatically alter its impact on a page. Don’t be afraid to crop drastically. Sometimes less is more. One caveat, though: If you’re going to substantially crop a bitmapped picture, create a new, cropped picture file in its original application or by choosing File > Save Picture > Selected Picture. The picture will print much faster.
To crop a picture by moving it within its box
- Choose the Content tool.
- Drag inside the picture box (you’ll see a hand icon) .
Use the Content tool to drag a picture around within its box.
Tip
Click a picture and press an arrow key to nudge a picture 1 point at a time. Option-press/Alt-press an arrow key to nudge a picture 0.1 point at a time.
To crop a picture by resizing its box
- Choose the Item or Content tool, then click a picture box.
- Drag any handle of the box -.
Cropping a picture by resizing its picture box. The picture is cropped after the mouse button is released.


Tip
To crop a picture by reshaping its box, read Chapter 18. If it’s a Bézier picture box, turn off Item > Edit > Shape (Shift-F4/F10) to crop the picture.
To fit a box to a picture
- Choose the Item or Content tool, then click a picture box.
- Control-click/Right-click the picture and choose Fit Box To Picture .
or
Choose Style > Fit Box To Picture.
Rather than cropping a picture, you can resize its box to fit it perfectly.
Rotating, skewing, and flipping pictures
Note: When you rotate, crop, or scale a picture, create a new picture file for it. It will redraw, process, and print faster. Use the original application, such as Photoshop or Illustrator, or use File > Save Picture > Selected Picture.
To rotate a picture and its box using the Measurements palette
- Choose the Item or Content tool.
- Click a picture box.
- Display the Classic tab of the Measurements palette.
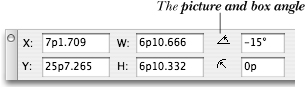
- In the picture and box angle field on the left side, enter a positive number between 0° and 360° to rotate the picture and box counterclockwise, or enter a negative number to rotate them clockwise .
The Box Angle field on the left side of the Classic tab of the Measurements palette
Tip
You can also use the Angle field in the Box pane of the Modify dialog box (Item > Modify) to rotate a picture and its box.
To rotate a picture and its box using the Rotation tool
- Choose the Rotation tool
 .
. - Click a picture box.
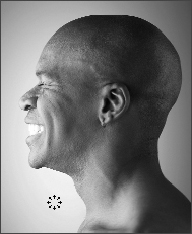
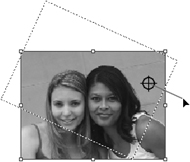
- Press to create an axis point, drag the cursor away from the axis point to create a lever for better control –, then drag clockwise or counterclockwise.
Before rotating a box, click with the Rotation tool cursor
 to establish the axis point. (You can create a lever by dragging away from the axis point.) When you rotate a box and its picture, if you don’t pause before dragging, only the outline of the box will be visible as you rotate it, not its contents.

Tip
Shift-drag with the Rotation tool to rotate an item in increments of 45°.
Tip
If you click with the Rotation tool and pause briefly, you’ll be able to see the picture and text reflow as you rotate the box. If not, you’ll only see the outline of the box.
To rotate a picture (and not its box)
- Choose the Item or Content tool.
- Click a picture .
0° rotation
- Display the Classic tab of the Measurements palette .
- In the picture angle field on the right side, enter a positive value to rotate the picture counterclockwise or a negative value to rotate it clockwise –.
20° rotation (the picture box has a frame) −20° rotation (no frame on the picture box)


Tip
You can also use the Picture Angle field in the Picture pane of the Modify dialog box (Item > Modify) to rotate a picture.
Tip
To rotate the picture box and not the picture, first rotate the box and picture together using the Box Angle field on the left side of the Measurements palette’s Classic tab. Then, rotate just the picture using the angle field on the right side. For example, you could rotate the picture with its box 20°, then rotate the picture back –20°.
To skew a picture and its box
- Choose the Item or Content tool.
- Click a picture box of any shape. Only one item can be skewed at a time.
- Control-click/Right-click the box and choose Modify or choose Item > Modify (Cmd-M/Ctrl-M).
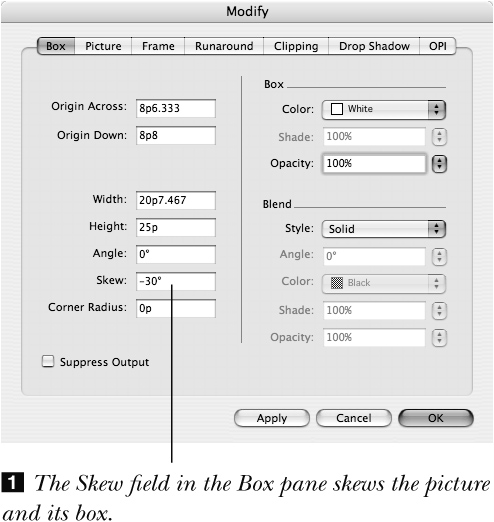
- Click the Box pane, then enter a Skew value between –75 and 75 . Enter a positive value to skew it to the right or a negative value to skew it to the left.
- Click OK . A picture can be edited in its skewed position.
A picture and its box skewed –30°

To skew a picture (and not its box)
- Choose the Item or Content tool.
- Click a picture box of any shape. Only one item can be skewed at a time.
- Display the Classic tab of the Measurements palette.
- On the right side, enter a Skew value between –75 and 75 . Enter a positive value to skew it to the right or a negative value to skew it to the left.
- Press Return/Enter -.
A picture skewed –30° within its box The box skew feature was used to distort the top and side portions of this cube.


Tip
You can also use the Picture Skew field in the Picture pane of the Modify dialog box (Item > Modify) to skew a picture.
The flip commands flip the contents of a box. A picture can be modified in its flipped position.
Note: As with cropping and rotating, it’s better to flip a picture in its original application than in QuarkXPress—it will print and redraw more quickly. Or, use File > Save Picture > Selected Picture to create a new, flipped picture file.
To flip a picture
- Choose the Content tool.
- Click a picture box.
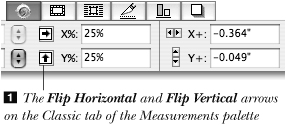
- Click the Flip Horizontal and/or Flip Vertical button on the Classic tab of the Measurements palette –.
or
Choose Style > Flip Horizontal and/or Flip Vertical.
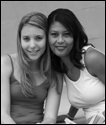
The original picture The picture flipped horizontally


Tip
When flipping pictures, watch out for text (such as a logo on a T-shirt) that may be unreadable or noticeably backwards when flipped ![]() –
–![]() .
.

![]() The original picture
The original picture

![]() The picture flipped horizontally: The numbers on the watch face are noticeably backwards.
The picture flipped horizontally: The numbers on the watch face are noticeably backwards.
Tip
To undo a flip, stand on your head, or choose the command again, or click the button again on the Measurements palette.
Applying special effects to pictures
Although high-end publishers will probably never lose their affinity or need for a dedicated image-editing application such as Photoshop, QuarkXPress has come a long way toward providing more image handling features. The advantages to this are many, including saving steps, viewing image changes in the context of the surrounding layout, and having new creative options. In addition, you can modify images without making permanent changes to the picture files—unless you choose to. Features include:
• The ability to import native Photoshop files and manipulate any layers, channels, and paths saved with them. Use File > Import Picture to import Photoshop files and then use Window > PSD Import ![]() .
.
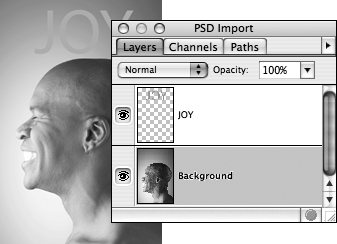
![]() Choose Window > PSD Import to manipulate layers, channels, and paths saved with native Photoshop files.
Choose Window > PSD Import to manipulate layers, channels, and paths saved with native Photoshop files.
• Adjustments to images such as Brightness/Contrast, Color Balance, and Selective Color; and filters such as Unsharp Mask, Emboss, and Add Noise. Use Window > Picture Effects ![]() to apply adjustments and filters.
to apply adjustments and filters.

![]() Choose Window > Picture Effects to apply adjustments and special-effects filters to images.
Choose Window > Picture Effects to apply adjustments and special-effects filters to images.
• The ability to automatically create new picture files from selected pictures or all the pictures in a layout. The new files reflect all the modifications made to them in QuarkXPress—including cropping, scaling, and adjustments—and can automatically replace the originals in the layout. Use File > Save Picture to create new files ![]() .
.
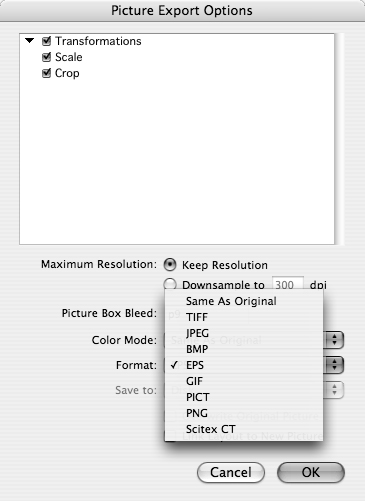
![]() The Picture Export Options dialog box lets you create new picture files that reflect modifications made in QuarkXPress.
The Picture Export Options dialog box lets you create new picture files that reflect modifications made in QuarkXPress.
• The ability to modify picture opacity and to access alpha channels/masks.
Note: To import native Photoshop files, be sure the PSD Import XTension is enabled. To apply adjustments and filters, and to create new picture files from modified images, make sure the Vista XTension is enabled. Both XTensions come with QuarkXPress and are enabled by default (Utilities > XTensions Manager).
When the PSD Import XTension is enabled (Utilities > XTensions Manager), you can simply import a native Photoshop picture file the same way you import any other picture file (File > Import Picture). If the picture file contains layers, channels, and paths you want to work with, you can access them through the PSD Import palette (Window > PSD Import). With this new ability, you may need to rethink your workflow and put some effort into image preparation. For example, if you have three different versions of a magazine cover image you want to experiment with, put them on separate layers in the same file.
To work with Photoshop files
- Choose the Item or Content tool.
- Click a native Photoshop picture.
- Choose Window > PSD Import.
- Click the Layers, Channels, and Paths tabs to see what’s available in the image. You can click the eye icon to the left of any image element to display and print it. For example, you might hide a layer containing text or hide one color channel to create a special effect.
- In the Layers tab, you can change the transparency of selected layers by entering a value in the Opacity field or by choosing a percentage value from the menu. If the picture has multiple layers, you can modify the way pixels interact with each other by choosing a blending mode from the menu .
The Blend menu and the Opacity field on the PSD Import palette (Window menu)
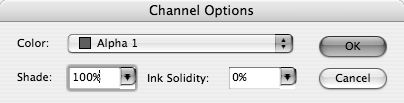
- In the Channels tab, you can double-click a channel and change its color –.
In the Channels tab on the PSD Import palette, double-click a channel to change its color The Channel Options dialog box lets you modify the color of a channel.
- In the Paths tab, you can show and hide clipping paths created for the image.


Tip
The blending modes in the Layers tab work the same as those in Photoshop.
Tip
You can’t apply Window > Picture Effects to native Photoshop files.
When the Vista XTension is enabled (Utilities > XTensions Manager), you can apply color corrections and special effects to bitmap images through the Picture Effects palette. All these controls are similar to those in Photoshop. The special effects filters are fun to experiment with, but the color correction controls are best left to experienced users. This is our nice way of trying to say that if you don’t know anything about color correction, you have no business performing color correction. You can, however, use the adjustments to create interesting effects such as negatives.
To apply image adjustments
- Choose the Item or Content tool.
- Click a bitmap picture such as a TIFF or JPEG.
- Choose Window > Picture Effects.
- From the Adjustments menu , choose an option. These options are primarily for correcting images, but you can also use them to make dramatic changes.
- A dialog box displays for the effect. Make any changes, using the preview to see what’s happening (keeping in mind that what you see onscreen may not be exactly what prints) . Click OK once you’re happy with the adjustments.
The Brightness/Contrast dialog box is an example of a dialog box that displays when you choose an option from the Adjustments menu.
- If you want to see how an image looks without the adjustment, uncheck the box next to the adjustment name on the Picture Effects palette .
Check the box next to an effect to hide it; drag any effect to change its position on the list.
- As adjustments and filters are added to the list, you can drag them up or down in the list to arrange the order in which they are applied.


Tip
To see the RGB and CMYK color values of any given pixel in an image, click the Info triangle. You’ll see the color values as you point at pixels in the image. Note that this only works after you apply an adjustment or filter.
To apply special-effects filters
- Choose the Item or Content tool.
- Click a bitmap picture such as a TIFF.
- Choose Window > Picture Effects.
- Click the Filters menu and choose an option; you may be familiar with some of them from Photoshop.
- A dialog box displays for the filter. Make any changes, using the preview to see what’s happening . Click OK when you achieve the look you want.
The Add Noise dialog box is an example of a dialog box that displays when you choose an option from the Filters menu.


Tip
Remember that you can check and uncheck effects in the Picture Effects palette to see how the image looks. You can also drag them up and down in the list to change the order in which they are applied.
The modifications you make to pictures in QuarkXPress may look good, but the picture files themselves may be unnecessarily large causing them to print slowly. You can create new picture files with the changes already applied (reducing their file size) and reimport them.
To create a new file from a modified picture
- Choose File > Save Picture > All Pictures in Layout.
or
Select the pictures you want to save and choose File > Save Picture > Selected Picture
- Optional: In the Picture Export Options dialog box, check the changes you want to keep in the new files and specify the Resolution, Color Mode, and Format you need for output .
The Picture Export Options dialog box (File > Save Picture) lets you create new picture files that reflect all the changes you make in QuarkXPress.
- To apply changes to the original picture files, check Overwrite Original Picture.
or
To create new picture files and import them into the picture boxes, check Link Layout to New Picture.
- Click OK.

Time was that if you wanted to see through an item or picture to what was behind it, you were relegated to using Photoshop or another program that offered transparency support. QuarkXPress 7, however, introduces transparency, allowing you to layer pictures, items, and text with abandon—or not. Transparency is one of those things in which less can be more. Don’t go nuts layering stuff just because you can. But if you’ve got a good reason—go for it!
To change a picture’s transparency
- Choose the Item or Content tool.
- Click a picture box.
- Choose Item > Modify.
- Click the Picture tab.
- In the Picture area in the upper-right corner, enter a value in the Opacity field or click the arrow(s) to the right of the field and drag the slider .
- Click Apply to see the change . If necessary, drag the Modify dialog box out of the way to see the picture.
Changing the opacity of a picture layered over text allows the text to shine through.


Tip
When you change a picture’s opacity, you should be able to see items behind the image. If you can’t, be sure the box background is None (Item > Modify > Box tab > Box area > Color menu).
Tip
When working with transparency and overlapping images, text, and other items, it can’t hurt to talk to your printer about his or her experience with actually printing these effects.
A mask is an area of an image that you want to isolate—to hide it, display it, or somehow treat it differently. If you have created a mask for a picture in an image editing application, you can choose to limit the picture display to the masked portion in QuarkXPress. In Photoshop, masks should be saved in alpha channels. If you change the picture’s opacity, the change is reflected in the mask. (Clipping paths, which also control what area of a picture displays, are discussed on page 211.)
To select a mask
- Choose the Item or Content tool.
- Click a picture box .
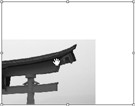
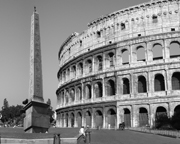
We didn’t think this scene was monumental enough, so we added an obelisk.
- Display the Classic tab of the Measurements palette.
- Choose an option from the Mask menu at right -.
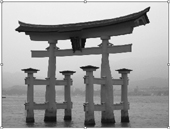
We used the Mask menu on the Classic tab of the Measurements palette to enable an alpha mask. Eccolà! Instant tourist attraction.

Tip
You can also choose Item > Modify and use the Mask controls in the Picture pane.
Locking pictures
As you can see, it’s pretty easy to import pictures—and it’s easy to make them pretty. After all the trouble you go to, how can you be sure that nobody, including you, accidentally or intentionally, messes them up? Lock them.
To lock a picture to prevent changes
- Choose the Content tool.
- Click a picture box.
- Choose Item > Lock > Position (F6) to prevent the picture box from being moved—at all.
- Choose Item > Lock > Picture to prevent the picture from being modified (scale, placement, etc.) or replaced (File > Import).
- If a picture is locked and you try to modify it, the lock cursor displays .
When an item and/or its content is locked, the lock cursor displays. If the position is locked, you can’t move it. If the picture is locked, you can’t modify or replace the picture.

Updating pictures
When a picture is imported into a QuarkXPress file, the original picture file name and location is stored in the QuarkXPress project file. If the original picture is then renamed or moved (is missing), its path to the QuarkXPress file must be reestablished in order for it to output correctly ![]() .
.

![]() QuarkXPress will notify you if you attempt to print, export as PDF, or collect for output a layout with missing or modified pictures. QuarkXPress really wants you to find and update those pictures!
QuarkXPress will notify you if you attempt to print, export as PDF, or collect for output a layout with missing or modified pictures. QuarkXPress really wants you to find and update those pictures!
QuarkXPress doesn’t automatically update missing pictures. To do it yourself, follow the instructions on the next page.
If an original picture is modified in another application, on the other hand, its onscreen preview may or may not be updated automatically, depending on the current Auto Picture Import setting, which is discussed below. Unlike missing pictures, modified pictures will print correctly, whether you’ve chosen to have their onscreen previews update or not.
Thankfully, when a picture is updated, any scale, rotation, color, and offset values that were previously applied to it aren’t changed.
To choose an import setting for modified pictures
In QuarkXPress (Edit, in Windows) > Preferences > Project > General, for Auto Picture Import, you can specify whether or not modified picture files in the project will be updated automatically when the project is reopened ![]() .
.
• If you reopen a project that was last saved with Auto Picture Import Off, the modified pictures won’t be updated.
• If the Auto Picture Import setting is On, the pictures will be updated automatically without a prompt appearing onscreen.
• If the Auto Picture Import setting is Verify, a prompt will appear. Click Yes to have the modified pictures update; no further steps are required.

The path to missing (moved or renamed) picture files can be updated at any time using Utilities > Usage > Pictures. When pictures are updated, any scale, rotation, color, and other attributes that were previously applied to them are preserved.
The Usage dialog box can also be used to update modified pictures. You’ll need to do this if Auto Picture Import was Off in Preferences > Project > General when you opened the file (that is, if you opted not to have modified pictures update automatically), or if you modify any of the pictures outside of QuarkXPress after opening the file.
To update pictures using the Usage dialog box
- Optional: Choose the Content tool, then, in the layout, click the picture you want to update.
- Choose Utilities > Usage (Option-F13 in Mac OS X).
- Click the Pictures option in the scroll list at left.
- Click any file name whose Status is listed as Missing or Modified. If you clicked a picture in step 1, its name will be selected.
Optional: Click Show to see the picture selected in the project window
. - Click Update .
- For any missing picture, locate and click the picture file name in the Find dialog box, then click Open .
For any modified picture, click OK.
- Click Done/Close.


Tip
In the Page column of the Pictures pane, a PB indicates a picture that is on the pasteboard.