
8. Tables and Tabs
Tables and tabs
Using the table features in QuarkXPress, not only can you stack columns of text and/or numerals ![]() , you can also create a table of pictures or even combine text and picture cells in the same table
, you can also create a table of pictures or even combine text and picture cells in the same table ![]() . Best of all, the features are simple to use.
. Best of all, the features are simple to use.

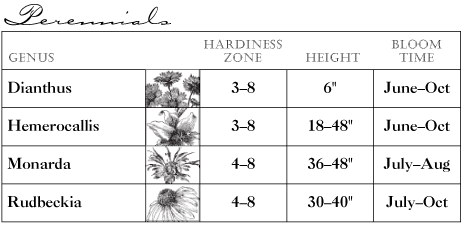
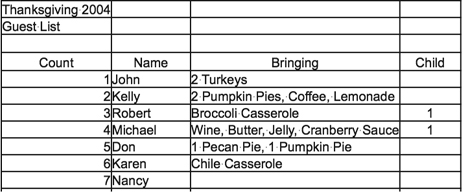
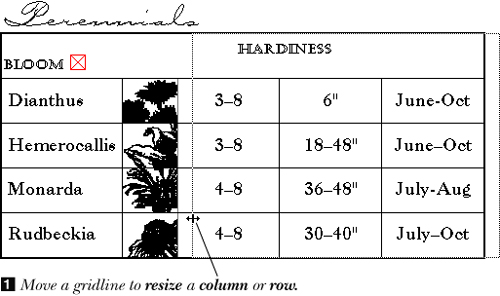
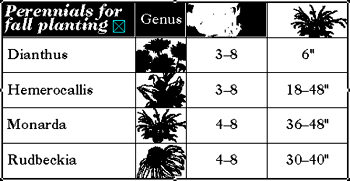
![]() A table containing text
A table containing text
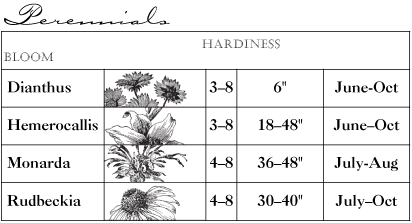
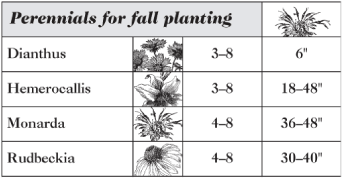
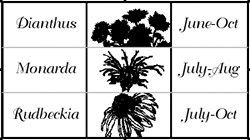
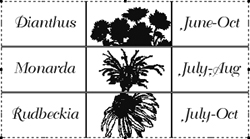
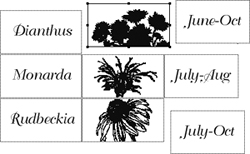
![]() A table containing pictures and text
A table containing pictures and text
You can create a table first using the Tables tool and then put text and pictures into it, or you can convert existing text to a table. In addition, you can create a table and link to data from Microsoft Excel. You can’t convert existing pictures into a table, but you can cut and paste or import pictures into a table. All tables contain blocks, called cells, that you type or import text or pictures into. As you type into a text cell, the type wraps automatically.
Once a table is created, you can change the text or pictures that it contains; change the overall dimensions of the table itself; change the way the cells are configured by adding or removing rows or columns; and change the table’s appearance by recoloring or restyling its outer frame and/or interior gridlines, or by changing the background color of any of its cells.
Note: If you need to line up numerals on the decimal point or align page numbers with a dot leader for a table of contents, you’ll need to use tabs, which we start discussing on page 157. If you need to, you can insert tabs into text inside a table cell.
Creating tables
As we said on the previous page, you can create a table in one of three ways: Create the table and then enter type into it, convert existing text into a table, or link to data from Excel. First, we’ll show you how to create an empty table.
Note: These commands work only for cells that aren’t linked.
To create an empty text table
- Choose the Tables tool.

- Drag a box on any page in a layout (Shift-drag to make a square). The Table Properties dialog box appears.
- Enter the desired number of Rows and Columns
 .
Choose table parameters in the Table Properties dialog box.
.
Choose table parameters in the Table Properties dialog box. - Click Cell Type: Text Cells. The cell size will be calculated to fit within the overall table automatically.
Note: The overall table dimensions, as well as the individual row and column sizes, can be changed later.
- Optional: To specify that row heights or cell widths grow to accommodate text additions, check Rows and/or Columns in the Auto Fit area. This area is unavailable if you check Link Cells, which allows text to flow to the next cell.
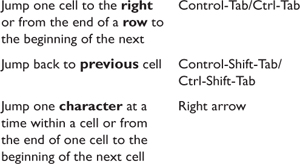
- Optional: To specify the order in which the text insertion point will jump from cell to cell (see the sidebar), choose from the Tab Order menu.
- Optional: If you want the cells to be linked together so text can flow from box to box, click Link Cells (you can also link cells manually once the table is created). Then choose an option from the Link Order menu for the order in which cells will be linked.
- Click OK. To enter text, choose the Content tool, click in a cell, and start typing
 . You can also choose File > Import Text, in which case the text will flow into that cell and any cells it’s linked to.
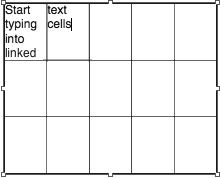 Enter text in the new table.
You can apply all the standard style and paragraph formatting attributes to table text, either manually or via paragraph and character style sheets.

Tip
The table’s overall size determines the maximum number of rows and columns it can contain.
If you want all the text cells to be linked together, then you’ll be satisfied with the Link Text Cells option, described below. But what if you just want to link a few cells, and not all the cells in a table? You can do it manually with the Linking tool, just as you would non-table text (see page 89).
You can even link a text cell to a text box outside the table. Just remember the standard rule for all linking: You can’t link to a box that already contains text, even if all that’s left is a nonprinting character, such as a paragraph return. Also, you can’t link a text cell to form controls in a Web layout.
To link all the text cells in a table
- To begin with, the table must be empty. It can contain picture cells; the links will just bypass those cells.
- Choose the Item tool, then click the table.
- Choose Table > Link Text Cells .
None of the cells are linked in the original table.
or
Ctrl-click/Right-click the table and choose Table > Link Text Cells from the context menu.
The cells will be linked
in the Link Order currently chosen in the Table pane in Tables tool preferences (see the sidebar on this page). After choosing the Link Text Cells command, all of the cells are linked.

The link order is the order in which text cells are linked together, either when you created the table initially or via the Link Text Cells command. Use the Table pane of the Item > Modify dialog box to change the link order of a table.
Note: If your table contains text cells that were linked manually, or if it contains text, you can’t change the link order using the method below—you have to unlink all the linked cells and empty the table out first. If you don’t want to empty out the table, you can manually relink cells in any order with the Linking tool.
The tab order is the order in which the text insertion point jumps between unlinked cells by using the shortcuts listed in the sidebar on page 138. The tab order has no effect on linked cells.
To change the link or tab order in a table
- Choose the Item or Content tool, then click a table that doesn’t contain any text.
- Choose Item > Modify, then click the Table tab .
The Link Order menu in the Table pane of the Modify dialog box
- Choose an option from the Link Order menu –
 .
This is the table’s original link order. (In order to make the links appear, for illustration purposes, we selected the table and chose the Linking tool.) After choosing a new option from the Link Order menu, the table links look like this.
.
This is the table’s original link order. (In order to make the links appear, for illustration purposes, we selected the table and chose the Linking tool.) After choosing a new option from the Link Order menu, the table links look like this.and/or
Choose an option from the Tab Order menu.
The link order can be different from the tab order.


Tip
To unlink cells, use the Unlinking tool.
Tip
To choose the default link or tab order for future tables, see the sidebar on the previous page.
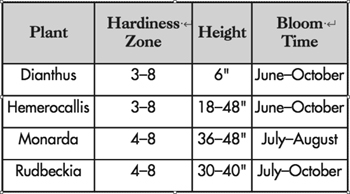
To create a table from existing text
- Choose View > Invisibles, if necessary, to see how the information is separated.
- Note which characters in the original text (returns, tabs, spaces, or commas) determine how the text will be distributed into table cells, and add or delete those characters if necessary.
- Choose the Content tool, then select the text that you want copied into the table cells .
Select the text you want to appear in the table. Note that there are no spaces surrounding the tabs.
- Choose Table > Convert Text to Table.
or
Ctrl-click/Right-click the table and choose > Table > Convert Text to Table from the context menu.
- From the Separate Rows With menu, choose which character in the selected text will be used to designate the start of each new row of cells . If you choose Paragraphs, for example, every paragraph return ¶ will start a new row.
The Convert Text to Table dialog box controls how text gets distributed into cells.
- Columns in the table will be set up according to the characters currently in the selected text, as reflected on the Separate Columns With menu. If you choose Tabs, for example, every tab will start a new column.
- Change the Rows and Columns values if you want to add blank rows or columns.
- From the Cell Fill Order menu, choose the direction in which you want the existing text to flow into the new table.
- To ensure that the rows are wide enough for the text, check Auto Fit: Rows. If you want the columns to adjust as well if necessary, check Auto Fit: Columns. (Width is adjusted first.)
- Click OK .
With Auto Fit: Columns checked, the text automatically fits within the columns when the text is converted to a table.


Tip
After converting the text to a table, you can delete the original text and/or its text box if you don’t need it.
To create a table with data from Excel
- Make sure the Table Import XTension is running (Utilities > XTensions Manager).
- Choose the Tables tool.
- Drag a box on any page in a layout (Shift-drag to make a square). The Table Properties dialog box appears.
- Optional: To specify that row heights or cell widths grow to accommodate text additions, check Rows and/or Columns in the Auto Fit area.
- Check Link to External Data. All the other commands in the dialog box become unavailable.
- Click OK; the Table Link dialog box appears .
The Table Link dialog box lets you import an Excel file into a QuarkXPress table.
- Click Browse to locate and select an Excel file. The selected file is listed in the Name field.
- If you want to import a portion of the file, use the Table area to select a Sheet and enter a Range of records.
- In the Options area, check the things you want to import with the file.
- Click OK. The Excel file will import into a new table .
The Convert Text to Table dialog box controls how text gets distributed into cells.

Tip
If the Excel file changes, you can update the data in the table through Utilities > Usage > Tables pane. QuarkXPress maintains as much of the new formatting you’ve applied as possible.
To create a picture table
- Choose the Tables tool.
- Draw a rectangle in a layout. The box shape and size can be changed later.
- Enter the desired number of Rows and Columns.
- Click Picture Cells .
- Click OK. Use File > Import Picture to add pictures to cells.
Choose the Content tool, click the table, then:
You can also use the Table > Select submenu to select odd or even rows or columns (to format every other row, for example), or to select cells, grids, or borders.
To edit the contents of a table cell
- Choose the Content tool.
- Click the cell whose attributes you want to change.
or
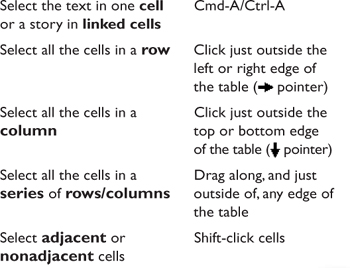
Select multiple cells by using one of the selection methods listed in the sidebar at left
–. Shift-click to select individual cells. - Do any of the following:
• To edit the attributes of text in a table cell (which are similar to text boxes), use any of the standard methods, namely, the Style menu, the tabbed Measurements palette, and paragraph and/or character style sheets.
• To move text or pictures from one cell to another, select it, then use the Cut (Cmd-X/Ctrl-X) and Paste commands (Cmd-V/Ctrl-V).
• To modify the attributes of a text cell, such as its width, background color, background shade, or Text Inset, use the Item > Modify > Cell and Text panes (Cmd-M/Ctrl-M). You can even rotate or skew text within its cell. The Cols and Gutter options aren’t available for table cells.
• To modify picture cells, use the Picture, Runaround, or Cell pane in Item > Modify.
• To color the table border segments or gridlines, see pages 151–152.
• To color the overall table box or the table box frame, see page 269.
• To convert text cells to picture cells, or vice versa, see the sidebar on the facing page.

Reconfiguring tables
To resize a column or row by dragging
- Choose the Content tool, then click the table.
- Optional: If you want the overall size of the table to remain fixed as you resize columns or rows, choose Table > Maintain Geometry. The columns and rows will resize automatically to compensate for the resized table. Uncheck Maintain Geometry if you want to resize only one column or row at a time. The table will become larger or smaller to accommodate the new column or row size.
or
Ctrl-click/Right-click the table and choose > Table > Maintain Geometry from the context menu.
- Drag the vertical or horizontal gridline that separates any two columns or rows (the pointer will become a double-headed arrow
 ) –.
The column is enlarged with Maintain Geometry checked, so the overall table size remains the same. The column is enlarged with Maintain Geometry unchecked, so the overall table enlarges to accommodate the larger column.
) –.
The column is enlarged with Maintain Geometry checked, so the overall table size remains the same. The column is enlarged with Maintain Geometry unchecked, so the overall table enlarges to accommodate the larger column.If the column or row contains text, the text may rewrap inside each cell. If the row or column contains a picture or pictures, more of the pictures will become exposed or hidden as a result.
If View > Snap to Guides is checked, then a gridline will snap to the nearest guide if it’s moved within the Snap Distance specified in QuarkXPress (Edit, in Windows) > Print Layout > General.

Tip
You can also change the Maintain Geometry setting in the Table pane of the Modify dialog box (Item menu).
To resize a column or row by entering values
- Choose the Content tool.
- Select the column(s) or row(s) you want to reshape or resize (see the sidebar on page 143).
- Choose Item > Modify (Cmd-M/Ctrl-M).
- In the Table pane, check Maintain Geometry to have the overall table size remain fixed as you resize columns or rows; unselected columns and rows will resize automatically. With this option checked, you can’t resize the rightmost column or bottommost row.
or
Uncheck Maintain Geometry to have the table enlarge or shrink to accommodate the new column or row size. Unselected columns or rows will stay the same size.
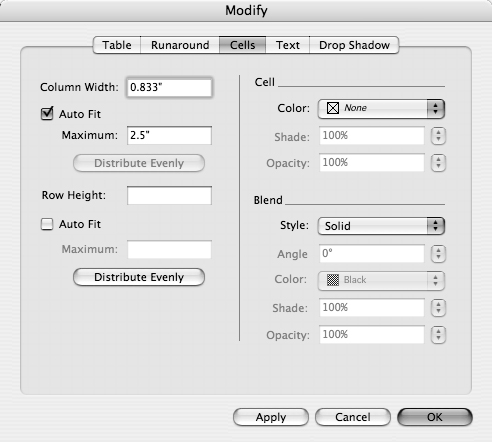
- Click the Cells tab, then enter the desired Column Width or Row Height . With Maintain Geometry on, one of these two fields won’t be available. If the selected cells aren’t uniform in size, a field will be blank, but a value can be entered.
In Item > Modify > Cells, enter new Width and/or Height values for selected rows and/or columns.
- Click Apply (Cmd-A/Alt-A), make any adjustments, then click OK.
To make columns and/or rows uniform in size
- Choose the Content tool.
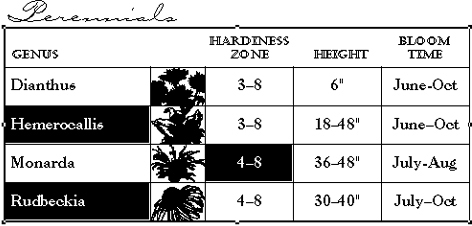
- Select the rows or columns you want to make uniform in size .
Five columns of uneven width are selected.
- Choose Item > Modify, then click the Cells tab.
- Click Distribute Evenly under Width and/or Height –
 . A value will be entered automatically.
Click Distribute Evenly in Item > Modify > Cells. After clicking Width: Distribute Evenly, all the columns are now the same width. The text rewrapped in the first column.
. A value will be entered automatically.
Click Distribute Evenly in Item > Modify > Cells. After clicking Width: Distribute Evenly, all the columns are now the same width. The text rewrapped in the first column.Note: This option won’t be available if the selected columns or rows are already uniform in size.
- Click Apply to preview the results, if desired, then click OK.


If a table becomes too wide or too long to fit on a page or within a specific area, you can split it into multiple subtables. Any changes to the table’s structure or content reflow through the other subtables.
To split a table
- Choose the Item tool or Content tool.
Note: A table can not be split if Maintain Geometry is enabled (see page 145).
- Click a table you want to split .
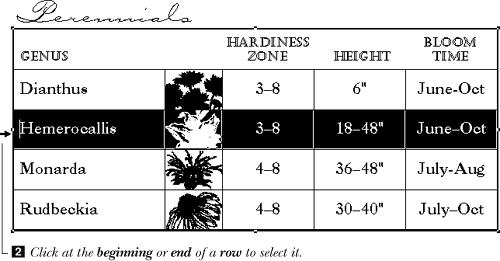
The top row of this table contains column headings.
- Choose Table > Table Break.
- Check Width if you want the table to split when it gets too wide. Check Height if you want it to split when it gets too long . (You can check both, but that really doesn’t make sense.)
The Set Table Break dialog box controls how wide or tall a table can get before it splits into separate tables. You can move the continuation of a table to any other location in a layout.
- Specify the maximum Width or Height of the table before it splits.
- Click OK. (If nothing happens, it’s because the table is not yet too big. Add rows or columns or resize the table.)

Tip
To create completely separate tables, select any instance of the split table and choose Table > Make Separate Tables.
Once you split a table, you may want any header or footer rows to be repeated on continued instances of the table.
To create header and footer rows
- Choose the Content tool.
- Select the row(s) you want to repeat as headers or footers. You can select any continuous rows at the top for headers and any continuous rows at the bottom for footers.
- Choose Table > Repeat as Header or Table > Repeat as Footer. The header or footer rows are repeated on continued instances of the table .
The table is split in two, with the same header row used in both subtables.

Tip
The text in header and footer rows is synchronized, so if you change it anywhere it changes everywhere. This means you can’t put text such as “continued” in a header row.

To resize a whole table
- Choose the Item tool, then click the table.
- Using one of the shortcuts listed in the sidebar, drag any of the table’s eight handles –. The cells will reshape to fit the new table dimensions.
A corner handle is dragged with Option-Shift/Alt-Shift held down. The table’s dimensions—but not its content—are enlarged proportionally.
or
Change the W (width) or H (height) value on the Classic tab of the Measurements palette.
or
Control-click/Right-click the table and choose Modify, click the Table tab, enter new Width and/or Height values, click Apply if desired, then click OK.


Tip
To move a selected table to a precise location on your page, change the Origin Across and Origin Down values in Item > Modify > Table or change the X and Y values on the Classic tab of the Measurements palette.
Tip
The Live Refresh feature (which lets you see the contents of an item as you scale it) does not work for tables.
Before you add or delete columns or rows, you need to decide whether to permit the overall width and height of the table to change as a result. With Maintain Geometry checked in the Table menu, the overall dimensions of the table will be preserved as columns or rows are added, but existing cells will become smaller in order to accommodate the new ones. With Maintain Geometry unchecked, the cell sizes won’t change, but the overall table dimensions will increase.
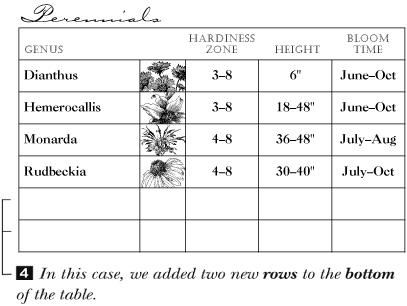
To add columns or rows to a table
- Choose the Content tool.
- Click OK, then click a cell or select the row or column that you want the new row or column to appear next to .
The original table, with the insertion point in the bottom row.
- Choose Table > Insert > Row or Table > Insert > Column.
or
Control-click/Right-click the selection and choose Table > Insert > Row or Table > Insert > Column from the context menu.
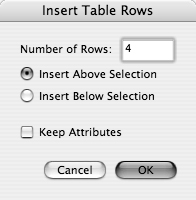
- Enter the desired Number of Rows or Number of Columns –, and click where you want the new rows or columns to be inserted (such as Insert Left of Selection for columns).
In the Insert Table Rows dialog box, enter the number of rows you want to add, and click a position where they will be inserted. In the Insert Table Columns dialog box, enter the number of columns you want to add, and click a position where they will be inserted.
- Optional: Check Keep Attributes to have inserted cells and gridlines acquire the attributes of the selected row or column.
Attributes that are duplicated include typographic specifications, style sheets, and settings in the Cell, Text, and Picture panes of Item > Modify.
- Click OK .


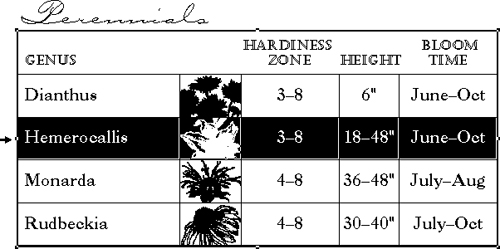
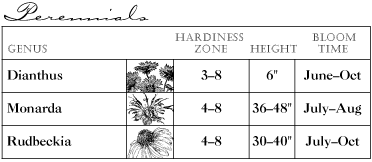
To delete a row or column from a table
- Choose the Content tool.
- Select one or more rows or columns to delete (see the list of selection methods in the sidebar on page 143) .
A row is selected.
- Control-click/Right-click any selected cell and choose Table > Delete > Row or Table > Delete > Column.
or
Choose Table > Delete > Row or Table > Delete > Column
. You can undo this. The Table > Delete > Row command deleted the selected row.
To change the content of a cell (picture, text, or none)
- Choose the Content tool.
- Select the cell or cells you want to convert (use one of the selection methods listed in the sidebar on page 143 if you want to select multiple cells).
- Choose Item > Content > Picture, Text, or None. If you choose None, you’ll be able to recolor the background of the cell or apply a blend to it but not put text or a picture inside it.
- If an alert dialog box warns you that text or a picture will be deleted, click OK. (If that is not okay, copy the content into an empty box first.)
There are a number of reasons for combing cells. Maybe you want a header to span across the whole top of your table. Or perhaps you’d like to display a picture more prominently in a larger portion of the table.
Beware! The text or picture in the topmost left selected cell will be preserved when you combine other cells with it, but any text or pictures in other selected cells will be discarded (you’ll get a warning).
To combine cells
- To preserve text or a picture for later use, take a moment now to copy and paste it either into a separate box outside the table or into a cell that you’re not combining.
- Choose the Content tool.
- Select the cells you want to combine .
Three cells in the top row are selected.
- Choose Table > Combine Cells. If the cells currently contain text and/or pictures, an alert will appear . If you want to live dangerously, click “Do not show this warning again,” then click OK .
This alert dialog box will appear if the cells you’re combining contain text or pictures.
The selected cells will be combined into one. If the topmost left selected cell contained text, that text will now spread across or downward to fill the now larger cell size. If it was linked to another box, that link will be broken. If that cell contained a picture, the picture either will now fill, or can be scaled to fill, the whole combined cell.


To uncombine cells
- Choose the Content tool.
- Click the cell you want to split up.
- Choose Table > Split Cell. The content of the cell will be placed inside the first of the newly divided cells.
Restyling tables
You can dramatically change the appearance of a table by changing the line style, width, color, or shade of its gridlines and/or border, and this can be done using a dialog box (instructions on this page) or using submenus (see the next page). The default border and gridlines are black and 1 pt. in width.
To restyle the border or gridlines using a dialog box
- Choose the Item tool, then double-click the table .
The original table
- If you’re going to change the width of the border/gridlines, you need to decide whether or not to permit the overall width and height of the table to change as a result. Click the Table tab. If you check Maintain Geometry, the overall dimensions of the table will be preserved, but existing cells will resize automatically in order to fill the gap. If you uncheck Maintain Geometry, the cell sizes won’t change, but the overall table dimensions will.
- Click the Grid tab.
- On the right side of the dialog box, click one of the three buttons for the gridlines and borders you want to restyle: Horizontal and Vertical
 , Horizontal only
  , or Vertical only
  .
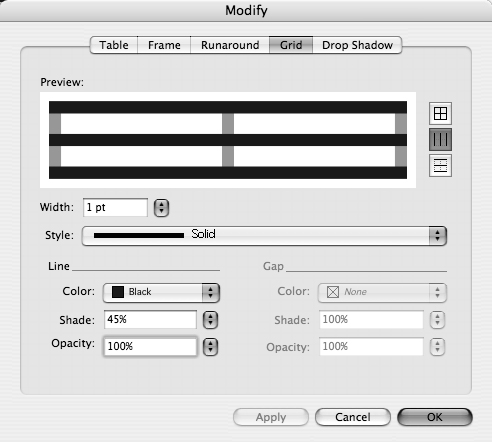
Choose Width, Style, Color, and Shade options for gridlines in Item > Modify > Grid.
.
Choose Width, Style, Color, and Shade options for gridlines in Item > Modify > Grid. - Choose a gridline Width, Style, Line: Color, Shade, and Opacity; also choose a Gap: Color, Shade, and Opacity if the line style contains gaps. The horizontal gridlines will print on top of the vertical gridlines. To make the gridlines disappear, choose the Style: Solid, and choose a Width of 0 and/or a Color of None.
- Click Apply. At this point you can click another icon and apply different settings, if you like. Adjust any of the settings, then click OK .
First we checked Maintain Geometry in the Table menu. Then in the Grid pane, we clicked the Select Vertical button, increased the Width, and changed the Shade to 45%.

You can single out a handful of gridlines and/or border segments for restyling, or you can restyle all of them at once.
To restyle multiple border segments or gridlines via submenus
- Choose the Content tool.
- Shift-click a gridline or border segment, then Shift-click additional horizontal or vertical gridlines or border (outer) segments. Gridlines and border segments can be selected at the same time. If a gridline is narrow, it may be hard to tell if it’s selected.
or
Choose Table > Select > Horizontal Grids, Vertical Grids, Border, or All Grids
. You can use the Select submenu to select multiple rows, columns, cells, gridlines, and borders. - Choose attributes from the submenus on the Style menu –.
The original table The formatted table
or
Control-click/Right-click one of the selected gridlines or border segments and make choices from the Line Style, Color, Width, etc., submenus on the context menu.
or
Display the Table Grid tab on the Measurements palette and use it to make any changes
. The Table Grid tab of the Measurements palette lets you format selected gridlines.


Tip
You can also change the gridline color, shade, and opacity (but not the gap color) via the Colors palette (Window menu).
Here’s a zippity-quick way to restyle a single gridline or segment.
To restyle one border segment or gridline via the context menu
- Choose the Content tool.
- Control-click/Right-click a gridline or border segment and make choices from the Line Style, Width, Color, Shade, and Opacity submenus.
Choosing Tables tool preferences
If you create tables frequently and you tend to choose the same parameters over and over for them, it’s worth your while to take a moment to set a few preferences. These Creation preferences affect future tables that you create using the Tables tool but not tables created using the Convert Text to Table command.
To choose Tables tool preferences
- Double-click the Tables tool.
or
Choose QuarkXPress (Edit, in Windows) > Preferences > Print Layout > Tools, then click the Tables tool icon.
- Click Modify, then click the Creation tab.
- Choose whether you want future tables to contain text or picture cells, and make default Rows and Columns choices .
Choose preference settings for future tables in the Creation pane of the Modify dialog box.
- To have text cells in future tables be linked automatically, click Link Text Cells.
- Optional: To prevent the Table Properties dialog box from opening each time you use the Tables tool, uncheck Show Creation Dialog. If Link Text Cells is also checked, cells will be linked in the default order, which is
 . With Show Creation Dialog checked, the Table Properties dialog box will open each time you use the Tables tool, displaying your preferences.
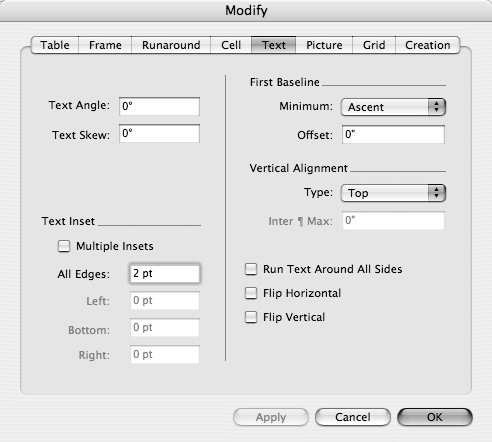
 - Click the Table, Frame, Runaround, Cell, Text , Picture, or Grid tab, and change any of the available options in those panes, if desired.
Choose text preferences for future tables in the Text pane. Choose Width, Style, Color, Shade, and Opacity preferences for gridlines in future tables in the Grid pane.
- Click OK twice.


Converting tables
When the Convert Table to Text command is applied to a table, a new text box is created, and it’s filled with a copy of the text from the table. You can choose the order in which the text blocks from the table cells will flow into the new box, and whether they’ll be separated by Returns, tabs, commas, or spaces. You can also choose whether you want the original table to be preserved (the default setting) or deleted.
Note: If the table contains pictures, those pictures will be inserted into anchored picture boxes within the new text box.
To convert a table to text
- Choose the Item or Content tool.
- Click the table you want to convert .
The original table
- Control-click/Right-click the table and choose Table > Convert Table > To Text from the context menu.
or
Choose Table > Convert Table > To Text.
- From the Separate Rows With menu , choose which character you want to have inserted at the end of each row.
Settings for the extracted text are chosen in the Convert Table to Text dialog box.
- From the Separate Columns With menu, choose which character you want to have inserted between each column.
- Choose an option from the Text Extraction Order menu for the order in which text is to be extracted from the table.
- Check Delete Table if you want the table to be deleted. Whether this box is checked or not, the converted text will appear in a new, separate box after you click OK. This control is not available for tables that are split.
- Click OK .
 After choosing Table > Convert Table > To Text, in this case, the columns are separated by tabs and the rows are separated by paragraph returns.


Tip
If the table contains linked text and all you want to do is extract the text, just copy and paste it into a conventional text box instead of converting the table.
Follow these steps if you’d like to convert your completed table into separate but grouped conventional text boxes and/or picture boxes. Unlike the Convert Table to Text command, discussed on the previous page, this command doesn’t copy the table—it converts it without copying.
To convert a table to a group
- Choose the Item tool.
- Click the table you want to convert .
Click a table.
- Control-click/Right-click the table and choose Table > Convert Table > To Group from the context menu.
or
Choose Table > Convert Table > To Group.
Leave the boxes grouped together
, or choose Item > Ungroup at any time . Text from a series of linked cells will be preserved as a story. After choosing Item > Convert Table > To Group command After choosing the Ungroup command and then moving a few boxes
Tip
If you want to continue a table on another page, don’t convert it to a group. Instead, use the Table Break command (Table menu) which is discussed on page 146.
Table editing and formatting recap
QuarkXPress 7 changes the way you work with tables with the addition of the Table menu and the Table Grid tab of the Measurements palette. The old workhorse, the Item > Modify dialog box, is still around, and has controls for a few parameters that aren’t available elsewhere, like the settings for tab order and link order.
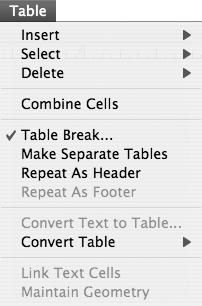
The Table menu consolidates all the controls for modifying tables—except for formatting cells and cell contents.

The Modify dialog box provides panes for modifying the selected parts of a table. For example, when cells are selected, the Cell pane is available; when gridlines are selected, the Grid pane is available.

When gridlines are selected, the Table Grid tab on the Measurements palette lets you quickly format the gridlines. You can also use the Text tab to modify the text inset for cells and the Paragraph Attributes and Character Attributes tabs for formatting text.
Setting tabs
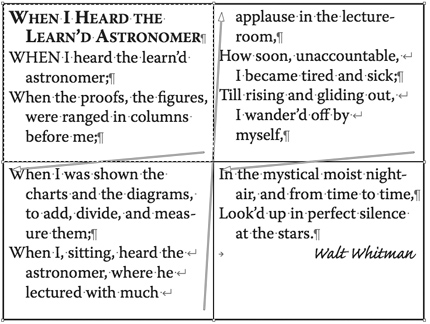
Tabs are invisible commands that tell blocks of text where to line up ![]() –
–![]() . If no custom tabs are set and you press Tab, text to the right of the Tab character will jump to the nearest default tab stop (they’re 0.5-inch apart). Before you can set custom tab stops (next two pages), you must insert invisible tab characters → into text. Note: Don’t use spaces to create columns; it will look uneven due to variable character widths.
. If no custom tabs are set and you press Tab, text to the right of the Tab character will jump to the nearest default tab stop (they’re 0.5-inch apart). Before you can set custom tab stops (next two pages), you must insert invisible tab characters → into text. Note: Don’t use spaces to create columns; it will look uneven due to variable character widths.

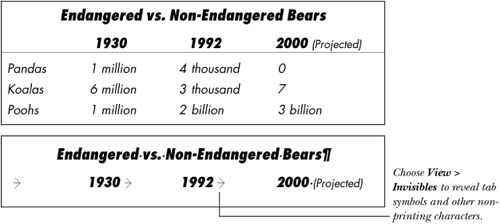
![]() Use tabs to align columns of text.
Use tabs to align columns of text.
You can set up columns of text and/or numerals without tabs, by using the tables feature, but tabs are handy for inserting dot leaders or aligning numbers on the decimal. Tabs can also be added to text in a table.
To insert tabs into text
- Choose the Content tool, then click in a text box.
- Press Tab as you input copy before typing each new column. The cursor will jump to the next default tab stop.
or
To add tabs to existing text, click to the left of the text that is to start each new column and press Tab.
Tip
Don’t press Tab more than once to move type further along. If you’re not happy with the location of the default stops, set custom stops (see next page).
You can set a virtually unlimited number of custom tab stops per paragraph.
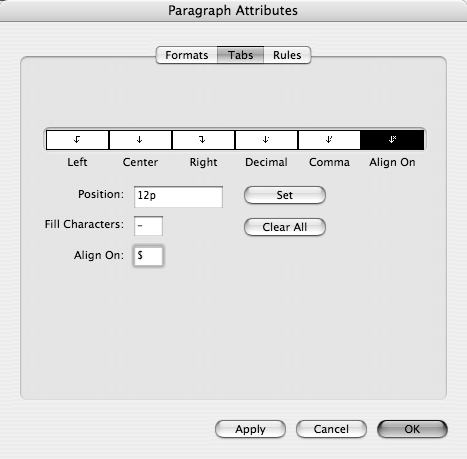
To set custom tab stops
- Choose the Content tool.
- Zoom in on your layout to make it easier to see the tab ruler increments, but make sure you can still see the full width of the text column.
- Select all the paragraphs for which the tab stops are to be set.
- Display the Tabs tab of the Measurements palette (, next page). The tab ruler displays above the text box.
To create a dot leader with extra space between the dots, enter a period and a space in the Fill Characters field.
- Drag one of the tab icons (Left, Center, Right, Decimal, or Comma, or Align On) from the palette to the tab ruler, using the guide to judge the placement (, next page). If you chose Align On, you can click the tab icon and enter a character in the field.
To create a dashed line with extra space between the dashes, enter a hyphen and a space in the Fill Characters field.
or
Click a tab button, enter a value in the Position field, then click Set.
- Optional: To create a leader, type one or two characters in the Fill Characters field (–, this page). For a dot leader, type a period.
To change the point size, tracking, color, or other attributes of a tab leader, you have to do it manually for each instance or by using Find/Change. The tab leader in this example is tracked out, horizontally scaled, and baseline shifted downward.
Tip
You can copy and paste a tab from one line of text to another. If you double-click the tab character, the whole leader will also become selected.
You can use any character as a fill character. Be creative! This is the tilde character (to the left of the “1” on the keyboard).


Tip
To move a marker, drag it to the left or the right. Or, select the tab stop icon, enter a position number (location on the ruler) in the Position field using any measurement system, then click Set.
Tip
To set a series of tabs by specifying the distance between them, enter “+” and then the gap length in the Position field (e.g., “p10+p12”). If the list gets too long, click the last tab marker on the ruler, then continue on your way.
Tip
You can also choose Style > Tabs (![]() , next page; Cmd-Shift-T/Ctrl-Shift-T), but the huge Paragraph Attributes dialog box tends to get in the way of viewing tabs.
, next page; Cmd-Shift-T/Ctrl-Shift-T), but the huge Paragraph Attributes dialog box tends to get in the way of viewing tabs.

![]() The Tabs tab on the Measurements palette provides an interactive method for dragging tabs into a layout. The two triangular icons on the left side of the ruler let you adjust paragraph indents on the fly; the top icon is the first line indent and the bottom one is the standard left indent (drag both for a simple indent). Use the triangular icon on the right side to adjust the right indent. Dragging these icons produces the same results as altering values in the First Line, Left Indent, and Right Indent fields in Style > Formats.
The Tabs tab on the Measurements palette provides an interactive method for dragging tabs into a layout. The two triangular icons on the left side of the ruler let you adjust paragraph indents on the fly; the top icon is the first line indent and the bottom one is the standard left indent (drag both for a simple indent). Use the triangular icon on the right side to adjust the right indent. Dragging these icons produces the same results as altering values in the First Line, Left Indent, and Right Indent fields in Style > Formats.

Select a tab alignment icon (the Decimal tab is selected here), enter Fill Characters in the field (a period and space are shown here) and then drag the icon up to the tab ruler above the text. A guide shows where the tab stop will be placed and the text updates according to your tab settings. Release the mouse when you’re happy. If you still need to fine-tune the placement or other settings of a tab stope, click its icon to select it and make changes.
You can use similar techniques to set tabs in Style > Tabs (Cmd-Shift-T/Ctrl-Shift-T). The behemoth Paragraph Attributes dialog box ![]() tends to get in the way of viewing the tabs in your text, though, so you’ll probably need to drag it out of the way.
tends to get in the way of viewing the tabs in your text, though, so you’ll probably need to drag it out of the way.
![]()
To edit or remove custom tab stops
- Choose the Content tool.
- Select all the paragraphs that contain the stops you want to change or from which you want to remove tab stops.
- Display the Tabs tab of the Measurements palette.
or
Choose Style > Tabs (Cmd-Shift-T/Ctrl-Shift-T).
- Do any of the following:
To change the alignment of a stop, click its marker, then click a different Alignment button.
To change fill character(s), click a marker, then change the Fill Character(s).
To move a tab stop, drag it to the side manually. Or click it, change its Position value, then click Set (Cmd-S/Alt-S).
To remove one tab stop, drag its marker upward or downward off the ruler
. Drag a tab stop marker out of the ruler to remove it.To remove all the tab stops, click Clear All (Alt-C in Windows)
or Option-click/Alt-click the ruler. Click Clear All to remove all tab stops from the currently selected text. The default tab stops will be restored to the text. - If you’re using the Tabs pane of the Paragraph Attributes dialog box, click Apply to preview (Cmd-A/Ctrl-A), readjust any of the settings, if desired, then click OK .
Four different alignment options were used in this table.


