In addition to retrieving data about the entities and data schema, the Microsoft Dynamics CRM MetadataService allows you to programmatically modify schema changes. This section will explore the structure of CrmMetadata’s objects in more detail and show how you can programmatically create, update, and delete objects.
Working with entities in the MetadataService closely mirrors the experience found in CRM’s customization user interface. Consequently, you cannot perform actions with the MetadataService that users can’t perform in the user interface. Developers typically use MetadataService messages to manipulate metadata on remote systems to facilitate the deployment of their solutions.
Unfortunately creating an entity with the MetadataService is not as straightforward as creating a data record with the CrmService. To create an entity, you use CreateEntityRequest and set the following properties: Entity (EntityMetadata), PrimaryAttribute (StringAttributeMetad ata), HasNotes (bool), and HasActivities (bool). Once you create an entity’s Primary Attribute, Notes, and Activity settings, you cannot change them.
When you set the schema name it must be unique among all entities and ManyToManyRelationships because a unique database table is created using this name (hence the term schema). The lowercase version of the schema name is the entity’s resulting logical name.
Best Practice
To avoid confusion with case-sensitive code, use lowercase letters for the schema name.
Creating an entity using the MetadataService has the same consequences as creating one with the customization user interface. Microsoft Dynamics CRM automatically creates a number of standard attributes (for example, Created On, Modified On) in addition to creating forms and views for the entity. In addition, Microsoft Dynamics CRM create relationships to the System User entity (for example, Created By, Modified By, Owner).
The following code sample demonstrates how to create a custom entity named "project" using the MetadataService:
MetadataService metadataService = GetMetadataService("contoso");
EntityMetadata projectMetadata = new EntityMetadata();
projectMetadata.SchemaName = "new_project";
projectMetadata.DisplayName = CreateLabel("Project", 1033);
projectMetadata.DisplayCollectionName = CreateLabel("Projects", 1033);
projectMetadata.Description = CreateLabel(
"Describes a Project. A time bound collection of work.", 1033);
projectMetadata.OwnershipType = new CrmOwnershipTypes();
projectMetadata.OwnershipType.Value = OwnershipTypes.UserOwned;
StringAttributeMetadata nameMetadata = new StringAttributeMetadata();
nameMetadata.SchemaName = "new_name";
nameMetadata.DisplayName = CreateLabel("Project Name", 1033);
nameMetadata.Description = CreateLabel("The Name of the Project", 1033);
nameMetadata.MaxLength = new CrmNumber();
nameMetadata.MaxLength.Value = 200;
nameMetadata.RequiredLevel = new CrmAttributeRequiredLevel();
nameMetadata.RequiredLevel.Value = AttributeRequiredLevel.Required;
CreateEntityRequest request = new CreateEntityRequest();
request.Entity = projectMetadata;
request.PrimaryAttribute = nameMetadata;
request.HasActivities = true;
request.HasNotes = true;
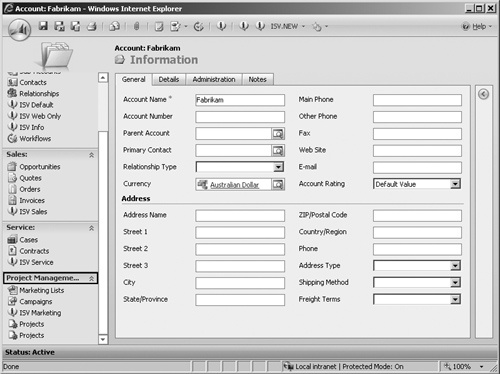
metadataService.Execute(request);Figure 8-7 shows the new entity through the user interface.

If you don’t provide explicit values in the organization’s base language for the entity DisplayName, DisplayCollectionName, and attribute’s DisplayName, an error results. You must always populate these values in the organization’s base language.
Once you create an entity, the CreateEntityResponse has GUID properties that you can use with RetrieveEntityRequest and RetrieveAttributeRequest as a means of locating these objects. You can take advantage of these metadata identifiers in your own code. For example:
//Execute the Request
CreateEntityResponse createResponse =
    (CreateEntityResponse)metadataService.Execute(createRequest);
Guid entityId = createResponse.EntityId.Value;

//Retrieve New Entity
RetrieveEntityRequest retrieveRequest = new RetrieveEntityRequest();
retrieveRequest.EntityItems = EntityItems.EntityOnly;
retrieveRequest.MetadataId = entityId;
retrieveRequest.RetrieveAsIfPublished = true;
RetrieveEntityResponse retrieveResponse =
    (RetrieveEntityResponse)metadataService.Execute(retrieveRequest);
string entityLogicalName = retrieveResponse.EntityMetadata.LogicalName;

//Write Logical Name to Console
Console.WriteLine(entityLogicalName);Only a relatively small number of entity properties are valid for updating. To update related attributes and relationships you need to use their own unique update messages.
You can only update the following properties:
Description
DisplayCollectionName
DisplayName
DuplicateDetection
IsAvailableOffline
Similar to updates using the CrmService Web service, you simply instantiate an object—in this case an EntityMetadata object—set the properties you want to change, and add the unique identity (LogicalName). The following code sample demonstrates this technique to change the Display Name and Duplicate Detection settings of the entity:
MetadataService metadataService = GetMetadataService("contoso");

EntityMetadata entity = new EntityMetadata();
entity.LogicalName = "new_project";

entity.DisplayName = CreateLabel("Technical Project", 1033);
entity.DuplicateDetection = new CrmBoolean();
entity.DuplicateDetection.Value = true;

UpdateEntityRequest updateRequest = new UpdateEntityRequest();
updateRequest.Entity = entity;
updateRequest.MergeLabels = true;

metadataService.Execute(updateRequest);
Notice the MergeLabels property on the UpdateEntityRequest. When this property is set to false, all LocLabels in the CrmLabel objects being updated will be overwritten. When this property is set to true, CRM merges the array of LocLabels with the labels that currently exist for the entity. This allows developers to update a string for a single language without having to restate all the strings for all the other languages available in the organization.
Deleting an entity through the MetadataService is very straightforward. Simply use the DeleteEntityRequest message and supply the entity’s logical name. All related records, forms, views, attributes, and relationships will also be deleted. This functionality is identical to deleting an entity using the customization user interface. Only custom entities can be deleted from CRM.
Note
Similar to the user interface experience, Microsoft Dynamics CRM prevents you from deleting an entity referenced on a published form or view.
The following code shows how to delete an entity:
MetadataService metadataService = GetMetadataService("contoso");

DeleteEntityRequest deleteRequest = new DeleteEntityRequest();
deleteRequest.LogicalName = "new_project";

metadataService.Execute(deleteRequest);Each attribute type in CRM has a unique object type that inherits from the AttributeMetadata object, which in turn inherits from CrmMetadata. It is important to understand the data type of each attribute because each one has unique properties and behaviors. If you’re not familiar with the various Microsoft Dynamics CRM data types and their properties, you might want to open the customization user interface to view more information about the various attributes. Getting comfortable with all of the different attributes will save you time when you develop your code.
Creating an attribute simply requires a reference to the logical name of the parent entity and an AttributeMetadata object. The following example shows how to create a custom attribute named Project Cost with a Money data type for our project entity, that we created in earlier examples:
MetadataService metadataService = GetMetadataService("contoso");

MoneyAttributeMetadata cost = new MoneyAttributeMetadata();
cost.SchemaName = "new_cost";
cost.RequiredLevel = new CrmAttributeRequiredLevel();
cost.RequiredLevel.Value = AttributeRequiredLevel.Recommended;
cost.MinValue = new CrmDouble();
cost.MinValue.Value = 0;
cost.MaxValue = new CrmDouble();
cost.MaxValue.Value = 10000000;
cost.DisplayName = CreateLabel("Project Cost", 1033);

CreateAttributeRequest createRequest = new CreateAttributeRequest();
createRequest.EntityName = "new_project";
createRequest.Attribute = cost;
metadataService.Execute(createRequest);
You can directly retrieve attributes using RetrieveAttributeMetadata by specifying the logical names of the attribute and its parent entity or by retrieving the entity and parsing collection of attributes on its attribute property. You can update and delete attributes by simply providing the entity and attribute names.
Most of the properties of AttributeMetadata objects are self-explanatory and very easy for a developer to interpret, so we won’t spend a lot of time explaining them. However, one property does require more explanation: DisplayMask. This is a bit-level setting property used to conserve space in the database. It is an older piece of metadata brought forward from previous versions. Developers will typically only modify this property to change the Searchable property of an attribute. Searchable (also known as Valid For Advanced Find) determines whether an attribute can be visible in the Advanced Find user interface. Figure 8-8 shows the attribute form with the Searchable attribute’s value set to Yes.
Caution
Incorrectly formatting DisplayMask can cause unexpected behavior in the application. Proceed with caution and thoroughly test any code that interacts with this property.

First let’s retrieve the DisplayMask value for this attribute and display it in the console, as shown in Figure 8-9.
Tip
When doing a retrieve in anticipation of then updating the metadata, it is a good idea to use RetrieveAsIfPublished = true. This returns the data as shown in the customization user interface.
MetadataService metadataService = GetMetadataService("contoso");

RetrieveAttributeRequest request = new RetrieveAttributeRequest();
request.LogicalName = "websiteurl";
request.EntityLogicalName = "account";
request.RetrieveAsIfPublished = true;

RetrieveAttributeResponse response =
    (RetrieveAttributeResponse)metadataService.Execute(request);

StringAttributeMetadata websiteUrl =
    (StringAttributeMetadata)response.AttributeMetadata;

Console.WriteLine(websiteUrl.DisplayMask.Value);
The following values are returned:
ValidForAdvancedFind
ValidForForm
ValidForGrid
Let’s now remove the ValidForAdvancedFind value so that it is no longer available in the Advanced Find user interface. Notice that we also need to set the other two values in the DisplayMasks property.
MetadataService metadataService = GetMetadataService("contoso");

StringAttributeMetadata websiteUrl = new StringAttributeMetadata();
websiteUrl.DisplayMask = new CrmDisplayMasks();
websiteUrl.DisplayMask.Value = DisplayMasks.RequiredForForm | DisplayMasks.RequiredForGrid;
websiteUrl.LogicalName = "websiteurl";

UpdateAttributeRequest request = new UpdateAttributeRequest();
request.Attribute = websiteUrl;
request.EntityName = "account";
request.MergeLabels = false;
metadataService.Execute(request);
If we now refer back to the customization user interface, we can see that the Searchable property has now been set to No, as shown in Figure 8-10.

If we re-run the Console sample that reads the DisplayMask values, we will get the result shown in Figure 8-11.

The Picklist attribute type has a number of special messages available to it in the MetadataService. The following code sample demonstrates how to create a new Picklist attribute. The various picklist values are found in the Options Array. You need to specify each one and provide the appropriate multilingual values using the CrmLabel object.
Tip
The Picklist default value is set using an Int, not a CrmNumber. You do need to set the values of each Option object with a CrmNumber, but always use an Int when setting the default value.
MetadataService metadataService = GetMetadataService("contoso");

//Create Attribute object
PicklistAttributeMetadata picklist = new PicklistAttributeMetadata();

string[] labels = new string[]
{
    "Gold",
    "Silver",
    "Bronze"
};

//Set number of Options
picklist.Options = new Option[labels.Length];

for (int i = 0; i < labels.Length; i++)
{
    picklist.Options[i] = new Option();
    picklist.Options[i].Value = new CrmNumber();
    picklist.Options[i].Value.Value = i + 1;
    picklist.Options[i].Label = CreateLabel(labels[i], 1033);
}

//Set the Default Value to Gold using an Int and not a CrmNumber
picklist.DefaultValue = 1;

//Set the Requirement Level
picklist.RequiredLevel = new CrmAttributeRequiredLevel();
picklist.RequiredLevel.Value = AttributeRequiredLevel.None;

//Set the Schema Name
picklist.SchemaName = "new_medalrating";

//Set the Display Name
picklist.DisplayName = CreateLabel("Medal Rating", 1033);

//Execute the CreateAttributeRequest
CreateAttributeRequest request = new CreateAttributeRequest();
request.Attribute = picklist;
request.EntityName = "account";
metadataService.Execute(request);
Manipulating the arrays of picklist options can be time-consuming. The MetadataService provides some special messages to ease this burden: InsertOptionValue, UpdateOptionValue, DeleteOptionValue, and OrderOptionValue.
The InsertOptionValueRequest allows you to simply "inject" a new option into the picklist without calling UpdateAttributeRequest and specifying the entity array. In the following example we add a new option called Copper into the Medal Rating Attribute we created in the previous example:
MetadataService metadataService = GetMetadataService("contoso");

InsertOptionValueRequest request = new InsertOptionValueRequest();
request.AttributeLogicalName = "new_medalrating";
request.EntityLogicalName = "account";

request.Value = new CrmNumber();
request.Value.Value = 4;

request.Label = CreateLabel("Copper", 1033);

metadataService.Execute(request);
In the next example we use UpdateOptionValueRequest to change the U.S. English (1033) value of Gold (Option 1) to Platinum. The MergeLabels property is set to true so that only the strings for the languages provided are updated.
Tip
The UpdateOptionValueRequest value must be an integer, not a CrmNumber. This differs from CreateOptionValueRequest, where a CrmNumber is used.
MetadataService metadataService = GetMetadataService("contoso");

UpdateOptionValueRequest request = new UpdateOptionValueRequest();
request.AttributeLogicalName = "new_medalrating";
request.EntityLogicalName = "account";
request.Value = 1;
request.Label = CreateLabel("Platinum", 1033);
request.MergeLabels = true;

metadataService.Execute(request);
The OrderOptionRequest request allows you to reorder the picklist values as they are displayed by the user interface. Note that this order is independent of the language selected. You simply create an ordered array of integers to represent the new display order, as shown in the following example:
MetadataService metadataService = GetMetadataService("contoso");

OrderOptionRequest request = new OrderOptionRequest();
request.AttributeLogicalName = "new_medalrating";
request.EntityLogicalName = "account";
request.Values = new int[] { 4, 3, 1, 2 };

metadataService.Execute(request);
The DeleteOptionValueRequest is very straightforward. Simply provide the logical names of the attribute, entity, and integer for the item you want to delete.
It’s important to understand the relationship capabilities of Microsoft Dynamics CRM 4.0 before embarking on programming the various relationship-specific messages of the metadata service. You can find a good primer on the relationship capabilities in your CRM server’s online help: http://<servername>/help. Figure 8-12 shows the help screen for entity relationships.

Tip
If you don’t have a CRM server installed you can also reach the help provided by CRM Online at http://help.crm.dynamics.com/help. Better still, you don’t need a CRM Online account to access it!
Modifying one-to-many relationships is relatively straightforward. Simply set all the appropriate properties and execute the correct request:
CreateOneToManyRequest
UpdateRelationshipRequest
DeleteRelationshipRequest
Remember that one-to-many and many-to-one relationships are the same thing. The important thing to remember is the Referenced and Referencing entities.
One major difference between the customization user interface and the MetadataService when creating and updating relationships is the way cascading properties are handled. The user interface does have three "helper" settings (Parental, Referential Restrict Delete, and Referential) that preconfigure the cascading rules. This often causes confusion with developers who believe these to be actual settings. In reality they are just templates that are applied to the Cascading properties. In the MetadataService you should set each value manually and ensure that you understand the consequences of each (clearly documented in the online help).
When creating a one-to-many relationship you need to supply a Lookup attribute for the referencing entity. In the following example we create a relationship from Project to Account. In other words, the Account entity is the referenced (the "one") entity and the Project entity is the referencing (the "many") entity. In the Microsoft Dynamics CRM user interface, you can add an Account Lookup attribute on the Project form. And, since an account can have many projects, you will see a link to Projects in the Account form’s left navigation area.
MetadataService metadataService = GetMetadataService("contoso");

//Create the Relationship object
OneToManyMetadata relationship = new OneToManyMetadata();
relationship.ReferencingEntity = "new_project";
relationship.ReferencedEntity = "account";
relationship.SchemaName = "new_project_account";

//Define the Associate Menu Behavior. This will appear on the Account Form
relationship.AssociatedMenuBehavior = new CrmAssociatedMenuBehavior();
relationship.AssociatedMenuBehavior.Value = AssociatedMenuBehavior.UseCollectionName;

relationship.AssociatedMenuGroup = new CrmAssociatedMenuGroup();
relationship.AssociatedMenuGroup.Value = AssociatedMenuGroup.Marketing;

relationship.AssociatedMenuOrder = new CrmNumber();
relationship.AssociatedMenuOrder.Value = 10001;

//Define each Cascading Behavior
relationship.CascadeAssign = new CrmCascadeType();
relationship.CascadeAssign.Value = CascadeType.NoCascade;

relationship.CascadeDelete = new CrmCascadeType();
relationship.CascadeDelete.Value = CascadeType.RemoveLink;

relationship.CascadeMerge = new CrmCascadeType();
relationship.CascadeMerge.Value = CascadeType.NoCascade;

relationship.CascadeReparent = new CrmCascadeType();
relationship.CascadeReparent.Value = CascadeType.NoCascade;

relationship.CascadeShare = new CrmCascadeType();
relationship.CascadeShare.Value = CascadeType.UserOwned;

relationship.CascadeUnshare = new CrmCascadeType();
relationship.CascadeUnshare.Value = CascadeType.NoCascade;

//Create the Lookup Attribute
LookupAttributeMetadata lookup = new LookupAttributeMetadata();
lookup.SchemaName = "new_account";
lookup.DisplayName = CreateLabel("Account", 1033);
lookup.RequiredLevel = new CrmAttributeRequiredLevel();
lookup.RequiredLevel.Value = AttributeRequiredLevel.Recommended;

//Create and Execute the Request
CreateOneToManyRequest request = new CreateOneToManyRequest();
request.OneToManyRelationship = relationship;
request.Lookup = lookup;

metadataService.Execute(request);
Four menu groups exist on each record’s left navigation area, and you can decide when you create a relationship where the resulting link will be displayed. By default, these groups are named
Details
Sales
Marketing
Service
AssociatedMenuGroup is a noncustomizable enum that has the same values. However, you can actually rename the labels for these groups within the ISV.Config. After you export the ISV.config file, you need to search for the NavBarAreas element. Example 8-1 shows a sample element included and commented out in the default ISV.config file.
Example 8-1. Sample update to NavBarAreas element
<NavBarAreas>
  <NavBarArea Id="Marketing">
    <Titles>
      <Title LCID="1033" Text="Project Management"/>
    </Titles>
  </NavBarArea>
</NavBarAreas>
Modify these values using any text editor, and import the file back into Microsoft Dynamics CRM using the Import Customizations mechanism. You can see the results in Figure 8-13.
Many-to-many relationships are peer relationships between two entities. Microsoft Dynamics CRM creates an intersect entity to store the intersect data for each many-to-many relationship. When you create a many-to-many relationship, you need to specify the schema name of the relationship and the schema name of the Intersect entity. The relationship schema name must be unique among all other relationships (including one-to-many relationships), while the schema name of the Intersect entity must be unique among all entities.
The following code sample demonstrates how to create a many-to-many relationship:
MetadataService metadataService = GetMetadataService("contoso");

//Create the Relationship Object
ManyToManyMetadata relationship = new ManyToManyMetadata();
relationship.SchemaName = "new_account_project";

//Set Values for One Side of the Relationship
relationship.Entity1LogicalName = "account";

relationship.Entity1AssociatedMenuBehavior = new CrmAssociatedMenuBehavior();
relationship.Entity1AssociatedMenuBehavior.Value = AssociatedMenuBehavior.UseCollectionName;

relationship.Entity1AssociatedMenuGroup = new CrmAssociatedMenuGroup();
relationship.Entity1AssociatedMenuGroup.Value = AssociatedMenuGroup.Marketing;

relationship.Entity1AssociatedMenuOrder = new CrmNumber();
relationship.Entity1AssociatedMenuOrder.Value = 10002;

//Set Values for the Other Side of the Relationship
relationship.Entity2LogicalName = "new_project";

relationship.Entity2AssociatedMenuBehavior = new CrmAssociatedMenuBehavior();
relationship.Entity2AssociatedMenuBehavior.Value = AssociatedMenuBehavior.UseCollectionName;

relationship.Entity2AssociatedMenuGroup = new CrmAssociatedMenuGroup();
relationship.Entity2AssociatedMenuGroup.Value = AssociatedMenuGroup.Marketing;

relationship.Entity2AssociatedMenuOrder = new CrmNumber();
relationship.Entity2AssociatedMenuOrder.Value = 10001;

//Create and Execute the Request
CreateManyToManyRequest request = new CreateManyToManyRequest();
request.IntersectEntitySchemaName = "new_account_project";
request.ManyToManyRelationship = relationship;
metadataService.Execute(request);Unfortunately, you cannot create relationships between all the entities because some of the out-of-the-box entities contain special behaviors. You can use the following six special messages in the MetadataService to determine whether a relationship is valid. Usually these messages are only used if an alternative customization user interface is being developed (similar to the Data Migration Manager mentioned at the start of this chapter).
CanBeReferencedRequest. Returns a Boolean if an entity can be a Referenced entity in a one-to-many relationship.
GetValidReferencedEntitiesRequest. Returns an array of entity logical names that can be Referenced entities in a one-to-many relationship.
CanBeReferencingRequest. Returns a Boolean if an entity can be a Referencing entity in a one-to-many relationship.
GetValidReferencingEntitiesRequest. Returns an array of entity logical names that can be a Referencing entity in a one-to-many relationship.
CanBeManyToManyRequest. Returns a Boolean if an entity can participate (as either Entity1 or Entity2) in a many-to-many relationship.
GetValidManyToManyRequest. Returns an array of entity logical names that can participate (as either Entity1 or Entity2) in a many-to-many relationship.
You can set an optional property referencing an entity for the GetValidReferencedEntities, GetValidReferencingEntities, and GetValidManyToMany messages. The MetadataService will filter the returned results to the entities that are valid references.
Just like modifying the data schema through the Web interface, you must publish your customization changes before users will see the changes you made. You might expect that you can publish customizations using the MetadataService, but you need to use the CrmService API to publish customizations. Use the PublishAllXml and PublishXml messages in the CrmService Web service to accomplish this.
As you learned in Chapter 5, both the Publish and PublishAll messages are eligible for plug-in registration. This enables developers to monitor the publish action and act accordingly. With the MetadataService also available inside plug-ins (see "Connecting to the MetadataService" earlier in this chapter), you can build plug-ins that can manage the metadata process. Please note that Microsoft Dynamics CRM does not execute MetadataService operations through the standard pipeline, and therefore you cannot register plug-ins against its operations.
More Info
See an example of how to use the Publish and PublishAll messages for capturing customization changes in Chapter 5.