With a rudimentary understanding of Windows Workflow Foundation, we are now equipped to dive into ways that you can extend the native workflow functionality within Microsoft Dynamics CRM. The most common method for extending workflow functionality is by registering your own custom activities with Microsoft Dynamics CRM. This lets you reference them as custom steps in the workflow designer.
Because this is our first activity, we’ll keep it simple. We’ll create an activity that calculates the difference between two times and displays this difference as text, such as "5 months" or "12 minutes".
To get started, we’ll need an assembly to hold our custom activities.
Creating a custom activity assembly
Start Visual Studio 2008.
If you’ve already created the ProgrammingWithMicrosoftDynamicsCrm4 solution in a previous chapter, you can open it now and skip ahead to step 6.
On the File Menu, select New and then click Project.
In the New Project dialog box, select Other Project Types and then select the Blank Solution template.
Type the name ProgrammingWithDynamicsCrm4 in the Name box and click OK.
On the File Menu, select Add and then click New Project.
In the New Project dialog box, select the Visual C# project type targeting the .NET Framework 3.0 and then select the Class Library template.
Type the name ProgrammingWithDynamicsCrm4.Workflow in the Name box and click OK.
Delete the default Class.cs file.
Right-click the ProgrammingWithDynamicsCrm4.Workflow project in Solution Explorer and then click Add Reference.
On the Browse tab, navigate to the CRM SDK’s bin folder and select microsoft.crm.sdk. dll and microsoft.crm.sdktypeproxy.dll. Click OK.
Right-click the ProgrammingWithDynamicsCrm4.Workflow project in Solution Explorer and then click Add Reference.
On the .NET tab, select System.Workflow.Activities and System.Workflow.ComponentModel. Click OK.
Right-click the ProgrammingWithDynamicsCrm4.Workflow project in Solution Explorer and then click Properties.
On the Signing tab, select the Sign The Assembly check box and then select New from the drop-down list.
Type ProgrammingWithDynamicsCrm4.Workflow in the Key File name box, clear the Protect My Key File With A Password check box and then click OK.
Close the Project Properties window.
At this point you can compile the project, but of course without any classes the assembly isn’t too valuable. We’ll remedy that by adding our first custom activity class.
Creating your first custom activity
Right-click the ProgrammingWithDynamicsCrm4.Workflow project in Solution Explorer and select Class from the Add menu.
Specify CalculateAgeActivity as the class name and click Add.
Delete the predefined contents of the CalculateAgeActivity.cs file after it opens.
Now that we have a blank file ready to go, let’s start by including the following using statements at the top of the file:
using System;
using System.Workflow.ComponentModel;
using Microsoft.Crm.Sdk;
using Microsoft.Crm.Workflow;
Now we need to add the class definition. Note two items of interest here. First, we inherit from System.Workflow.ComponentModel.Activity the way that all activities are required to do (either directly or indirectly). Second, we apply the CrmWorkflowActivity attribute to our class, which tells the Microsoft Dynamics CRM workflow designer how to display our custom activity in the user interface. Example 6-1 shows the simple, stubbed-out CalculateAgeActivity class definition.
Example 6-1. CalculateAgeActivity class definition
namespace ProgrammingWithDynamicsCrm4.Workflow
{
    [CrmWorkflowActivity("Calculate Age",
        "Programming Microsoft CRM 4")]
    public class CalculateAgeActivity: Activity
    {
    }
}
The next thing we need to do is define the properties for our class. We need two CrmDateTime properties that we can compare and a string property to contain our human-readable age output value. Normally you would implement them like this:
private CrmDateTime _earlierDate;
public CrmDateTime EarlierDate
{
    get { return _earlierDate; }
    set { _earlierDate = value; }
}
However, this implementation would not expose your properties to be bound to the values of other activities. To achieve this, we need to use a DependencyProperty for the backing store of the property. You can achieve this by implementing your properties as follows:
public static DependencyProperty EarlierDateProperty = DependencyProperty.Register(
    "EarlierDate", typeof(CrmDateTime), typeof(CalculateAgeActivity));

[CrmInput("Earlier Date")]
public CrmDateTime EarlierDate
{
    get { return (CrmDateTime)GetValue(EarlierDateProperty); }
    set { SetValue(EarlierDateProperty, value); }
}
Wow! That seems like quite a bit of code for a simple property. The first thing you probably noticed is that you no longer have a private field. It is replaced by a static public DependencyProperty. This DependencyProperty is used like a key for getting and setting the value of the property. The DependencyProperty is created by calling the static DependencyProperty.Register method, which takes arguments of the property name as a string, the property type, and the activity class type.
The addition of the CrmInput attribute on the property definition is also new. This attribute tells the workflow designer that the property is meant to be used as an input and also provides the label that should be presented in the designer’s user interface.
Finally, the property getter and setter use the GetValue and SetValue methods, which are defined on DependencyObject (Activity’s base class). Both GetValue and SetValue take a DependencyProperty as an argument to determine which property value should be retrieved or assigned.
Although these steps might seem like a burden, they allow Windows Workflow Foundation to efficiently bind activities together without those activities having any knowledge of each other.
Tip
You can use a snippet in Visual Studio 2008 to insert properties that use a DependencyProperty as the backing store by typing in propdp and then pressing the Tab key twice. As with all snippets, you can specify the different values, such as the property type and name, and then just press Tab to jump to the next input field. When you are done entering input fields, press Enter and you’ll return to the normal text input mode.
Unfortunately, the snippet was designed for use with Windows Presentation Foundation (WPF), which also uses dependency properties. Because of this, the snippet calls an overloaded version of DependencyProperty.Register passing in a System.Windows.UIPropertyMetadata, which is used to specify a default value for the property. You can just delete this last argument and it will work fine—it’s just an additional step.
Armed with this understanding of dependency properties, we can define the remaining two properties like this:
public static DependencyProperty LaterDateProperty = DependencyProperty.Register(
    "LaterDate", typeof(CrmDateTime), typeof(CalculateAgeActivity));

[CrmInput("Later Date")]
public CrmDateTime LaterDate
{
    get { return (CrmDateTime)GetValue(LaterDateProperty); }
    set { SetValue(LaterDateProperty, value); }
}

public static DependencyProperty AgeProperty = DependencyProperty.Register(
    "Age", typeof(string), typeof(CalculateAgeActivity));

[CrmOutput("Age")]
public string Age
{
    get { return (string)GetValue(AgeProperty); }
    set { SetValue(AgeProperty, value); }
}
The only thing worth noting here is that our Age property has been marked with the CrmOutput attribute, which tells the workflow designer that the property should be used for output and given the label "Age" in the user interface.
Now that our properties have been defined, we just need to implement the part of the activity that actually does something. The base Activity class defines an Execute method that is called by the workflow run time whenever the activity needs to be executed. Example 6-2 shows CalculateAgeActivity’s implementation of Execute.
Example 6-2. CalculateAgeActivity’s Execute method
protected override ActivityExecutionStatus Execute(
    ActivityExecutionContext executionContext)
{
    CrmDateTime earlierDate = this.EarlierDate;

    if (earlierDate != null)
    {
        CrmDateTime laterDate = this.LaterDate ?? CrmDateTime.Now;
        this.Age = GenerateHumanReadableAge(
            laterDate.UniversalTime - earlierDate.UniversalTime);
    }

    return ActivityExecutionStatus.Closed;
}
This method simply gets the values from our two input CrmDateTime parameters and passes their difference into the GenerateHumanReadableAge method, which does all the work. The return value is assigned to our output Age parameter. Also, if the LaterDate property is null, it uses the current date and time for that value. Notice that we use the UTC version of both dates through the UniversalTime property. We are not using the ActivityExecutionContext object that is passed in at this point, but we’ll cover it later in the chapter.
More Info
The return value for the Execute method is of type ActivityExecutionStatus. You almost always want to return ActivityExecutionStatus.Closed, which indicates to the workflow run time that this activity is complete and the next activity can begin executing. However, you can use several other states to indicate that either something has gone wrong or that your activity is temporarily suspended. See http://msdn.microsoft.com/en-us/library/system.workflow.componentmodel.activityexecutionstatus.aspx for more information on the ActivityExecutionStatus enumeration.
Example 6-3 shows the implementation of the GenerateHumanReadableAge method, which is actually not specific to WF or Microsoft Dynamics CRM in any way.
Example 6-3. The GenerateHumanReadableAge method
private string GenerateHumanReadableAge(TimeSpan age)
{
    string result;
    int years = age.Days / 365;
    int months = age.Days / 30;
    int weeks = age.Days / 7;

    if (years > 1)
    {
        result = String.Format("{0} years", years);
    }
    else if (months > 1)
    {
        result = String.Format("{0} months", months);
    }
    else if (weeks > 1)
    {
        result = String.Format("{0} weeks", weeks);
    }
    else if (age.Days > 1)
    {
        result = String.Format("{0} days", age.Days);
    }
    else if (age.Hours > 1)
    {
        result = String.Format("{0} hours", age.Hours);
    }
    else if (age.Minutes > 1)
    {
        result = String.Format("{0} minutes", age.Minutes);
    }
    else
    {
        result = String.Format("{0} seconds", age.Seconds);
    }

    return result;
}
This method follows a fairly simple algorithm to convert a TimeSpan into some text that gives an approximate age that is more human-readable.
Now that our custom activity is implemented (and should compile without errors), we need to register the assembly with the Microsoft Dynamics CRM server. Registering a custom workflow assembly is very similar to registering a plug-in assembly. In fact, the plugintype and pluginassembly entities are used to store information about custom workflow activities and their assemblies, respectively.
We will take a look at registering assemblies both by using the PluginRegistration tool from the CRM SDK and by extending the ProgrammingWithDynamicsCrm4.PluginDeploy tool we implemented in Chapter 5.
If you want to get this sample up and running quickly, you can follow these steps to use the PluginRegistration tool from the CRM SDK. See the section "Building the Registration Tool" in Chapter 5 for instructions on how to compile the PluginRegistration tool.
Registering your custom workflow assembly
Launch the PluginRegistration tool.
Connect to your Microsoft Dynamics CRM server. (See Chapter 5 for information on setting up the connection.)
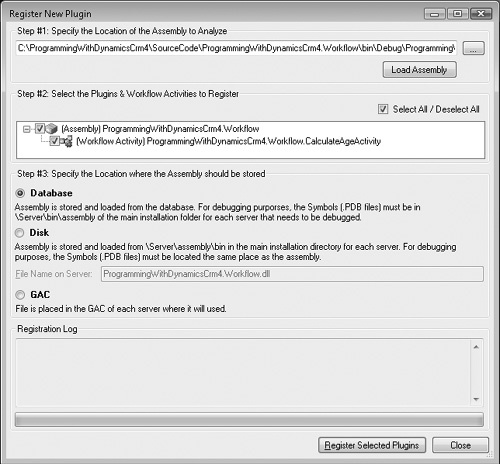
Select Register New Assembly from the Register toolbar button.
Click the ellipsis button to navigate to and select your compiled ProgrammingWithDynamicsCrm4.Workflow.dll.
Click the Register Selected Plugins button at the bottom of the dialog box. (Yes, it does say "Plugins," but it is for both plug-ins and workflow assemblies.)
You should receive a message that your assembly was successfully registered.
That’s all it takes to use the PluginRegistration tool, which is the quickest way to get your custom assemblies up and running on your Microsoft Dynamics CRM server.
To demonstrate how to programmatically register custom activities, we’ll just enhance the ProgrammingWithDynamicsCrm4.PluginDeploy project that we created in Chapter 5. Because of the overlap in entities used to contain plug-in and workflow activity registration data, our changes will be minimal.
Extending ProgrammingWithDynamicsCrm4.PluginDeploy to register activities
First add a reference to the System.Workflow.ComponentModel assembly: right-click the ProgrammingWithDynamicsCrm4.PluginDeploy project in Solution Explorer and then click Add Reference.
On the .NET tab, select System.Workflow.ComponentModel and click OK.
Open the Program.cs file in the ProgrammingWithDynamicsCrm4.PluginDeploy project.
To keep the code as concise as possible, add the following two using statements near the top of the file after the pre-existing using statements:
using System.Workflow.ComponentModel;
using Microsoft.Crm.Workflow;
Because the workflow activity types are not included in RegisterSolutionRequest, we need to update the RegisterSolution method to return the pluginassemblyid for the assembly it registers. Change RegisterSolution to match the following implementation:
private static Guid RegisterSolution(CrmService crmService, pluginassembly
    pluginAssembly, SdkMessageProcessingStepRegistration[] steps)
{
    RegisterSolutionRequest registerRequest = new RegisterSolutionRequest();
    registerRequest.PluginAssembly = pluginAssembly;
    registerRequest.Steps = steps;
    Console.Write("Registering solution... ");
    RegisterSolutionResponse registerResponse =
        (RegisterSolutionResponse)crmService.Execute(registerRequest);
    Console.WriteLine("Complete");

    return registerResponse.PluginAssemblyId;
}
To now add the new functionality, replace the last line of the DeployPlugin method with the following lines that just call two new methods:
Guid pluginAssemblyId = RegisterSolution(crmService, pluginAssembly,
    steps);

plugintype[] workflowActivities =
    LoadWorkflowActivities(pluginAssemblyPath, pluginAssemblyId);
RegisterWorkflowActivities(crmService, workflowActivities);
Next, define the LoadWorkflowActivities method. LoadWorkflowActivities iterates through all the types in the specified assembly and finds any that inherit from Activity and are decorated with a CrmWorkflowActivity attribute. Any matches are packaged into plugintype classes and returned. The method is implemented as shown here:
private static plugintype[] LoadWorkflowActivities(string pluginAssemblyPath,
    Guid pluginAssemblyId)
{
    List<plugintype> workflowActivities = new List<plugintype>();
    Assembly assembly = Assembly.LoadFile(pluginAssemblyPath);

    foreach (Type activityType in assembly.GetTypes())
    {
        CrmWorkflowActivityAttribute activityAttribute =
            (CrmWorkflowActivityAttribute)Attribute.GetCustomAttribute(
            activityType, typeof(CrmWorkflowActivityAttribute));

        if (activityType.IsSubclassOf(typeof(Activity)) && activityAttribute != null)
        {
            plugintype workflowActivity = new plugintype();
            workflowActivity.typename = activityType.FullName;
            workflowActivity.pluginassemblyid =
                new Lookup("pluginassembly", pluginAssemblyId);
            workflowActivity.isworkflowactivity = new CrmBoolean(true);
            workflowActivity.friendlyname = activityAttribute.Name;
            workflowActivities.Add(workflowActivity);
        }
    }

    return workflowActivities.ToArray();
}
Now define the RegisterWorkflowActivities method, which simply iterates through the plugintype entities returned from LoadWorkflowActivities and passes them to the Create method on the CrmService. The code for RegisterWorkflowActivities is shown here:
private static void RegisterWorkflowActivities(CrmService crmService, plugintype[]
    workflowActivities)
{
    foreach (plugintype workflowActivity in workflowActivities)
    {
        crmService.Create(workflowActivity);
    }
}
After these changes, you can use ProgrammingWithDynamicsCrm4.PluginDeploy to register both plug-ins and custom workflow activities. In fact, you can put custom workflow activities and plug-ins within the same assembly and ProgrammingWithDynamicsCrm4.PluginDeploy will properly detect and register both of them with the Microsoft Dynamics CRM server.
Now that our assembly is registered with the server, we can create a new workflow to test it. Our new workflow will be triggered by a case changing to the resolved state. It will then send an e-mail to the manager of the case’s owner, letting her know how long the case was open.
Creating the case age notifier workflow
Open Microsoft Dynamics CRM in your Web browser.
Navigate to the Workflows view by clicking Go To in the top menu and then selecting Workflows in the Settings section.
Click New on the Workflow toolbar.
Type Case Age Notifier for the workflow name.
Select Case for the workflow entity. Click OK.
In the workflow designer, change the Scope to Organization and make sure the only Start When value is Record Status Changes.
Click Add Step on the step menu bar and then select Check Condition.
Click the <condition> (click to configure) link in the newly added step.
Configure the condition to check whether the case status equals Resolved.
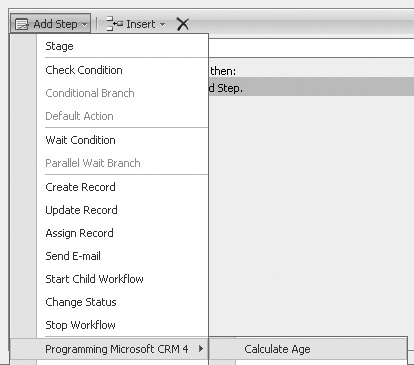
Click the Select This Row and then click Add Step Line under the condition, and then click Add Step on the step menu bar. Select Calculate Age from the Programming Microsoft CRM 4 submenu.
Click Set Properties for the Calculate Age step.
Use the Form Assistant to specify the Created On attribute for the Case entity in the Earlier Date field. Leave the Later Date field blank. (It will default to the current system time.)
Click Save And Close.
Click Add Step on the step menu bar and then select Send E-mail.
Click Set Properties on the Send E-mail step.
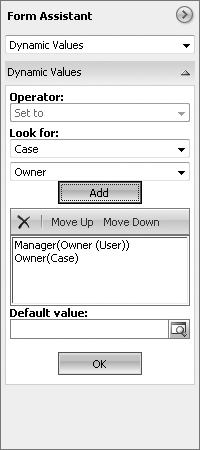
Using the Form Assistant, set the From field to be the case’s owner.
Specify both the owner’s manager and the case’s owner as values in the To field by adding them to the list in the Form Assistant. To add the owner’s manager, you need to select Owner (User) in the first Look For picklist and Manager in the second picklist. This is because the manager is actually an attribute on a related entity. You add the case’s owner to the list by selecting Case in the first picklist and Owner in the second picklist. By specifying both the owner’s manager and the case’s owner, you are indicating to e-mail the owner directly if he or she does not have a manager assigned.
In the Subject box, type Case closed after, and be sure to leave a space at the end of the text for the dynamic value.
Next add the Age property from the Calculate Age step to the end of the subject box. You do this using a similar method to specifying dynamic values from related entities. Start by selecting Calculate Age from the first Look For picklist and Age for the second and then click Add.
Click OK at the bottom of the Form Assistant to add the dynamic value to the subject box. Your Send E-mail properties window should look like this when you are complete:
Click Save And Close.
Your completed workflow should look like this:


At this point you should be able to create a test case in the Service area. After resolving it, you (or your manager if you have one set up) should receive an e-mail with the case’s age in the subject line.
This sample, although simple, demonstrates some of the flexibility available to you when extending the native workflow functionality within Microsoft Dynamics CRM. In the "CRM Workflow Attributes" section, we’ll take a look back at some of the attributes and classes we used to implement this sample and explore them in more detail.
When implementing custom activities, you will inevitably come across a workflow that has a status of "Waiting" in the workflow grids. If you open the workflow, you will see a generic error message like this:
"An error has occurred. Try this action again. If the problem continues, check the Microsoft Dynamics CRM Community for solutions or contact your organization’s Microsoft Dynamics CRM Administrator. Finally, you can contact Microsoft Support."
A message such as this typically means that an exception has not been handled in your custom activity and the workflow instance has been suspended so that a system administrator can deal with it appropriately. You can use three fairly straightforward techniques to retrieve the exception information from a suspended workflow: Advanced Find, a SQL query, and a CrmService query
Advanced Find is the quickest way to get the additional error information because you can set it up within Microsoft Dynamics CRM itself. Start by basing your Advanced Find view on the Suspended System Jobs view. Next add the Message attribute to the columns. You can optionally filter the system jobs to show only workflows. When you run the Advanced Find, the Message column displays the exception information. The only downside to using the Advanced Find technique is that the message information is typically long and not ideal for displaying in a grid column.
A SQL query can be a more robust method of retrieving the exception information if you have database access. The following SQL script returns the same information as the Advanced Find query in the first example:
SELECT AsyncOperationIdName, ActivityName, Message
FROM WorkflowLog
WHERE status=3
ORDER BY CreatedOn DESC
A CRM query provides a third option for retrieving the exception details. This option might be useful if you are developing a support tool for diagnosing suspended workflows. The following Query returns the same error information as the first two methods:
QueryByAttribute query = new QueryByAttribute();
query.EntityName = EntityName.workflowlog.ToString();

ColumnSet cols = new ColumnSet();
cols.AddColumns("asyncoperationid", "activityname", "message");
query.ColumnSet = cols;

query.Attributes = new string[] { "status" };
query.Values = new object[] { 3 };

All these techniques are valid ways to retrieve the exception information from a workflow instance. Determining which is best suited to your situation is up to you.
As you have seen in the preceding samples, you can apply several attributes to your custom activity classes and dependency properties. Understanding these attributes is critical if you want your custom activities to work correctly the first time they are deployed. The full list of custom workflow attributes is shown in Table 6-6.
Table 6-6. CRM-Related Workflow Attributes
Attribute | Applied To | Description |
|---|---|---|
CrmAttributeTarget | Picklist or Status dependency properties | Used to specify which entity type and attribute can be assigned to the property. This will be used to filter the dynamic values in the Form Assistant and also provide an option to select a specific picklist or status value in the workflow designer for this property. |
CrmDefault | Dependency property | Specifies a default value that should be assigned to the property if none is set in the workflow designer. |
CrmInput | Dependency property | Used to designate a property that should be used for input. Also used to set the label for the property that will be shown in the workflow designer. |
CrmOutput | Dependency property | Used to designate a property that should be used for output. Also used to set the label for the property that will be shown in the workflow designer. |
CrmReferenceTarget | Required for Lookup, Customer, or Owner dependency properties | This attribute dictates which type of entity can be assigned to the property. Only the appropriate entity types will be shown in the list of dynamic values in the Form Assistant. |
CrmWorkflowActivity | Custom Activity-derived classes | This attribute is required for custom activities to be displayed in the workflow designer. Also used to specify the name of the step displayed in the designer’s user interface. |
When your custom activity executes, you frequently need information about the current state of the workflow that your dependency properties cannot provide. For example, if you need to know the type of entity the current workflow is executing for, or the message that triggered the workflow, you need something more than the dependency properties. This is where the ActivityExecutionContext argument comes in. Passed in to the Execute method as an argument, ActivityExecutionContext can be used to retrieve information about the workflow or request additional services provided by the host application.
More Info
ActivityExecutionContext is a class provided by Windows Workflow Foundation that has many capabilities. For more information on the ActivityExecutionContext class, please see http://msdn.microsoft.com/en-us/library/system.workflow.componentmodel.activityexecutioncontext.aspx.
Because our workflows are going to be specifically for Microsoft Dynamics CRM, we frequently just want to get to the IWorkflowContext service, which provides access to the ICrmService and IMetadataService services as well as details about the primary entity for the workflow. Example 6-4 shows how to retrieve IWorkflowContext within the Execute method.
Example 6-4. Retrieving the IWorkflowContext interface
protected override ActivityExecutionStatus Execute(ActivityExecutionContext
    executionContext)
{
    IContextService contextService = executionContext.GetService<IContextService>();
    IWorkflowContext workflowContext = contextService.Context;

    ...

    return ActivityExecutionStatus.Closed;
}
As shown, the first step is to retrieve the IContextService from the ActivityExecutionContext and then access the IWorkflowContext from the IContextService’s Context property. IWorkflowContext exposes several methods, most of which are only used by Microsoft Dynamics CRM internally. The six methods and their descriptions are listed in Table 6-7.
Table 6-7. IWorkflowContext’s Methods
Method Name | Description |
|---|---|
CreateCrmService | Creates an instance of ICrmService that the activity can use to communicate back to CRM |
CreateMetadataService | Creates an instance of IMetadataService that the activity can use to access CRM’s metadata information |
EvaluateCondition | Evaluates a condition based on a primary value, an operator, and a list of values as arguments. Returns a bool that represents the result of the evaluation. Typically only used by Microsoft Dynamics CRM. |
EvaluateExpression | Evaluates an expression that consists of an operator and a list of values. Returns an object that represents the result of the evaluation. Typically only used by Microsoft Dynamics CRM. |
PopulateEntitiesFrom | Used internally by Microsoft Dynamics CRM. |
RetrieveActivityCount | Retrieves the current number of activities for the primary entity. Typically only used by Microsoft Dynamics CRM. |
Of these methods, you will likely only use CreateCrmService and CreateMetadataService. Both methods come in two flavors: one without any arguments, and one that takes a Boolean argument specifying whether the service should run as the admin user. If you use the parameterless version or pass in false to the overloaded version, you will be provided with a service that runs as the current user. By specifying true to the overloaded version, you can get a service that runs as the admin user. This allows your custom workflow activities to access data that the workflow owner may not typically have access to.
IWorkflowContext also exposes many properties. Although you may not use several of them frequently or at all, it is good to have a basic understanding of them. Table 6-8 lists the IWorkflowContext properties available to custom activities.
Table 6-8. IWorkflowContext’s Properties
Property Name | Type | Description |
|---|---|---|
ActivationId | Guid | The workflow ID for the currently executing workflow. |
AsyncOperationId | Guid | The ID for the system job that started the workflow. |
EntityDependencies | Collection<Entity Dependency> | A list of workflow entity dependencies. For more information on workflow dependencies, see Chapter 12. |
InputParameters | PropertyBag | The input parameters specified by the message that triggered the workflow. |
MessageName | String | The name of the message that triggered the workflow. |
OrganizationId | Guid | The ID for the organization the current workflow belongs to. |
OutputParameters | PropertyBag | The output parameters returned by the core operation from the original execution pipeline. |
PluginTypeId | Guid | The ID for the compiled workflow type. For more information on the workflow compilation process during publication, see Chapter 12. |
PrimaryEntityId | Guid | The ID for the primary entity instance that triggered the workflow. |
PrimaryEntityImage | DynamicEntity | A snapshot of the primary entity instance that triggered the workflow. The attributes included in the image are based on the attributes you reference in your workflow steps. |
PrimaryEntityName | String | The entity name for the primary entity that triggered the workflow. |
PrimaryEntityPostImage | DynamicEntity | A snapshot of the primary entity instance after the core operation was completed. The attributes included in the image are based on the attributes you reference in your workflow steps. |
PrimaryEntityPreImage | DynamicEntity | A snapshot of the primary entity instance before the core operation was completed. The attributes included in the image are based on the attributes you reference in your workflow steps. |
SharedVariables | PropertyBag | A collection that can be used to pass values between custom activities within the same workflow instance. |
StageName | String | The name of the stage as defined in the native workflow designer. |
UserId | Guid | The ID of the system user under which the current workflow is executing. In addition, this is the user that will be passed to the Microsoft Dynamics CRM Web service API when calls are made within the workflow. |
Although many of these properties have straightforward definitions, the image properties are worth taking a closer look at.
In Chapter 5 we discussed entity images as they pertain to plug-ins. You use entity images with plug-ins to get attribute values from an entity that would otherwise not be available. For instance, you can get attribute values on an entity that has already been deleted by registering for a pre-image in a plug-in. When registering a plug-in, you specify which images you want and which attributes should be included within it.
However, with workflows you cannot specify which images and entities to include when using the native workflow designer. The image registration information is determined by the messages that can trigger a workflow as well as which attributes are referenced within the various workflow steps.
More Info
The images and attributes to include are stored in an entity named workflowdependency. See Chapter 12 for a full explanation of this entity.
To understand which entities and attributes are included in a workflow, it can be useful to implement a debugging activity. We will create the DebugEntityImagesActivity to demonstrate this concept.
Use the steps previously outlined in this chapter to add a class named DebugEntityImagesActivity to the ProgrammingWithDynamicsCrm4.Workflow project. Replace the code in the newly added DebugEntityImagesActivity.cs with the contents of Example 6-5.
Example 6-5. Start of the DebugEntityImagesActivity class
using System;
using System.IO;
using System.Reflection;
using System.Workflow.ComponentModel;
using Microsoft.Crm.Sdk;
using Microsoft.Crm.Workflow;

namespace ProgrammingWithDynamicsCrm4.Workflow
{
    [CrmWorkflowActivity("Debug Entity Images", "Debug")]
    public class DebugEntityImagesActivity: Activity
    {
    }
}
Similar to our previous example, we start with a class that inherits from Activity and apply the CrmWorkflowActivity attribute to provide a suitable display name and folder for our custom activity. Next we’ll add a single dependency property to allow the user to specify an output text file to capture the information we extract from the entity images. Example 6-6 shows the OutputFileName property implementation.
Example 6-6. DebugEntityImagesActivity’s OutputFileName property
public static DependencyProperty OutputFileNameProperty =
    DependencyProperty.Register("OutputFileName", typeof(string),
    typeof(DebugEntityImagesActivity));

[CrmInput("Ouput File Name")]
public string OutputFileName
{
    get { return (string)GetValue(OutputFileNameProperty); }
    set { SetValue(OutputFileNameProperty, value); }
}
By this point, this should be nothing new. OutputFileName is a simple dependency property that is marked to be used as an input property within the Microsoft Dynamics CRM workflow designer. Next, we’ll override the Execute method as shown in Example 6-7.
Example 6-7. DebugEntityImagesActivity’s Execute method
protected override ActivityExecutionStatus Execute(
    ActivityExecutionContext executionContext)
{
    if (!String.IsNullOrEmpty(this.OutputFileName))
    {
        IContextService contextService =
            executionContext.GetService<IContextService>();
        IWorkflowContext workflowContext = contextService.Context;

        using (StreamWriter output = File.AppendText(this.OutputFileName))
        {
            output.WriteLine(DateTime.Now);

            SerializeDynamicEntity(output,
                "PrimaryEntityImage", workflowContext.PrimaryEntityImage);

            SerializeDynamicEntity(output,
                "PrimaryEntityPreImage", workflowContext.PrimaryEntityPreImage);

            SerializeDynamicEntity(output,
                "PrimaryEntityPostImage", workflowContext.PrimaryEntityPostImage);
        }
    }

    return ActivityExecutionStatus.Closed;
}
The Execute method opens a text file for appending and serializes the current date and time into it. The method continues by calling SerializeDynamicEntity for each of the three entity image properties on the workflow context. Example 6-8 shows the source code for the SerializeDynamicEntity method.
Example 6-8. The SerializeDynamicEntity method
private void SerializeDynamicEntity(
    TextWriter output, string title, DynamicEntity dynamicEntity)
{
    if (dynamicEntity == null)
    {
        output.WriteLine("{0}: (null)", title);
    }
    else
    {
        output.WriteLine("{0}:", title);
        output.WriteLine("{");
        foreach (Property prop in dynamicEntity.Properties)
        {
            output.Write("    {0}: ", prop.Name);
            SerializePropertyValue(output, dynamicEntity[prop.Name]);
            output.WriteLine();
        }

        output.WriteLine("}");
    }
}
SerializeDynamicEntity is responsible for converting a DynamicEntity to text and serializing it to the output stream. This fairly straightforward implementation is dependent on the SerializePropertyValue method to convert the various property values to a string. The implementation of SerializePropertyValue is shown in Example 6-9.
Example 6-9. The SerializePropertyValue method
private void SerializePropertyValue(TextWriter output, object value)
{
    if (value == null)
    {
        output.Write("(null)");
    }
    else
    {
        PropertyInfo nameProperty = value.GetType().GetProperty("name");

        if (nameProperty != null && nameProperty.PropertyType == typeof(string))
        {
            output.Write("{0} ", nameProperty.GetValue(value, null));
        }

        PropertyInfo valueProperty = value.GetType().GetProperty("Value");
        if (valueProperty != null)
        {
            output.Write(valueProperty.GetValue(value, null));
        }
        else
        {
            output.Write(value);
        }
    }
}
SerializePropertyValue uses reflection to transform the property values into a string. Because most of the Microsoft Dynamics CRM types (such as CrmNumber, CrmDateTime, and CrmBoolean) have a Value property, we can use reflection to get the property by name without having to know the actual property type. Likewise, we look for a name property to output as well, because types such as Picklist, Lookup, and Customer include the display name of the referenced entity instance in addition to the ID. Finally, in case the value is a standard Microsoft .NET Framework type and does not have a Value property, we output it directly. This will most commonly cover string values.
At this point you should be able to compile and deploy the activity assembly using the steps previously outlined in this chapter. Next we will create a workflow to determine how the entity images are populated based on the message and workflow steps.
To use the DebugEntityImagesActivity, we’ll need to create a new workflow that includes a step for our custom activity. Using the steps previously defined in this chapter, create a workflow definition named Debug Images for the account entity that runs automatically whenever an account is created. Add our custom step, Debug Entity Images, as the only step in the workflow. Update the properties for the step to specify a file where the debug information will be written. The file does not need to exist, but the Microsoft CRM Asynchronous Processing Service must have write access to the folder. By default, the service runs as the Network Service user. When you are finished, your workflow should resemble Figure 6-5.

Once you publish the workflow, create an account, specifying Test as the account name. After you save the account, the output file you specified on the custom workflow step should be updated within a few seconds. Once it is updated, you will likely see something like the following upon opening it:
7/22/2008 8:28:50 PM
PrimaryEntityImage:
{
    name: Test
    accountid: c6a6b6ab-5658-dd11-b751-0019b9f8f548
    owningbusinessunit:  23da3575-181d-dd11-8839-0019b9f8f548
}
PrimaryEntityPreImage: (null)
PrimaryEntityPostImage:
{
    accountid: c6a6b6ab-5658-dd11-b751-0019b9f8f548
    ownerid: Corey O'Brien 237d2b4e-191d-dd11-8839-0019b9f8f548
    owningbusinessunit:  23da3575-181d-dd11-8839-0019b9f8f548
}
Although the details will be different in your output file, you should have the exact same attributes included. Based on this output, it would appear that for the Create message, Microsoft Dynamics CRM is including a post-image and minimal attributes. It makes sense that the pre-image is null, because as we learned in Chapter 5, the Create message cannot supply a pre-image.
Let’s take a look at what happens when we handle an Update message. Unpublish your workflow and change it to also run automatically when the record attributes change. Specify Account Name and Account Number as the attributes to monitor. Once you publish the workflow, open the Test account that you created previously. Change the name to Test 2, specify an account number of IL-123456, and then save the account. Once your workflow runs, you should have a new entry at the bottom of your output file similar to the following:
7/22/2008 9:42:08 PM
PrimaryEntityImage:
{
    name: Test
    accountid: c6a6b6ab-5658-dd11-b751-0019b9f8f548
    owningbusinessunit:  23da3575-181d-dd11-8839-0019b9f8f548
}
PrimaryEntityPreImage:
{
    accountid: c6a6b6ab-5658-dd11-b751-0019b9f8f548
    ownerid: Corey O'Brien 237d2b4e-191d-dd11-8839-0019b9f8f548
    owningbusinessunit:  23da3575-181d-dd11-8839-0019b9f8f548
    name: Test 2
}
PrimaryEntityPostImage:
{
    accountid: c6a6b6ab-5658-dd11-b751-0019b9f8f548
    ownerid: Corey O'Brien 237d2b4e-191d-dd11-8839-0019b9f8f548
    owningbusinessunit:  23da3575-181d-dd11-8839-0019b9f8f548
}
Now we have a pre-image, but why isn’t the accountnumber attribute included in any of the images? The accountnumber attribute isn’t included because Microsoft Dynamics CRM examines the workflow steps to determine which attributes are accessed by the workflow. Because it does not see a reference to accountnumber, it does not create a workflow dependency to include it in the image.
To prove this point, let’s edit the workflow one more time and reference accountnumber. Unpublish the workflow and add a Check Condition step after the existing Debug Entity Images step. Specify the condition to simply check that the account number contains data. The condition page should look like Table 6-6 when you are finished.
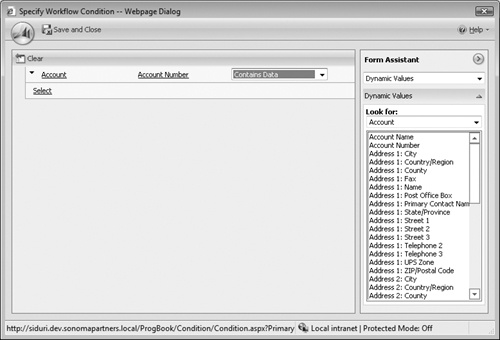
Save the condition and then publish the workflow. Notice that we did not specify a step to execute if the condition evaluates to true. Next, edit the Test 2 account and change the account number to MI-654321. After you save the account and the workflow runs, open your output file and examine the results. You should see a new entry at the bottom similar to the following:
7/22/2008 9:56:56 PM
PrimaryEntityImage:
{
    name: Test 2
    accountnumber: MI-654321
    accountid: c6a6b6ab-5658-dd11-b751-0019b9f8f548
    owningbusinessunit:  23da3575-181d-dd11-8839-0019b9f8f548
}
PrimaryEntityPreImage:
{
    accountid: c6a6b6ab-5658-dd11-b751-0019b9f8f548
    ownerid: Corey O'Brien 237d2b4e-191d-dd11-8839-0019b9f8f548
    owningbusinessunit:  23da3575-181d-dd11-8839-0019b9f8f548
    name: Test 2
    accountnumber: IL-123456
}
PrimaryEntityPostImage:
{
    accountid: c6a6b6ab-5658-dd11-b751-0019b9f8f548
    ownerid: Corey O'Brien 237d2b4e-191d-dd11-8839-0019b9f8f548
    owningbusinessunit:  23da3575-181d-dd11-8839-0019b9f8f548
}
Now we can see that the accountnumber attribute is included in the images even though we didn’t do anything more than add a step to see if it contained data. By referencing a property in a condition or as a dynamic value within a workflow, you can guarantee it will be included in the entity images and therefore available to your custom activities. In Chapter 12 we will examine setting up your own workflows and workflow dependencies from scratch without the Microsoft Dynamics CRM workflow designer. If, however, you prefer to design your workflows natively, you can use the DebugEntityImagesActivity to discover how Microsoft Dynamics CRM registers for images based on the message and workflow steps defined.
As powerful and flexible as the Microsoft Dynamics CRM workflow designer is, it does have a few limitations. For example, only the following preset list of property types can be assigned values in the designer:
CrmBoolean
CrmDateTime
CrmDecimal
CrmFloat
CrmMoney
CrmNumber
Customer
Lookup
Owner
Picklist
Status
String
In addition, although you can create composite activities—activities that can contain one or more child activities—the designer does not allow you to add child activities to them. For example, if you want to make a custom activity that continues to execute a list of child activities until an input parameter evaluates to true, you have to define the list of child activities at compile time, because the designer does not allow you to add child steps within a custom activity.