The Web service is the core API mechanism for programmatically interacting with all entities in Microsoft Dynamics CRM. This service contains six common methods that work on all entities, and an Execute method that is available for all other needs. The service is strongly typed and WSDL compliant, and it can be updated with any changes to the schema directly through Visual Studio 2008.
Important
Microsoft Dynamics CRM automatically updates its API interfaces as you add custom entities and custom attributes using the Web-based administration tools. For example, if you add multiple custom attributes to the Account entity, you can reference these new attributes programmatically through the API, and you can even use IntelliSense updates to reflect these new attributes in Visual Studio 2008 when using the WSDL-based API.
The CrmService Web service is located at http://<crmserver>/mscrmservices/2007/crmservice.asmx, where <crmserver> is the Microsoft Dynamics CRM Web server.
In addition, we recommend that you initialize the service Url property in your code, as shown in the following code example:
public static CrmService GetCrmService(string orgName, string server)
{
  // Standard CRM Service Setup
  CrmAuthenticationToken token = new CrmAuthenticationToken();
  token.AuthenticationType = 0; //AD (On-premise)
  token.OrganizationName = orgName;

  CrmService service = new CrmService();
  service.Credentials = System.Net.CredentialCache.DefaultCredentials;

  // If you know you are using the default credentials,
  // you can replace the service.Crendentials line with the following line
  // service.UseDefaultCredentials = true;

  service.CrmAuthenticationTokenValue = token;
  service.Url = string.Format("http://{0}/mscrmservices/2007/crmservice.asmx",server);

  return service;
}With the service’s Url property, you can access the Web service URL, which might be different from the URL specified in your project’s Web reference. Set the Url property of the service by using a configuration approach or by using the CrmDiscoveryService so that you can deploy to different environments without having to recompile your code. We demonstrate setting the service Url property using the CrmDiscoveryService later in the chapter.
Tip
Specifying a valid organization name in the token for your service’s URL is critical. If you receive a 401: Unauthorized error, first check to see whether you have the correct unique organization name for your service’s endpoint.
Now that you have a little background on the CrmService Web service, we can review these additional topics related to the CrmService:
Authentication
Common methods
Execute methods
Request and Response classes
DynamicEntity class
Attributes
When your code references the Microsoft Dynamics CRM APIs, of course you need to provide the appropriate authentication information so that you receive the appropriate security-related information. How you authenticate to the APIs depends on how your code will be deployed. From an authentication standpoint, Microsoft Dynamics CRM considers three different deployment models:
On-premise (intranet via Active Directory)
Internet-facing deployment (IFD)
Microsoft Dynamics CRM Online
Note
Microsoft Dynamics CRM Online uses Windows Live Id authentication. Please refer to the SDK for additional information.
We discuss the on-premise authentication in three areas:
Authenticating to the API services
Configuring the security token
Understanding the security context of the method call
With an on-premise deployment, your code needs to pass valid Active Directory credentials to communicate properly with the Microsoft Dynamics CRM Web service APIs. You commonly see this handled with the following Credentials line of code:
CrmService service = new CrmService();
service.Credentials = System.Net.CredentialCache.DefaultCredentials;
This code uses the logged-on user’s credentials for validation. By default, the Microsoft Dynamics CRM APIs then translate the domain credentials to the proper CRM system user and uses the CRM user ID (usually referred to as the systemuserid) throughout the life of that service’s instantiation.
Instead of using the logged-on user’s credentials, you can also specify a user to authenticate by passing in a valid set of credentials as shown in the following line of code:
service.Credentials = new NetworkCredential("UserName","UserPassword","UserDomain");Obviously, try to avoid hard-coding any credential set, but if you do have to use this approach, be sure to encrypt the information. We describe the hard-coded credential option so that you can understand that authenticating to the Web service is network-dependent, not Microsoft Dynamics CRM–dependent. As long as a user has a valid Active Directory credential set, the user can authenticate to the service APIs, even if that user is not a valid Microsoft Dynamics CRM user. However, to actually retrieve any data you must provide a valid Microsoft Dynamics CRM systemuserid. This concept is discussed further shortly.
In addition to the multiple deployment models, some editions of Microsoft Dynamics CRM include the option for a user to work with multiple organizations (multi-tenant). Therefore, you need to construct and pass an authentication token to the API as part of the SOAP header. The code for the token typically is the following:
CrmAuthenticationToken token = new CrmAuthenticationToken();
token.AuthenticationType = 0; //AD (On-premise)
token.OrganizationName = "<ValidOrganizationName>";
You need to set the authentication type and specify the unique name of the organization you want to access. Table 3-3 lists the possible values for the AuthenticationType property. Choose the type appropriate for your deployment.
Table 3-3. AuthenticationType Values
Description | Value |
|---|---|
Active Directory | 0 |
Microsoft Dynamics CRM Online | 1 |
Internet-facing deployment (IFD) | 2 |
Finally, you can set the service’s CrmAuthenticationTokenValue property to your newly created token, as shown in the following code:
service.CrmAuthenticationTokenValue = token;
Now that you have properly connected to the service, you need to understand the Microsoft Dynamics CRM security context under which the call is being made. This need is often overlooked because Microsoft Dynamics CRM implicitly defaults to the user set with the Credentials property.
The security context used by Microsoft Dynamics CRM determines which actions can be performed with the API. For instance, if you write logic that creates a new lead, the calling user must have rights to create a lead.
Important
Context also varies depending on how you access the API. For example, plug-ins execute under the same identity as the Microsoft Dynamics CRM Web application pool. Workflow context execution varies depending on how the rule is initiated.
Microsoft Dynamics CRM recognizes that at times you might need to perform actions on behalf of a user whose rights in the Microsoft Dynamics CRM application differ from the user who triggered the logic. You can perform this type of authentication in your code by using a technique known as impersonation. Chapter 4 takes a closer look at impersonation and other security-related topics.
The following six methods provide the basic create, read, update, and delete (CRUD) operations for entities, including custom entities:
Create. Creates a new record for a given entity.
Retrieve. Returns a single record based on the entity ID passed in.
RetrieveMultiple. Returns multiple records based on a query expression.
Update. Edits an existing record.
Delete. Removes a record.
Fetch. Returns multiple records based on a FetchXML query. The FetchXML query syntax mirrors that of previous Microsoft Dynamics CRM versions.
Let’s review how you would use one of the common methods in your code. This example retrieves the account name, main telephone number, and relationship type for a single Account record, and then displays the information. You will work with the Account record shown in Figure 3-1. For simplicity, this example runs in a console application.

Because this is the first SDK example, we will walk you through the process of creating a basic console application in Visual Studio 2008.
Creating a new console project
Open Visual Studio 2008.
On the File menu, click New, and then click Project.
Under Project Types, select Visual C# Projects, and then click Console Application under Templates.
In the Name box, type ProgrammingDynamicsCrm4.SdkExamples.
Using either WSDL-based approach explained earlier in this chapter to add the service reference, add a Web reference to the CrmService Web service, calling it CrmSdk.
Now that you have the basic console application in place, add the logic to return values from an Account using the Microsoft Dynamics CRM retrieve method.
Retrieving an Account record from Microsoft Dynamics CRM
In the default Program.cs file, add the code shown in Example 3-1.
Open an existing Account record in your Microsoft Dynamics CRM system. After you have the record open, press the F11 key to access the address bar in Internet Explorer. In the address bar, you can retrieve the Lead record’s unique identifier. The ID will be the 32-character string between the braces after the id= parameter. In the following example, the Account record ID would be D7B3DC72-0E2C-DD11-8A81-0019D13DDA0E:
http://siduri/ProgBook/sfa/accts/edit.aspx?id={D7B3DC72-0E2C-DD11-8A81-0019D13DDA0E}#.Replace the accountId value with your own.
Update the organization name and server with the correct unique organization name and Web server of your Microsoft Dynamics CRM system.
Save the class file.
On the Build menu, click Build Solution.
Example 3-1 shows the code for retrieving the Account record. If you run this example, you might have to update the namespace of your CrmSdk, depending on the name of your project.
Example 3-1. Retrieving an Account record
using System;
using System.Collections.Generic;
using System.Text;
using System.Net;
using ProgrammingDynamicsCrm4.SdkExamples.CrmSdk;

namespace ProgrammingDynamicsCrm4.SdkExamples
{
  class Program
  {

    static void Main(string[] args)
    {
      // Replace the default guid with a specific account from your system.
      Guid accountId = new Guid("3963176C-0E2C-DD11-8A81-0019D13DDA0E");
      RetriveAccount(accountId);
    }


    public static void RetriveAccount(Guid accountId)
    {
      // Use generic GetCrmService method from earlier
      // Replace <organization> and <server> with your values
      CrmService service = GetCrmService("<organization>", "<server>");

      // Set the columns to return.
      ColumnSet cols = new ColumnSet();
      cols.Attributes =
        new string[] { "name", "telephone1", "customertypecode" };

      try
      {
        // Retrieve the record, casting it as the correct entity.
        account oAccount =
          (account)service.Retrieve(EntityName.account.ToString(), accountId, cols);

        // Display the results.
        // Because you have a strongly typed response,
        //   you can access the properties directly from the object.
        Console.WriteLine("Account Name: {0}", oAccount.name);
        Console.WriteLine("Main Phone: {0}", oAccount.telephone1);
        Console.WriteLine("Relationship Type: {0}", Account.customertypecode.Value);
        Console.ReadLine();
      }
      catch (System.Web.Services.Protocols.SoapException ex)
      {
        Console.WriteLine(ex.Detail.InnerText);
      }
    }


    public static CrmService GetCrmService(string orgName, string server)
    {
      CrmAuthenticationToken token = new CrmAuthenticationToken();
      token.AuthenticationType = 0; //AD (On-premise)
      token.OrganizationName = orgName;

      CrmService service = new CrmService();
      service.UseDefaultCredentials = true;

      service.CrmAuthenticationTokenValue = token;
      service.Url =
        string.Format("http://{0}/mscrmservices/2007/crmservice.asmx", server);

      return service;
    }
  }
}
After you add this code, compile it, and run the project, you might receive the following error message:
Object reference not set to an instance of an object.
Console.WriteLine(oAccount.customertypecode.Value);
This error occurs because Microsoft Dynamics CRM does not return an object reference for any attribute that has a value of null. You receive this error because the sample Account does not have a Relationship Type value selected in the picklist, hence its value is null in the database. So, when your code tries to access the customertypecode value property, you get an exception.
Important
Microsoft Dynamics CRM will not return a requested field if the field has a null value in the database.
To account for the possibility that Microsoft Dynamics CRM might not return a field that your code is expecting, you should ensure that the attribute you want to access is not null. The following code example shows one way to check for null values:
Console.Write("Relationship Type: ");
if (oAccount.customertypecode != null)
         Console.WriteLine(oAccount.customertypecode.Value);
After the code in Example 3-1 is updated to check for a null value and refreshed, you’ll receive output similar to that shown in Figure 3-2.

Even though the API contains the other methods Create, RetrieveMultiple, Update, Delete, and Fetch, we will not go through examples of using those methods in this book because they work in a similar fashion to the example we just completed. The SDK contains many more examples of the six common methods if you’re looking for more information and samples.
The Execute method allows you to run any special commands or business logic not addressed by the common methods. Unlike the common methods, the Execute method works on Request and Response classes. You pass a Request class as a parameter to the Execute method, which then processes the request and returns a response message. Though the Execute method can perform all of the actions of the common methods, its real purpose is to provide you with the functionality that the common methods lack. Typical actions for which you might use the Execute method are to retrieve the current user, assign and route records, and send e-mail messages through Microsoft Dynamics CRM. For instance, the following code example shows how to use the Execute method to retrieve the current user:
// Use generic GetCrmService method from earlier
// Replace <organization> and <server> with your values
CrmService service = GetCrmService("<organization>","<server>");
// Get current user object. WhoAmIRequest userRequest = new WhoAmIRequest(); WhoAmIResponse user = (WhoAmIResponse) service.Execute(userRequest);
Microsoft Dynamics CRM uses a Request and Response message class model for the Execute method. You must create a Request class message and set the appropriate properties. You then send the Request object to the platform by using the Execute method. The platform runs the request and sends back an instance of a Response class message.
Microsoft Dynamics CRM Request and Response classes support generic, targeted, specialized, and dynamic entity requests. These Request classes always end in the word Request, such as WhoAmIRequest, CreateRequest, and SendEmailRequest. Generic requests are not dependent on a specific entity and do not contain an entity name in their class name. Generic requests can work across multiple entities (such as the AssignRequest) in addition to sometimes working with no entities (such as the WhoAmIRequest).
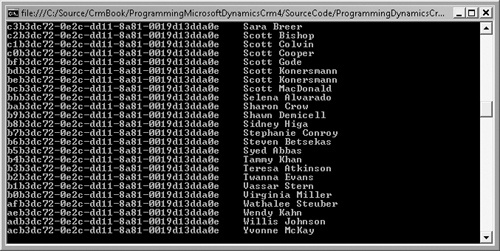
The following code sample demonstrates how you can use existing published duplicate detection rules within code by using the generic RetrieveDuplicatesRequest:
// Use generic GetCrmService method from earlier
// Replace <organization> and <server> with your values
CrmService service = GetCrmService("<organization> ", "<server>");

lead lead = new lead();
lead.emailaddress1 = "[email protected]";

// Create a RetrieveDuplicates request
RetrieveDuplicatesRequest Request = new RetrieveDuplicatesRequest();
Request.BusinessEntity = lead;
Request.MatchingEntityName = EntityName.lead.ToString();
Request.PagingInfo = new PagingInfo();

try
{
  RetrieveDuplicatesResponse Response =
   (RetrieveDuplicatesResponse)service.Execute(Request);
  foreach (lead leadResult in Response.DuplicateCollection.BusinessEntities)
  {
    Console.Write(leadResult.leadid.Value.ToString());
    Console.WriteLine(leadResult.fullname);
  }
  Console.ReadLine();
}
catch (System.Web.Services.Protocols.SoapException ex)
{
  // Handle error.
}
Figure 3-3 shows the output.
Generic requests that apply to entities require a target message class to specify which entity should receive the action. A target class name begins with the word Target and, once instantiated and configured, is then applied to the target property of a generic class.
Specialized requests are similar to targeted requests except that they work only on a specific entity to perform a distinct action. Their naming convention is <Action><EntityName>Request. Good examples of these requests are the SendEmailRequest and the LoseOpportunityRequest.
With the dynamic entity request, you can use requests at run time for any entity. By setting the parameter ReturnDynamicEntities to True, your results are returned as a DynamicEntity class instead of the BusinessEntity class. Not all requests permit the DynamicEntity option, and you should refer to the SDK for the complete list that does. We go into more detail about the DynamicEntity class next.
The DynamicEntity class, derived from the BusinessEntity class, provides run-time access to custom entities and custom attributes even if those entities and attributes did not exist when you compiled your assembly. The DynamicEntity class contains the logical name of the entity and a property-bag array of the entity’s attributes. In programming terms, you can think of this as a loosely typed object. With the DynamicEntity class, you can access entities and attributes created in Microsoft Dynamics CRM even though you might not have the actual entity definition from the WSDL.
The DynamicEntity class must be used with the Execute method, and it contains the following properties:
Name. Sets the entity schema name
Properties. Array of type Property (which is a name/value pair)
Review the syntax of the DynamicEntity class to create a Lead. You create a string property to store the subject text, which you pass into the DynamicEntity dynLead. After you create the DynamicEntity object and set its name to lead, you create the TargetCreateDynamic class to serve as the target message for the CreateRequest call:
  // Use generic GetCrmService method from earlier
  // Replace <organization> and <server> with your values
  CrmService service = GetCrmService("<organization>","<server>");

  // Set up dynamic entity.
  DynamicEntity dynLead = new DynamicEntity();

  dynLead.Name = "lead";
  dynLead.Properties = new Property[] {
     CreateStringProperty("subject","New Lead Using Dynamic Entities"),
     CreateStringProperty("lastname","Steen"),
     CreateStringProperty("firstname","Heidi")
  };

  // Standard target request, passing in the dynamic entity.
  TargetCreateDynamic target = new TargetCreateDynamic();
  target.Entity = dynLead;
  CreateRequest create = new CreateRequest();
  create.Target = target;
  CreateResponse response = (CreateResponse)service.Execute(create);

// Helper method that creates a string property based on passed-in values
private Property CreateStringProperty(string Name, string Value)
{
  StringProperty prop = new StringProperty();
  prop.Name = Name;
  prop.Value = Value;
  return prop;
}
Obviously, you would not use the dynamic entity approach instead of the common Create method to create a Lead record if you have access at compile time to the CrmService Web service—the dynamic entity approach is not as efficient and requires more code. However, Microsoft Dynamics CRM provides this class for run-time situations in which you might not know the entity, or when new attributes might be added to an existing entity.
However, you will make heavy use of the DynamicEntity class with Microsoft Dynamics CRM because it is your primary entity class for writing plug-ins and workflow assemblies, as you will see later in this chapter.
We also want to highlight the helper method used in this example for creating the properties that you want to set. In this particular example, you know you are working with a string and owner properties, but in some scenarios, you might not know the property type. To address this, you should query the metabase and determine the data types of your desired attributes at run time. With Microsoft Dynamics CRM, you can do this with the MetadataService Web service, as you will see shortly.
Remember that when you use an individual WSDL in your code, the Microsoft Dynamics CRM attributes will be strongly typed. Therefore, you must create a typed attribute when setting values for an entity, unless you are using the DynamicEntity class. The SDK documentation lists examples of each type and how to use them, so we won’t list them here. However, you will see examples of this throughout the sample code.