When you configure security roles in Microsoft Dynamics CRM, you grant the user privileges to the entire entity. If someone can read an account record, they can read all of the values in the account record. If they can edit a contact record, they can edit all of the values in the contact record. As you might guess, many organizations want to lock down specific attributes of a record depending on the permissions of a specific user. This request is typically referred to as field-level security.
Although you can’t accommodate this field-level security request by configuring security roles, you could implement this type of field-level security through a variety of methods, such as:
Custom entities Create custom entities that contain the attributes that you want to restrict, relate the custom entities to the parent entity, and then use the native security roles to restrict access to the custom entities.
Form scripting Use form scripting to hide or show fields and tabs on the Microsoft Dynamics CRM
Custom IFrame Create a custom Web page that you display in an IFrame within the entity’s form.
Each option has advantages and disadvantages. In this sample, we will focus on the form script–based approach. Unlike the other options described, the form script approach allows for the following:
You can define security at the field level or tab level.
It provides a more seamless user experience because the user does not need to access data from a related entity
It keeps the data model simpler, allowing for easier access to the data in views, reporting, and advanced find queries.
However, using JavaScript to enable field-level security brings with it the following drawbacks:
Restricting rights on the form only limits the rights to edit and view data on the entity’s main form. The user is not restricted from seeing a record’s data through print preview, views, an export to Excel, reports, etc. Therefore, you should not attempt to use this technique to hide attributes from users, but it should work well for restricting their ability to edit a field.
Form scripting might not prevent a user from updating a record value via a workflow rule.
To prevent the protected data from being exported, a user’s right to export to Excel needs to be removed. This action eliminates that user’s ability to export all data throughout the application. You cannot configure the export to Excel security privilege for specific entities; it is an across-the-board privilege.
This approach may not be seamlessly upgradeable in future Microsoft Dynamics CRM releases.
Even though this technique includes considerable constraints, we still think it’s worthwhile to share as an example of what’s possible with form scripting. This example will also show you how to store and retrieve configuration data in custom entities (instead of a custom database or configuration file). By storing the field-level security settings in custom entities, you can allow business users to modify the security settings in the Microsoft Dynamics CRM Web interface without needing to write new scripts and deploy them. Before we continue with our implementation of form-based field-level security, we want to remind you about hiding fields and tabs with Microsoft Dynamics CRM.
Microsoft Dynamics CRM 4.0 does not allow you to create forms based on a user’s security role or some other custom logic natively; everyone sees the same form. Some customers want to display different information on the entity form depending on the security role of the user viewing the form. One technique to accomplish this is to implement your own business logic and use DHTML to hide form tabs and fields based on the user’s security role.
To hide a tab, we recommend you use the display property of the element’s style attribute. The following JavaScript example can be used to hide a tab:
tabnTab.style.display = 'none';tabnTab refers to the ID of the tab. The n is the number of the tab starting with 0 from the left. In Figure 15-5, the Administration tab is tab2Tab.

To show a hidden tab, you can use the following script:
tabnTab.style.display = 'inline';You can use the same approach to hide and show a field and its label that you use to hide a tab. However, unlike the tab example, you may not want to collapse the area because the fields on the form might shift around unexpectedly. Therefore, you might want to set the style’s visibility property instead. Just as with the tab, you need to find the ID of the element you wish to toggle and set its visibility property to hidden or visible as appropriate.
Use the following script to hide a field and label, replacing attributename with the name of the attribute you wish to hide:
crmForm.all.attributename_c.style.visibility = 'hidden'; //label
crmForm.all.attributename_d.style.visibility = 'hidden'; //data
You can use the following script to show a field and label by replacing attributename with the name of the attribute you wish to show:
crmForm.all.attributename_c.style.visibility = 'visible'; //label
crmForm.all.attributename_d.style.visibility = 'visible'; //data
Important
As a reminder, when the display property is set to none, the browser removes the entire element from the page upon rendering and shifts all remaining elements as appropriate. The visibility property can also hide an element, but the element still occupies its proper space on the page.
We next discuss how to use this approach with script to apply basic field-level security. Then, we walk through a simple example of how to apply this functionality to your Microsoft Dynamics CRM application.
Before we step through our example, let’s review the script that provides the logic behind the field-level security implementation. We will break up the script into multiple listings to describe each method. Please refer to the source code download for the full script. We start with Example 15-7, which simply sets up the security level variables and the two types of objects that can be secured. Then we call the SetPageSecurity() function to execute the field-level security logic for the form.
Example 15-7. Field-level security script setup
// security levels
var HIDDEN = 1;
var READ_ONLY = 2;
var EDIT = 3;

// object types
var FIELD = 1;
var TAB = 2;

SetPageSecurity();
Example 15-8 defines the main SetPageSecurity() function. The SetPageSecurity() function retrieves the current roles for the logged-on user. Then the script retrieves the custom security settings for the entity form and loops through the returned objects, setting the field or tab security based on the object type.
Example 15-8. The SetPageSecurity() function
// Main page security routine
function SetPageSecurity()
{
  var formObj = document.all.crmForm;
  var formType = formObj.FormType;

  // Retrieve user roles and security configuration for the form type.
  var userRoles = GetUserRoles(currentUser);
  var securityObjects = GetSecurityObjects(formObj.ObjectTypeName, userRoles);

  // loop through returned security objects and set up form security
  for ( var i = 0; i < securityObjects.length; i++ ) {
    switch( securityObjects[i].objectType ) {
      case FIELD:
        if ( formType == 4 )
          return;
        SetFieldSecurity( securityObjects[i] );
        break;
      case TAB:
        SetTabSecurity( securityObjects[i] );
        break;
      default:
        alert( "Unhandled object type in SetPageSecurity()" );
        break;
    }
  }
}
Example 15-9 shows the SetFieldSecurity(), SetTabSecurity(), and SecurityShowField() functions. These functions set the custom security level based on the user.
Example 15-9. The SetFieldSecurity(), SetTabSecurity(), and SecurityShowField() functions
// Configures the form security for fields
function SetFieldSecurity( securityObject )
{
  var fieldObj = document.getElementById( securityObject.objectName );

  if ( fieldObj != null ) {
    switch( securityObject.securityLevel ) {
      case EDIT:
        SecurityShowField( fieldObj.id, false );
        fieldObj.Disabled = false;
        break;
      case READ_ONLY:
        SecurityShowField( fieldObj.id, false );
        fieldObj.Disabled = true;
        break;
      case HIDDEN:
        SecurityShowField( fieldObj.id, true );
        fieldObj.Disabled = true;
        break;
      default:
        alert( "Unhandled Security Level in SetFieldSecurity." );
        break;
    }
  }
  else {
    alert( "An error occurred while attempting to set security on " + securityObject.
objectName );
  }
}

// Configures the form security for tabs
function SetTabSecurity( securityObject )
{
  //don't hide tab on quick create
  if(crmForm.FormType > 0 && crmForm.FormType == 5)
    return;

  var tab = document.getElementById( securityObject.objectName );

  if ( tab != null ) {
    switch( securityObject.securityLevel ) {
      case HIDDEN:
        tab.style.display = "none";
        break;
      case EDIT:
      case READ_ONLY:
      default:
        break;
    }
  }
  else
    alert( "An error occurred while setting security on " + securityObject.objectName
);
}

// Method that displays or hides fields.
function SecurityShowField( fieldName, isHidden )
{
  var fieldObjTcLabel = document.getElementById( fieldName + "_d" );
  var fieldObjTcControl = document.getElementById( fieldName + "_c" );

  if ( isHidden ) {
    fieldObjTcLabel.style.display = "none";
    fieldObjTcControl.style.display = "none";
  }
  else {
    fieldObjTcLabel.style.display = "inline";
    fieldObjTcControl.style.display = "inline";
  }
}
The GetUserRoles() function returns an array of all of the Microsoft Dynamics CRM security roles for the currently logged-on user. The script accomplishes this by using the EqualUserId operator telling Microsoft Dynamics CRM to use the current user. Example 15-10 shows the script for both of these functions.
Example 15-10. The GetUserRoles() function
// Helper method to return the CRM security roles of a user
function GetUserRoles(userId)
{
  // Define SOAP message
  var xml =
  [
  "<?xml version='1.0' encoding='utf-8'?>",
  "<soap:Envelope xmlns:soap="http://schemas.xmlsoap.org/soap/envelope/" ",
  "xmlns:xsi="http://www.w3.org/2001/XMLSchema-instance"
  "xmlns:xsd="http://www.w3.org/2001/XMLSchema">",
  GenerateAuthenticationHeader(),
  "<soap:Body>",
  "<RetrieveMultiple xmlns='http://schemas.microsoft.com/crm/2007/WebServices'>",
  "<query xmlns:q1='http://schemas.microsoft.com/crm/2006/Query' ",
  "xsi:type='q1:QueryExpression'>",
  "<q1:EntityName>role</q1:EntityName>",
  "<q1:ColumnSet xsi:type='q1:ColumnSet'>",
  "<q1:Attributes><q1:Attribute>name</q1:Attribute></q1:Attributes>",
  "</q1:ColumnSet>",
  "<q1:Distinct>false</q1:Distinct>",
  "<q1:LinkEntities>",
  "<q1:LinkEntity>",
  "<q1:LinkFromAttributeName>roleid</q1:LinkFromAttributeName>",
  "<q1:LinkFromEntityName>role</q1:LinkFromEntityName>",
  "<q1:LinkToEntityName>systemuserroles</q1:LinkToEntityName>",
  "<q1:LinkToAttributeName>roleid</q1:LinkToAttributeName>",
  "<q1:JoinOperator>Inner</q1:JoinOperator>",
  "<q1:LinkCriteria>",
  "<q1:FilterOperator>And</q1:FilterOperator>",
  "<q1:Conditions>",
  "<q1:Condition>",
  "<q1:AttributeName>systemuserid</q1:AttributeName>",
  "<q1:Operator>EqualUserId</q1:Operator>",
  "</q1:Condition>",
  "</q1:Conditions>",
  "</q1:LinkCriteria>",
  "</q1:LinkEntity>",
  "</q1:LinkEntities>",
  "</query>",
  "</RetrieveMultiple>",
  "</soap:Body>",
  "</soap:Envelope>"
  ].join("");

  var resultXml = executeSoapRequest("RetrieveMultiple",xml);
  return getMultipleNodeValues(resultXml, "q1:name");
}
The GetSecurityObjects() function shown in Example 15-11 retrieves the custom security behavior records for an entity and array of Microsoft Dynamics CRM security roles. It then loops through the records and sets an array of SecurityObjects.
Example 15-11. The GetSecurityObjects() function
// Helper method to custom security objects
function GetSecurityObjects(entity, userRoles)
{
  // Define SOAP message
  var xml =
  [
    "<?xml version='1.0' encoding='utf-8'?>",
    "<soap:Envelope xmlns:soap="http://schemas.xmlsoap.org/soap/envelope/" ",
    "xmlns:xsi="http://www.w3.org/2001/XMLSchema-instance" ",
    "xmlns:xsd="http://www.w3.org/2001/XMLSchema">",
    GenerateAuthenticationHeader(),
    "<soap:Body>",
    "<RetrieveMultiple xmlns="http://schemas.microsoft.com/crm/2007/WebServices">",
    "<query xmlns:q1="http://schemas.microsoft.com/crm/2006/Query" xsi:type="q1:
QueryExpression">",
    "<q1:EntityName>sonoma_securitybehavior</q1:EntityName>",
    "<q1:ColumnSet xsi:type="q1:AllColumns" />",
    "<q1:Distinct>false</q1:Distinct>",
    "<q1:LinkEntities><q1:LinkEntity>",
    "<q1:LinkFromAttributeName>sonoma_securitybehaviorid</q1:LinkFromAttributeName>",
    "<q1:LinkFromEntityName>sonoma_securitybehavior</q1:LinkFromEntityName>",
    "<q1:LinkToEntityName>sonoma_securitybehaviorrole</q1:LinkToEntityName>",
    "q1:LinkToAttributeName>sonoma_securitybehaviorid</q1:LinkToAttributeName>",
    "<q1:JoinOperator>Inner</q1:JoinOperator>",
    "<q1:LinkCriteria><q1:FilterOperator>And</q1:FilterOperator>",
    "<q1:Conditions><q1:Condition>",
    "<q1:AttributeName>sonoma_rolename</q1:AttributeName>",
    "<q1:Operator>In</q1:Operator>",
    "<q1:Values>"
  ].join("");

  for (var i = 0; i < userRoles.length; i++)
  {
    xml += "<q1:Value xsi:type="xsd:string">" + userRoles[i] + "</q1:Value>"
  }

  xml +=
  [
    "</q1:Values></q1:Condition></q1:Conditions>",
    "</q1:LinkCriteria></q1:LinkEntity></q1:LinkEntities>",
    "<q1:Criteria><q1:FilterOperator>And</q1:FilterOperator>",
    "<q1:Conditions><q1:Condition>",
    "<q1:AttributeName>sonoma_entityname</q1:AttributeName>",
    "<q1:Operator>Equal</q1:Operator><q1:Values>",
    "<q1:Value xsi:type="xsd:string">",
    entity,
    "</q1:Value></q1:Values></q1:Condition></q1:Conditions></q1:Criteria>",
    "</query>",
    "</RetrieveMultiple>",
    "</soap:Body>",
    "</soap:Envelope>"
  ].join("");

  var resultXml = executeSoapRequest("RetrieveMultiple",xml);

  var securityObjects = new Array();
  if( (resultXml.xml) != null && (resultXml.xml.toString().length) > 0)
  {
    var objectNodes = resultXml.getElementsByTagName( "BusinessEntity" );

    // create an array of SecurityObject objects to deserialize the
    // XML returned from the webservice
    for ( var i = 0; i < objectNodes.length; i++ )
    {
      securityObjects[i] = new SecurityObject();
      securityObjects[i].objectName = objectNodes[i].selectSingleNode( "q1:sonoma_
        targetname"
        ).text;
      securityObjects[i].objectType = Number(objectNodes[i].selectSingleNode(
        "q1:sonoma_targettype" ).text);
      securityObjects[i].securityLevel = Number(objectNodes[i].selectSingleNode(
        "q1:sonoma_behaviortype" ).text);
    }
  }
  return securityObjects;
}
Finally, the last part of the script contains the helper methods used earlier. These methods range from defining the SecurityObject properties to extracting the node values from XML. You also have a helper method that builds and executes the SOAP requests. Example 15-12 describes these four helper methods.
Example 15-12. Helper functions
// SecurityObject properties
function SecurityObject()
{
  this.objectName;
  this.objectType;
  this.securityLevel;
}

// Helper method to execute a SOAP request
function executeSoapRequest(action, xml)
{
  var actionUrl = "http://schemas.microsoft.com/crm/2007/WebServices/";
  actionUrl += action;

  var xmlHttpRequest = new ActiveXObject("Msxml2.XMLHTTP");
  xmlHttpRequest.Open("POST", "/mscrmservices/2007/CrmService.asmx", false);
  xmlHttpRequest.setRequestHeader("SOAPAction",actionUrl);
  xmlHttpRequest.setRequestHeader("Content-Type", "text/xml; charset=utf-8");
  xmlHttpRequest.setRequestHeader("Content-Length", xml.length);
  xmlHttpRequest.send(xml);

  var resultXml = xmlHttpRequest.responseXML;
  return resultXml;
}

// Helper method to return a single node value from XML
function getNodeValue(tree, el)
{
  var retVal = null;
  var e = null;
  e = tree.getElementsByTagName(el);

  if (e != null && e[0] != null) {
    retVal = e[0].firstChild.nodeValue;
  }
  return retVal;
}

// Helper method to return a multiple node value from XML
function getMultipleNodeValues(tree, el)
{
  var retVal = new Array();
  var e = null;
  e = tree.getElementsByTagName(el);

  for(i = 0; i < e.length; i++) {
    retVal[i] = e[i].firstChild.nodeValue;
  }

  return retVal;
}In this example, we demonstrate how to use the field-level security script described previously. You apply the script to the onLoad event of the Account form and then configure the security settings using two custom entities. You can accomplish this example by performing the following steps:
Import two custom security entities.
Add the field-level security script to the onLoad event the Account entity.
Create security records to define authorization.
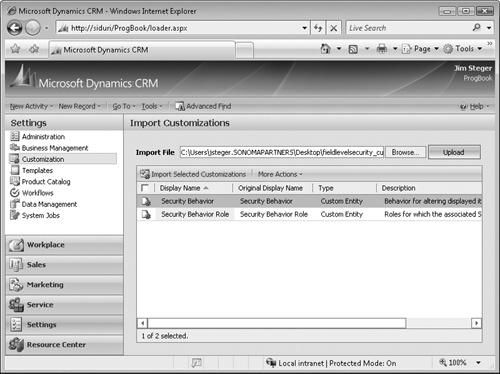
First, you need to import and publish the custom security entities located with the source code download. These two entities allow you to configure the security of the form without changing any code.
Import custom security entities
Download the source code mentioned in the book’s Introduction.
Open Microsoft Dynamics CRM in a Web browser and click Settings in the Application Area.
Click Customizations, and then click Import Customizations.
Click Browse and select the fieldlevelsecurity_customizations.xml file located in the Chapter15 folder of your source code download.
Click Upload, and you should see two new entities.
On the Customizations toolbar, click More Actions and then select Import All Customizations.
Click OK in the Import Customizations dialog box after Microsoft Dynamics CRM successfully imports the entities.
Return to the Customization area, and click Customize Entities.
Open the Security Behavior entity. On the General tab, under Areas That Display This Entity, ensure that Settings is selected. If not, select Settings and click Save And Close.
On the Customize Entities grid, select the two new security entities and click Publish on the grid toolbar.

This field-level security example can apply to different types of entities in the system, so you will need to decide which entities you want to set up. To add field-level security to an entity, you will need to add the field-level security script to the onLoad event of the entity form. For this example, we chose the Account entity, but you could apply this to multiple entities if you desired.
Add script to the onLoad event of Account entity’s form
Open Microsoft Dynamics CRM in a Web browser and click Settings in the Application Area.
Click Customizations, and then click Customize Entities.
Double-click the Account entity.
Click Forms and Views, and then double-click the Form record.
Click Form Properties, select the onLoad event, and click Edit.
Select the Event Is Enabled option, and then copy and paste the script in the fieldlevelsecurity.js file located in the Chapter15 folder of your source code download.
More Info
For more information regarding the field-level security script, please refer to Example 15-7 through Example 15-12.
When you are finished, click OK to close the Event Detail Properties window, and then click OK on the Form Properties window.
Save the form and publish the Account entity.

The custom security entities that you previously imported allow you to configure how you wish the form to display for each role without having to change any source code. You need to create records for each attribute that you want to include in the field-level security solution and then configure the roles that have access.
Important
Only Microsoft Dynamics CRM users with the System Administrator role can see the Security Behavior and Security Behavior Roles entities. If you want other users to configure security, you need to update the security role to allow access to these two new entities.
Table 15-1 describes the values the security behavior record expects.
Table 15-1. Security Behavior Form Attributes
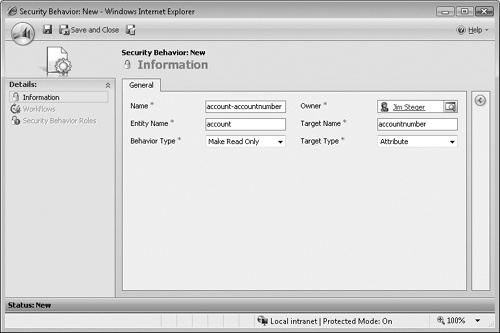
Attribute | Description |
|---|---|
Name | Name of the security behavior record; provides a descriptive way to find security behavior records in Microsoft Dynamics CRM. Not used by the field-level security script. |
Entity | The name of the entity. |
Behavior Type | Behavior Type describes what should be done to the attribute or tab. Possible values include Hide, Make Read Only, and Make Editable.
|
Target Name | Schema name of the attribute or tab name. For tabs, use the format tabn Tab, where n represents the order in which the tab appears on the page from the left starting with 0. For example, if you want to apply field level access to the first tab, type tab0Tab in the Target Name field. |
Target Type | Available options include Attribute and Tab. |
In the following procedure, you prevent users who only have the salesperson security role from editing the account number field and seeing the Administration tab.
Configure security records
Open Microsoft Dynamics CRM in a Web browser and click Settings in the Application Area.
Click the Security Behavior link.
Click New to launch the Security Behavior form.
Complete the form as follows:
Click Save.
From the form’s left navigation links, click Security Behavior Roles.
Click New to launch the Security Behavior Role form.
In the Name field, type Salesperson-Read Only. In the Role Name field, type Salesperson. The Security Behavior field should already default to your newly created security behavior record.
Click Save And Close on the Security Behavior Role form and then click Save And Close on the parent Security Behavior form.
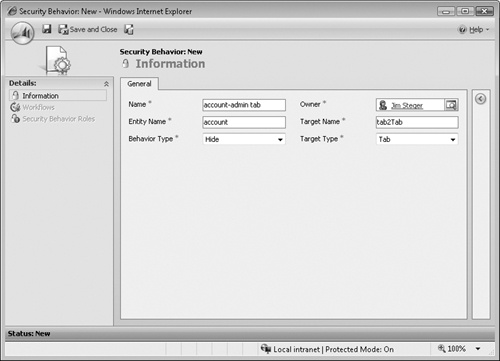
Repeat the same steps to hide the Administration tab. Click New to launch the Security Behavior form.
In the new Security Behavior form, enter the following:
In the Name field, type account-admin tab.
In the Entity Name field, type account.
In the Target Name field, type tab2Tab.
For Behavior Type, select Hide.
For Target Type, select Tab.
Click Save and then repeat the process in step 8 to set up the Security Behavior Role record for a salesperson.

Tip
You can create the records in Microsoft Office Excel and use Microsoft Dynamics CRM import functionality to quickly configure your field-level security records. Alternatively, you could create your own custom interface to make this process easier.
Figure 15-6 shows an example of an Account record when accessed from a user with a Salesperson role after the field-level security changes are applied. The salesperson cannot alter the Account Number field and does not see the Administration tab.
