
Chapter 16
ADR and Looping
Getting the Lips to Flap in Sync
“The actors were whispering. . . whenever they weren't yelling.”
I believe in the magic of the production track. If the director and producer want less ADR in their films and more of that “magic production,” then they must work more closely with the production mixer. They must put a lot more effort and patience into getting the magic of the production track at the time of principal photography, or they ultimately pay extra budget dollars and time to revoice the actors later on the ADR stage. Best effort or not in trying to capture a great production track, the fact is, here you are with a certain amount of need for revoicing dialog.
Before we proceed, the first thing we need to do is clarify the difference between ADR and looping. Today we so often use the term loop or looping when we talk about an ADR session. We say, “We need to loop these lines,” or “She does not loop well,” when we are really referring to the process of vocal replacement and not the actual technique itself.
The technique of looping goes back to the beginnings of motion picture sound. In order to reperform dialog over an existing visual performance, a “looping editor” would have to roll both picture and optical track through a synchronizer, listening for the lines using the optical head mounted over the second gang of the sync block. Once the editor found the line to be looped, he or she would cut both picture and track out, precisely in sync, making a mark with a grease pencil of the matching frame lines. The editor would add a little extra on either side of the line so that the actor would have a lead-in. Both picture and sound were then spliced head-to-tail, making a film loop, with the start frame clearly marked and punched in the center.
The loop editor would then take a grease pencil and make an angular one-foot-long cue on the picture. This was a visual reference for the actor to see when the first frame of modulation of the line to be reperformed actually started.
The punched hole in the film was to assist the projectionist when he would slide the looped picture into the gate of the projector. It was often extremely difficult in the dim light of the projection booth to see the grease pencil marks once the film was inside the gate area, but there was no mistaking the bright illumination coming through the punched hole, even when the douser of the projector was closed.
Once the picture film loop was loaded into the projector and the audio film loop was loaded into an optical playback dummy (term used for a play-only machine that slaves to other machines), the projector and playback dummy were “put on the line” (interlocked together by a distributor drive unit) so that when the projector ran forward, the playback dummy would run forward exactly in sync.
The looping mixer was given a green light and the mixer would tell the looping editor and actor on the stage that the next cue was ready. With that the mixer would roll the projector, which of course rolled the playback dummy. The cue to be reperformed would be seen on the screen, along with the grease pencil cue that would cross the screen (usually left-to-right), ending with the beginning of modulation of the line to be replaced. The original recording was also being heard as the actor would spend a few moments rehearsing it.
When the actor was confident that he or she was ready, the loop editor would tell the mixer that they were ready to make a take. The mixer would have the recordist put the optical film recorder on the line with the projector and playback dummy. Once the mixer rolled the projector and it got up to speed, the actor would perform the line. The loop would continue to go around and around, allowing the actor to reperform the line several times—sometimes giving variations and different inflections to the performance.
Once the actor and looping editor were satisfied, the mixer would stop the projector and the crew would take down the picture and audio loops and put up the next cue loops. This is the way it was done for many years. The basic difference being that in the early 1950s optical sound recording was replaced by 35 mm magnetic film recording.
Understand that there was no way to stop and back up and listen to these recordings. The projector, reproducer dummies, and recorder were incapable of operating in reverse, as we know today. What became known as “rock-and-roll” technology, which allowed projector and playback equipment to stop and reverse in sync, did not come into existence until the mid-1970s. As late as 1978 I worked on a picture that was mixing at the Warner Brothers sound department where we still could not stop and back up.
A variation of this style of looping was done at a few studios, such as Universal Studios, which specialized in a heavy amount of looping, especially as it was handling vast numbers of television shows. These looping rooms used the same technique of using physical film loops, but with an important variation difference. At the end of each day's shoot two copies of the circled takes were transferred to 35 mm mag stripe by the sound department. These copies were made on two interlocked mag stripe recorders, making them simultaneously. The picture editorial apprentice would pick up one set and the show's loop editor would pick up the other set. The loop editor would break down all of the lines that each actor said, carefully making notes of scene/angle/take. Each actor's lines were then made into a loop, but a slightly different kind of loop. They did not bother with picture; it was considered too costly and took too much time for the process to run the cycle through the laboratory and back to sound editorial.
The loop editor would make each loop the length of the performance and again as long with two extra beats of fill. This would allow room for the actor to comfortably repeat the line during the blank period of the loop after he or she had just heard the original portion of the track played back in the headset.
These loops were carefully marked with show code number, actor name, scene, angle, and take, and then each actor's loops were placed in 2000’ film cans and stored on a rack. The following day, after the actors had completed that day's shoot, they would report to a looping room where they would reloop all of the lines that they had performed the day before. This gave incredible latitude to picture editorial and subsequently sound editorial during the sound-editorial phase after picture lock, greatly speeding up the postproduction phase as they rarely had to call actors back in, except to change performances with different dialog than originally written.
These looping rooms did not project picture. The machine room loader threaded the loop onto a sprocketed 35 mm playback machine. As the loop played, it traveled around and around over the playback head, first playing the actor's original performance and then falling silent as the blank 35 mm fill passed over. This allowed the actor in the booth to repeat the line he or she just heard. As the loop continued around, the actor would hear the loop again and then, during the blank spot, would repeat the line, only this time altering the performance, giving a different inflection or emphasis. This process continued until the actor delivered 10 or 15 variations, enough from which the loop editor and director could choose.
Once the cue was finished, the machine room loader removed the first loop and loaded the next, continuing the same process through the listed cues. The recordist placed a handwritten note of the next loop's code number on a piece of tape and placed the tape on the 35 mm mag stripe (after the record head) for ease in breaking down the recordings later by the loop editor assistant. Once ready, the green light would come in, notifying the room that the loop was mounted and ready to roll. The looping mixer would roll the loop for the actor to listen to and get comfortable with. Once the actor signaled that he or she was ready, the recordist would place the 35 mm mag stripe film recorder on the line, interlocking it to the reproducer dummy.
The actor simply stood next to a music stand that held the looping editor's notes and printouts of the actor's lines. This gave the actor a tremendous advantage. The actor could close his or her eyes and concentrate on listening to the performance and then reperforming his or her performance, either as an exact match or with variations. It gave the actor the freedom to act rather than be overwhelmed with having to watch picture, take notice of cue stripes, or hear beeps in the headset or try to match lip flapping to the visual. All of these nonacting demands distracted and pulled the actor out of the realm of delivering an audio performance.
That said, we will review this philosophy and present style of how to recapture this almost lost art form in the last part of this chapter under “Looping today in the digital realm.”
This technique will also serve you well when it is extremely difficult to access actors who are literally unavailable to an ADR stage or looping room. You must be very creative in working with these actors, even when they are shooting a film in the jungles of Africa or the Antarctica—definitely nowhere near an ADR stage until long after your postproduction schedule and the 2-track print master has already been delivered to the laboratory. I will discuss the mechanics of this location looping technique later in the chapter under “Remote Location Looping.”
ADR
In the mid-1970s, with the advent of the “rock-and-roll” system, where projectors, reproducers, and recorders could stop, reverse, and roll forward again in absolute sync, the system of ADR came into being.
Contrary to some beliefs, ADR does not stand for “All Dialog is Ruined,” though some directors would certainly argue that with me. The initials ADR are quoted two ways: “Automatic Dialog Recording” and “Automatic Dialog Replacement.” Personally I do not understand why some refer to it as “Automatic Dialog Replacement” because it does not replace anything; it takes an ADR editor to do that. Where the term really stems from is the fact that for the first time an ADR mixer could program into the stage automation equipment a precise foot and frame that he or she wished the film recorder to record and what foot and frame the mixer wished the film recorder to cease recording.
Based on these numbers that were physically entered into the automation using analog pushbutton switches, the equipment would react to preset parameters to roll at high speed (in those days six times speed was high speed) down to the desired line, sense the proximity of the foot and frame and automatically slow down and park itself so many feet prior to the line. As computer programs started to drive the automation equipment, programming became even more complex and more detailed, entering a digital reality.
Timecode was used when the video was on a magnetic tape medium and the video machine needed to be slaved in perfect sync with the rest of the equipment, and so ADR stages became automated setups so that the ADR mixer could choose whether to work and enter in-and-out cues in either feet and frames or in timecode.
The mixer would roll back and forth through the line for the actor to get a sense of the performance. Precisely three feet prior to the foot and frame entered by the mixer, the automation triggered the ADR beeps (single-frame 1-kHz tone) so that the actor would hear three very short rhythmic beats just prior to the actual line to be replaced. These are known as the beeps (or pips to many English editors), spaced every sixteen 35 mm frames apart, equal to one beep every foot. Where the fourth beep would have landed is silent (known as the fourth silent beep)—this is the exact frame where the actor must begin to speak the line being replaced, otherwise referred to as first frame of modulation.
The idea was that the actors also watched their physical performance projected up on the screen. There was no need for laborious grease pencil cues to be marked on the film, as the three beeps prior to action provided the actors with an accurate rhythmic cueing. The actors had a chance to watch themselves and become quite aware of things about them in the movie realm that they might want to react to and that might influence their new performance.
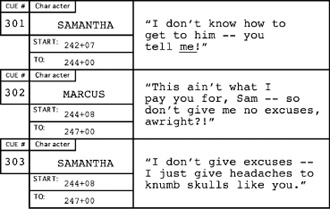
Figure 16.1 This is an ADR practice exercise to help you get used to the timing of the “beeps.”
This was a great toy. The studio that I was working at in 1977 was installing this kind of automated technology on Stage C, and I became very involved in this new process. But we very quickly discovered that some actors are perfect for ADR-style reperforming and others are totally intimidated by it, some to the point that they would devise all kinds of strange personal techniques in order to face the microphone.
Many who supervise performing talent on an ADR stage often notice how many actors are distracted by the beeps that precede the dialog cue to be reperformed. They are not used to hearing the beeps and especially not used to the rhythmic timing. I have therefore decided to include a kind of rehearsal exercise for those who would like to be better prepared before stepping onto an ADR stage costing many dollars by the minute.
For those of you who are interested in having a little practice exercise before you attempt doing it on the real ADR stage, which can be expensive, I suggest you use the practice session shown in Figure 16.1 as you listen to and emulate the three cues on the DVD provided with this book; you will find it under the DVD menu button ADR Practice.
The Practice ADR Lines
Just as you will experience on a professional ADR stage, you will hear three rhythmic beeps and then a piece of production dialog—the line intended to be revoiced. The beeps and dialog cues are repeated six times to assist you in getting used to the rhythm of the beep cues and the silent fourth count, which is the cue to lip-sync your voice against the production dialog.
To further the practical realism of line replacement, the practice cues have noisy ambiences, making it difficult to hear the original dialog at times. As you listen to the DVD cue with the beeps and production cue repeated six times, try to repeat the line in perfect sync. As you master the ability to match sync, change the inflection and performance, while still keeping the temp and rhythm in perfect sync. This should help any aspiring actor overcome the fear of working with the beeps and better understand what is expected as he or she works on today's ADR/looping stage.
The ADR Supervisor
The ADR supervisor, more than any other postproduction craftsperson, interfaces and works with performing acting talent. When temperamental or difficult talent is involved, the producer and director's first concern is who handles the ADR responsibilities—and politics.
Some actors love to ADR. They see it as a chance to get back on stage and improve their own performance, to massage it, fine-tuning it in a way not possible on location. On the other hand, many actors dislike ADR immensely. They are intimidated or inhibited by the ADR stage process. To them, the onscreen sync track was the magic performance they provided while filming the scene on location. Many actors do not listen to the production track with a discerning ear. They only hear their own performance and, once satisfied, often refuse to loop a requested cue. Many are not audio aware. These actors do not always notice the intrusive airplane flying overhead that mars the recording; neither do they hear the distorted brittleness in the track where they shouted or suddenly burst forth in a dynamic shift, catching the production mixer off guard and causing the voice to be overmodulated.
This is where strong and politically smart ADR supervisors really earn their salaries. If a supervisor gains an actor's confidence that he or she is sincerely interested in improving and magnifying the performance, the actor almost always defers to the opinions and recommendations of the ADR supervisor.
An ADR supervisor does not always have to be the best ADR editor in the world (one can always hire ADR editors with reputations for cutting good sync), but the ADR supervisor must appear on stage neatly dressed, with a professional bearing of calm self-confidence. The supervisor must also be extremely well organized, able to locate the right paperwork at any moment. If the supervisor does not have the answers literally at the fingertips, he or she must know where and how to get it in a timely manner without fuss.
The ADR supervisor must articulate clearly, to both the actor as well as the director and producer(s) as needed, why certain cues are added and how they will improve the outcome of the final soundtrack. The ADR supervisor should not give the perception of being just the bearer of bad news or a presenter of problems, but rather of a professional presenting solutions. The ADR supervisor works hard, surgically gleaning out problematic dialog lines (for both performance and technical issues). He or she compiles a complete list of lines to be looped and devises tactical solutions for gaining access to remote actors not available for formal looping sessions.
Nothing is worse than being on an ADR stage or, even worse, on the rerecording stage and having a director or producer notice that lines were missed. It is bad enough when a director or producer decides on additional dialog needs after the fact; it is altogether a most undesirable situation to overlook lines that either clearly were requested in the initial spotting session(s) or were not gleaned out by common sense by the ADR supervisor while cueing the ADR lines at the workstation.
Listen Carefully to the Production Track
One pitfall that the director, picture editor, and producer(s) constantly encounter is losing touch with their production track. Remember, they have lived with the picture and their production track for weeks, often months, and on occasion even years. They know every word, every production sound effect, every dropout, every flaw. They have grown so close to it, however, they have lost the ability to hear it anew, as heard by an audience for the first time. It is often very difficult to convince directors and producers that a dialog line must be looped when the repetitious playback of that line is indelibly etched in their minds.
In a spotting session, I hear a problematic line. The director, picture editor, and producer are not flagging it. I hold up my hand. “What did they say?” Invariably, the director or picture editor will tell me what the actor said instead of realizing that my not understanding the line was related to its lack of clarity.
The best ally a supervising sound editor and ADR supervisor can have is the dialog mixer, who helms the ultimate rerecording of the project. Many times a director or producer disagree with or try to badger the ADR supervisor, claiming nothing is wrong with a particular line. “You can make that work.” However, when the dialog mixer says to loop it, nobody questions it. After all, the dialog mixer is the ultimate authority through whom all dialog tracks must flow. He or she has the power to bounce the reel off the stage and refuse to mix it if the material cannot be made to work because of the way it has been prepared. It is for this reason that, as supervising sound editor, I always insist on having the sound facility set in place and the mixing crew contracted at the outset of commencing the postproduction sound-editorial chores. The first thing I want is an interlock running of the picture with the dialog mixer, who usually helms the stage.
Naturally, I have my dialog editor (responsible for cutting original production tracks) as well as my ADR supervisor on stage for the running. More important, I want the director, picture editor, and producer(s) in attendance to hear exactly what the dialog mixer says about one cue or another. The dialog mixer runs the production track through the very mixing console used during the predubbing process. Often, the picture editor, director, and producer(s) hear the track truly for the first time, through quality theatrical speakers that are extremely transparent—they do not color or hide the flaws or warts of the recordings. All is revealed.
Many veteran dialog mixers explain that they have a three-count rating system as the team discusses the various dialog lines. If they rate it a “one,” that means they have no problems with the technical characteristics of the line and can make it work; however, if they want to loop it for performance reasons, that is the call of the director and/or producer(s). If they rate it a “two,” that means they do not like what they hear. Either there is a fringy edge (usually the threshold of distortion) or some kind of hum or noise, such as overhead aircraft, offstage traffic, or other intrusive sounds. The dialog mixer feels that he or she can work with the line if necessary, but would rather have it looped.
If the mixer rates the line a “three,” that means there is no choice but to loop the line, as the dialog mixer cannot equalize it or work with it to make it sound right. Do not even argue with the dialog mixer about his “three” count—even actors who have died can and do have line replacement done by soundalikes.
From time to time the dialog mixer pauses and lays on a few equalization moves or runs the sound through a universal dip filter to make sure that some offending noise can be notched out without encroaching on the characteristics of the voice. By the time the running is over, there is usually no question as to the scope of work to be done. The mental alignment of the sound-editorial team and picture editor, director, and producer(s) becomes fairly well set. With a short conversation regarding tactics of dialog preparation and perhaps other options to save certain critical lines, such as using Sonic Solutions or renting specialized signal-processing gear for the dialog predub process, everyone leaves the running focused on the job ahead of them.
Having an interlock running with the dialog mixer at the beginning also relieves the mixer of responsibility with you. It is one thing to show up on the rerecording stage for dialog predubs and have the dialog mixer zinging the sound editors because something was not done, but, when the dialog mixer is part of the decision-making process from the beginning, he or she is bound to the sound-editorial team as well as the director and producer(s) by what was counseled before work began.
Crushed Schedule Trends of Mega-Monsters
Several ADR supervisors have shared the nightmare trend, especially on huge accelerated-schedule mega-budget pictures, that they rarely even get a chance to have an actual and realistic ADR running as I have just described in great detail.
Nonlinear technology with Final Cut Pro and Avid make it easier and easier for picture editors and directors to put in visual special effects (as work in progress) and have a sound team (either for temp work only, or the eventual actual sound editing contractors) start developing and make crash-down temp sound mixes long before the picture even gets to a point of being considered ready to turn over to sound editorial.
R.J. (Bob) Kizer is one of the industry's more respected ADR supervisors. His credits include Steven Spielberg's version of War of the Worlds, The Terminal, Master and Commander: The Far Side of the World, Catch Me If You Can, the 2000 version of Planet of the Apes, X-Men and X-Men: The Last Stand, Anna and the King, The Siege, Alien Resurrection, Date Night, and Inception, to name a few. He confesses that he often gets his first real interaction with the picture editor and director about what lines to set up and cue for an ADR session during the first temp dub!
I personally find this appalling—certainly not Bob's choice—but it is important to take notice of the inevitable evolution of how things are being done: not for art form's sake but for schedule and business considerations. Often, these decisions are made by those who do not understand the collateral costs that are incurred by what might seem like expedient practices but, in fact, cost untold wasted dollars due to ignorance of the process.
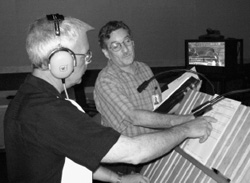
Figure 16.2 On an ADR stage, R.J. Kizer clarifies a point for David Kulczycki before he replaces a dialog cue. “One thing you have to master right away as an ADR editor is when to speak up and when to keep your mouth shut. You won't always know when you failed to do the former, but you will quickly know when you failed to do the latter,” said Kizer. Photo by John LeBlanc.
Tighter budget films cannot afford that kind of technique and are better served by the ADR running technique that we talked about earlier in this chapter. But it is vital to understand how and why certain techniques and trends are constantly evolving, and the professional ADR supervisor will know how to shift gears from one technique to another, depending on the client and the studio involved.
R.J. Kizer has a few thoughts to share on the opportunities and disciplines of ADR (and/or looping).
ADR has changed a lot from how it was done 15 years ago, and it is on the verge of changing yet again. The transistor revolution of the 1950s brought about the introduction of “Automated Dialog Replacement” in the late ’60s and early ’70s. The computer revolution of the mid-’80s brought about the use of personal computers in the compiling of cueing information for ADR sessions. There must be at least eight different cueing software out there. (And who knows how many are floating around Europe and Asia?)
Cutting movies on the Avid and Lightworks has made recutting much easier and less labor intensive. Consequently, ADR editors must do their cueing on some kind of computer system just to keep up with all the changes. On Master and Commander, for example, I had a new version of the picture turned over to me every Friday. It would take me eight days to conform my programming. As you can see, I quickly fell behind. I then had to conform my programming to every other version and gamble that I wouldn't be called to the ADR stage during a version that I had skipped.
Back in the days of shooting ADR on film and mag, I used to allow 10 minutes per cue. Today, I allow 4 minutes per cue. These days it is extremely rare to encounter a location mixer who only uses a reel-to-reel Nagra to record the production track. Thankfully the days of using a DA-88 are behind us. Nowadays, more and more location mixers are using hard-drive recorders (like the Deva). Production dialog is now routinely coming to us as 48 kHz/24-bit, broadcast Wave files.
Likewise, ADR is being recorded at 48 kHz/24-bit. Many ADR stages in Los Angeles and New York use Pro Tools as either the primary or secondary recording device.
On the set, location mixers are using combinations of radio mics and boom mics to record the track. On multichannel recorders, they will assign individual actors to specific channels and place the boom on a separate channel.
For the 2005 remake of War of the Worlds, the production dialog was recorded across 8 channels. Channels 1–5 were individual radio mics, channel 6 was the boom mic, and channels 7–8 were combines (bumped up by 8 dB) to be given to sound transfer for transfer to mag stripe—Spielberg likes working with film and mag, and so he has his editor cut his movies on a Moviola.
Some location mixers are very lazy and they take the radio mics and the boom mic and combine all the signals into one channel and leave the other channels blank. It's true!
As a result of this multi-mic recording situation, many ADR editors are having their ADR recorded with two mics: a traditional boom mic (either a short shotgun like the Sennheiser MKH 416 or MKH 60, or the Neumann KMR 81) and a lavalier microphone. So the ADR editor ends up with two channels recorded per cue. Both channels are cut and presented for predubbing. The dialog rerecording mixer will then decide which channel to use or use a combination of the two—whichever way matches the production track the best.
As you can guess from the above, if production dialog has 8 channels per “line,” then the edited Pro Tools session could easily be 64 channels wide. Usually the dialog editor goes through and strips out the channels that are not needed. So the edited session comes in around 12 to 16 channels wide.
The edited ADR session can be extremely wide: 2 channels per cue, plus however many alternates the director asked for, split for onstage/offstage treatment, and phone and TV speaker treatment—you can end up with 72 channels of ADR being presented for predubbing. (Personally, in ADR I have found only two specific instances where I was glad I had the lavalier mic recording. All the other times, we have only used the boom channel.)
More directors today do not know their craft nor do they know anything about any of the other crafts. Their sense of hearing is severely skewed to listening to extreme rock and roll music. Some show up to the final mix after having inhaled several lines of cocaine. Drugs like cocaine increase the heart rate, which will increase blood pressure. That sends more blood to the head, and the increased pressure affects your hearing. Things tend to sound more muddy. It's like having water in your ear. So directors start complaining that the dialog sounds too muddy. And the mixer is forced to EQ everything higher, so that dialog starts to become shrill.
Richard Portman always used to say, “Sound is round.” By that he meant sound is a medium that should not be cut jaggedly like picture. Sound has an approach, a by and an away. If you chop it all up, it becomes hard to listen to, and eventually the brain will tune it all out. Film editors like to cut sound as discrete blocks of events, just as they cut their picture. They want to hear the car when they see the car. If they don't see the car, they don't want to hear it.
[On ADR cueing:] In England, a device was created by Colin Broad called the Video Streamer. It had a software that allowed the operator to enter all the event addresses (cues) for a character, then it would trigger an electronic streamer or wipe for each event without having to stop in-between. This allowed an actor to ADR an entire scene as a single take, if he so desired. So far, Disney and Fox have installed this box and software on their feature ADR stages. I have used it successfully (it can be a bit buggy) on three features, most tellingly on War of the Worlds.
Meanwhile, an outfit down in New Zealand has come with something they call VoiceQ. This uses a QuickTime movie and track. The operator loads in the QuickTime movie and sets the starts and stops for all the cues by marking the guide track in a timeline. You type in the dialog for the cues in a special window. Now, the software analyzes the track for each cue and then displays the dialog on a running subtitle banner on the picture. The letters of the words are squeezed together or stretched out according to how fast or slow the word was said on the track. This eliminates the need for the actor to look down at his script as he is speaking his lines. All the dialog is up on the screen.
Each cue will be triggered automatically as the film is running, allowing the actor to do as many cues in a run as he wants. And like the Colin Broad Video Streamer, the software allows for the importing of cue data from other software via a tab-delimited text file. I have been lobbying Fox to get VoiceQ. I believe the software was originally developed to accommodate foreign language dubbing, but they used it on Lord of the Rings and King Kong for principal ADR.
APPROPRIATE USE OF LANGUAGE
Language is a very delicate and extremely important part of the soundtrack. So few producers, directors, or writers truly understand the ramifications and broad audience enthusiasm for their film because of judicious and careful use of profanity in the dialog track. This is not about what previously was known as the television network Standards and Practices board. This is a question of common sense and a calculated decision on the part of the producer of defining the audience for the film.
In an industry immersed in an assault on the senses, where we are exposed to extremes of cinematic content, most of the new generation of filmmakers unfortunately is desensitized and perhaps suffers from ignorance of this controversial and delicate subject. Seriously ponder for what audience you have been making the picture, and then rethink the use of profanity or slang used in the script. I have witnessed several projects that could have done much better commercially but were banished to a harsher MPAA rating because of the careless use of blasphemy and profane dialog.
Not an issue of Victorian prudishness, this is the experience of being associated with over 100 theatrical motion pictures, watching their creative evolutions through to box-office success or failure, and witnessing elements that made them successful and those that weakened them, turning off audiences. The topic is broached here because it is during the looping process that you may wish to rethink your dialog track through one more time with a critical eye toward this cause and effect; you still can make changes and improve the film's commercial worth.
Aside from primary content consideration, you must address television coverage. After you finish the M&E (foreign) mix, you will need to prepare a television version. You will not find an official no-no wordlist anywhere. Probably out of fear of violating the First Amendment, nobody wants to dictate and formally publish such a no-no list, nor will I. However, many sound editorial firms, especially those dealing with network television, have lists compiled from meetings and verbal edit strategies. Of course, the list is constantly changing. At one time, certain words could not be said on television or even in movies; now they are heard on a regular, desensitizing basis. Each network and cable channel has its own threshold of acceptance.
Determining what is profane or what will trigger a harsher MPAA rating is not as obvious as you might think. The word “hell” is a good example—an extremely common and virtually everyday word that has lost much of its impact. If an actor says, “Oh, what the hell,” this is not a problem. If an actor turns to another actor and says, “You go to hell!,” this is a problem, for now it is used in a spiritually damning way against another human being. Therein lies the difference.
The most powerful and surefire trigger to not only doom your film to a harsher MPAA rating but also to turn off a huge cross-section of the audience is the use of blasphemy. Should an actor place the word “god” in front of the word “damn,” the most profane word has been uttered—yes, it is even worse than the f-word.
It is just amazing to me how badly warped the cable censorship community has become. American Movie Classics and other popular so-called family channels will bleep out the defecation s-word, yet they will leave in the harshest of all obscenities by leaving the blasphemous “godd–n” words in. This is not an indictment based only on Christian ethics. God is a global term that applies to the specific spiritual names that define the pinnacle deity of almost all religions; therefore, using it in a blasphemous way is worse than hearing Al Pacino count up the number of times he used the f-word in Scarface. If you do not understand what I am talking about, then I suggest you check out the Ten Commandments that Moses brought down from the mountaintop to the Israelites—it is the only verbal utterance that is forbidden by God.
The body count, bullets, and blood mentality that desensitizes the audience will (and is) eroding the viewing tolerance. I should know. I have worked on many films that I would not, by choice, go to see. I have been bombarded by images and language that for long periods of time has desensitized me. It took months to return to a mental state where I could act and react to things in a normal way (whatever that is supposed to be). But you are never really the same.
Hollywood argues that their studies tell them the kinds of movies that the public wants to see. Statistical studies will yield information in exactly how you present the question. We did not believe Hollywood's box-office studies of the public taste and demand, and after making our own study it quickly revealed why. Fewer and fewer middle age and older moviegoers were going to the theater because of the product, not because of a lack of desire to go see a movie in a theater. It becomes kind of a chicken-and-egg argument, doesn't it?
After conducting a study of moviegoers, as well as patrons who rented from local video shops, we discovered that language, without a doubt, was the number-one reason why a significant number of potential patrons stopped going to the movie theaters. At the very least they had become far pickier about which films they wanted to see. Many of their comments surprised us, especially in regard to the specificity of objectionable words. For instance, many viewers reacted very badly to the word “crap” or “crappy” in film dialog, saying they actually would prefer to have heard that other overused defecation s-word cliché.
While it is true that some of these comments came from areas many refer to as the Midwest or the Bible Belt audience, filmmakers forget that that audience accounts for a giant share of income and can certainly wield powerful critical acclaim or disapproval. Have you ever considered the collateral loss of dollars that you do not know about, because you did not know what was possible to begin with? I think the movie The Rookie, starring Dennis Quaid, is an excellent example of a picture that has heart, passion, emotion, action, interesting photography, good sound and music score, and yet does not have one curse word in it. By the way, it was rated G, for all you Hollywood-hype executives that spout that G-rated films are poison at the box office.
This is not just a lesson in ethics or morals, but a good business lesson in possibilities. Just remember which audience your film is targeted for and analyze your visual image and dialog track with a critical eye and ear. It will tell you what must be done. You may also find it interesting that since, as we have discussed in this book, foreign sales stream income now dominates the domestic market, you should pause and think through the tastes and tolerances of foreign markets. Each overseas audience market has their own thoughts and reactions to film language. Sometimes it may be translated out, but certain words are universally recognized. This is not to say that you cannot or should not make R-rated films. They definitely have their market. This is about recognizing what market your film is really speaking to and making sure that the content speaks the presentation to match.
A few years ago I was supervising the sound on what should have been a cute little PG-rated robotic film. We had just sat down to commence the spotting session when the lead actor turned and used the “godd–n” word—not once, but several times. I raised my hand for the editor to stop. I turned with a puzzled expression to the producer, “So you're making an R-rated film?”
He recoiled at my comment. “What gives you the idea that we're making an R-rated film? This will be rated PG!”
I shrugged, “That's what I thought your market was going to be. But you sure have an R-rated film now.”
The producer asked how I came to assume that. I explained that after working on more than 100 theatrical motion pictures, many of which I am privy to the interactions of the producer and the MPAA, I have come to know what will trigger certain ratings, and using the “godd–n” word will get you an R rating.
The producer scoffed at me. What did I know? I was just a sound editor! Several months later, when we commenced the final rerecording process the producer burst onto the dubbing stage with a deluge of profanity. How could the MPAA have given them an R rating? I glanced knowingly at the head mixer who smiled with an unspoken I-told-you-so acknowledgment.
Rather than take the time to go back in and loop the offending lines and resubmit the film for a new MPAA rating, the producer did not understand that it was this simple language issue that garnished the R rating, so the lines were never replaced. Consequently the picture was released as an R-rated film, which was not the audience for which it was designed for. The film failed miserably, all because of a dozen “godd–n” outbursts in the dialog track.
Finally, if you do not want your film to play on a well-known cable channel and have muted dropouts in the soundtrack because you did not supply a television version, accept the advice from the ADR supervisor regarding getting television coverage while you have the acting talent on stage for the primary ADR session.
CUEING ADR LINES
After a thorough run-through and discussion with the director and producer on actor performances and availabilities, the ADR supervisor goes through the film to cue the dialog, noting both replacement and added lines to be recorded.
Before computer programs, ADR cue sheets were always typed. A real professional never took handwritten ADR cue sheets to the stage. Never give an actor a handwritten ADR cue sheet, unless you are adding or collaborating on new dialog on stage with the actor. The neatness and precise look of the ADR cue sheet is your ambassador of professionalism and trust. Watch for misspelled words or crossed-out lines with handwritten corrections. Many actors are intimidated by the ADR stage already. If you give the actor handwritten cue sheets, you do not instill confidence and inspire the actor, and you may find yourself soon replaced. It may not be up your supervising sound editor; he or she may be compelled by the director or producer's office to do it.
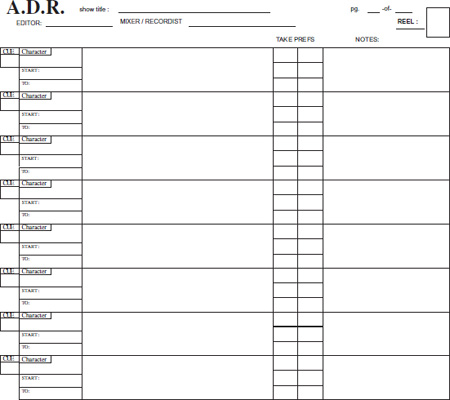
Figure 16.3 This is a classic example of a traditional ADR form.
The Traditional ADR Form
Note that each ADR line in Figure 16.3 has a cue number. Almost all ADR supervisors use the reel number as the first designation, so all cues in reel 4 are the 400 series (401, 402, and so on). Many supervisors leave a blank box in between each cue, allowing space to add lines on the spur of the moment, but also making it much more comfortable for the actor to find and read the lines in the dim light of the ADR stage. The actor must concentrate on the image projected on the screen to match sync and not waste time to find the written cue on the page.
List each part by the character name, not the actor's real name. Every ADR supervisor has a specific technique and preference as to how to prepare ADR sheets. Many supervisors list ADR cues just as the ADR form is displayed in Figure 16.3. In other words, ADR cues are listed in a linear order, in sequence of performance, listing each character. Other ADR supervisors choose instead to put all the lines for each character on a separate page. Their contention is that this is not as confusing to the actor on the ADR stage. I simply take a yellow highlighter to all Richard's lines, and on another copy I highlight all Jeanie's lines, thereby making it much easier for the actors to focus on their own dialog requirements.
As supervising sound editor, I prefer ADR sheets in linear order. With today's computer software, it is so easy to extract per-character variants from the master cue list and print them for the actor on stage, but I do not want to fumble through a dozen separate sheets looking and accounting for lines of dialog.
Each line has a “start” and “to” designation. This designation is either listed in feet and frames or in timecode. Many veteran theatrical editors still like to work in feet and frames, but video outputs from the cut picture are offering fewer and fewer opportunities to use feet and frames. Aside from personal preference, a few ADR stages cannot even display feet and frames anymore, and so timecode is the only choice in those instances. (Always check with the stage before starting this task.)
When cueing the line to be ADRed, list the exact frame in which the first audible modulation can be heard—exactly! At the end of the line, add 10 extra for overtones to die off. Not all ADR mixers like their “start” cues the same way. Some want it 2 frames prior; others want as much as 8 frames prior; still others want it right on the frame of modulation. You will probably use more than one ADR stage to complete all ADR work for the picture. Each stage may want the “start” cues slightly different. Either tell the mixer that all your cues are right on the frame so that specific preferences can be utilized, or print out new sheets with the preferred frame specifications already listed for each recording venue.
The ADR supervisor soon has a list of the stages, both local and around the world, that will be dealt with to accomplish the looping chores of the picture. The ADR supervisor discusses preparation preferences as well as media requirements from the ADR mixer and/or audio engineer of each facility. It is often necessary to prepare separate ADR sheets for individual ADR facilities, customizing the data to best accommodate that facility's own capabilities or limitations.
Most good ADR supervisors have an added line of notations for each cue. They list a reason why the line is to be reperformed; for example, noise, distortion, performance, television coverage, and so on. This has developed out of frustration from ADR supervisors, supervising sound editors, producers, directors, and rerecording mixers who, in the final analysis, have to make it all work. Initially, the producer or director perceives that the dialog for the film is basically in good shape and does not require much looping. Then the ADR supervisor and supervising sound editor run the reels with the rerecording mixer on a dubbing stage to analyze the true quality and nature of the production sound. It never fails to shock the producer and director, who have never truly heard their production track in this theatrical environment, just how bad and brittle their soundtrack is.
Now come the lines added because of unwanted vocal overlaps that were unnoticed before, for instance, airplane noise not detected on the little speakers of a picture editorial workstation. The rhythmic ticking was not noticed because of early-morning condensation impacting the microphone diaphragm. If you loop the passenger character in the front seat of the car talking, you either must loop the driver or crossfill all the noise from the driver's dialog under the passenger character to avoid a series of checkerboarded dropouts, which ultimately accomplished nothing if you were intent on getting all that noisy background out from behind the passenger character's lines in the first place!
Now the ADR lines start adding up. At an average of 10 minutes per line to successfully record, the producer and director get nervous. Their “good-shape” dialog track is now escalating into several hundred, even a thousand-plus ADR cues. Then you send an ADR kit to South Africa to an actor on location but with access to an ADR stage in Johannesburg for an afternoon. The budget cannot afford for the ADR supervisor to fly down there to oversee the session. What comes back is a marked-up ADR sheet with only a fraction of the ADR lines done. The actor either does not understand or does not care about the technical problems of the scenes. The actor considers his or her performance fine.
I received a 1/4” backup master from an ADR stage in Florida, where a name actor had performed his ADR session unsupervised. Without due consideration of why the ADR cues had been written up, and without calling the editor in Los Angeles to ask why he was expected to loop certain lines, he arbitrarily decided not to loop some lines and to loop others. As I ran the 1/4” backup master, I could hear the actor scoff as the film rolled. He demanded to know what idiot had cued the lines. He crossed out a line and wrote, “omit.” Of course, he did not pay attention to the background noise, which the ADR supervisor knew would give the dialog rerecording mixer absolute grief later. Guess who caught the criticism from the rerecording mixer when he heaved a sigh and said, “I can't make this work! Why didn't you loop this line?!”
By making notes as to why the particular ADR line has been cued, the ADR supervisor not only informs and educates the actor to gain cooperation but also makes a paper trail record that may be necessary to prevent later blame and to show the producer and studio executives that the ADR supervisor had prepared the job correctly in the first place.
Note in Figure 16.3 the six squares to the right of the ADR line. The ADR supervisor keeps a close record of which takes are most desired, kind of like the circled takes on a production sound report. Before direct-to-disk digital recording systems, such as Pro Tools, ADR was recorded to multichannel magnetic stock. At first it was 3-channel 35 mm fullcoat, and as the 35 mm 4-channel head stack came out in the late 1970s, we were thrilled to have one extra channel. Then stages started adapting 24-track 2” magnetic tape, especially when Dolby Laboratories made the Dolby A 24-channel noise reduction encoder/decoders. This became even more popular with the Dolby SR (Spectral Recording) encoder/decoder. Cue sheets during these years had 24 square boxes for the ADR editor to keep notes in, especially in keeping what take was on which channel.
With today's direct-to-disk nonlinear recording systems, “what channel” is irrelevant. It becomes a matter of “what take,” as it all resides on the hard drive unless otherwise thrown away by the user. It really falls to the ADR mixer assistant to help the mixer keep the take numbers straight, as after recording a line, the mixer would need to tap twice on the recorded audio track to rename it. That renaming would become critical for future reference. It becomes very easy to record numerous takes before the director chooses one or more to “print,” which is an old term meaning the sound transfer department should make a transfer copy (in whatever medium was required) for the ADR editor to cut. With today's digital technology we do not print anymore, though the term still sticks; it just means that the ADR editor will want to pay strict attention to the director's choices. The ADR supervisor also makes notes as to how to cut the line. The director may ask for the first part of the line from take 3 with the second part from take 9.
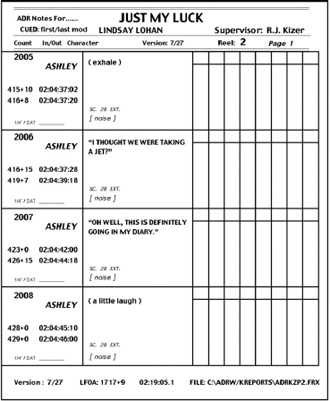
Figure 16.4 A computer program printout for the first few ADR lines for R-2 of Just My Luck.
ADR Software to Further Automate the Process
Figure 16.4 shows page 1 from the ADR cue sheet for the character Ashley from the comedy-romance film Just My Luck. Note that as in the traditional ADR form, the information disciplines are the same, with a few important variations.
The header lists the name of the film, the name of the actress (not the character she plays) who will be replacing the lines cued, and the name of the supervising sound editor (R.J. Kizer). Note the piece of information on the far left-hand side of the header. This is very important information: Cued: First/Last Mod. This tells the ADR mixer exactly how the ADR was cued, that there were no pre-frames built into the cue, as was the practice a few years ago.
The next line of information tells us the count (what cue number the line is). As in the traditional ADR form technique, the first number denotes what reel of the project is being cued. The last three numbers refer to each cue in numerical order.
The next item of information is the In/Out, referring, of course, to the first frame of modulation of the line to be replaced and the last frame. Before automation ADR software that would actually drive the recorders, we usually built in one extra foot after the last detected frame of modulation. This allowed for overtones, so they would not sound clipped. Note: The In/Out counts have both 35 mm feet and frames as well as timecode.
The next item of information is the name of the character that Lindsay Lohan plays in the film, Ashley.
The next very important piece of information is the version identification. On Starship Troopers I had to keep 18 version cuts straight, so you really need to know to what version the cue feet and frame/timecode numbers sync with. In this case the date (July 27) is used as the identifying version number.
The next item of information tells us what reel has been cued (in this case reel 2).
The last item of information on this line is the page number.
Note the fine print under the In/Out footage/timecode numbers. 1/4”/DAT ____. The ADR mixer will tell the supervising ADR editor on what 1/4” or DAT roll he or she can find the backup protection.
There are three pieces of information in the next box to the right of each cue number. The first bold type is, obviously the cue itself. If it is not actually dialog, but breaths, grunts, sights, exhales, or other vocal peculiarities, they are listed as such in parentheses. Dialog is listed in quotes.
The second piece of information in this box is in fine type near the bottom of each box; it is the scene number and Int. or Ext.
The third piece of information in this box is also in fine brackets under the scene number—the explanation of why the line is being replaced. In this case, because of [noise].
At the bottom of each page, the software will repeat the version date (or number). It also lists the LFOA (also known as LFOP; the last frame of action). In this case it is 1717 feet plus 9 frames. This tells us instantly that this is an A-B reel, and not the traditional 1000’ reels that were described in Chapter 7. The next number is the timecode frame of the LFOA (02:19:05.1; this tells us that it is reel 2, 19 minutes, 5 seconds, and 1 frame).
The next piece of information tells us the exact file that R.J. Kizer produced to make this cued report.
All that said and done, there are many ways to approach producing ADR cue sheets with software. You can spend a great deal of money (on average $2000) or you can use much more cost-effective variations.
One of the reasons why you really want to use properly authored software for cueing your ADR is that the supervising ADR editor can show up on the stage and hand off a disc of the file that he or she has produced (a tab-delimited text file).
The mixer will take this disc and enter the file into the computer system in the stage's recording booth equipment system. One popular system is the CB Electronics VS-1, which allows direct entry of cues from a remote keyboard, downloading an ADR list to both the SR/MR controller and the video streamer (CB Server software). It requires the Video Streamer with RS422 processor board and EPROM update. Set the SR/MR system to Auto/ADR—the list will be entered on both the SR/MR and the Video Streamer.
Many major ADR stages today are set up with this system to read the timecode numbers and automatically set up each cue.
The Video Streamer is a wipe-streaming projection device that will automatically project a white traveling wipe or streamer across the screen, just like we used to make by hand in the old days with a grease pencil and ruler, drawing them right onto the 35 mm picture dupes. For further information, you can check out this and other devices by Colin Broad at the website, www.colinbroad.com.
VoiceQ—for ADR, Foley, and Dubbing
We all know that dialog replacement is an integral part of filmmaking, and depending on your director, it can be a nightmare experience. We who have had to endure the instant preparation expectations of clients and suffered the promises of so many software products have gotten tired of the big-If syndrome. If you rename your audio tracks with certain key letter inclusions so that the software will understand what to do with it, . . . If you have enough money to afford the huge expense that certain packages entail, . . . If, If, If!
KIWA International Ltd., based in Auckland, New Zealand, has developed a system that really does seem to fit the supervising ADR's dreams and fantasies, a software called VoiceQ. After extensive chats with R.J. Kizer, and looking into the product myself, I contacted David Kite of KIWA and invited him to more formally present his product in this chapter where it is a welcome consideration. Here, David Kite talks about VoiceQ:
It is common practice to rerecord and synchronize the majority of dialog and sound effects after filming is complete. In addition, do not forget all the work that accompanies the translation of most movies into alternate languages for release in foreign markets.
The two most common forms of cueing actors in an ADR session are “streamers” and “3 beeps” just prior to the cue to be reperformed. A streamer works by cueing in the actor through the use of a vertical line that moves in succession across each frame until the “event” is reached, which is the cue to start. [We just spoke of this technique by using the Colin Broad cue projection device.]
The 3-beep method aligns a loop with the movement onscreen and cues the actor using a series of three audio beeps. On the fourth “silent” beep the actor reads the loop and attempts to match the voiceover aligned with the voice movements and performance onscreen.
While these methods can be considered industry standards for expediting the ADR process, they are both highly inefficient. Multiple repetitions may be required to ensure accurate synchronization with the footage; time wastage often occurs in setting up and waiting for the cue event and any dialog changes are made manually in the recording studio. The result is a significant loss of time, and thus reduced productivity and efficiency.
VoiceQ expedites the dialog replacement process during audio postproduction through visual onscreen cues. The Apple Macintosh digital software products VoiceQ ADR and VoiceQ DUB can be standalone or integrated seamlessly with any Pro Tools and any other recording systems via MIDI timecode. VoiceQ ADR was conceived for automated dialog replacement, which is the practice of rerecording parts of the dialog in the original language to obtain optimal sound quality. VoiceQ DUB has been designed for dubbing, the replacement of one language with another.
The principal function of both VoiceQ ADR and VoiceQ DUB is to scroll the dialog across the screen in sync with the film. This is achieved with such a level of accuracy that actors can literally see when to start each individual word that they need to speak, which makes their task considerably easier, enabling them to give a better performance in considerably less time. Preparation of ADR sessions outside the recording studio further reduces cost and valuable recording time.
A VoiceQ session consists of the live video stream with the lines to be spoken by the actor scrolling across the bottom of the screen from right to left. At the left-hand side of the screen is a vertical line. When a word hits the line, it is time for that word to be spoken. Lines for different actors are distinguished by color and vertical alignment allowing for multiple actors to be recorded simultaneously. Symbols and characters can be added to facilitate interpretation and expression of the dialog as well as for Foley and sound editing. A line may be previewed onscreen on request and a host of other features are available for all key production personnel. Although a multitude of reports for scheduling and other purposes are provided VoiceQ advocates paperless processes.

Figure 16.5 The main VoiceQ Screen.
The VoiceQ Screen consists of three distinct sections. The Script Editor section enables input and editing of dialog, scenes, comments, timecode parameters, character assignment, and progress tracking of each line. The Timeline Editor section allows sychronization of lines, words, and symbols, scrolling speed, zoom in/out, toggle text, timecode, and preview line on/off. Selection of the language is displayed and the FPS rate and Offset as appropriate. There is a Play control deck for standalone mode. The Character Editor section is where you add and edit the Foley category and characters, select dialog by character(s), filter by character, and change colors and altitude of the dialog displayed onscreen, by character.
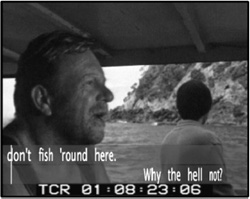
Figure 16.6 VoiceQ oncreen output.
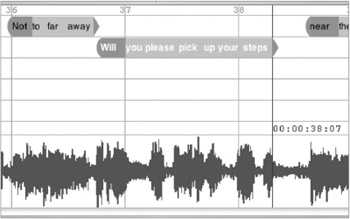
Figure 16.7 Synchronization of dialog.

Figure 16.8 VoiceQ preferences.

Figure 16.9 VoiceQ Project Languages.
When a word hits the yellow vertical line it is time for the actor to speak that word. Synchronizing each word allows for gasps, breaths, and silence within a line. Text is overlaid live onto a QuickTime format of the film and can be output to an external monitor, TV, or projector. Overlaying of text enables changes to be made on the fly and immediately displayed onscreen. Note that each character is color-coded to allow for multiple actor recording.
Dragging lines and words using the audio waveform makes the synchronization process easy and updates all other areas of the application automatically.
VoiceQ provides a host of preferences to suit the user, actor, and ADR supervisor, as well as the audio engineer and mixer.
VoiceQ is Unicode, enabling the selection of any language for translation and dubbing for foreign markets. Some of the features of VoiceQ are:
• |
Scrolling synchronized dialog over video |
• |
Simple drag-and-drop features |
• |
Multi-language capability |
• |
Manual and automated script input |
• |
Spotting, detection, and adaptation functionality |
• |
Frame-accurate cueing |
• |
Feature-rich reporting and character filter functionality |
• |
Real-time on-the-fly script editing |
• |
Works as standalone or in conjunction with Pro Tools LE and Pro Tools TDM systems |
• |
Includes MIDI timecode generator |
• |
Output through DVI or S-Video to external monitor, TV, or projector |
• |
Configurable onscreen presentations |
• |
Automated file saving |
• |
FPS or feet and frames |
• |
Choice of scrolling or static script cue |
• |
Automated line referencing, notes, and progress tracking |
• |
Jog wheel option with user-definable key mapping |
• |
Abundance of quick keys for common functions |
Some of the VoiceQ benefits are:
• |
Better for actors |
||
|
• |
No more paper; read the script directly off the screen |
|
|
• |
Record with other cast members for improved dramatic interplay |
|
|
• |
Improved dramatic interpretation and comedic timing |
|
• |
Better for directors/ADR supervisors |
||
|
• |
Reduced recording time leaves more time for creative play |
|
|
• |
Make your script changes and display onscreen instantaneously |
|
|
• |
Reference the original script against other iterations and languages |
|
• |
Better for engineers |
||
|
• |
Greater accuracy means halving the time spent in editing |
|
|
• |
Perfectly timed streaming Foley symbols and notes give you greater accuracy and control |
|
|
• |
Completing projects in half the time means quicker throughput of projects |
|
• |
Better for producers |
||
|
• |
Streamlined processes means less time and costs in actors |
|
|
• |
Improved production standards means lower costs in postproduction |
|
|
• |
Greater accuracy gives you a better sounding and synchronized product |
|
• |
Better for your business |
||
|
• |
Simplicity of VoiceQ means you can diversify your business |
|
|
• |
Financial and qualitative advantages of VoiceQ will make you gains in margin and turnover |
|
|
• |
Keeping your film secure on an external drive means you only need to plug it into VoiceQ when you need to |
|
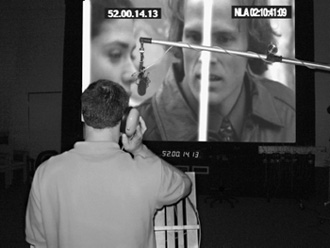
Figure 16.10 Actor preparing to replace a line of dialog.
ADR STAGE: THE CREW
ADR Mixer
The ADR mixer must be highly experienced in the use and placement of various microphones and must know how to listen to the production track and match the colorization and timbre of the ADR stage microphone so that the actor's voice blends into the production track as seamlessly as possible. In addition, the ADR mixer must be a politician, knowing when to guide and handhold and when to remain quiet and step back.
The ADR stage is known for everything from making magic to provoking bouts of fisticuffs. Tempers flare and feelings get trampled. The ADR mixer de facto becomes both host and problem-solver, but the mixer almost always has the last word. Most ADR mixers I have met are slightly reserved, politically smart individuals who know how to focus on the good of the show and how to guide the temperaments of all concerned toward a constructive end.
The great ADR mixers are extremely comfortable and smooth with their equipment. With what seems like effortless magic, the mixer rolls the tape, presses the in-line mic, and slates the multitrack and DAT backup recorder, “Cue four-oh-three take five, channel six.”
A beat later the three rhythmic ADR beeps sound, and, on the silent fourth, the actor performs the line. Without being asked, the mixer quickly rewinds the tape and hits the talk-back button so all on the stage can hear. “Playback.”
The tape rolls, and everybody hears the production track. At exactly the right moment, the mixer mutes the production dialog as take 5/channel 6 plays back the new performance. The mixer smoothly slips out the production track exactly at the end of the cue so those on stage can get a sense of how the new line sounds.

Figure 16.11 ADR recording engineer Derek Casari prepares to record an ADR on the ADR stage at 20th Century Fox. Photo by John LeBlanc
We wait for a response from the director. Is it a circled take, and we go on to the next cue, or do we try another take of this cue? It is a circled take, and yes the director wants to try another one. The mixer calmly switches off channel 6. “Save channel 6, moving on to channel 7.” The recordist makes the appropriate note on the ADR protection report, and they roll the videotape to try it again. The instant feedback may help ease the actor into relaxing about the process and help toward a successful and rewarding completion.
ADR Recordist
The ADR recordist supports the ADR mixer. The recordist is responsible for receiving either the film dupes or the videotapes of the picture prior to the ADR session. If the session is being synced to videotape, the recordist spins down to the 1-minute timecode designation and checks if the tape really is drop or nondrop timecode as advertised on the label. Many times people just assume the label is filled out correctly, and even more frequently the video transfer facility fails to list the technical specifications at all.
If the videotape is drop frame, the visual timecode numbers (note the semicolon for the frame count) jump from 01:00:59;29 to 01:01:00;02, skipping over 2 frames. Obviously, if the tape is nondrop, the visual timecode numbers (note that it is a colon and not a semicolon for the frame count) simply flip from 01:00:59:29 to 01:01:00:00.
Once the timecode rate has been determined and verified, the recordist makes sure that the proper number of multitrack audiotapes (such as 2” 24-track analog or 1” 48-track digital) have been properly degaussed and timecode striped for the upcoming work. The recordist prepares all labels for both the multitrack masters as well as the 1/4” or digital DAT backups. The recordist also lays down line-up tones on all tapes, making sure that all channels are recording properly and that the stock is stable and reproducing properly. The recordist further confirms that the signal path from the mixer's console is patched through the noise-reduction encoders and that the right console fader assignments indeed go to the correct input channel on the recorder.
The recordist also does a shakedown run of the videotapes supplied by the ADR supervisor, making sure that the timecode is reading correctly and that the production track on channel 1 is playing clearly. Videotapes are not all transferred with equal attention to quality or timecode. The last thing you want is to run an ADR session and discover that your videotape has dropouts in the timecode. If you do not have a good backup tape at your disposal, the entire session can come to a screeching halt, or at least to a short-tempered delay.
At the start of the ADR session, the recordist takes the ADR sheets from the ADR supervisor and sets them up so that the mixer is only concerned with the business at hand. The recordist keeps all paperwork and organizational chores out of the mixer's way so that the mixer can focus on balancing the microphones and capturing the actors’ performances clearly without distortion or unwanted noise.
As the ADR session progresses, the recordist methodically and carefully maintains the backup digital DAT, checking that each cue has its own program number (PNO) and determining which takes are requested by the director as circled takes. The recordist monitors the playback head of the multichannel, vigilantly listening for any break up, distortion, or other anomalies that inhibit a successful audio conclusion.
Up to this point, another fix-it option existed all the way down the line from the first day of principal photography, but not anymore. Nobody else can fix it. You either get the recording clean or you fail. At the first sign of clicks, pops, distortion, or other unwanted noise, including squeaks from the actor pivoting around on a stool too much, the recordist flags the mixer (who may not be hearing it from the prerecord head position), who then asks for a retake or diplomatically informs the talent that they are making unwanted noise.
The recordist is ultimately responsible for seeing that the master multitrack is either delivered to the client, goes to the transfer department to transfer the circled takes to whatever medium the editor dictates, or is downloaded into a digital workstation format such as Pro Tools.
MICROPHONE CHOICE AND PLACEMENT
A most important factor in good ADR recording is the choice of microphone. As discussed earlier, not all microphones have the same colorization or character. The ADR mixer needs to know exactly what microphones the production mixer used on the set, so that the same model of microphone is used to record the ADR.
Often I pick up a production roll and find no mention of the microphones on the sound report, not even the model or head stack configuration of the sound recorder itself is listed. Although many production mixers do recite an audio checklist at the head of each production roll before they roll their line-up tone, it must be assumed, as often is the case, that the production roll is not in easy access to the ADR mixer; if the production mixer had listed the recorder and microphone information on the sound report, it would be instantly available.
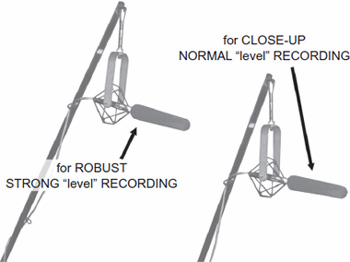
Figure 16.12 Pictured are two Sennheiser 416 microphones used on an ADR stage. Although there is no need to use windscreens indoors, the mixer leaves on the windscreens because they were used on the microphone during exterior filming. The mixer tries to recreate the exact colorization of the microphones so that the ADR lines better match the production performance.
At any rate, the ADR mixer needs to know the model of microphone used in order to duplicate the audio texture and colorization, so that the new ADR lines flow as seamlessly as possible with the original production material against which they are cut. Otherwise, the audience will be mentally yanked out of the performance of the scene because the ADR lines glaringly stand out from production.
Most ADR stages have two matching microphones set up for the session. The first microphone is approximately 2 feet from the actor, slightly higher than the forehead and angled downward toward the mouth. At this distance, a depopper screen in not needed, but some actors have a well-trained stage voice that requires protection from their powerful Ps; as Christopher Lee apologized to me once, “Ah yes, I have vented many a theater.”
The second microphone is placed farther back from the first, between 4 and 6 feet, depending on the perspective required. This microphone is also slightly higher than the closer mic. With this configuration, the ADR mixer can switch from one microphone to the next to achieve a more desirable perspective in matching the original production track. Without the two-microphone setup, the ADR mixer must constantly get up, go out into the stage, and readjust the microphone position from cue to cue, wasting precious time and accelerating the fatigue and irritability factors. The only time to move the close-up microphone any nearer the actor is on those rare occasions when recording intimate whispering and extremely subtle vocals that require the microphone ultra-close. Be very careful about the popping Ps and hard consonants with this in-your-face proximity.
ADR PROTECTION REPORT
The ADR supervisor sits on the ADR stage near the acting talent, interacting with them and the director. The recordist maintains the multitrack recorder and digital backup DAT. The recordist keeps track of the ADR cue number, lists each take and its channel. If the backup is made to 1/4” tape, the recordist notes the timecode start. If the backup is being made to a digital DAT, the recordist notes the PNO (program number) the DAT machine assigns to the tape each time it rolls.
The recordist also circles those takes the director and/or ADR supervisor want to keep. These takes are protected on the multitrack recorder. The mixer does not record over those channels if additional attempts at the performance of that cue are requested.
Note that the protection report also lists microphones used, tape speed, whether noise reduction was used and what kind, and so forth. Always prepare these forms as if someone with absolutely no knowledge of your procedures and protocol is working with the material and cannot converse with you on the phone if they have questions. Additionally, a copy of the ADR protection report is kept in the multitrack tape box. A copy is also given to the ADR supervisor—especially valuable because of the DAT PNOs.
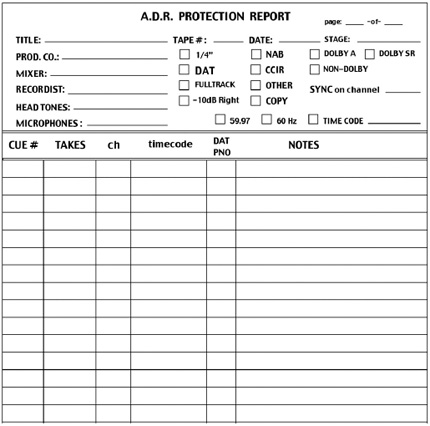
Figure 16.13 ADR protection report.
Several years ago a mixer shipped out a good amount of material in great haste, without filling out the necessary information. He simply told the messenger that the transfer man should call with any questions the next day. Sad but true, the mixer had a fatal heart attack that evening. Also sadly, the transfer man was left with many unanswered questions.
ISDN TELECOMMUNICATIONS INTERLOCK
Sometimes it is not possible, for economic or scheduling reasons, that directors and actors can be in the same place at the same time. Increasingly, telecommunication ADR sessions are necessary. Say three actors in a film live in New York. The director must oversee their ADR session but also must remain in Los Angeles for another postproduction task. Do not fear; many ADR stages now offer digital interlockable sessions. Book an ADR stage in New York and schedule the three actors to show up for their lines. At the same time, book a small ADR or viewing stage in Los Angeles. Both stages hook up and interlock using an ISDN line. Logically, these kinds of sessions are simply referred to as “ISDN sessions”—that was a real stretch. One line handles the timecode feed, while a second line handles the digital audio feed of the actors’ performance as heard through the mixer's console. A third line handles the communication feed for the director and/or ADR supervisor to communicate with the actors just as if they were on stage with them.
The New York and Los Angeles stages both have identical picture (film prints, videotapes, or QuickTime video files) with matching production track. The third line with timecode interlocks the Los Angeles videotape machine and slaves it to the mechanism of the New York machine. The digital audio feed is decoded through a quality digital-to-analog decoder on the Los Angeles stage and played through a good speaker system. The price of the hours of phone lines is a fraction of the cost of flying the actors to Los Angeles and paying per diem and expenses or for the director and/or ADR supervisor to fly back to New York.
THE RETURN OF THE LOOPING TECHNIQUE
As frustration mounts over the issue that the director cannot get his actor to recapture the magic of the production track, one starts to look for other alternatives. Naturally, if the production track did not have that jet noise over the dialog, or if the actor had not been so far off-mic—the what-ifs mount up like dead insects in a bug zapper.
Forget the what-ifs—you will just have to place more emphasis on giving the production mixer what he or she needs to record better production tracks for your next project. You have to overcome the frustration of the here and now. When you have acting talent that is not classically trained, you are almost always going to have to replace more dialog during the postproduction phase.
Almost all first-time actors are inhibited and intimidated by the beeps in the ears and concentrating on a poorly projected image of themselves on a screen or on a monitor as they try to match the lips in sync. As they have to pay attention to doing all of this, they cannot possibly concentrate on acting the performance. Isn't that what all of this is about?
On one particular occasion, the actress just could not make it happen. The stage clock was clicking off the hourly rate, the director was frustrated that he wasn't getting the performance, the actress could not walk and chew gum as the producer's thermometer was rising, foreshadowing an oncoming stroke.
I turned to the ADR mixer and signaled him to shut it down. He was recording straight to a Pro Tools session. I asked him to cut away the production track on either side of the actress's line and highlight the line as much after it and a couple of seconds more. “Go up to Options and select Record Loop.” I told him.
I went onto the stage where the actress was about to pull her hair out. The director was literally pacing. I gestured to my ears for her. I told her that she would hear her line in her headsets, then there would be a silent space, and then she would hear her line again. Forget looking at the screen, forget trying to sync your lips to what you see. “Close your eyes and listen to your line—and then during the silence that follows, perform your line—all I want you to do is focus on being an actress and bring forth your character. You will hear it again, and you will perform it again, with a different inflection maybe. Forget the technical bull#%! and just act!”
The director looked at me suspiciously as I turned. I winked at him and gave the ADR mixer the signal to roll. The actress held her headsets close to her ear and closed her eyes. After a couple of times just listening to her line, she started to repeat it, reperforming it, and the difference was night and day. Suddenly we were getting a performance; the character that was on the screen started to come to life.
Sounds just like the technique we talked about at the top of the chapter, at the studio that had all the actors loop all of their lines every day, no matter what. Well it works. And using the Record Loop option in the Pro Tools menu makes it easy.
It is also amazing how much material you can do in an hour using this method. Rather than 6 to 8 lines an hour using the ADR method, we were easily doing 10 to 15! You sacrifice the “toy” playback machine for the director to roll back and forth after each take and review the ADR line in sync—which is not in sync most of the time anyway. What you gain is an actor who can become an actor again. Which method you choose to employ is up to you.
Though the Record Loop mode works extremely well with digital video QuickTime files (so you can loop your visual picture in sync with your audio loop), the method of not using a picture reference transcends the technical prowess of technology and allows the actor to concentrate on his or her acting.
Remember, we are servants to the performance on the screen! All the rest of this technical minutiae is just that—techno-wizardry mumbo-jumbo. Personally, I believe in the KISS principle, “keep it simple, stupid!”; and when it comes to the art form on the screen and the need to serve the actor in his or her ability to capture that performance, I am about making it as simple and streamlined as possible.
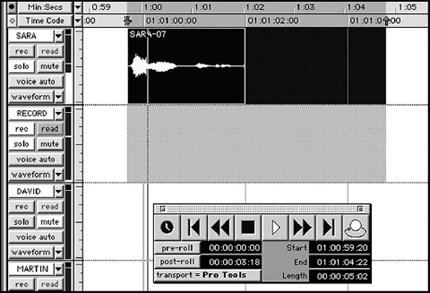
Figure 16.14 Recording dialog using the looping technique with the Record Loop function.
Recording Dialog Using the Looping Technique
The technique is the same, no matter what nonlinear system you use. Figure 16.14 shows a Pro Tools session with a line of dialog that has been isolated and highlighted so that the line will play back for the actor, and then the same amount plus a couple of extra seconds during the silent phase so the actor can reperform the line that he or she just heard. Once the recording head (the line that crosses from left-to-right) reaches the end of the highlighted area it will immediately loop back and repeat again.
The key is to get set up properly. First of all, whether you were going to hold an ADR session or a loop session, you would have transferred the cut work track from the locked picture into your work session.
Prior to the looping session, the ADR editor (who has now, technically, become a loop editor) would have built a session for each reel of film. In this case the actress's character name is Sara. The loop editor would break out and isolate each character's lines to be looped and place them in their own channels. Rename each audio channel with the actor's character name.
This makes it much easier and more efficient during the actual looping session to jump to the next line to be done, thereby not wasting the actor's time, waiting for the looping mixer to scroll down and find each line and prepare it during the looping stage time, which is one thing you want to avoid.
Move the track that has the character lines that you are going to be looping to the top of the session. Name the second audio channel “Record.” This is the channel that you will actually record the new looped lines that the actor on the stage will reperform.
Activate the Solo buttons on the character channel (in this case, Sara) that you wish to hear as well as the Record channel that you are going to record to. This will mute all other channels in your session.
Open the Show Mix Window under Display in the menu bar. You need to assign all of your character channels—those channels that have the cut-up production track and are meant for the actor to listen to—to output 1.
Some actors wish to be able to hear their own voice as they are reperforming the line during the silent space; some would rather not hear it, as it may be distracting. If the actor wants to hear his voice, then you need to also assign the output of the Record channel to output 1. If not, simply assign it to output 2 so that only the looping mixer can hear in the booth and the director and loop editor can hear through their own headsets.
This means that you need to have a headset signal path that can bifurcate the playback signal from the actor and the director and loop editor. The loop editor will control who will be able to hear what from the outboard mixing console.
While you are in the Show Mix Window mode, make sure that your input channel assignment for the Record channel is the same channel that the line input feed that carries the signal from the stage microphone(s) are plugged into.
Make sure you engage the Rec button on the Record channel. This is an arming safety. You will not record anything if this button is not on.
Now select Show Transport Window under Display in the menu bar. The Transport window will appear. This is your “tape recorder,” complete with all the controls to interlock, record, play, stop, and so on.
Using the Line tool, highlight from the front edge of the cue to be looped and continue on for as long again plus a couple of seconds longer. This allows a comfortable amount of time for the actor to reperform the cue in-between the playback phases. If the actor is a little slow in responding to reperform, you may have to open the distance up a little wider. With a cue or two you will immediately sense how much extra time you should allow for each actor's style and ability.
Take the cursor and press the button on the far right-hand side of the Transport window. This is the Record Arming switch. Once you have armed the Transport window you are ready to roll. When you press the Play button (the triangle button that points to the right), the record head (line) will start scrolling across the highlighted area. You will hear the dialog line from the channel above and then during the following blank area, the actor will reperform the line, which will be recorded in the Record channel.
Once the actor has reperformed the line (as many times as the actor and/or loop editor and director may want), then press the black square button in the center of the Transport window. This is the STOP button. A bold filename will appear in the REGION LIST on the far right side of your Pro Tool Session. Your brand new cue will read “RECORD 01.” Tap twice on this filename of the cue you just recorded. A window will pop up for you to rename this cue. Simply enter the character name and cue number that is advertised on the loop editor's ADR sheet.
Note: Remember that if you end a filename with a number, it is a good idea to put a slash after it. Take the cue in Figure 16.14 as an example. The timecode hour tells us that this is reel 1. The loop editor's cue sheet shows this line as cue 107. You tapped twice on the file and named it “SARA 107/”. This will avert disk management confusion when the cue is cut. Pro Tools automatically renames a cut clip with a dash and sequential number assignment (i.e., -01, -02, -03). If you named the audio cue “SARA 107”, a cut clip name may read “SARA 107-07”. A visual scan may become confusing to the human eye. If, on the other hand you named it “SARA 107/”, a clip name will read “SARA 107/-07, a much easier number to visually scan.
It will also prevent you from relying on Pro Tools to automatically name your audio clips, which presented us with a disaster when we had inherited a show that had been started by another sound-editorial facility. Their protocols were not anywhere near professional and experienced and they had allowed Pro Tools to autoname based on the name of the audio channel. During the course of the ADR sessions, they had a particular actress come in over seven sessions. Each session started with a new session. When we got the show, we discovered that we had seven identical names for seven different performances. “JANICE-09” was being seen by the computer seven different times and of course did not know which “JANICE-09” was the correct one to select to boot up the Pro Tools cut session. In such a case it defaults to the first one it sees, which most of the time is the wrong one.
So you can see that there is more than one reason to be particular about your audio cue name protocol!
Remember what we talked about in Chapter 11; this is the “part number” for this series of performances for this line.
Once you have completed recording the loops for this reel, simply Save and Close this reel session and open up the next reel session and continue the process.
Once you have finished this actor, simply move the track that holds the original lines (in this case SARA) down from the top position, somewhere below the Record channel and then move the next character channel up to the top to more easily work with the next actor. You will find that you can move along very swiftly and the difference in the performance material will amaze you.
If the director wishes to see a line in sync with the picture, you can easily pull the line in from the region list, align the waveform against the original line, place the session in interlock (Command + j on a Mac), and play the videotape back.
The director should not be encouraged to do this too often as this will slow the session down to a snail's pace. The director should get used to reviewing the scene prior to looping the sequence, and then listen to the actor reperforming. Remember what we said about developing a visual memory in Chapter 7? The same is true for directors.
Remote Location Looping
By now the ADR supervisor has all but two of the film's actors accounted for; those two are on other projects. One is on location in Lapland in the northern part of Finland, and the other is shooting in Kenya, both remote locations with no ADR facilities nearby. The ADR supervisor has talked to the production companies of both projects, and both are willing to collaborate in getting the dialog looped. Great, but how do we actually do it?
Using a variation of looping, you take a page from that technique manual and give it a little different spin. The ADR supervisor scrolls through the picture editor's cut track (also known as a DIA 1:1, PIX DIA track) on the digital workstation, ferreting out all the lines the two actors must reperform. The ADR supervisor (or assistant) digitally copies each line and groups them together, one after the other.
You can do this one of two ways: check with either the sound facility or the production mixer on location where the distant location talent is located and see what they are capable of doing. If they have a nonlinear editing platform, you can simply send a CD-R or DVD-R with the audio files to be replaced along with a Pro Tools session that the ADR supervisor has prepared to make the job easier for the distant location recording them.
If they do not have a nonlinear editing platform, they most certainly will have a digital DAT recorder. So, make a DAT copy from your workstation's DAT machine and feed in 30 seconds of –18 dB line-up tone. Then highlight the first line and again as much blank with an extra couple of beats as blank space. Go up to the Options menu and drag down and choose Loop Playback.
Now roll your DAT tape and play the line and subsequent blank space. It will play then loop and play again, loop and play, loop and play again. Let it record at least 12 to 15 repetitions. Then stop the playback. Do not stop the DAT machine immediately. If you press the Rec Mute button, the DAT machine will record 5 seconds of silence before it stops and parks itself in a record standby pause mode. This also allows the actor on location to know you are moving on to the next cue.
Highlight the next dialog cue the same way you did the first one. Then repeat the recording process. Take clear and accurate notes of which dialog cues are at which DAT PNO. Put each of the two actors on his or her own separate DAT, as they are heading off to two different parts of the globe.
When the digital DAT and a copy of your ADR notes arrives in Lapland, the actor and production mixer get together after their day's shoot or on their off-day. The production mixer in Finland should know where to find a good acoustically flat-sounding environment to record. It is helpful if the ADR supervisor adds any interior or exterior notes. Such indications guide the production mixer in deciding the kind of environmental deadening necessary. He or she may string up a couple of packing blankets or angled cardboard sheets to trap and flatten reflection or slap.
The production mixer sets up a DAT machine to play back the source DAT you sent. The mixer then plugs in a set of headphones for the actor so that the actor can hear the dialog lines as they repeat themselves loop-style.
The production mixer sets up a second DAT machine or a 1/4” deck. The note that the ADR supervisor sent along also specifies the kinds of microphones used on the original shoot. If the production mixer does not use the exact kind of microphone, one is chosen from the mixer's own set that comes as close as possible to the texture and colorization.
The production mixer lays down line-up tones and then rolls the playback DAT machine as the recorder is rolled. In the headsets, the actor hears the line to be looped. He or she then repeats the line during the silent part of the recording, just like traditional looping procedures. This technique works extremely well when you have no method of getting your acting talent to a real ADR stage.
ALEXANDER MARKOWSKI
Alex is a sound recordist/engineer who has become an ADR specialist in Wilmington, North Carolina. He offers his perspective on ADR:
Prior to viewing The Soundscapes of Middle Earth, the wonderful behind-the-scenes extras contained on the special edition of The Lord of the Rings: The Fellowship of the Ring, I had always defined ADR as “automated dialog recording.” If you get the chance to see the Soundscapes section from the first of The Lord of the Rings trilogy, disk 4, chapter 8 begins with the sound of three beeps under the title “Additional Dialog Recording.” Thereafter, in this section, is a splendid demonstration of the ADR process. The Soundscapes sections for all three of Peter Jackson's Lord of the Rings movies are a must-see for all film students interested in film sound. The word “additional” does make a bit more sense than “automated.” It is simple and self-explanatory and does not require additional explanation of the term automated.
I began mixing ADR in 2002 soon after moving to Wilmington, North Carolina. Before my migration south, I worked in New York as a rerecording engineer for 17 years. In Wilmington I mixed ADR for the last full season of Dawson's Creek. After that I mixed the next seven seasons of One Tree Hill. When I started I wasn't completely green and had engineered bits of ADR on occasion on various projects I was mixing or sound editing. While in New York I had worked as a rerecording mixer with 16 and 35 mm film for 10 years and then transitioned into mixing and sound editing in Pro Tools for another 7 years. My move to computers and sound editing after being a mixer was helpful, as I had to reinvent myself to include ADR mixing.
While setting up my first ADR sessions in Wilmington I was comfortable to go with the flow and adapt to whatever was needed with resources available. One thing I embrace about filmmaking is that I learn something new every day, and more often than not I need to be the one figuring out the “what and how” of the thing that needs to be done before anyone asks.
I quite enjoy working with an actor who is stepping onto the ADR stage for the first time. After working on teen dramas for the past eight years I have had my share of first-time actors on the ADR stage. I do my best to walk the actor through the process and assure them it is quite easy, even though it may not be—depending on the actor's training and natural abilities. I try to get them to relax so they can concentrate on acting rather than worrying about the technical aspect. The ADR supervisor for One Tree Hill, Beth Crookham, and myself have orchestrated a calm positive line of encouragement for the first-time ADR actor. Setting the studio in a positive light is a good way to ease tension as it is up to myself and the ADR supervisor to provide a relaxed working environment to allow the actor to focus on the job at hand. That is, performing precisely and well-delivered lines in a very sterile environment of a sound-treated ADR stage.
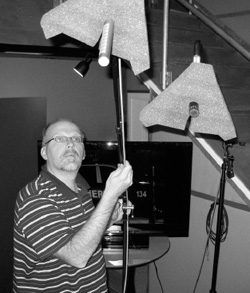
Figure 16.15 Alexander Markowski adjusts his two microphones for an ADR session.
Regardless whether the actor is a first-timer or a veteran they will be required to perform from one word to several pages of lines; whatever it is, if the actor seems a bit apprehensive I try to make it seem like it isn't that much of a big deal. In this vain, I may point out the cues that are just one or two words or just “breaths,” which is often the case. Whatever I say as the actor arrives, it is measured by what is appropriate for that very moment. I may not have to say much at all, as I have to be very perceptive of the mood and temperament of each actor each time they enter the stage.
As a weekly teen drama, One Tree Hill has a fair amount of ADR each week. The show has had an excellent production sound crew for the past 7 seasons, first headed by mixer Jeffree Bloomer for seasons 1–3 and then later Michael Rayle for 4–7. The largest factor with regards to the amount of ADR needed for each episode comes down to the production sound crew and their abilities to deal with their location, the scene action, and elements on set. One Tree Hill is about 50 percent location and 50 percent sound stage.
An episode with mostly stage work may yield just a few lines that require ADR, unless there are heavy rain storms, which can knock a few lines over the edge with regard to background noise created by rain pelting on the steel roof of the stage. Out in the real world of locations the production is more likely to have need for ADR. Out on location there is less control of the surroundings with regards to audio intrusions. In one instance with One Tree Hill, the scheduling of a popular exterior location for the show coincided with the demolition of a nearby office building, producing lots of lovely clanks and bangs that made the nearby production recording unusable. The demolition crew was willing to stop work, but for a price that far exceeded the cost of a few hours of ADR. It was decided to let the demolition continue. Each principal actor may only have two or three lines one week and the next week they may need to do an entire scene to do something that cannot be controlled cost effectively.
After the first read, I can tell fairly well how the rest of the session will go. Some actors come in and nail it, while other actors may struggle. If the actor admits to never performing ADR before, I like to run through the process with them. I will explain to the actor, “Each of your lines are proceeded with ADR beeps, there are three beeps, one, two, three, and where the fourth one would be is where your line begins.” I always recommend a slight inhale on the first or second beep which makes it a lot easier to speak when the fourth imaginary beep comes. “It goes like this beep, beep, beep, line.”
Next I show the actor their headphones with their own volume control on the stand next to them. I gesture toward where they will be positioned to perform their lines. I tell them it is better to stand during ADR unless of course they were sitting during the delivery of their line. The actor is encouraged to try to mimic whatever action they may have been doing during scene while they deliver each line, within reason of the confines of the stage. This sometimes requires the actor to run in place for a bit before delivering their line if the original scene entails that the line was delivered during some physical exertion.
Before I started mixing ADR for a particular show, many of these actors had developed bad habits of sitting for any and all ADR. In fact one the biggest stars of the show at that time would begin sitting upright and eventually slouch back in the high chair, so much so that the microphone perspective would change noticeably. At which point I would need to say, “That sounded a bit far away. Did the mic move?” Of course it didn't but the actor would sit up again, which brought the actor's mouth about a foot closer to the mic.
At the beginning of the sixth season of Dawson's Creek, which was my first season, producer Greg Prange came to one of my early ADR sessions. In fact it was the first session that I had made some changes in an effort to streamline things for myself. I had repatched the signal flow so the preamp fed directly into Pro Tools instead of being routed through the analog console. I was using Pro Tools along with a new control surface and I monitored through the analog board that was there instead of mixing through it.
The video for the session was a QuickTime movie, no more 3/4” tape! I had beeps laid into a dedicated track replacing the Micro Lynx beep generator. It was light years faster. I could concentrate on what the actor was doing and not what buttons to push. After the session was over and the actor had left, Greg was still there talking to ADR supervisor Brenda Dalrymple. I asked Greg how he thought it went. I had never met him before. He looked at me with a curious expression and for a moment I thought maybe I should have kept quiet. He gently smiled and said, “That was the fastest and most painless ADR session I have ever witnessed.” I hope the earlier blank expression was his thinking “What the heck were the other guys doing before?” but I didn't ask.
The ADR Setup
The setup for ADR these days involves importing a QuickTime movie with a guide track into Pro Tools. I may have to capture it myself or just import a file that may have been downloaded from an ftp site or iDisk space. The picture is placed in the timeline so that the timecode “burn in window” matches the Pro Tools session timecode. Every once in a while I need to flip the Pro Tools counter to the old-style 35 footage counts, but there is always a timecode that needs to be aligned.
The position of the cues are taken from the submitted ADR cue logs, which are emailed to me. I set them to memory locations in Pro Tools sorted by character. In the workflow of One Tree Hill, the sound supervisor Ray Spiess emails me the cues in a custom Word document, which allows me to sort the cues by character or timecode and allows for easier cueing. It is helpful to have each actor's cues sorted together in the memory locations even though they will not occur that way in the program. Being ready and organized allows the session to be set up quicker and engineered with less worry. I highly recommend establishing organized consistent labeling, color-coding recent sessions, and sorting and organizing media on the hard drive consistently. All these are great habits to embrace as soon as you can.
I try my best to have the rhythm and flow of the session follow the actor's efforts. I feel out the pace and time the actor needs to regroup between takes. As things get going I may need to make a pass right away without announcing my audio slate, which can be distracting and clinical. The rhythm will change with the difficulty of the line. The ADR supervisor will sometimes need to ask the actor to perform a highly emotional or physical read last, so as not to influence the other performances. Of course each client runs their session uniquely. If it's my first session with a client I need to gain a sense quickly whether to captain the session or settle back to just pushing buttons with quick acknowledgments to the client. This is especially true with ISDN sessions when the client directing is a faceless voice in our headsets. The engineer becomes invisible and the session runs itself, or a least that is how it should appear.
The submitted guide track for the program must be the production track only. It is essential to have the production track in the timeline, as it allows me to match the waveform of the newly recorded line against the waveform of the production track. I always record new ADR lines to a track just below the guide track to compare them easily. I then drag each take down to an appropriately numbered track below, after a recording pass. I have tracks numbered 1 through 16 for takes 1 through 16 just below the record track. Simply naming and renaming the record track with the cue name allows me to keep track of each take as the prefix of _01 is added to the newly created audio file after recording one pass. Record again and _02 is placed. For example, the track name is 203 DAVID boom. After the third recording pass on that track, the audio file is labeled 203 DAVID boom_03. After each record pass I drag the track down to a track below that matches the take number.
I then mark the cue sheet with the take number in its track label box. In an ADR session for One Tree Hill, the ADR supervisor, myself, or the actor will chose a select take and at that point I add a “P” to the end of filename, 203 DAVID boom_03P. I move a copy of that take up to the print track above the record track. We always select a print and an alternate take for each line with One Tree Hill. Due to time constraints and fast pace of the audio post for this TV show, the ADR editor will only import the print and alt track to work with in their edit, and by doing so keep their edit simplified and less wide by not importing all of the other takes that can be 32 additional tracks.
I will always record two mics on two grouped tracks during the session and be prepared with three mic choices. I use a combination of two boom mics close and far with a lav mic, all ready to go without stopping the session. If any of the session's ADR requires matching a radio lav mic, I use a Sanken COS11 clipped midchest. I usually work with a MKH50 about three to four feet away as the main boom, along with a KMR81 about three to five feet away, higher up and coming down at a steeper angle. I never actually measure the distance. In my mind the distance and angle of the mic are related to the sound quality I get and that's it. They are one. I can adjust a mic properly after only hearing a few words from the actor. That's why I like to chatter a bit with the talent while we are all in position almost ready to begin. I sometimes run out to the room and move the mic what appears to be an inch but that is all that it may need.
Each of my record tracks is paired as mono tracks so I always have two mics for each take. It is usually “boom” and backup, which I label “BU.” But I may choose to use a boom and the lav and switch out the backup mic. When in use, the backup is turned down slightly in gain. This works very well to contain levels when an actor is louder and varies their performance from a whisper to a yell during a single take. The far mic tends to sound more natural as it is angled down as well as gained down, so it will not overload as fast. I love telling the ADR super that “I got it” after the front mic seems too hot during record. This technique was a lifesaver while recording some ADR with Malcolm McDowell. He came in for only two or three lines for an episode of Law and Order and would only give me two takes each. With bravado, the actor blasted his first lines so much higher than I expected I almost fell out of my chair, yet I did not lose the first take, which of course was perfect. He only needed to give two takes of each line because each read was perfect and then better.
I always have a backup recorder running constantly during the session. This is especially helpful while working with an obsessive director. This way I can avoid the situation of a client believing I missed the take that will “win the Academy Award.” This is the take that will be obsessed about if it “appears” lost. Since the backup recording is always running on a separate recorder it takes a little more time to retrieve. The funny thing with regard to that lost “magic take,” what often happens is after I play it back to the director, the magic is lost. The director then has the actor do another 20 more takes even after the “perfect take” was not lost. Usually ADR is not so involved with mind games, but it happens. I witnessed one actor perform the one word earth over and over for about one hour and forty-five minutes until the director was satisfied.
After the ADR session is completed, the session is stripped of the redundant media, which includes media sound editorial will already have, the guide track, and QuickTime movie. Rarely do we FedEx the material out to sound editorial. The audio files and metadata from the session are uploaded to the client via ftp and in minutes after the recording, an editor in L.A., New York, or Toronto can be editing with pristine audio the same day of the session, even if they are over 3000 miles away.
INHUMAN VOCALITIES
On many occasions you may want to use a human voice mimic to perform character grunts, whines, and growls and barks of dogs, monkeys, cats, pigs, horses, rhinos—all kinds of creatures. Vocal specialists can emulate huge nostril snorts of bulls, for example; other specialists create unearthly creatures that defy description. As you can imagine, these talented individuals cost more for a day's work than a standard Group Walla vocalist. If you think their price too high, try going out in the pasture with your DAT machine and recording an angry bull snorting. Some cinematic creatures need an entire team of vocal specialists just to create the wide range of vocals, breaths, snorts, and gutturals—no one person can do it all.
Group Walla
The director is filming two actors sitting in a lounge, talking over drinks in the intimate setting of a booth. A couple can be seen sitting in a booth behind the main characters. Occasionally someone walking by or a waitress delivering drinks can be seen. The rest of the bar is brought to life by cutting sound effects of, say, a bartender making drinks off-camera, maybe an occasional cigarette machine movement. Depending on the kind of bar scene, the editor might cut in occasional billiard sounds. The sound effects editor pulls some cocktail lounge crowd walla, everything from intimate conversational murmur to three guys chuckling at the bar to occasional chatter from the back billiard room. This is a classic situation for Group Walla. The sound effects editor lays some library walla tracks, but the unique specificity of the scene is developed and borne out of the recording of custom group walla.
Organized groups specialize in hiring out Walla Groups as needed. The supervising sound editor and/or ADR supervisor chooses a group and then has the group leader look at a videotape of the film, along with some initial conceptual thoughts of the goals. After the group leader looks at the videotape, he or she meets with the supervising sound editor and ADR supervisor to go over the notes that were made. Working within the confines of budget restraints, they work together to structure how many voices the budget can afford and how much time will be allocated on an ADR stage. They discuss the need for specialized ethnic or dialect requirements. There may be a need for a session where vocal talent is auditioned for inclusion in the Group Walla session.
The more languages and/or different vocal inflections a vocal talent can bring to a session, the more apt that individual is to work consistently. Sounding different on demand throughout a film is very cost-effective. In big crowd sequences, every vocal performer in the group should field numerous voices, as the ADR mixer records the group several times in the same scene, layering each recording until the Walla Group of 12 to 15 men and women sounds like hundreds.
There is an important footnote to atmospheric foreign language Group Walla. Unless you personally speak the language, either ask the actors what they are saying or brief them with a strict set of performance parameters regarding slang. On one such picture, we were surprised to hear Vietnamese theatregoers laughing hysterically during a serious sequence where the hero is hiding in the reeds of a Vietnam jungle while a North Vietnamese ambush patrol passes by. It turned out that the Walla Group performers had made up a bit of impromptu dialog where the onscreen North Vietnamese are talking about their command officer. They groused that their leader was probably lost and did not know where the hell they were. Another performer commented that they were sure that they were going to be ambushed by a roving American patrol. The idea was not really bad—the humor was nice—except the vocalists peppered the dialog with Vietnamese profanity.
A good supervising sound editor works with both the director and ADR supervisor to write specific offstage vocal dialog, scripting a more accurate and refined finish to a period picture or a film with much technical hardware. Research a period film, studying news events of the day as well as indigenous nomenclature and slang. Well-thought-out Group Walla scripting and texturing for specific sequences add an immeasurable spin on the atmospheric hubbub.
For Moscow on the Hudson, I secured the services of a group of recently immigrated Russians, who would bring with them the latest and freshest of street terms and translation variations that would best fit the picture. I also used them to check over the dialog editing sessions before they went to the rerecording stage to make certain that there were no mistakes, as my English-only speaking dialog editor did not speak a word of Russian. However, as I pointed out to Paul Mazurski, sound is sound; the phasing of dialog tracks (as we discussed in Chapter 15) would make it unimportant that my dialog editor could speak Russian. He would be able to check alternate takes by audio relationships and I would have Russian translator, Anastasia, check his work to verify that everything was just right. And it all was.
Recording Group Walla
In the past, most Group Walla sessions were recorded monophonically. The new trend is recording Group Walla stereophonically, especially in big crowd scenes. The Group Walla actors are placed strategically around the ADR stage, for a feeling of depth and separation. The ADR mixer records the entire scene with the Group Walla actors standing in a particular position on channels 1 and 2; then the mixer rewinds to the top of the sequence as the actors move to change the spatial placement of their voices. They not only change their physical position in the room but also utilize a different colorization and texture to their voices for the next recording pass.
The ADR mixer safeties the first two channels (so they cannot be accidentally recorded over) and then records the next stereophonic pass on channels 3 and 4. The actors move again. The mixer records on the next stereo pair, and so on and so forth until they build up a layered crowd that captures the size and energy required.
All these recordings must be recorded flat. No echo or equalization beyond the removal of line or system hums is built into these recordings. It is vital to deliver this material to the mixing stage during predubbing as flat recordings, for the rerecording mixer to echo and manipulate as desired. To add echo or other graphic or parametric equalization, especially noise gates or expansion dynamics, prior to the dialog predubbing only traps the dialog mixer into signal processing that cannot be undone if inappropriate.
TECHNIQUES OF CUTTING ADR
Cutting ADR is not like phase-matching production dialog. Although the words are the same (most of the time), the precise rhythm and timing are almost always a little different. Some actors are so good at ADR that the editor just imports the ADR line into the edit session and lines it up against the waveform of the production dialog track. When the editor plays it back against the video picture, it lays in precisely.
Sometimes, it seems that no matter how the editor syncs it up, too much vowel or word squirts out in the middle or at the end. The editor must learn how to study the human mouth when people talk. See how the lips move when they form consonants and vowels. The editor learns all too quickly that when the human mouth closes, extra modulations cannot spill over.
Start by finding a hard consonant in the word you are trying to sync. Good consonant choices are Ds, Bs, or Ts, as they are executed in one frame. Vowels are drawn out over several frames and, as a result, are not good choices to sync to. Ss and Rs are equally poor choices, as they begin modulation without a dramatic and precise movement of sync.
Some ADR editors use computer software that assists in sculpting the loop line into sync to match the waveform from the production track. Like all technological tools, the software is only as good as those using it, and like most digital processing devices, must be used like a fine sable brush rather than like a paint roller. The ADR editor probably will have more satisfying results by learning how to edit than by relying on algorithmic shortcuts. With a little practice, the ADR editor learns to sync the hard consonants that dictate precision of visual sync and then to adjust the vowels and blend them with various combinations and lengths of crossfades.
With more practice and confidence, the ADR editor learns how to steal consonants and vowels from other readings and words and to massage them into the problematic loop line. This kind of work is only advisable to the master craftsman, the ADR editor who knows the actor's voice and inflections as well as his own. To misuse this technology and have the reel bounce on the rerecording mix stage can have disastrous effects and erode confidence in the eyes of the director and producer.
The other side of the coin is pure magic. There is an art form to being able to take the actor's voice and, through the skilled hands of the ADR editor, bring forth a better performance than the actor originally gave.
During the ADR session, the director or producer may request that the ADR supervisor cut alternate readings, as they wish to see which performances work best. Tactically, it is not wise to go to the dubbing stage with numerous alternate readings. The rerecording stage costs anywhere from $400 to $800 per hour and is not to be used as a very expensive audition session.
The smart ADR supervisor has the director and/or producer come to the sound editorial room where the loop lines are prepared. The director and/or producer must listen to the cut material and make selective choices. If it turns out that the director simply cannot decide on a few lines until heard on the dubbing stage, the ADR editor prepares those lines as stage alternates, but at least dozens of other alternate preparations are decided on in advance of the dialog predubbing in a much less expensive environment.