
Chapter 10
Custom Recording Sound Effects
The Real Fun and Adventure
“Why do you have to go clear out to Oklahoma to custom-record a
Stearman for? Save the money—use our crop-duster sound effects
from North by Northwest. Nobody will ever know the difference!”
I laid behind the low wall of rocks hastily piled together as an impromptu bullet-resistant shield to protect myself from the spray of lead I knew would be flying toward me at any moment. Although I had just signed a release of responsibility should I be accidentally wounded or killed, my partner, Ken Sweet, and my first assistant, Peter Cole, still tried vigorously to talk me out of placing myself in such a dangerous position.
“Why can't you just leave the tape recorder and microphones there and clear out of the line of fire?” Ken asked.
I gazed up at my concerned partner as I slipped on my headsets. “Have you ever recorded bullet zing-bys before, let alone stereophonically?”
Ken sighed. “No.”
“Well, neither have I.” I powered up the Nagra recorder. “I don't have the slightest idea what to expect, so I wouldn't have a ghost of a chance of making a qualified preset. The only way I know how to do this is to stay here and monitor the tape as we are recording, and then make quick adjustments between volley fire.”
“It's a bad idea,” growled Ken.
“We're wasting time. Get back to the firing line and keep accurate notes,” I insisted.
Ken and Peter gave up and went back the 400 yards to the firing line, where the two contractors and clip loaders were finishing preparations. Over the past 3 days, we had recorded 27 different machine guns. We had recorded in a variety of acoustically different locations west of Las Vegas, chewing up over 9000 rounds of ammunition.
I rolled over to check the equipment again. The microphones were live; the batteries were strong. In a few minutes the shooting team would be ready. I tried to relax. How did I ever get myself into this position in the first place?
I had been on Stage D at Goldwyn Studios in the midst of a temp dub on Twilight Zone: The Movie when Don Rogers, head of the sound department, asked if I could step outside a second. Out in the hallway, Don briefed me that they had an awkward situation. A Chuck Norris picture was temp dubbing over on Stage C and the director was throwing quite a tantrum. It seemed that the sound-editing crew had cut inappropriate weapon sounds, and, to make matters worse, the supervisor was calling every firearm on the screen an Uzi. Don wondered if I would mind coming back to Stage C to try to inject some damage control.
As soon as I walked on stage, I was introduced to Steve Carver, the director of the film Lone Wolf McQuade. He ordered the reel to be run. As the workprint flickered on the screen, Steve would point and demand, “What kind of gun is that?!”
I felt like I was being flashed silhouette identification cards in a precombat briefing. “That's a Mac-10.”
On screen another stuntman jumped into view, brandishing another kind of weapon. Carver pointed again. “And that?!”
“That's an M16.”
Another stuntman kicked in the door of the cabin. Carver grinned as he pointed once more. “What about that one?”
I smiled as I recognized the weapon. “Oh my, I've never seen a Ruger Tri-Automatic before.”
Carver signaled the mixer to halt the projection as he turned to me with a curious expression. “Then how do you know it is one?”
“I meant I've never seen one in action, just in last month's issue of Guns & Ammo.”
Steve smiled. “Then you have the sounds of these weapons in your library.”
“Not yet, but I will soon.”
That was how I came to lie there, waiting for the first machine-gun burst. The radio crackled, and my assistant asked if I was ready. I turned on the Nagra and radioed back that I had speed.
I heard a faint distant burst, and a beat later I could barely hear the bullets flying high overhead just prior to impacting the far cliff wall. I lifted the radio. “No, no guys. You're way too high. You have to bring it down lower.”
A few moments passed, and then another burst was heard, followed by a flight of projectiles passing somewhat lower, but still not low enough. I lifted the radio. “Still too high. You have to come lower still.”
A short time passed before I felt a series of impacts and disorienting debris. I had been struck in the back of the head, and, since I knew being struck by a bullet probably would not feel like what you think, I experienced a moment of disbelief and shock. Instantaneously, another 9 mm slug somehow flew between the crevice of two rocks, came under my head, and struck the ground two inches from my left eye. It then flew forward, striking a river rock, and flipping back in front of my face on the ground as a mangled lead lump.
I moved my hand cautiously behind my head and gingerly felt my scalp for blood or an open wound. Fortunately, I only was struck by a rock that had been struck by a bullet. I suddenly felt immense relief that I was not mortally wounded, more than happy to endure a nasty lump rather than a hole in the head. My eyes focused on the still-hot lump of lead in front of my face. I was instantaneously aware that this piece of metal had flown under my head. I picked it up and set it in the palm of my hand to look at it.
I suppose several awkward moments had passed and the firing line crew had not heard from me. The radio crackled. It was Peter calling. “David... David?”
Snapping back into reality, I picked up the radio. Unfortunately, however, I did not pay strict attention to my exact choice of words. “I'm okay Peter. I have a bullet in my hand.”
Peter's voice wailed away, “Oh, my gawd!! We've shot David!!”
If you are interested in hearing some of these recordings, especially the bullets whizzing past my head (which you hear in a lot of movies now) refer to the companion website, under “Custom Recording FX”, submenu “Recording Guns”. Note how each succeeding flight of bullets gets closer and closer.
I am the first to encourage you not to record weapons like this. I was lucky but stupid and irresponsible. Although we captured some of the most remarkable bullet flights in a you-are-there perspective, far better ways are available today to record such effects without putting yourself in harm's way. If that bullet had grazed one of the rocks as it passed through the stone barrier, it could easily have changed course and struck me in the head, instead of passing just underneath my eye. It is better to plan the process with a safe and sane philosophical agenda. Problem-solve how you could monitor your tape recorder and make adjustments in another way instead of placing yourself in a dangerous and compromising position. Be smart and survive. This does not diminish the excitement or thrill of recording live action sound effects. After all, you will be able to enjoy practicing your art form for a much longer period of time.
Most sound editors do not know one weapon from another. Since we were serving a director who was fanatical about the audio signature of weapons used in the film, we had to find some way to help the sound editor identify and use the correct sound effects with onscreen gunfire. We took a page from classic World War II aircraft identification posters, the ones with a series of aircraft silhouettes. If you see this silhouette, then it is this kind of enemy aircraft. I cut out photographs from numerous periodicals and books that showed the weapon profiles and carefully listed the applicable recordings.
I called it “see-a-gun/cut-a-gun.” If you see an actor using a weapon that visually matches one seen in any of these sound-effect catalog pages, then one or more sound-effect cues listed under each picture are the appropriate ones to cut.
In Figure 10.2, John Fasal, Charles Maynes, and Alan Robert Murray are custom-recording both American and Japanese World War II weapons for Flags of Our Fathers. This action war epic, directed by Clint Eastwood and produced by Clint Eastwood and Steven Spielberg, was picture edited by Joel Cox, who has worked with Clint on numerous projects, starting with the 1976 The Enforcer.

Figure 10.1 See-a-gun/cut-a-gun. We incorporated photographs of the exact weapons we recorded, and then grouped sound cues that pertained to each weapon together. In this fashion, the sound editor needed only flip through the pages of the catalog until he or she recognized the weapon being used in the film—a different spin on the police mug-shot book idea. Photo by David Yewdall.
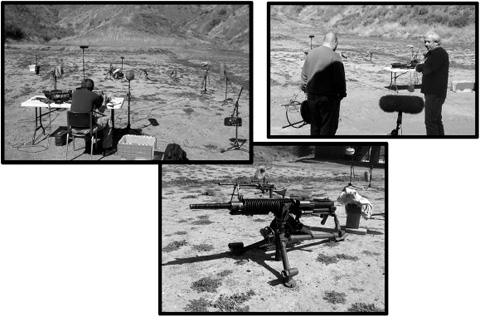
Figure 10.2 Custom recording World War II weapons for Flags of Our Fathers.
The particular weapon shown is a Japanese Type 92 medium machine gun, firing 7.7 mm rounds, fed by 30 round stripper clips, much like the Italian Breda.
The photo on the right shows the supervising sound editor, Alan Robert Murray, discussing some of the weapons that armorer Dave Fencl has brought on for that day's work. This is the 14th picture that Alan has helmed the sound supervisorial sound chores for Clint, starting back with Firefox in 1982. He also served as a sound editor on seven others, starting with the 1980 film Bronco Billy. Alan knows what Clint likes, he knows what Clint wants, but more importantly, he knows what Clint needs.
The photo on the left is of sound recordist John Fasal setting up his gear in preparation for multiple recorders to capture multiple perspective recording. In this case, John recorded with two Sound Devices 744T recorders as well as a Fostex FR-2 and an analog Nagra IV.
Alan Murray wandered around in various distant positions with a Fostex FR-2 to capture perspective character recordings. Sound effect editor Charles Maynes was also recording with a Sound Devices 744T as well as two Fostex FR-2s and his PowerBook with a Denecke AD-20 preamp attached.
Charles remembers the session:
I am not certain of all the mics that John had running, but I was using a Crown SASS MKII, two Shure SM57s, two MXL 990s, two Oktava MK012s, a Sanken CSS-5, and a Heil PR 40.
John and I kind of worked independently as far as setups and such. As sound craftsmen are well aware, everyone has their own way of going about doing this kind of high-impact dynamic recording, and there is no sense in trying to change one person's work methods. You just hire people who you trust to get good sounds and be done with it. Alan had worked with John Fasal for an awfully long time, so I think he was the insurance policy in the shoot. I had not worked with Alan before, so I think he was a little concerned about what I might get, but to not go into too much detail, we came back with great tracks from each of us.
As to setting up the mics, we basically had mics all over the place. We recorded the impact area which was about 150 meters away (too close frankly), close-ups on the weapons, and then medium close. This was the fifth gunshoot of the year for me, so I was pretty confident that I could get at least a few good tracks from the set, but we ended up with a few clunkers.
As to the value of analog, I think it is done for weapons. Recording at 96 k gives amazingly lifelike quality, and the right mics being used can give you every bit of compression you might have been used to with the Nagra IV. Though the Nagra can sound quite rich, its signal-to-noise ratio is dismal compared to high-def digital.
THE ADVENTURE OF CUSTOM RECORDING
Custom recording sound effects is probably my favorite phase of the soundtrack creation process. Maybe it is because of my memories of venturing out to capture the exact kinds of sounds needed to successfully mount a project. Maybe it was the freedom I felt as I packed my car with recording gear and any special props I might need and simply got out of town. You cannot help but feel a bit like Indiana Jones as you set out to capture new sounds.
A wonderful side-benefit from custom recording is the incredible learning experience that goes with it. If you truly are dedicated to the sound job, you cannot help but immerse yourself totally into the subject, learning the mechanics of how things work by studying sounds that emanate from whatever you are recording.
Sometimes the adventures were short and poignant; sometimes they became multiteam military-style operations involving thousands of dollars and careful planning. No matter how small or large the custom recording undertaking, my commitment to new recordings had a great deal to do with my growing reputation as a supervising sound editor and my marketability in the industry in the early 1980s.
Hopefully, the supervising sound editor is set for the project early enough so that he or she can screen dailies, or at least view significant event sequences long before picture editorial is ready to lock picture and turn it over for sound-editorial work. Early on, you will discover that the screenplay, the scripted roadmap of how the movie is intended to be made, is not the last word in the actual outcome of the visual adventure ultimately turned over to sound editorial. The smart supervising sound editor only uses this as a guide of expectations and challenging promises. Once he or she actually sees footage, then the precise audio needs make themselves crystal clear.
After an overview of the sound-effect material either in the sound library or in any wild track recordings the production mixer may have gotten on the set during principal photography, the supervising sound editor starts to list needs for custom sound-effect recording. The supervising sound editor usually has one or more favorite locations that historically have been successful sites to record exterior sound effects. From prior experience, he or she knows air traffic patterns and temperature inversions that affect wind currents. In addition, the supervising sound editor has probably developed a relationship with local authorities or with individuals who occasionally enjoy developing sound effects and are willing to lend a hand.
More often than not, the supervising sound editor personally goes out and custom records the sound or teams up with other sound-effect recordists in larger sessions that require multiple microphones and a team effort.
Increasingly, custom sound-effect recording is done by specialists who devote much of their careers to custom sound recording. These men and women all have various reputations for specialties. A supervising sound editor may hire one individual because he or she is known for quadraphonic background recordings. On the other hand, a different sound-effect recordist may have a reputation for eerie organic sounds, while another is known for being good with vehicles. The supervising sound editor considers who is best suited for each job and then checks for schedule availability. Once the recordist has been set, the supervising sound editor usually runs sequences of action with the sound-effect recordist, reviewing certain details of action and the concept of the performances. For instance, it is vital to articulate precisely how an engine should sound. Should it be cherried up? Should they unbolt the muffler and shift it back a little? Should it have a couple of spark plug wires removed? Should they even physically remove a spark plug? How heavy-handed does the sound recordist get? By the time the supervising sound editor completes the briefing, the scope of work is well defined, and the sound recordist has a clear picture of the mission to accomplish.
Steven Spielberg's Jaws required a great deal of attention and creative forethought. Contrary to what one might think in light of its history, Jaws was not intended to be a big picture. In fact, it was the little horror picture for Universal that year, a small project to add to the package of big films that the studio was offering. Box-office history has shown that the year's other, big pictures were comparative failures and that Jaws saved the financial future of the studio.
No one could make that kind of prediction during the principal photography phase of the picture. The postproduction budget was not only unremarkable but also low-budget and bare-boned in design. Jim Troutman, the picture's supervising sound editor, had to make do with what little he had and to do it quickly. One of the better decisions was allowing him to custom record the Orca, the sharking boat used to search for the dreaded great white.
“The Orca played throughout a good third of the picture. We had to record it doing all kinds of things to match the action in the movie,” Troutman remembers. “They had been very smart and had brought the Orca out to Los Angeles along with the Swedish captain that maintained and operated the boat for the studio.”
Jim and his recording team set up early in the morning. The captain took the small boat beyond the breakwaters of the L.A. harbor, out where Jim could get good, clean recordings.
“We recorded the flapper on the exhaust bouncing and spitting; we recorded the engine cruising along, under strain, with trap door open, with trap door closed—and then I happened to glance over the gunnels of the boat, and I began to pay closer attention to what was going on.”
Jim stepped over to the captain. “Excuse me for asking, but this is a very interesting optical illusion. We seem to be riding lower in the water than we were a couple of hours ago.”
The captain calmly replied in his heavily accented English, “Ja, we are sinking.”
Jim's eyebrows shot up as he immediately announced that he had recorded enough material of the Orca heading west, and now he thought they should record the more important “flank speed” segment as they headed back to port!
One of the more interesting underwater recordings made earlier in the day utilized an underwater hydrophone. Jim and his team had tried to make underwater point-of-view recordings of the Orca, with mixed results. At one particular point, the mixer had Jim listen to a very strange emanation through his headsets. After a moment, Jim asked the captain if he knew what was making the peculiar sound. After listening to it, the captain nodded that he indeed had some experience with this back in Scandinavian waters—they were listening to the sound of shrimp eating. This is the strange and almost alien sound you hear as the movie begins. The Universal logo has just faded to black, and before the underwater title shot fades up, all we hear is Jim's recording of shrimp eating. From before the first frame of visual picture, Jim had set a weird and unearthly mood for things to come. Jaws won an Academy Award for Best Sound that year.
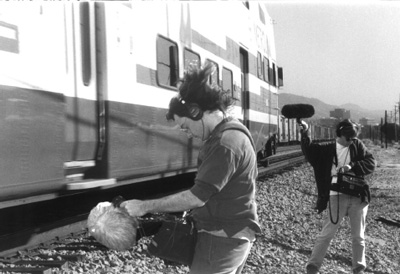
Figure 10.3 Eric Potter and Charles Maynes recording a Metro Rail train-by at 80 mph.
WHY A CUSTOM RECORDING SPECIALIST?
Why have special custom sound-effect recordists record sound effects when you have the production mixer and all his or her gear out on location anyway? I have met very few production mixers who understand how to record sound effects. A production mixer's prime directive is to capture the spoken word on the set. When the actors speak, the production mixer does everything to record the actors’ performances as cleanly and vibrantly as possible. As discussed in Chapter 5, the production mixer must overcome incredible ambience adversities to do this. He or she knows where the microphone must be placed to capture the best timbre of the human voice.
Good mixers know the necessity in doing everything to keep extraneous noises out of the production track. Audio intrusions such as generators, airplanes overhead, footsteps, cloth rustlings, and close proximity camera noise are some of their daily nemeses. The valuable experience of the seasoned production mixer is a precious commodity indeed. Despite all this, I would not hire a production mixer to record custom sound effects, especially vehicle series. They just do not understand the dynamics and intricacies of required performance cues and, more important, where to put the microphones.
When I was working on a period picture (circa 1919) entitled Moonbeam Riders, the authentic motorcycle engines of this action-adventure racing story challenged us. I was told the production mixer had exactly custom recorded what I would need for the Aero Indian motorcycle in the final reel of the film. Of course, I was more naïve back in 1978. Our reels were due to start predubbing first thing in the morning, and, as often happened, we found ourselves cutting late into the night to finish the work on time.
By 3 A.M. I finally completed the old Harley and turned my attention to the Aero Indian. I pulled the 400-foot roll of 35 mm wild track from the back rack of my table, laced the film over the sound head of the Moviola, and started to audition it. With every foot that passed over the sound head, I became more and more dismayed. If the sound recording was not suffering from vibration distortions, then it was the mixer talking during the performance or drastic changes in level as the bike performed. As the roll grew smaller in my hand, my blood pressure rose correspondingly higher. The recording was worthless! I knew the material needed was not there.
This was one of many instances where a production company has had a perfect opportunity to custom record historically rare and/or one-of-a-kind props only to squander the opportunity.
It is one of the most important lessons to learn as a producer or director—rather than dictate how you think the quickest and most cost-effective method of producing a great soundtrack, listen to your supervising sound editor's advice as he or she has a hundred times more experience than you do by virtue of his or her résumé of experience. Been there, done that, learn from their experience. In the end they will save you precious thousands of dollars as well as get the job done correctly the first time. Do not find yourself being a victim of the old postproduction adage, “They can't find enough money or time to do it right, but somehow they fine more money and extra time to do it over!”
Making a Career Out of Recording Sound Effects
By far, Eric Potter is one of the most respected specialists. He has developed an extremely successful career recording sound effects to problem-solve some of the most challenging motion pictures produced today. Steven Spielberg's War of the Worlds, Master and Commander, Spider-Man, The Time Machine, Ocean's Eleven, Ronin, The Peacemaker, Independence Day, and Twister are just a handful of the projects that have benefited from a very impassioned young man who has traveled to the far reaches of the earth to record anything and everything.

Figure 10.4 Sound-effect recording specialists John Fasal (left) and Eric Potter take a break from recording custom sound effects for the epic Spielberg remake of H. G. Wells's sciencefiction classic War of the Worlds.
“We recorded this LAV (Light Armored Vehicle) at Camp Pendelton Marine Base for War of the Worlds. Both Eric and I were recording 4-channel sound at 96 kHz/24-bit using the Sound Devices 744T recorders,” recalls John Fasal. “At the time, the 744T had just been introduced.”
Fear of Being Stereotyped
By the end of the 1960s, legendary director Robert Wise was afraid of being typecast as a director of period costume pictures. While looking for a project that would completely change his image, he got a call from an associate at Universal who talked up a wacky science-fiction thriller written by a young kid named Michael Crichton (The Andromeda Strain). Wise jumped at the opportunity. What a change from Helen of Troy! It had the potential to rival his other science-fiction classic, The Day the Earth Stood Still.
Joe Sikorski studied the Andromeda script and reviewed the sound-effect material on hand at the studio. Very little lived up to the level of both story hardware and visual art direction that Wise was capturing on film. Sikorski met with Wise to discuss the concerns of having the new and modern sounds the picture needed. Although Joe Sikorski and fellow sound editor Bob Bratton had tackled a similar style high-tech computer film the year before (Colossus: The Forbin Project), The Andromeda Strain went way beyond anything they had done in Colossus.
Sikorski proposed custom recording all new types of stuff to make the underground bio-tech lab come to life. But where could they do it? Wise told Sikorski he would get back to him. Three days later, Wise called Sikorski to let him know that he had secured the cooperative assistance from the Jet Propulsion Laboratory in Pasadena.
For two full days, Sikorski had a sound mixer, boom operator, cable man, and access to all the high-tech toys he would want to record. Nitrogen fill tanks, a vacuum pump on an electron microscope, centrifuges, laboratory ambience backgrounds, clean-room doors, hydraulics, air compressions, transformers, switches, air vents, mechanical hand movements, sterilization processes, cutting-edge telecommunication gear—Sikorski not only had access to the real sounds but also to the best technical advisors to guide him in their use.
At the time, Robert Wise did not consider The Andromeda Strain a big sound job, as we think of big soundtracks in today's acoustical barrages, but Andromeda was. Each moment of the picture had a precise and focused audio event that underlined and supported the visuality. It did not blast you out of your seat with a wall of sound; instead, it reached out with a special singularity in the storytelling process. The unique custom-recorded sound effects added a fresh spin that really captured your attention.
SOUND EDITORS RECORD THEIR OWN MATERIAL
Some of the best sound-effect recordists have come from the ranks of sound editors. They are driven to record out of frustration because they need specific characterization in their sound effects to make their edit sessions really come alive. Others record because they love the challenge and freedom of using the world as their sound stage. Either way, sound editors bring editorial experience with them that dramatically affects how the material is performed and consequently recorded. Some of the best sound effects I have ever heard have been recorded by sound editors who learned how to record their own material.

Figure 10.5 John Fasal leans out over the starboard railing with a long microphone boom so he can get the microphone down as close as possible to record the bow wash against the wooden hull in Master and Commander: The Far Side of the World.
Before I draw up battle plans to custom record a whole series of sound effects, I always sift through the production sound reports first, noting the wild track recordings and listening to them before I make commitments on what to record. Needless to say, the more that sound editors become frustrated by lack of material in the studio's sound library, coupled with increased frustrations of improperly recorded wild tracks from production, the more they venture out to custom record their own sounds.
In the old days, by strict union definition of job functions, sound editors were not permitted to record their own sound effects. I knew of several editors who got slapped with $500 fines by the union for doing the work of a Local mixer. Like a shark that has tasted the blood in the water, though, once we had recorded sounds for our precise and unique applications and had cut them into sync to the picture, we had to have more. We liked the results and refused to turn back. Many of us decided to have dual unionship.
If we were 38 miles from the intersection of Hollywood Boulevard and Vine Street in Hollywood, we were legally outside union jurisdiction. This is the main reason why I started returning to my hometown of Coalinga to custom record my sound needs in the late 1970s. A secondary reason for recording away from the Los Angeles area should be painfully obvious. In terms of controlling ambient sound, a metropolitan city is one of the worst places to record; unless, of course, you need busy streets and noisy neighborhoods with police helicopters patrolling overhead.
At the beginning of my sound editing career, I did some limited custom recording for one picture or another, especially while contracting Roger Corman films (Humanoids from the Deep, Battle Beyond the Stars). Escape from New York was the film that swept me into serious field recording and made me understand the unique styles, challenges, and disciplines of stereo. Suddenly, I was no longer thinking monophonically. Now I thought in three dimensions: left-to-right, right-to-left, and in the surround channels. At first, though, trying to problem-solve the stereo requirements for the many audio challenges of a motion picture can be mind-boggling.
Custom Recording Vehicles
With Escape from New York we staged our first serious stereophonic car-recording expedition. The Coalinga morning air was cold and still; a light fog lingered through the early afternoon. I soon learned that such conditions are perfect for sound effects. The best recording trips have been during the late fall and winter. Sound carries very well through cold air, and crickets and other pesky insects are frozen and silent.
I have developed a special background for recording vehicles, born out of the frustration of trying to make an old library car effect series work on a sequence without the proper components of recorded material to make the action come alive. I had recorded many vehicle series over the previous 5 years with mixed results, but it was John Carpenter's Christine that focused and galvanized the style and standards by which I would record vehicles in the future.
With Christine we had a vehicle that, during some sequences of the film, had to sound sad and beat-up; in other sequences, though, the car needed to sound tough and beefy. This would require a mechanic and whatever assistance he or she would need for the car to sound a variety of ways.
When recording vehicles, you must be very sensitive to the local authorities. Not all roads fall under local jurisdiction. If you are not careful, you can find yourself in deep trouble if you record car stunts on the wrong stretch of highway. Personally, though, I have yet to find one highway patrolman or county sheriff who does not like to assist and be involved in recording hot cars for the movies, but you must involve them in your early planning and listen carefully to their recommendations.
The photos in Figure 10.6 show us custom recording the out-of-tune character vehicle (an LTD) for the 1989 production Cohen and Tate, starring Roy Scheider and Adam Baldwin. It was much easier for us on this picture for two reasons. First, the production company gave us the actual car to do with as we pleased. We ran it into the ground, we side-swiped it; Gonzo even got up on the roof and threw himself down as bodyfalls—still some of the best body-to-car material available! Second, we had already established the ground work on how to really custom record cars on John Carpenter's horror possessed-car picture Christine, and ever since then, the sound-effects editor always had the audio coverage to make the vehicles really sound like what they needed to sound like—it is all about understanding making the bits and pieces of cues that you will weave together later to create the reality of the sequence.
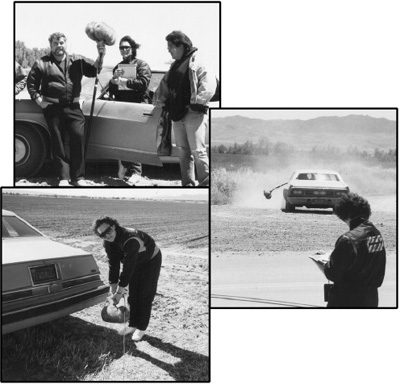
Figure 10.6 The author and his recording team out in the San Joaquin Valley just outside his hometown of Coalinga to record an out-of-tune LTD for Cohen and Tate.
For Christine, the highway patrol suggested that it would be much easier, with much less “maintenance observation” required on their part, if we hired a security officer to be with us as we worked. This benefited both parties. A uniformed officer with experience in traffic management and radio communication with the local authorities gave us instant access should a troublesome situation arise. He also lent a visual symbol of authority and legitimacy to people driving through the recording zone.
We quickly discovered, however, that we could not use the road we first had in mind because it fell under state jurisdiction, making necessary a mountain of complex paperwork and approvals from the state capital to use a state highway. Local authorities noted several alternate roads that fell under county jurisdiction, making it vastly easier to receive permission and clearances so that we could perform various stunt driving for the express purpose of recording sound effects.
We did not choose a location at which to record simply by fingering the map and picking a place at random. We drove out (at the same time of day the recording was planned) and stopped on each road, got out, and walked the length, listening to the ambience, considering potential audio problems posed from a nearby factory, airport, field pumps, and so forth, not the least of which was daily wind shift patterns. On some locations, we discovered that if we had not gotten our recordings by noon we were doomed to winds that kicked up for the remainder of the day.
I secured the assistance of Tim Jordan, a school friend who owned an automotive shop in my hometown. Tim served as head mechanic and vehicle liaison officer, knowing who in town owned what kind of car. I briefed him on the sound effect requirements and the range of automotive changes and challenges he would make on the performing vehicles while we were out in the field. In a matter of moments Tim and his assistant could remove spark plug wires, in some cases removing a spark plug completely for a real raspy clatter. The two men would detach the muffler and move it back slightly, causing a gap, or they would change the timing. All of these alterations had to be done quickly, and often with the audition result that the desired effect was not realized. In a matter of minutes, though, the car was ready to make awful (but necessary) noises.
Christine was the first picture on which I used two recording teams. The first recording unit, or “close-up” perspective team, would always set up on the road itself, close to the car. The second recording unit was the “semi-background” perspective team, set off the road 20 or 30 yards to get a softer performance. Approach recording a car series with the material needs of the sound editor in mind. You seldom record a single performance with all the elements of that recording working together in their proper balanced volumes. The undercarriage may overwhelm tire hum; engine dynamics disappear under tire skids. A perfectly balanced mixture of elements in one recording almost never happens. Therefore, do not approach recording cars with the idea that each recording is an end unto itself. Every recording is but one piece of the puzzle of sound effects that must be cut and blended together to make a slick car sequence work. With this understanding deeply rooted, the intelligent custom sound recordist breaks the action into traditional parts. Smart supervising sound editors always record cars in the same groupings, from which a sound editor can create any movement.
Listed below is a typical vehicle performance series as broken down into single cues. Of course, your own needs for vehicle recordings vary, but this is a good guide.
Vehicle Mechanicals
• |
Trunk open and close |
• |
Hood up and down |
• |
Hood and/or trunk release mechanism |
• |
Driver door open and close |
• |
Passenger door open and close |
• |
Into car movement/out of car movement |
• |
|
• |
Window cranked (or motor) up and down |
• |
Emergency brake set and release |
• |
Shifter movement into gear/reverse movement |
• |
Glove compartment open and close |
• |
Cigarette lighter movement |
• |
Radio switch on and off |
• |
Cassette or CD player movement—cassette/CD in and out |
• |
Rummage through glove compartment |
• |
Gas flap release (on newer vehicles) |
• |
Gas cap key and off and on movements (especially older vehicles) |
• |
Various dashboard clicks, knobs, and lever settings |
• |
Keys into ignition movement (be careful not to use a keychain) |
• |
Turn-signal relay clicking |
• |
Windshield wipers—recorded dry (various speeds) |
• |
Windshield wipers—recorded wet (various speeds) |
• |
Brake squeaks (with squeaky brakes, roll car down slope with engine off, brake to stop—various) |
• |
Roll car over light gritty asphalt |
• |
Roll car off asphalt onto shoulder of road |
• |
Pry off and put on hubcaps |
• |
Overhead light |
• |
Convertible room open/close mechanism (if applicable) |
• |
Moon/sun roof mechanicals |
• |
Pedal movement |
• |
Mirrors (if motorized) |
Now you must record the performance of the car engine itself. Contrary to those who would assume they know how car sound effects are recorded, let me assure you that the best series are recorded in a very methodical, often boring manner. Note that the perspective of the recording from the tailpipe area sounds completely different from that made before the front bumper. Likewise, a recording made from the side of the car sounds different from that from either front or back. These positions become extremely handy and critical later in sound editorial when the actual demands of the visual picture may require the car to start, have a short idle, and then pull past the camera and away. Another shot may require a rear perspective view, where a front-end microphone does not sound appropriate. It all boils down to common sense.
Recording a Car—Start and Idle
Following is a list of idles and revs required in a static position. Note that “jump” revs are recorded in a static position; the car does not actually leave the ground and fly by.
• |
Start, idle, and off (close front perspective) |
• |
Start, idle, and off (close tailpipe perspective) |
• |
Start, idle, and off (mid-side perspective) |
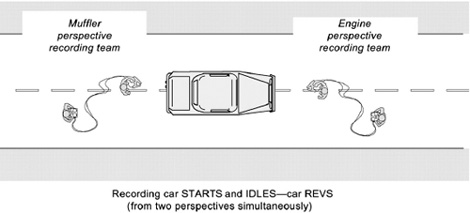
Figure 10.7 Recording the static position starts and idles as well as the static rev cues.
• |
Start, light revs, and off (close front perspective) |
• |
Start, light revs, and off (close tailpipe perspective) |
• |
Start, light revs, and off (mid-side perspective) |
• |
Start, medium revs, and off (close front perspective) |
• |
Start, medium revs, and off (close tailpipe perspective) |
• |
Start, medium revs, and off (mid-side perspective) |
• |
Start, big angry revs, and off (close front perspective) |
• |
Start, big angry revs, and off (close tailpipe perspective) |
• |
Start, big angry revs, and off (mid-side perspective) |
• |
Start, “jump” revs, and off (close front perspective) |
• |
Start, “jump” revs, and off (close tailpipe perspective) |
• |
Start, “jump” revs, and off (mid-side perspective) |
I have met few car owners who take kindly to having their vehicles “jumped.” Actually, vehicles seldom make such a sound when they leave the ground. It has become one of those Hollywood audio clichés, a metaphor we expect or even feel satisfaction from because we believe the way it befits the action on screen. To add to the sensation of flight, move the microphones away from the engine as the engine peaks in its “freewheeling” rev, duplicating the sensation that the vehicle is passing by in flight.
Recording a Car—Start and Aways
Following is a list of variations on the start and aways.
• |
Start, short idle, and away—various speeds (close front and mid-side perspective) |
• |
Start, short idle, and away—various speeds (close tailpipe away perspective) |
• |
Start, short idle, and away—various speeds (mid-side away perspective) |
In addition to the three basic perspectives, you also need the driver to perform each take with a different emphasis. One start-and-away should be slow and lethargic. Another should be at normal speed, with yet another a little faster, building to a fast and hard away, throttling downrange.
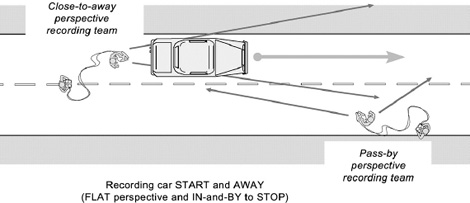
Figure 10.8 Recording car aways.
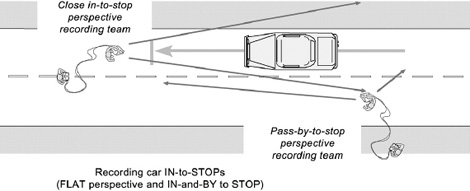
Figure 10.9 Recording car stops.
Recording a Car—In to Stop
Using the same philosophy as the start and aways, now you must deal with variations of where the car actually stops. One of the most overlooked approach-and-stop cues is having the vehicle approach and pull up into a driveway. This cue sounds so much different from simply pulling up to a stop on the street. Refer to the following list

Figure 10.10 Recording car bys.
The car should not always stop directly in front of or to the side of the microphones. Performances that have the car pass to a stop a bit past the microphones are not only a good idea but also vital for perspective placement. You might also have the driver approach, slow as he or she nears, then pass by 8 to 15 yards from the microphone and U-turn back in to stop. These types of in-to-stops are excellent for estate driveways.
Recording a Car—Bys
I have never encountered a sound-effects library that has too many approach-and-bys for any given vehicle series. Remember, don't record for only the film you are working on, but for any future uses. Refer to the list below for guidelines:
• |
Approach, by, and away—various speeds (stop close front perspective) |
• |
Approach, by, and away—various speeds (close by and stop tailpipe perspective) |
• |
Approach, by, and away—various speeds (mid-side away perspective) |
You should not only record numerous variations such as sneak by, slow by, normal by, medium by, fast by, race by; you also must think about accelerating or decelerating on the by—shifting gears as in upshifting or downshifting just prior to or just after the by itself. You should also not record all your approach-and-bys from the same location. If a seam or a tiny piece of debris is in the road, you will discover later that you got a rhythmic click or thump in the same spot in the performance, quickly making the vehicle bys predictable and uninteresting.
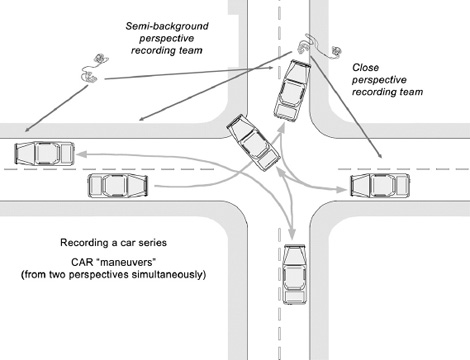
Figure 10.11 Recording car maneuvers.
Start-and-aways, in-and-stops, approach-and-bys are all very obvious. They are the “getting there” cues, but vehicles do not drive only like that; they need transitions and dipsy-doodles to tie the “getting there” cues together into a single ribbon of reality.
Recording a Car—Maneuvers
Maneuvers are one of the most vital, yet greatly overlooked, performances a vehicle can do. As a sound editor, I can cut bits and pieces of vehicle maneuvers and weave them into the transitional moments of screen action in ways that not only bridge one “getting there” effect to another, but also inject a variety of interesting moments that bring the vehicle to life and create a character, a performing actor made of metal and rubber.
You should most certainly record several sets of maneuvers, moving from one location to another, as the surface on which the tires bear down is revealed to the microphone more dramatically than any of the other “getting there” cues. Remember that the sound of a tire on asphalt is totally different from how it sounds on cement, let alone how it sounds on a dirt road. Refer to the list below for the ranges of maneuvers.
• |
In and maneuver about—slow and deliberate (perspective #1) |
• |
In and maneuver about—slow and deliberate (perspective #2) |
• |
In and maneuver about—normal (perspective #1) |
• |
In and maneuver about—normal (perspective #2) |
• |
In and maneuver about—fast and aggressive (perspective #1) |
• |
In and maneuver about—fast and aggressive (perspective #2) |
Last but not least, record a variety of onboard constants. I usually set a pair of microphones on the back bumper, pointing downward toward the road and being influenced by the tailpipe. The second pair of microphones is inside the vehicle in a wide separation with the windows up. Later, in sound editorial, I cut the tailpipe constant alongside the interior constant to develop the right blend.
One of the most vital and important points about onboard recordings is the illusion of speed. Many vehicle onboard recordings I have heard from other sound libraries are flat and lifeless, a dead giveaway they had been recorded literally. When you record onboards, find a road with a very long gradual grade so that the performing vehicle engine always “works” and does not freewheel. Very often we must drive at slower speeds in lower gears to simulate higher speeds, an audio illusion wise to learn early. Recording reality is not always the most desirable. If you are interested in hearing some of these recordings, refer to the companion website, under “Custom Recording FX”, submenu “Recording a Car Series”.
To add to the recording challenge, Christine had been filmed during both rainy and dry weather. I did not want to cheat the wet tire sound effects under a dry car recording any more than I had to, so we decided to record the vehicles both dry and wet. This required hiring a water truck and driver. It was a hot August day when we custom recorded the wet car series. The water truck operator surely thought we were out of our minds when he arrived. He glanced about for a dirt road or construction site to wet down as he asked me where I wanted the water. I gestured down the hot broiling asphalt of the highway.
“Are you nuts? The water will evaporate in a matter of minutes!” he snapped.
I assured him I understood that, but the work order did specify a mile-and-a-half stretch of county road. He asked me if I knew how much this load of water cost. Again I assured him I did, especially since I was paying for it. I asked him if he was getting paid for doing the job, and, if so, why should he care where and how the water was being utilized?
He shrugged. “Whad'ya want me to do when I finish dumpin’ it?”
Smiling, I stated, “I guess you had better go back and get another load. At the rate of evaporation, you're gonna be busy all day.”
For the next 6 hours, the water truck shuttled back and forth, laying down a fresh surface of water on the stretch of road.
Christine had another unique problem. After the car was beat up and hurt, she limped back to the garage to heal. The rerecording mixer was capable of adding echo to the sound effects as the car rolled into the garage, but I wanted to customize a really unique audio event into the recording when Christine gets back to her “nest” in the garage. A somewhat surprising location presented itself. Regrettably, my California hometown had been decimated in the 1983 earthquake destroying 360 buildings and 11 square blocks of downtown. The powerful quake had also rendered the Sunset School buildings unusable for several years. Originally, the school had been designed with a unique open hallway and concrete corridors between buildings that had a roof but no walls between the wing groupings of classrooms. I knew recording a vehicle in a real garage with enclosed walls would add so much reverb to an engine recording it would be unacceptable. Here at Sunset School, the semi-open corridor provided a taste of enclosed reverb, but still allowed the major echo build-up usually accompanying interior recordings to escape into the open grassy breezeways. It was perfect. We just had to maneuver the performing vehicles up concrete steps into the hallway corridors.
Once we experienced the subdued reverberation, I knew we must customize several exact shots, as I just loved the sound of Christine's puffing engine, achieved by having four spark-plug wires removed and the exhaust pipe unbolted. This procedure worked well for the sequence in the movie where Christine blows up the gas station and returns to the garage. She enters the shelter with her entire chassis sizzling from the fire, turning past Robert Prosky as he watches her in disbelief. We had recorded very slow pass-bys in the corridor, allowing the performing car to basically idle as she passed. The Doppler effect of the tailpipe was perfect, and the entire effect built toward the crowning moment when she backed into her stall and switched off.
A signature effect of Christine in the movie was a complete accident. While out on the county road recording start-and-idles, we discovered that the hydraulic system of the car wheezed and whined as it relaxed. At first, Tim Jordan was apologetic about it, jumping out of the car to cure the unwanted sound. I asked him to leave it alone for a moment, as we should specifically record the comical little wheeze with the pathetic metallic edge. Later, during sound editorial, we decided to factor the sound into the sequence where Christine backs into her stall and turns off. The wheeze/whine became her pitiful exhalation. When John Carpenter (director) heard it on the rerecording stage, he asked if we could also use it in the last shot of the movie when the camera moves in close on the compressed block remains of Christine in the wrecking yard, and a little piece of her grill flexes.

Figure 10.12 Sometimes you just really have to “get into” your work! John Fasal gets into an M1 Abrams main battle tank to do some serious custom recording for Steven Spielberg's War of the Worlds.

Figure 10.13 Charles Maynes recording a metal press.
Do not record vehicles in the same way as production dialog. For recording dialog you put your microphone out on a fish pole and hold it up in the air just above the actors as the ideal placement to record their voices. Dialog recording mixers follow the same philosophy for recording sound effects, but that does not (and actually seldom does) yield the most vibrant and exciting performance for sound effects. Oddly enough I have my microphones very low to the ground, especially when recording the tailpipe perspectives. Also pay very close attention to what comes out of the tailpipe, should you choose to take up position there, as I discovered with Christine on the “angry revs.” You need to try various placements until you find what pleases you the most.
Rule of thumb: “If it sounds good, it is correct.” The placement of the microphone is an illusion of the reality you are creating for the screen.
Because sound travels better in colder air and fewer people and vehicles are out at night, so too, less ambient gray noise clutters the atmosphere. Some of my best vehicle recordings were done during the late fall through early spring season, around or after midnight. The only allusion we have to nighttime is the sound of crickets, but crickets are also heard during the day, even though they are not as lively.
Recording Multiple Points of View Simultaneously
With the advent of digital nonlinear editing technology, it has been much easier to record and develop complex multichannel “points-of-view” performance recordings. During an action chase sequence, such as in the movie, Road Warrior, the audience's point of view is all over the big tractor-trailer rig. One moment you are up in the cab with Mel Gibson, the next moment you are back on the rear of the tanker with the rear gunner, and the next moment you are on the front bumper of the tractor with Vernon Wells. Each one of these angles is going to sound, and should sound, totally different. With the decelerations and the accelerations as the big rig maneuvers about, the powerful engine is going to be the foundation character. The RPM rate, whether it is rising or falling as well as what gear the tractor is in, cannot and should not suddenly be different from shot to shot. The ever-changing dynamics of the truck should have continuity, linking the series of shots together in a binding motion.
To cut a vehicle series together from individual cues that were recorded separately has always been a very challenging and arduous task. With today's technology we can easily record and remaster multiple points of view in synchronous stereo pairs that if we cut from one angle to the other, the dynamics of the engine will always be exactly at the correct RPM, whether decelerating or accelerating, making the sound-editorial task vastly easier.
For a similar assignment, Eric Potter and his team had gone out to custom record the big Kaiser 5-ton army truck with the turbocharger for an action chase sequence. After studying the sequence in the picture with the supervising sound editor, the two had worked out the various kinds of actions that needed to be covered. In addition to a standard series of recordings, a list of specialized moves and road surfaces were noted.
Eric had decided that the best way to tackle the problem was to hire several other recording colleagues to join the team, bringing not only their expertise but also their equipment to use. In all, Eric had a 12-man recording crew. Some of the recorders were digital DAT machines; some were 1/4” stereo Nagras. After evaluating the microphones in their arsenal, the recording teams agreed on what types of microphones and recording formats would work best in the various positions chosen.
Each recording team had a 5-watt communication radio. Three recording teams were positioned in a huge triangle configuration out on the desert salt flats. The stunt driver would perform the vehicle in its chase sequence action by driving around in a huge one-mile circle, allowing each of the three ground recordists to have a close drive-by point of view followed by a long away and a long approach.
The fourth and fifth recorders were in the cab of the truck, recording action as miked from the front bumper and from inside the cab angled toward the driver's feet. The sixth recording team had their microphones positioned between the tractor and the box, able to get bright and ballsy exhaust raps. The seventh recording team was positioned on the rear of the truck, with microphones attached on shock mounts to the rear underside, favoring suspension and rattles.
Eric used a toy clicker as a sync slate, which he held up to his 5-watt communication radio when he clicked it. Each recordist had his own radio receiver held near his own slate mics of the field mixer so that each recording would have a very short click point to be used later by the sound librarian to edit and align the material for mastering (as described in Chapter 11).
As with recording car series, it is very important not to allow tire skids or screeches into the performance. The primary task is to record a wide and full range of engine revs, accelerations, and decelerations that can be cut clean. If tire skidding is heard in the recording, it is very difficult to cut out later, denying the sound editor the use of clean engine sounds where the tire skid has been heard. A sound editor will invariably not want the skids that are in the recording for the sequence he or she is cutting, but would rather add separate tracks of skids and surface reactions separately so that they can be properly controlled and balanced later in the mix.
Recording Animals
Recording animals can be extremely challenging. Many movements or vocals that must be recorded are so subtle that you must record the animals under very strict audio controllable conditions. Many choose to record animals on a Foley stage, which can work for various kinds of animal recordings, but some animals do not respond naturally in an alien environment. The biggest problem in recording real animal vocals and movement performances is that the vast majority of animal trainers who contract with entertainment industries train their animals to react to vocal or signal commands. This makes it impossible when working with a trainer who is constantly blowing his or her whistle or snapping a clicker or shouting vocal cues, most of the time either on top of or intruding into the desired part of the animal's vocal.
One animal trainer who does not rely on making unwanted noises or speaking to his performing animal during sound recordings is Karl Lewis Miller of Animal Action. Karl trains his dogs to perform on cue or make desired reactions or vocals by use of visual signals. Only once or twice during the recordings of his dogs did he actually have to speak. Daddy, the big Saint Bernard that played the title character in Cujo, ambled up to the stone Karl had set on the ground as Daddy's “marks.” I had advised my boom operator, Chuck Smith, to extend the microphone pole to give some distance between himself and the big dog.
Chuck waved me off, thinking Daddy was about the most docile canine he had ever come across, and therefore stood far too close to the mark. I rolled the Nagra and announced “speed.” Karl silently got Daddy's attention and stuck his finger out, pointing at Daddy's nose. Then he made a wide sudden gesture. The dog lunged forward, stopping within inches of the microphone, his giant jowls snapping, reminding us how he had made Cujo so terrifying. He growled, barked, and lunge-snapped. After a full minute of canine viciousness, the trainer made another motion. The massive dog stopped his performance, backed up on the stone mark, and returned to his docile and friendly self as if nothing had happened. Chuck turned pale with fear. Perspiration streamed down his forehead as he immediately began to loosen the microphone pole tube locks and extend the pole to its maximum 18-foot reach.
An interesting trick the trainer used to keep his dogs from barking, while still allowing the animal to perform vicious growls and vocal gutturals when desired, was to insert a tennis ball into the dog's mouth. The ball was a toy, so the dog was having fun, but it inhibited the animal from barking.
As animal trainers strive to be in demand, more and more are learning to train their animals to perform to visual rather than audio cues. Such noise cues end up on production tracks over the dialog when the animals perform on screen, spoiling many a soundtrack and making preparations in sound editorial much more difficult.
Check out the companion website, under “Custom Recording FX”, submenu “Recording Animals” to watch Mark Mangini custom recording Tigers in Seoul, Korea.
Recording Airplanes
Recording airplanes is similar to recording vehicles. After all, you still want to record engine start, idle, and offs. You still want to record engine start and rev ups and downs. You still want to record engine start, taxi, and aways as well as taxi in toward mic, stop rev, and offs. The major difference is where you position the microphones for maximum yield, and, especially with propeller craft, not be subject to massive wind buffeting.
Several unique positions are necessary to get the power of the propeller aircraft engine on tape. I took up position just out in front of the Stearman with the assistants holding onto the tail section of the plane while the pilot would rev up the engine to a very high RPM. The amazing harmonic rise and fall from these recordings became vital for power dives, in-flight maneuvers, strained pull-outs, and so forth. We also had the aircraft perform a figure-8 around us doing variations: some with engine revving up, some with engine decelerating.
While recording the 1920s-era biplane aircraft for The Aviator, we were challenged not only to find the precise and authentic aircraft with the correct engine, but to find them in a part of the country remote enough to safely record without jet aircraft interference or distant traffic noise. After calling Oshkosh, Wisconsin, the home of aviation, we were quickly referred to Hurley Boehler, an aviation expert and liaison out of Tulsa, Oklahoma. Hurley was able not only to put together the correct and exact engine combinations called for by the producer but also to locate an excellent area to record the aircraft where we would be unfettered by unwanted audio intrusion.
We had two recording teams, each recording with a Nagra IV-S at 15 ips (inches per second) for maximum saturation. Our 2-week recording expedition took in three biplanes and six period automobiles from the second largest private car collection in the world, out of Muskogee, Oklahoma. Each day, we wrapped the recording session between two and three o'clock in the afternoon and then shipped all the 1/4” tapes back to my studio in North Hollywood, where they were edited and logged by the sound librarian. That recording adventure taught us some very important lessons.
First, always tell the recordist who will be inside the aircraft recording onboard perspectives that you have asked the pilot to simulate engine failure as the plane is diving and swooping. As the Stearman went roaring past us, the pilot flipped the magneto off and on to simulate major engine trouble. All we could see was our recordist, his eyes big as saucers, fingers embedded in the fabric of the cockpit lining with an abiding certainty that he was about to meet his maker.
Second, try to find a high position to record the aircraft fly-bys and especially the long lazy turns that work well for exterior in-flight constants. If you record these cues too close to the ground, you run the risk of picking up ground reflection as well as bird chirps and creature noises.
The ultimate recording is made from a unique “third-position” aerial platform. Such platforms do not exist naturally, unless you have a very tall tower in a recording environment with no wind. Try to find that! The serious aviation recordist will have a special all-welded metal hot-air balloon basket rig made. The reason for this is to eliminate every conceivable noise-generating source that conventional hot-air balloon baskets are notorious for. This multitier platform is made of lightweight aircraft metal and has two levels. The top position is the pilot/safety officer platform. His job is to turn the burner off during the actual time of recording and back on when the recorders are turned off. As the safety officer, he also maintains radio communication with all recording mixers and boom operators, both just below him, on the ground and/or in the performing aircraft, as well as the performing pilot. He is, therefore, responsible for the overall control of action and subsequent safety precautions.
The recording mixer sits with the boom operator in side-by-side seats with body harnesses on the lower level of the metallic rig. The multitrack recorders are strapped into a foam-insulated roll-bar-type welded rack in front of and alongside the recording mixer. The boom operator is strapped into the seat next to the recording mixer. The boom operator has control of the “hot-head”-type pillow block pylon that runs through the center of the dual-level basket. This absolutely silent pillow-block mechanism allows the boom operator to rotate the lower deck from side to side or completely around in a 360° movement as required to keep the fixed angle multi-microphone setups in perfect spatial positioning as desired.
With this unique recording position, the usual audio clutter associated with point-of-view microphones that are confined to being on the ground are eliminated. As the hot-air balloon will drift with the prevailing wind, so breeze buffet, which often plagues recordings (especially after 11 A.M.) are cut down tremendously. The trick is for the performing pilot to understand that he needs to use the hot-air balloon as the center of the performance, keeping his bys and maneuvers to large circular arcs around the hot-air balloon in addition to hard bys. Just think of it as recording a car for “estate” driving and the creative possibilities will all become clear to you. If you are interested in hearing some of these recordings, refer to the companion website, under “Custom Recording FX”, submenu “Recording Airplanes”. This will take you step by step, very much like recording the car. I only wished I had prewarned Steve Rice on the last cue, as he was in the plane at the time that it had, um, engine troubles.
This is also where multi-recorder points-of-view-style philosophy pays off. Careful breakdown and mastering of these audio cues back in the studio by the librarian will be crucial. (This is explained in detail in Chapter 11).
Recording Explosions
As a precaution, I made arrangements for the Westside Fire Department to stand by one Sunday morning at the Federal Pit as we detonated a custom-made explosive device for the helicopter explosion in John Carpenter's The Thing. The nine firemen watched with interest as a 1-foot hole was dug in the ground. I then poured 5 pounds of black powder into a steel pipe. On either side of the pipe, we strapped two small 1-inch pipes filled with black powder. I placed the bottom end of the pipe bundle into the hole, and then placed an upside-down trash can on top, knocking a hole through which the top of the pipe would fit. My assistant then shoveled gravel into the trash can in and around the pipes. We set a second trash can, right-side up, on top of the base can and filled it with high-octane gasoline.

Figure 10.14 Too big a blast.
The two smaller pipes would actually make the bang; the main pipe was to launch a short steel sleeve up through the bottom of the second trash can, igniting the fuel and blasting it up and out.
To simulate helicopter debris for the explosion, my assistant, Peter Cole, had absconded with all kinds of metal siding and scrap found alongside the road, including some old signs still being used by the county. (Fortunately, the fire captain had a good sense of humor about the roadside markers.) We ran the detonator wires back about 200 feet, where Peter had the battery and ignition switch. I had taken up a position about 50 feet back from the device with my microphones spread wide left and right, where I hoped to catch an acoustical concussionary slap off the far wall of the pit.
The fire crews and their trucks pulled back 200 yards to safety. All were instructed not to verbally react or say anything until well after the event. I told Peter I would yell “rolling” and he should silently count to three and hit the switch. After being satisfied that the tape recorder was rolling properly, I yelled “rolling” and waited for the detonation. Almost 10 seconds passed without an event. I peered out of my foxhole to see Peter struggling with the battery. It was not strong enough to set off the detonator through that much wire. I quickly called out for him to stop trying.
I jumped up and ran over to check the device. Gasoline was starting to leach from the upper can. We had to do something quickly, before fuel drenched the pipes below. I yelled to the top of the pit for someone to drive my car down. Within moments someone delivered my Dodge Diplomat down into the Federal Pit to Peter's position. I lifted the hood and pulled the detonation wire over to the car battery. Grabbing a hold of Peter to get his undivided attention, I yelled, “Whatever you do, when you touch these two wires, do not hesitate or wait for the explosion. Touch the second wire and instantly drop to the ground, as fast as you can. Do you understand?”
Peter nervously nodded. As he took the detonation wire, his hands were shaking. I repeated my previous instructions. “I will say ‘rolling.’ Then you count silently to three and touch it off. Got it?”
I ran back to my foxhole and turned on the tape recorder. “Rolling!” Three silent moments passed, and then the air was split by the explosion. Peter was actually starting to drop to the ground when the second wire touched the car battery terminal. The main pipe split open and flattened out, flying over Peter's head like a Frisbee, landing 200 yards away, only 3 feet from a fireman.
The fireball mushroomed out like a miniature atomic explosion, blowing over my foxhole, then rising skyward. Metal debris flew everywhere. Most of the Federal Pit was ablaze when the fire trucks headed down to douse the flames. Satisfied that I had captured the audio event, I stood up from listening to the playback of the recording to find the fire captain standing next to me, watching his men mop up the aftermath. He turned to me and winked. “Well son, that was about as good as sex.” Then he continued on down the hill. I was not quite sure what to say to a comment like that, except I doubt Roger Ebert ever gave a thumbs-up rating with a quote like that.
As it turned out, I learned some very valuable lessons about recording explosions. First, always work with a professional explosives contractor who knows what he or she is doing.
Second, unlike the auto bullet flights discussed at the beginning of this chapter, explosions are definitely recordable without your having to be with the equipment. The most important part of the explosion is the first fraction of a second after the initial blast ignition. If you are not set to properly record that, then the rest of the recording is meaningless. I usually use the horn of a big car at semiclose proximity, such as a Cadillac, to act as a pseudo onsite recording-level test. It is only a guess, but it gets you close to a safe recording level. As with recording gunfire, your first few shots are either overmodulated or underrecorded, until you find the ideal record setting. Do not depend on one explosion. That is one of the primary reasons we like to record these kinds of high-maintenance high-cost-per-performance events with multiple tape recorders. On the first explosion, if one recorder overmodulated, there is a good chance that one of the others did not.
After the first explosion, each recorder should be carefully rewound and reviewed for you to hear the playback of the blast. The sound-effect recordist should pay strict attention to the VU meter, as a quality speaker monitoring system cannot be onsite to audibly analyze the recording. Headsets should only be used as confirmation that the recording was successfully made; they should not be depended on to render a quality analysis of the frequency breadth of the recording.
Third, do not rely on record limiters to keep from overmodulating. If your first explosion is overmodulated, then make a new level adjustment. By using record limiters, you invite unwanted signal compression that ruins the desired effect.
Fourth, record gunfire and explosions at the fastest tape speed you can. At the very minimum, record with an analog tape recorder at 15 ips. If you can get your hands on an analog tape recorder capable of field recording at speeds of 30 ips, you truly will be ecstatic with the results! (Review cue #22 of the provided audio CD for a comparison of the same rifle-shot sound recorded by an audiocassette at 1-5/8 ips, an analog Nagra recording at 7-1/2 ips, an analog Nagra recording at 15 ips, by a digital DAT, and a direct-to-disk digital recording on the Deva. Each recorder is using Electro-Voice RE16 microphones in an X-Y configuration. Absolutely no equalization or signal manipulation occurs prior to the audio CD mastering. Each rifle shot cue is presented absolutely raw for better quality comparison.)
Fifth, and most important, do not try to integrate debris into the recording of the explosion. As explained in Chapter 12, debris such as the metal signs and junk should not be used in a staged explosion. Debris should be recorded as separate audio cues and cut together with the explosion blasts later during the editorial process.
To achieve a unique explosion sound, try taking several recordings of the same explosion, recorded on different tape recorders using different microphone configurations, and then blend them together. Often, one set of microphones delivers a more crackly character to the explosion, with little low end. Another stereo pair has a rich bottom-end boom, with little high-end. A third stereo pair may have more midrange with a near overtone tail to it. Putting all three stereo pairs together during the sound-editorial process delivers a combination that none of the stereo pairs alone could capture.
The Cannons of Master and Commander
Supervising sound editor/sound designer Richard King won an Academy Award for Best Sound Editing for Master and Commander: The Far Side of the World. Like all the work that Richard tackles, his emphasis is always on developing a palette of sound that is unique and interesting for each project. Master and Commander was certainly no exception. Figure 10.15 shows Richard recording a Hotchkiss gun as part of the sound design recording process. Richard shares his experience with the cannon challenges.
This weapon was recorded for Master and Commander. John Fasal, Eric Potter, and myself were the sound-effect recordists. We needed something for the ship's volley guns, which were positioned high up the masts or along the rail. These fired a small projectile about 1–1-1/2” in diameter or, more often, grapeshot. Although it's a more modern weapon (late nineteenth/early twentieth century) we chose the Hotchkiss gun as it is approximately the correct caliber, and the armorers were able to convert it from a breech loading gun to a muzzle loader.
We were also able to use black powder, which produces a different sound when fired than smokeless powder. We fired round shot made of lead. We recorded this in a rather small box canyon north of Los Angeles—a shooting range which we rented for the day, and found that the small canyon made the retort of the gun “hang” in the air for a moment, giving us a satisfying and dramatic audio effect.
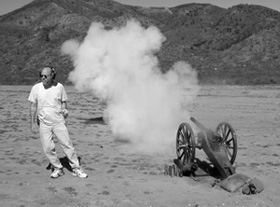
Figure 10.15 Richard King records a Hotchkiss gun with special vintage black powder shells.
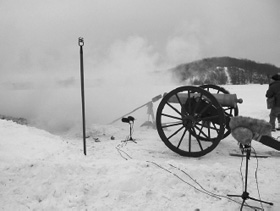
Figure 10.16 Richard King and his custom effects recording crew recording Civil War vintage cannons with various types of naval shot in the snow-covered National Guard base in northern Michigan.
We had a large array of mics close around the gun, going to several different recorders: a Deva, a DAT machine, and a Nagra IV-S to give us that analog crunch. We also had several mics downfield, aimed both at and away from the gun, to get more of the decay and low end, and several mics on the hilltop over which the projectiles were fired to get the missile pass-by whirrs.
The large guns recorded for Master and Commander were 12-lb. and 24-lb. field pieces of Civil War vintage. Over a period of several months, the dimensions and construction of the various types of shot had to be researched and then cast from scratch: round shot, bar shot, chain shot, and grape shot, and the armorers made up the black powder charges in linen sacks.
In January 2003, we all convened at a National Guard base in Northern Michigan, which has a very large howitzer range, to do our recording over a three-day period. John Fasal set up close to the gun with his array of mics and recorders. We vaporized a pair of SM57s which were placed too close to the muzzle of the gun, but before they got fried we got some great sounds from them! Eric Potter was about a quarter-mile downrange behind a concrete berm recording shot pass-bys and impacts into a wooden target we had constructed out of oak to simulate a ship's hull.
I was driving around on a snowmobile with a DAT machine and a Neumann 191 recording from as much as a half-mile away. The cold air and especially the open space of the large range definitely affected the sound, but I found that when we put all the channels into Pro Tools and played everything together, the sum was much more dramatic than any of the individual parts. And great fun was had by all.
Smaller Is Often Bigger
Just as you record vehicles in slower low gears to create the illusion of speed, you must look to other, smaller props to sell the illusion of size. Glass and metal chains illustrate this point.
Big chains do not make big chain noise; they make very disappointing clunky sounds. Accurately judging how chains will sound is extremely difficult when you go to the hardware store to pick the correct size and grade of chain for your recording. I take along my tape recorder and listen to the chains through the very microphone I intend to use. How does the microphone hear the chain metal? Small links, as well as brass or brass alloy metal, work best, but you must test them by listening to their movement and clanks through the recorder's microphone, as not all chain links are created equal.
Concerning glass, say you have a sequence in which a huge storefront window is smashed. Do not buy thick sheets of storefront glass. They only sound dull and “thunky.” Single-thickness glass sheets make the biggest sounds. We discovered that holding the glass sheet horizontally in the air and then swinging a solid steel bar upward from underneath just as you let go of the glass, produces the best results with longer air-flight time for glass shard ring-off.
Remember, you must wear eye goggles. It is also advisable to wear thick motorcycle gauntlets and wrap your body in packing blankets for protection. However, be aware of unwanted cloth and leather glove movements with all this protective armour.
One of the best glass-breaking sequences I recorded was performed outdoors. My father and I went to an old concrete bridge that crossed a dry streambed. I placed one set of microphones near the glass sheets to break and the other set down near the bottom. My father then dropped one sheet of glass at a time, making sure it clipped the edge of the bridge railing. The glass burst into shards, cascading a wonderful shower of glass down to the concrete slope below, where I got a very nice impact and shard slide.
An amazing glass recording I made 15 years ago is still being used today: the exploding lightbulb smash for The Philadelphia Experiment. We took an 8’ 2 × 12 and drilled five rows of 20 holes, the exact width to screw in a lightbulb. Into these 100 holes we screwed 100 6” fish-tank bulbs. Taking the prop to the Foley stage, I had an assistant hold the bottom of the board so it would stand upright. The assistant wore heavy gloves and eye goggles; several thick packing blankets were also draped over him. Slipping on my eye goggles, I took an iron bar to the lightbulbs in one smooth swing. The result was an astounding explosion of glass.
The largest wood rips and tears are not recorded with huge logs or thick lumber, but with thin plywood sheets exposed to the weather. The lamination on the plywood comes apart because of being soaked in water and baked in the sun for several years. Stand back a couple of feet from the microphone and pry the layers apart with various intensities. These recordings produce amazing results when combined with the wrenching whine a tree makes as it begins to fall from being chopped through. Veneer and plywood separation rips truly sell the desired moment.
IMPORTANCE OF SCRIPT BREAKDOWN
Every producer, director, unit production manager, production coordinator, director of photography, and anyone aspiring to these jobs should read this section very carefully. The described incident is not unique to the film discussed herein. Setting your supervising sound editor before you commence principal photography is an excellent and advisable idea. After reading the script, the supervising sound editor apprises you on a number of sound-editorial requirements that lie ahead. Don't just listen to his or her advice—follow it! This will save you tens of thousands, if not hundreds of thousands, of dollars.
Producer Ross Hunter was looking for a full, exciting sound job for his 1970 smash hit, Airport. Hunter sent a copy of the screenplay to Joe Sikorski at Universal Studios. Joe carefully read through the script, making numerous notes and underlining areas of concern. A few days later he sat down with Hunter and reviewed his notes. He had made a precise list of approximately 120 sound events that concerned him deeply. The producer must guarantee that these recordings would be made during the principal photography process, as all the equipment and manpower necessary to create these sounds would be available at that time.
The production company secured the St. Paul Airport in Minnesota, with exterior runway and tarmac filming to occur when the airport was shut down in the evenings. Months passed. The production company had wrapped the shoot and returned to Los Angeles. Several weeks later, Hunter called Sikorski about doing a temp dub for the sequence where George Kennedy tries to get a stuck Boeing 707 out of the soft ground between two runways. The congo line of snow plows and scrapers lines up, awaiting Burt Lancaster's order to move forward and plow the distressed airliner off the airfield, making room to open up runway two-niner for the inbound bomb-damaged Trans Global airliner to land. Hunter wanted to have a temp sound-effect job underline the visual excitement of the sequence to show it to a test audience and see how it played.
Sikorski said he would be happy to oblige. “You need to send over the sound-effect recordings that we asked you to make while you were up there filming.”
After an awkward pause, Hunter replied, “We forgot. We didn't get any.”
Sikorski explained that the studio's sound library did not have the sounds the sequence required. Hence he had given the painstakingly precise sound-event notes to the producer in the first place. Hunter understood and then asked Sikorski to work up a budget of what it would take to custom record the sounds he needed. Several days later, Sikorski received a call from Hunter, who had just reviewed the custom recording budget. “Are you out of your mind? This is half the budget of the picture! Couldn't we just go down to LAX [Los Angeles International Airport] and record this stuff?”
Sikorski explained to the producer that, even if they could get permission and cooperation from the FAA to record at Los Angeles International, his team certainly would not be able to get the clean, isolated recordings that sound editors need. He suggested they might try putting together some odds and ends, mixing them together to get through the temp. This ray of hope delighted Hunter. “Anything, try anything!”
In addition to a multitude of other sound effect requirements for the temp dub, Sikorski pulled numerous sounds of jets, motor whines, turbine start-ups, and other noises and cut them into elements to remix as new sound effect masters for the jet revs.
A couple of weeks later, Sikorski was on the dubbing stage, supervising the temp mix with Hunter. An exciting sequence grew to a climax. Burt Lancaster orders the line of snow plows forward. The flight assistant glances at George Kennedy in the pilot's seat, while the aircraft shudders from the engines, straining to pull itself out. “Petroni, she won't take much more!”
The furrows on Kennedy's brow deepen with determination as he chomps on his cigar. “Well, she's gonna get it!”
Kennedy shoves the engine controls forward with a resolution to either get her out of the mud or tear themselves apart in the effort. Sikorski's newly created jet revs scream out, adding to Alfred Newman's exciting musical score. The angle cuts to a close-up on the landing gear as the tires mash down on wood plankings. Sounds of wood moaning and twisting tell of the incredible weight bearing down. Suddenly the 707 wallows up from the soft ground and lunges out onto the taxiway; the engine revs peak and settle down into a reverse to slow. To be sure, it was an exciting audio moment and a memorable sequence in theatrical film history.
Joe Sikorski soon found himself manufacturing various sound events from other sounds to make do. It is not what he wanted. Customized sound recording undoubtedly would have brought the picture to an even higher level of achievement. It is, however, a tribute to what a creative sound-editorial team can do when faced with having to make do with what's at hand.
Sound editors often must work with what they have even when the producer went to the trouble of recording wild tracks. I was working on a helicopter action movie that involved several very stylish-looking choppers. To add delight to the project, the cinematography was fairly good, especially the aerial action footage. The picture editor had thought through the material most succinctly and had cut it with an eye for action stereophonic sound. I had been informed that the production mixer went to great lengths to record all kinds of helicopter action sounds. Eagerly gleaning the 1/4” production tapes, I tried to find the golden recordings that would jump to the forefront and make the show come to life. To my dismay, only a handful of cues were usable. As during the recordings, crew members were constantly talking.
Later, on the rerecording stage, we were mixing the sound effect predubs when one of the producers (also an owner of one of the helicopters) got up. “That's not a Hughes 500! Why didn't you use the wild tracks of the helicopters we recorded?!”
I had had it! I spun around on him with fed-up looks to kill. “I would have loved to have used your wild track recordings! But your crew couldn't keep their mouths shut. If they had kept quiet while your mixer was trying to record your helicopters, then I could have used your wild track recordings! Maybe next time you'll teach your crew how to keep their #$%*ing mouths shut when your production mixer is trying to get a priceless recording!”
Suffice it to say, I didn't hear another word out of him during the rest of the mix. It is infuriating to spend hours poring over what should have been fabulous production recordings only to find them filled with voices and other noises. I just could not contain my anger.
FIELD RECORDING IN 5.1
Recording 5.1 ambience “fields” can yield some very exciting results. But one must not be deluded into thinking that 5.1 “imaging” is just what you want for production sound. Believe me, I have been around this block with numerous highly talented, highly qualified sound mixers. The basic issue is that unless you are perfectly aligned with the camera's exact point of view, so that the spacial positioning matches precisely with what the camera lens sees, it will never work.
Take that one step further. When production shoots have multiple camera angles, three, four, five, or more cameras on a common marker each with its own distinct point-of-view, you would have to have a 5.1 rig for each camera in precise alignment and movement with each camera.
The problem with this scenario is twofold. First, you have the problem of close proximity to a camera that makes noise. I am sorry, all cameras make some noise, and digital recording has only sharpened the ability to hear it.
Second, the crew itself. People, by in large, are totally unaware how noisy they are. Even when they think they are being perfectly silent, they make noise. We have talked about this problem in a previous chapter, so I will not rehash it.
Talk about a postproduction headache! The worst I ever had to handle was 48 channels of production simultaneously. That is expected if you are shooting 70 mm concert performance projects—not for straightforward film shoots—and what about when the director and cinematographer (and rightfully so) want to move the camera, fast and fluidly.
Now, of course, the veteran supervising sound editors know that 5.1 “imaging” recording is great—for postproduction purposes. For this application (at least in terms of feature and television work) the postproduction custom recording game is exactly what this kind of recording is well suited for.
Now, let us say you are shooting a three-camera (fixed position) project, such as a stage play shot on video or film or live concert shoots. These are applications that readily jump to mind that 5.1 “imaging” recordings could really make a difference and give a very live and present image.

Figure 10.17 The Schoeps Double M/S matrix (type designation DMS Matrix) offers a complete 5.0 surround signal directly. Photo courtesy of Schoeps Corporation.
If you decide that you want to utilize the 5.1 “imaging” technique, whether it be for postproduction custom recording or if you have a production application that makes sense and it would really yield an exciting difference, then you might want to consider the Schoeps MDMS U Matrix for Double M/S system as shown in Figure 10.17.
The Double M/S matrix is a supplement for the Double M/S Set. This set is a surround microphone setup tailored for recording situations in which a small, lightweight, and easy-to-use arrangement is needed. Its main properties are:
• |
Only three microphones and channels are required for 5.0 surround. |
• |
It is very small and lightweight. |
• |
It can be protected well against wind (with windscreen and “fur” Windjammer). |
• |
It allows postproduction processing. |
The Schoeps Double M/S matrix (type designation DMS Matrix) offers a complete 5.0 surround signal directly. It is a small, sturdy box containing high-quality transformers that form a passive decoder matrix. As can be seen in Figure 10.17, the microphone signals are converted directly into the 5.0 surround signals L/R/C/LS/RS. The directivity functions of the resulting channels are adjusted for optimal sound quality and localization.
An additional switch enables a second setting, which is a 4.0 four-channel L/R/LS/RS setup without the center channel, optimized for ambience recording. Phantom powering is required on only three of the output channels: L, R, and LS.
PREPARING FOR SUCCESSFUL RECORDINGS
Put together a kit of supplies and tools to take along on location recording sessions. The one thing you can count on is that unforeseen problems and “whoopsies” are parts of your recording adventure. The larger the crew and the more complex the scope of work, the more Murphy's Law (“Whatever can go wrong, will”) rises up to try and frustrate you.
Probably the most common shortcoming in field recording is lack of an adequate and dependable power supply. You do not find an abundance of AC wall outlets built into the rocks in the field. Therefore, pay attention to the inventory of batteries necessary to sustain your equipment during your session. Not all batteries are created equal, especially battery packs unique to certain recording devices and custom designed to be used only with those units. This is where the analog Nagra 1/4” machines show they are such great workhorses. The internal battery cavity holds 12 D-cell batteries, which, when the recorder is properly used, easily sustain the machine all day long and longer. Have a full set of backup batteries securely packed and sealed should your battery meter test suddenly plunge.
The other great thing about D-cell power is that if you do break down in the middle of nowhere with battery shortcomings, you can just go to the nearest convenience store and you are back in business. I shy away from using any tape recorder, whether analog or digital, that has custom-designed batteries unique to that unit. Where do I find emergency battery supplies if I am up in the High Sierras? I doubt the local trading post has any custom batteries in the stockroom, let alone the JMV-3871/X88 rectangular power cells required by a particular portable digital machine.
Towels are extremely useful, for covering and insulating equipment, for drying things that got wet, or even for helping isolate wind buffets in emergencies. I usually keep a couple of bath towels and several hand towels in the trunk of the car for such use. In addition to traditional towels, towelette packets with premoistened wipes are extremely handy.
Keep several plastic clothes bags from the dry cleaner in a separate paper bag. Plastic clothes bags make excellent microphone and equipment wraps when recording in damp, drizzle, or even a full-fledged downpour. Use 3/4” paper tape to wrap the plastic clothes bag tightly around the recorder or microphone(s) so that loose plastic does not flap about, making unwanted noise.
Adhesive tape is very handy. You should use a wide but gentle paper tape if you need to tape microphone cable firmly against the side of a vehicle to keep cable vibration from spoiling the recording. You do not want to pull the tape up and have the paint job come with it. I like to have a roll of 1/2” Scotch Magic Tape for paperwork or lightweight applications, as well as a roll of gaffer tape or at least duct tape for heavy-duty needs. I also keep several colors of 3/4” paper tape for color-code labeling. You will also need several Sharpie markers of different colors.
Always keep a tool kit, including both a full-sized Phillips screwdriver and a flat-head screwdriver (in addition to a fine instrument size of each). You should have a claw hammer, a 1” paintbrush never used for painting, a pair of needle-nosed pliers, and a standard set of pliers. Include large and small sets of Allen wrenches.
Stock a separate head cleaner kit, with a can of compressed air to blow dust and debris out of the equipment, along with head cleaner and head cleaning swabs secured in heavy-duty zipper-lock freezer bags. Include a steno or small notepad so that you or your assistant can jot down recording information to assist in the sound library work that soon follows.
Pack a set of flares in the car for both emergency use and traffic control. Also pack a fire extinguisher, just in case. Purchase at least two heavy-duty flashlights for your kit. Many recording sessions are done in the night. You can also use flashlights as microphone reference points for the shooter to see. As your recording experience increases, you will develop a system of signaling with flashlights rather than risking audio intrusion on a recording by speaking.
Always have a personal safety kit. This should include a standard first-aid kit with the basic bandages, gauzes, iodine, medical tape, and snakebite kit. Fortify the first-aid kit with good eye wash, petroleum jelly, calamine lotion, strong sunblock, and insect repellent.
Include several pairs of ear plugs to protect the eardrums from the sound of close proximity gunfire. The personal safety kit should also include several pairs of eye goggles and heavy construction gloves. You should have a little accessories bag to keep in the personal safety kit that has safety pins, a good pair of scissors, a box of industrial single-edged razor blades, and/or an Exacto knife.
Figure 10.18 The lonely recordist.
When recording sound effects outdoors, especially in desert regions, dehydration and sunstroke are real dangers. Many technicians get deeply involved and forget that the sun is beating down on the tops of their uncovered heads, or they forget to use SPF 35 sunscreen on their face and arms. Three hours later, they wonder why they feel funny and their skin feels tight and crispy.
You should also include a water spray bottle. Being able to spray water onto the body or onto a prop you are recording is also very useful.
Take along a change of comfy and warm clothes, especially socks and shoes. I have lost count of recording trips where, for one reason or another, I either fell into or found it necessary to get into water, such as a mountain stream, pounding surf, flooded fields, swimming pools, or other liquid masses that will spoil your attire. I especially remember what the sloppy mud and clay of Oklahoma can do, not only to your clothing but also to your equipment and vehicle mats.
When you know you must put yourself into the wet and muck to properly achieve an audio performance, do what is necessary, no matter what you are wearing. Hence, you should record in junk clothes, taking a change of clothing with you. Remember, wear cotton clothing, not nylon or plastic, as synthetic fibers make “shushy” noises when you move, obviously spoiling your recording.
Proper planning and preparation of equipment and supplies go a long way to help you achieve supremely recorded sound effects. The rest is limited only by your own imagination. But I guarantee you, some of the fondest times you will remember for years to come are the custom recording adventures that you made to capture new and exciting sound effects!