
Chapter 5
The Challenging Battlefield of Production
“I'm sorry, David, but the #$%*!ing director won't give me two
minutes to slap a couple of wireless mics on the actors, and there's
no room in the #$%*ing office for my boom man, so I had to stick
the mic on the floor under the desk—so don't
blame me if it sounds like #$%*!”
Without doubt, the most difficult and arduous recording process in the audio-track development of a film is the on-camera production dialog recording. It's here that any lack of preparation and tactical planning will rear its ugly and expensive head in the coming months of postproduction. Here the ignorance and apathy of other production-unit department heads, usually consumed by their own contracted concerns, becomes apparent; they do little to help the sound-recording team in what should be a collaborative effort to achieve ideal production audio tracks during the shoot. Only seasoned directors and producers know the loss that occurs of both real money—spent to ADR actors’ lines—and of the magic of on-camera performance, rarely recaptured and seldom improved on.
Some actors have it written into their contracts that they will do no postproduction looping. In other words, if the sync production track is not usable, or if the director or producer decides that a line should be read differently or replaced for whatever reason, the actor would not be available to come onto an ADR stage and reperform it. These additional contractual complexities add even more pressure to capture the most pristine production recordings possible—pressure that seldom concerns other production heads, who so often have an immediate and dramatic impact on the ability of the production sound mixer and boom operator to achieve such recordings.
I remember, while working on one film, watching the production crew filming a medium angle of Jamie Lee Curtis at MGM. I was amazed to see a crewman standing just off to the side of the camera's view calmly eating an apple. The penetration of his teeth was clearly heard each time he bit into the apple's skin. An electrician stood beside him playing with the loose change in his pocket. Neither was making this “sound clutter” on purpose; both were clearly audio-ignorant. Nevertheless, I was stunned at the lack of respect and professionalism they paid to their audio craftspeople during the sequence filming. I knew that a few weeks hence, some sound editor would heave a sigh of disappointment and spend an unnecessary amount of time and extra production dollars to clean out the audible intrusions.

Figure 5.1 A typical basic production sound crew of three: the production sound mixer on the right (Paul Jyrälä), the boom operator on the left (Matti Kuorti), and the cable man in the center (Olli Viskari) working on Talvisota (The Winter War). Photo by Ulla-Marja Parikka.
I talked to hundreds of various craftspeople while writing this book, and was constantly surprised and fascinated by the wide range of views and perceptions regarding sound. The vast majority agree that sound is one of the most important components of a film, and many actually rate sound as more important than the visual photography itself, yet most craftspeople not working in sound do not understand their own contributions to the success—or failure—of the production soundtrack.
THE PRODUCTION RECORDING TEAM
The Sound Mixer
Responsible for the quality of the sound recordings on the set, the head of the recording team is the sound mixer. During preproduction the sound mixer consults with the producer and director on the best ways to tackle recording challenges of the production sound. Each project is different and each dictates its particular needs. Simple projects may have fairly straightforward requirements, so it might be agreed to record the dialog on a less expensive two-channel digital recorder—most likely direct-to-hard-disk within the machine or flash technology. Most digitally recorded dialog today is captured at 48 kHz/24-bit, but there are projects seeing the wisdom to move up to 96 kHz/24-bit. Virtually every serious professional recording device today is rated at least at this level, as this standard is quickly approaching. A few units are already qualified to record at 192 kHz—decidedly prepared for future and inevitable growth. The retarding factor in this higher recording rate is the compatibility with nonlinear picture editorial platforms such as Final Cut Pro and Avid. The incredible reduction cost in price-per-gigabyte disk space is making such leaps in improved audio file size much easier to deal with.
Most serious projects will probably require multiple channel recording capabilities so the sound mixer can capture multiple microphone setups. These will be in constant flux with different actors in constant motion on a complicated set, each on his or her own discrete channels. More and more complicated audio setups are becoming the norm, not the exception. Individual wireless microphones may be placed on each actor as well as two channels of overhead “air” mics and two foreground boomed mics. This could easily require at least one 8-track recorder. Such discrete control becomes vital in maintaining control in mixing the discrete channels later, to avoid prematurely mixing together two or more microphone sources, only to have misbalance mixing decisions made on the set and then be unable to rebalance them later.
The sound mixer must choose the right recording format for the project, rent or supply the necessary equipment to accomplish the task required, and use that equipment to the best of his or her abilities during the filming process. The sound mixer not only supplies picture editorial with the best possible recorded material, but also with a volume of copious notes and sound reports that help guide the picture editor, and later the sound editors, through the maze of sync recordings, wild tracks, and room tones.
The Boom Operator
The boom operator is an incredibly important position. If he or she does not get the microphone into the right position at the proper moment, the actor's voice is off-axis and sounds off-mic. There is no such postproduction plug-in to process off-mic dialog and correct it. Off-mic is off-mic! The boom operator must be strong and agile, as well as attentive and observant. He or she must know the exact positions of invisible boundaries below which the microphone must not dip down into the view of the camera. The boom operator must also memorize light throws and angles so as not to allow the shadow of the microphone to be seen on any surface of the area being photographed.
For those readers who might think it cannot be any big deal dangling a microphone around over a couple of actors, tie an unopened can of dog food to the end of an 18-foot pole and hold it (fully extended) over your head for 4 minutes. Now think about having to do this while concentrating on rotating and pivoting the pole to flip the microphone into position, first one way, then suddenly another way—all the while watching for microphone shadows and keeping it above the view of the camera lens. You must accomplish all of this without making any noise or vibration that will telegraph low-end thumping into the microphone's diaphragm. Getting tired yet?
The boom operator must also know the delicate workings of radio microphones. He or she must know how to wire an actor quickly and how to work diplomatically with performers’ often unpredictable personalities and temperaments. The boom operator has a personal kit: a tool or tackle box that holds the tools, tapes, batteries, supplies, and implements that make it all work. In a matter of moments, the wireless microphone must be placed on the actor, in exactly the right spot. The wire must be carefully hidden under the clothing and run to wherever the transmitter is being hidden on the actor's body. This is an art form unto itself.
The boom operator must be constantly on the lookout for anything making unwanted noise. Good boom operators do not complain or report problems to the sound mixer or first assistant director; he or she assesses the problem and offers solutions for dampening the offending sound down, if not completely eliminating the audio intrusions from polluting the recording.
The Cable Man
The cable man used to be known as the third man. He or she is also known as the sound utility, and, when a second microphone boom is needed, the cable man wields it into place. The cable man literally clears the microphone cables and keeps the boom operator from backing into things or banging props or the side of the set with the fish pole when cast and crew are in motion. When a boom operator must make a backward maneuver to clear the way and reposition to capture the actors cleanly, the cable man guides the boom operator back with a hand on the belt or back, clearing cable or even silently moving things out of the way.
If a microphone cable has gone bad or is suspect, the cable man grabs another cable and changes it out instantly! The cable man is often creating an impromptu rain hat, using short sections of doweling (often precut thin lengths of branches) and wrapping it with a thin liner of plastic cover from a dry-cleaning bag and a section of air-conditioning “hog hair” filter. He or she anticipates problems before they arise and quietly solves them so the boom operator can concentrate on the job at hand.
THE SEQUENCE OF PRODUCTION RECORDING
The production mixer understands the rhythm of the production shoot. He can tell when the first A.D. (first assistant director) is about to announce that she is ready to roll film for a take. The mixer sets his sound recorder into a standby, or Test position. This allows the electronics to power up and be warmed and ready to operate at nominal performance on command.
The production mixer's sound recorder has been parked in the pause (Test) mode, keeping the electronics live and ready to roll. The mixer activates the recorder in the Record mode. The tape turns at the designated speed, and the indicator shows a steady and dependable speed. The mixer presses his slate mic on his microphone mixing unit to verbally slate the shot, “Scene 29 Baker, take 3.”
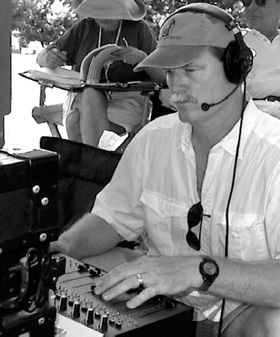
Figure 5.2 Production mixer Glen Trew with his Deva V and Cameo handling the chores on James Agee's classic novel for Masterpiece Theater, A Death in the Family.
Verbally slating the audiotape before the camera rolls can save valuable film negative. Many mixers actually preslate the upcoming take prior to the first A.D.’s announcement to roll sound. The mixer will preslate and then place the recorder in pause (Test) mode again, waiting for the first A.D. to call to “Roll sound.”
Sure enough, the first A.D. calls out, “Let's have the light and bell.”
The production mixer is also responsible for the warning light (the revolving red light) just outside the stage or on the perimeter of the location set. The mixer flips the warning light on, which also sounds the bell (one ring duration). Work activity stops and the crew hold their positions quietly for the shot.
Satisfied that activity has settled on the set, the first A.D. cries out, “Roll sound!”
The production mixer turns the recording machine into Record mode. Once he or she is satisfied that the machine is up to proper speed and that timecode or pilot sync is true and steady, the mixer will call out, “Speed.”
Nothing—and I mean nothing—can or will proceed until the sound mixer has called out “Speed.” I have seen too many beginning mixers feel so intimidated that they are holding up the shoot that they call out “Speed” before their equipment is truly ready, especially if they had turned the recorder on from a cold start without having the electronics warmed up. This means that the first few seconds of recording will not sound clear. On more than one occasion valuable dialog was ruined because the mixer did not take the extra few seconds to pay strict attention to the sound through the headset and be satisfied that he or she was actually getting a proper clear and steady signal. Just because we live in a digital world now does not mean that digital equipment does not have to be warmed up and up-to-speed and before the mixer commits to go forward.
Once the mixer has announced “Speed,” then the first A.D. cues the camera crew: “Roll camera.”
The camera operator turns the camera on and gives it a moment to gain sound speed; then he or she answers, “Camera speed.”
The slate assistant (who is usually the film loader) holds up the slate that has the vital information for the show and scene number written on it. For our example purposes, it reads 29 “B” TK-3. Most camera crews have the slate assistant verbally slate the scene, “Scene 29 Baker, take 3.”
Some crews forgo doing this as an excuse to save film. It is really up to the protocol desired and the concern of film stock that will dictate this choice of procedure. The slate assistant snaps the slate for sync and steps quickly out of camera view.
The first A.D. calls, “Cue background.”
The second A.D. cues the background extras so that they will be in motion. The director allows the action to take a few moments so that a few precious seconds of presence with background movement will be recorded (it will match any “interfilling” that needs to be done later by a dialog editor). Then the director cues the actors, “Action.”
The above is the proper and ideal protocol for preslating, rolling sound, and onscreen slating by a slate assistant and for creating pre-action presence with the natural action of background extras as it will sound during the internal action of a scene. If you were to record presence tone without the background extras, the intercut presence would sound horribly out of place, cut in between actors’ lines, for instance, to replace a director's cue or an unwanted sound. With audio-aware directors and assistant directors, you will achieve this level of protocol and consideration consistently, rendering the best possible audio results.
THE BASIC RECORDING KIT
Like anything else, the composition and extent of the mixer's tools at his or her disposal differ with every picture and every budget at hand. Whether the project has no money to speak of or is a multimillion-dollar blockbuster, the basic recording kit does not change much. You need the following items:
Sound cart
Sound recorder(s)
Portable mixer
Microphones
Microphone cables
Wireless RF microphones
Shock-mount pistol grip with zeppelins
Windscreen covers
Miscellaneous adapters and phase inverters
Smart slate
Communication radios/comtechs
Voltage meter for AC tie-ins
Battery supply
Cables
Extra plugs, batteries, etc.
Plastic and/or blanket for protection from flying objects or weather
ANALOG OR DIGITAL
Whether to record digitally or analog is a decision that requires factoring numerous technical and philosophical requirements and attitudes. One must not think that just because a new technology and/or “fad buzzword” is used means that it is better or more desirable. For instance, it is nearly impossible to convince someone that analog recording can not only be preferable, but superior, unless they have used both a digital DAT recorder as well as an analog Nagra under comparative recording conditions and compared the results.
Personally, I embrace both analog and digital recording and decide on an individual basis what will accomplish the desired result. In the early days of DAT recording I became weary of listening to my colleagues argue back and forth about which was better, analog or digital. So I decided that we should go out and record analog and digital formats side-by-side simultaneously, using identical microphones that were arrayed together (for precisely the same recording aspect) and identical cables. The only differences would be the tape recording device—analog or digital, and the format. To help you appreciate the recording differences, review the “comparative medium recordings” on the companion website for book.
We felt that we needed a very dynamic intense audio event to make the comparison easier to analyze, and frankly, I could not think of anything more dynamically intense than a .308 Heckler and Koch assault rifle!
Most production mixers currently use a direct-to-disk digital recorder as their primary tool; however, many still keep a 1/4” Nagra in the sound truck. When the digital gremlins plague a recording session—and many mixers have their own “bad days” stories—they require a rugged and dependable backup recorder to fall back on until the digital gremlins have been vanquished.
For the first 10 or 12 years of production digital recording, serious audio craftspeople still preferred the fullness and warmth of analog recording, especially when they had the luxury to record on a Nagra at 15 ips. During those early days of digital production sound, very few of us disagreed with that ideal, especially those of us with the trained ear to harmonic subtleties. However, those of us who still recorded material in analog (for whatever practical reason) would immediately transfer the audio material into the digital environment for the postproduction process.
The question of analog versus digital recording then became an issue of the production challenges themselves, budget considerations, and, of course, who handled the recording chores as mixer. I have had the pleasure of working with a handful of mixers who were extraordinary at recording digitally in the early days of DAT technology. Lee Howell (based in Los Angeles) is one; Paul Jyrälä (based in Helsinki) is another. Peter Meiselmann was, by nature a hardcore analog specialist, but was pressed into recording the production track for Terror Tract using a DAT recorder because the first-time producers felt they needed digital technology for some postproduction reason. It was Peter's first time using the DAT technology, but his years as a disciplined analog mixer served him well to adapt to the digital medium. In fact, I was stunned by the results, as I happened to handle this project. The usual flaws and recording mistakes that plague the digital world were not there. In fact, numerous sequences that had a screaming monkey, shotgun blasts, and other harsh concussive audio cues were not only recorded beautifully, but they were devoid of distortion and overload edginess—all of which were overcome because of Peter's analog experience and discipline know-how.
One must not be lulled into thinking that the final outcome of a film's soundtrack is reflective of the production mixer's work. It can be, but not necessarily. I have handled films where every second of production recording was ultimately stripped out of the track and every syllable of the movie was revoiced.
BACKUP TAPES
As discussed in Chapter 4, having backup media (whether it be backup DATs, DVD-Rs, or clone drives) may seem like an inconvenience and a waste of money, but when you first experience the shipping carrier losing the shipment on the way to the lab or sound facility, or the first time your primary DAT machine “eats” the tape at program number 88, or the audio data files on your removable drive are found to be corrupted, you will wish that backup precautions had been a part of the budget.
The mixer should always hold on to the original material, sending the clone drive, DVD-R, or duplicate backup DAT back to picture editorial. The last thing you want is to ship both the original and backup medium together, as obviously all would be lost if the shipment got lost or was destroyed! That is, after all, the whole point of the exercise.
The mixer has the original in his care should the director and producer have a critical question that may arise from “bad sound,” or problems that actually became an issue of a bad sound transfer later at the lab, or sloppy digitization by the assistant picture editor. Many a sound mixer could have avoided being the scapegoat in a finger-pointing row between the producer and sound transfer over the poor quality of a daily soundtrack. I know of several situations where the sound mixer was vindicated because an A-B comparison between the original recorded medium and the transfer was played side-by-side for the director and producer. On one particular picture, the studio was actually compelled to fire its own sound transfer department as contractor and then contract the sound-transfer chores to a rival studio, all because the mixer had kept either a backup tape (or drive) or the original, depending on which he or she sent back to picture editorial.
LINE-UP TONES
As described in greater detail in Chapter 6, it is critical that every tape, whether analog or digital, even when you are recording direct-to-disk, have a known line-up reference tone at the head of the tape or the first cue on the hard drive. The sound mixer threads up the first tape of the day onto the Nagra, or inserts the first DAT cassette into the recorder, or warms up the multichannel direct-to-disk recorder. The first thing he or she does is record an announcement of what is what, where they are, and what kind of line-up tone is about to be heard.
Good morning, we're out here today at Glacier Point for Silver Run Entertainment's production of Five Rings of Michael. The date is Tuesday, June 26th, 2007. This is drive three. We're recording on a Sound Devices 744T with a flat-EQ mode at a sampling rate of 96 K at 24-bit. Stand by for the reference tone which is –20 dB equals “0” VU.
In this short and to-the-point pell-mell of information, you have given the most important hit points:
1. |
Location of recording |
2. |
Name of the production company |
3. |
Project name |
4. |
Date of recording—month, day, and year. |
5. |
The 1/4” roll, DAT, or removable hard drive number |
6. |
Type/model of recording device |
7. |
Equalization setting |
8. |
Tape speed or sampling rate |
9. |
A clear definition of line-up tone |
One must approach recording the information header of a fresh roll of recording tape, DAT, or hard drive as if the tape or drive itself will be the only thing that survives the shoot. The box will be lost, the data card will be lost, the sound report will be lost. Believe me I know. I once had a big box handed to me that was just a huge wad of 1/4” tape from a shoot in the Philippines. No box, no reports, no reels—just thousands of feet of 1/4” tape. Anything and everything I was going to know about the material on it (once I unwound the scrunched up ball of magnetic ribbon) was going to be what I gleaned from the mixer's header information and verbal shot slates. With that kind of nightmare possibility looming around you, it really makes you keep in mind how vital clear and precise vocal slates and information headers are to everyone who will work with your material.
Once the line-up tone is defined, the mixer will lay down at least 8 to 12 seconds of line-up tone. The reference tone level quoted on the tape is interpreted to be referenced to “0” on the VU (volume unit) analog meter or is referenced to what level “0” is interpreted on a peak meter (i.e., 20 dB equals “0” VU, or if you are using a peak meter in transfer, make –20 dB equal –20 dB on the peak meter). Without this reference tone, one cannot accurately set playback levels to make exact 1:1 (one-to-one) copies at a later time.
SOUND REPORT
The sound report is the key to the mixer's hard work and efforts: it is the road map of what is on the recorded tape and where to find it. If properly filled out, the sound report also offers a wealth of information through notations made by the mixer as work progresses. Some mixers are more note-oriented than others, but if mixers actually realized the value of their notes, they would probably pay more attention to making them.
As a supervising sound editor, I know the invaluable contribution of a mixer's notes, especially when it comes to comments about airplane noise or undesirable talking (listed as VOX) that may have marred the recording.
The most valuable of notes are those regarding wild tracks (listed as WT). When I begin a project, I immediately get a copy of the mixer's sound reports and quickly scroll through them, looking for any wild tracks or miscellaneous recordings that may determine what other recordings I may need to refer to or authorize to have done.
On more than one occasion, I was required to look at the sound reports of a project before I committed a bid, and depending on the quality of note coverage (or lack thereof) I have actually rejected even bidding on a show because I could see the dialog work was going to be too much of a nightmare because of sloppy mixer notations and lack of vital information. The reverse is also true: I have accepted what appeared to be impossible edit assignments because the mixer's sound reports were highly detailed and had a wealth of notes regarding unwanted noise to watch out for, good production sound-effect moments, as well as the presence of professional technique to record numerous WT (wild tracks) to help problem solve audio issues that sound editorial would eventually find invaluable.
It is equally important to list a shot where there is no sound. For one reason or another it may be decided to shoot a setup where the sound mixer is not rolling sound. He or she will list on the sound report the abbreviation MOS (which stands for “without sound”). Actually a person could sit for hours and wonder how in the world you get the letters MOS out of “without sound,” until one knows the genesis of the abbreviation.
Back in the early 1930s, during the infancy of the motion picture sound process, a famous director was shooting a picture when he decided not to have the optical sound camera roll for whatever reason. He turned to his crew and in his heavy European accent he announced to them, “Awlright children, this vun vee do mit out sound.” The continuity script girl did not ask what he meant by that, but listed the sound note of the shot as M.O.S. in the script notes, and to this day the abbreviation MOS has stuck.
Frankly, it is uncertain who actually coined the term. Believe me, every academic professor has his or her expert opinion, but I can guarantee you that none of them was there to witness it. I have heard of someone who claims to have been there, but when you scratch the surface of the claim it was actually hearsay. I have interviewed a number of my colleagues on this issue, several of whom date that far back, but none of them knows the answer beyond a shadow of a doubt. Many think that it was the colorful, if not legendary, Michael Curtiz who said it (The Sea Hawk, Casablanca, The Egyptian, We're No Angels). Curtiz certainly had an infamous reputation for mauling the English language. Others insist it was Ernst Lubitsch (The Shop around the Corner, Heaven Can Wait, To Be or Not to Be, That Uncertain Feeling)who said the immortal words, while Hal Mohr, a cinematographer who had worked with Paul Fejos many years ago, attributes the quote to Fejos himself, whose continuity script girl's abbreviation stays with us even to this day.
Regardless of who said it, the fact remains, when the production sound mixer writes MOS on his or her sound report next to a scene/shot designation, every sound transfer facility in the world knows that the sound recorder was not rolling.
There is no doubt that at some point one or more of these individuals may well have slurred the pronunciation and enunciation of the directive. The truth of the matter is that that is not the genesis of the abbreviation but rather a romantic explanation by those who do not know the entire background. (Remember what I said in Chapter 1.)
The fact is that there is no substantiation that the curious expression spawned the abbreviation, whereas during the evolution of recording sound onto 35mm film negative, using a sound “camera” as a photographic optical medium for production sound recording, the designation MOS was well-known to mean “minus optical sound.” When the director did not require sync sound for a particular shot, the recording mixer simply listed the abbreviation MOS on the sound reports.
Unlike hearsay stories, there are actual written sound report notes that explain this fascinating legend. Not as romantic and fun, huh? Sorry. Remember, back during the first two and a half decades of motion picture audio, production sound recordings were accomplished by “photographing” the microphone pick-up via the optical sound camera.
Increasingly more mixers are adopting a full-page-width sound report, which gives considerably more room for notation. The slender version of the sound report that dominated the industry for decades was designed so that you could fold it over and simply lay it inside the box of a 5” or 7” reel of 1/4” tape. Unfortunately, this convenient width also inhibited mixers from writing sufficient notations, and, believe me, we in the postproduction process will read as many notes, ideas, and warnings as the mixer will take the time to write.
As you study a typical sound report (Figure 5.3), note the types of vital information displayed there. Believe it or not, even the title of the picture is important. Too many times the transfer department is hung up trying to find a scene and take of a print only to discover that someone picked up a similar-looking box assumed to belong to the same show because no markings indicated the contrary; hence valuable time is lost as the transfer department searches the right roll number from the wrong show title. Worse, when the “right” scene is found and the transfer department takes and prints it, it is sometimes discovered too late that it is from the wrong show.
Many times, mixers do not fully complete the information header, which has often confused transfer departments. Sometimes unusual head tone levels are utilized; these must be carefully noted.
If the mixer is using a DAT machine, he or she enters the PNO (program number) that the DAT recorder automatically assigns each time it starts a new recording. The PNO locator system has been a wonderful thing for us in postproduction. You simply enter the program number of the scene and take you want and hit the Play button. The DAT machine spins at 200 times speed in search of this number, automatically stops, aligns at the head of the recording, and plays it—what a great timesaver!
Next to the DAT PNO, the mixer lists the scene and angle designation number of each recording. Generally, a mixer only enters the scene number once and then draws a line vertically alongside all the takes until the next angle. For example, the mixer lists scene 105 “A” in the scene box and then take 1. He or she lists take 2 below that and take 3 below that, all the while drawing a vertical line from 105 “A” until that angle is a wrap. The next setup is 105 “B.” Each take has its own line. Do not list all the takes together on one line. It is not only more convenient for the mixer to write, but it is much faster for an assistant editor or transfer tech to find material, as the writing will “eye-scan” much more easily and more efficiently.
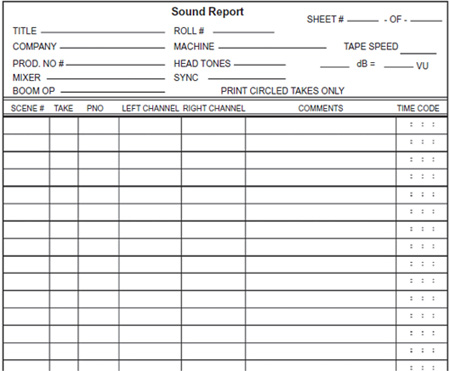
Figure 5.3 A typical 2-channel sound report form.
A mixer may use a single microphone but have it split on two channels. The first channel (left) is recording at standard level; the second channel (right) is recording the exact same information only at a lower level (often –10 dB) in case of sudden bursts of sounds, such as gunshots, crashes, screams, and so forth. The mixer makes this notation accordingly.
In the middle of the roll, a mixer may decide to use two microphones and keep them on dedicated channels. He or she notes that actor #1 is on channel number one (left) and that actor #2 is on channel number two (right).
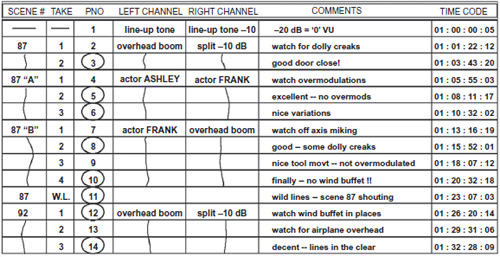
Figure 5.4 A closer view of the sound report data chart; lots of notes are the keystone for success.
In the comments column, the mixer makes any pertinent comments that he or she feels the postproduction people may need. I personally love it when a mixer makes a comment such as “Great door slam,” or “Neat machinery ka-thumps,” or “Watch out for airplane in track.” During interviews for this book, mixers confessed that if they really thought their notations were being read and utilized by anyone after the day's shoot, they would certainly make a bigger effort to write them. Sadly, many mixers do not feel that, in today's compressed postproduction schedules and budgets, anyone takes time to glance through their notes and/or ferret out wild tracks recorded for postproduction applications.
Many transfer departments use sophisticated calibrated varispeed controllers. Many times, a director wants a setup photographed off-speed, such as overcranking the camera at 30 frames per second (fps) or higher for a slightly slowed-down effect, or under-cranking at 18 or 20 fps, which ultimately speeds up the shot when projected at a normal 24 fps. If the director does not want the harmonic pitch and timbre of the voice to sound pitched in relation to the over- or under cranking, then the varispeed unit correctly pitch-shifts the audio up or down; this way, when it is played back at 24 fps, the visual action is slow-motion or accelerated, but the pitch and timbre of the soundtrack sound normal.
One particular underwater monster picture was shot entirely 2 frames per second slower than sound speed (22 fps), making the pace of the action faster. This not only allowed the producer to tell a 103-minute story in only 95 screen minutes (which also proved more desirable to the distribution company), but it also allowed a performance edginess and tension to be instilled because the cast was speaking and moving slightly faster.
If such notations are made in the comments column, the transfer department can effect the transfer accordingly, making daily transfers to match the picture.
Note that the last column is formatted for timecode notations. In today's ever-increasing world of “smart” slates and timecode dailies, the far right-hand column, which used to be reserved for transfer notations, is now being utilized by the production mixer to list timecode starts for each take.
MICROPHONES AND PICK-UP PATTERNS
The primary tools in the arsenal of weapons at the mixer's disposal are the various kinds of microphones with their various types of pick-up patterns. Good mixers have carefully chosen kits they can mix and match, depending on the location and challenges of the sequence to record. What follows is an explanation of the basic kinds of microphones generally used for production recording (Figure 5.5).
Microphone Pattern
Omnidirectional Microphone
This condenser microphone has an omnidirectional pick-up pattern, as illustrated in Figure 5.5. The good thing about the omnidirectional microphone is that it has a relatively even pattern that picks up everything around it. The bad thing is that it has a relatively even pattern that picks up everything around it, including but not limited to camera noise, feet shuffling, crew downrange who are whispering, aircraft high overhead, the 18-wheeler truck making the grade 5 miles away, and so forth. As with the use of any microphone, though, you must choose the right microphone for the right job. In some situations you could not be better served than by using a good solid omnidirectional microphone.

Figure 5.5 Basic microphone pick-up patterns.
Cardioid: A Directional Microphone
Both dynamic and condenser microphones can be cardioid. As indicated in the diagram, the cardioid microphone has a directional pattern of some degree, or what is called a heart-shaped pick-up response. That means it picks up more signal directly in front of it than to the sides and especially behind it. It is not just a matter of sound level that is affected. It is a matter of axis. As the actor moves off-axis, or to the side of the microphone, the character and richness of the voice thin and the frontal presence falls away. This is referred to as being off-mic.
Dynamic microphones do not require phantom power and are known for being rugged and able to handle a wide dynamic range of sound-recording situations. Vents run alongside the microphone shaft, allowing sound to enter from behind, striking the diaphragm and canceling out some of the same ambient signal that enters from the front, which gives the directional microphone its unique function of cancellation. Signal cancellation is crucial for clear dialog recording, especially when working in exterior situations. Sound of identical character that enters the rear of the microphone as well as the front and that strikes the diaphragm equally is canceled out, thereby cutting down the amount of ambient noise in relationship to the unique sound being recorded directly in front of the microphone, such as the actor's voice. The more sound allowed in from behind the diaphragm, the more directional the pattern.
As you can easily see, this kind of microphone is more suited for precision miking of actors on a location set already filled with an abundance of unwanted ambient noise. The challenge is to keep the center of the pattern right on the origin of the desired sound; otherwise you suffer off-mic recordings.
Hypercardioid: Highly Directional or Mini-Shotgun
Like its directional cousin (the cardioid), this type of microphone is more than just somewhat directional, hence its nickname the mini-shotgun. Actually, the term is sort of a misnomer, its origin unknown, though sales personnel probably concocted it; regardless, shotgun has come to designate microphones with a more forward pick-up pattern. The longer the microphone tube, the greater the number of vents (to allow for rear-pattern cancellation and frequency compensation), and the more directional the microphone.
Supercardioid: Ultra Directional Shotgun
Early supercardioids were called line microphones or rifle microphones. The supercardioid is just that: super highly directional and equally more difficult to keep directly on the desired spot of origin for the most pristine of recordings. This microphone is not a good choice if your actor is doing much moving or if you have more than one actor on the set to cover; however, for single setups or two-shots where you cannot get in close with a fish pole and a traditional microphone, the supercardioid can really reach out and grab the signal.
The biggest mistake in using any microphone is forgetting that it does not have a brain. In other words, it cannot tell the difference between a voice and noise. Every application has a requirement; a right microphone exists for the right job. Your job is to know which to choose. For music applications, certain microphones can handle the sound-pressure levels that a kick drum might give out, or the brash brass of a trombone or saxophone. Other microphones cannot handle the percussiveness as well, but have a much better reproduction of the top-end for use in recording violins and triangles.
Unfortunately in our industry, many craftspeople try to make one microphone do too many chores. The veteran mixer will have developed a taste and style of recording, either personally owning or insisting on the rental of a precise mixed assortment of quality microphones to fill his or her arsenal of recording tools.
The Sennheiser MKH 60 is a lightweight shotgun microphone (Figure 5.6). It is versatile and easy to handle and its superb lateral sound muting makes it an excellent choice for film and reporting applications. Its high degree of directivity ensures high sound quality for distance applications.
Features
• |
Extremely low inherent self-noise |
• |
High sensitivity |
• |
High directivity throughout the whole frequency range |
• |
Transformerless and fully floating balanced output |
• |
Infrasonic cut-off filter |
• |
Symmetrical transducer technology ensures extremely low distortion |
• |
Switchable pre-attenuation, switchable roll-off filter, and switchable treble emphasis |
• |
Rugged and weatherproof |
• |
Black, anodized light metal body |
Technical data
• |
Pick-up pattern: super-cardioid/lobar |
• |
Sensitivity in free field, no load (1 kHz) 40 (12.5) mV/Pa |
• |
Nominal impedance: 150 Ohm |
• |
Minimum terminating impedance: 1000 Ohm |
• |
Equivalent noise level: 6 (14) dB |
• |
Equivalent noise level weighted as per CCIR 468-318 (25) dB |
• |
Power supply: Phantom 48±4 V |
Profile Super-cardioid/lobar shotgun interference tube microphone with infrasonic cut-off filter, switchable pre-attenuation, switchable roll-off filter, and switchable treble emphasis. Frequency response 50–20,000 Hz, sensitivity (free field, no load) 40 (12.5) mV/Pa at 1 kHz, nominal impedance 150 Ohm, minimum terminating impedance 1 kOhm, equivalent noise level A-weighted 6 (14) dB, CCIR-weighted 18 (25) dB, maximum SPL 125 (134) dB at 1 kHz, phantom powering 48±4 V, supply current 2 mA, dimensions Ø 25 × 280 mm, weight 150 g. Values in parentheses with attenuator switched on (– 10 dB).
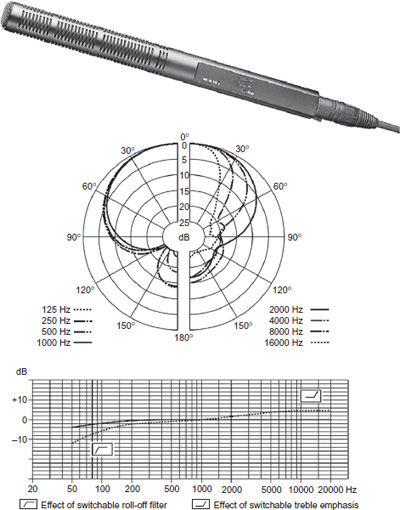
Figure 5.6 The Sennheiser MKH 60 shotgun microphone. Photo courtesy of Sennheiser.
Here are some guidelines for the proper selection of the various microphone capsule options if you are using the Schoeps Colette system (Figure 5.7). Schoeps is often asked to recommend a microphone for a particular recording application, whether you are recording production dialog, custom sound effects, and especially if you are recording music. Some microphone manufacturers readily answer such requests. That might make sense if a microphone has a frequency response tailored to the characteristic sound of a given instrument. But the possible applications for such microphones would then be restricted significantly.
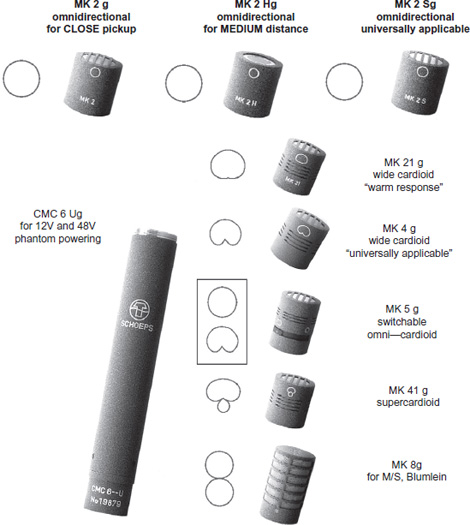
Figure 5.7 The Schoeps Colette, CMC “workhorse.” Photo courtesy of Schoeps.
Schoeps’ opinion is that a good microphone ought to sound natural, just as one expects a good audio amplifier to sound; thus it should be suitable for any musical instrument or other production recording need. This requires flat frequency response and a directional characteristic independent of frequency. There will be no difference in sound quality whether the pick-up is on- or off-axis.
Obviously this ideal can be achieved only to a finite degree. With directional microphones, proximity effect causes the low-frequency response to vary significantly while with nearly all microphones (especially omnidirectional microphones), the polar pattern is rarely ideal at the highest frequencies.
Only in rare cases can “the” correct microphone be chosen unequivocally, since, according to experience, one must also consider the aspects of taste, recording location, position of sound sources and the microphone, and the atmosphere of the music or other program material. Any absolute prescriptions would thus be of limited value at best. Schoeps offered the following text, to help orient the choice(s) that the recording mixer must make before deciding which capsule(s) should be used for the recording challenge at hand.
The microphone type that comes closest to the theoretical ideal is the classic pressure transducer. It has an omnidirectional pick-up pattern, reproduces even the lowest audio frequencies with full sensitivity, and has no proximity effect.
In practice some degree of directionality is generally considered desirable and the most commonly used pattern for medium-distance pick-up is the cardioid (MK 4/CCM 4 and the MK 4V/ CCM 4V). In particular situations, however, there may be good reasons to make a different choice, which could include:
• |
For increased directivity either for the sake of a “drier” recording or for the suppression of sound from adjacent instruments: supercardioid type “41” (=MK 41 or CCM 41), assuming that there is no nearby sound source or loudspeaker behind the microphone, since it has a rear lobe. |
• |
For decreased directivity or very natural sound quality even for sound arriving at the sides, or for improved low-frequency reproduction: the type “21” wide cardioid. |
• |
For essentially perfect pick-up of low-frequency information and room sound: the omnidirectionals, type “2H” or “2S.” |
• |
For very close miking: with directional microphones it is necessary to compensate for proximity effect by means of a corresponding bass roll-off. This is especially true when miking instruments; see our recommendations. For voice: try type “4S” or “4VXS.” For instruments the omnidirectional type “2” may be of interest (no proximity effect, low sensitivity to “popping” or to solid-borne noise); for grand piano, the BLM 03 Cg. |
• |
For very distant miking with essentially perfect bass response and/or as an “ambience” microphone: omni type “3.” |
• |
For outdoor recording if directivity is not required (at close miking distances): omni type “2S” 1 windscreen W 5 or W 5 D (advantage: low sensitivity to wind, popping, and handling noise). |
• |
For high directivity: type “41” with W 5 D, W 20 R1, or WSR MS (basket-type windscreen with built-in elastic suspension for mono or stereo). |
As a starting recommendation, Schoeps suggests the switchable omni/cardioid capsule MK 5 plus CMC 6 Ug microphone amplifier of the modular Colette series or the corresponding compact microphone CCM 5.
One of the hottest high-quality shotgun microphones to come onto the market is the CMIT 5U (Figure 5.8). When you need to record dialog outdoors, the surrounding environment is very noisy, and you are finding your current supercardioid pressed to the limit and you are still not getting what you would like, you should look at the Schoeps CMIT 5U.
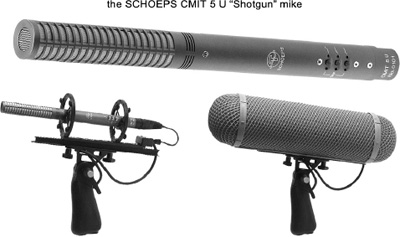
Figure 5.8 The Schoeps CMIT 5U shotgun mic. Photo courtesy of Schoeps.
The Schoeps CMIT 5U has unusually low coloration of off-axis since the pickup angles at low and high frequencies are kept reasonably similar to one another. At medium frequencies the directivity of the CMIT 5U is higher than one would expect from a microphone of this length, while at high frequencies the pick-up pattern is not narrow as with long shotgun microphones. This being the case, it is so much easier to cue the boom and keep actors on mic in very active scene scenarios.
This mic also has the audio quality that makes it extremely suitable for music recording as well as dialog. The directional pattern and sound quality are consistent in both the horizontal as well as the vertical planes, unlike some other shotgun microphones.
The CMIT 5U also enjoys a greater immunity to wind noise than the Schoeps supercardioid. It is very lightweight, utilizing a very sturdy all-metal housing. The capsule and amplifier of the CMIT 5U are built as a single unit, unlike the Schoeps Colette microphone series.
There are three pushbutton activated filters that allow the microphone to adapt to all kinds of recording situations. For high-frequency emphasis (15 dB at 10 kHz) it enhances speech intelligibility and compensates the high-frequency loss caused by windscreens and woolly covers.
The steep low-cut filter (18 dB/oct. below 80 Hz) suppresses wind and boom noise nicely. A gentle low-frequency roll-off (6 dB/oct. below 300 Hz) compensates for proximity effect.
Pairs of LEDs next to each pushbutton indicate the status of the filters, which is very handy when the user needs to know the status of his options on dark sound stages or night shooting environments.

Figure 5.9 The Neumann KMR 82 is a shotgun microphone with a high directivity that remains within the acceptance angle independent of the frequency.
In principle, Neumann shotgun microphones use a combination of a pressure gradient transducer and an interference tube. If the wavelength of the frequency is longer than the tube length, the microphones work as pressure gradient transducers. At higher frequencies they operate as interference transducers for lateral sound. Off-axis sound sources are picked up with reduced level, but without coloration.
The KMR 82 is less sensitive to wind and pop noise when compared to the KM 150 miniature microphone with a similar high directivity. The shotgun microphone features extremely low self-noise, good impulse response, and high output level.
The polar patterns of the KMR 82 shotgun microphone show it to have very directional characteristics. The microphone capsule is positioned inside a housing tube that is acoustically open but has a high flow resistance. The directional pattern of the microphone is lobe shaped. The attenuation of lateral sound is practically independent of the frequency. The KMR 82 has a frequency independent directivity within a pick-up angle of 45° for audio signals that determine the tonal balance of the program material.
THE “SMART” SLATE
Figure 5.10 shows the Denecke “smart” slate. This timecode-lit display slate device is very handy and used especially in music video work and fast location shooting scenarios. A wireless transmitter hooks up to the timecode out connector of your audio recorder, which, of course, needs to have a timecode generator (either built-in or outboard hook-up). The timecode that is being embedded into your recording sync signal is exactly what will be transmitted to the smart slate.
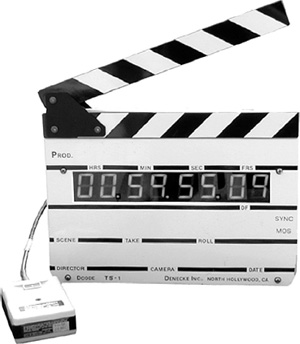
Figure 5.10 The Denecke smart slate.
As you can see in the figure, there is a small wireless receiver (usually fitted with a patch of Velcro on the back). When you plug the connector wire into the receiver from the smart slate, the receiver's little red indicator light will come on, thereby powering it up automatically. On the backside of the slate is a small toggle switch seated on a slim metal battery case. (The smart slate uses eight C cell batteries.) If you flip the toggle switch one way the timecode numbers will illuminate on “low” intensity. If you flip the toggle switch “On” in the other direction, the time-code numbers will illuminate on “hi” intensity. Obviously, high intensity will make the numbers easier to see in brightly lit situations, and of course, just as obviously, the “hi” intensity choice will wear out your C cell batteries a lot quicker as well.
The slate assistant holds the smart slate up, after he or she has handwritten the Scene-Angle-Take information on the front, as with traditional slates. When the recording mixer rolls the audio deck, the timecode will advance on the slate. When the slate assistant snaps the slate, the timecode number will freeze on 00:00:00:00 for a moment and then turn off. There are two small flush-mounted contact points near the end of the clapper arm; when the two touch at the snap point, it activates the timecode to cut off.
Even though this is a seemingly convenient and visually easy thing to see for picture editorial, the fact of the matter is that many mixers find that sync is not precise. You may experience as much as plus or minus two frames accuracy. For those of us who come from the old school of precision, this is just not precise enough.
THE STUDIO MICROPHONE BOOM
The studio microphone boom is a large wheeled perambulator with a small platform on which the boom operator stands while operating the traverse wheels that not only lengthen or shorten the boom extensions but also rotate and pivot the actual microphone position at the end of the boom arm. When properly operated, the boom functions silently and smoothly.
Studio microphone booms are used progressively less on feature films today because of complex and realistic set construction and the widespread use of practical locations being filmed under accelerated shooting schedules that don't allow the sound crew time and space to use the traditional perambulator boom. These silent microphone arms still have an important use in television production, though, especially when taping live-audience situations.
The techniques are considerably different from those of booming with a handheld fish pole—style boom. Not only does a studio boom operator need coordination and dexterity to operate the traverse wheels accurately and smoothly, but he or she also must learn how to turn a microphone and extend the boom arm quickly (so as not to allow air buffeting to affect the delicate microphone diaphragm), and then rotate the microphone back into position once the boom arm has been thrust out into position. It is a technique wisely learned from the veteran boom operators who have worked the boom arms for many years, a technique that cannot be mastered overnight.
THE SHOCK MOUNT AND WINDSCREEN
Two of the biggest enemies of good exterior recordings are vibration and wind buffet. All microphones are mounted onto something, whether a plastic friction clip or a cradle of a rubber band—mounted yoke. Budget restraints motivate you to new levels of inventiveness. Through experimentation and test recordings, you will develop a wide range of techniques to insulate the microphone from the vibrations of, say, a car as you hard-mount your microphone on the rear bumper to favor tailpipe exhaust. You will learn how to stuff foam around your mic and cram it into a crevice or lodge it between solid substances. You will learn how to detect wind direction and swirl patterns and how to effectively block them. You will learn to grab an assistant and physically place him or her between the source of unwanted breeze buffets and the microphone diaphragm.
Mount and Zeppelin
An effective way to control both vibration and wind buffet is a combination of the pistol-grip shock mount fitted with a windscreen tube called a zeppelin. The microphone is fitted into the plastic ring clips, which hold it in place and protect it from undue vibration by the rubber-band trapeze.
Be careful to guide the microphone cable through the small round cutout at the bottom of the plastic ring, and then snap the rear cap of the zeppelin into place. Do not pull the microphone cable too tight, as the microphone shock mount works best if a little play of cable remains inside for movement. Depending on the breeze factor, you can either slip the gray “sock” over the zeppelin or, if the breeze is fairly stiff, you might slip on the Rycote Windjammer (also referred to as a woolly, dead cat, furry dog, or the high wind cover) instead. These remarkable furry wonders have done much to knock down the kind of wind buffet that ruined many sound recordings in the past.
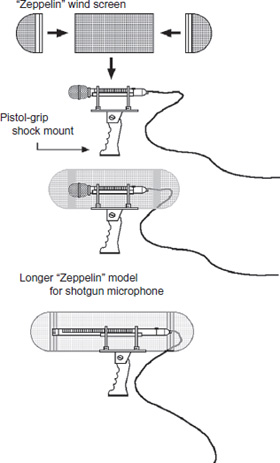
Figure 5.11 The pistol grip with the zeppelin wind protection tube attached.
FISH POLE MICROPHONE BOOM
As the name implies, the fish pole is a long pole with a microphone socket attachment to hold the microphone shock mount. Most microphone fish poles are lightweight aluminum tubes that slide out and extend the length of the pole. Unlike with the studio microphone boom, do not extend the length of the fish pole during the recording process. You must either lengthen or shorten the desired length of the fish pole by unscrewing the friction locks and extending the second or third extension tube and then screwing it tight again before rolling sound.
Today, more and more production sound recording teams are taking advantage of wireless microphone booming techniques. This solves a multitude of issues, not the least of which is the length of cable that has to be constantly managed and watched after as the boom operator moves about as needed on the set. The wireless transmitter is located at the opposite end of the microphone boom from the microphone hanger. It does not take much to figure out that the collateral savings in costs and freedom of movement for the boom operator far outweigh the cost of having the microphone boom fitted out to be wireless.
GOOD MICROPHONE BOOM TECHNIQUES
Most microphone boom work is done by placing the microphone over the actors’ heads, higher than the line of sight of the camera lens, pointing downward toward the spoken word.
Some mixers want the microphone to be pointing straight down, using an omnidirectional pattern diaphragm mic, as it picks up a uniform ambient background recording, regardless of which way the performance comes at it. This view is not shared by all mixers and/or boom operators, just as all boom operators have their own favorite styles and techniques of how to record the best production tracks.
The unfortunate reality of having an omnidirectional microphone in a full-down position is that it tends to pick up many footstep sounds. Foot shuffling and movements will seem to dominate. Again, it depends on the circumstances and the surface of the floor.
Some boom operators cradle the fish pole downward, pointing the microphone up at the actor's voice, keeping the mic low enough to be out of camera view. Again, this lends itself to a less-than-desirable characterization of recording and does not always serve the project well. This technique is most often used for documentary or news work, where one is not concerned about the precise timbre or quality of the vocal recording or whether the microphone is seen in the frame. Many consider it a “lazy man's” cradle.
Truthfully, the best sound recording can be obtained by holding the fish pole high above your head and pointing the microphone at a downward, but slightly tilted, angle, aiming right at the throat of the actor. Some boom operators will tell you that the ideal target to aim the directional pattern at is the bridge of the nose. Others will tell you they aim at the upper chest, where the voice originates. They swear that the resonance of the chest is vital to the timbre of the recording. Still other boom operators aim right at the mouth, from where the voice issues.
These are all valid opinions that I have heard repeated many times. Each boom operator uses the technique that best serves the mixer and most successfully captures the desired vocal performance. Whatever technique you and/or your boom operator use, be consistent! Changing technique in the middle of recordings changes the timbre colorization from scene to scene.
Without a doubt, holding a fish pole above your head for takes is a grueling and punishing task (boom operators are perhaps the most physically fit craftspeople on the set). Because of this, it serves the recording team well for its members to look after each other. On one particular shoot, a boom operator held a big Sennheiser 815 super-cardioid microphone on a fully extended fish pole boom to cover an extremely slow dolly shot that moved in closer and closer on Lloyd Bridges, who gave a four-and-a-half minute performance at a pulpit. At the height of the sequence, the cable man could see that the boom operator was fatiguing badly. He carefully brought his own boom in, which was equipped with the same kind of microphone, and cautiously lowered it down next to the boom operator's. At a slight pause in Lloyd Bridges's delivery, the mixer faded from the first microphone to the cable man's mic and whispered into the boom operator's headset on his PL (communications term for “private line”).
The boom operator raised his boom up and out of the way and stepped back silently. He lowered the fish pole and allowed himself a moment to rest, and then raised his pole and reinserted his microphone alongside the cable man's. Again, as Lloyd Bridges paused to draw a breath, the mixer faded from the cable man's mic back to the boom operator's so that he could finish the take. Without that kind of teamwork, it just would not have been possible to sustain a fully extended heavy mic recording for that length of time.
As a general rule, the master wide shot does not sound as good or pristine as the other close-up coverage angles. It is simple practicality: you have more set to cover, with more lights to watch out for and more potential noise to consider.
Boom Operator During Setup
One of the first things good boom operators do when starting on a show without a prior working relationship with other department heads is to find out which people serve as the keys. They also must identify the gaffer and key grip and introduce themselves, as these people decide how to fulfill the DP's (director of photography) lighting wishes. They decide exactly where a light is set and how the light is controlled, using flags, cutters, and scrims.
The importance of establishing a good relationship with fellow crew personnel is illustrated by the following example. A grip may cut (light control) a lamp by putting a C-stand on one side of the light. At the same time, the boom operator may really need that spot for maneuvering and properly booming the actors’ movements. The grip could just as easily place the C-stand on the other side and use an elbow joint to put the scrim in the original position, thereby leaving the floor space available for the boom operator. However, if the boom operator has not made introductions and explained what is needed to fulfill the microphone-placement requirements, then he or she can blame no one else if the microphone cannot be placed in the necessary spot when the director is ready to roll camera and make a take.
The smart boom operator babysits the set. The boom operator gets the fish pole and stands by while the crew lights the set. The boom operator may wear headsets, slid down around the neck. This way everybody knows the boom operator is there, standing by to assist in the lighting collaboration; now he or she can follow the action without a boom shadow thrown somewhere on the set where the camera lens will pick it up. Boom shadows are the quickest way to fall into disfavor with the director and DP.
Being a good boom operator is also being a good gaffer or a good grip. One must know how to read the lights. One must know where to stand, where the camera will be, what size lens is used. Often a boom operator asks a simple question of the camera operator, such as, “What size lens are you using?” Sometimes a simple question like this causes the DP to be more attentive and to ensure that the crew cooperates more fully with the boom operator, allowing sound to get in and do its job effectively.
Director and cinematographer John LeBlanc has lensed and directed both feature films and commercials. “If the boom operator is not in there with us setting up the shot, I have no sympathy for the sound crew. I want good sound! I know that good sound will only help to make my work play better, but if the sound crew is not dedicated to getting in and showing us where the boom and microphones need to be while we're lighting the set, then it's their problem if they can't get in because they are suddenly making shadows.”
As you can see, boom operators must know everyone's jobs in addition to their own to maximize the efficiency of the work. Unfortunately, although physical and technical demands on boom operators make theirs one of the most difficult jobs on the set, many production mixers will tell you they truly believe that boom operators are given the least respect—except, of course, from the production mixers themselves.
Checking with the Prop Department
The boom operator is responsible for talking to the prop department to discover pertinent information that will impact the sound recording, such as whether the firearms handler will use quarter-load, half-load, or full-load rounds in the guns to be fired onscreen. If full loads are used and a multitude of weapons are discharging, you will be deaf by the time you run through the sequence master and the various angles a few times. The microphones amplify the signal, and, with today's digital headsets for monitoring, the mixer and boom operator will have a bad time of it.
Many unfortunate situations occur when scenes using a practical weapon are rehearsed one way but actually performed differently. An example now gone to court is where an actor had rehearsed a scene during which he fires a pistol three or four times and then backs up and delivers his line. The mixer and boom operator compensated, covering the gunshots as rehearsed, and then the actor lowered the pistol and began speaking. Right in the middle of his delivery, the actor whipped the pistol up and fired again. The mixer and boom operator flung their headsets off as they grabbed their ears in pain. They had already altered their record levels for the actor's voice, not his pistol shot, and they had been exposed and vulnerable.
USING THE WIRELESS MICROPHONE
Obviously many situations occur where the boom operator cannot take the microphone boom where traditional microphones may go. The obvious answer is to break out the RF (radio frequency) mics. These wireless devices come in a multitude of models, but basically adhere to a simple and uniform configuration. A small microphone capsule can be either clipped or taped in a position somewhere on the upper part of the body, usually against the chest just above the heart. The capsule has a small wire that runs under the clothing to where the transmitter pack is attached. The transmitter pack is belted, taped, or otherwise affixed to the actor's body and has a short but critical transmission wire (antenna) taped in place to broadcast the signal to the mixer.
Batteries are consumed rapidly when using a radio microphone, so the boom operator should be prepared to change the batteries every couple of hours. It is not practical to turn the transmitter pack on and off between takes, so leave it turned on from the time you mic the actor to when you either wrap the actor or reach a point where the batteries, starting to show signal degradation, must be changed.
Before the boom operator approaches the actor, he or she goes to the wardrobe department to coordinate fabrics and textures as well as any special requirements, such as cutting holes inside the costume to allow wires of radio microphones to be connected to the transmitter worn somewhere on the talent's body.
Some fabrics, such as silk, wreak havoc with radio mics, as they cause much noise. Another consideration may be whether an actress is wearing a brassiere. If so, the microphone wires can be hidden easily in the bra material, circling around the chest to the back. The wire can be taped as it descends down to the transmitter, which is often hidden in the small of the back. The absence of a bra necessitates carefully taping the wire to the body so that it does not move and show up as it pushes out against the fabric of the costume.
Due to delicate situations like the one above, boom operators must approach the task of placing radio microphones on acting talent in an extremely professional manner, concentrating on the primary mission: hiding the microphone where it will not be seen by the camera, where it captures the best recording of the actor's voice, while anticipating and solving potential problems with wardrobe fabrics and design.
Radio microphones are a fact of the entertainment world, and their use is increasing. A good boom operator not only understands the delicacies of the job but also is very sensitive to the feelings of all actors. The boom operator articulates clearly and succinctly what he or she requires of the performing talent in placing a radio mic on them. Humor and innuendoes are completely inappropriate and do not contribute to the professional trust factor that must be instilled and maintained. Every situation is different, and every actor responds differently. The boom operator adjusts the style of communication and demeanor to each, taking cues in comments or attitude. Again, the boom operator must never do or say anything to break the essential trust developed with the acting talent.
As Rusty Amodeo was handling the boom-operator chores on an interview shoot with Barbara Walters and Jay Leno, the mixer warned Rusty to get it right the first time. “Get the microphone in the right place where it can't be seen and can't be heard, because Barbara won't let you get back in and adjust it.” As soon as Barbara entered the room, Rusty approached her to introduce himself. “Barbara, I'm Rusty Amodeo and I'm here to put a microphone on you.”
“Well, give me the microphone and I'll put it on.” she replied.
That's a tough situation for any boom operator. The microphone must go into an exact spot, and, more important, the place must be fabric-managed. The boom operator must run the wire so that the camera will not see it, and the transmitter must be situated properly with the transmission wire placed in a precise attitude for a clear signal.
“Fine, you want to put the mic on,” Rusty answered as he held out the tiny microphone, pointing to a precise spot in the center of her chest, “then I need you to place the microphone right here, just under this flap of material, and then I need you to run the wire under and across to this side and tape it in place so that the connector will be. . .”
Barbara stopped him. “Well, maybe you should do it.”
Rusty knew he had convinced her to allow him to do his job, but now he needed to win her confidence and trust. The two went upstairs, where her wardrobe department made the gown choice. Rusty opened his kit and removed the toupee tape (a clear durable tape sticky on both sides) to start affixing the microphone wire to her blouse.
“What are you doing?” she asked.
As Rusty continued to work he explained that he did not want to just put a mic on her. He wanted her to look her best, and using toupee tape would rigidly hold the microphone wire in place and prevent the button-down front from bulging open as she turned and flexed. It also would be in her best interest to protect the microphone from rubbing. In other words, Rusty was doing his job to make her look and sound as good as possible. Later, during the shoot, Barbara did not hesitate to allow Rusty to readjust, as now she was convinced that a truly dedicated professional was looking out for her and her image.
Because of wardrobe or camera coverage, boom operators must constantly consider new hiding places for the radio transmitter pack. Sometimes the small of the lower back is not an option, due to lack of clothing or a tightly fitting costume with the camera covering the back of the actor. Sometimes a boom operator hides the transmitter pack in the armpit. The toughest of all situations is when scanty clothing is worn, and all options above the waist are ruled out. More than once a boom operator had to revert to hiding the transmitter high on the inside of the thigh.
Although it is most desirable to place the microphone in the upper center position of the chest, you are not always able to do this. For instance, it is difficult to hide the microphone there if the actor is not wearing any shirt. Such was the case on a Paul Mazursky picture, Moon over Parador, starring Richard Dreyfuss. The production mixer Jim Webb (not to be confused with the songwriter of the same name) and his boom operator struggled to figure out where to put the microphone.
As Mazursky rehearsed the actors, the boom operator noticed how the character that played Dreyfuss's valet followed him around like a shadow. The boom operator pointed it out to Jim, and the two of them hit on the idea of literally making the valet character a traveling microphone stand. They placed a wireless microphone very carefully on the forward edge of the scalp of the valet, hidden just inside his hairline. In this manner, the valet, who spoke no lines of dialog during the scene, followed Dreyfuss back and forth in the bedroom of the manor, picking up Dreyfuss perfectly.
GETTING ROOM TONES AND WILD TRACKS
The production mixer must anticipate the audio trials and tribulations that will come during the postproduction sound-editorial phase. If the mixer works with the mindset that he or she is the one to make the material work, then the mixer is much more attentive to potential dialog lines or sequences, recommending recording pick-up wild lines with the actor after the camera has stopped rolling.
The mixer can either record such lines right then and there, while the crew holds still and the camera does not roll, or, what happens more often than not, the mixer takes the actor to a quiet area with a dead ambience and has the actor say the lines a number of times. These are usually short pieces of dialog spoken by a bit or minor character that were not clearly recorded during the actual on-camera shoot because of complex miking problems, practical equipment making noise that drowns out the line, or something like a door slam or a vehicle startup overpowering the dialog.
Aside from wild track pick-up lines, ambient room tones are also needed. Many mixers try to record room-tone ambience whenever possible, but it is very difficult to get a full-scale camera crew to freeze in place and truly be silent while capturing a good 30 seconds of ambience. You see, if you do not deliver at least a good clean 30 seconds of room tone – later, in post-production sound editorial, the dialog editor may have to make considerably longer fill track of what meager clean room tones that he or she can get. Anything shorter starts to sound very LOOPY – especially if it turns out that a considerable amount of ADR ends up being required. So many times we have gotten a room tone that has only a second or so of usable material. The mixer rolls tape, but the crew has not completely settled down, even to the sounds of feet shuffling. By the time the crew has actually come to an ideal audio texture, the director, extremely antsy to move on to the next setup, usually comments that that is enough, thinking the mixer has had a full 60 seconds, when in fact only 3 or 4 seconds of usable material can be salvaged.
People not sound aware often think that room tone is only needed for those little occasional holes or to patch over a director's voice cueing actors in the midst of a scene. They forget we may be required to patch-quilt entire scenes where one actor is looped but the other actors are not. Hence production dialog editors make a 3-second ambient piece fill a sequence lasting several minutes onscreen, as it must underline all the ADR dialog of the second actor that was looped. We often are stuck using a very loopy sounding ambience because the production crew did not religiously and seriously record room-tone ambience.
More times than not, the assistant director is responsible for helping the sound mixer get the necessary presence recordings. I have heard too many reports from mixers and boom operators alike who have told me uncooperative assistant directors do not care or understand the needs and requirements of anything but sync sound, which has inhibited presence recordings. The smart assistant director understands that by working with the sound mixer to record presence fill and wild track pick-up lines, or even to arrange prop series sessions, such as recording a rare or unobtainable prop aside from the shoot, he or she is saving the production company literally thousands of future dollars that otherwise would be spent to recreate or fix something that hadn't been solved right then and there.
One of the most banal excuses I hear from those in positions to make decisions having collateral sound-cost consequences is that they are visual people. I have news for them: so am I, and so are my fellow craftspeople in the sound industry. Someone claiming to be visual-oriented really is admitting to being sensory-deprived. That person has immediately told me he or she knows very little about the storytelling process of making film. It is because we in sound are visually empowered that we can design and create spectacular audio events to make the visuality rise to new heights of production value, the whole becoming a more thrilling spectacle than visual-only thinking can produce.
SPLITTING OFF SOURCE SOUND
Very often, the production mixer has a scene to record that has a practical television in the shot. The television audio should not play back and be heard by the actors’ mics, so the mixer takes an audio feed from the video source feeding the television and records it onto a dedicated channel.
In many cases a mixer records on a 2-track Nagra or DAT. The mixer line-feeds the video source onto Channel 2 as he or she records the actors’ dialog onto Channel 1. This eliminates all the conversion speed-rate issues; it also creates ease in finding exact sync by having the live-feed material transfer-recorded in this fashion.
X-Y MICROPHONE CONFIGURATION
The X-Y microphone configuration is important when you are recording a left-right stereo spread with two matching microphones. Recording stagnant ambiences with two matching microphones spread wide apart from one another is not usually a problem, but whenever you have a situation where there is a sound-emanating source (such as a car, an airplane, or motorcycle) that is moving, ever-changing the distance from itself and the two microphone diaphragms, you will experience phasing.
X-Y Pattern
As shown in Figure 5.12, a sound source such as a car passing across the median axis of a bilaterally symmetrical pattern of both microphones experiences a phase wink-out. As the car approaches, the sound of the engine takes ever so slightly longer to reach the far mic as it does the close mic. As the car approaches, the time it takes to reach the far microphone decreases to the point that, as it hits the axis (center) point, the two microphones switch roles. Now it is taking increasingly longer for the sound to reach the far left mic. At this crossover point is a phase wink-out, or drop-out of signal.

Figure 5.12 The X-Y microphone configuration. Photo courtesy of Schoeps.
The severity of the phase wink-out is proportional to how far apart the two microphone diaphragms are from each other. The closer they are to each other, the less the phase wink-out. That is why stereo microphones have the two diaphragms in the same capsule, either side by side or one on top of the other.
If you are using two monaural microphones to record stereo material and you have the potential for audio sources such as cars, trains, or aircraft, then you may wish to place the two mics in what is called an X-Y pattern. In this configuration the left microphone is facing to the right, covering the right hemisphere, while the microphone on the right is pointing to the left, covering the left hemisphere. This places the microphone diaphragms physically as close as possible to each other to greatly reduce the time the audio source signal takes to reach one microphone diaphragm as to the other.
Figure 5.13 shows a typical dual-capsule stereo microphone. Note how the diaphragms sit as closely as possible to each other, one on top of the other.
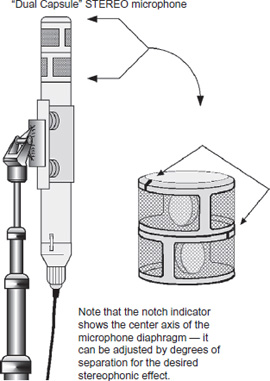
Figure 5.13 Stereo capsule microphone
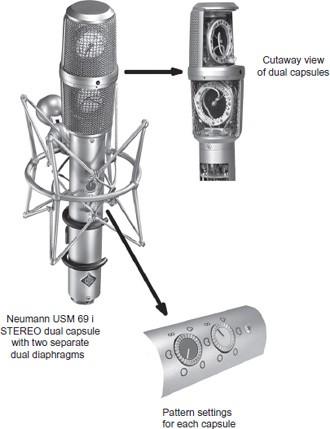
Figure 5.14 The USM 69 i stereo microphone. Photo courtesy of Neumann Corporation.
STEREO CAPSULE MICROPHONE
The top diaphragm capsule rotates to increase or decrease the degrees of separation as desired. Be careful to maintain the correct up-and-down attitude of the stereo microphone, to keep the left and right coverage in correct aspect. The advantage of using a stereo “dual-capsule” microphone is that the left and right diaphragms are much closer together than by placing two monaural microphones in an X-Y pattern. The chances of experiencing phase cancellation and wink-outs are minimized greatly.
Neumann USM 69 i
The USM 69 i stereo microphone has two separate dual-diaphragm capsules. These are mounted vertically and rotate against each other. The directional polar patterns can be selected separately for each capsule. The capsules operate independently from each other.
The USM 69 i (condenser) stereo microphone is a studio microphone for intensity stereo recording. It is suitable for XY and MS recordings.
The microphone consists of the amplifier section and the capsule head. The amplifier section contains two microphone amplifiers operating independently from each other. They have an extremely low self-noise.
Two completely separate microphone capsules are positioned closely above each other within the capsule head. Their diaphragms are made out of gold-sputtered polyester film. The upper capsule rotates against the lower one over a range of 270°. Color markings on the lower capsule system help to identify the angle by which the upper capsule has been rotated.
When sound waves reach the microphone capsules from different directions they will generate audio signals with different intensity only, but not with time differences, since the capsules are in close proximity and the sound arrives at both capsules simultaneously. The result is an intensity stereo signal that can be summed together for excellent mono compatibility without causing interference.
The USM 69 i has two built-in rotary switches. The five polar patterns of both capsules can be selected at the microphone itself. Therefore, no special AC power supply units or powering adapters are necessary.
The two outputs attach directly to any 48 V phantom-powered connectors. In addition to the usual polar patterns: omnidirectional, cardioid, and figure-8, it also has a hypercardioid and a wide-angle cardioid pattern. A built-in DC converter generates the required capsule polarizing voltages.
THE ILLUSION OF MONITORING FIELD RECORDINGS
Eric Karson has been on many a shoot, both domestic and abroad, learning well the difference between what you think you've got and what you really have. Eric offers the following advice:
We're on location, in the heat of battle, making the picture, and we are given headphones to monitor what we believe is actually being laid down on tape. Later when we wrap the shoot and settle into the picture editorial process, we discover that it does not really sound how we remembered it. Oh, it is what the actors had said, but the perceived quality value that we thought we had at the time was not really on tape. As a producer or director, you learn that lesson early on and sometimes in a very hard and brutal way.
In another case, John LeBlanc was asked to serve as director of photography on a low-budget western. The producer had made commercials successfully for several years but was inexperienced in the handling of feature projects. I received a call from John, asking if I would mind if he brought the producer, the director, the UPM, and the gentleman the producer had hired to handle the production mixing chores to a meeting.
The following day, we met and discussed the various aspects of the show as they related to sound. Unknown to me, John had heard the production mixer talk about how he would handle recording on the set during previous preproduction meetings, and, knowing a few things about feature sound, several mental red flags had gone up. John segued the conversation into having the young man convey his intentions for me to hear for myself.
With a great amount of eagerness, he explained how he would record on a Tascam DA-88 so he could use up to eight channels at once, placing microphones all around the set. He wound up his dazzling litany with the warranty that the producer need not waste money on Foley, as his production soundtrack would make all that obsolete.
John turned to me. “Well, Dave, whad'ya think?”
I did not know whether to laugh or cry. “I think that you are hurtling toward an apocalyptic collision with postproduction hell, that's what I think.”
The young man was offended by my comment, but I felt the need to make my point. “Tell me, son. How many feature films have you mixed sound for?”
He tried to change the subject. He started to detail all the big-name features he had mixed. I grabbed the previous year's edition of the Annual Index to Motion Picture Credits published by the Motion Picture Academy as I calmly began pointing out that one should not try to equate working on a postproduction rerecording stage in a totally controlled environment with the combat-zone-style rigors of recording in the field.
The young man finally admitted this was going to be his first time, but he had had more experience with digital sound than anyone else on the face of the earth. He actually extended his hand to me and said I could kiss his ring.
I returned to the Annual Index. “I don't see your name listed here under two of the titles you mentioned.”
He explained that he did not mix on the actual soundtrack for those films but had handled mixing the sound for a making-of-a-film television program. John LeBlanc rose and shook my hand, as he knew nothing more was to be said.
Despite that afternoon's revelation, the producer decided to have the young man handle the production mixing job anyway, based on the digital sleight-of-hand that was offered—and I am sure a lot of it had to do with the temptation to save monies earmarked for the Foley process.
Several months later, John showed up with a video of the film. It was a work-in-progress, but clearly revealed the caliber of work of the mixer. John recounted how the production mixer became progressively more bogged down during the shoot, totally underestimating the reality of the work and more importantly, what the focus of his specific job required; get as clear and pristine dialog track as possible—that is “watch my lips” dialog, you know, the spoken word—not trying to capture footsteps instead of leaving that chore to the Foley process in post-production. The production mixer's misunderstanding of his prime directive job had gotten to the point that the crew was even making fun of him. Not only did the producer have to go ahead with the original plans to have the Foley performed, but much more work in sound-effect development became necessary, as well as a huge amount ADR had to be re-performed, bloating the budget off the chart. Because the production mixer did not do his job properly, but kept trying to reinvent the wheel to save money—there are reasons why professional craftsmen do things the way they do things—his inexperienced attempts at recording cost the picture a lot more money, instead of saving a lot of money as he had professed. The producer would have been far better off using veteran experts and following their experienced advice. With extremely few exceptions, we do things a certain way because we have practiced our craft enough that we have developed it into an art form.
MULTICHANNEL MIXING
When we speak about production recording in a multichannel format we refer to anything other than a single track monaural recording device. This can mean anything from an analog 2-track Nagra IV or a 2-channel DAT -to- eight (8), sixteen (16) and more analog or digital sound recorders. A couple of years ago I personally handled a thirty-two (32) channel production dialog job. Each take lasted ninety (90) minutes! For the most part, DAT recording has faded into obsolescence and that is the danger of technology evolution changing so fast. I find it very interesting that analog is making a comeback as – and for good quality of audio “richness” reasons.
When you think of the grandfather of multichannel production sound recording, you must be thinking of the renowned Jim Webb, who handled the production recording chores for the legendary film director Robert Altman on such pictures as California Split, Buffalo Bill, 3 Women, A Wedding, and Nashville, the first Dolby 2-track matrixed stereo mix (this picture earned Jim the BAFTA for Best Sound).
On A Wedding, Altman really made the production sound recording for the 1975 feature Nashville extremely complicated. Before you continue reading, just remember, that Nashville was recorded long before digital multi-channel recorders and all the newfangled sound equipment that we enjoy today. Jim Webb found himself recording on two 8-track machines simultaneously. Altman shot with two cameras amid 50 actors all interrelating with each other. Jim played musical microphones as he was mixing one group of actors holding a conversation, with camera setups moving from group to group. There was no real script, as Altman worked best with impromptu performances, so Jim had to be ready for anything.
For each setup, his cable man went out and made a character ID strip of tape with numbered assignments on each of the radio mics affixed to the actors. When he came back to the sound cart, the cable man laid the assignment tape right across the bottom of Jim's fader pots on the mixing console so that he would know who was on which microphone.
“It was nuts, I had an assistant keeping the log on who was on what track just so that the script supervisor could keep all the material straight, as there was no time for me to keep an accurate log!” he remembers.
On California Split, Jim had the challenge of not only having to record 8-channel production dialog, but to do so while on a practical traveling location, a bus en route to Nevada. Keep in mind that, today, 8-channel mixing boards are commonplace, but in the 1970s Jim Webb's techniques were way ahead of mainstream production recording. The 8 channels of signal had to be fed through two 4-channel audio mixers into the 1” 8-channel tape recorder located on the bottom shelf of the cart near the floor. A 1/4” Nagra was fed a combined mixdown signal for protection backup purposes. Jim Webb operated the first 4-channel mixer while his boom operator, Chris McLaughlin, operated the second 4-channel mixer.
RECORDING PRACTICAL PHONE CONVERSATIONS
For All the President's Men, director Alan Pakula told Jim Webb, “I don't want a throw-away soundtrack.” (A throwaway soundtrack means basically just a guide track is being recorded so the actors can loop their lines later in an ADR session.) Jim could not agree more, so for every aspect of the production recording process Jim left no stone unturned.
Figure 5.15 Production mixer Jim Webb (far right with headset) won an Academy Award for his innovative techniques in recording complex multichannel production dialog on the political conspiracy-thriller All the President's Men. Photo courtesy of Warner Brothers.
Warner Brothers removed the wall between Sound Stages 4 and 11 to build the full-scale set of The Washington Post newsroom through the breadth of both stages. Jim recalls:
We had one shot that was a 180-foot dolly shot inside the four walls of the set. In order to eliminate what would have been a nightmare of ballast hum due to the entire ceiling being filled with rows of fluorescent lamps, the construction crew rigged a huge rack for the ballast units just outside the sound stage and bundled the wiring in groups that fed back into the stage to the fluorescent tubes themselves.
As you know, it seems that half the picture was performed on telephones. Well, they didn't want the traditional style of actors having to act out a telephone conversation with no one on the other end of the phone to play off on, so it was decided early on with the help of the special-effects crew to build a practical telephone system into the set. We had five lines that you could switch back and forth on as Redford might put one call on hold while he answered another or placed a second call while keeping one or two other lines on hold. Each off-camera actor was on the other end of the phone conversation and was set up in an isolated area of the stage.
Jim warns that simultaneously recording an onscreen actor clean while also recording the telephone feed must be handled carefully.
All the multiple phone calls are recorded in real time, which can be a problem if the onscreen actor's voice is in the phone feed. What you need to do is take the transmitter out of the handset of the on-camera actor's phone so that you don't experience “double up” of the live mic with the phone-line tap. You set up the actors on the other end of the phone with headsets so that they are hearing the on-camera lines from the production mic (prior to the record head) so that you do not get that delay as heard from playback. The nice thing about this technique is that the off-camera phone feed has total isolation because the on-camera actor has the receiver right to his ear, listening to the off-camera voice so there is no acoustic leakage. Dialog overlaps are never a problem as you have both actors in complete isolation, and each actor is recorded on a dedicated channel. This allows dialog interplay in real time.
It was the first time Robert Redford had ever used this kind of telephone technique while shooting a picture. After the director sounded “cut” on the first rehearsal, Redford looked up and exclaimed his excitement over being able to act and react to a live actor on the other end of the line. Jim could not have been happier with the results. “It really sets the actor free to act rather than try to play to nothingness, or to carefully avoid overlaps of lines being read off-camera by the script person.”
Was all this extra effort worth it? All the President's Men was awarded the Academy Award for Best Sound that year.
PERILS OF RECORDING IN SNOW
In the winter of 1989, digital production recording was anything but mainstream. Long before inclement-weather digital recording was being mastered, Paul Jyrälä had endured 105 days of production recording in freezing temperatures, handling the literal trench-warfare chores of mixing the war epic Talvisota (The Winter War)in his homeland of Finland.
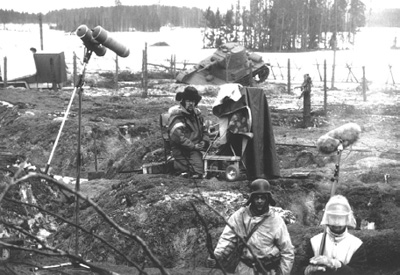
Figure 5.16 Production sound mixer Paul Jyrälä sits bundled against the freezing cold, his digital DAT and 1/4v Nagra protected by thermal blankets and battery-operated heating units. The boom operators wear machinist face shields and padded jackets to protect them from flying rocks and debris during explosion effects while recording spoken dialog. Photo by Ulla-Maija Parikka.
Moisture, hot and cold temperature extremes, dirt, and grit are all sensitivity issues that inhibit DAT machines from working to their optimum potential, and these problems plagued Paul during the grueling shooting schedule. His boom operator and cable man worked hard to wrap the equipment with cellophane and pad them with thermal blankets to keep moisture and cold at bay.
“There were times we thought we should be awarded, I think you Americans call it the Purple Heart,” chuckled boom operator Matti Kuortti. “No matter how careful the special-effects crew was, there was always the possibility of something going wrong. During one scene where we filmed birch trees being blown apart, a rather large sliver of wood flew past the camera and pierced the director of photography in his shoulder. All of us had to be on guard, as there was danger everywhere.”
Paul used four Sennheiser 416 microphones, backed up by two Vega and two Micron wireless microphones. The team used Ryocote woolies to combat wind gusts and air concussion from explosion pots. Unlike American production recording techniques, Paul encoded the production recording on Talvisota with DBX II onto the original 1/4”. After the crew wrapped shooting for the day, Paul returned to the location barracks and carefully transferred the day's work himself. He decoded the DBX II signal and then re-encoded a noise reduction called Telecom (a European version of the Dolby noise-reduction system) as he transferred the dialog dailies onto 2-channel, 17 1/2 mm fullcoat film. The first channel was a “flat” transfer, with no Telecom encode, making it convenient for the picture editor. The second channel was the Telecom-encoded version Paul would work with later during the postproduction process.
Because of the meticulous attention to detail that Paul Jyrälä brought to the production mixing chores, the picture only had 5 percent of its dialog looped later in an ADR session, an astoundingly small percentage given the difficult recording circumstances of snow, mud, flying dirt, and debris. Paul earned his fifth Jussi (the Finnish version of the Academy Award) for Best Sound, and Talvisota was one of the seven finalists that made the American sound-effects bake-off for consideration for an Academy Award nomination.
BOOM ERGO DYNAMICS
by Rusty Amodeo
We've all been there, no matter what your job title is. The scene is rolling along, and we hear those infamous words, “Keep rolling, from the top.” Yikes! It was already a long master and now they want to continue? Or the director is really trying to get the most drama out of an actor during an intense scene, and continues to roll, over and over and over again, to get the feeling that they want from the actor. If you're a microphone boom operator using a fish pole, it's not just a matter of strength anymore; it's mind over matter. And if you're a mixer, you're hoping that this won't be something that breaks the sound crew since you weren't prepared for this from any of the key meetings.

Figure 5.17 Walk ‘n’ talk is easy to operate on the beach. Notice mic technique is straight on as opposed to side miking to avoid recording the ocean waves in the background.
The HD Camera—Coming to a Shoot Near You!
The introduction of high-definition cameras with the inclusion of the capabilities of recording the material directly to the camera has created a problem for sound engineers, specifically boom operators. The plethora of information on various manufacturers’ websites solidifies the possibility, if not fact, that scene takes will be longer because the replacement “mag” in the form of a chip or laptop hard drives mounted directly into the camera. But there's hope, my friends. It's called the Cuemaster, and Steve “Rabbit” Schuneman has been successful in its operation and instruction to many professionals in the motion picture and television industries.
The operation of the production studio boom is complex and difficult to master. While it is suitable for use on the average sound stage, there are quite definite limits on its performance that can only be overcome by using an additional operator or pusher to control a single production studio boom. There is also the standard fish pole made by various manufacturers closely resembling a painter's extension pole, but the Cuemaster is an alternative method to booming long extended takes that minimizes the possibility for injury to your physique.
Steve Schuneman is considered by many to be a senior boom operator and has been honing his techniques for over 26 years. He was also part of the sound crew nominated for an Emmy Award for the situation comedy Cybill. I've had the honor of working with Steve on several sit-coms and recently asked him to share the story of the Cuemaster.
The Cuemaster is a body-mounted fish pole that can be adjusted from 5 to 20 feet and is counterbalanced, taking the weight and pressure off your arms and back! With a control handle mounted on the fish pole, you can tilt the microphone forward and backward (articulation). Using your right hand, you twist the fish pole left and right. This gives you better control of the microphone.

Figure 5.18 Photo courtesy of Michael Clark, C.A.S.
Rusty Amodeo has been a production sound and video engineer for over thirty years and along with a lot of other production mixers, video engineers and video assistants, attended a seminar on the Hi Def Red Camera in Burbank, California. Other than the quality of picture, and different formats produced by the Red Camera, one of the camera's attributes is the amount of run time (through various sizes of storage devices) could be achieved. Depending on the film speed, it was noted that it could record 2 to 3 hours on a single storage device mounted on the camera.
During the lunch break, Rusty spoke with a long-time acquaintance, Michael Clark, C.A.S., production sound mixer for How I Met Your Mother, who shared a story about his crew's return from hiatus and a location shoot at the University of California at Los Angeles (UCLA) in a lecture hall. With over 300 extras, a studio boom of any size wasn't feasible for use with the uneven floor, stairs, and camera angles. And the use of a standard fish pole would prove to be painful at the least.
Given the circumstances, Steve, one of Mike's boom operators, chose to use the Cuemaster all day long, and would have been physically exhausted had he performed his work without it. I spoke with Steve and he said that some of the long takes he has boomed have been an easy 20 to 30 minutes long without stopping. That shoot day was no exception, as the nonstop camera rolls lasted over 20 minutes, all the while booming from the stairs. These long continuous shots are relatively new to features and television series, but not to those of us who have worked at broadcasting television networks, stations, and live sports broadcasting.

Figure 5.19 Magliner dolly.
A Brief History of the Cuemaster
The Cuemaster was created and designed by the late Leslie “Les” Drever,1 founder of Lightwave Audio. With the articulating hanger, the mic can be positioned in any direction, up and down 180° in addition to the existing panning left to right, without the need to preset into what you think is going to be the best angled position for the shot.
The harness supports the back and torso while allowing total control of the pole and microphone. The vest harness is made of a ballistic denier, and has various adjustments for your personal physique. The pole sits in a pocket in front, but I will tell you that, because of the balance of the pole, it is not uncomfortable at all. As with any boomer, the device becomes an extension of your body and arms, and you become one with the pole. The pole itself is made of a carbon material that is strong yet non-corrosive, with no microphonics.2 The range for the pole extension from the fulcrum (your body) is from five (5) to twenty (20) feet. The unit can be transported quite easily, especially when adapted to a Magliner dolly.
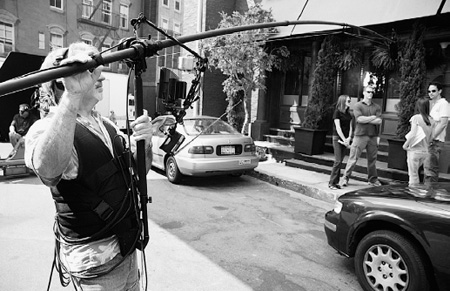
Figure 5.20 The Cuemaster boom is remarkably easy to use and good for your personal health and stability.
Drever also created several different microphone windscreens, hangers, and other microphone attachments. Steve acquired the patents, molds, and materials from Les. He currently offers for sale, lease, or rent these custom-made devices on his website at www.RabbitAV.com.
Applications of the Cuemaster
With all of the sophisticated electronics now available, the art of recording dialog still requires that the microphone be positioned both as close to the speaker as is possible and in a proper orientation, since most microphones used are highly directional. Of course, the other limitation is that the microphone must be located out of view of the camera, over the scene being filmed or broadcast. Thus, a microphone boom must be manipulated to move the microphone as the speaker moves, or as different speakers speak in turns. Accordingly, the microphone boom is used both to support and to aim the microphone located at the end of the boom.
Another attribute is that you can put any type of mic hanger on it, for instance, a Sennheiser MKH 70 (which has replaced the Sennheiser 816 super hyper cardioid microphone) along with a zeppelin and hog hair (in the rain) and is easy to maneuver. There is a counterbalance of weights at one end with a Colette in the center making it effortless to adapt to all sorts of angles and predicaments.
The Cuemaster weighs only 22 pounds. During a recent visit to Paramount Studios for a television series, I witnessed the two boom operators resting their fish poles on top of their heads during the long extended shot. I pointed out to them that the position is very difficult on the neck, back, and shoulders.
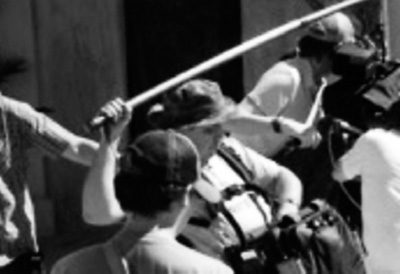
Figure 5.21 This is NOT a good technique—resting your microphone boom on your head. Do not do it.

Figure 5.22 Use your brain, not your back. Fix the job, not the worker. This is the backbone showing the lumbar spine sections.
No other type of miking technique, especially wireless microphones, can replace the natural human sound of an over- (or under-) the-head boom microphone. Most dialog editors will agree that it's much better to cut a single track of dialog than to reinvent the scene and its intensity from individually recorded microphones.
Figure 5.23 The body joints.

Figure 5.24 These are the left and right rotator cuffs of your shoulders.
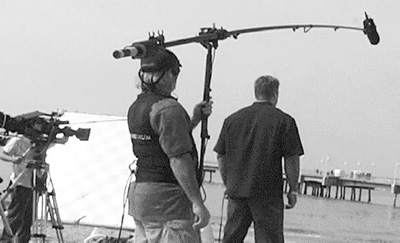
Figure 5.25 See how the microphone boom is completely balanced above the head.
Sound familiar? Well it should! It is part of the many slogans of ergonomics we've been hearing for several decades. Supporting a weight with your arms above your head for extended periods of time can play havoc on your shoulders, back, legs, heart, and muscles. No matter what your strength limits may be, it is physically demanding to perform this function indefinitely without some sort of negative consequence on your physique. Ours is not the only business that has this problem. Athletes, construction, linemen, and automotive mechanics are businesses also included in this list. Some of the causes of injury to the rotator cuff (made up of the muscles and tendons in your shoulder) may include lifting and repetitive overhead arm activities. One of the common names for this consequence is musculoskeletal disorders, or MSD.
According to the Occupational Safety and Health Administration (OSHA),3 “Some conditions of MSD to consider may include, but are not limited to: Awkward Postures; prolonged work with hands above the head or with the elbows above the shoulders; prolonged work with the neck bent; squatting, kneeling, or lifting; handling objects with back bent or twisted; repeated or sustained bending or twisting of wrists, knees, hips or shoulders; forceful and repeated gripping or pinching.” This sounds like a typical day on set if we're booming with a standard fish pole.
Think about the most comfortable working posture for your neck, shoulders, arms, wrists, and hands. Your shoulders are down and relaxed, your arms are close to your sides, elbows bent and wrists and hands straight, almost as if you were going to shake hands with someone. This is called a neutral posture. When your working posture is out of the neutral position, the stress on your joints, muscles, tendons, nerves, and blood vessels is increased. The amount of muscle effort is also increased and your risk of fatigue and injury also increases. It takes more muscle effort to work at eye height than to work at elbow height, and working with your arms raised is a very awkward posture that puts stress on the muscles, tendons, and joints of your arms, hands, and shoulders. Working at elbow height also allows you to use your body weight to push the tool being used.
Because you are no longer supporting the weight of the pole, hanger, blimp, and mic with your neck and shoulders, you can now fully concentrate on your performance and achieve greater accuracy with the actors’ dialog. Your focus is more on what you're doing to achieve a great recording of sound than not hurting yourself. The Cuemaster is quickly becoming one of the favorite tools in a mixer's bag for all types of dialog recordings, especially in MOWs, Features, Series, Sports, Live Broadcasts, and various other applications.
– Rusty Amodeo
A POINT OF VIEW THAT THE “VISUAL” DIRECTOR AND/OR
CINEMATOGRAPHER SHOULD DEVELOP
Director and cinematographer John LeBlanc has lensed and directed both feature films and commercials. He talks about his career and the importance of good production sound:
As a brief sketch of my background, I started in the film business in 1965. A friend of my father's was the key grip on the film The Sound of Music. He helped me get a studio rigging grip job on the stages at 20th Century Fox Studios in West Los Angeles. I then went off to the military during the Vietnam era for two years. When I came back I went to work at Mark Armistead's, a leading camera rental house in Hollywood at the time, where I spent three years as a camera mechanic. I learned a lot from cameramen and camera assistants who would come in to prep their equipment. I was sent out to many locations to repair cameras that had broken down on location and formed strong relationships with many camera crews because of that.

Figure 5.26 In the background, John LeBlanc is both the director as well as the director of photography of a car tire commercial shot on location in Soda Lake, California. His son, Eric LeBlanc, the first assistant cameraman, is on the left.
With what I had learned, I was drawn to shooting small projects on my own on 16 mm film with a small group of friends. One day in 1970 Dean Cundey, director of photography, came in to Mark Armistead's and I showed him some of my footage. He offered me a job shooting and directing the 2nd unit of the movie Where the Red Fern Grows. This was the start of a 30 + -year career making movies. I have worked on over 40 feature films including The Kentucky Fried Movie with John Landis, director, and again with John Landis on The Blues Brothers. After I screened a short film for Ron Howard that I had shot, he asked me to shoot and direct the 2nd unit on the first Cocoon.
The first full-length feature film I shot as director of photography was a film called Stripped to Kill that Roger Corman produced. Yes, I am another person to whom Roger Corman gave a career start as a director of photography on a feature film.
My career took a turn after Cocoon. I started shooting and directing commercials. I have worked on over 200 commercials in various positions including first assistant cameraman, camera operator, director of photography, and director/cameraman, covering all sorts of products including airlines, automobiles, banks, brokerages, gaming casinos, insurance companies, newspapers, beverages, coffee, food, wine, stores, tires, television program promotionals, clothing, fabric softener, and more, with brand names such as Apple, AT&T, IBM, Coca-Cola, Audi, BMW, Honda, Wells Fargo Bank, Franklin Templeton Investments, and so on. Many of these commercials featured high-level stars and celebrities such as Jodie Foster, Eddie Murphy, Steven Seagal, Scottie Pippen, John McEnroe, and George Foreman, to name a few.
Another aspect of my work was shooting music videos. I shot music videos during their early days and on into their evolution as a format of their own. The interesting challenge of shooting music videos at that time was that it was a wildly changing format that was breaking rules that were the bedrock of filmmaking. At first, I resisted the swings from present to past and lack of continuity in time, costume, and location. The only continuity was the musical piece itself. As far as every other component, it was a free form. In a short time I accepted the avant-garde nature of the format and began really enjoying pushing the limits myself!
Some of the featured talent I worked with were the Rolling Stones, Michael Jackson, Madonna, Prince, and Vanessa Williams. That work was always a fun departure from our formal professional filmmaking.
I have won several awards such as the Golden Lion Award at the Cannes Film Festival for a series of international commercials for AT&T, and four Omni Awards for Blue Cross/Blue Shield and the Kansas City Star News.
I had the privilege to serve as the American director of photography on two Showscan films; one entitled Call from Space and the other Magic Balloon. Both were shot on a Cinema Products 65 mm camera (CP 65 mm) at 60 frames per second and projected back at 60 fps. Because of my technical background, I also served as director of photography and operator on Dial M For Murder/The Birds, shot with twin 35 mm Vista Vision cameras for great 3D effect for Universal's theme park in Orlando, Florida. I also shot with twin 65 mm cameras for another film entitled Magic Journey for a 3D project for Disney World's opening of its Epcot theme park in Florida. On both of these 3D films we used an over-under camera system to create a 3D motion picture image to be shown on a large theatrical screen.
I have had the great opportunity to travel all around the world in my career to places like Japan, Korea, Israel, Italy, as well as Mexico, and all over the United States and Canada.
I always want the best production sound that is possible because I have come to understand that it will make my visual images appear to look bigger and better with great sound to support them.
If the boom operator is not in there with us setting up the shot, I have no sympathy for the sound crew. I want good sound! I know that good sound will only help to make my work play better, but if the sound crew is not dedicated to getting in and showing us where the boom and microphones need to be while we're lighting the set, then it's their problem if they show up just before we shoot and can't get their equipment in at the last minute because they are suddenly making shadows.
Time and money are on the line on every shoot. Causing disruption or a waste of time at the moment when all departments and actors are ready to shoot is unprofessional. To create a harmonious and professional atmosphere on the set, stay in step with everything that is progressing on the set, keep open communication with the camera department, be prepared, take your positions, and pay attention.
Within the standard protocol of preparing for a shoot there are times allocated for the collaboration of all the departments. The location scout with all department heads is the time to discuss how each shot will be approached. The cinematographer indicates the most likely way he or she will set up for the shot and that is when the sound department should get into that conversation and make a plan for the inclusion of themselves and their equipment.
Then on the day of the shoot the sound crew should be paying attention right along with the camera crew in setting up the shot so that all departments are simultaneously ready and settled to roll film and sound.
Boom operators must know everyone's jobs in addition to their own to maximize the efficiency of the work. Unfortunately, although physical and technical demands on boom operators make theirs one of the most difficult jobs on the set, many production mixers will tell you they truly believe that boom operators are given the least respect; except, of course, from the production mixers themselves. I can say that now, because as a director of photography and filmmaker, I was, understandably, a “visual” person—that is until 1991 when I was the director of photography on a feature film entitled Angel Town where I met David Yewdall, sound editor, on Rerecording Stage 2 at Ryder Film Services in Hollywood, California.
On the dubbing stage David showed me how to listen to a good soundtrack. Wow! I thought I heard the world for the first time. In less than an hour I learned that I had only been listening at sound. I realized then that good sound made my visual image appear to be stronger. I also learned that it doesn't work the other way around. After that, I have become much more aware of sound overall.
Over the last five years, I have been teaching third and fourth year cinematographers at the University of North Carolina School of the Arts, School of Filmmaking. In my third year cinematography class I point to the production sound mixer and his boom operator and cable person, all of whom I have as part of my class, and I ask my students, “Do you see those three people?” and then I tell them, “They are the other half of your movie. You need to learn to work with and collaborate with them and not think of them as being in the way but that they are necessary for good production sound. Believe me, as a DP you will stop thinking of them as a necessary evil. Instead you invite them to become a big part of your crew. By doing this you will become ‘soundtrack empowered’ and that will only help you and the movie to achieve its total visual art form gold!”
THE ULTIMATE GOAL AND CHALLENGE
The challenges of production sound recording make it a difficult and arduous job. The production mixers and their teams face the daunting and often disheartening struggle with the ignorance factor of the producer(s) and director and their lack of personal empowerment by not knowing what is possible and what preparations and techniques can most efficiently accomplish the mission. If they do not understand what is possible (and they will not understand that unless you have at least certain tools and procedural protocols), and if they do not understand the importance of what “quiet on the set” really means, then how can they hope to deliver what is truly possible? How can they dream to deliver the magic opportunities of production sound?
Nearly every director I have worked with in postproduction jumps up and down insisting on how much he or she wants the magic of production, but in reality so many of them do not do their part to assist the production mixers and their teams to bring that magic of performance to its fullest possible potential. So many times opportunities are lost in the logistical heat of battle, in the sheer struggle of shooting the film, or getting the shot before they lose the light. If ever a phase of the creation of the motion picture cried out for the discipline and regimentation of a military operation, it is the challenging battlefield of production.
1 U.S. Patent Application Number 08/114,264, August 30, 1993. Inventor: Drever, Leslie (Van Nuys, CA). U.S. Trademark Registration Number 74194553.
2 Microphonics describes the phenomenon where certain components in electronic devices transform mechanical vibrations into an undesired electrical signal (noise). The term is derived by analogy to microphones where that behavior is inherent in the design.
3 OSHA, www.osha.gov.