4. Basic Email Tasks
In This Chapter
• Composing and sending new email messages
• Retrieving and reading messages
• Replying and forwarding messages
• Working with file attachments
It’s high time we started emailing. You’ve got your email services set up and squared away, you’ve figured out how to maneuver around the program window with confidence, and now it’s time to communicate with the outside world—or, if you work in an office, send a message to your coworker inquiring about where you’re eating lunch later.
Basic emailing tasks involve composing and sending messages and receiving and reading messages. That really is the gist of it—send some, get some sent to you. Ah, but it’s the subtle nuances of the activity of emailing that require explanation. In this chapter, we explore all those nuances and make sure you can handle all the incoming and outgoing communications with true finesse.
Composing and Sending Messages
You can compose a brand new email message using Outlook’s Message window, a special form with special boxes for filling in special message details. Perhaps I’m overselling it a bit, but forms are a handy way to tell Outlook what to do. A Message window also offers all kinds of bells and whistles you can apply to add extra elements to your message, and you can find them dispersed among the tabs on the window’s ribbon. (Yes, a Message window has its own ribbon of commands and tools, and they’re a bit different from the ones found on the Mail module.) Figure 4.1 shows an example of a Message window already filled in with details.

A Message window looks a lot like the main Outlook window, with a title bar, ribbon of tools, and window controls. Naturally, the title bar tells you the name of the window; in this case, it’s the Message window. As soon as you fill in a subject for the message, the title bar displays the subject as its title, too.
You can use any of these methods to open a new Message window:
• Click the New Email button on the Home tab (see Figure 4.1).
• Press Ctrl+N on the keyboard.
• Click the New Items button in any Outlook module and choose E-mail Message from the drop-down menu.
To fill out your empty form, shown in Figure 4.2, start by addressing your email. Do you know the recipient’s email address? Good, then you can type it into the To field. Is the recipient already someone in your contacts list—the digital Address Book you use to store information about people you contact? If so, you can click the To button and grab the person’s name from the Select Names dialog box, shown in Figure 4.3. Simply double-click the name of the person to insert it into the To field, and click OK to close the dialog box.


 Tip
Tip
If you have more than one email service, you can change which one the message is sent from using the From drop-down menu at the top of the form. Click the button and choose a service.
If you’re on an Exchange network, you don’t have to type in a full email address of the person you’re sending to who’s also on the network. Instead, you can just type in the person’s email alias. Timesaver!
Do you need to address the message to more than one person? That’s easy; use a semicolon to separate email addresses in the To field. If you use the Select Names dialog box to add names, Outlook automatically inserts a semicolon for you, even if you insert only one name from your Address Book. (To learn more about building your contacts list in Outlook, see Chapter 8, “Contacts.”)
Tip
If you don’t quite know a person’s full email address, Outlook can help you out. Type in as much as you know, and then click the Check Names button on the Message window’s ribbon (look on the Message tab). This opens the Check Names dialog box and a list of possible matches you can choose from; click one and click OK.
Do you want to carbon copy someone else on the message? The term carbon copy is a remnant of the days in which you had to use a sheet of carbon paper inserted between two sheets of paper in a typewriter to make a copy of a memo or letter. To Cc someone, click in the Cc field and type in the email address, or click the Cc button and choose people from your contacts list.
Tip
Want to send a blind carbon copy? Click the Cc button to find the Bcc field in the Select Names dialog box. To blind carbon copy is to send a copy of the message to another user without the original recipient knowing or seeing the other person’s inclusion. You can also send a blind copy of a brand new message, too.
After you enter the email address or addresses, you can move on to the Subject field and type in a title or subject heading for the message. This text identifies the message content for recipients; it’s a heads up regarding what the message is about. In turn, the subject title is what they’ll see when they view their incoming messages. It’s a good practice to keep your subject titles brief and to the point.
Finally, click in the large, empty area of the Message window to type in your message text. If you’re interested in formatting the text (applying attributes such as bold, italic, different fonts, sizes, and text color) or adding other features, flip over to Chapter 6, “Advanced Email Features,” to read more. Not everybody’s email services can read all message formatting, so keep that in mind before you start trying to format a message like a Microsoft Word document. You can choose between three overall message formats in Outlook:
• HTML—This format, which is a web page format, supports text and paragraph formatting (such as bold, italic, text alignment, fonts and sizes, background colors, and the like). Most email readers support HTML, and if one doesn’t, the message appears as plain text.
• Rich Text—This format supports more attributes than HTML, such as borders and shading. On the downside, this format is usually compatible only with Outlook and Microsoft Exchange Server. The text is converted to HTML for other email readers.
• Plain Text—This is the most basic of the formats; no attributes appear in plain text messages, just straight up text. This format is supported by all email readers.
You can control the message’s format by clicking the Format Text tab on the ribbon, then making your selection from the Format group of buttons.
After you’ve completed your message, click the Send button or press F9. If you’re connected to the Internet, Outlook immediately sends the message. If not, the message hangs out in the Outbox folder until you’re ready to send and receive messages.
Tip
If you’re piling up messages in your Outbox, you can press F9 or click the Send/Receive All Folders button on the Quick Access toolbar when you finally connect to the Internet and are ready to send.
And that’s how you compose and send an email.
Reading and Replying to Messages
All the emailing activities you perform happen in the Mail module, Outlook’s email component. You learned a little about how the Folder pane works in Chapter 2, “Basic Outlook Operations.” That’s where all the Inboxes for each email account you use are listed. That’s also where your list of incoming messages piles up. To view a list of messages for a particular account, click the account’s Inbox. The message list that appears shows you who sent the message and gives you a peek at the first line. You can scroll up and down to view the list of messages.
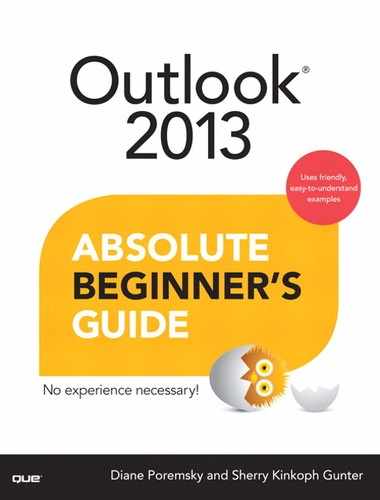
If you turn off the Reading pane, you can see more details about the messages displayed across the width of the viewing area (aka Information Viewer), such as date and time sent, message size, priority levels, or flagging. You can also see tiny paper clip icons representing file attachments. Figure 4.4 shows an example of the message list expanded.

Notice that the message details are organized into columns with labels. If you want, you can resize the columns if you need to view more or less of a certain detail. Click and drag the column label’s border to resize the column. You can also use the column headings to perform sorts on a particular column. For example, you can sort your list by date or sender, and so on. You might choose to sort your list alphabetically by sender name, for example, to help you see who sent you what. Outlook displays two buttons at the top of the list to view all the message or just the unread messages.
You can tell which messages are read or unread based on their appearance in the list. If they appear bold and in blue, they’re unread. If they are not bold and have no color, you’ve read the message already (see Figure 4.4). If the Reading pane is displayed and the message list is less wide to accommodate it, a blue vertical bar on the left side of the message indicates an unread message.
To select a message, click it. This makes it active, and you can perform actions on it. To open it entirely, double-click it. This opens the message in a Message window, similar to Figure 4.5. The window is the same as the one you use to compose new messages. To close it and return to viewing your message list, click the window’s Close button.

If the Reading pane is open, you can also view a selected message’s content there. Figure 4.6 shows an example of the Mail module with the Reading pane displayed (the pane can be displayed to the right or at the bottom of the window—your choice). If the People pane is displayed, you can see contact information pertaining to the sender. You can reply directly in the Reading pane, which I’ll show you in a bit. To toggle the pane on or off, click the View tab, click the People pane button, and choose a setting.
From the Reading pane, you can navigate messages using these techniques:
• You can scroll through longer messages using the scrollbars, or you can click the scroll arrows.
• To move up or down a long message one page at a time, press the spacebar on the keyboard. At the end of the message, press the spacebar again to open the first page of the next message.
• You can use the Zoom tool on the status bar to zoom your view of the Reading pane display; drag the slider left to reduce the size of text, or drag the slider right to magnify the text.
• Don’t forget—you can choose between displaying the Reading pane on the right side of the pane or at the bottom of the pane. (Press the View tab, click the Reading Pane button, and make your selection.)
 Note
Note
If you turn the People pane on, it appears directly below the Reading pane. The People pane displays information about the message sender, including references to previous correspondence. If you keep info about the person stored in your contacts, you can view it in the People pane. For example, if the person’s contact record includes a picture, the image appears in the People pane. You can expand and collapse the People pane using the tiny arrow icon in the upper-right corner of the pane. You can also control the pane through the View tab; click the People pane button and choose Normal (expanded), Minimized (collapsed), or Off.
Checking for New Messages
You can tell Outlook to check for messages, or you can set the program up to check them automatically at a designated interval. By default, Outlook is set up to check for new email every 30 minutes.
To check for new messages manually, use one of these methods:
• Click the Send/Receive All Folders button on the Quick Access toolbar; you can do this no matter which Outlook component you’re viewing.
• Click the Send/Receive All Folders button on the Home tab when viewing the Mail module (see Figure 4.7).

• Click the Send/Receive tab and click the Send/Receive All Folders button.
• Press F9 on the keyboard.
Of course, you must be connected to the Internet to receive messages from your email services. That’s a given.
To set up an automatic email check or to change the default setting, click the File tab to visit Backstage view, and then click the Options category. This opens the Outlook Options dialog box, as shown in Figure 4.8. Click the Advanced category, and then scroll down to the Send and Receive group of options. Click the Send/Receive button to open the Send/Receive Groups dialog box, shown in Figure 4.9. Here you can turn off automatic mail retrieval or specify a different interval for downloading messages. You can even set options for retrieving email from individual email accounts.


To turn off the default retrieval, deselect the Schedule an Automatic Send/Receive check box. You can also reset the interval to another setting, such as every 60 minutes. You can tell Outlook to retrieve mail whenever you exit the program window, too. Click Close to exit the dialog box, and click OK to exit the Outlook Options dialog box.
Replying to a Message
One of the niftiest aspects of emailing is the capability to send messages back and forth. You can keep replying to an original message as long as you need to, with both parties sending their responses back and forth, thus creating a conversation of sorts. By default, Outlook includes the original message content each time in the message body. New responses are added to the top of the message, and the conversation scrolls along newest to oldest.
New to Outlook 2013, you can reply directly to a message from the Reading pane without opening a Message window. With the Reading pane turned on, select the message from the list to view it in the pane, as demonstrated in Figure 4.10, and then click the Reply or Reply All button at the top of the pane. Reply sends a response to the sender, whereas Reply All sends the response to everyone referenced on the sender’s list (the To field).

Outlook displays mini form window fields, and you can type in your reply, similar to Figure 4.11. Outlook also automatically adds an RE: prefix to the subject title, which stands for Reply, Regarding, or Referencing (depending on whom you ask). After typing in your reply text, click Send.

You can click the Pop Out button to pop out the reply into its own window, which lets you access all the additional message tools. If you decide you don’t want to carry through with creating a reply message, click the Discard button to remove it.
You can also reply to a message by double-clicking it in the message list to open it in its own window, and then click the Reply or Reply All button.
Forwarding a Message
You can also forward a message to a new recipient. For example, you may want to forward a funny email you received from your coworker to your friend, or forward a message about a new product to your boss. When you forward a message, Outlook adds a FW: prefix to the subject title, which stands for Forward, naturally. Figure 4.12 shows an example.

To forward a message from the Reading pane, click the Forward button at the top of the pane. This command displays the same mini form window fields that appear when you click Reply or Reply All. You can type in any message text you want to include with the forwarded text, and click Send.
To forward a message from a message window, double-click the message from the list and click the Forward button on the ribbon’s Message tab.
Deleting a Message
You can remove messages from the list and place them in the Deleted Items folder to permanently delete later. Deleting messages as you read them can help keep your Inboxes managed. If you don’t stay on top of it, the messages tend to pile up fast and create giant lists, which in turn, takes up more room on your computer. I find it incredibly satisfying to delete junky messages.
To delete a message, select it and use one of these methods:
• On the right side of the highlighted message (see Figure 4.13), click the Delete button.

• Right-click the message and choose Delete.
• On the Home tab, click the Delete button.
You can empty the Delete Items folder periodically to clean out messages. See Chapter 5, “Managing Email,” to learn how to permanently delete messages.
If you accidentally delete a message you still wanted to see in your message list, click the Deleted Items folder in the Folder pane, select the message, and drag it back to the Inbox.
Saving Messages
Unlike some of the other Microsoft Office programs, such as Word or Excel, you don’t have to worry about saving files much in Outlook. Items you create, such as messages, tasks, and contacts, are saved when you add them to the modules. You don’t have to save your work before exiting Outlook, for example. However, there are occasions for saving emails, as I am about to show you.
Saving a Draft Message
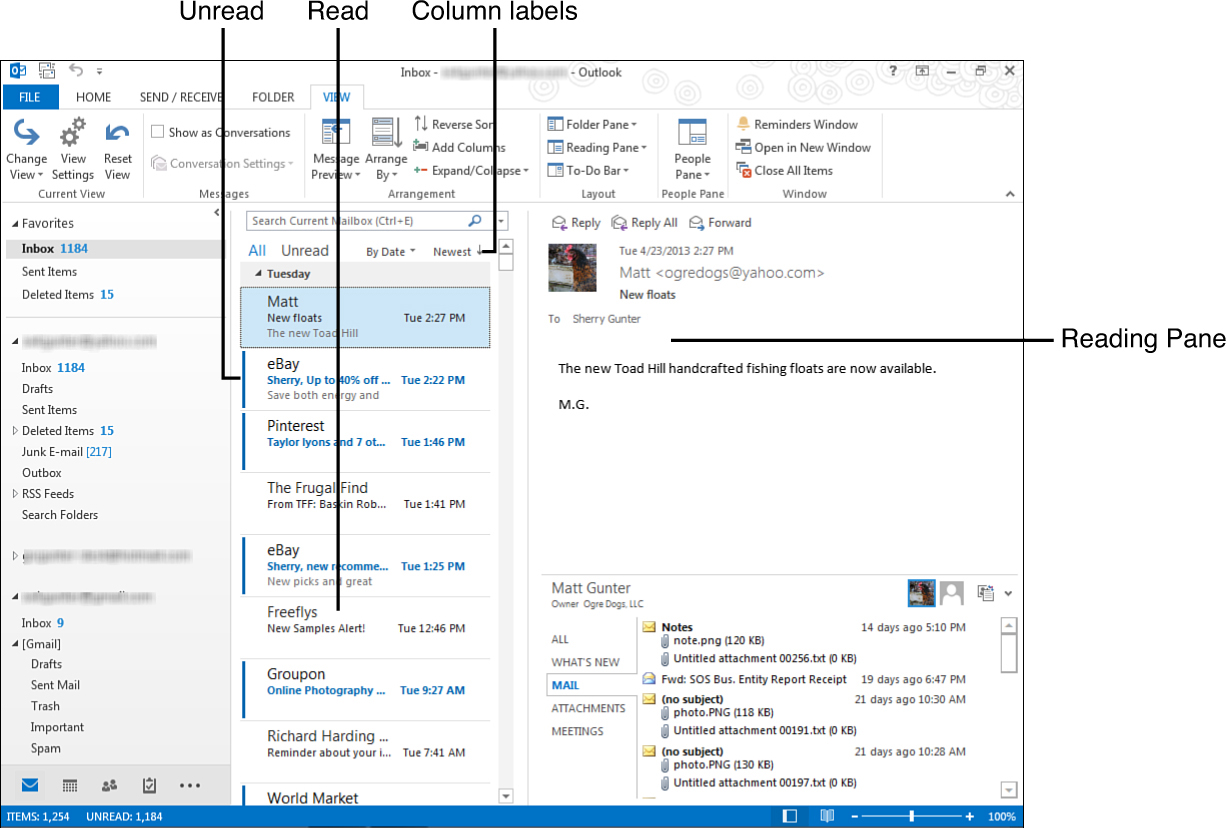
If you’re in the middle of composing a message and need to step away before completing it and sending it, you can save it. The Message window form has a Save button on its Quick Access toolbar which, when clicked, places the message in the Drafts folder, shown in Figure 4.14. (Each email account you work with in Outlook has its own Drafts folder.) The Message window stays open, however, so you can keep working on it. If you happen to close the window, the message still sits in the Drafts folder waiting for you.
This feature is handy when you want to work on a message and keep it around temporarily until it’s ready for sending. You can reopen it anytime and work on it more. Click the account’s Drafts folder and double-click the message you want to edit. When it’s finally ready to go out, click the Send button.
Tip
If you decide not to use the draft message after all, you can delete it from the Drafts folder. Click the message in the Drafts folder list of messages and then click the Delete button. Outlook moves the message to the Deleted Items folder.
Saving a Message File
You can also choose to save an Outlook message as a message file. You might, for example, save a message to use in another program, or maybe you’ve written a masterful message that needs to be saved for posterity. Aside from the obvious ways to retain a message (print it out on paper), you can save it as a file on your computer or other storage device, or export it to another program.
When saving a message as a file, you have the option of controlling what sort of file format is used. You can save it in any of these formats:
• Text Only—The simplest of formats, this saves just the text, no formatting (attributes you assign to make the text look nice).
• Outlook Template—Use this option if you’re creating a message template to use over again in your emailing tasks. It saves all the formatting controls and attachments associated with the message. (Learn more about formatting in Chapter 6).
• Outlook Message Format—The default format, this saves all the attributes and attachments, too. However, the only way to read this file type is in Outlook.
• Outlook Message Format—Unicode—Sort of the international flavor of file formats, this file type saves the message and attributes for easy reading with other versions of Outlook that use different languages.
• HTML—This saves the message as a web page, which means it can be viewed in a web browser or other programs that read web pages. When you use this option, an additional folder is also created with the file, containing support files for HTM (Hyper Text Markup).
• MHT files—This is the same as HTML, but without an additional folder for support files.
To save a message, use these steps:
1. With the Message window open, click the File tab.
2. Click Save As.
3. Navigate to the folder and drive to which you want to store the file (see Figure 4.15).

4. Click the File Name box and type in a name for the file.
5. Optionally, click the Save as Type drop-down arrow and specify a file type.
6. Click Save.
Outlook saves the message as directed.
Working with File Attachments
You can attach files to your emails to send to others and receive file attachments, too. File attachments are files created in other programs that you want to send along with a message. File attachments can be pictures, word processing documents, spreadsheets, slideshow presentations, desktop publishing documents, and so on. For example, suppose you want to send an email to a new client and include an electronic copy of your latest product list or a picture of your top-selling widget. You tell Outlook what file you want to include and it attaches to the message as a file the recipient can open and view. Or how about this—you just captured the best family portrait ever and want to send it to your aunt in California; add it to your email message as a file attachment.
File attachments increase the overall size of your email message. This is something to consider if your email service sets limits to how much data you can send. Some files are obviously bigger than others, with picture files often being the largest.
At the other end of the spectrum, you can open attachments you receive from others and save them on your computer for viewing and using. You can easily see if a message in your list has an accompanying attachment; Outlook displays a tiny paper clip icon when a message has a file attachment.
Here’s something nifty—you can email attachments directly from the other Microsoft Office programs. Suppose you want to send a Word document; just click the File tab, click Share, click Send Using E-Mail, then choose Send as Attachment.
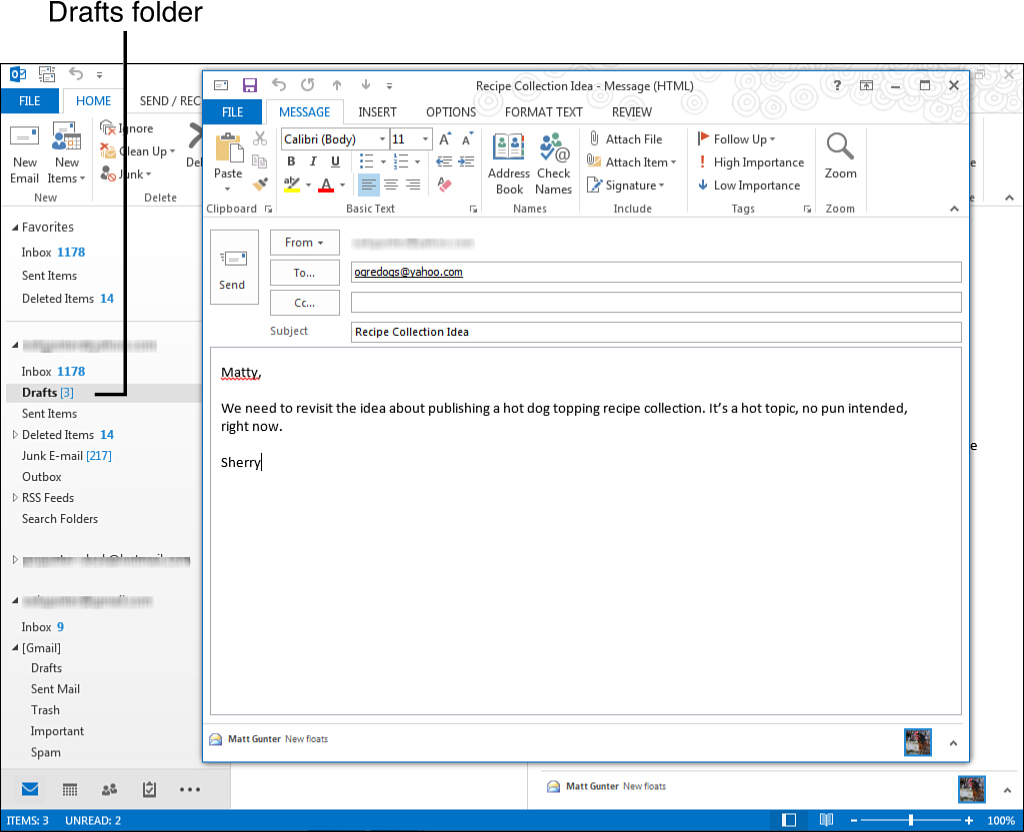
Attach a File
To attach a file, follow these steps:
1. From the Message window, click the Message tab (if it’s not already displayed).
2. Click the Attach File button (see Figure 4.16).
3. In the Insert File dialog box (see Figure 4.17), navigate to the folder or drive containing the file you want to attach and select the filename.

4. Click Insert.
Outlook attaches the file. Now you can send the message when you’re ready.
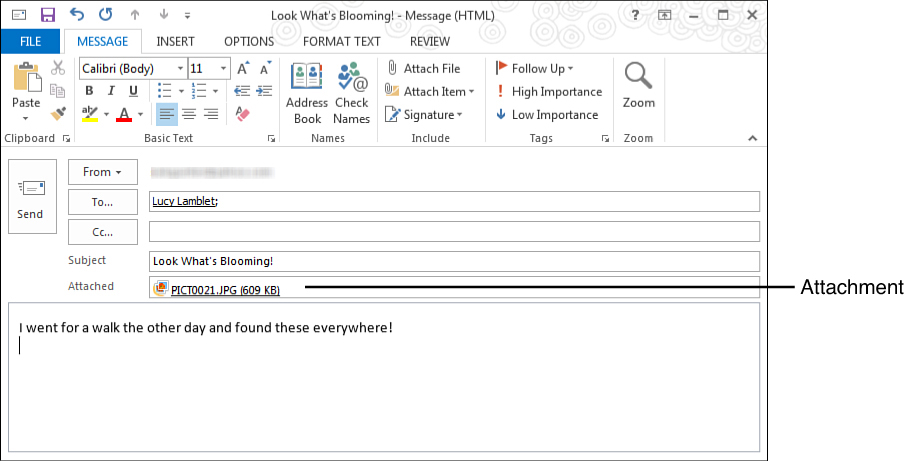
If you’ve chosen HTML or Plain Text as the email’s format, the attached file’s name appears in the Attached box in the message header area, just below the subject title, as demonstrated in Figure 4.18. If the message format is in Rich Text, the attachment appears as an icon in the message body, as shown in Figure 4.19.

Open an Attachment
When you receive a message with a file attachment (which is marked as a tiny paper clip icon in your message list), you can choose to view the attachment in several ways. You can preview some types of files, such as PDF files, Word documents, and Excel workbooks, in Outlook’s Reading pane. Figure 4.20 shows an example of what this looks like. Click the attachment and instead of showing the message text in the Reading pane, a preview of the attachment fills the area, and an Attachments tab appears on the ribbon. To switch back to the message content again, click the Show Message button on the Attachments tab (see Figure 4.20) or click Message in the Reading pane’s header area.

To open a file attachment in its own program-appropriate window, double-click the file attachment. Depending on the file type, a program window opens to view the file.
To save the attachment onto your computer and work with it later, right-click the attachment and choose Save As. You can then navigate to the folder or drive you want to save to and activate the Save command.
Outlook may prompt you about viewing attachments from unsafe sources. This is a precaution against computer virus and hacking. If you trust the source, you can continue with the preview. If not, stop to run a virus check using your computer’s virus protection software.
Using Simple Message Tools
To close out this chapter, I’ll show you some basic features for working with your messages, particularly as you read them. In Chapter 6, you can learn about advanced features, such as formatting controls, automating replies, adding signatures, and such. For now, though, let’s talk about some of the tools you can use to process messages in the message list.
Marking Messages as Read or Unread
As you’re working with messages in the list, Outlook lets you know which messages are read and which ones are unread. Learning to ascertain which ones you’ve read already can help you eliminate wasted time reviewing unimportant messages. Every new message that arrives in your Inbox (or Inboxes, if you’re using multiple email accounts) is marked with a blue vertical line and bold blue header text. This indicates that the message is unread. As soon as you open it, or preview it for a margin of time, Outlook marks the status as read, indicated by the lack of the blue vertical line.
Occasions may arise when you want to mark a read message as unread to remind yourself to view the message again. Or you might want to mark an unread message as read so you don’t have to stop and view (maybe it’s another joke email from your Uncle Roger that you’re trying to avoid).
To change the message status, use one of these methods:
• Click the blue vertical bar to mark the message as read (see Figure 4.21).

FIGURE 4.21 Marking messages as read and unread can help you review which messages require your attention.
• Right-click the message and choose Mark as Unread or Mark as Read.
• Select the message, and on the Home tab, click the Unread/Read button.
• Press Ctrl+Q to mark a selected message as read.
• Press Ctrl+U to mark a selected message as unread.
• To mark everything in a folder as read, right-click the folder name and choose Mark All as Read.
You can also mark groups of messages by selecting the group first before applying a new status.
Flagging Messages
You can flag a message with a reminder so you’ll revisit the email later to address it or take care of a task. Flagging is a great tool to help you stay on top of things you need to do or people you need to reply to with haste. Any messages you flag are added to your Task list. (See Chapter 9, “Tasks and To-Do’s,” to learn more about working with tasks in Outlook’s Task module.)
You can flag messages with dates and reminders. For example, if you want to tell yourself to deal with the message the following day, choose the Tomorrow flag. If you want to assign a reminder, choose the Reminder option and fine-tune the start and due dates.
To flag a message, use one of these techniques:
• Hover the mouse pointer over a message until you see a Flag icon (see Figure 4.22); click it and choose how you want to mark the message.

• Right-click the message and choose Follow Up; then click a flag.
• Click the Home tab, click the Follow Up button, and then click a flag.
To remove a flag, hover over the flag icon in the message list and click it to turn it off.
Categorizing Messages
You can color code your messages to help you determine actions you need to take on them. Outlook offers six preconfigured category colors, and you can rename them to suit your own workflow or create new ones. You can learn more about using categories in Chapter 14, “Using Color Categories,” but for now, you learn how to apply them to your messages.
Select the message you want to categorize, then click the Categorize drop-down arrow on the Home tab. Click a color category and Outlook immediately assigns it to the message, adding a color box to the listed item and adding a color bar to the message content, as shown in Figure 4.23. The first time you use the feature, Outlook may prompt you to give the color category a unique name. You can do so then, or you can change it later (see Chapter 14).

You can also right-click a message in your list and choose Categorize, and then specify a color.