14. Using Color Categories
In This Chapter
• Upgrading to color categories
• Creating new categories
• Adding and removing categories
• Discovering tips for using categories
We could all be organized, right? Outlook has a great feature that helps you get organized, makes it easier to use your contacts, see the important appointments when you view your calendar: color categories. You can use color categories to create contact groups, use Group by Category views to view related items together. Or use Instant Search or Search folders to find your categorized items.
Color categories take categories to a new level by highlighting the item with color when you assign a category. This allows you to color code Outlook items so it’s easier to visually identify them, or use Instant search to find the items within a specific category.
You can “group” categories that have similar purposes by assigning them the same color or color family. For example, you are working on several projects for a client and created categories for each project, calling them Project1, Project2, and Project3. You are using the blue category colors for this client. Project1 is active and uses the dark blue category color. Project2 and Project3 are still in the planning stage, and the category color is light blue. All email, appointments, and tasks that are associated with these projects are assigned the appropriate category. When you glance over your calendar, you know which client and project the appointment is for, just by seeing the category color.
You can assign more than one category to an item. For example, John’s contact belongs in the Friends category and also in the Softball team category. Instead of creating folders for each group of contacts (and creating duplicate contacts), you use categories to mark contacts belonging to the softball team and your friends.
You can use categories to create dynamic Contact Groups, instead of adding contacts to a Contact Group. By using categories to create groups, you don’t need to update the Contact Group to add or remove members or after updating a contact’s email addresses. When you send email to the category, you’ll always have the updated addresses.
Assigning Color Categories to Outlook Items
Assigning a color category to an email message, appointment, task, or contact is simple. First, select what you want to categorize. Like all things in Windows, there are several ways you can assign a category:
• Right-click a message in the message list and choose Categorize, and then select a category from your list of categories
• Choose a color category by clicking the Categorize button on the ribbon and choosing a category from the menu.
• Click in the category column to apply the Quick Click category or right-click to choose from your list of categories.
• When an Outlook item is open and has a category assigned, double-click or right-click the category in the message header to access the Category menu.
To assign color categories to an email message follow these steps:
1. Select the message.
2. Right-click on the message and choose Categorize from the menu.
3. Select a category from the list (see Figure 14.1).
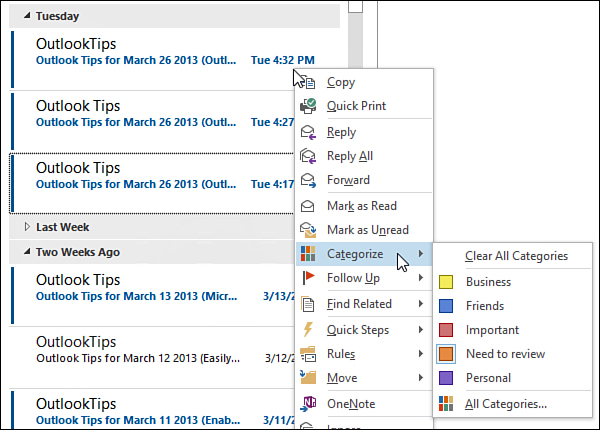
FIGURE 14.1 Right-click a message and choose Categorize; then select a category from the menu to add it to the email message.
4. Repeat to add more categories.
After you assign a category to a selected item, the category is highlighted with a pale blue border on the Categorize menu or has a checkmark beside the category name in the Color Category dialog box.
The 15 most recently used categories are shown on the Categorize menu in alphabetical order. Select All Categories from the bottom of the Categorize menu to open the Color Category dialog box, and then select a category from your entire list of categories, including those not listed in the menu. The Clear All Categories command removes all categories assigned to the currently selected item.
You can clear one or all categories assigned to an item:
1. Select the categorized item.
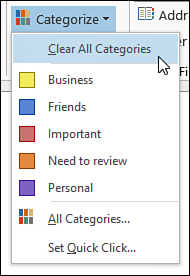
2. Click the Categorize button to expand the menu.
3. To remove one category, select it from the menu.
4. To remove all categories, select Clear All Categories (see Figure 14.2).
 Note
Note
The first time you select each one of the default color categories, Outlook brings up the Add New Category dialog box so you can give the category a more descriptive name.
Using the Quick Click Category
Outlook has a handy little feature to help you out, called the Quick Click Category. You set your most frequently used category to use the default color category. Then when the category field is shown in a view, you can click in the color category column to add the color category to the item, saving time and a lot of mouse clicks.
To select other color categories, you right-click the category field and choose a category.
Set a Quick Click Category
You’ll want to set one of your most frequently used categories to the Quick Click.
1. On the ribbon, click the Categorize button to expand the category menu.
2. Select Set Quick Click (see Figure 14.3).

3. Choose the color category you want to use as your default category and click OK.
4. Click the color category column. Outlook adds this color category, allowing you to categorize an item as the default color. If you click again, the category is removed from the color category column.
The Quick Click Category field is supported only in single line List views; it is not available in the Compact view, which is the default view in all Mail folders. Turning the Reading pane off will switch the Inbox to a single line view.
Note
The Quick Click category is not available in the Compact message list view in Outlook 2013.
Clicking in the category field toggles on and off the category assigned to the Quick Click. Right-click the Category field to select from the list of most recently used categories. Selecting a category from the Category menu toggles the category on and off, allowing you to add more than one category to the selected item (see Figure 14.4).
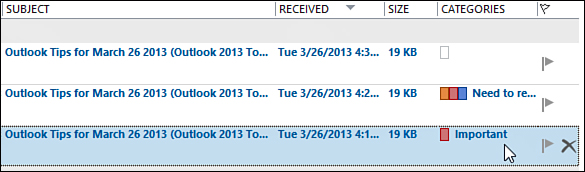
FIGURE 14.4 When the view shows the Category field, you can click in it to apply the Quick Click category.
Note
The Color Category Picker is not available in Internet Message Access Protocol (IMAP) accounts. You can assign keyboard shortcuts to color categories, and then use the shortcuts to add categories. You can also add categories to an open appointment by clicking File, then clicking Properties to open the Properties dialog box.
Assigning or Removing Color Categories
To assign a color category to an email message, follow these steps:
1. Select a message in your Inbox.
2. Right-click anywhere on the message and choose Categorize.
3. Select a category from the list.
4. Right-click again and choose another category. Notice the color block for the category selected in step 3 is highlighted.
5. On the ribbon, expand the Categorize button and choose Clear All Categories to remove the categories from the message.
Note
In the Calendar view, the Category color takes precedence over colors applied using views. This means that you can’t use Conditional Formatting to highlight appointments in color if they are assigned a category. If you use a List view, you can use both Conditional Formatting and Color Categories to highlight appointments. See Chapter 17, “Working with Views,” to learn more about Conditional Formatting.
Creating Color Categories
Outlook comes with six predefined color categories. You can add as many additional categories as you need and assign keyboard shortcuts on up to 11 categories. You are limited to 25 colors, but each color can be assigned to multiple categories.
The first time you choose one of the default color categories, a dialog box opens so you can assign the category a more descriptive name (see Figure 14.5). If later you decide that you want to rename a category, you can rename it and all items assigned to the category will be renamed.
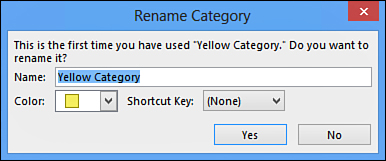
FIGURE 14.5 Use the Rename Category dialog box to change the default category names to something more meaningful.
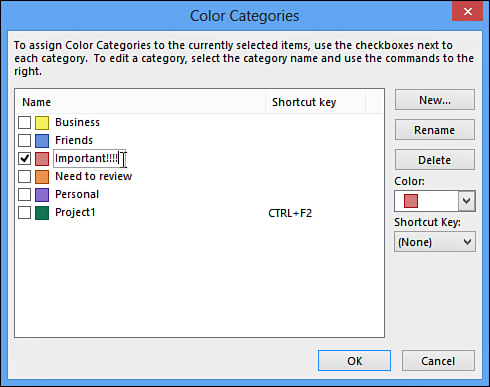
You use the Add New Category dialog box to create as many new categories as you want or need (see Figure 14.6).

FIGURE 14.6 Use the Color Categories dialog box to create new color categories or edit existing categories.
Follow these steps to create new Color Categories.
1. Click the Categorize button to expand the Category Picker.
2. Select All Categories to open the Color Categories dialog box.
3. Click New.
4. Type a name for your new category.
5. Select a color.
6. Select a shortcut from the list of available Shortcut Keys, if desired.
7. Click OK to create the category.
If you decide you want to delete the category, change the category name, use a different color, or assign (or change) the shortcut key, select the category name and use the buttons on the right. When you choose Rename, you’ll edit the name in place (see Figure 14.7).
 Tip
Tip
Assign keyboard shortcuts to your frequently used color categories, and you’ll be able to assign categories without using the mouse.
Upgrading to Color Categories
When you import an Outlook Personal Folders file (.pst) that has categories assigned to items, you need to use Outlook’s Upgrade to Color Categories command to add these categories to your Master Category list. Outlook assigns random colors to the categories.
How to Upgrade to Color Categories
When some of your categories are not listed on the Master Category list, or are not assigned a color, you’ll need to follow these steps to add the Categories to the Master Category list. If you aren’t sure, go ahead and run Upgrade to Color Categories; it is completely safe to use.
1. Right-click the top-level folder in your mailbox. This is the folder that displays your email address; if it’s your default data file, clicking on this folder opens the Outlook Today screen.
2. In the menu, click Data File Properties.
3. Click the Upgrade to Color Categories button (see Figure 14.8).

FIGURE 14.8 If you previously used Outlook, upgrade your categories to color categories before creating new color categories.
If you don’t use the Upgrade to Color Category option, categories not in the master list are colored white and marked “not in Master Category list” (see Figure 14.9) These one-off categories cannot be used on other Outlook items until they are added to the Master List.

You can add categories to the master list without using Upgrade to Color Categories.
1. Open or select the Outlook item containing one-off categories.
2. Click Categorize then click the All Categories box.
3. Select the category, and then click the New button.
4. The Name field contains the category name, and a color is assigned. Select a different color and choose a shortcut, if desired, before clicking OK to add the category to the master list.
Using Color Categories to Create Contact Groups
Color categories might be one of the most underutilized features available for Contacts. Many people choose to use multiple folders to categorize their contacts, with one for personal contacts and another for business contacts. Other people go so far as to create one contact folder per company or organization.
Using multiple folders is often the worst way to manage your contacts. One of the biggest problems you encounter when you use multiple folders is maintaining multiple copies of contacts when they are filed in more than one folder, such as someone who is both a personal and business contact.
Another problem concerns how the automatic resolution feature of the address book works. When Outlook is trying to resolve a name, it searches all the address books in order and stops at the end of the first address list in which it finds a match. For example, if you have Wayne Johnson in your business contacts folder and John Archer in personal contacts, and you type John in the To field, Outlook stops looking for matches to John after finding Wayne Johnson in the business contacts folder. When both men are in one contacts folder, Outlook finds both and enables you to choose the correct person.
Instead of using multiple folders to group similar contacts, you can use categories. Each contact can belong to multiple categories.
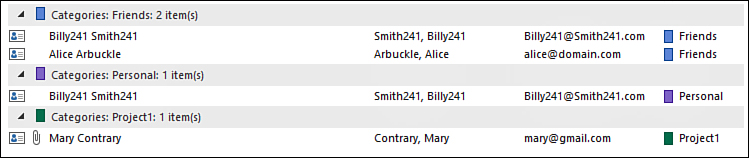
Figure 14.10 shows a contact list grouped by color category. Although it might seem that there are duplicates of the contact, it’s really just one contact. If you need to remove a contact from one category, open the contact and remove the category using the category picker. Don’t delete the contact from the category in the List view.
Sharing Color Categories
Color categories are stored in the mailbox and are available only to the current mailbox. If you have multiple accounts in your Outlook profile, each account will have its own set of color categories. If you want the same categories available in each account, you need to create the categories in each account.
This same limitation applies to shared mailboxes and folders; when you share folders in an Exchange mailbox with co-workers, they won’t be able to see the colors assigned to categories or create and edit exiting categories unless they have Owner permission to your mailbox.
Tip
Outlook doesn’t provide a built-in method to share categories with other people. It is possible to create a list of your categories and add the list to the Master Category list using a macro or a third-party utility. We have provided a macro that does this at http://slipstick.com/categoriesmacro and a list of utilities at http://slipstick.com/categories.
Discovering tips for using categories
How would you use Color Categories? The obvious and most frequently used method is just to mark items so they are more easily found or to signify importance: Important is the red category, yellow is used for Needs Attention, and green is Complete. But there are other ways to use color categories.
As previously mentioned, and one of my favorite uses, is using categories to create a dynamic Contact Group. When the group membership changes, you need to edit and update the Contact Group. It’s easier to add and remove a category from the contacts. If a contact is in several Contact Groups and has a new email address, you need to update every group his contact is in. Plus, you can’t easily use Contact Groups in Mail Merges, but you can create a mail merge using just the contacts in a specific category.
I also like to use the same shade of color on related categories. Suppose you want your contacts organized in folders, with each country in a different folder. You should use categories instead of folders. Create a category for each country and assign colors by continent or region. For example, categories assigned to contacts in the Northern European countries have the dark blue color, North America is green. This solves the problem of “too many categories, not enough colors” while making it easier to glance over the list and know who is in Europe and who is in America.
Although not a favorite of mine, a number of users use a black category to cross “yesterday” off or mark appointments completed. Simply create a category named Completed and assign black or another dark color. When the appointments are finished, assign the completed category to the appointment. The appointment picks up the color of the most recently assigned category. To cross off dates in the monthly calendar, create an All Day Event and assign the Completed category to it.