17. Working with Views
In This Chapter
• Creating new views
Outlook contains a lot of data, including all your email, contacts, appointments, and tasks—often several years’ worth of data. If you send and receive a lot of email, you could have thousands of messages in your inbox to sort through. Views can help you manage your email, calendar, and contacts, making it easier to find the information you need. You can use Outlook’s default views or create your own custom views, with conditional formatting to color code items or filters to show only the item you want to see.
Views are a powerful way to manage your email, but because they were buried in menus in previous versions of Outlook, few people used the views included with Outlook and even fewer people created their own customized views. The View tab in Outlook 2013 (see Figure 17.1) makes it easy to use the supplied views and to create your own customized views.

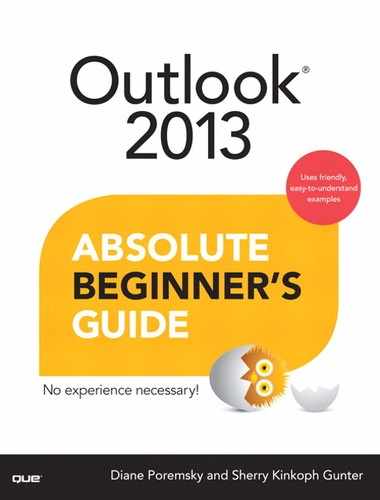
FIGURE 17.1 The View tab has the commands you need to change the view and arrangement of your email messages.
You change the view on the folder using the Change View command. You edit the view using View Settings and change how the items are grouped by selecting one of the commands in the Arrangement section. Use the Reverse Sort command to change the sort order. Finally, to undo all changes and return the view to the default settings, click the Reset View button.
Changing Views
Changing the view in Outlook is simple:
1. Select the Views tab.
2. Click Change View to expand the menu and select a new view (see Figure 17.2).

Outlook includes several predefined views for each folder type. Each folder type has different views that work best for each specific folder type, such as the monthly calendar view for the calendar folders and the business card view for the contacts folders. One or more list views are available for each folder type.
Items in a list view can be grouped together by the category, date, subject, or several other fields. Outlook 2013 refers to this as Arrangement. The fields you can arrange by vary with the folder type, but you’ll have category and date arrangements available in each folder type (see Figure 17.3).
 Note
Note
You don’t need to use the Views ribbon to change the Arrangement or sort order. In the message list, click By [field name], and then choose a different arrangement from the menu. To change the sort order, click the field name you want to sort by, and then click again to reverse the sort order.
Email Views
The predefined views for folders containing email are all list views and include the following:
• Compact—Default two-line view containing the subject, sender, and date
• Single—The subject, sender, date, and other fields on one line
• Preview—A single-line view with the Reading pane turned off
Some folders have views that were designed specifically for the type of messages stored in the folder, such as a Sent To view in the Sent Items folder which shows the name or address the message was sent to. There is also an RSS view for the RSS feeds, and Documents and Site Mailbox views for Search Folders.
IMAP accounts have their own views:
• IMAP Messages—A Compact view, the default for IMAP accounts.
• Hide Messages Marked for Deletion—When you delete messages from an IMAP account, they get marked for deletion (crossed out) and deleted later. This view hides these messages.
• Group Messages Marked for Deletion—This view groups messages that are marked for deletion.
• Preview—A two-line view with the reading pane turned off.
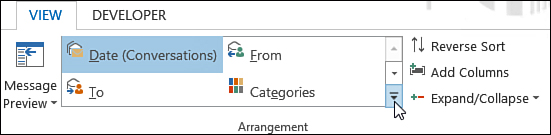
You can use a 1-, 2-, or 3-line message preview with each of these views to display up to the first 256 characters in a message (see Figure 17.4).
Note
To view only unread messages, click Unread at the top of the message list. Click All to show all messages.
The Compact view was designed to provide more information about each message when the Reading pane is on the right, whereas the Single-line view works better with the Reading pane off or on the bottom.
Note
Message Preview previews all messages if enabled. There is not an option to preview only unread messages.
Calendar Views
The calendar comes with the standard calendar views and list views with filters, which include the following:
• Calendar—This is the familiar Day, Week, and Month view of the calendar.
• Preview—Day, Week, and Month views that include the contents of the notes field, as space allows. This is most useful with longer appointments.
• List—A list of all appointments in table format. The appointments can be sorted or arranged in groups.
• Active—This view shows the upcoming appointments in a table format.
To view multiple calendars at once, add a check beside the calendar’s name in the Navigation pane. Click the arrows in the calendar tabs to switch between overlay and side-by-side view.
In addition to the typical day, week, and month layouts, the calendar includes a Schedule View (Figure 17.5). The Schedule View was designed to display multiple calendars, with the calendar names listed top to bottom and the hours going left to right.

Each calendar can be displayed using a different color. You can let Outlook pick the color automatically or permanently assign a color to a calendar. To change the calendar color, select a calendar and on the View tab, click the Color button or right-click the calendar and choose Color.
People Views
Outlook’s People module, formerly known as Contacts, contains all of your contacts and the traditional address card and list views as well as a new People view.
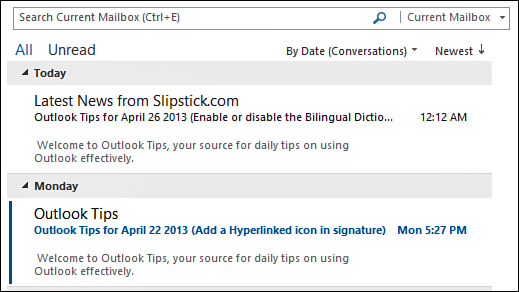
• People Hub—An aggregate view of your contacts. When you have more than one contact for a person, the details from each contact are combined on the Contact Card in the People Hub, with links to each contact. (Figure 17.6)
• Business Card—A business card-like view. The cards can be customized with company logos and photos.
• Card—A simple card view, displaying the contact’s information in a list.
• Phone—A list view containing name, company, and the phone number fields.
• List—A list in table format containing the company-related fields as well as address and phone fields.
The People Hub displays “contact cards” and links to the person’s contact(s), with all data on each contact displayed as one contact on the contact card. If you use the LinkedIn or Facebook social connector in Outlook, contacts in the People Hub will include links to their LinkedIn or Facebook profiles.
The People Hub may seem confusing at first. When you have more than one contact for a person, the People Hub displays the information from all of the contacts, including Facebook and LinkedIn, on one card. To open the person’s contact, click the link under View Source.
Task Views
All task views are simple table or List views, using predefined filters. You can sort and arrange tasks in groups using any of these views.
• Detailed—Includes most task fields.
• Simple List—Includes only the basic task fields: Subject, Due Date, and Categories field.
• To-Do List—Task list with the Preview pane turned on. This view is useful in the To-Do List with flagged email messages.
• Prioritized—Groups tasks and flagged messages by the Importance field (High, Normal, Low).
• Active—Completed tasks are hidden.
• Completed—Only completed tasks are shown, using a normal font, not the strikeout text normally used for completed tasks.
• Today—Shows only tasks due today or overdue.
• Next 7 Days—Tasks due in the next 7 days or those that are overdue.
• Overdue—Shows only overdue tasks.
• Assigned—Shows only the tasks assigned to others.
• Server Tasks—This view includes custom Priority and Status fields used only with SharePoint Tasks.
Notes Views
Outlook 2013’s “sticky notes” use two types of views, list and icon, and come with these default views:
• Icon—Displays the notes as Small or Large icons or in an icon list arrangement
• Notes List—A list view, with the note subject (the first sentence or 256 characters), the created date, and categories shown
• Last 7 Days—A list view that shows only the notes created within the last 7 days
Journal Views
The journal is well hidden and will eventually be removed from Outlook, so I don’t recommend using it; however, if you do, you’ll have Timeline or List views to choose from; these are as follows:
• Timeline—The dates scroll across the top of the view.
• Entry List—A list view.
• Phone Calls—Shows journal items marked “phone calls.”
• Last 7 Days—Shows journal items created within the last 7 days.
Applying Views to Folders
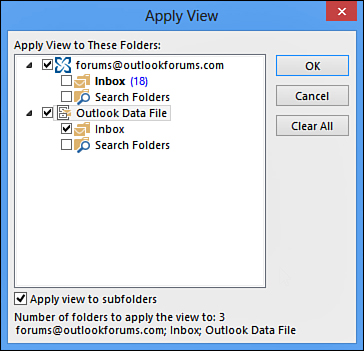
After you change a view on one folder, you can apply the view to many other folders at once. You need to view the folder whose view you want to apply to other folders. You can apply views to any or all folders of the same folder type. Follow these steps:
1. Open the folder whose view you want to apply to other folders.
2. Switch to the View tab.
3. Expand the Change View button.
4. Select Apply View to Other Folders.
5. In the Apply View dialog box, select the folders you want to apply the view to.
6. Select the top-level folders and add a check to Apply View to Subfolders to apply the view to all folders of that type within your mailbox or data file.
7. Click OK when you are finished selecting folders. This applies the current view to all the selected folders (see Figure 17.7).
 Tip
Tip
When you use a list view, if you press and hold Shift as you click field names, you can sort by multiple fields.
Creating Custom Views
Customized views can be used to show or hide Outlook items meeting certain conditions. You can use custom views to filter contacts before doing a mail merge. If you use the same search queries over and over, a custom view can be used as a more permanent instant search.
Views offer seven areas you can customize:
• Columns—Add the fields you want to see in your view.
• Group By—The default setting is to Automatically Group According to Arrangement.
• Sort—Change the sort order of your Outlook items.
• Filter—Create filters to show or hide Outlook items. Choose from preselected options or use the Advanced tab (and SQL tab, when available) to create your own filters using any available field.
• Other Settings—The options available in Other Settings depend on which folder you view. Use this dialog box to change fonts and customize your layout.
• Conditional Formatting—Conditional formatting changes the color or font of an item in List view when the item meets the conditions in the conditional formatting rule. Not all views support conditional formatting.
• Format Columns—Use this to change the format used in columns containing dates or numbers or to change Yes/No fields to check boxes or words.
To create a custom view, you need to switch to the View tab. Click View Settings to customize the current view or click Change View, Manage Views to create a new custom view.
To create a new custom view, follow these steps:
1. On the View tab, click the Change View button.
2. Select Manage Views.
3. Click New.
4. Enter a name for your view.
5. Select the type of view.
6. Select who can see the view.
7. Click OK.
8. In the Advanced View Settings, select the Columns (fields) that will be used in the view (see Figure 17.8).
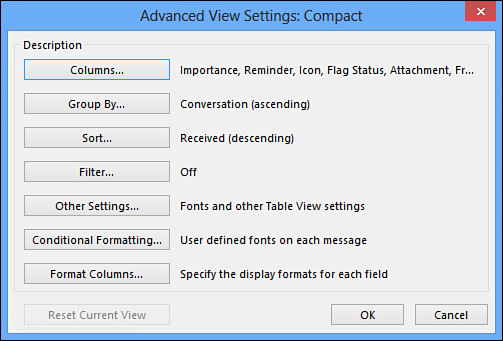
9. Configure the other options, including filters and conditional formatting.
Close the dialog box when you are finished to apply the view to your folder.
Resetting Views
Although a rare occurrence, occasionally one or more views become corrupt and prevent Outlook from displaying the folder contents. To fix it, press the Reset View button on the View tab, as shown in Figure 17.9.

You can also reset views using the Manage Views dialog box. Select the view you want to reset and click Reset View. You can reset only the default views; custom views are deleted instead.
If Outlook won’t open and you suspect the view is corrupt, or resetting the view on the folder does not fix the problem, you’ll need to close Outlook and restart using the cleanviews switch.
To use the cleanviews switch, close Outlook, and then press the Windows key+R to open the Run command and type the following:
outlook.exe /cleanviews
Press Enter or click OK to start Outlook and then reset all the views in Outlook.
All custom views are deleted, and the default views will be reset to their original settings.
Copying Views
Imagine this scenario: you spent an hour creating a number of conditional formatting rules in one of Outlook’s default views. Because Outlook does not offer an easy way to lock a view, you accidently reset the view and lost all of your hard work.
Although you can’t lock views to prevent changes, you can make copies of custom views to use as backups if the original is lost or changed.
Create a copy of the current view from the View tab by selecting Change Views, Save Current View as a New View.
If you want to copy other views, choose Manage Views, then select the view and click Copy and enter a new name for your view.
Using Conditional Formatting
Conditional formatting is used to format messages or other Outlook items that meet specific conditions. For example, messages from your boss can be shown in the message list with a larger red font, and messages from friends can use a smaller purple font (see Figure 17.10).

Conditional formatting rules are part of a view; if you change the view, you’ll lose the conditional formatting rules.
Note
Outlook includes default conditional formatting rules for read, unread, expired, and overdue messages. The formatting can be changed, but the conditions cannot be changed.
To create a conditional formatting view, follow these steps:
1. Switch to the View tab.
2. Click the View Settings button.
3. Click the Conditional Formatting button.
4. Click Add to create a new Conditional Formatting rule.
5. Enter a name for the rule (see Figure 17.11).

6. Click Font to select a color. You can also change the font and font size.
7. Click Condition to open the Filter dialog box to create your filter.
Note
To create a filter for an email address or part of an address, use the From field on the Messages tab. To use the display name, use the Advanced tab and select the From field from the list of fields.