19. Data File Management
In This Chapter
• Understanding Outlook data files
• Importing and exporting data files
• Storing data files in the cloud
Outlook uses two types of data files to store your email, calendar, contacts, and tasks on your computer: Personal Folders and Offline Folders. All your Outlook data—email, calendar, contacts, tasks, and notes—are stored in one or more data files.
Understanding Outlook Data File Types
Personal Folders have the file extension .pst and are often referred to as simply “pst.” Personal Folders files are used with POP3 (Post Office Protocol 3) email accounts or “No mail” profiles and can be moved from computer to computer. Archiving is always to a .pst file.
Offline files have the extension .ost. These are used with Exchange server accounts in cached mode, IMAP accounts in Outlook 2013, and Outlook.com Exchange Active Sync accounts. The offline files contain a replica of your online mailbox and do not need to be backed up.
While the Personal Folders files (.pst) can be moved to other computers or used in other profiles, the offline data files (.ost) can be used only by the account that created it.
Moving Data Files
Outlook 2013 stores the .pst files in a folder under your My Documents, typically at C:UsersusernameDocumentsOutlook Files. They are backed up when you back up your other documents.
You can move .pst files to any location on your hard drive. However, it’s not recommended that you store .pst files you are actively using on a network drive because you risk corrupting the data file. You can keep backup copies on a network drive.
Offline files are difficult to move to a new location. Because the offline files are copies of your mailbox, .ost files don’t need to be backed up. Third-party .ost recovery software is needed to recover data from orphaned files.
To find out where a .pst (or .ost) that is used by your profile is stored, open File, Account Settings, and then click the Data Files tab. Select the data file and click Open Data File Location. This opens Windows Explorer to the folder where the data file is stored.
Follow these steps to move a .pst file to a new location:
1. Open the folder where the .pst file is located.
2. Close Outlook. If you use Lync, you’ll need to exit it as well.
3. Move the .pst file by dragging it to a new folder, or use cut and paste and paste it in the desired location.
4. Open Control Panel, search for the Mail applet, and open it.
5. Click the Show Profiles button.
6. Select your profile and click Properties, and then click Data Files.
7. Select the .pst file from the list and then click the Settings button (see Figure 19.1).

8. Because the file was moved, you’ll receive a warning message saying that the file can’t be found.
9. Click OK. The Create or Open Outlook Data File dialog box opens for you to find the .pst file.
10. Browse to the location where you moved the .pst file to, select it, and click Open.
11. Click OK to return to the Account Settings dialog box. Close the dialog box.
When you restart Outlook, it will use the .pst file that you put in the new location.
Importing and Exporting Data Files
Outlook can import or export your calendar, contacts, appointments, and tasks in Comma Separated Values (CSV) or Outlook Data File (pst) format. In addition, you can also import vCards, iCalendars, and vCalendars.
Which format should you use? When you need to import data stored in another application, you need to export it in a format Outlook can import. In most cases, your only choice is to export it to the CSV format. If vCard (.vcf) or iCalendar (.ics) is an option, you can choose either format, but CSV is generally easier to import. If you need to edit the CSV file before importing it, you can open the CSV in Excel or Notepad for editing.
To use the Import and Export Wizard to import a CSV exported from another application, follow these steps:
1. Open the File tab, and then click Open & Export.
2. In the Open list, select Import/Export.
3. Select Import from Another Program or File, and then click Next (see Figure 19.2).

FIGURE 19.2 Select your desired import or export action from the list. Import from Another Program or File is chosen here.
4. Select Comma Separated Values and click Next.
5. Select the file to Import.
6. Choose how you want Outlook to handle duplicates, and then click Next.
7. Select the folder you want to import the file into, and then click Next.
8. Click the Map Custom Fields button.
9. Verify that the fields are mapped correctly. If you need to change any field mappings, drag the field from the left side of the dialog box to the field name on the right. When the field name is highlighted, drop the field to set the mapping (see Figure 19.3).

FIGURE 19.3 Check the field mappings and drag fields from the left to the right column to correct incorrect mappings.
10. Click OK to exit the Map Custom Fields dialog, and then click Finish to complete the import.
Outlook can’t import Apple’s multiple contact vCards; it imports only individual vCards, one vCard at a time. There are third-party utilities that can import multiple vcards, and you can use a VBA macro to import vCards in bulk. More information is available at http://www.slipstick.com/vcards.
The process is the same when you export your Outlook data. You have two choices for the file types to export to: Comma Separated Values or Outlook Data File (.pst) format. Choose the CSV format if you need to use the data in another program, and choose Outlook .pst if you need to use it in Outlook.
To use the Import and Export Wizard to export your Outlook data, follow these steps:
1. Go to the File tab, and then click Open & Export.
2. In the Open list, select Import/Export.
3. Select Export to a File, and then click Next (see Figure 19.4).

4. Select Comma Separated Values (CSV) if you are going to use the data in another program or Outlook Data File (.pst) if you will be using it in Outlook. Click Next.
5. Select the folder you want to export. You can export only one folder at a time when you export to CSV.
6. Click Browse. Select the file you want to export to, or type a name to export to a new file. If you are exporting to a .pst file, you’ll need to choose how you want Outlook to handle duplicates.
7. Click Next to export the data.
 Note
Note
If you are going to use the data in Outlook, you should export to the Outlook Data File (.pst) format. If you are moving your Outlook data to a new computer with Outlook, don’t use export. Instead, copy your existing .pst file to the new computer and add it to your profile.
Note
When you export to a CSV file, you need to export each folder separately. When you export to a pst file, you can include subfolders.
Backing Up Your Data
When you use a POP3 account or have Outlook data stored in a .pst file, it’s important that you make frequent backups because the items in your .pst file may be the only copy you have. If you use IMAP, Outlook.com, or Exchange Server accounts, you don’t need to back up the data file your email is delivered to because a copy of your mail is stored on the server. You need to back up your calendar, contacts, tasks, and notes if you use IMAP, or your notes if you use Outlook.com, because these item types are not synced to the server. Everything in your mailbox is synced with the server when you use an Exchange server mailbox.
Making a backup is as simple as locating your data file. By default, it is in your My Documents folder, in a folder named Outlook Files. Close Outlook and copy the data file to back up media or cloud storage, such as SkyDrive or Dropbox. It can be as complicated as configuring a backup program to back up your entire hard drive. The important thing is that you make frequent backups. You should also test the backup occasionally to ensure that your Outlook data file is not corrupt.
Note
If you use an online backup such as Mozy or Carbonite, you need to check the backups every now and again. Outlook puts a lock on the .pst file when the .pst file is open, and if the backup tries to run while the lock is on, the Outlook data file is not backed up.
Archiving Email
As email ages and the data file grows, many people archive their email to remove it from their mailbox, while saving it in case they need it years from now. However, many people never access the archived mail; being a pack rat with computer files only means you need more storage space.
Note
Always follow company policy for archiving. If the administrator wants business email deleted, don’t move it to a data file to save it.
You can use either AutoArchive to move or delete email, appointments, or tasks to the same folder in an archive .pst or use manual archiving to move or delete messages in a specific folder and its subfolders at any time. Contacts are not archived.
Each folder can be configured to have unique AutoArchive settings, or you can apply the same setting to all folders.
Note
When you use an Exchange server mailbox with an online Archive mailbox, Archiving in Outlook is disabled.
To enable AutoArchive, open the AutoArchive dialog and click File, then click Options, click Advanced, and then click AutoArchive Settings. These enable you do to the following:
• Check Run AutoArchive Every 14 days, and change the number of days if desired. To disable or turn off AutoArchive, deselect this option. Maximum value is 60 days.
• If you want to be notified before AutoArchive runs, enable Prompt Before AutoArchive Runs. With this enabled, you will be able to cancel archiving if you think it will interrupt your work.
• If you use expiration dates on email, select Delete Expired Items (email folders only). This removes messages marked as expired.
• To remove old email, appointments, and tasks, enable Archive or Delete Old Items. If this is not selected, only expired messages will be deleted.
• Select Show Archive Folder in Folder List if you want the archive .pst file added to your Outlook profile. If this is not checked, the .pst is added to your profile temporarily during the archive process and removed when the archive is finished.
• Select the default age for archiving old messages. This applies to all folders that do not have folder-specific settings (see Figure 19.5). The maximum time period is 60 days, 60 weeks, or 60 months. Choose the time period that is appropriate for most folders. By default, the age is based on the last modified date, not the received date.

• Choose between moving old items to an archive folder or permanently deleting the old items. If you are moving old items, you can use the default archive .pst or choose a new one. You can return to this dialog and change the data file at any time. If you permanently delete old items, you will not be able to recover them.
• Click Apply These Settings to All Folders Now to apply the default settings to all folders; then close the dialog.
If you want any folders to use a different AutoArchive setting, you’ll need to change the folder settings before AutoArchive runs. For example, you can configure the Deleted Items and Junk E-mail folders so that items older than three days are permanently deleted. Every time AutoArchive runs, these folders will be cleaned out.
To check for folder-specific settings, right-click the folder and choose Properties; then click the AutoArchive tab. You can also access this dialog from the Folder tab by clicking the AutoArchive Settings button (see Figure 19.6).

FIGURE 19.6 Configure folder-specific AutoArchive settings, such as to permanently delete older deleted items or junk mail.
These settings are specific to each folder and are not applied to subfolders. You’ll need to change each folder individually.
You can run AutoArchive at any time using the AutoArchive option on the File tab. Click Cleanup Tools, and then click Mailbox Cleanup, then AutoArchive.
Mailbox Cleanup
Outlook has several built-in tools that make it easier for you to discover how large your data file is and to reduce the size. These tools are grouped on the Mailbox Cleanup dialog, click the File tab, and then Cleanup Tools (see Figure 19.7).
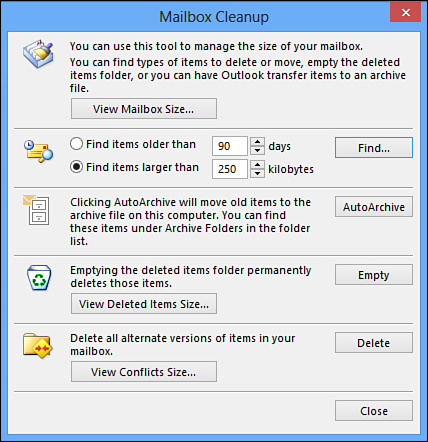
Following are options in the Mailbox Cleanup dialog:
• View Mailbox Size shows you the size of your mailbox and each folder within the mailbox. This information is also available when you right-click a folder, choose Properties, and then click Folder Size.
• Find Items Older Than and Find Items Larger Than. Select the age or file size and click Find to open the Advanced Find dialog using the selected criteria. You could use Instant Search with the criteria “size: > 250KB” or “received:(<12/1/2012)” right from your Inbox.
• As mentioned previously, the AutoArchive button runs AutoArchive.
• View the size of the items in the Deleted Items folder and empty it. You can empty the Deleted items folder by right-clicking the folder and choosing Empty Folder.
• View Conflicts Size shows you the size of the conflicts in your mailbox. Conflicts are created when Outlook creates a copy of an existing item, usually when the original item is being edited. This is more common with Exchange Server mailboxes, but is possible with Outlook.com accounts and IMAP accounts.
Outlook also has a manual Archive option, in File, Cleanup Tools. Manual archiving lets you select just the folder and subfolder that need to be archived, and you can choose a specific date to use. You can archive to your archive .pst file or select a different .pst file (see Figure 19.8).

If you select the top-level folder (where your account name is), you can archive the entire data file using a specific date.
For example, after a project has ended, you could use this to archive a folder created for that specific project.
Storing Data Files in the Cloud
With the popularity of cloud storage services, such as Dropbox and SkyDrive’s inclusion in Office 2013 subscription, I’m often asked if the .pst file can be stored in the cloud.
Storing an active .pst file in the cloud (or on a network drive) is not supported for two reasons:
1. Outlook keeps a lock on the .pst file when it’s open, and it cannot be uploaded to the cloud while the lock is on.
2. The typical .pst is around 1GB in size, but many are much larger. Not only do larger files take longer to sync, they also use a lot more of the available cloud storage.
You can store your archive .pst files in the cloud, provided you don’t keep them open in Outlook. However, if there are problems syncing, the data could be corrupted.
Note
Some cloud services, such as Sugar Sync, create and delete temporary files when they try to sync a .pst opened in Outlook. If the deleted items count toward your cloud quota, you may find your free space is limited because of hundreds of temp files.
Outlook puts a lock on the .pst file when the .pst file is open. SkyDrive continually syncs the local folder. It won’t be able to sync correctly when Outlook is open because Outlook has a lock on the data file.
Although you could use cloud storage to store backup copies of your data files, it’s not recommended because of the large size of many .pst files: uploading a large data file can take “forever.” If you want your Outlook data in the cloud, use Office 365 or other hosted Exchange service, Hotmail/Outlook.com, or an IMAP account. Office 365/Exchange will store all Outlook data online, whereas Outlook.com/Hotmail is email, calendar, tasks, and contacts only; IMAP is email only.
There are online backup services that can back up .pst files when Outlook is open and incrementally back up the .pst so that only changes are saved. These are safe to use because they are designed to work with Outlook data files. However, unlike backing up a file to SkyDrive or DropBox, you can’t download the .pst file to another computer when needed. You need to restore it using the backup application.
Repairing the .pst Using Scanpst
Sometimes the Personal Folders file is damaged and needs to be repaired using the Inbox Repair Tool, or Scanpst, as it’s more commonly called.
Scanpst.exe is included in your Office installation, which by default is at C:Program FilesMicrosoft OfficeOffice15 or C:Program Files (x86)Microsoft OfficeOffice15 if you installed Office 2013 32-bit in 64-bit Windows.
Most people will have Office 2013 Home Premium or University, which is installed from the Internet, also known as Click to Run. Look for scanpst.exe under the root directory in the install path. If you used the default path, Scanpst.exe is at C:Program FilesMicrosoft Office 15 ootOffice15scanpst.exe. If you installed 32-bit Office in 64-bit Windows, Scanpst.exe is at C:Program Files (x86)Microsoft Office 15 ootOffice15scanpst.exe.
If you have Office 2013 Pro Plus and did not need Internet access during the installation process, scanpst.exe for 64-bit Outlook is at C:Program FilesMicrosoft OfficeOffice15Scanpst.exe or C:Program Files (x86)Microsoft OfficeOffice15scanpst.exe for the 32-bit version.
Note
The icon used for Scanpst.exe is a broken envelope. This is supposed to indicate that it works with broken messages. It does not mean the application is broken.
When you need to repair your .pst file, you’ll follow these steps:
1. Close Outlook.
2. Open Scanpst.exe.
3. Click Browse and browse to the location of the .pst. The file browser will open to C:UsersusernameDocumentsOutlook Files, which is the default location for .pst files in Outlook 2013.
4. Select your .pst from the list (most people will have just one).
5. Click Open, Start to begin testing your .pst file. It can take several minutes if your data file is large.
When Scanpst is finished running the tests, a dialog reports the errors it found and tells you if you need to repair the data file (see Figure 19.9). If you need to repair the .pst, always make a backup.
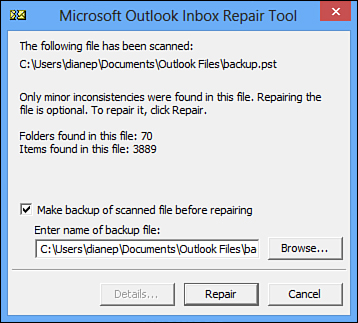
Scanpst will almost always find errors in the .pst file, especially if you use add-ins or applications that use Outlook data, such as sync utilities. Not all errors need to be fixed, though. Outlook will fix minor errors as part of the startup process.
I do not recommend running Scanpst on a regular basis. Use it only when Outlook tells you to run it or when you suspect the data file might be damaged. Don’t use it as part of your normal computer maintenance. Scanpst will almost always find errors but minor errors don’t need to be fixed, and fixing the .pst file over and over can cause more corruption. Outlook checks the .pst file when it starts and will fix minor errors, and it will let you know when you need to use Scanpst.
Only POP3 accounts, archive files, and exported files use a .pst file. IMAP, Outlook.com, and Exchange server use offline files (.ost). If these files are corrupt, close Outlook, delete the file, and Outlook will create a new file when you restart it.
Note
In the rare event that Scanpst can’t fix a corrupt .pst file, you’ll need to use a commercial repair utility. You can find a list of programs that do this at http://www.slipstick.com/repair.