9. Using Tasks and To-Do’s
Tasks and to-do’s help you organize and prioritize your work. With reminders set, you won’t forget what is on your list. Both Tasks and To-Do’s display in the Task peek, so you always know what needs your attention.
What is the difference between a task and a to-do? Tasks are, well, tasks. They are created using a Task form and saved in a Tasks folder. To-Do’s are messages that are flagged for follow up. Both Tasks and To-Do’s are shown in the To-Do List and in the Task Peek.
Although tasks have a lot in common with appointments, they serve a different purpose. Typically, you’ll use tasks to track events you need to get done but don’t need to do at a specific time, such as 2 p.m. Tasks can be open-ended with no start or due date, or you can set start and due dates.
Creating Tasks
Some events and to-do’s can be entered as either calendar or task items, but for the most part, you’ll want to create tasks for items that don’t have a set time to be completed. You can set a due date or leave the task open-ended.
To open a blank task form from anywhere in Outlook, select New Items, Task or press the keyboard shortcut of Ctrl+Shift+K.
 Note
Note
Windows 7 and 8 have a cool time saving feature called Jump List, where shortcuts to files are added to the menu that is shown when you right click on a program icon on the task bar. Outlook added shortcuts for new items to the Jump List for you. The Jump List makes it easy to create new tasks when you are working in other programs. Simply right-click the Outlook icon on the taskbar and choose New Task.
You only need to complete the Subject field for your task and save it. But in most cases you’ll also want to include a Due Date, and you might want to include a Start Date and Reminder Time, or assign Categories. As you work on the task, you can update the Status and % Complete fields.
How to Create a Task
Now that you know a little about Tasks, you can create a task of your own.
1. From any folder in Outlook, select New Items, Task or press Ctrl+Shift+K.
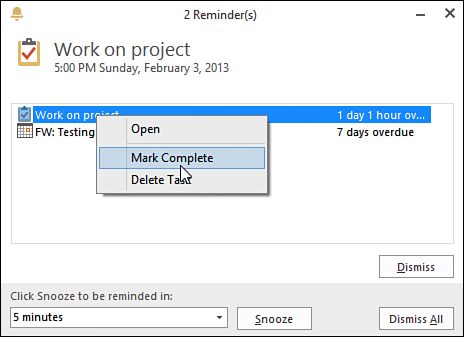
2. Enter a subject for your task (see Figure 9.1).

FIGURE 9.1 The task form needs only a few fields completed: Subject, Start Date, Due Date, and Reminder time. As you complete the task, you change the % Complete and Status fields.
3. Using the Tab key, navigate to the Start Date field and type or select a start date.
4. In the Due Date field, type or select a due date.
5. Select a Priority, if desired.
6. Select the Reminder field and choose a date and time. The default reminder date is the due date. The default reminder time is set in Task Options (see Configuring Task Options later in this chapter). You can choose a different reminder time if desired.
Note
Tasks use the default reminder sound set in File, Options, Tasks, but you can assign a different reminder sound to any task by clicking the Sound icon to the right of the reminder time and selecting a new sound.
It’s much easier to type the dates in the date and time fields than to use the date and time pickers when you know the shortcuts to use. In addition to the usual short date format of 12/25 or 12/25/10, you can use natural language phrases and other shortcuts. Among the available shortcuts are 1d (for 1 day), 2w (for 2 weeks), 10 or 10a for 10 a.m., and 235 or 235p for 2:35 p.m. The date fields accept natural language words, which enable you to type such phrases as next christmas, tomorrow, and week from friday and have Outlook enter the correct date in the field. These fields are not case sensitive and you can use lowercase letters for holiday and day names, as I used in my examples.
Note
You can use the following abbreviations for dates: d for day, w for week, mo for month, and y for year. Times can be entered using numbers only; a or p is not required for times entered during working hours. To subtract from a date, use before, as in 2 days before.
Outlook can set the due date based on the start date. For example, to create a task that starts next Friday and is due 2 days later, enter next friday in the Start field, and then press Tab to go to the Due Date field and enter 2d.
Outlook can calculate the start date of a task from the due date. For example, if you want to create a task due in 42 days and it needs to be started 5 days before it’s due, you’d tab to the Due Date field and enter 42d, and then use Shift+Tab to return to the Start field. Type 5 days before in the Start Date field and tab out. Outlook correctly calculates the dates in each field.
More Ways to Create Tasks
In addition to creating tasks “from scratch” with a new task form, you can drag or copy email messages to the Task folder, or type into the Type a New Task field at the top of the Tasks or To-Do List folders, or in the Task Peek. You can also flag email messages to make To-Do’s.
If you want to create an actual task from an email message, rather than flagging it as a to-do, drag the message to Tasks in the Folder bar at the bottom of the Outlook window. This opens a new task form with the Task subject filled in, and the message text in the task’s body. Complete the other task fields as needed and save the task.
The Move, Move to Folder, or Copy to folder command also creates a task when you select the Task folder as the destination. The Move command is on the Home tab. You can also use the Move command when you select a message in a list and right-click to display the context menu.
 Tip
Tip
I generally recommend using Copy to Folder; using Move to Folder inserts the email message as an attachment and deletes it from your Inbox.
Using the Type a New Task Row
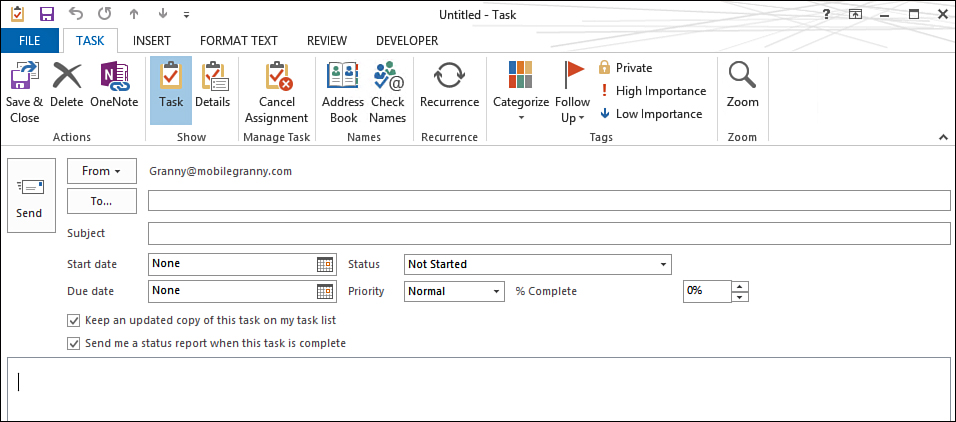
At the top of the Task list in some views is an empty row with the words “Click here to add a new Task”. The Task Peek has a similar row. This is the Type a New Task row and it is great for quickly adding simple tasks to your task list (see Figure 9.2). After you type in the Task Subject, the due date and reminder time are set on the task, based on your Quick Click flag options. You can right-click the task and choose a different flag to change the due date and reminder.

Note
Calendar, Contacts, and Notes can also have a row at the top of the list views. If you are using a List view and don’t see it, you need to select Allow in-cell editing and Show “new item” Row in the Other Settings dialog. Switch to the View tab, click View Settings, then click the Other Settings button. In-cell editing is near the top of the dialog.
Using the Type a New Task row to create a quick task is simple. The task saved automatically when you press Enter or click somewhere on the screen.
1. Click in the Type a New Task field.
2. Type the subject for your task and tab out of the field.
3. The task uses the Quick Click flag due date and reminder time. Right-click the flag field and select a different flag to change the due date and reminder time.
When you need to fill in more fields in the task, double-click in the Type a New Task field to open a new task form. When you open a new task using this method, the Due Date field is set to the Quick Click default.
When the Reading pane is turned off, the New Item row is identified as Click Here to Add a New Task. You can complete any or all of the fields shown in the view.
Note
If you don’t want the New Item row in your Tasks folder, you can turn it off in View Settings. Switch to the View tab and choose View Settings. Click Other Settings and remove the check from the Show ‘new item’ Row option.
Note
The Quick Click Flag is the gray flag that is visible when you move your mouse over a message and at the far right in some views. When you click on the Flag it sets a Follow up flag due Today. If you want to change the default to another date, right click on the flag and choose Set Quick Click. You can choose from Today, Tomorrow, This Week, Next Week, No Date, or Custom. This week and Next Week set the due date to your last work day of the week, which for many people is Friday.
Completing Tasks
As you work on the task, you can change the % Complete field to reflect how much work you’ve done toward completing the task. Although it’s not necessary when working on your tasks, if you’re working on a shared task or you are assigned a task by someone else, updating the % Complete field helps others gauge how much you have left to do. The list contains 25, 50, 95, and 100, or you can type any whole number into the field.
You can also set a status for the task, choosing from the following:
• Not Started
• In Progress
• Completed
• Waiting on Someone Else
• Deferred
When the % Complete field is changed, and the Status field is on the default of Not Started, the Status updates to In Progress or Completed. Status selections are unchanged when another status is selected and the % Complete field is updated to anything except 100% Complete, at which time the status changes to Completed.
When the task is complete, you can mark it complete using one of several methods. You can do this from the reminder window, from an open task, or in the Tasks folders:
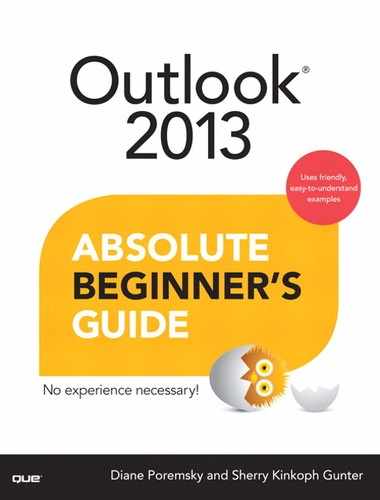
• To mark the task complete in the reminders window, do not click the Dismiss button; this removes only the reminder. Instead, right-click the task and choose Mark Complete (see Figure 9.3).
• On opened tasks, click the Mark Complete button on the ribbon or set % Complete to 100.
• In the Tasks folder or To-Do bar, you can click the Flag, click in the Complete column (if shown in the view), click the Mark Complete button, or right-click the task and choose Mark Complete.
Entering Task Details
The Details page (Figure 9.4) contains fields useful for billing purposes: hours worked, mileage, and billing information. You’ll need to fill in these fields yourself; only the Completed date is set for you. The Total Work and Actual Work fields use the Work Hours setting in Options, Tasks to calculate the days worked. For example, if you have the work hours set to the default of 8 hours per day and 40 hours per week, when you enter 12 hours in the work field, Outlook converts it to 1.5 days.

The Create Unassigned Copy button is available only when you send a task request; use it to create an unassigned copy of the task on your task list.
Recurring Tasks
When you need to repeat a task over several days or weeks, you can create a recurring task and Outlook generates the next task in the series when you mark the task complete.
When you have recurring tasks with reminders, do not dismiss the reminder in the Reminder window, because this will turn the reminder off for future tasks in the series. Snooze it instead or mark the task complete to remove it from the Reminder window.
Create a Recurring Task
1. From an open task form, click the Recurrence button on the Home ribbon or press Ctrl+G to open the Task Recurrence dialog (Figure 9.5).

FIGURE 9.5 Use the Task Recurrence dialog box to create recurring tasks. Recurring tasks must fit a pattern; you cannot use this dialog to create tasks that don’t fit a pattern.
2. Select the desired recurrence pattern. Choices are Daily, Weekly, Monthly, or Yearly.
3. Select the frequency. When you select the Recur Every option, the next task is generated as soon as you mark the previous task complete. With Regenerate New Task After Each Task Is Completed, the next task is not generated until the period of time passed.
4. Select a start date for the recurrence range and an end date. It’s highly recommended that you always set an end date. For long-running tasks, I recommend ending recurrences at the end of each year and re-creating the task at the beginning of each new year.
5. Save and close the task when you’re finished.
6. When the task is completed, mark it complete to generate the next occurrence.
Using Task Requests
You can assign new or existing tasks to another Outlook user. They’ll receive the task by email and can accept or decline the assignment.
When status updates are enabled, each time the recipient updates the status of the task, updates are sent back to you, and the copy of the task in your Tasks folder is updated.
Note
If either you or the recipient aren’t using Exchange Server, many times the task updates are sent as plain-text messages, not rich text, and your copy of the task isn’t updated automatically. When this happens, you’ll receive a message containing the task fields and you have to update the task status yourself.
Creating a Task Request
When you are ready to assign a task to someone else, you’ll follow these simple steps:
1. On the ribbon, to open a new Task Request (see Figure 9.6), click the New Items button, and then click the Task Request button or press Ctrl+Alt+Shift+U. You can also click the Assign Task button on an open task to convert the task to a Task Request. If you change your mind, click the Cancel Assignment to convert the task request to a regular task.
2. Enter the recipient’s name in the To field. Although you could send the task to several people, you will not receive updates when the task request is sent to more than one person.
3. Enter the subject, start and end date, and priority.
4. Select Keep an Updated Copy of This Task on My Task List if you want the task added to your task list. If this is selected, updates the recipient makes will be reflected on your copy.
5. Select Send Me a Status Report When This Task Is Complete. With this enabled, you’ll be notified by email when the task is completed.
6. To create an unassigned copy of the task in your Task list, click the Details button, and then click Create Unassigned Copy.
Click the Send button when you’re finished creating the task.
After receiving the task, the recipient can either Accept or Decline it by clicking the appropriate button in the Reading pane or opened task. If the task is declined, you can take ownership of the task again by clicking the Return to Task List button.
Accepting a Task Request
When someone sends you a task request, you need to accept or decline it.
1. When a task request arrives in your Inbox, you can accept or decline it either by clicking buttons in the Reading pane or on an opened message (see Figure 9.7).

FIGURE 9.7 Click the Accept or Decline button in the Reading pane when you receive a task assignment.
2. If you accept the task, a dialog box displays this message: “This task will be accepted and moved into the Tasks folder. Do you want to edit the response before sending it?”
3. When you decline the task, a dialog comes up with this message: “This task will be declined and moved into the Deleted Items folder. Do you want to edit the response before sending it?”
4. Choose Edit the Response Before Sending if you want to add a message to the response before sending. An email message form will open for you to type a note.
5. Send the Response Now will send the acceptance or decline immediately.
After you accept the task, it’s added to your task list; when you decline a task, it’s moved to your Deleted folder.
Viewing Tasks
There are several ways you can view your tasks:
• In the Tasks folder
• In the Task Peek (see Figure 9.8)
• Using the Daily Task List in the Calendar (see Figure 9.9)
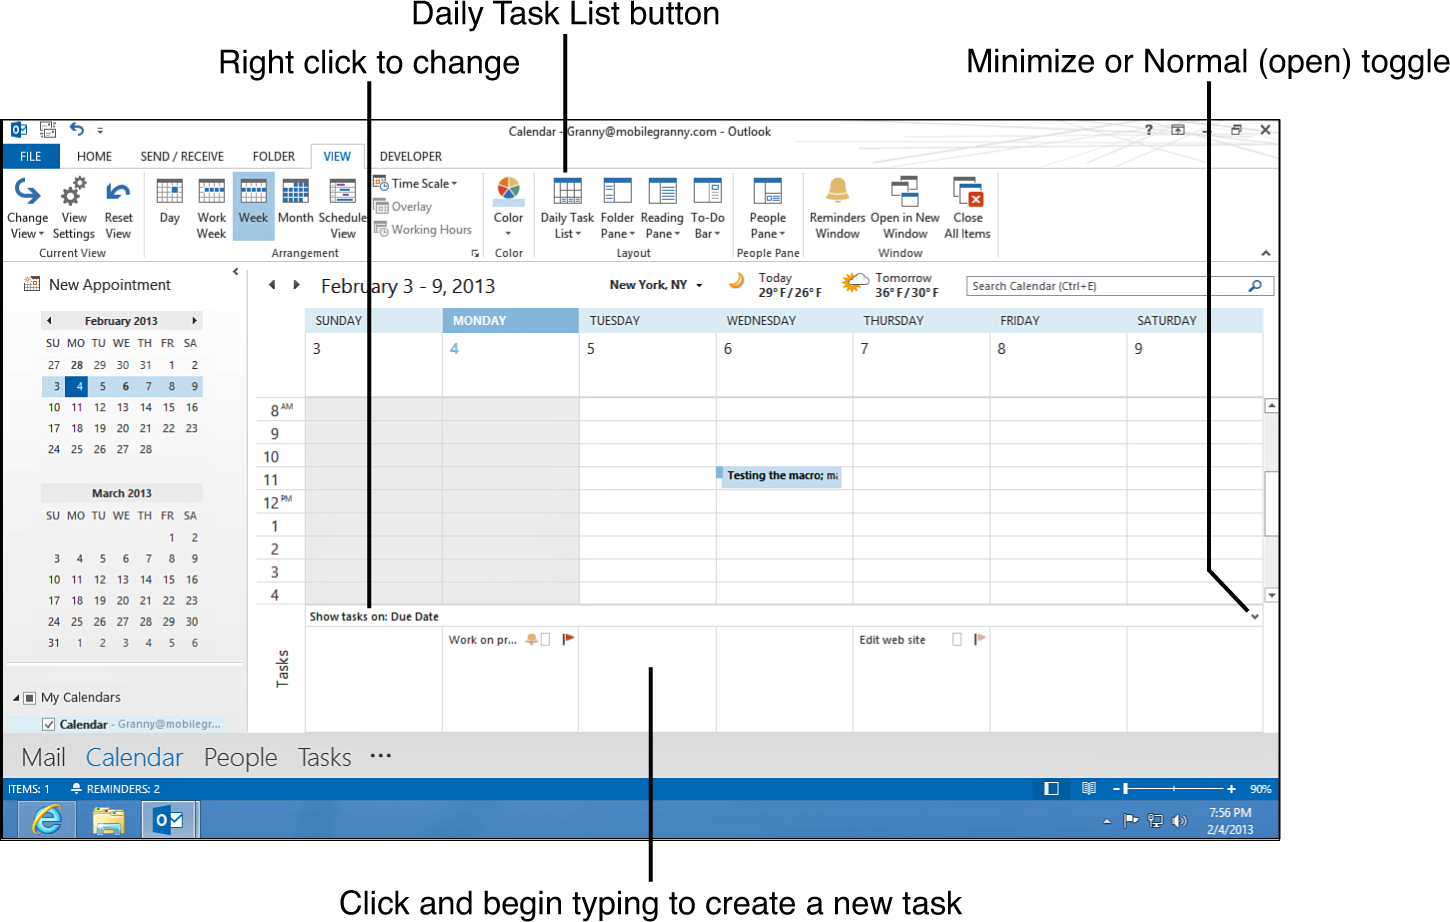
FIGURE 9.9 Current tasks are shown under the date when you view your calendar in the day or week view.
• On the Outlook Today page
The task list in the Task Peek displays tasks from all Tasks folders in your profile and all flagged messages, contacts, and other Outlook items.
When the peek is docked, you can resize the task section by pulling the separator up or down.
You can display your tasks in the Daily Tasks List at the bottom of the day or week calendars. The Daily Tasks List is not available in the monthly view.
If the task list is not visible on the day or week calendars, switch to the View tab and expand the Daily Task List button; then select Normal. Click the icon on the right side of the Daily Task list to minimize the list, and click it again to restore it.
Although the task list does not say Type Here, you can create new tasks by typing in the daily task list.
The task list supports two views: Show Tasks by Start Date or Show Tasks by Due Date. You can hide Completed tasks in either view. Right-click the bar separating the task list from the calendar to change the order or show/hide completed tasks. The view can also be changed from the View tab by clicking Daily Tasks List, and then clicking Arrange By.
The Outlook Today screen lists the Tasks that are due today or overdue. You can mark Tasks complete from the Outlook Today screen or open a Task by double clicking on a task in the list. This screen shows only the Tasks in your default mailbox or .pst file. The To-Do List shows the tasks in all folders.
Customizing the Task or To-Do List View
If you don’t like the predefined views in the Tasks folder or To-Do list, you can customize the views or create a new view.
You can change the views from the View ribbon by following these steps:
1. Select a different view from the Change View button.
2. Choose View Settings to open the customize view dialog. Many of the options are on the ribbon.
3. Click the Reset button to reset the view to the default.
4. To view the first 1 to 3 lines of a task’s Notes field, expand Message Preview and select Off, 1, 2, or 3 lines.
5. Change how the tasks group by selecting a different arrangement. The available arrangements vary based on the selected view and may include Categories, Start Date, Due Date, Folder, Type, or Importance.
6. Click the Reverse Sort button to change the sort order.
7. Add additional columns (Task fields) to the view.
8. Click Expand/Collapse to expand or collapse the groups in the view.
Customizing the Task Peek View
Unlike other folders, the Tasks Peek has only one view. You can customize the view, but you can’t create additional views. To customize it, follow these steps:
1. Click Arrange By at the top of the Task list (see Figure 9.10).

2. Select a new arrangement from the context menu: Categories, Start Date, Due Date, Folder, Type, or Importance.
3. Select Show in Groups to toggle grouping off and on. When grouping is enabled, the Task list is grouped by the Arrange By field.
4. Customize or reset the view by selecting View Settings.
5. Right-click Type a New Task to view a second context menu containing the same view options.
Configuring Task Options
You can configure limited options for Tasks. Following are the steps.
1. Click the File tab, then click Options.
2. Select Tasks to open the Task Options dialog box (see Figure 9.11).

FIGURE 9.11 Use the Task Options dialog box to choose an automatic formatting color of overdue and completed tasks, whether to use reminders on tasks with due dates, and how you want to handle assigned tasks.
3. Configure the task options, and when you are finished, click OK to return to Outlook.
The task options that users can configure include the following:
• Set Reminders on Tasks with Due Dates—With this enabled, every task with a due date will have a reminder set, using the default reminder time.
• Default Reminder Time—Choose the time of day you want to use for default reminders on tasks and to-do’s that are due “tomorrow” or later in the week. Tasks and to-do’s created and due today have a reminder time 1 hour before the end of the workday, as set in Calendar Options.
• Keep My Task Updated with Copies of Tasks I Assign to Other People—With this enabled, you’ll receive updates for tasks you assign to others.
• Send Status Report When I Complete an Assigned Task—When someone else assigns a task to you, a status update is sent to the originator.
• Overdue Task Color—This sets the color of the subject in list views. The default color is red, and you can choose another color from the menu, if desired.
• Completed Task Color—This option sets the color of completed tasks used in list views. The default color is gray.
• Set Quick Click Flag—Set the default due date when you click in the flag column for email or create a task using the Type a New Task row. The default is Today.
Work house is the final setting in Task options. You’ll use this to set the length of your working day. This setting is used to calculate how many working days you work on a task. This should be set to the average length of your workday and workweek.
In addition to setting a default reminder time in File, Options, you can choose a specific date and time for your reminder on the task form. These fields accept natural language entries.
When you create a new task by typing in the Type a New Task field in a view, the task is automatically flagged using the Quick Click flag. If the Quick Click flag is Today, the reminder is automatically set for 1 hour before the end of your working day. When the Quick Click flag is tomorrow or later, the task uses the default reminder time set in options.
Creating To-Dos
A To-Do is a flagged message or contact. It acts like a task, supports reminders, and displays with your tasks in the To-do List, but the item you flagged remains in its own folder.
Setting a flag on a message is easy: move your mouse over the message in the message list then click on the Quick Flag icon when it comes into view to use the default flag or right click on the Quick Flag icon to choose a different flag (Figure 9.12).

FIGURE 9.12 Move your mouse over a message to display the Quick Flag icon. Click or right-click on it to set a flag.
You can use the Follow Up button on the ribbon, which is located above the reading pane and also in opened messages and contacts. You can click on the Follow Up button and choose one of the preset flags (see Figure 9.13). You’ll flag a contact in the same manner—either by selecting the contact and clicking the Follow Up button on the toolbar, or by right clicking on the contact and choosing the Follow Up menu.

FIGURE 9.13 Select a Follow Up flag to create a To-Do for a message or contact. The start and due date as well as the Flag to phrase are added to the Infobar under message header.
The Flag to Follow Up choices are:
• Today—Due at the end of the day. When the default reminder is used, the reminder is set for 1 hour before the end of the workday, as set in Calendar Options (click File, then Options, and select Calendar).
• Tomorrow—Due tomorrow, uses the default Task reminder time.
• This Week—Due at the end of the work week; uses the Work week setting in Calendar Options and the default Task reminder time.
• Next Week—Due at the end of the next work week.
• No Date—Sets a flag but without a due date or reminder.
• Custom—Choose your own due date and change the Flag to phrase. Uses the default Task reminder time.
• Add Reminder—Use to Add or edit a reminder to items currently flagged.
In addition, you’ll have these options available on most of the Follow Up menus:
• Mark Complete—Mark To-do complete after you finish the task if you want to keep it in the To-do List.
• Clear—Clears the flag and removes the item from the To-Do List.
• Add a flag to messages and contacts to create To-Do’s. Flagged items are shown in the To-Do List with your tasks.
 Caution
Outlook.com and IMAP accounts do not support all of the Follow up options. You are limited to setting a flag and clearing it. You can’t customize the flags or choose a due date.
You can change the phrase “Follow Up” which displays in the Infobar under the To field in a received message or above the contact’s name in a contact. Either choose from one of the predefined Flag to phrases or type over Follow Up to add your own text. You can type up to 255 characters in the Flag to field. (See Figure 9.14)

When you no longer need the flag, you can either clear the flag or mark it complete using the same steps: click on the Follow Up button and choose Mark Complete or Clear. Choosing Mark Complete keeps the item in the To-Do List for future reference, while Clear removes the flag and removes the item from the To-Do List.
Note
Do not delete the item from the To-do List or you’ll delete it from Outlook.
Sending tasks to and linking with OneNote
Office 2013 owners can send email, tasks, and appointments to OneNote and create Outlook tasks in OneNote. When Outlook Tasks are linked to OneNote pages, you can mark the task complete in either Outlook or OneNote and it will be marked complete in the other application. Notes added in OneNote won’t sync to the Outlook Task but you can open the task from OneNote and the OneNote page from the task.
Why would you want to use OneNote for task notes instead of adding notes to the task body? The most obvious reason is because you already use OneNote for note taking and want to keep all of your notes together. If you aren’t using OneNote, you need to try it: you can store your notebooks in SkyDrive and access them on your smartphone, tablet, or another computer.
To link a task to a OneNote page, follow these steps:
2. Click the OneNote button on the ribbon. In an open task, it’s on the Task tab (Figure 9.15); when you select a task, it’s on the Home tab.

3. If this is the first time you’ve linked an Outlook item to OneNote, the Select Location in OneNote dialog box opens for you to select the location where you want the task (see Figure 9.16).

4. You can set the selected location as your default location by checking Always send task notes to the selected location. If you change your mind later, you can change it in OneNote’s Options.
5. The Task’s subject is used as the OneNote page title and flagged with the due date.
After the OneNote page is created, clicking the OneNote button in Outlook will open the page in OneNote. You can open the Outlook task from OneNote by right-clicking on the flag and choosing Open Task in Outlook from the menu. You can also change the due date, mark the task complete, remove the tag, or delete the task from Outlook. Changing the due date or marking it complete will update the Task in Outlook. Of course, if you choose Delete Outlook Task, it will be deleted from Outlook (Figure 9.17).

FIGURE 9.17 Use the right-click menu to change the due date, mark it complete, delete the task, or open the task in Outlook.
If you remove the tag, you won’t be able to open the Outlook task from OneNote but the Outlook task will open the OneNote page.
The steps to create an Outlook Task from OneNote are just as easy:
1. Click in front of the line you want to use as the task subject
2. Click Outlook Tasks button and select a Flag.
3. A task is created in Outlook, with the line as the subject. The line is added to the task body as text and a copy of the OneNote page is attached (Figure 9.18).
