12. Sync and Share Outlook Data
In This Chapter
• Sharing Calendars and Contacts
• Syncing with Smartphones and Tablets
• Sharing Calendar and Contacts with a second computer
• Using Outlook.com to Share Calendar and Contacts
• Using Contacts in other programs
When you use more than one computer, or if you have a smartphone or a tablet, you’ll probably want to sync your Outlook data with the other computer or smartphone. You might want to share your calendar and contacts with another user or use the data in another program. If you have an Exchange Server mailbox, syncing your mailbox to other computers is as easy as configuring your account in Outlook. Sharing your calendar and contacts with other users is also easy, as long as the other users also have mailboxes on your Exchange Server. If you aren’t using Exchange Server, it’s not so easy.
Sharing Calendar and Contacts
Most people who use Outlook on more than one computer want to use their calendar and contacts on their other computers or share them with other people. Sharing works best if you use an Exchange Server mailbox or an Outlook.com email account, because your email, calendar, and contacts will be stored on the mail server and synced to any computer or device.
If you use a POP3 (Post Office Protocol 3) email account, your choices are to leave the mail on the server and download it on each computer or use a utility to sync your email, calendar, and contacts. IMAP (Internet Message Access Protocol) accounts sync email only; you need to use a utility or another method to move your calendar and contacts between computers and devices.
You can share your calendar and contacts by exporting your contact to a personal folder file (*.PST) or exporting to a CSV file and importing on the other computer. I recommend using a PST file to move Outlook items to another computer whenever possible. When you use a CSV file, attachments and contact photos are not included when the file is imported.
Syncing with Smartphones and Tablets
The easiest way to sync your mailbox with smartphones or tablets, or even other computers, is with an Outlook.com or Exchange Server mailbox, such as Office365. Apple, Android, Windows Phone, and Blackberry 10 smartphones and tablets sync directly with Outlook.com and Exchange Server mailboxes.
If you’re using an IMAP account, email syncs to all your devices, and changes you make on one device, such as reading a message or replying, are seen on your other devices.
If your email account supports only POP3 accounts, you’ll need to configure Outlook to leave mail on the server so it will be available to download on all devices.
 Note
Note
If you want the best experience using email, calendaring, and contacts on multiple computers and portable devices, you need to use an Exchange Server mailbox, such as offered by Office365 for business users. The accounts are targeted to businesses, but can be used by individuals as well.
Apple iPhone and iPad users who do not use Outlook.com or Exchange mailboxes can share Outlook Calendar, Contacts, and Tasks using the iCloud add-in. The iCloud moves appointments, contacts, and tasks to an iCloud data file in Outlook, which then syncs to the iCloud and all Apple devices linked to your Apple ID account.
The iCloud works well, but many users don’t like that all appointments, contacts, and tasks are removed from Outlook’s folders, even though they are still visible in Outlook.
Android and Windows Phone users will need to use a third-party utility to sync with Outlook if they don’t have Outlook.com or Exchange server mailboxes. A list of third party utilities can be found here: http://www.slipstick.com/smartphones.
Sharing with a Second Computer
If you’re sharing with a second Outlook on another computer, one of the easiest ways to do it is to copy the PST file to the other computer and open it in the profile. Go to the File tab, click Open & Export, click Outlook Data File, and then select your PST file. This is recommended over Import and Export because views and other customizations are not exported. If you need to export, use the native Outlook Data File format to export to a .pst file.
Moving the Data File
Before you can move the data file, you need to find it on your hard drive. The easiest way to do this is by using the Account Settings dialog.
1. Click the File tab and select Account Settings.
2. Select the Data Files tab.
3. Select the .pst file.
4. Click the Open File Location button to open Windows Explorer to the location of the .pst file (see Figure 12.1).

FIGURE 12.1 Click the File tab, click Account Settings, and then click Data Files tab to go the location of the .pst file.
5. Close the Account Settings dialog box.
6. Close Outlook, and then copy the .pst file.
Copy the data file to the second computer. You can put it anywhere on the hard drive, but I recommend using Outlook 2013’s default location for .pst files and place it in the My DocumentsOutlook Files folder. This makes it easier to make a backup copy of your Outlook data (which you should do on a regular basis).
Open the data file in your profile by going to Outlook’s File tab, selecting Open & Export, then Open Outlook Data File to select your .pst file.
Only .pst files can be used in other profiles. IMAP, Outlook.com, and Exchange offline files can’t be opened in other profiles.
Using Export and Import
Although I generally recommend moving the entire .pst to a new computer to preserve views and other hidden data, as well as the modified dates, it is easier to export if you need to move your calendar and/or contacts to another computer also using Outlook. When you use the data in another copy of Outlook, export in Outlook Data File (.pst) format. Use CSV format when the data will be used in other programs.
To Export Outlook data, open the Import/Export wizard by clicking the Open & Export menu, and choosing Import/Export. Choose Export to a File and click Next. If you are using the data in Outlook, choose Outlook Data File (.pst).
Sharing Calendar
You can use one of several methods when you need to share a calendar in Outlook 2013. In addition to exporting the calendar or copying the .pst file, you can share the calendar by email or publish it to a WebDAV server.
To access these options, right-click the Calendar folder and choose Share.
Sharing by email creates an iCalendar (.ics) file of your calendar and inserts it in an email message; it also creates a planner-style calendar in the message body. For more information on these options, see Chapter 7, “Using the Calendar.”
Using Outlook.com to Share Calendar and Contacts
Outlook 2013 syncs with Outlook.com calendar and contacts using the Outlook.com (EAS) account type. When you use a POP3 or IMAP email account, you can use an Outlook.com account to sync your appointments and contacts with other computers and smartphones.
All you need is a Microsoft account. Although you could use an Outlook.com or Hotmail address, you can create a Microsoft account using any valid email address because you’ll use this account only for appointments and contacts, not email.
If you don’t have a Microsoft account for your email address, go to https://signup.live.com/signup.aspx and complete the form to create a Microsoft account, entering your email address in the Microsoft account name field.
After the Microsoft account is created and verified, log in to http://outlook.com to begin using the account. You’ll receive a couple of welcome emails in the account online.
Next, you’ll need to add your email account and the Microsoft account to Outlook 2013.
1. Go to File tab and click on Account Settings then select Account Settings.
2. Click New to open the Add Account dialog.
3. If you need to add a POP3 or IMAP account, you can use Auto Account Setup. If you aren’t using Auto Account Setup and need instructions to configure POP3 and IMAP accounts, see Chapter 3, “Setting Up Accounts and Personalizing Outlook.”
You’ll need to manually configure the Microsoft account, selecting the Outlook.com account type.
From the Account Settings dialog box, follow these steps:
1. Click New to open the Add Account dialog box.
2. Select Manual setup or additional server types from the lower left.
3. Click Next.
4. Choose Outlook.com or Exchange ActiveSync compatible service (see Figure 12.2).
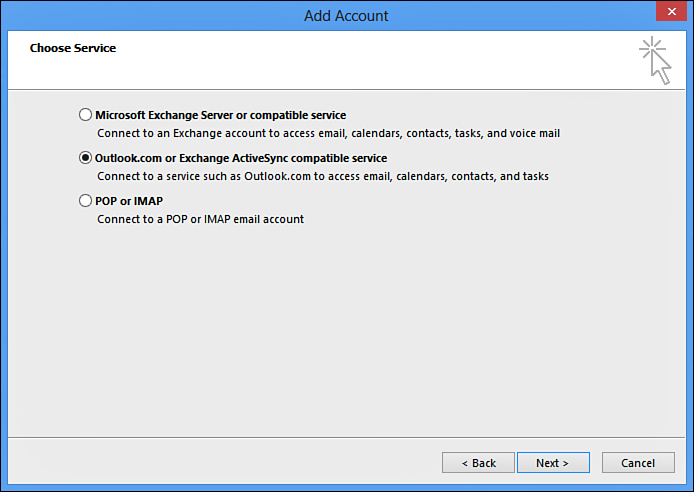
FIGURE 12.2 Choose the Outlook.com or Exchange ActiveSync account type when using a Microsoft account to share calendar and contacts.
5. Type in your name and email address.
6. Enter m.hotmail.com as the server address, then enter your email address again and your Microsoft account password (see Figure 12.3).

FIGURE 12.3 Enter your account information on the Server Settings screen, using m.hotmail.com for the server address.
7. Click Next to test the settings and exit the dialog.
The Microsoft account is added to your profile.
Before closing the Account Settings dialog box, switch to the Data Files tab. Select the new account’s data file and click Set as Default so appointments display on the Calendar Peek, and new appointments and contacts will be added to the Outlook.com folders and sync to the server. Now you can close the dialog box.
When you return to Outlook, you’ll have two accounts in the folder list: your ISP or “real” email address for email and the Outlook.com account for calendar and contact sync. Both accounts will have the same email address.
It’s confusing to have two accounts with the same address in your profile, but you can rename the Microsoft account. To do this, open the Send/Receive Groups dialog using Ctrl+Alt+S, and then click Edit. Select your Microsoft account and click the Account Properties button in the upper-right corner. You’ll enter a friendly name for the account on the General tab in the dialog (see Figure 12.4). Click OK to change the name.

You’ll need to close and restart Outlook to finalize the changes.
You’ll need to move or copy existing appointments and contacts to the Microsoft account data file. This is easier if you use a List view and then select all and drag to the folders.
1. Switch to the Calendar folder.
2. Select the View tab.
3. Click the Change View button and select List.
4. Select an appointment and press Ctrl+A to select all.
5. Use the Move to command on the Home ribbon or drag the appointments with your mouse to move them to the new calendar folder.
6. Switch to the Contacts folder, select all contacts, and move to the new contacts folder.
If you want Outlook to open to your Inbox, go to File, Options, Advanced, and select your Inbox to be the default start up folder.
Out of the box, Outlook 2013 uses the email account that belongs to the folders you are viewing. This means if you compose a new message while viewing the Microsoft account calendar, the message will be sent using the Microsoft account by default. This is not the desired behavior when you are using an Outlook.com account only for syncing calendar and contacts, because the From address is a long Hotmail address.
To fix this, you need to add Registry value to force Outlook to always use the default account for new email messages.
To force all new messages to use the default email account, regardless of which data file you are viewing, follow these steps:
1. In the Windows Search dialog, type regedit to open the Registry Editor.
2. Browse to HKEY_CURRENT_USERSoftwareMicrosoftOffice15.0OutlookOptionsMail.
3. Right-click on Mail and choose New, DWORD (32-bit) Value.
4. Type NewItemsUseDefaultSendingAccount as the value name (see Figure 12.5).

5. Right-click the name and choose Modify. Enter a value of 1.
6. Restart Outlook.
If you prefer not to edit the Registry yourself, I have a Registry file that will update the Registry for you. Download it from http://www.slipstick.com/outlook-com.
Using Contacts in Other Programs
You can use contacts in other programs by exporting to a CSV file. You can even use a List view, then select all the contacts, and copy and paste into any application that accepts paste.
Most applications can import (and export) CSV files.
To copy and paste a List view, create a custom view containing only the fields you need. (See Chapter 17, “Working with Views.”) Select the contacts you need using Select All (Ctrl+A) or hold Ctrl as you click specific contacts. Use Ctrl+C to copy the selected contacts and paste into any application that accepts paste. If you paste Outlook data into Word, you’ll need to paste as text.
Using Contacts in Word
There are two ways to use Outlook Contacts in Word: you can use Outlook’s address book in Word to address letters and envelopes or you can use mail merge. These features are discussed in Chapter 20, “Using Mail Merge.”