16. Using Search
Finding your messages in a large mailbox isn’t difficult when you use Instant Search. If you use the same search over and over, you can create a search folder, which contains always-up-to-date search results.
Outlook offers several ways to find things in your mailbox: Instant Search, Search folders, Find Related, Advanced Find, filters in custom views, and the People pane. Each method uses essentially the same search criteria, and each method has benefits.
Instant Search
Instant Search is a quick and easy way to find your messages, contacts, or appointments. Type a keyword into the search field or refine the search query using field names and wait a few seconds for Outlook to find items matching the keyword. If you don’t refine the search to specific fields, all common fields will be searched.
The Search context tab displays when you click in the Search field or press Ctrl+E on your keyboard, so you can select the fields to refine the search (see Figure 16.1). After you learn the common field names, it’s usually faster to type the query into the search field.

Choose the folders you want to search in the Scope group on the left of the Search ribbon, choosing from All Mailboxes, Current Mailbox, Current Folder, Subfolders, and All Outlook Items.
To set a specific scope as your default search scope, open the Search Options dialog box (see Figure 16.2). From the Search tab, choose Search Tools, and then click Search Options.

FIGURE 16.2 Configure the search options, including the default scope, the search term highlight color, and whether to include the Deleted Items folder in the results.
Other options you can enable or disable are as follows:
• Include messages from the Deleted Items folder in each data file when searching in All Items.
• When possible, display results as the query is typed.
• Improve search speed by limiting the number of results shown.
• Highlight search terms in the results and choose the highlight color.
• Notify me when the search results might be limited because indexing is not complete.
You can include or remove a data file from the index using the Search tab’s Search Tools menu. Expand the Locations to Search menu and select a data file to toggle the setting. Data files with check marks beside their name are indexed. In most cases, you’ll want all data files selected.
Searching for mail, calendar, or contacts in Windows Start Search field or Windows Explorer’s Search field will not include items in Outlook 2013. You can search for Outlook email, appointments, and contacts only by using Outlook 2013’s Instant Search or Advanced Find.
Instant Search Queries
Instant search includes a number of commands you can use to refine a search. These commands can be inserted by clicking buttons on the Search tab, or you can type the query into the search field directly. Typing the query can be a faster and more efficient way to do a search when you know the commands to use.
To search by a field name, type the Outlook field name into the search field. Don’t use a space in multiple-word field names. Following are examples:
from:john
firstname:mary
To search between (but not including) two dates, use the following format with any date field. The following example finds messages received 1/2/2013 through 4/14/2013:
received:(>1/1/2013 AND <4/15/2013)
To include the two dates in the results, add an equal sign or use two periods between the dates. These two queries will find messages received 1/1/2013 through 4/15/2013:
received:(>=1/1/2013 AND <=4/15/2013)
received: (1/1/13..6/15/13)
To find messages of a certain size or within a size range, use the greater than, less than, and equal signs or two periods, as shown in these examples:
size:10kb
size:=50kb<60kb
size:3mb..12mb
In addition to greater than (>), less than (<), and equal symbols (=), you can use commas, AND, or OR operators between search terms.
from:(mary NOT smith)
cc:(mary AND sue)
to:(mary OR billy)
You can use some natural language words with Instant Search. Search recognizes days of the week (Sunday, Monday, Tuesday), the months (March, April, May), as well as today, tomorrow, yesterday, week, next month, last week, past month, and coming year. The space between multiple word phrases is optional: thisweek, nextmonth, lastweek, pastmonth, comingyear are valid in Instant Search.
received:(last week)
start:(nextmonth)
Partial Word Searches
Instant Search can’t do the type of partial word search most people want, with the search term found anywhere in the word. Instant Search looks for the search term at the beginning of each word. This means searching for ann would include Anniversary in the results but not MaryAnne. The search engine sees most punctuation as the end of a word, so it would find ann in Mary-Anne.
Finding Mail Sent to or from Specific People
There are several ways to find mail sent to or from a specific person. You can use the Find Related, the People pane, or Search Folders.
Find Related
Find Related is a predefined Instant Search query found on the right-click context menu (see Figure 16.3) or on the Message tab in an open message. To use it, right-click a message and move the mouse over Find Related, selecting Messages in This Conversation, Messages from Sender, or if a category is assigned to the message, Messages in [category name].

The Find Related commands create an instant search using one of the following queries:
Messages in this Conversation: [Conversation]:=“message subject”
Messages from Sender: from:(sender display name)
Messages in Category: category:=“category name”
People Pane
If you need to find recent messages, attachments, or appointments from a person, the message will be listed in the People pane at the bottom of the Reading pane, in an open message, or on the person’s Contact information.
The sender and each person the message was sent to will be listed in the People pane, represented by the contact’s photo, if available, or a generic people icon. Click on the photo or icon to view messages from that person and click any message to open it.
Minimize and maximize the People pane by clicking the top of the bar (or use the arrow on the right side as shown in Figure 16.4). You can adjust the height of the maximized window by dragging the top edge. To turn the People pane off completely, switch to the View tab and select People Pane, Off.

FIGURE 16.4 The People pane displays recent messages from the sender or any recipient of the current message.
The People pane works best when you need to find recent messages, because it is limited to the 100 most recent items, including Facebook or LinkedIn status updates.
Search Folders
If there is an instant search you use a lot, you can create a search folder for it. Search folders are virtual folders that can display messages from any folder in the data file (unlike Instant Search, which can search all data files in the profile). If a search folder is used at least once every 8 days, the folder watches for messages meeting the condition of the search and adds them to the search results.
To create a search folder, follow these steps:
1. Right-click Search Folders in the folder list.
2. Choose New Search Folder.
3. Select from one of the predefined searches or create a custom search folder (see Figure 16.5).

4. Choose the criteria.
5. Click OK to close the dialog box.
6. Right-click the new search folder and choose Show in Favorites.
 Note
Note
Search folders are limited to email only. They cannot be used with other Outlook item types.
Search folders display the results of a search; messages are not moved to search folders.
Advanced Find
Although Instant Search is powerful and can handle most searches, there are times when Advanced Find is useful. Like Search Folders, Advanced Find is limited to searching one data file at a time. But unlike Instant Search, the results are listed in a separate window (see Figure 16.6). This enables you to keep the search results open onscreen as you work in other Outlook folders.
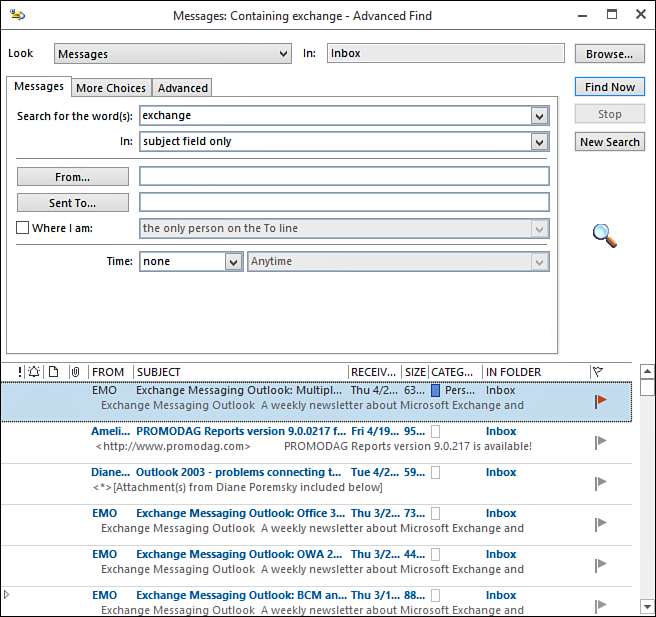
The context menu is available when you right-click items in the Advanced Find results, allowing you to flag messages, add categories, reply or forward messages, and more. You can also customize the view in the Advanced Find results pane; to do this, right-click the row of field names to select from the various options.
AND and OR operators are supported in the Advanced Find filters (see Figure 16.7). When the criteria uses the same field, the conditions use the OR operator. You can put the conditions together on one line or use separate lines for each criteria.

From contains Mary OR John
When the criteria uses different fields, the criteria uses the AND operator. This filter would search for messages from Mary and sent to John (see Figure 16.8).

From contains Mary
To contains John
To use the AND and OR operators together with different fields, you need to use a hidden feature called Query Builder, which allows users to create complicated queries using AND and OR operators (see Figure 16.9). When it is enabled, it works with all uses of the Filter dialog box, including custom views, search folders, and Advanced Find, and you will be able to use queries such as this:
From contains Mary
OR
To contains John

To enable Query Builder, perform these steps:
1. Press Windows key+R to open the Run command.
2. Type regedit in the Open field and click OK.
3. Browse to HKEY_CURRENT_USERSoftwareMicrosoftOffice15.0Outlook.
4. Right-click Outlook and click New, and then Key.
5. Type QueryBuilder as the new key name, and then press Enter.
6. Close the Registry editor and return to Outlook.
7. Press Ctrl+Shift+F to open the Advanced Find dialog box. A new tab called Query Builder is added after the Advanced tab.
Search Troubleshooting
If the Instant Search results don’t include content from all data files in your profile, verify that the data file is enabled for search. To check, click in the Search field, expand the Search Tools button, and then click Locations to Search and verify the data file is selected.
On the rare occasion when Instant Search doesn’t seem to be working correctly, you may need to rebuild the Search Index.
To rebuild the index, go to File, Options, Search, and click Indexing Options. Click the Advanced button, and then click Rebuild. This rebuilds the instant search index and should fix most search problems.
Although it’s generally better to use the Rebuild button when you need to rebuild the index, you can delete the search index files from the hard drive to force Windows to rebuild the index.
To do this, delete all files and folders in C:ProgramDataMicrosoftSearchData.
ProgramData is a hidden folder, and you’ll need to type the entire path in the address bar of Windows Explorer to see it. You need to reboot before Windows starts to index your Outlook files over again.