18. Printing
In This Chapter
Although Outlook is primarily an electronic personal information manager, at times you’ll need to print out messages, appointments, or tasks.
Outlook supports the calendar and contact formats used by popular planners, including Day-Timer, Day Runner, and Franklin Planner, using a wide range of paper sizes and layouts.
Printing Basics
Outlook doesn’t offer a lot of print options; in fact, many people consider Outlook’s printing capabilities primitive and limited. There are two basic print styles for all Outlook items: Table Style and Memo Style, with additional print layouts available for Calendar and Contacts.
The Table Style printout creates a list of the contents of the selected folder, exactly as shown on your screen. This style is good if you need a checklist of tasks or a list containing the sender, email subject, and received dates.
The Memo Style prints an individual item, one per page. When you open a message, appointment, or contact before printing, Memo is the only style available.
You can open the Print dialog box from the File tab by clicking Print or using the keyboard shortcut Ctrl+P to select the layout and printer configurations. The available styles are listed under Settings, and on the right is a print preview of the selected style (see Figure 18.1).

The basic elements of the Print dialog box include the following:
• Print button—When you are ready to print, select this button.
• Printer—Select the printer you want to print to here. Most people will have an electronic format, such as OneNote, in addition to a standard printer.
• Print Options—Use this to include attachments in the printout, change Page Setup, save custom print settings, or select the number of pages to print.
• Settings—Choose Table Style or Memo Style here.
• Preview—Previews the pages before printing. When you select one item to print Memo Style, print preview is automatically enabled. If you select more than one item to print in Memo Style, or have a large number of items in the folder and are using Table Style, they are not automatically previewed.
 Note
Note
Messages with Rights Management (IRM) enabled will have the Print menus disabled and are not printable.
Printing Email
When you print most Outlook items from a table view, including email messages, tasks, and lists of calendars or contacts, the default print settings are often acceptable. You can print one or more items in their entirety using the memo format, or you can print a list of the selected items or a list of all items in the folder. When you print a list of Outlook items, the fields visible in the folder are included in the printout.
Table Style includes all the fields used in the current view, on one line; if Message Preview is enabled, the preview is included in the printout (see figure 18.2). Additionally, all formatting shown in the view is printed when you use Table Style. This includes icons, dates, flags, and category fields. Unread messages are printed using bold formatting.

Group headings are included in the printouts. If you are using a view that groups items, such as Arrange by Date or by category, the group titles are included in the printout. Conversation groups are not expanded when printed; however, the message count is included in the printout.
If you want to include specific fields in Table Style printouts, create a custom view and select it before printing.
You’ll use the Memo Style when you want to print messages or items in full, with one Outlook item per page. When you open an item and choose File, Print, the only style available is Memo Style.
The Memo Style doesn’t give you control over the fields that are included. The header fields will print, including all the recipients listed in the To and CC fields. Attachments included on the message can be printed along with the message. All fields in appointments or contacts are printed.
 Tip
Tip
If you need to print a message but don’t want to include the list of recipients, click the Forward button, delete the names and email addresses from the message body, and then print. After the message is printed, close the Forward without sending it.
Print Styles
A print style is a combination of page settings and paper sizes that let you control the way items print. Outlook includes a number of built-in styles that can be customized to create additional styles. Additionally, you can choose the font and other formatting options and can create custom styles to use again and again.
You can use custom styles to use a specific paper size, fonts, or header and footers. For example, if you use a Day Planner, you can create a custom print style that uses the correct paper size for the planner.
The two basic print styles give you the choice of printing individual items or printing a list of all items in the folder. For example, you can print a single appointment on one sheet of paper or print a list of appointments in the Calendar folder (see Figure 18.3).

FIGURE 18.3 Choose Memo Style to print the Outlook item or table view to print a list of all items in the current folder.
All Outlook items types support these two basic print styles:
• Table Style prints Outlook items in a table format similar to the List Style view used in Outlook folders.
• Memo Style is used to print out an Outlook item on a single sheet of paper.
In addition to Memo Style and Table Style, the Calendar and Contacts folders have additional print styles, which are similar to layouts used in day planners. These Calendar print styles can be selected when you use the Day, Week, Month, or Schedule view:
• Daily Style prints appointments in a daily appointment-style list by the hour, similar to the 1-day view available in Outlook and used in day planners.
• Weekly Agenda Style creates a printout with the week displayed in two columns and three rows.
• Weekly Calendar Style prints the calendar using the daily format, but with all seven days included.
• Monthly Style prints your calendar in a traditional monthly style, similar to the monthly style used onscreen.
• Tri-fold Style creates a trifold calendar. By default, it contains appointments for a specific date, along with your tasks or a blank area for handwritten notes and a weekly calendar. The content of each section is configurable.
• Calendar Details Style prints a simple list of appointments, grouped by date. The printout includes the appointment details.
When you are viewing Contacts in People, Business Card, or Card views, the following styles are available for printing:
• Card Style prints your contacts using the same fields that are visible in the Card view.
• Booklet Style offers small or medium booklets. Use this style to create an address book you can take with you. This style can be printed on both sides of a sheet of paper that folds into a booklet.
• Phone Directory Style prints your contacts in an alphabetical list, similar to the format used in commercial phone books.
The print styles that are available to use depend on the folder view. When you use a List view, only the Memo and Table Styles are available. When you use an Icon or Timeline view, only Memo Style printing is an option.
The additional print styles for calendar and contacts are present only when you use Day, Week, Month, or Schedule views or the People, Business Card, or Card views. If you don’t see these print styles listed when you choose File, Print, you need to change the view on the folder before opening the print dialog.
Note
You can change the fonts and paper sizes, but you cannot customize the templates.
When you customize a print style, the customization is stored in a file called OutlPrnt, located in C:UsersusernameAppDataRoamingMicrosoftOutlook. If you have multiple Outlook profiles, they will share the OutlPrnt file and custom styles will be available in all Outlook profiles.
Some printing errors, including Outlook crashing when you try to print something, can be fixed by deleting or renaming the OutlPrnt file. It’s safe to delete this file; Outlook will create a new OutlPrnt the next time you print, but you will lose any custom settings or styles.
Configuring Printing Options
Outlook comes with preconfigured print styles, and many people never change the defaults. However, you can change them if you want to, or you can create your own print styles using Page Setup or Define Styles. If you use several different paper sizes, you can create a style for each paper size.
You can manage the Printing Options using these two dialog boxes:
• Page Setup—Change the fonts, paper size, margins, headers, and footers.
• Define Styles—Save custom settings to use again.
If you want to use the print style again, follow these steps:
1. Open the Print dialog by clicking the File tab, then Print.
2. Click the Print Options button.
3. Choose Define Styles, and then click Copy.
4. Enter a name for your style and then click OK in the Define Styles dialog to save it.
To open the Page Setup dialog box (see Figure 18.4) choose Define Print Styles, and Edit or Copy. The Format tab will get the most use, with different options available for each Outlook item type.

FIGURE 18.4 Use the Page Setup dialog to customize your printout, add a basic header or footer, and select from an assortment of paper sizes.
Although the available options vary with the print format, the Fonts settings and Column Shading settings are available in all print styles and enable you to customize the style’s properties.
Use the Paper tab, as shown in Figure 18.5, to choose the paper type, the size of the printed page, and the page orientation. Many paper types are included in the list, but you also can create a custom type. The page size reflects the size of the finished page, with many sizes defined, including pages for popular planners. As you select different page sizes, a preview of the page is shown in the orientation preview section.

The Header/Footer tab has your options for headers and footers (see Figure 18.6). Click your mouse in any of the sections and click the icons at the bottom of the footer area to insert the page number, date and time, and username. Text entered into the left block is blocked left, text in the center section is aligned center, and text on the right is blocked right.
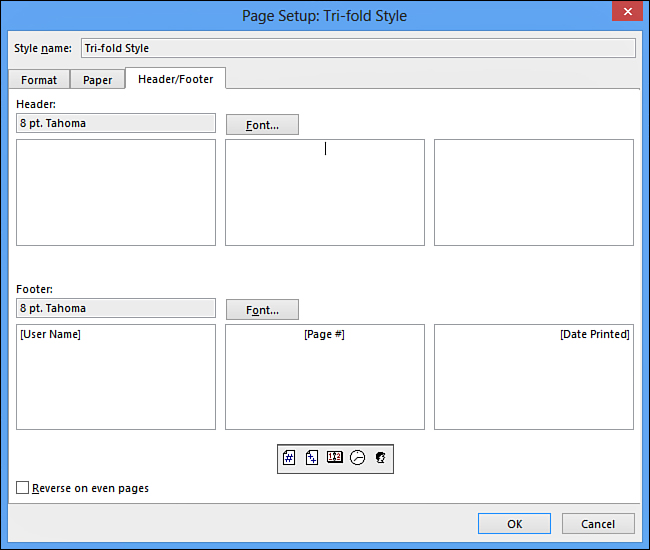
You can type anything into the header and footer blocks, such as your name, company name, and other information. Add page numbers, number of pages, printed date, printed time, and username to the headers and footers. Font changes apply to the entire header or footer.
Note
A frequent question is how to remove the user’s name from the top of the page. Although you can’t remove the line under the name, you can use a font that has a blank character set, such as WP MultinationalB Courier font. If this font is not installed on your computer, search for a copy online.
You can edit the style from the Print dialog box by clicking the Page Setup button, but if you want to create a new print style, choose Define Print Styles. This opens the Define Print Styles dialog box, which enables you to select the default style that you want to work in creating your new style (see Figure 18.7). Select the style that’s closest to your needs and click Copy.
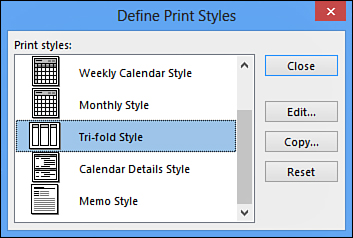
When you choose Edit or Copy, the Page Setup dialog box opens, as shown in Figures 18.4 and 18.5. Use it to create the style you need. For example, if you often print out copies to carry in your planner, you’ll want to create a style with the paper options set for your planner.
When you Copy a style you are creating a new style, whereas Edit changes the configuration of the selected style. Reset will reset the default styles to the original state. You should use Copy when you want to save custom styles, rather than editing the default styles.
Removing Your Name from the Printout
People don’t always like to see their names at the top of the menu style printouts. Although you can’t edit the template to remove the name or the bold line, you can make your name invisible by changing the font used for the page title. If you choose a font that does not contain the alphabet, the name will be blank (see Figure 18.8).
1. Click File, and then click Print.
2. Click Print Options.
3. Click Page Setup.
4. On the Format tab, click Title Fonts.
5. Select a font that does not include the characters in the western alphabet, such as WP MultinationalB Courier or Adobe Blank font, and then select OK.
6. Click Print.

If you don’t have a font installed that has blank squares for the alphabet, you can download Adobe Blank from SourceForge. You can find that download at http://slipstick.com/adobeblank.
Printing Calendars
The layout options you’ll have to choose from when you print your calendar vary with the print style you choose. Among the options you can select is the number of pages to use per selected time period, which is usually one or two pages per day, week, or month. You’ll also use this dialog box to include a task list or a blank area for handwritten notes.
You can change the Page options to include only your workdays, not weekends, in a printed calendar, leaving more room for your important appointments.
Note
When you have the option to include a notes area, it’s for handwritten notes, not Outlook notes.
Calendars have additional print styles available when you use the Day, Week, Month, or Schedule views on the folder. When you use a Table view, you’ll have Memo and Table styles only.
Although the options you’ll have available depend on the print style you choose, some of the options include the following:
• The time range to include for daily calendars; the default is 7 a.m. to 7 p.m.
• Exclude weekends on monthly calendars.
• Force a full month per page when you select a date range that spans months.
• Arrangement used for days in a weekly calendar (left to right or top to bottom).
The paper type and size selections and header/footer options are the same used for Table and Memo styles.
You can print your calendar using a wide range of styles, options, and paper sizes. The Print dialog used for the calendar has some options not found in the Print dialog for Table and Memo views. In addition to several styles to choose from, if you have multiple calendars, you’ll be able to choose which calendar to print when you display multiple calendars.
1. Open your Calendar folder and apply a Calendar view if you’re currently using a List view. The configuration of your calendar might affect the printout. For example, if you show end times, they may be included in the printout of your calendar.
2. Open the File menu and select Print.
3. Select the calendar you’d like to print from the Print This Calendar drop-down list. The list will contain multiple calendars when you have more than one displayed side-by-side in Outlook.
4. Select the date range to print.
5. Add a check to Hide Details of Private Appointments if you want to hide the details of appointments marked private.
6. Select the print style you want to use. You can choose from
• Daily Style—A daily calendar divided into hours.
• Weekly Agenda Style—A planner-style format, two columns by three rows; dates can go left to right or top to bottom.
• Weekly Calendar Style—Similar to the daily calendar, it can be configured with the dates across the top of the page and hours down the side or dates down and hours across the top.
• Monthly Style—Traditional monthly calendar. Print all dates or weekdays only.
• Tri-fold Style—A three-column printout, your choice of calendar or tasks in each column.
• Calendar Details Style—A simple list of appointments.
7. After selecting a style, choose Page Setup to set additional options (see Figure 18.9).

8. After selecting all your options, choose Print from the Page Setup dialog or click OK in the Print dialog.
That’s all there is to printing out your calendar. When you save the styles, you can print out your calendars in just three steps: Choose the File, Print command; select your style from the Print Styles list; click OK to print it.
Tip
You can double-click the style when you select it to open the Page Setup dialog.
Printing Contacts
As with the calendar, there are print styles specifically for contacts. You must view your Contacts folder using an Address Card view to access the special print styles. The special print styles available for contacts are the following:
• Card Style—Large booklet style, contacts are displayed in 2 columns. All fields in the view are included in the printout.
• Small Booklet Style—A small version of the Card style, containing 8 small columns of contacts. Suitable for folding into a booklet for your purse or pocket.
• Medium Booklet Style—Similar to the Card style, but with 4 columns. Suitable for folding.
• Memo Style—Prints one contact per page, with all fields included in the printout.
• Phone Directory Style—Formatted similar to a phone book, with only the contact name and phone number listed.
The Card and Booklet Styles are similar and have the same Page Setup options (see Figure 18.10). Phone Directory Style prints a phone-book–style list of your contacts.

Note
Contact photos and business cards are not included in the printouts. If you want to print the photos, you’ll need to use screenshots or a utility to print.
When you print a Card or Booklet Style listing, a section is created using the first letter or number of the File As name. If you want the sections on separate pages, choose Start on a New Page; otherwise, leave it set to Immediately Follow Each Other.
Choose the number of columns you want to use. Unless you’re using landscape format, you’ll want to limit this to three or fewer.
Blank Forms at the End prints blank forms so you can add new contacts to your booklet. Naturally, you’ll have to write the contact information into the fields by hand. Later, you can enter the information into Outlook.
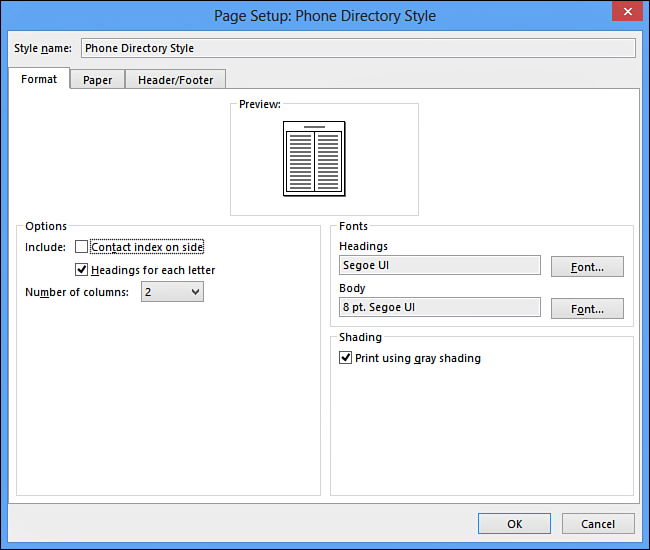
You can include the contact index on your printout. This is a vertical list of letters down the right edge of the printout, similar to the index many address books have. Unless you are printing a large number of contacts, it’s probably better to use the default setting of Headings for Each Letter, which adds a letter between each contact section.
Use the Paper tab to select the paper types, sizes, and layouts for your printout. Customize the header and footer using the Header/Footer tab.
Choose OK to return to the Print Options dialog. If you want to use the style you created again, save it using a new name. To do this, click Define Styles, select the style you customized, then choose Copy. Enter a new name for your style and save it.
To preview your printout, choose Preview, and when you are ready to print your address book, click Print to send it to your printer.
Phone Directory
The Phone Directory Style prints a list of your contacts in a format similar to traditional phone book listings. The Page Setup options available for Phone Directory Style are limited to the number of columns and whether to use headings for each letter or the contact index (see Figure 18.11).