8. Contacts
In This Chapter
• Introducing the new People Hub
• Creating and using Outlook contacts
• Linking contacts in Outlook’s new contact cards
• Creating and using contact groups
• Introducing the Address Book
• Working with contact views
• Configuring contact options
Contact management is one reason many people choose Outlook over other email clients. Not only can you store email addresses, phone numbers, and mailing addresses in contacts, but you can also store personal information such as your contacts’ birthdays, anniversary dates, and spouses’ or children’s names.
You can use contacts as an email addresses book, or to address letters in Word. Smartphones and tablets can synchronize their address books with Outlook contacts. This chapter shows you how to create and manage your contacts.
People Hub
The first time you open Outlook 2013’s People module, you’ll see a list of your contacts along with their photos, and clicking on a contact displays the contact’s details in the reading pane. This view of your contacts is called the People Hub. It’s a new view and may be confusing the first time you use it, especially if you used Outlook previously. When you double-click on a contact, it opens a contact card; however, while you can edit some fields in a contact card, you can’t edit the contact photo or see attachments in the Notes field.
Each contact in the People Hub displays data from all sources Outlook links together. For example, if you have an Outlook contact for a person, and are friends on Facebook and LinkedIn, contact information from all three sources is displayed on one contact card in the People Hub. The contact card includes links to each data source, and you can edit the Outlook contact from the People pane (see Figure 8.1).

FIGURE 8.1 Outlook 2013’s new People Hub. Click the blue links to create a new meeting, send email to the contact, or view the full contact.
When a modem, Skype, or Lync is installed, you can initiate a call to the contact from the contact card.
Editing Contact Cards in the People Hub
To edit an Outlook Contact from the People Hub, click Edit in the contact card or right-click the contact in the People list and choose Edit Contact.
When you click the Edit link in the Reading pane, you can edit the contact in place. If you double-click the contact (or right-click and choose Edit contact), the contact card opens in a new window. Edit the fields or click the plus sign icon to add more fields to the card. When you are finished, click Save (see Figure 8.2).

You can drag the contact card to reposition it on the screen, or you can resize the card by dragging the resize handle in the lower-right corner. The contact card remains open until you click the X to close the card.
If you need to edit the full contact, click Cancel, and then click the links under the View Source heading to edit the Outlook contact. You can also view the contact’s Facebook, LinkedIn, or SharePoint profile by clicking links on the contact card.
Linking Contacts
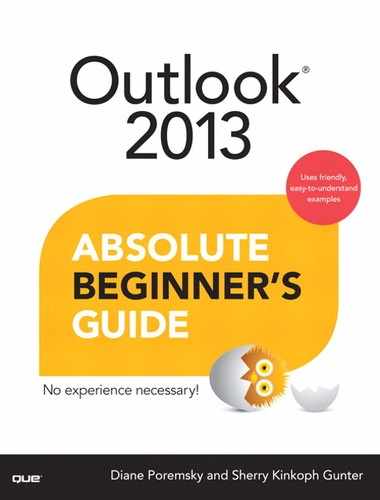
If you have more than one contact for a person, you’ll see all of their contact details together in one contact card. Outlook tries to be helpful and automatically links contact records it identifies as belonging to the same person. If Outlook gets it wrong or you want to link other contacts, such as linking contacts for a husband and wife, you can manually link (or unlink) contacts using the Linked Contacts dialog box.
To open it, click the Link Contacts hyperlink to open the Linked Contacts dialog box (see Figure 8.3). When you hover over a contact, an x is visible on the right. Click it to unlink the contact.
To link a contact to the current contact, type a contact’s name in the Link Another Contact field and search for more contacts to link to this contact.
Creating Contacts
Before you can use contacts to address email or letters, you need to create some contacts. When you are viewing the Contact folder, you can click the New Contact button or use the Ctrl+N keyboard shortcut.
You don’t need to view a contacts folder to create a new contact. You can do it from any Outlook folder, using the Ctrl+Shift+C keyboard shortcut. If you prefer using the mouse, click New Items, and then click Contact to open a new, blank contact form. Fill in the fields, click Save, and then click the Close button. The contact is saved to the default Contacts folder (see Figure 8.4).

FIGURE 8.4 An Outlook contact form contains fields for email addresses, phone numbers, and mailing addresses.
The General page of the contact form includes fields for your contact’s name, the employer, three physical addresses, 19 phone numbers, three email addresses, notes, websites, and IM addresses. You can also add photos or images to a contact, which display on email messages from the contact.
The business card displays the contact’s name, address, and phone numbers. It can be customized to include a business logo or image.
The Details page (see Figure 8.5) is opened by clicking the Details button. It contains fields for additional information, including the contact’s manager and assistant names, and the Internet Free/Busy publishing location. Personal information, such as the contact’s birth date, anniversary, and spouse’s name, is also entered on the Details page. Recurring events are automatically created in the calendar when you enter the birth date and anniversary of a contact.

 Note
Note
When birthday or anniversary dates are entered on the Details tab, Outlook automatically adds these events to your calendar. If you don’t want these events created on your calendar, enter the dates in the Notes field instead.
In addition to the Contact form, Outlook 2013 also uses a contact card to display your contacts. Contact cards display contact information when you move the cursor over an email address in Outlook. The contact cards display the contacts in a simpler card format; however, not all contact fields are available on contact cards.
Creating a Contact
You can create contacts by using two different contact interfaces: the full featured contact form or the simpler contact card.
To create a new contact using the contact form, follow these steps:
1. Open a contact by clicking on New Items on the Home tab, and then Contact.
2. Enter your contact’s name.
3. Fill in the other fields as needed.
4. On the Contact tab, click on Picture, and then Add Picture to add a photo or image.
5. Click the Details button.
6. Enter the birthday and anniversary dates.
7. Click Save & Close when you are finished.
Although you can create a new contact by opening a new contact form and typing in the contact information, you can also create contacts for people who send you email messages. When you use this method, the name and email address fields are filled in automatically.
1. Select a message.
2. Right-click a name and email address in the From, To, or CC field.
3. Choose Add to Outlook Contacts.
4. Fill in the desired fields.
5. Click the plus sign (+) to add email, phone, and address fields.
6. Drag the lower-right corner to resize the form.
7. Click Save when you’re finished.
When you click Save, the contact is saved to your Contacts folder. The contact card remains open onscreen. Click Close to close it. If you want to add a contact photo or an attachment, click the link under View Source to open the full contact form (see Figure 8.6).

FIGURE 8.6 A completed contact card; open the full card by clicking the Outlook (Contacts, email address) link under View Source.
Click the ellipsis (. . .) to add the contact to the People Peek Favorites or to link the contact to other contacts. You may have additional options listed, including adding the contact to LinkedIn, Facebook, or other social networks. If you have Skype or Lync installed, you can link the contact to those services and tag a contact so you are alerted when they come online. If Business Contact Manager (BCM) is installed, you can add the contact to BCM from here.
 Tip
Tip
If you want to create a contact for someone who sent you an email, and the email message contains their mailing address or other information you want to keep with the contact, drag the email message to the Contact button in the Navigation pane. A new contact is created using the sender’s name and email address; the message body is added to the notes field on the contact.
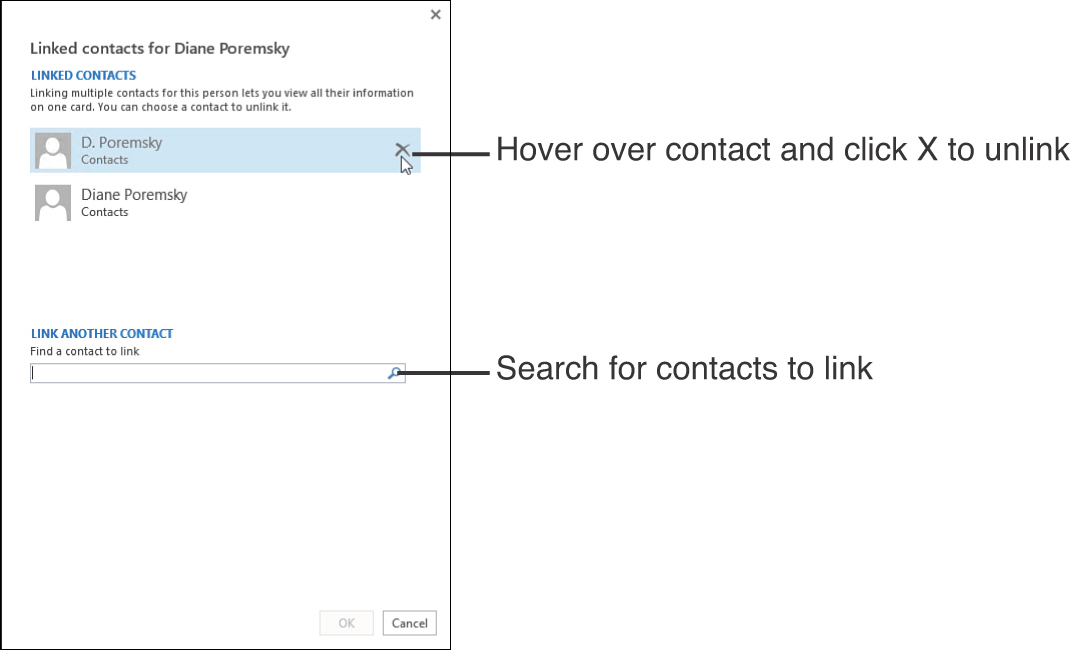
Create New Contacts from the Same Company
When you need to create several contacts from the same company on the Contact tab, click Save & New, and then select Contact from the Same Company. This opens a new contact form with the company name, business address, and phone number fields from the first contact. If you customized the business card, the new contact will have the same customization (see Figure 8.7).
Add the new contact’s name and email address, and then click Save & Close.
Customizing Contacts and Business Cards
Outlook 2013’s contact form contains two image fields, one for a picture of the contact and one in the business card for a picture or company logo. You don’t need to insert a contact photo or image, but if you do, the image displays in the message header in the Reading pane or opened message.
In addition to adding an image or logo to the business card, you can control which contact fields display on the business card, the text size, color, and position (see Figure 8.8).

Tip
The photo looks better if you crop and resize it using an image editor, such as Paint. You’ll want the image cropped close to the person’s head and sized to approximately 96×96 pixels.
Adding a Contact Picture
To add a photo to the contact, open the Contact. Double-click the Picture icon, or from the ribbon select Picture, Add Picture. Select the photo or image you want to use for the Contact’s photo. Click Save & Close.
That’s all there is to it. If you want to change the photo, repeat the process and select a new image.
Customizing Business Cards
Each business card can be customized with a different image and text formatting. If you want to apply a similar business card layout to every contact, you need to edit each one individually. You can’t easily change the default layout, and you can’t apply it to existing contacts.
Follow these steps to customize a Contact’s business card:
1. Open the Contact.
2. Double-click the business card to open the Edit Business Card dialog box (see Figure 8.9).

3. The business card in the upper left displays the current card layout.
4. Use the Card Design options on the right to change the size, alignment, and location of the contact picture or replace it with a different image. You can also add a background color.
5. Add, remove, or rearrange the contact fields that display on the card in the Field section in the lower left.
6. Select a field and use the Move Field Up and Move Field Down buttons to reorder the fields, or click Remove to delete the field. Changes are reflected immediately in the business card.
7. Click the Add button to add additional contact fields to the card.
8. Customize the formatting of the selected field on the right side of the Edit section. If the data in any field is incorrect, you can edit it in this dialog box and changes are updated in the contact and the business card.
When you’re done editing the business card, click OK to save the change and return to the contact. If you don’t want to keep the changes, click Reset. This removes all customizations and restores the default business card.
If you want to use a new business card layout for your contacts, you can publish a custom form and set the form as the default for new items, or you can use a VBA macro to apply the format of one card to other cards. See http://slipstick.com/ bizcards for more information.
Using Contact Groups
If you send messages to the same group of people frequently, you can create a Contact Group. When you send a new message to the group, you’ll select the Contact Group instead of each address individually.
Creating a Contact Group
Use these steps to create a new Contact Group.
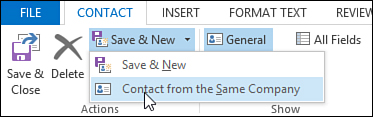
1. Open the Contact Group form by using the New Contact Group button or by pressing Ctrl+Shift+L.
2. Type a name for your Contact Group in the Name field.
3. Click the Add Members button and choose From Outlook Contacts (see Figure 8.10).
4. Double-click each address that you want to include in the group, or select the contacts and click the Members button to add the names to the Members field.
5. Click OK when you are finished selecting names to return to the contact group.
6. To add addresses of people who are not in your contacts folder, go to Add Members and select New Email Contact and enter the name and email address.
If you have a list of addresses in Excel or Notepad, you can add your contact group in one step. The list needs to be comma or semicolon separated or have one address per row.
1. Copy the list of email addresses.
2. Click the Add Members button and choose From Outlook Contacts.
3. At the bottom of the dialog box, paste the list in the Members field and press OK.
4. If you want to add notes about this contact group, click the Notes button.
5. Save and close the group when you are finished.
You can send email to the group or create a meeting invitation by clicking the Email or Meeting buttons on the contact group form, but it’s usually easier to select or type the group address in the To, CC, or BCC field of an email or meeting request.
After addressing a message with the contact group, you can click the plus sign beside the group name to expand the list and see the individual names.
If you need to remove a member from the Contact Group, select the name or address and click the Remove Member button on the ribbon.
Don’t click the large X icon labeled Delete Group unless you want to delete the entire group. Surprisingly, this happens a lot. If you make this mistake, find the group in the Deleted Items folder and drag it back to the Contacts folder.
Note
Select more than one name at a time by holding down the Shift or Ctrl key as you select names. You can double-click names to add them to the Members field.
When you update a contact with a new email address, any groups the contact belongs to are not automatically updated. You’ll need to click the Update Now button to update the contact group. Repeat this for every contact group the contact belongs to (see Figure 8.11).

Using Categories to Send Group Mail
Because member addresses are not automatically updated when their contact is updated, it’s often better to send group mail using Categories. Assign categories to the group members, and then select them using the Category arrangement.
You can send an email to a group of contacts using categories. Following are the steps.
1. Assign a category to each contact who belongs to the group.
2. Switch to the View tab, click Change view, and then click List.
3. In the Arrangement section, select Categories.
4. Click the category group name (see Figure 8.12).
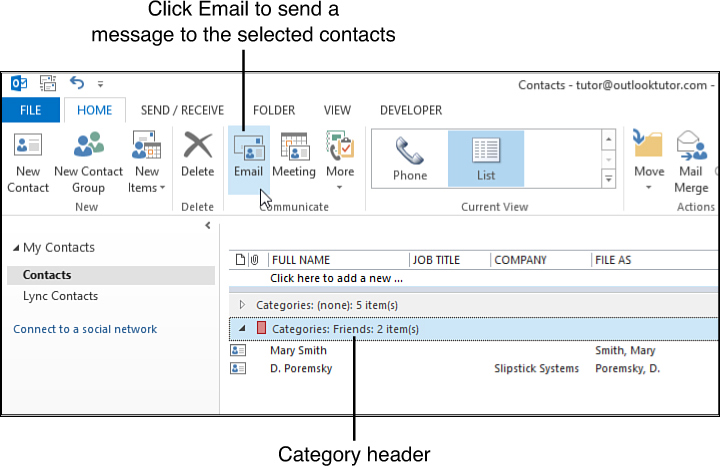
FIGURE 8.12 Select the Category header, and then click the Email button to send a new message to the contacts in that category.
5. Switch to the Home tab, and in the Communicate section, click the Email button.
A new message addressed to every contact in the category opens.
The benefits of using this method are that the group is dynamic, the addresses are always current, and deleting a member is as easy as removing the category from the contact. This is good for mailing lists where the contact group membership changes frequently. You can also use the list in a mail merge.
The benefits of using a Contact Group is that it’s easier to put the group in the CC or BCC field, and you can begin the message from any folder or easily add the group to a reply. If your group membership is stable and rarely needs editing, a contact group works well.
Auto-Complete List
When you start typing a name or address into the To field, Outlook offers suggestions. This is called the auto-complete list. When a name is not yet on the Auto-Complete list, Outlook attempts to resolve the name against one in your address book, underlining it with a red squiggle or straight black line.
Using the Auto-Complete List
Every time you send a new message or reply, the address is added to the Auto-Complete list. The Auto-Complete list is limited to the last 1,000 addresses you sent email to. Although this is enough for most users, Outlook removes the older, least used addresses from the list when the list hits 1,000 addresses. When you open a new message, you can address it by typing the first couple of letters into the address field and selecting the address from the Auto-Complete list.
Sometimes the Auto-Complete list contains old addresses that are no longer used or mistyped addresses. You can delete these when they come up, either by selecting them with the arrow keys and pressing the Delete key or using the mouse to click the x on the right (see Figure 8.13).
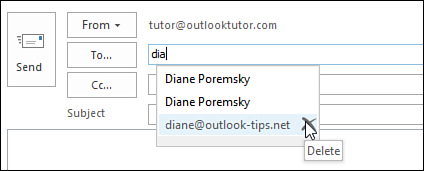
FIGURE 8.13 Select addresses in the auto-complete list to address new email or delete them by clicking on the x.
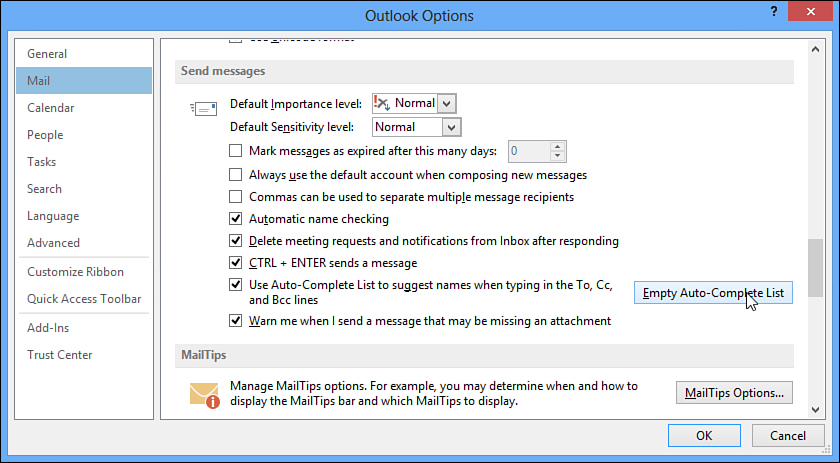
If you don’t want to use auto-complete, you can disable it in File tab, Options, Mail. Look in the Send messages section for “Use Auto-Complete list to suggest names when typing in the To, CC, and BCC lines.” If your auto-complete list has a large number of “bad” names, you can empty the list from this dialog box as well (see Figure 8.14).
Auto-Resolution
When you type a name in the To or CC field and Outlook doesn’t find a match on the auto-complete list, it resolves it against the contacts in your address book. When it finds multiple names, it underlines the name with a red squiggle. Right-click the name and select the address you want to use. After you’ve resolved the name once, you’ll be offered this name the next time you type that name (see Figure 8.15).
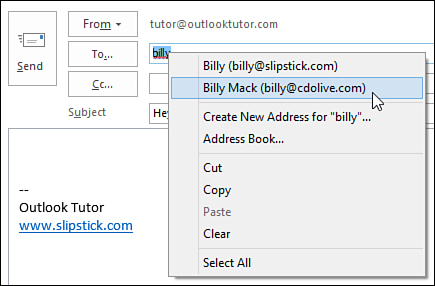
If auto-resolution offers you the wrong addresses, type a space or semicolon after the name, and Outlook underlines the name in red, allowing you to pick a different name from the address book.
You don’t need to type a contact’s full name for Outlook to resolve it; you only need the first few letters of the first or last name and Outlook will find matches in the address book.
Using the Contact Data
After you enter the contact information and save it, you don’t have to open the contact to use the information it contains. You can use commands on the Contact folder’s Home tab or by right-clicking on the contact and selecting commands from the context menu to interact with the contact data. You can send messages, make calls, or schedule meetings with the selected contact.
Some of the menu items work only when one contact is selected, whereas other commands, including Email and Meeting buttons, open a message or meeting request addressed to all the selected contacts.
When the contact is open, you can view the contact’s web page or view its address on a map at Bing.com.
From the Home tab, you can automatically use the contact data for the following actions:
• Send an email message to the contact.
• Create a meeting request addressed to the contact.
• Assign Tasks to the contact.
• Call the contact using one of the phone numbers entered on the contact form.
• Create a new contact using the company information from the selected contact.
• Share your contacts with co-workers (this requires Exchange Server).
• Open a co-worker’s contacts folder that was shared with you (requires Exchange Server).
Using the Address Book
When you click the To or CC button when addressing a message, you are using the Address Book. The Address Book doesn’t contain its own list of addresses; it displays all your contacts that contain a valid electronic address, which can be either an email address or a fax number.
Open the Address Book by clicking the Address book button on the Home tab. You can also open it using the keyboard shortcut Ctrl+Shift+B.
Click on Tools, and then Options menu to access Address book options. In this dialog box, you’ll choose the order addresses are resolved in when you type partial names. You can also choose which address list is shown first when you click the To button (see Figure 8.16).

FIGURE 8.16 Configure the order Outlook searches address books and which address list is shown first in the Addressing dialog box.
Your choices are the following:
• Start with Global Address List (Exchange Server accounts)—If you send more email to co-workers than contacts, you’ll want to check names against the Exchange Server Global Address List (GAL) first.
• Start with contact folders—When most of the email is sent to your contacts, you’ll want the contact folders listed first.
• Custom—You choose the order Outlook uses. Select the address list and use the arrow button to change the order.
This dialog box is also where you choose which address book is shown first when you click the To button or open the Address book.
Changing Contact Options
Outlook 2013 limits the options you can configure. The most important options for most users are the default Full Name and File As order. These settings affect how you enter contact names and how they are filed (see Figure 8.17).
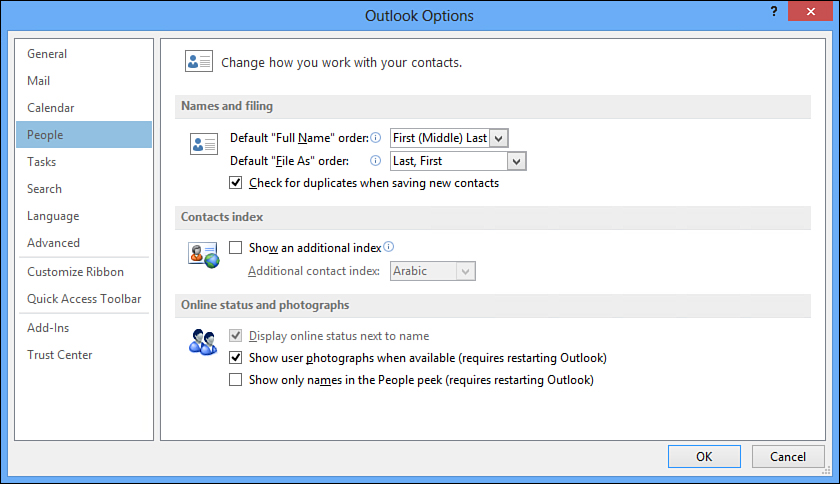
FIGURE 8.17 Click on Options and then People to open the Outlook Options dialog box to change options such as Full Name and File as Order.
These settings affect how addresses are sorted in the Address Book and Contacts folder. To change these options, click File, click Options, and then click People to open.
Choose from the following options for the Full Name and File As Order:
• Default “Full Name” Order—Choices include First (Middle) Last; Last First; First Last1 Last2. When you use either of the First Last formats, you can type the last name first if you use a comma separator. When you set it for Last First you do not need to use a comma between the last and first names.
• Default “File As” Order—Choices are Last, First; First Last; Company, Last, First (Company) and Company (Last, First).
• Check for Duplicates When Saving New Contacts—This checks the first and last name fields for matches. If Outlook finds an exact match, you’ll be given the chance to merge the contacts or create a new one (see Figure 8.18).

FIGURE 8.18 Outlook will warn you if a contact with the same name already exists. Compare the records and choose which record you want to keep.
• Show an Additional Index—This adds another index, in one of several languages, to the People and Card view. The index can also be enabled or disabled by clicking the globe icon at the bottom of the Index column.
• Display Online Status Next to the Name—When Lync or Skype is installed, the status of your contacts is shown beside their name in the Reading pane and open messages.
• Show User Photographs When Available (requires restarting Outlook)—When a contact includes a photo, it’s displayed in the Reading pane or open message, to the left of the subject field.
• Show only names in the People Peek (requires restarting Outlook).
One additional dialog affects your contacts and address book—the Address Book dialog in File, Account Settings, Address Book tab. Double-click Microsoft Outlook Address Book to open the options dialog and change how your contacts display in the address book. You can show contacts in First Last order or use the File As format as set on each contact (see Figure 8.19).
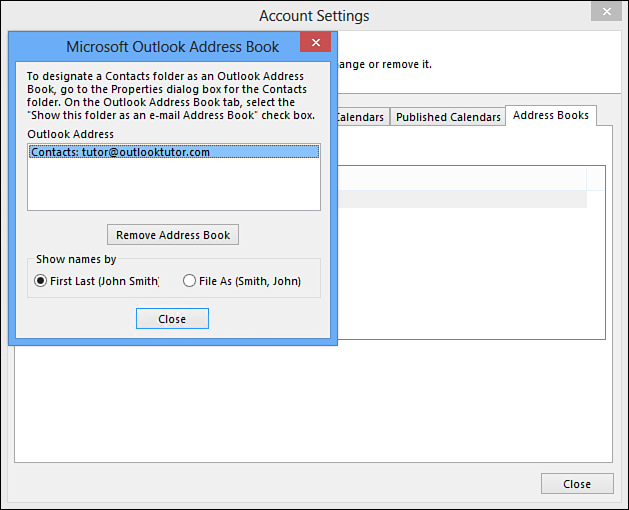
FIGURE 8.19 Use the Microsoft Outlook Address Book dialog box to change the sort order in the address book.
If there are contact folders you don’t want to see when you click the To button, you can remove them from this dialog. Or you can right-click the Contact folder you don’t want to use as an address book and choose Properties, click the Outlook Address Book tab, and then deselect the option Show This Folder as an E-mail Address Book. If you change your mind and want to use the Contact folder as an address book, re-select it on the Outlook Address Book tab.
Searching for Contacts
When you have hundreds of Contacts, it’s usually easier to search for a contact than it is to look through the folder. There are two ways to search for contacts: using the Search People field at the end of the Home tab or using Search Contacts (press Ctrl+E) in the Contacts folder.
When you use Search People, the search results contain matches for the first, middle, or last names or company name. Search Contacts searches by more fields and you can use criteria to limit the search results.
When you know part of the contact’s name but aren’t sure of the spelling, use initials or the first letters contained in their name. For example, in my Contacts list, entering “j b” or “j bar” will return the contacts for Jessie Bartee, Jim Barman, and Raja Abartish.
Using the People Pane
You can view mail, meetings, and attachments sent by the contact on the People pane at the bottom of messages or contacts (see Figure 8.20). The People pane displays only mail, meetings, or attachments from the person, not messages you sent to them or other Outlook items. You can open, reply, or forward messages from the People pane, but you can’t delete items.

FIGURE 8.20 Email, meetings, and attachments from the selected person are listed in the People pane.
If you have a social networking account, such as LinkedIn or Facebook, you can sign in to your account and see updates and the profile picture of contacts or people who send you email.
Using Views
When you have a large number of contacts, using views to limit the contacts that are visible is often necessary to find and manage your contacts. Among the things you can use filtered views for are
• Selecting contacts for mail merge
• Changing some contact fields
• Limiting the display to contacts that meet specific conditions
• Controlling the layout for printed lists
The default views include
• People—This is a new view that displays linked contacts.
• Business Card—Displays the business card.
• Card—A card layout that displays basic contact data, including all addresses and phone numbers.
• Phone—A list view that includes the phone number fields. Use with the Arrangements to change how this view is grouped.
• List—Use the Arrangements to change how this view is grouped.
List views include these default arrangements:
• By Company—Groups contacts by company.
• By Category—Groups contacts by category.
• By Location—Groups contacts by country as selected in the Address field. Click the Business, Home, or Other button to see the Country/Region selector.
Card, Phone, and List views have in-cell editing enabled, enabling you to make changes to visible fields without opening the contact for editing. In most cases, when you group contacts by a field, you can drag contacts to other groups to change that field for the contact. This is helpful when you need to change a field used by many contacts, such as when a company name changes or when you’re categorizing contacts.
The default views are customizable, or you can create custom views. To change the current view, go to the View tab and click the View settings button. Select Change View, Manage Views to create new views. You can apply the current view to other Contacts folders from the Change View button.
Note
You can use custom views to control the fields that are included in a printout. Create a view that has all the fields you want included in a printed list, select File, Print, and choose the table style printout. The printout will include only the fields shown on the screen.
Edit Contact Data Using Views
Making changes to multiple records can seem like a daunting task, but depending on the field that must be changed, Outlook can make the changes for you. This method works with most editable fields.
Create a group by view for the field that needs to be changed, and drag the contacts that need to be changed to the other group.
Changing the Company Name Field
When a company changes its name, you need to update the records to reflect the new name (see Figure 8.21). Follow these steps:
1. Switch to the View tab.
2. Expand the Change View button and select List.
3. In the Arrangement section, select Company.
4. If the list is not grouped by company, click Reset or right-click the Company field and choose Group by this field.
5. Edit one contact so the company name field is correct.
6. Select the group with the old company name and drag to the group with the new company name.
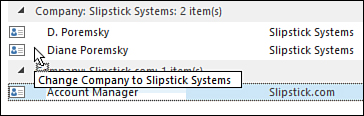
FIGURE 8.21 Use Group By views to change fields without typing. Drag contacts between groups to change the value of the field.
When you are finished changing the company name, click the Reset View button to restore the default view.
The People Peek
The People Peek is a new Outlook feature that works like this: when you hover over the word People, a window pops up that lists your Favorite contacts. If you use Lync, your favorite Lync contacts will be listed here as well.
To add a contact to the People Peek, right-click a name or email address in a message or right-click a photo in the People Pane and choose Add to Favorites (see Figure 8.22).
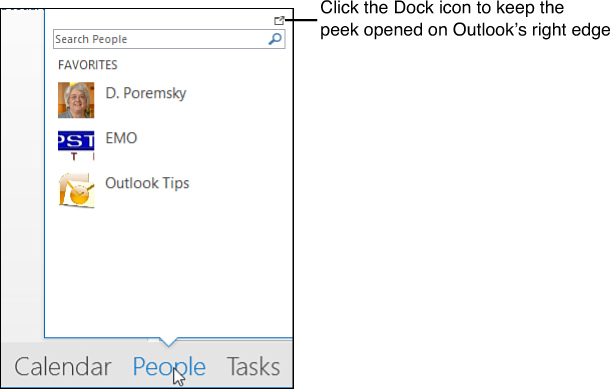
Hover over the entries on the Favorites list to view the contact card and start an email, instant message, or phone call.
To remove a contact from the Favorites list, right-click the contact and choose Remove from Favorites.
Dock the people peek on the right edge of Outlook by clicking the dock icon in the open peek.
Note
When a peek is docked, it is docked in all folders of the current item type. For example, if you dock the peek to a mail folder, it will be docked in all mail folders but not in the Contact folder.