In order to implement the previous use case, the administrator must perform the following configuration steps:
- Configure the Oracle Registry Repository Exchange Utility (ORRXU)
- Configure the OSR Connection Details
- Configure Automated Workflows to publish to OSR
- Configure
Workflow.xml - Configure the Harvester
- Approve assets in OER
- Use OAG to consume a WSDL from the internal OSR's
- Manually publish WSDLs into the external OSR.
This section describes each of the preceding configuration steps.
This section describes how to configure OER to exchange metadata with OSR using the exchange utility.
Note
Note that installation instructions for OER and OSR can be found in Appendix, Installation Tips and Techniques of this book.
The Oracle Registry Repository Exchange Utility can be used to:
- Publish services and endpoints from design-time environments to OSR and to harvest runtime services back to OER.
- Harvest runtime services to OER for governance.
- Automatically publish services to OSR using Oracle Business Process Management 10g automated workflows that are built in OER based around the Asset's lifecycle status changes. For example, a workflow may be triggered when a service has its status changed to indicate that it is now ready for release to Production.
- Capture runtime metrics from Oracle Business Transaction Manager. This will be covered in later chapters.
- Capture service performance data contained in OSR back to the repository to better inform service providers of service usage.
Before we can execute the utility, we need to configure the connections to OER and OSR. The following sections will show you how to do this.
Connection details are contained in a file called orrxu.xml, which is located in the directory <OBPM HOME>/workflow/aler_egine. You will need to edit this file to set endpoints appropriate to your environment.
Open the orrxu.xml file and modify the following XML section to point to your OER instance and specify the appropriate credentials.
<repository>
  <uri>http://<OER SERVR>:7101/oer</uri>
  <credentials>
    <user>admin</user>
    <password>*****</password>
  </credentials>
</repository>
You should provide an encrypted password in the preceding code as described in earlier chapters.
In the preceding example, uri should point to the OER URI, using the following format:
http://<host>:<port>/<OER web app name>
Here host and port are the machine IP and port that are hosting OER.
The OSR environment-specific details are also configured in orrxu.xml. In here, a configuration can be made to publish one or more OSRs. The first step is to create one or more registry nodes with appropriate connection details.
For each registry in your architecture, you must configure the URLs to the appropriate UDDI APIs as follows:
<registries>
  <registry name="INTERNAL-DEV-OSR">
    <inquiryURI>http://<SERVER>:<PORT>/registry/uddi/inquiry</inquiryURI>
    <publishURI>http://<SERVER>:<PORT>/registry/uddi/publishing</publishURI>
    <securityURI>http://<SERVER>:<PORT>/registry/uddi/security</securityURI>
    <credentials>
      <user>admin</user>
      <password>*****</password>
    </credentials>
  </registry>
  <registry name=" INTERNAL-PROD-OSR ">
    <inquiryURI>http://<SERVER>:<PORT>/registry/uddi/inquiry</inquiryURI>
    <publishURI>http://<SERVER>:<PORT>/registry/uddi/publishing</publishURI>
    <securityURI>http://<SERVER>:<PORT>/registry/uddi/security</securityURI>
   <credentials>
      <user>admin</user>
      <password>*****</password>
    </credentials>
  </registry>
</registries>
As can be seen in the preceding code snippet, we have initially configured two registries, namely Internal Development OSR and Internal Production OSR. You will notice that we have configured the URI endpoints to various registry components, namely the inquiry service, the publish service, and the security service.
To set these values correctly for your environment, you will need to locate the UDDI API URLs from the OSR console. To do this:
- Log into the registry console (
http://<SERVER>:<PORT>/registry/uddi/web) and select the Search link:
- From the Search screen, enter the search criteria
UDDI_Inquiry_SoapServicein the Service name field:
- Click on the Find Service button. The results should be shown as follows:

- Finally, click on the link representing the name and the details of the service will appear as follows:
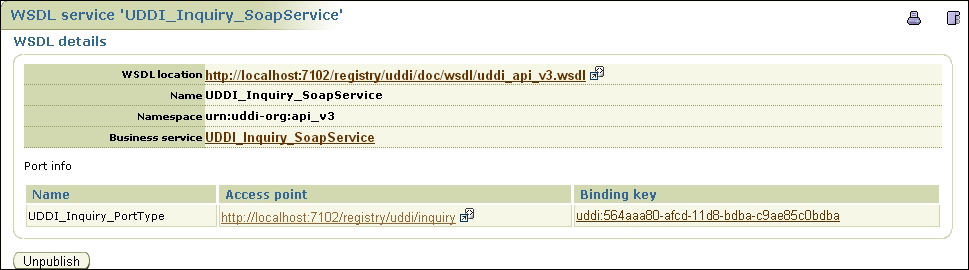
- Open the WSDL and ensure that it contains an entry for each of the following services
UDDI_Inquiry_SoapService,UDDI_Security_SoapService, andUDDI_Publication_SoapServiceas shown in the preceding screenshot. If it does then the same URL can be used for each service. Otherwise, you must repeat the process for the security and publication services.<?xml version="1.0" encoding="UTF-8"?> <definitions name="UDDI_API_V3" xmlns="http://schemas.xmlsoap.org.wsdl/" xmlns:soap="http://schemas.xmlsoap.org.wsdl/soap" xmlns:api_v3_binding="urn:uddi-org:api_v3_binding" xmlns:tns="urn:uddi-org:api_v3" targetnamespace="urn:uddi-org:api_v3"> <documentation> Copyright 2001-2005 Systinet Corp. All rights reserved. Use is subject to license terms. WSDL SOAP/HTTP binding for UDDI V3 Security, Publication and Inquiry APIs. </documentation> <import namespace="urn:uddi-org:api_v3_binding" location="uddi_api_v3_binding.wsdl"/> <service name="UDDI_Security_SoapService"> <port name="UDDI_Security_PortType" binding="api_v3_binding:UDDI_Security_SoapBinding"> <soap:address location="http://localhost:7102/uddi/security"/> </port> </service> <service name="UDDI_Publication_SoapService"> <port name="UDDI_Publication_PortType" binding="api_v3_binding:UDDI_Publication_SoapBinding"> <soap:address location="http://localhost:7102/uddi/publishing"/> </port> </service> <service name="UDDI_Inquiry_SoapService"> <port name="UDDI_Inquiry_PortType" binding="api_v3_binding:UDDI_Inquiry_SoapBinding"> <soap:address location="http://localhost:7102/uddi/inquiry"/> </port> </service> </definitions> - The
<soap:address>location attribute may containurn:unknown-location-uri. If this is the case, the WSDL file must be updated on the OSR machine. To do this, login into the machine hosting OSR and edit the WSDL file so that it contains the correct URLs for accessing the inquiry, security, and publishing services. The WSDL documents can be found in/opt/oracle/osr/doc/wsdl. Enter the SOAP address to match theUDDI_INQUIRY_PortTypeas determined.
Services are published to OSR based on the metadata attributes such as Asset status or Asset lifecycle stage. It is up to your specific implementation to define which attribute to use. In our use case, we used the Asset status; however, in the subsequent sections we describe how to do this configuration regardless of the approach taken.
Data that passes to and from OSR has to be mapped to the UDDI entities (see Chapter 7, Oracle Service Registry, for more details on UDDI). All the mappings are contained within the UDDIMappings.xml file that is also located under <OBPM HOME>/workflow/aler_egine.
The following metadata entities are mapped in UDDIMappings.xml and handled by the ORRXU:
- All services, SCA composites, and any custom services of any OER Asset Type developed by end users.
- Business Entities that have created and published the services.
- Endpoint Assets that describe a service's access point. These are mapped to UDDI Binding Templates (see Chapter 7, Oracle Service Registry, for more details on binding templates).
- OER Categorizations, which are mapped to UDDI tModels using the UDDI Category Bag (see Chapter 7, Oracle Service Registry, for more details on tModels).
- The status of the service is added to the Category Bag of the Business Service in OSR.
- Service keys are the keys that remain consistent across all the registries stating that the service is promoted to and from OER. Where services are published from OSR to OER, OER uses that service key whenever it promotes services to other service registries.
Tip
Note that the services without an HTTP transport are not published to the UDDI Registry. For further details on how metadata is exchanged with OSR, please refer to Section 10.3.2 of the OER Configuration Guide (http://docs.oracle.com/cd/E28280_01/admin.1111/e16580/oereu.htm#BGEHDBEB).
Next, we need to specify the connection to the registry that is to be published to. We do this by editing the orrxu.xml file and entering values for the <destinationRegistries> element. The following snippet demonstrates an example configuration that shows how to use the <destinationRegistries> element to refer to one or more destination registries. These elements specify where the selected services from OER will be deployed.
In our use case, we also want to query Assets based on their lifecycle stage. As such, Assets that reach the lifecycle stage of Stage 4 - Release should be released to the internal registry.
<destinationRegistries>
  <destinationRegistry name="INTERNAL-PROD-OSR">
    <endpointAssetLifecycleStatus>Stage 4 –
      Release</endpointAssetLifecycleStatus>
  </destinationRegistry>
</destinationRegistries>
Each destination registry element can optionally contain an endpointAssetLifecycleStatus property that filters service endpoints by the Asset Lifecycle Stage Categorization type. This ensures that only service endpoints that match the given Asset Lifecycle Stage Categorization are published to the specified registry.
It is necessary to create different configuration files configured to point at each registry. Depending on the lifecycle, the services can be moved to different registries based on the Asset lifecycle triggers.
In order to publish services to the registry, it is necessary to create queries that orrxu.xml will use to locate the services that are to be published. This section shows the reader the basics for creating such queries. Queries can be created in a number of ways and you can specify one or more queries that Repository Exchange Utility should use. A query can locate services in the following ways:
- By name
- By registration status
- By categorization
- Using a filter
For this use case we will query by filter and status. For more details on how to create other queries, the reader should refer to Section 10.2.3.3 of the OER Configuration Guide (http://docs.oracle.com/cd/E28280_01/admin.1111/e16580/oereu.htm#BGEHDBEB).
When the <registrationStatus> element is configured, only the services with the specified status are published. For this use case, we want to publish services to the internal registry when their status is set to Registered.
To create this query, we will set the element in orrxu.xml as follows:
<registrationStatus>Registered</registrationStatus>
So, the orraxu.xml file will now look as follows:
<query>
  <!--Query: the services to publish-->
  <repositoryQuery>
    <services>
      <service name="%"/>
    </services>
    <!--Search criteria for the registration status of the service in OER -->
<registrationStatus>Registered</registrationStatus>Finally, we need to filter by Asset Type since we only require the OSB endpoint to be published to the internal registry.
Filters allow us to query Assets using either metadata or WSDL location.
To create a filter, the user must edit the orrxu.xml file and create a filter element. The following filter element can be used to filter by Asset Type—in this case to query for an OSB proxy service only.
<filter
type="metadata.internal.introspector.store/sync/Service_Type" value="Proxy Service" />
Tip
For more details, the reader is referred to Section 10.2.3.3.4 of the OER Configuration Guide (http://docs.oracle.com/cd/E28280_01/admin.1111/e16580/oereu.htm#BGEHDBEB)..
Before publishing Assets to OSR, OER categorizations need to be mapped in the UDDI Mappings file, UDDIMappings.xml.
For example, the following snippet shows a mapping used to map a custom OER Asset Lifecycle Stage to UDDI categorizations:
<uddi:uddiSettings xmlns:uddi="http://www.bea.com/aler/integration/config/uddi">
  <categorizationMappings>
    <categorizationType
      alerCategorizationTypeName="AssetLifecycleStage"
      alerCategorizationTypeId="112"
      uddiCategoryTModelKey=
        "uddi:bea.com:aler:categorization:AssetLifecycleStage">
      <categorization alerCategorization=
        "Stage 4 – Release to Preproduction"
        uddiKeyName="Stage 4 - Release"
        uddiKeyValue="Stage 4 – Release to Preproduction" />
An OER categorization will be honored in OSR if a corresponding mapping is present in the UDDI Mappings file. Otherwise, the categorization will be ignored. Therefore, if a new Asset Categorization is created in OER, you must regenerate the UDDI Mappings file for that Categorization in order for it to be honored in OSR.
Tip
Further details can be found in the OER Configuration Guide in section 10.2.4 (http://docs.oracle.com/cd/E28280_01/admin.1111/e16580/oereu.htm#BGEHDBEB).t.
Chapter 6, Asset Lifecycle and Workflow, introduced the pre-built Asset registration workflows that support and automate the registration of Assets and form an integral part of the overall governance process. The processes and workflows are modeled and executed in the OBPM 10g component of OER. These processes can be run out-of-the-box with little configuration, and can be tailored to support different use cases.
One such workflow, PublishAssetToUDDI, supports the synchronization of OER and OSR. Assets and their metadata can be published to OSR by wiring events that are triggered when these Assets are registered or their status in the lifecycle is changed to the execution of ORRXU. By using workflows to invoke ORRXU, synchronization of OER and OSR can be fully automated.
To execute the workflow, we need to ensure that the event that represents the taxonomy being approved at Stage 4 – Release is wired to an action to call the PublishAssetToUDDI workflow. This is done by editing workflow.xml (see Chapter 6, Asset Lifecycle and Workflow, for further details) and entering the following xml snippet:
<state:name="urn:com:bea:aler:events:type:AssetTabApproved" value="Taxonomy">
  <action>PublishAssetToUDDI</action>
  <alrrxConfigFileName>orrxu.xml</ alrrxConfigFileName>
  <alrrxMappingFileName>UDDIMappings.xml</alrrxMappingFileName>
</state>
The addition of this event-action pairing will cause the PublishAssetToUDDI workflow to be executed when the all the approvals have been granted by the approvers (see Chapter 6, Asset Lifecycle and Workflow, for further details).
To avoid having to manually change the Asset Lifecycle Stage to Stage 4 – Release, the following snippet can be added to workflow.xml so that, when the Documentation tab is approved, the Asset Lifecycle Stage is automatically set to Stage 4 – Release.
<state:name="urn:com:bea:aler:events:type:AssetTabApproved" value="Documentation">
  <action>ChangeAssetLifeCycle</action>
  <assetLifecycle>Stage 4 - Release</assetLifecycle >
</state>
Tip
Further details on how to configure these automated workflows can be found in Chapter 6, Asset Lifecycle and Workflow, and section 10.3.1.1 of the OER Configuration Guide (http://docs.oracle.com/cd/E28280_01/admin.1111/e16580/oereu.htm#BGEHDBEB).
Prior to executing the workflow, ensure that the following files are available under <OBPM HOME>/workflow/aler_egine:
- plugins
orrxu.xmlorrxu.propertieslog4fl.propertiestypes.propertiesUDDIMappings.xml
Note that the orrxu.xml and workflow.xml files should be configured as per the previous section.
Chapter 5, Harvesting, of this book introduced the harvester as the tool used to gather the metadata about services deployed in the SOA ecosystem. Once the OSB proxy has been deployed, we need to harvest the endpoint back into OER.
For details on how to configure the harvester tool the user should refer to Chapter 5, Harvesting.
For this use case, the administrator needs to configure the Repository connection details for the command line. This is done by editing the HarvesterSettings.xml file. You will recall that we will harvest both the SOA composite information and the OSB business and proxy services. The latter should use the harvester that ships with OSB only. Locate the appropriate HarvestingSettings.xml file and set the repository connection details illustrated as follows:
<repository>
  <uri>http://localhost:7101/oer</uri>
  <credentials>
    <user>harvester</user>
    <password>*****</password>
  </credentials>
</repository>
Here it is necessary to provide the login details to the repository. Note that the password should be encrypted using the Oracle supplied encryption tool as described earlier in the book. In this case, we created a special user called harvester so that we could identify those Assets that have been automatically harvested.
We also need to configure the host details for the OSB server in order to harvest the OSB proxy. The following snippet shows how to connect to the OSB server:
<remoteQuery>
  <serverType>OSB</serverType>
  <projectName>%</projectName>
  <uri>http://<SOA Server>:7001/</uri>
  <credentials>
    <user>weblogic</user>
    <password>v2_1.G+NTr3az8thaGGJBn0vwPg==</password>
  </credentials>
</remoteQuery>
Here, we specify the server type as OSB and provide credentials on how to log into the OSB server.
Having deployed our OSB proxy to the SIT environment, we need to harvest the deployment details such as the service endpoint. This will ensure that OER masters all details of our deployed Assets.
Harvesting has already been dealt with in Chapter 5, Harvesting, of this book and the user should refer to this chapter to understand how to install, configure, and use the harvester tool. As stipulated earlier, we would recommend that harvesting only takes place late in the lifecycle; in our example, we harvest from pre-production and production. Note that depending on your particular requirements you may decide to take a different strategy towards harvesting.
When harvesting OSB proxies, please ensure that you use the harvester that came with the OSB installation.
In order to harvest, the user must set entries in the HarvesterSettings.xml configuration file that provide details of how to connect the deployed SOA infrastructure and how to connect to OER. Here, you will also specify the status at which the services are harvested—in our case, Submitted – under review when harvesting from pre-production and Registered when harvesting from production. Once these configuration values are set, the user can execute the harvester using the command line.
The following snippet shows how to set the harvested status of the Asset:
<!--Registration status to set on created Assets in OER.
  The Valid Registration states are 1) Unsubmitted 2)Submitted - Pending Review 3)Submitted - Under Review 4)Registered -->
  <registrationStatus>Submitted - Pending Review</registrationStatus>
Once the harvester configuration settings are configured, the harvester can be invoked and Asset metadata is harvested back to OER. Please refer to Chapter 5, Harvesting, for further details.
As described, Assets that are harvested from the testing environments will have been submitted with a status of Submitted - Under Review. The service will then need to be reviewed and registered. The Registration process will ensure that all the appropriate policies have been applied to the Asset. For details on how the service is accepted and registered, please refer to Chapter 6, Asset Lifecycle and Workflow, of this book, which details the Asset lifecycle and its approval processes.
Once a service has been deployed to the internal registry, the OAG developer can access the WSDL and create the Policy Enforcement Point (PeP) in OAG. The developers, in effect, will produce a proxy WSDL which will be used to access the service via the Oracle Enterprise API Gateway (OAG). The gateway will enforce security policies and protect Weir and Bell against threats such as XML bombs, denial of service attacks, and other external threads.
Tip
For more information on security threads and security web practices, we recommend referring to the Open Web Application Security Project (https://www.owasp.org).
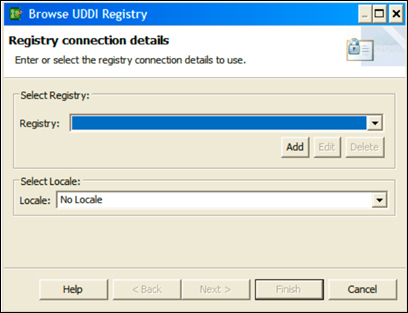
To access the service endpoint from the internal registry, the user must first configure the connections between OAG and OSR. This section describes how to configure the OAG Policy Studio to connect to OSR in order to browse the service data held in the registry. The Gateway itself does not connect to OSR but rather the Policy Studio connects to OSR in order to consume a service WSDL. The Policy Studio, however, must be connected to a Gateway in order to access the registry.
For details on how to determine the required repository URL settings, please refer to the section on Setting up the OSR Connection Details for OER. Once this configuration has been performed, log into the OAG Policy Studio and select the Web Services Repository node. Right-click on it and select Browse UDDI Registry. You will see the following screen:
Click on the Add button to add a new registry connection. Select UDDI v3, and enter the WSDL URLs for the inquiry, publishing, and security services that were found previously into the Inquiry URL, Publish URL, and Security URL fields as follows:
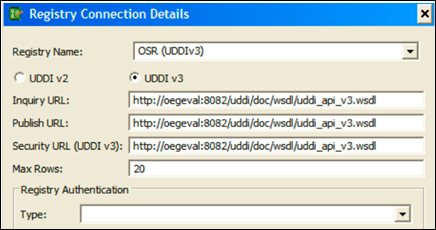
In the Registry Authentication fields enter the username and password for registry access.
Finally, click on OK and you are ready to browse OSR and consume service endpoints. This book will not provide details on how to create PePs for services and the reader should refer to the Oracle documentation that can be located at the following URL: http://docs.oracle.com/cd/E39820_01/index.html.
The gateway developer is able to create PePs that encompass the underlying service and the external bodies used to access the exposed services. The PePs implement protection steps, such as WS-Security, and utilize features of OAG to protect internal Assets against external threats.
Once the PeP is created, the developer can then enter the PeP endpoint into the external registry so that it can be consumed by the third party suppliers. Please note that it is possible to publish endpoints directly into OSR from OAG but this subject is beyond the scope of this book.
For completion, the OER administrators may wish to harvest the PeP endpoints from the external registries back to OER. Details of this can be found in Chapter 5, Harvesting, which details how to harvest Assets.